To take under the protection of a family of birds is a noble and pleasant task. And the first step to this is the construction of a bird house. A birdhouse familiar from childhood can be easily made with your own hands, but for each type of bird there are design and placement features that must be taken into account before calling new neighbors to the site.
Classic wooden birdhouse
A birdhouse of the simplest design consists of a square bottom with a side of 13-15 cm, blanks of sides 30-35 cm high with a slope in the upper part are cut end-to-end to fit the bottom, the end and back part should be 2-4 cm wider for fastening.

The difference in the length of the back and front walls of the birdhouse should be calculated so that the slopes are tightly adjacent to the lid. Another piece is cut to size and attached to the inside of the removable roof, providing a tight seal and the ability to open the birdhouse for cleaning.

Another option is a house with a pitched roof. Two identical blanks are overlapped on the trapezoidal front and rear wall. It is not necessary to nail such a roof tightly in order to provide access to annual cleaning and disinfection.

A round inlet is made with an indentation of 5-6 cm from the upper edge and a diameter of 4-5 cm. In the lower part of the building there should be enough space (10-15 cm) for the nest, protected from the wind.
Birdhouse parts are fastened with nails or self-tapping screws and wood glue.

The roof slopes protect against excessive moisture, they should protrude slightly on the sides to protect the walls as well. Joints should neatly, without gaps, adjoin each other. It is necessary to avoid unnecessary decorative elements on the walls and facade, which can become a place of moisture accumulation.

Pine or hardwood boards 2 to 4 cm thick are used as building material. Fiberboard and chipboard are not recommended, since the smells of chemicals contained in their composition can scare away birds.

For the same reason, the inner surfaces of the birdhouse are not treated with varnishes or paints. Outside, it can be sanded and made a waterproof coating.


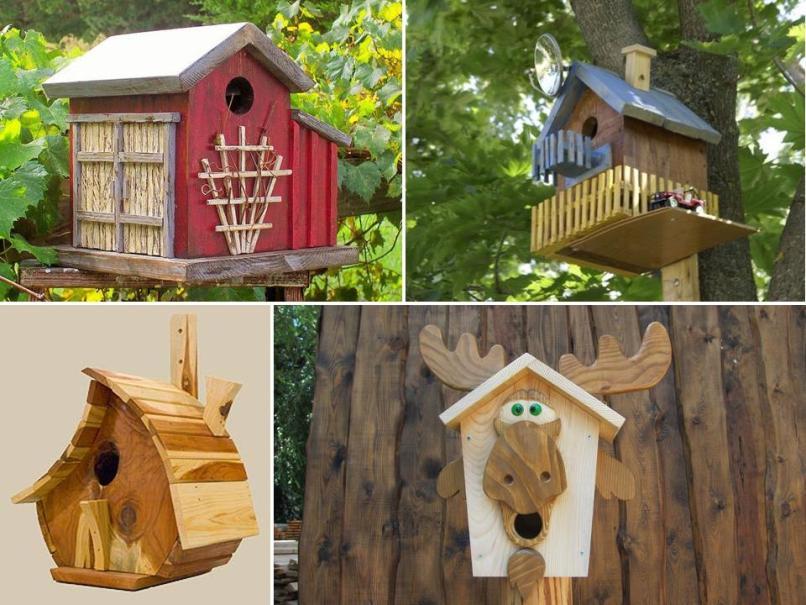
Wooden birdhouses are a good object for the realization of creative abilities. They can be painted and decorated with decor, but it is better not to use glass and other materials that reflect light. Photos of finished birdhouses of different styles will help you choose the most suitable option.

duplyanka
In order to cut a birdhouse from a wooden deck, it is more convenient to use a chainsaw. A brief instruction for creating such a birdhouse is as follows.
At the beginning of work, you need to firmly install the deck in a vertical position. The intended cut is divided into three equal parts: the upper one is for the slopes of the roof, the middle one is for the hollow and the perch, and the other third is for the nest.

First, the upper slopes for the roof are cut at an angle of 45 degrees. Then, if possible, the core is removed evenly over the entire height and an entrance hole is cut through. And only after that the birdhouse is cut off from the deck along the bottom line.

Houses for birds from improvised materials
Boots, bags, lamp shades, containers of similar size with necks, dried pumpkin - can become building material for a bird house.

Before you make a birdhouse with your own hands, you need to remember to observe the correct proportions to place the nest.


You also need to consider that the inlet should let the inhabitants through, but not be too large, for the sake of their safety. A homemade house should provide protection from moisture and wind.

Birdhouse installation
The ideal place for a birdhouse is a tree trunk free from branches. A triple-length wooden beam or pole is attached to the back wall, which is fixed by wrapping it with wire.

Then you need to give the birdhouse a slight forward tilt with a small piece of wood placed between the trunk and the house. This will prevent the chicks from falling and make it difficult for enemies (cats and crows) to access them. The entrance, and as it is also called, the letok, should face south or southeast to avoid cold winds.

Another option is fixing on the facade of buildings. But it is not worth hanging or placing a house on the branches, it must be stable and securely fixed. For a comfortable living, you also need a shade that protects from direct sunlight. 
You need to fix the bird house at a height of 2.5 to 5 meters, out of the reach of cats and other hunters. It is worth taking care of the absence of steps and branches that will help them get to the nest.

Often, a traditional perch in low-lying birdhouses becomes a support for the penetration of unwanted guests. 
DIY birdhouse photo


In this article, we will make birdhouses with our own hands - correct, beautiful (simple and unusual) bird houses. I decided to decompose this theme of birdhouses into clear points, so it will be more convenient to navigate through the article. And before I give specific drawings and schemes for assembling birdhouses, and tell you how to make a birdhouse, we will talk about important things– the location and method of fixing your bird house. After all, the model of the house still depends on what methods of fastening you have available, and on whether you will mount your birdhouse on a tree or on special tall structures. And further… before moving on to choosing the design of your future birdhouse, we will deal with the most common mistakes in the manufacture of birdhouses (in order to avoid them in our do-it-yourself house). So here you will find answers to the following questions:
- How to fix birdhouses on a tree (types of fasteners for bird houses)
- Where can birdhouses be fixed ( if there are no trees nearby).
- Major Mistakes when building a bird house.
- How to help the birds choose your birdhouse.
- Drawing and assembly diagram classic birdhouse.
- multi-local, multi-apartment
- bird houses non-standard forms.
- birdhouses from non-traditional materials(from boots, canisters, teapots, pots, etc.)
Even more ideas and tips on how to make birdhouses in the article.

After studying this article, you can make a birdhouse yourself for a kindergarten or school competition. Or buy a ready-made set of blanks for a birdhouse- assemble it and decorate according to your author's design.
How to fix a birdhouse
on a tree.
Birdhouses are usually tied to a tree with a rope. To do this, a thick long beam is nailed to the back wall of the house. It is leaned against a tree and wrapped around with a rope many times - wrapping the timber and the tree trunk at the same time.
But in the west, birdhouses are often nailed to a tree (harder to tie, easier to nail, although cruel to an adult tree). To do this, the back wall of the birdhouse is made a little higher in height - so that there is a ledge of the board on top where nails can be driven in.

In the same way, this upper ledge of the rear wall can be made even longer. Long enough to drill a hole in it and hang it on a rope, or an iron hook as in the photo below.

And you can also drive a hook into the roof of the house and hang a birdhouse on a chain or rope on it on a thick and strong tree branch in your country house.

SUPPORT FOR BIRDHOUSE.
In addition to wood, any tall structure made from improvised materials can serve as a support for a birdhouse. It can be a large branch cut from an apple tree. It can be dug into the ground. But it should be understood that on such a support, birdhouses will be too low above the ground, and it will be easy for cats to get to the house (this will alarm the bird). Such a support model is good in cases where there are no cats in the area and you have a quiet nook in the courtyard where even your “human foot” almost never steps.

Therefore, in order to maintain a sense of bird safety, it is necessary to make high support structures for wooden birdhouses. For example, such as in the photo of bird houses below.

Also, the original portal in the form of a pergola can serve as a support-pedestal for the birdhouse. But also for places with infrequent traffic. If people roam back and forth through this portal, the birds will not want to settle. It is better to put such a pergola in a quiet corner of your garden and not often go there. The birds will appreciate the solitude and the wilderness and will choose this place for the safe hatching of their offspring.

But in the photo below we see that the holders for simple wooden birdhouses can be very different from beams with decorative carpentry to ordinary old garden pitchforks stuck into the rammed earth.


Also, a pillar-support for your new do-it-yourself birdhouse can be interestingly decorated with fresh flowers. If you plant a climbing plant near the pole, or hang flower pots as in the photo with birdhouses below.

MAJOR ERRORS
in bird houses.
Very often you can see INCORRECT birdhouses made with mistakes. Such beautiful painted bird houses are certainly cute and beautiful, but the birds do not want to settle in them. And the houses just hang empty on a tree - purely for decorative purposes.
Let me tell you what mistakes the masters make in the manufacture of birdhouses. So that the birdhouse made by your hands is not only beautiful, but also initially correct. Then your homemade birdhouse will please the birds at first sight.
ERROR #1
entry hole too low.
The window-door in the birdhouse should be located at a height of at least 30-40 cm. This height is needed so that the bird has the opportunity to create a nest at the bottom of the house.

By the way, the photo above is an example of another fastener - a metal U-shaped bracket is nailed to the roof of the birdhouse (like an eye for latches).
Look, on the transparent birdhouses from the photo below, we just see that the bird is dragging more branches into the house. And if the window is low, the branches will block the exit from the house and it will be impossible for the bird to get out of it. And the bird itself does not want to sit in the nest, where its head will be at the level with the window, so it will be anxious. It is much safer if the window is high - and the wind does not blow on wet fledglings, and the mother bird feels safe.

By the way, the photo above shows the original birdhouse model, the back wall of which is made of glass with suction cups. Such a house is attached to a window in a large house and you can watch the birds settle in the nest. You just need to comply with the condition - the window. In the place of the window glass where you plan to mount such a birdhouse on suction cups, you must first seal it with a tint film - so that the birds do not suspect third-party observation.
ERROR #2
hole too big.
Starlings will not settle in a house where the door is large enough for the cat's head. Cats love to climb trees looking for the nests of defenseless chicks. And such a house with a large hole is an easy prey for them.
The small hole in the birdhouse is not in vain invented. The cat's head and paw should not fit into the hole, but starlings and other birds should easily climb inside. Therefore, when you make a birdhouse with your own hands, make a small hole in it.

Only if you live near a forest belt and make houses for owls flying in the vicinity - then a large hole will certainly be appropriate.

ERROR #3
BRIGHT COLORING of a house for birds.
If you do not live in a blooming jungle, and if the house you have conceived is not designed for parrots with bright plumage, you do not need to paint it in bright colors. Birds trust only natural colors and natural materials. It is good to use such a birdhouse as a designer piece for your living room or work for a competition in a school or kindergarten. But the birds will not live in it.

Mossy aged houses are much nicer for feathered mothers than glossy glamorous smoothly planed apartments.

And if you want your bird house to be original and beautiful, then you should know: you can make a decorative glamorous design in natural shades. Here in the photo below is just an example of such a house, which at the same time looks chic from the aesthetic-human side and does not scare away the birds with bright colors at all.

But the cutest houses for the feathered heart are dwellings, as much as possible disguised as an ordinary hollow on the tree. After all, initially starlings settled in hollows. From time immemorial it has been so - it is inherent in their bird genes: to look for a hollow. So make them an artificial hollow from unhewn bark slab boards(sold as firewood).

Or your house made of planed boards, take it and additionally decorate under a living hollow- wrap (or glue) it with branches, branches and pieces of bark.

Birds love houses made of unplanned wood, with elements of bark and rough branches.

ERROR #4
No slats for birds.
It is inconvenient for birds to climb the smooth boards of a wooden house. It's hard for them, their little claws slip off.

This is especially important for the INSIDE SIDE of the birdhouse walls. It is better to stick the inner front wall with small ladders (so that inside the bird can climb them to the exit window).
Or nail a piece of bark to the inner wall of the birdhouse, or an old grater, in short, any ribbed and rough surface. Or place a short sloping board inside the birdhouse (from the bottom to the window) - so that the bird can climb up this hill to the exit from the house.
And also if your birdhouse is made of a smooth planed board on the outside, make sure that the bird has a footstool.
These can be simple branches or branches that you cut while pruning apple trees in the garden.

It can be river pebbles glued on hot glue from a glue gun. Or, instead of a pebble, you can stick log cabins of branches (cut them into round-saw cuts and glue the house over).

Any old, rusty thing from the barn will work as a footrest for birds - a door hinge, a valve from a water pipe, a faucet, a reel from an old fishing rod, a rake, an aluminum fork, a key. Anything can become a perch stand in a do-it-yourself birdhouse.
Such things will only add originality and creativity to your simple bird house.


THAN ELSE
we can
HELP THE BIRDS.
In addition to hard branches, birds need soft material to build a nest - tufts of dry grass, moss, feathers, rag debris, pieces of paper that they collect everywhere themselves, spending long hours on a shaving search flight.
Why not make the bird's work easier and place a construction warehouse next to the bird's dwelling. Housewarming in your birdhouse will come much earlier if everything you need to create comfort is located next to the house.
You can pick up bunches of grass yourself, tear the cotton wool into pieces and place it in such a way that it is easy for the bird to pull out pieces of material from this construction warehouse. It is not necessary to tie the grass into tight bundles with a thread - the bird will not be able to pull the grass out of the tight bundle. It is necessary to make a storage out of a mesh container.

You can hang a box with rags, cotton and moss nearby. To prevent the wind from blowing the material, the box can be covered with a mesh (metal) or a plastic mesh, which we put on the bottom of the kitchen sink.
Or weave-twist balls from flexible branches and put cotton wool, centipon and pieces of chopped newspaper or toilet paper inside such wicker balls.

Even holders for bird fleece and rags specially made for this purpose are sold. They are installed or hung next to birdhouses.

Material for the construction of birdhouses.
MATERIAL for the house must have the correct characteristics of thickness and texture.
THICKNESS. Boards 2 cm thick. Such a thickness of a wooden board will allow you to better keep the heat of the house. After all, nests are built in the spring, when at night it is still quite cold and even frosty.
TEXTURE. As I said, the boards should be rough (croaker boards with unplaned bark will do). And if you only have smooth planed boards, but pieces of bark on them can be stuffed with carnations, glued on liquid nails (thick adhesive composition from spray cans).
Or create artificial roughness - scratch the inner wall of the birdhouse with a knife - make notches for which the bird will cling. Or nail pieces of bark onto the inner wall, several slats one after another like a ladder, or nail a grater, or a piece of insulation (it is made of foamed mass and it will also be convenient for bird claws to climb on it).
IT IS FORBIDDEN make houses from glue boards (plywood, chipboard, fiberboard - these materials contain glue resins, they emit toxins that birds may not like. I don’t know if it’s true or not, but they say that resin pine boards are also not suitable for a birdhouse, which is from warm In the sun, the tar board heats up and releases smelly resin, and that this is supposedly harmful to the birds.
Now I will give diagrams and drawings of simple houses. But I’ll make a reservation right away that your designs can be completely different in shape and size. You are free not to stick exactly to the drawing from the project below. As you have already understood from the photos above, the houses are very different.
But the logic of size must be preserved ... And this logic is as follows.
What are the dimensions of the correct birdhouse.
Window hole size(called letok) - no more than 5 cm in diameter. So that the crow could not stick its head into the birdhouse and eat the chicks. And the cat's head didn't fit in either.
The height of the notch-window- at least 20 cm from the bottom of the house. So that the wind from the window does not blow on the nest of chicks, and so that the chicks are not near the entrance - because of the danger of meeting with a crow's beak or a cat's clawed paw.
Birdhouse height - at least 35 cm. It can be a little higher, but remember that if you make the ceiling too high, then such a high-ceiling house will be harder for the birds to heat (warm air will go up and the birds below in the nest will freeze).
house width- (that is, the square area of \u200b\u200bhis floor) should also not be very large. A spacious house is not considered cozy and a wide nest requires a longer time for its construction. The bird is tormented by filling such a spacious house with twigs. Therefore, we try to stick to the bottom size of 15 x 15 cm (or 20 x 20). That is, if you are making a wide house, then put dry grass there yourself in advance (the bird will only be happy).
As you can see, these dimensions are dictated by the logic of survival in the wild.. And the right birdhouse is the one in which all these features are observed.
Well, now let's move on to the drawings and diagrams.
Here I have collected ways to make a birdhouse in the form of diagrams and drawings. You can choose your model of the house and figure out what details it can be assembled. And remember, it doesn’t matter if your sizes are slightly different - we make it from improvised material and therefore the dimensions will depend on our availability.

Here is another drawing of a birdhouse, although here the dimensions are given in inches. It will be easier for you to convert inches to centimeters if you ask your wife for a measuring tape for patterns - the one with which she measures the girth of her slimming waist during a diet. This measuring tape has centimeters on one side and inches on the other. So you can always see a quick conversion of any inch size to centimeter.

These drawings do not take into account one more CONDITION. In the Soviet birdhouses of our childhood there was always a clear rule: the front front wall (the one with the hole) should be tilted forward. This was done so that the starling could climb such an inclined hill to the exit from the house.
To observe this slope, you need to make 2 side walls from the rear edge straight vertical- and from the front oblique(we see a similar principle of oblique side walls in the photo below). Only in this example, the birdhouse generally has a triangular lateral section. And in Soviet birdhouses there was such a slope, but along with it there was also a normal bottom, so that there was enough space for a nest.

Below we see a drawing of real Soviet birdhouses from our childhood. True dimensions here are given in inches.

But if your house does not have a bevel on the sides, then to facilitate the exit of the bird, you can fill an inclined plank on the front wall from the inside of the house (it will perform the same function as a ladder).
And now let's look at the birdhouses of another unusual shape - a rhombus. Here he is in the photo. The idea is certainly beautiful, the house turned out elegant and decorative. But from a practical point of view, it would be better for the birds if the window expanded closer to the left or right edge - then the inclined plane of the wall would serve as a support for the birds to comfortably climb out.

And in this house that flaw that window too low- there is no place for a nest - it turns out that when a bird puts grass and twigs there, the height of the chicks will coincide with the height of the window - and they will look straight out and any crow will pull it out with its beak and devour it without a twinge of conscience.
A reasonable feathered mother will never choose such a dangerous house for housing - and it will just hang in your garden, and you will wonder why the birds do not settle in the birdhouse.
Here is a drawing of a similar house, but here the entrance hole itself is much higher - it's better. And even better to generally raise it under the very roof of the birdhouse. The bird will approve of this option.

APARTMENTS
bird houses.
And here are the options for simple multi-seat birdhouses. You will see a variety of options. Only here, not all apartments will be occupied, the side houses from the photo below have a too low entrance. I wish the same design - but with higher side turrets (or higher notch holes).

And in this photo, too, the central house will be inhabited - but there is no sidewall (the hole-entrance is too low). Therefore, you can make this design, but be aware that the side parts of the house will only have a decorative function. And the bird family will occupy only the middle apartment.

And here (in the photo below) is a multi-seat version, where all three houses are made according to the rules for the height of the notch and the height of the house. Such birdhouses will be fully populated.

Here is a beautiful option - the houses look in different directions of the world. By the way, it is recommended to fix the house so that the window looks to the south side, or to the east. The main thing is not to the north, the birds also need the sun.
It just seems that such a house is difficult to make. In fact, once you start drawing a drawing of a house, you will understand how simple it is. No more difficult than those designs that you made in your boyhood childhood from the designer.


You can design simple cell houses. In a row, like mailboxes in the entrance. Here's a good one on the left. And on the right photo, not very much - the notch is low. Not suitable for starlings, maybe for other birds, I don’t know ...

And here is another project of a multi-seat birdhouse. Here, each cell (except for the middle one) is a separate house with an exit in its own direction. If this drawing is changed and the height of the house is made larger and the entrance hole is raised to a height of 20 cm, then the starlings will appreciate such a communal apartment.

And here are some more options for beautiful and habitable birdhouses for several bird families at once.


Or you can make a very light and simple model - a birdhouse in the form of a rack shelf, with holes for entrances, as in the photo below. Only one drawback needs to be eliminated - here in the model below the houses are not large enough in height - it is necessary. It is necessary to make the height of the shelves at least 35 cm, and raise the notch by 20 cm from the bottom of each apartment shelf. Then the house will be occupied.

DECORATION OF BIRDHOUSES.
Decorative stylized birdhouses look very nice and can decorate any spring garden.


Bottle caps can serve as a decorating material (and at the same time insulating). Any material at hand can become decorative and finishing when building a house for starlings.

Pieces of laminate or linoleum left after repair can serve as material for the puff "tiled" roof of the house.

Just don't ever stop thinking about the birds. And if, for example, you have chosen a sheet of tin to create the roof of a house, think about how such a roof will rattle in the rain. The bird will go crazy with fear under the drum drops with a booming echo resounding in the house. Then, to such a roof, you need to add a sheet of sound-insulating material (foam or foam rubber).

And on the roof of the house you can set up a whole green garden. If you cut holes in parts of the house, put black soil there and plant plants. Pieces of moss or lawn take root well.

As well as special plants related to soilbloods. That is, those that grow with a carpet covering the soil, in the same way they will grow on your house not up, but in breadth with a carpet. This will add thermal insulation to the house. And most importantly, it will allow the birdhouse to merge with nature - and the birds will feel safe in such a cozy shelter disguised as a natural dugout.

WHERE TO BUY A BIRDHOUSE.
Birdhouses are often sold in hardware stores, they are also in construction stores, in the department everything is for summer cottages.
You can also buy them from individual craftsmen. There is such a well-known site called “Masters Fair” - we go to the site and in the old “site search” we set the word “birdhouse” and immediately pop up all the pictures of birdhouses with prices and addresses of the masters. You place an order and receive it by delivery or mail.
Here I have selected original creative works for myself Masters Dmitry(You can see his profile below).

And the same master has such works for sale. Do you want to buy such an exclusive birdhouse for your dacha. You are welcome to Fair of Masters to the author Dmitry (tik-kem).

And here are the works Sergey from the same Fair of Masters. Also cozy pictures of antiquity, revived in the form of birdhouses.

And on the same site there are a lot of options for ready-made kits for self-assembly of houses. Such sets are nice to buy, assemble - AND THEN DESIGN YOUR OWN INDIVIDUAL DECOR (glue over with twigs, overgrown with moss, turn into a toy house, or a fishing shed, or a cartoon character.
Company Workshop No. 13 on the site Fair of Masters offers a lot of kits for assembling birdhouses, as well as paints and coloring schemes for such houses.

If the house sets of this company are expensive for you, then there are other craftsmen selling the bases for birdhouses at a much more reasonable price. For example Master Cat- keeps a good price. You get an excellent solid house and turn on your decorating fantasy to the fullest.

DIY birdhouses
from NON-STANDARD MATERIALS.
Any material at hand can be adapted to a starling house. Previously, before human intervention in bird affairs, starlings found any holes in the natural environment to make a nest there. Therefore, they still do not pay attention to the external form and material - if only it was safe. Boots are boots, you don't have to choose. Moreover, it is very warm there.

On the Internet, such a picture roams - maybe it's a photoshop, or maybe in a deep forest and such a nest turned out to be safe enough for a bird. If the tree is tall and uncomfortable for cats to climb, then the bird will find it a good place to breed.

You can try to arrange any item in your country house as a house for starlings and titmouse. And suddenly he likes it. The ceramic pot holds heat well and does not drum in the rain.
But the iron kettle cools down quickly on a cold night, and during the rain it rattles like a drum, so it’s not suitable.

Houses can be made from old canisters. But just cover them with thick wooden boards - to avoid the roar of rain.


Old wicker baskets with a hole in the side can be turned into an original bird house - just make the notch taller and so that the walls do not blow through, do not be too lazy to insert a tab made of heat-insulating material inside.

HOUSES for WINTERING of birds.
Many of you will go to Google to look for more interesting drawings for birdhouses, in which case I want to warn you right away. DO NOT CONFUSE BIRDHOUSES (designed for nests and hatching of chicks WITH HOUSES FOR WINTERING OF BIRDS (the purpose of which is to provide a temporary overnight stay for birds in the cold winter season).
Houses for wintering differ in that…
- They contain an inlet at the bottom(so that warm air rises and remains in the upper part of the house).
- In such houses they stuff perches on which birds can sleep on a harsh winter night, protected from wind and cold.

And in winter, in addition to houses for cold weather, birds need feeders. I already have the same voluminous and detailed article on making a variety of bird feeders with my own hands.
Now, you know everything (or almost everything) about birdhouses and houses for hatching chicks. The birdhouse is basically a simple craft. Anyone can do it.
And if you didn’t find your birdhouse design here, then I have another article on the same topic. Perhaps your future bird house is located there -
Good luck with your work. And let the birds celebrate their feathered housewarming this spring. It's so nice to feel like those who built the house.
In our country, with our salaries, not everyone can afford to build houses. But even if you can’t build a house for your family yet, you have already done a real job if you built it at least for a family of birds. To this little, more will follow. After all, the magic of a house made by your own hands is already working to ensure that your family celebrates housewarming.
Magic is born when we start doing a good deed, with these hands of our own.
Olga Klishevska, specially for the site
Our interest in birdhouses wakes up in the spring along with a drop, bright rays of the sun and sonorous voices of birds. I really want nimble and cheerful birds to settle in our yard. It is pleasant to watch the family chores of birds and listen to their trills. It is no less pleasant to realize that the birds will help protect the garden from pests.
Birdhouses for birds: what are they?
We all observed a considerable number of different birdhouses. You might get the impression that these are just small houses with a hole of different shapes and colors. In fact, birdhouses can be made from a variety of materials and must have specific parameters for different types of birds. There are certain requirements for their design and placement.
Especially for you, we have grouped the existing options into a convenient form for review. Of course, before you start assembling a bird house, you need to see what they are.
Birdhouses made of wood - a classic of the genre
There is no doubt that wood is best suited for making a classic birdhouse. The reason is in the whole complex of its characteristics:
- good thermal insulation;
- acceptable soundproofing;
- sufficient strength;
- environmentally friendly;
- well processed;
- available at cost.
We have prepared for you a photo of 40 types of wooden birdhouses, arranging them in order of increasing complexity and quality of design.
 Before you are images of the simplest designs. As you can see, they suit the starlings themselves. Unless they do not suspect that the service life of an untreated house is limited. If appearance does not matter, choose one of these options.
 If you spend a little more time, you can make a noticeably prettier bird house. Perhaps you are using some other type of lumber for this purpose. Definitely, it will take a little more skill and effort.
 Fantasy played the main role in these constructions. Moisture-proof impregnation and a tin roof will definitely increase the life of crafts. Products are somewhat more complicated than ordinary bird houses.
 As you can see in the photo, the birdhouse can be decorated by cutting a hole in the shape of a bird silhouette. At least the roof can be painted. To assemble a bird house, you can use a lining processed with a blowtorch.
 The photos above show the application of paints. In principle, one color is enough to decorate the craft. Several bird houses painted in different colors look great.
 If you try, the paints will help turn the bird's housing into a fabulous house. The actual design is not complicated. Fantasy and diligence are the main tools of the presented success.
 A few more options for successful and simple solutions. Small-section sticks allow you to complement the craft with a fence, trellis, and so on. In the bottom two photos, using a jigsaw helped a lot. The use of wood of different colors and the unusual shape of the bird house ensured the exclusivity of the work.
 The photos above say: do not limit your imagination! Of course, to assemble an airplane and a helicopter, you will need parts made on a lathe. However, the locomotive and the tiger are made from ordinary planks using a simple tool. You can repeat!
 The two dainty birdhouses in the image above are made with taste and care. It's not easy to repeat this. Creating something similar and your own is even more difficult.
 We present four more examples that will serve as a decoration for a site of any level. Of course, wood carving is not for everyone. Note that the two lower options are quite realistic for copying. It will take a lot of time and effort.
Birdhouse made of logs - a separate issue
 A great idea is to use an ordinary log for a birdhouse in the country. This is also wood, but untreated. Note that an old tree trunk with a rotten core is the best option. Such housing for birds resembles a hollow and is called a hollow. As you can see, there can be a variety of products in terms of design.
 For many, an old log is more accessible than a cut board. Birds don't care what their home looks like. A simple deck or a birch palace will do. You make the choice.
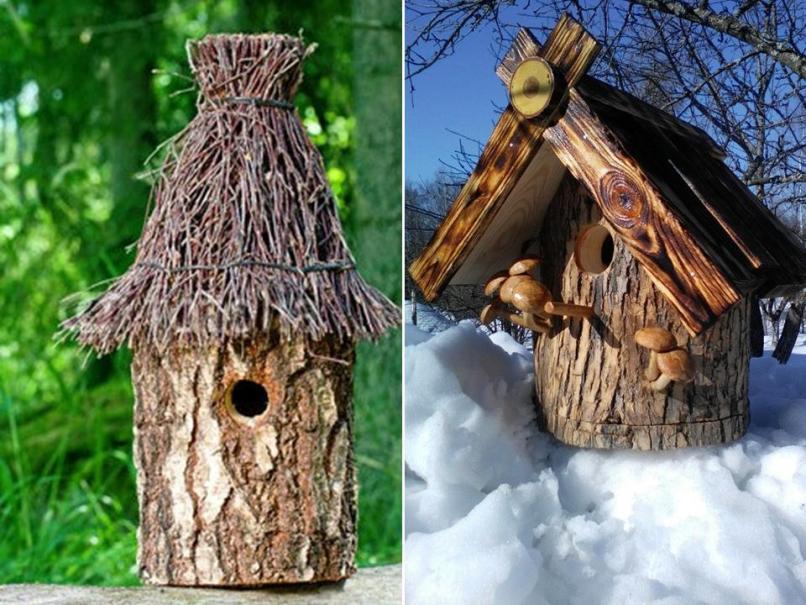 The nest box can be decorated with branches, boards, and mushrooms. Again, this is about the manifestation of fantasy.
In any case, those who decide to make the house more complicated and interesting should definitely link its design with the place and environment where the birdhouse will be located.
Plywood houses for birds are also made
 It is believed that plywood is not the best suited for a bird house, as it has an unpleasant and harmful smell of glue. However, the starling in the picture likes the plywood dwelling. Products with a noticeable smell of glue should probably not be used. It can be assumed that over time, the slight smell will pass. Plywood is more expensive than edged board, but is stronger and will last longer.
 Here is a factory kit for assembling a bird house. Its main advantages are interesting design and high assembly speed. Thin plywood has reduced heat and sound insulation. Such a bird house is best used in warm regions, and it will not last long.
 A few more options for the execution of plywood birdhouses demonstrate the wide decorative possibilities of the material. The use of paints will provide an impeccable external design. Probably, such crafts are best used for decorative purposes.
 Here is the simplest plywood bird houses. They are best used in relatively warm regions. They won't last long in this condition.
 The use of 20mm plywood and paints greatly improves the position of plywood houses. Experiments with the form of crafts are welcome.
Cardboard birdhouses - this is possible
 Cardboard birdhouses are hard to take seriously. As follows from the pictures, such products exist. At the same time, they are made at enterprises for the production of corrugated packaging.
 Of course, such a house for birds is inexpensive, it is assembled quickly and even looks decent. Obviously, they will last one season, and in those parts where it will not be soaked by rain. However, we decided to overcome the indicated shortcomings of the material and offer further in the text a scheme for assembling a fairly reliable house for birds made of corrugated cardboard.
Birdhouses from plastic bottles - a fallback option
 At first glance, plastic containers are very well suited for a bird's nest: they cost nothing, are durable, and are not afraid of rain. Note that birds do not like to sit in a transparent room with poor heat and sound insulation. In addition, the slippery surfaces of the bottle make it difficult for the bird to move around in the house.
However, these disadvantages can be overcome. Note that the assembly of such a product does not require a hacksaw and a drill and can be performed by a woman or a child. A plastic bottle can be painted, covered with an opaque material and trimmed from the inside with a cloth. It is better to use five-liter eggplants.
To prevent the wind from rocking the light structure, it must be securely attached to the tree, for example with adhesive tape. Obviously, in this situation, a wide scope for decor and decorations opens up. Further down the text, we offer a practical way to use plastic bottles for a birdhouse.
Bird houses from improvised materials
 A very interesting house for birds is obtained from a pumpkin. The internal contents of the plant are cleaned with a spoon through the future notch. The craft is dried, decorated and hung on a tree.
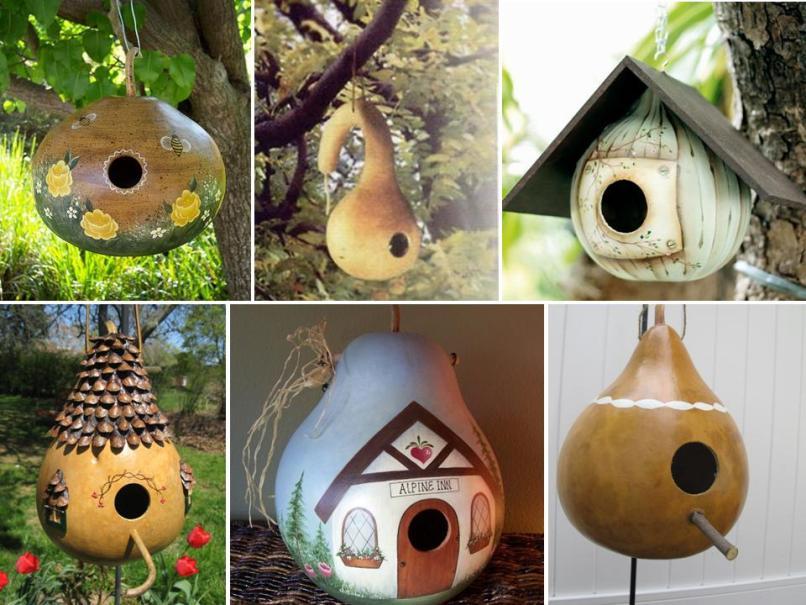 Options for "finishing the room" on the outside can be very different. Note that even in the simplest version, the product has a certain decorative value. Often, it is for this purpose that such crafts are made.
 A wooden barrel or pebbles and cedar cones, as well as beer cans, are suitable for building a bird house. Almost any material will do, from beer cans to shoes.
At the same time, it is important to observe the conditions for the comfortable living of birds, which we will discuss later in the text.
 An old boot is a great home for birds. By the way, the leather version will last a long time. The convenience of living in an old snag with a feathered hollow definitely does not need to be explained. Nothing stops us from adding our human ornaments.
 An old bucket is perfect for birds. It is especially convenient to use a piece of plastic pipe for arranging a bird's hut. Very simple and durable. The possibilities for decoration are, as always, endless.
Tenement houses or townhouses for birds
 Probably, the apartment buildings were mastered first by birds, and then by people. Options - a great variety. Like people, an apartment building can be beautiful.
 These examples are more like townhouses. Probably, next to the "high-rise building" for a large number of birds, you can always observe at least one of them.
At the same time, one should not forget that a cheerful company of birds can harvest your entire garden in one sitting.
Decorative birdhouses
 Decorative birdhouses also have a place to be. They are designed to decorate rooms. Often decorative crafts are placed in the garden.
 Birdhouses can be made by kids out of paper, cardboard boxes, plastic bottles and beer cans. Of course, no dimensions in this case should be observed. We have selected for you images of the most characteristic products that will suit the child.
Sizes of birdhouses for birds and other requirements
There are general requirements for bird housing, regardless of what specific birds they are intended for:
- The bird house must have sufficient thermal insulation, protected from noise, moisture and drafts. For this, a wooden birdhouse is made of boards with a thickness of at least 20mm. The seams and cracks of the house are sealed with clay, plasticine or tow.
- The design should not have sharp protrusions that could injure feathered inhabitants. The protruding parts are treated with emery cloth.
- The configuration of the birdhouse should allow the birds to easily get in and out. In a birdhouse made of planed boards, the front wall is roughened from the inside with a hacksaw and a drill. A birdhouse made of a plastic bottle is trimmed from the inside with a coarse cloth.
- The bird housing material should not emit unpleasant odors. Laminated chipboard and OSB board contain formaldehyde and are not suitable for birds. For the same reasons, the use of plywood is also discouraged. Do not use inorganic adhesives to assemble the birdhouse. It is better to paint the product with acrylic paints.
- Do not use too bright colors to decorate the house. Birds distinguish colors much better than people, and in nature they are not used to showing their nest to everyone. It is better not to create a tip for birds of prey and cats. Good paint will significantly extend the life of your product.
- The design and placement of the birdhouse should provide adequate protection from cats and woodpeckers.
- The birdhouse should not be too large so as not to provoke the female to lay too many eggs. Large numbers of chicks are difficult to feed and will not survive.
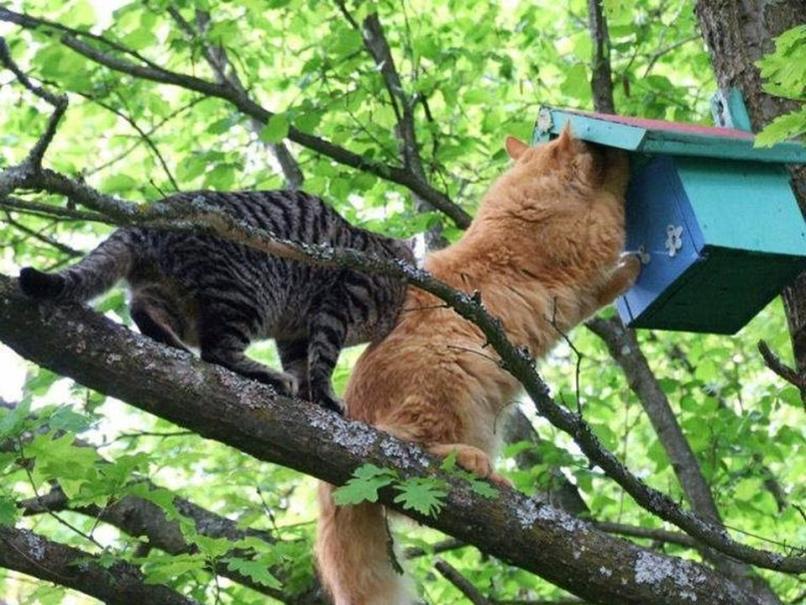 Let us add in more detail a few more essential remarks on the "architecture" of bird houses. To protect against feline organized crime groups (organized criminal groups), the birdhouse should be positioned so that it is impossible to climb into it from nearby branches.
It is better not to make a support under the entrance, as the entrance to the bird house is called: the bird has enough branches if the birdhouse is on a tree, and the cats will definitely take advantage of the additional opportunity for criminal purposes. To protect the chicks from attack from above, the overhang of the birdhouse visor is increased to 70-80mm. The greater the angle of the roof, the more difficult it is for cats to do dirty work.
 To prevent cat OPG from reaching the birdhouse along the support from below or above, it is wrapped in tin in accordance with the image. The cat slides on the metal and will not reach the chicks. To protect against the claims of the woodpecker, the birdhouse is reinforced with a metal or thick wooden lining, as in the photo. Then he will not be able to expand the notch and get to the eggs.
Quite often, birdhouses are made from coniferous wood. The resin released from the wood can ruin the plumage of birds. It is better to use birch or alder for a bird's nest. As a last resort, you should pick up pine boards without knots.
Different birds have their own characteristics and choose "apartments" for themselves in accordance with their needs. When planning to make a house for certain birds, use its standard GOST dimensions from the table below.
 The bird house mentioned in the table under the name "half-hollow" is intended for birds that are used to nesting not in hollows of trees, but in a depression between branches. These birds prefer a certain amount of light, and a slit entrance is suitable for them.
Please note that it is difficult for the wagtail to move along vertical surfaces, and it is better for it to equip a comfortable platform in front of the entrance with a width of 8-12 cm. For small birds, like pikas, they organize two entrances located opposite each other. It is believed that starlings do not settle in green houses.
The choice of location and methods of attaching bird apartments
 Ornithologists recommend placing one birdhouse on an area of 20m2. In practice, one birdhouse is enough in the garden, since a larger number endangers your cherries and even seedlings of tomatoes. If you install several birdhouses, ensure a distance of more than 15 meters between them.
Usually a birdhouse is installed at a height of 2.5-3.5 m from the ground. If there are objects nearby where people often appear that will disturb the birds, increase the height to 4.5-5.5m.
It is necessary to think about the optimal orientation of the bird house relative to the cardinal points. If the entrance to the open space faces south, the house may overheat. It is better to place it in the shade. It is also wrong to turn the notch in the direction of the most frequently blowing winds, since rain will fall through the entrance to the birdhouse. Also, to protect against rain, you should use the wall or roof of the building, the foliage of trees, etc.
Often a birdhouse has a special bar for attaching to a support. It can be fixed to inanimate objects with nails and screws. For fastening to trees, flexible clamps are used. Suitable reliable and durable cords and ropes. In this case, the fasteners should not pinch the tree as the trunk thickens. If the birdhouse you installed is not inhabited by tenants, try rearranging it to another place. Probably, this circumstance will affect the decision of the birds.
Workshops for making birdhouses
Drawings, dimensions and photos of the assembly of a wooden birdhouse with decorations
We invite you to familiarize yourself with the drawings of the three options for the most common birdhouses made of wood. Again, it is better to make them from hardwood or use pine boards without knots with resin. If you check the size table, you can find that for starlings and other birds, the house may have different dimensions than in the drawings. Next, we describe the scheme for assembling a birdhouse with a single-sided lid, guided by which you can independently carry out any of the three projects.
 Here is a drawing of a birdhouse from boards, which is the simplest. A feature of this design is a removable cover. In order for it to be securely fixed, an insert 120x120mm is provided, attached to the lid from the inside. If the cover is not going to be removed, the liner is not needed.
 The gable cover looks more interesting, but the design is a little more complicated. Pay attention to the accuracy of the connection of the roof parts with the side walls. It is possible that in these places additional sealing with plasticine, clay or hemp will be required. Removable cover design is not provided.
 This drawing shows a design with an inclined removable cover. Attention should be paid to the accurate execution of the inclined sections of the side walls. We give a master class for assembling a birdhouse in two stages: first we make a birdhouse according to the description, and then decorate it at our discretion.
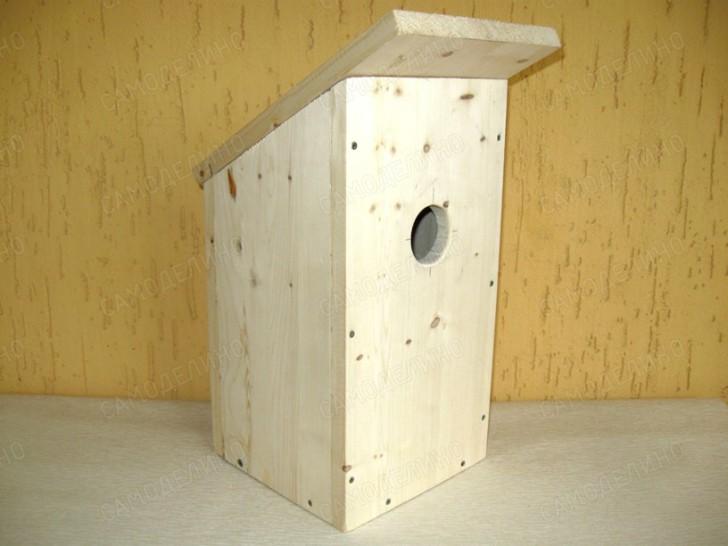
 This is how the finished birdhouse will look like
 Consider the sequence of actions in stages:
- For the manufacture of a birdhouse, I used a pine board with a section of 160x20mm. The knots are very small, so the resin will not interfere with the birds.
- For parts with a width of 120mm, I cut the board along this width. A 40mm wide cut was used as a pole for attaching a birdhouse.
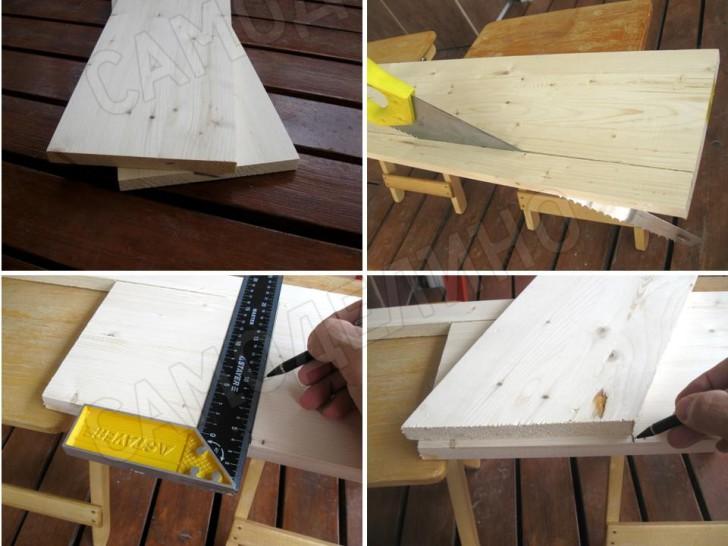
- To mark the details, I used a square. Otherwise, gaps in the craft cannot be avoided.
- I marked the length of the liner under the cover “in place”, it’s more convenient.
- With special care, he marked out and made an oblique cut on the front and back walls of the product.
- First, the notch was drilled with a feather drill.

- However, I did not have a feather drill of the required diameter, so I completed the work with a jigsaw.
- I scratched the front wall from the inside with a hacksaw to make it easier for the birds to get out of the house.

- The result is a set of parts shown in the picture.
- The notch was cleaned with sandpaper for the convenience of the birds.
- To assemble the house, I drilled holes with a diameter of 2 mm for screws. On long walls, three screws are enough, on short walls, two.
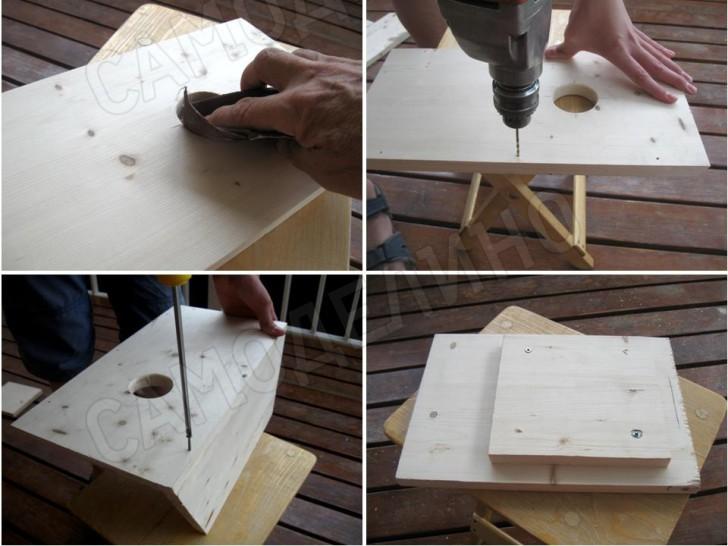
- I fastened the side walls with 3.5x40mm screws, 3.5x35mm screws came up to assemble the cover.
- The result is a bird house without cracks and gaps. For those who wish to extend the life of crafts with the help of paints and at the same time make a birdhouse a joke, we follow further.
- First, let's turn the canopy over the entrance into the visor of an impromptu cap. Marking is done with a compass.

- The cut along the arc was made with a jigsaw and processed the sharp edges with an emery cloth.

- I also smoothed out all the sharp edges of the craft with sandpaper. With this work, it is convenient to wrap the emery skin around a wooden block.
- Next, I cut out templates for the eyebrows, eyes, lips, and ear of the “Cyclops” from paper. I tried them on crafts and redid those that did not fit in proportions.
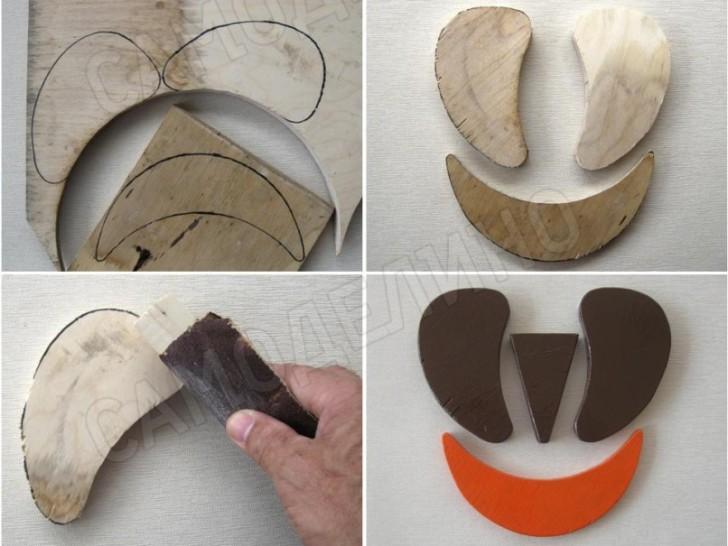
- For false ears I used 16mm thick plywood, for the mouth - 10mm. I pressed the corresponding templates to plywood and outlined the contours with a marker.
- All details of complex shape were cut out with a jigsaw.

- The nose has a geometric shape, so I marked it with a ruler. The cut parts were cleaned with sandpaper.
- Ears, nose and birdhouse lid painted with brown paint in two layers. I used red for the lips.
- The body of the “Cyclops head” was painted with yellow acrylic paint. To mark the white of the eye and eyebrow, I attached the appropriate templates to the front wall and circled with a marker. Eyebrow and eyelashes done with a black marker. The white of the eye was painted over with white paint.
- Ears, nose and mouth secured with screws. Especially for the photo he invited a cheerful bird - a fashion model.
New technologies for assembling a birdhouse from cardboard and bottles for women's and children's hands
Not everyone who wants to build a birdhouse with their own hands has the opportunity to saw boards, drill with a drill and wrap screws. On the other hand, plastic bottles and cardboard boxes are available to everyone. Both materials are poorly suited for creating a bird house.
 We came up with the idea that we would get a wonderful result if these improvised materials are used together: plastic protects against moisture, and corrugated cardboard provides thermal insulation. We bring to your attention the original project of a bird house from improvised means, which can be implemented by anyone at home. See how we did it in the picture.
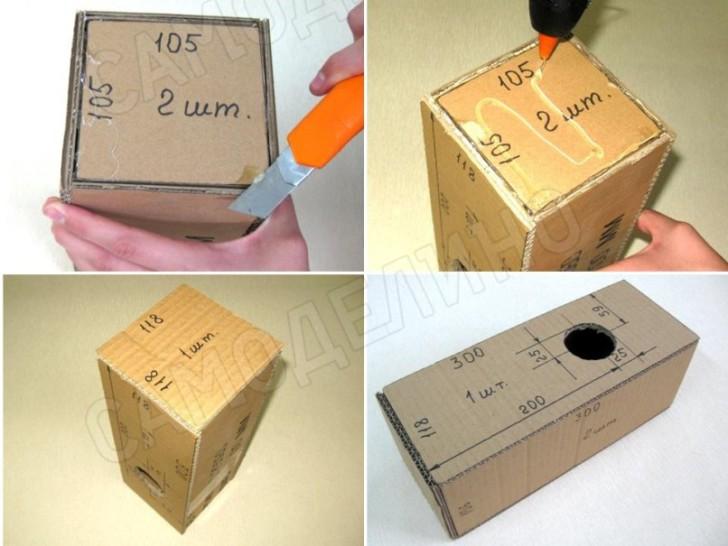
 Here is a presentation of a master class for making an apartment for birds from plastic bottles and corrugated cardboard. The drawing in this case is not required, since the dimensions are printed on the parts:
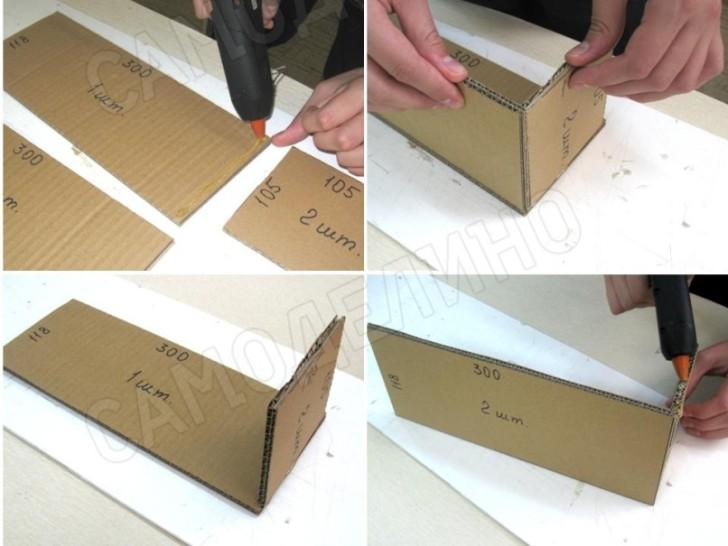
- First you need two identical five-liter bottles. We cut one of them from the bottom along the line marked with a marker. The cut point extends below the protruding part so that the second container can be inserted into the first.

- Corrugated cardboard is best suited two-layer 6mm thick. The markup should be a rectangle. We cut the cardboard with a clerical knife using a metal ruler.
- First, we cut out one part 118x118mm and check how it goes inside the cut container. Ideally, if it clings a little to the walls of the jar. If it passes with a large gap or passes into the container with difficulty, you will have to choose other sizes of the square. In the event that the size of the bottom and roof is changed or cardboard is used with a thickness not equal to 6mm, the detail drawings will be different. The height of 300mm will not change, the width of the front and back walls is equal to the size of the bottom and roof, the width of the side wall is equal to the width of the front, minus twice the thickness of the cardboard.
- We mark the entrance with a marker in accordance with the image. To get a circle, it is convenient to circle the lid of the container with a marker. The hole is cut with a narrow knife.

- We cut out all the details from corrugated cardboard in accordance with the image.

- With a glue gun, apply glue to the bottom of the back wall.
- We install the bottom liner on the glue. To ensure proper assembly, temporarily install and hold the side wall with your hand. It is necessary to hold the parts before they are fixed with glue.
- You will get an assembly in the form of the letter "G".
- Apply glue to the end of the bottom.
- Apply glue to the edge of the side wall.
- After installing the side wall and curing the glue, you will get an assembly of three parts.
- Apply glue to the top of the side and back walls.
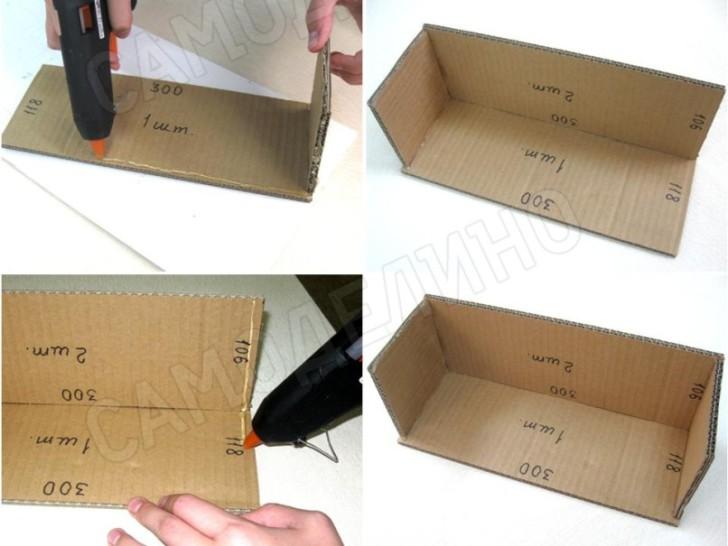
- Once the roof liner is installed and the adhesive has cured, you will have a four-piece assembly.
- We apply glue for the second side wall.
- We install the second side wall and get a box without a lid.
- We apply glue to the ends of the four parts and install the front wall.

- The base of the craft is ready.
- At the ends of the craft, we remove the glue that has come out to glue the bottom and roof.
- We apply glue to the four ends of the walls and the bottom liner.
- We install the bottom of the birdhouse.
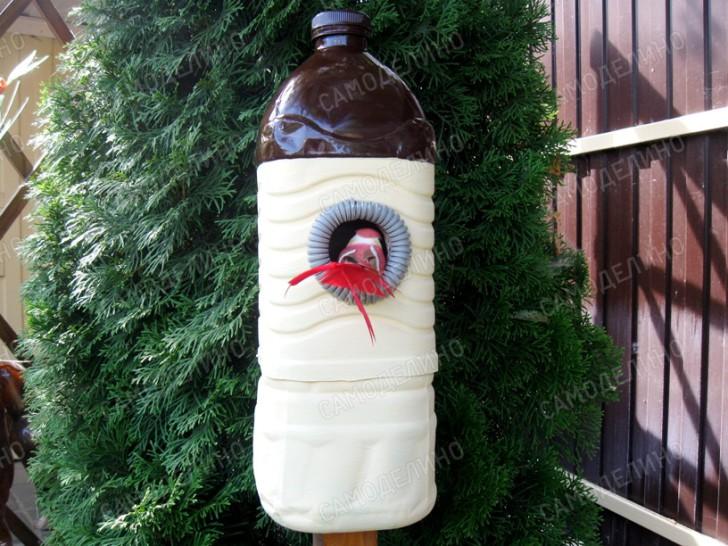
- Now we have a bird house with an insulated and reinforced bottom.
- This is how the finished cardboard capsule looks after the roof sticker.

- Carefully insert the cardboard insert into the eggplant and mark the notches on the bottle with a marker.
- Cut out the notch according to the markup.
- We are preparing corrugated cardboard parts for warming the bird house in accordance with the image.
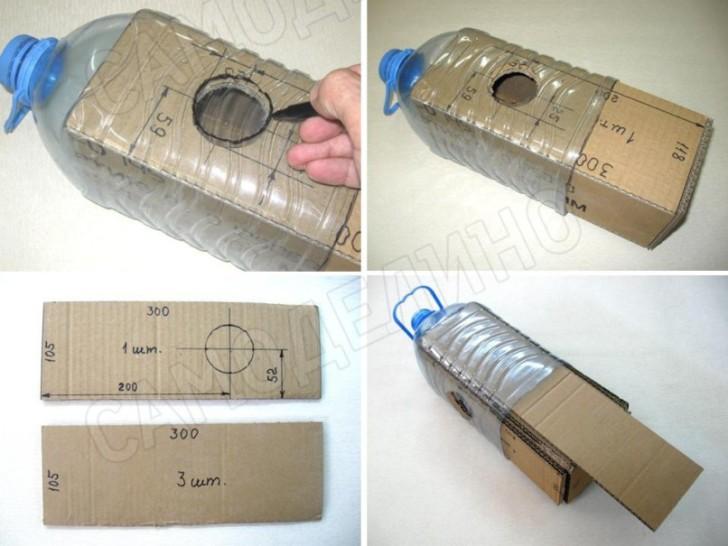
- Everything worked out for us, and the “insulation” is in place.
- We move the details into place. If they do not fit well, the parts can be cut or the cardboard can be dented at the edges of the long sides.
- After adjusting the size of the second bottle and assembling, mark the holes for wire staples on the sides of the birdhouse with a marker. We punch holes at a distance of 20 mm so as not to make a hole through the walls of the product through.

- We make two brackets from copper wire with a diameter of 0.5-1mm in accordance with the holes.
- Slide the bottom eggplant down and insert staples into it from both sides. We bend the ends of the staples so that they easily go into the upper bottle.
- We shift the lower eggplant into place and insert the staples into the holes on the upper bottle.
- Slide the bottom of the plastic container back into place.

- We twist the wire and bend the twist.

- It looks like an almost finished bird house. We received impeccable thermal insulation and moisture protection of the bird house.

- We painted the top of the house brown and the bottom yellow. The sharp edge of the plastic may injure the bird. We took a piece of corrugation, cut it along and put it on the edge of the notch. You can color the product at your own discretion. The craft resembles a castle tower, so you can draw a battlement from below.
How easy it is to make a birdhouse from a log
We have already given examples of arranging an original birdhouse made of logs. Birds will definitely like such a project, as it resembles a hollow that is familiar to birds: it has no gaps and merges with the environment. Now consider a master class for assembling such a birdhouse on your own.
Gardeners attract birds to their plots for a reason. It is pleasant to listen to the birds singing, to observe their behavior and the maturation of the chicks. And most importantly, the singing family is able to rid the garden of bugs and pests. If you make do-it-yourself birdhouse and hang it among fruit trees, there will be no need to use insecticides to protect garden plants. Biologists have calculated that chicks can eat almost as many larvae and bugs every day as they weigh themselves.
Who will live in the house?
Closer to warm spring days, birds return home from warm lands. For swifts and wagtails, starlings and flycatchers, swallows and titmouse in early spring, there is not enough food, and there is nowhere to hide. It is impossible to predict which feathered family will settle in the prepared house. One thing is known: in order to feed their brood, starling parents bring their children about a thousand larvae and beetles per week.
If birdhouse (do it yourself made or bought in a store) will remain in the garden for the winter, sparrows or titmouse will settle in it. However, with the onset of spring, the "legitimate" owners (starlings) will evict the tenants and occupy the dwelling.
For flycatchers, which also live in garden plots, smaller huts are built than birdhouses, but according to the same scheme. But for pikas, you need a teremok with two additional through holes in the side walls.

The dimensions of the notch in the house for titmouse should be no more than 3-3.5 cm. And housing for settling in wagtails should not have a perch under the entrance, but a small stand - a trap. The paws of this bird do not have sufficient tenacity.
Important! Before you start making a shelter for birds, first decide for whom exactly it is intended, since the dimensions of the dwelling must correspond to the size of the bird.
What is the difference between a birdhouse and a feeder
In the frosty and snowy winter months, people help the birds survive. Small devices and devices for feeding birds are called "feeders". Birdies are treated not only to bread crumbs. Titmouse love to peck on pieces of fat. Other birds will not refuse grain and rowan berries. Feeding troughs look like hanging mini verandas. This is a kind of bird dining in the open air.
DIY birdhouse make it more closed. In such towers, a feathered family builds a nest in the spring and hatches chicks. This dwelling should be inaccessible not only to predatory crows, but also to cats. If the feeder can be made even from an ordinary plastic bottle, then the house for permanent residence should be not only strong, but warm and reliable.
"Duplyanka" is a birdhouse made from a single piece of log with a hollowed out core. The round entrance resembles a natural hollow, which gave the house its name.

What materials do craftsmen use to make a home for birds? Natural ones are best, such as:
- tree;
- plywood;
- rough boards;
- waterproof cardboard;
- gourd lagenaria.
To improve moisture-resistant properties, ready-made birdhouses are treated on the outside with a protective agent.
Important! Birds do not like sharp smells of paint and drying oil. Therefore, acrylic enamels or wax impregnations are used for coating.
About birdhouses and design ideas
Even an old sneaker can find a "second life" as a birdhouse if you fix it on the board, and then on the tree with the heel part up! Pichugi will live it with pleasure.

Gets very warm do-it-yourself birdhouse, made from pieces of thick felt or knitted from coarse woolen threads. Above such little houses, an additional roof made of plastic or tin is necessarily fixed to protect against rain.
Important! Housing should be comfortable and safe for the feathered family and their chicks.
One of the interesting and easy-to-make options is a bird's hut made from gourds - gourds (lagenaria).

The sequence of work is as follows:
- take the dried fruit without cracks and damage;
- wash its surface with a rough sponge and hot water from possible contamination;
- dry well;
- mark with a simple pencil a place for a notch (entrance to the house);
- cut a hole with a sharp knife and clean its edges with a piece of sandpaper;
- shake out the seeds from the pumpkin;
- pierce a hole under the notch with an awl and insert a stick into it, previously lubricated with PVA glue;
- pierce the top of the pumpkin across the “tail” and thread a strong twine into the hole;
- lovers of drawing will be able to color an unusual do-it-yourself birdhouse;
- cover the finished house with a protective layer of acrylic varnish;
- hang a designer birdhouse on a tree or pole.
Such an unusual and beautiful nesting will serve as a decoration of the garden, will bring double benefits. After the departure of the grown chicks or in the fall, the product is removed, freed from feathers, straw and other residues, disinfected, dried and cleaned until next spring.
Simple and cost-free
The most budget option for making a birdhouse is a house from a juice bag. 15-20 wooden ice cream sticks are prepared in advance. The package is washed from the remnants of the juice, dried, a hole is cut with a knife for an entrance with a diameter of 5-6 cm. The entire surface of the package is glued on the outside with chopsticks (to look like a hut). From the inside, a small rough board is attached to the front wall so that the chicks can get out. A rope is threaded through the top of the package, for which the house is hung on a tree branch. Teremok is ready to receive guests.

Classic wooden birdhouse
DIY under the power to make not only a simple hut, but also a fairly solid housing for feathered friends. You will need the following tools and materials:
- wooden boards up to 2 cm thick;
- a pole and wire for attaching a birdhouse;
- ruler or square;
- simple pencil;
- hammer;
- screwdriver;
- jigsaw or saw;
- drill;
- PVA glue;
- nails or screws.
Blanks are marked on the boards and cut out in accordance with the dimensions.

On the front wall, a notch with a diameter of 5-6 cm is sawn through at a height of about 10-15 cm from the bottom. Traditionally, the entrance hole is made round, and its dimensions should correspond to the size of future residents. This must be taken into account so that neither a crow nor a cat can climb into the nest and drag off the chicks.
A hole is drilled just below the notch and a stick is inserted into it, 8-9 cm long. On this perch, the birds will rest and announce the surroundings with their trills. Sometimes the enemies of starlings and flycatchers also use this wand.
The lid is fixed at an angle to prevent water from entering the house. To do this, 2-3 cm are cut off on both side walls towards the front part. The inclined plane of the roof, in addition, prevents the predators that have climbed onto the birdhouse from keeping their balance.
Important! The inside of the front wall must be rough, otherwise the chicks will not be able to get out. If the boards are smooth, small notches are made on their surface.
Assembly of finished parts of the house
First, a pole is nailed to the back wall of the birdhouse. Then, sleeve strips are attached to the inside of the lid. Moreover, there should be a distance for the visor ahead. The next step is to connect the back wall to the side parts and nail the bottom, attach the front front wall. All parts must be connected tightly, without gaps and cracks. When using nails, small holes are pre-drilled at the joints. This is done so that the wood does not burst.

The lid is not nailed, but tightly inserted from above. This is done in order to subsequently easily care for the birdhouse after it is released by the birds. The roof should protrude forward a few cm, creating a small visor above the notch.
Important! During work and assembly, it is necessary to ensure that the tips of the nails do not stick out on the inner surface of the walls. Otherwise, the birds that will live in the hut may get hurt.
How to fix a birdhouse
After the assembly is completed, it is important to choose the right place where it will hang birdhouse. DIY you need to prepare a strong wire. Do not nail a pole with a house with nails to a tree. It is tightly attached at a height above 3 meters, attached with wire to the trunk.
It is recommended to hang the bird house with a slight forward slope. To do this, use a small board, which, when installing the birdhouse, is placed under the upper part of the rear wall. This step will keep the rain out of the nest and make it easier for the chicks to get outside.
Important! The birdhouse is fixed in such a way that the entrance faces south or southeast. Then the cold winds will not blow in and the chicks will be warm and comfortable.
Both feeders and nests for feathered singers are not located in open space. Birds are very cautious and shy. They will only use the houses if they feel safe.

Do I need to care for birdhouses
Then the dwelling is dried, aired and cleaned until the next bird season.

Many gardeners pre-repair paints and outdoor surfaces so that any smells will wear off by spring. And in mid-March and early April, install cozy bird houses on your site.
Attracting birds to your local area is a pleasant and rewarding activity. After all, birds not only delight our ears with their trills, but also eat harmful insects.
How to make a birdhouse with your own hands - this is our article.

Raw Materials
The starting material is exclusively wood. It is recommended to use wood only from deciduous trees, as conifers emit resin, which can lead to the premature death of a feathered tenant.

You can not make birdhouses for birds from plywood sheets, chipboard and OSB. Glue and special impregnation contained in such materials discourage feathered guests.

As a result, the assembly and fastening of blanks should be carried out only with nails and self-tapping screws, without the use of adhesive composition.

Usually, for the manufacture of a birdhouse made of wood, non-planed boards are used, with a thickness of at least 2 cm. This thickness allows you to maintain a constant temperature inside the bird house.
In order to prevent cracks from appearing on the boards during fastening, it is necessary to pre-drill holes for the screws.

How to choose the size of a birdhouse
The size of the birdhouse depends on which birds it is intended for. Different types of birdhouses differ in their proportions and the length of the notch.

For example, for starlings, the required dimensions are: 10 × 10 × 40 cm, letok - 5 cm. For tits and flycatchers, sparrows - 10 × 12 × 30 cm, letok - 3-3.5 cm. 20 cm with a notch 3.3-5 cm high across the entire width of the wall.

Usually only the height of the birdhouse changes.

Half-hollows can also attract squirrels.
Some birds prefer to settle in nest boxes-birdhouses, made from a part of a log by gouging. The bottom and roof of such structures are made of boards.


To make the birdhouse habitable again, it is necessary to pull out the old nesting place from it and scald it with boiling water. An additional measure may be treatment with potassium permanganate.

How to make a birdhouse a safe home
To avoid ruining the birdhouse by cats and woodpeckers, you can take the following measures:
- Increase the roof overhang;
- Poke the roof with nails;
- Finish the notch with a tin sheet;
- Fill around the notch with nails;
- Attach a wooden overlay with horizontally arranged fibers near the notch;
- Make special protective belts from tin strips or from "brooms", while it is necessary to strictly adhere to the required distances between them.

Important: there should be no knots, feeders and other likely supports between the protective belts and the birdhouse.
How to choose the right place for a birdhouse
Birdhouses should be hung on trees at a height of at least 3 m. It is not desirable that busy paths pass near these places and benches are located.
Note!


When choosing a place on a tree, it is necessary to take into account that there are no large branches near the notch. You need to install the birdhouse facing south so that there is a slight forward tilt.

Making a birdhouse
It is necessary to take raw hardwood boards with a thickness of at least 2 cm. Gloves are also required. Next, we take the drawings of the birdhouse and cut out the component parts. It is necessary to cut carefully and evenly, at an angle of 90 °, so that there are no gaps in the future.

It is better to choose nails with a diameter of 1.5-2 mm and a length of no more than 40-50 mm. We start assembly. We apply the side parts to the facade at an angle of 90 ° and nail it. It is recommended to use 3-4 nails for each.

We turn over, install the bottom, nail it to the sides. Next, we insert the back wall and also fix it with nails with a bottom and side parts.
We flip again. We fix the bottom on the other side. We install the roof in such a way that the overhang is at least 5 cm. Preferably 10 cm. We nail it.

Note!

We examine the resulting birdhouse and bend all the protruding nails.

Whether to install a perch is up to you.

Nowadays, on the Internet, you can easily find a variety of ideas on how to make a birdhouse in the country or near your home.

Some of them are very unusual. Therefore, feel free to make houses for birds.

After all, the original birdhouse can become a real decoration of your garden.

Note!

DIY birdhouse photo


