Many centuries ago, Chinese and Vietnamese lacquer artists began to use this raw material to create their miniatures. They drew attention to the fact that when pressed on the shell, a beautiful pattern is formed from the finest cracks, making the blanks look like the surface of a cracked rock or an ancient wall. The shell began to be used in lacquer painting to depict various buildings and crowns of flowering trees. Masters of the East managed to turn the main drawback of the eggshell - fragility - into its main artistic merit.
 In general, the decoration of the background with a mesh of cracks is used not only in eggshell mosaics, but also in other decorative crafts. Such a pattern can be seen on pottery covered with a special glaze, or on hand-painted fabric. Regardless of what material they are made on, such cracks are always called craquelure, and the technique of creating a pattern of cracks that creates the effect of antiquity is called CRACKLE.

Unlike eggshell toys, crackle mosaics made from the same material are strong and durable. If you work carefully, carefully finish even small details of a mosaic set, you can learn how to make crafts that are in no way inferior to purchased souvenirs. Eggshell ornaments are used not only for flat objects - all kinds of caskets and wall panels, but also blanks turned on a lathe - vases, pencil holders, decorative dishes and plates.
 Let's try to make a mosaic picture out of an eggshell or, as experienced artists say, a mosaic set. Unprepared raw materials for our mosaic are more like garbage - these are not even whole eggshells, but just their uneven fragments. It is not easy to imagine that facing plates can be made from them, which have a special decorative property and look like ivory. Nevertheless, it is so.
Of course, guys, you will immediately want to decorate a specific thing with a crackle mosaic - decorate a box or a vase with a shell. Take your time. Let's first practice on small boards, and then, having mastered the secrets of the craft, we will do more complex work. By the way, if any educational craft turns out to be very successful, it can be used as the basis for a small wall panel or other souvenir.
You will need:

Before you start work, you need to stock up on raw materials, that is, eggshells.
1. Be sure to rinse the shells in lukewarm water.
2. And then dip into a solution of baking soda in order to degrease their surface.
3. Now it remains only to dry the blanks well.
4. And for the time being, put them in cardboard boxes for storage. When a large number of shells of different shades are typed, we will be engaged in the manufacture of facing plates.
MANUFACTURE OF FACING PLATES
First of all, we will decide which glue is more convenient to use for gluing parts.
The fact is that when using PVA, the quality of gluing is higher, but insufficiently experienced craftsmen often fail to firmly connect the shell to the paper.
Working with "Moment" is easier, but this glue has a pungent odor, and the strength of the connection of parts decreases over time.
If we choose PVA, then it is enough to apply a thin layer of glue on the inner surface of the shells, and when gluing the parts with “Moment”, it is necessary to lubricate both the lining and the shell.
Now we are all set to flatten and smooth the shells.
If you carefully examine the shell of a fresh egg, you can see a thin film lining it from the inside. Upon impact, such a shell will not crumble into separate fragments - its pieces will be held together by an elastic film. Let's use the hint of nature and glue a special lining under the fragile shells, for example, a sheet of thin paper. The blanks supplemented with lining are easy to cut with ordinary scissors - the shells do not crumble into separate pieces. But how to glue semicircular shells to a flat sheet of paper? That's what we need a trowel for.
Lay out the prepared shell with the convex side up on sheets of paper. While doing this work, it’s a good idea to sort the blanks by color - stick only snow-white shells on one sheet, yellowish ones on the other, pinkish-brown on the third, and spotted fragments of quail eggs on the fourth:

Such a division into colors and shades will help us when making a mosaic set.
We cover the shells with a sheet of plywood and slightly press on it - you will hear a slight crackle, and the blanks will be flattened.

If the raw material was glued with PVA, we will hold the plywood in this position for about a minute, and if with the “Moment”, then we will immediately proceed to the next operation.
Take a trowel in your hands and with a little effort iron each piece of the shell.

The blanks will crack into many tiny pieces and at the same time adhere more firmly to the paper. Let's take a closer look - an almost indistinguishable network of cracks covers the shell. These are the same craquelure, which we have already discussed. So far, they do not affect the appearance of the facing plates, and we have yet to develop the crackle pattern.
Facing plates must be covered on top with a protective layer of tracing paper. The protective layer will not only protect the shell from crumbling, but also facilitate the transfer of the working drawing to the material. It is necessary to stick the tracing paper with a paste, it is easily washed off from the surface of the workpieces, leaving no traces. Under translucent paper, it can be difficult to distinguish the color of the prepared raw materials, so we mark each sealed sheet with a small shell of the desired shade. The label will tell us the color of the blanks hidden under the paper.

MAKE A MOSAIC
And now, when we have prepared a sufficient number of facing plates, let's try to make our first mosaic set.
First, we will master the simplest kind of crackle mosaic, and then, having gained a little experience, more complex ones.
The easiest way to stick on the background are the details of the ornament pre-cut from the eggshell. This method is suitable for small jobs where image details do not exceed the size of flattened shells, and a significant amount of space is given to the background.
Now that we have prepared a sufficient number of facing plates, let's try to make our first mosaic set.
First, copy the ornament shown in the figure:

Let's put tracing paper on the page of the book and outline the contours of the image - the working drawing is ready.
It can be used repeatedly - just put a sheet of carbon paper under the tracing paper and circle the lines of the ornament again. When making a mosaic set, the drawing will have to be transferred twice - onto the board, which serves as the basis for the product, and onto the facing plates.
Applying an image to a smooth board is easy - you need to put carbon paper and tracing paper on it, fasten them with buttons and carefully outline the lines with a hard, sharp
sharpened pencil.
The drawing is transferred to small, uneven pieces of the shell piece by piece.
Let's first number all the details of the ornament as shown in the figure - this will help us not to make mistakes when assembling the mosaic.

Now let's put the image of one of the parts of the ornament on the shell and circle it with a pencil.
Let's assign each part a number corresponding to the number in the working drawing.
Having cut out all the parts of the mosaic from the eggshell, grease them on the inside with PVA glue and glue them to the background.
Let's wait for the glue to dry completely and remove the protective layer of paper covering the shells. To do this, slightly moisten the mosaic set with a sponge or a wide brush. Let's wait until the paper softens, and remove it from the shell.
The crackle mosaic is almost ready, and all that remains for us is to color the background and develop the craquelures.
We use black or colored ink for painting crafts.
Our choice is not accidental - the chemical properties of the carcass allow you to quickly and efficiently finish the workpiece. The bile that is part of this dye penetrates into the thinnest, invisible cracks, dragging particles of paint with it, and the shellac contained in them, after drying, ceases to dissolve in water and turns into a kind of cement that holds the tiny shells together.
First, ink on the background of the mosaic set. And then, when it dries, - and an ornament from a shell. When coloring the shells, it is very interesting to watch how graceful dark branches of cracks grow. Here they rush forward, scatter to the sides, branch out, filling the white background with an unusual mesh pattern.
Having shown the craquelures in this way, wipe the plates from the shell with a damp cloth, removing excess ink. After rubbing, the paint will remain only in the cracks, and the ornament itself will again acquire a white or cream shade.
POLISHING THE MOSAIC SET
Sanding a mosaic set is a very responsible operation! The thickness of the shell is small, and careless movement of the grinding bar can easily damage the facing plate.
To begin with, we will process the mosaic set with a wooden block wrapped in the finest sandpaper. Then we start polishing. We need a very simple tool for polishing - a piece of ordinary writing paper.
In the manufacture of paper, substances such as chalk and kaolin are introduced into it, giving it a roughness. With their help, we will polish the mosaic set, which, after a short treatment, will acquire a soft silky sheen, which is especially noticeable against the dark background of the ink-painted board.
Elena Artamonova "Unusual souvenirs and toys"


 And that's not far from perfection.
Egg shells are difficult to scratch with a knife and are close to marble in hardness. It is perfectly ground and polished, acquiring a pleasant soft sheen.
In oriental lacquer painting, eggshells were glued where it was necessary to depict a cracked stone wall or rock. A scattering of small shells imitated the flowering of spring gardens.
The expressiveness of the crackle mosaic is given by the so-called craquelure - cracks that form a bizarre mesh pattern on the surface of various materials.
When straightened, the eggshell breaks into many tiny pieces that do not fall apart due to the thin film on the inside. Many of the cracks formed between the shells are almost invisible. But as soon as they are developed with some kind of dye, the mesh pattern of cracks becomes visible, turning an ordinary eggshell into an attractive decorative material.

Egg shell preparation
The collected shells are dipped for two to three minutes in a five percent solution of baking soda, and then thoroughly washed in running water. Usually, shells from raw eggs are used, the shell that has undergone heat treatment loses its hardness, its surface becomes looser and less suitable for further work. (But: for children's mosaics, you can use any shell, including those from boiled eggs, for example, the one that Left over from Easter eggs.
To use purely mosaic technologies, that is, to create pictures from shell pieces, it is necessary to separate the film from the shell. Dry the shells and their parts, dye them in their entirety (fabric dyes, a number of food dyes are suitable), then store in a dry, clean container, sorted by color. Usually the shell is stained unevenly, which creates a large selection of colors and shades for mosaic work.
To create a mosaic effect or a craquelure effect, the shell is not cleaned of the film, but straightened on a sheet of paper. The inner surface of the shell is smeared with a thin layer of glue, such as PVA (Fig. 1, a). Then the shells smeared with glue are laid out on a thin sheet of paper (preferably colored) and pressed on top with a flat board (Fig. 1, b). After about a minute, the plank is laid aside and each shell is ironed with effort with a wooden trowel (Fig. 1, c). The trowel is a solid wood rod, the oblique cut of which is polished to a shine. Separate pieces of the shell will split into smaller parts that will fit snugly against the paper.

After that, a plank is again placed on top and pressed down with a heavy load (Fig. 1, d). After two or three minutes, when the glue sets, the paper, together with the shell glued to it, is smeared with a thin layer of flour or starch paste. Tissue paper is placed on the surface of the shell smeared with paste and carefully smoothed with palms (Fig. 1, e). A weight is placed on top and the glue is allowed to dry for several hours (Fig. 1, f).
Having pasted all the prepared shells in this way, the sheets are folded into a folder. In this form, they can be stored for a very long time. The advantage of this preparation of the shell is the ability to cut out the details of the future image from the sheet with ordinary scissors.
On a colored or dark background, the silhouettes of the pasted shell are clearly visible even through tissue paper. This makes it possible to correctly navigate when cutting blanks on which the contours of mosaic elements are drawn. The silhouette of the pasted shell is unique, it can give impetus to the imagination of the artist. You can enter the contours of various animals, human figures, buildings, cars, plants, and much more into it (Fig. 1, g). Having drawn on the shell found, for example, the contours of a fish, they cut the shell with scissors around the silhouette, not trying to work out small details. It is easy to cut the shell with scissors along straight and curved lines only from the outside (Fig. 1, h). All kinds of recesses, concave cuts and holes are made with a scalpel or cutter, as well as drills after gluing the shell onto the base substrate.
It is possible to harvest shells having various natural color shades. These colors can be used, for example, when working on a mosaic panel based on ancient architecture. Let's say the master has white, brown and cream shells at his disposal. White shells are suitable for imitating snow, white stone walls, brown for fortress walls and towers, and cream for buildings inside the fortress. This is, of course, an approximate layout.
Shell mosaic direct set
The dyed shell is broken into pieces with tweezers. With the development of the skill, the shell can be broken quite accurately, the resulting elements will have a certain shape - triangles, squares, thin strips. Depending on the creative tasks and the scale of the work, it sometimes makes sense to first prepare the pieces of the shell, sorted by color, and then proceed to the mosaic. For small chamber work, breaking off elements can be done directly in the typing process as needed.
A mastic or adhesive is applied to a thick cardboard or plastic sheet. Then the contour of the picture is drawn. Pieces of the shell are placed with tweezers in place in accordance with the pattern. The work is dried and then covered with a colorless varnish. For quick-drying adhesives, you can use a brush to apply glue to the shell or directly to the place where the element is glued, but this method is more laborious and time consuming.
Making a mosaic by removing the shell

All works are carried out on separate boards, which play the role of the basis of the mosaic set - the substrate. The prepared shell is cut into polygons with straight sides (Fig. 2, a). At the same time, they try to make them, if possible, have right angles. This will make it easier to fit their sticker to the base. One of the sides of the plank is completely pasted over with a shell, carefully fitting the cut polygons to each other. Each polygon is pressed as tightly as possible to the base with a trowel.
Crackle mosaic technology
Then, on the shell glued to the board, the contours of the intended image are drawn with a simple pencil (Fig. 2, b). The figure shows the sequence of execution of a mosaic set with an image of an elephant. In areas where there should be a background, excess shell is removed with various cutting tools. For drilling blind holes, gimlets or a small drill are used. Carving, as well as chipping off the shell, is done with a scalpel or a joint knife. Engraving is done with engravers. Work begins with drilling (Fig. 2, c1), then engraving is performed along pencil lines (Fig. 2, c2), after which they begin to chip the shell in the areas reserved for the background. After finishing mechanical processing, the tissue paper pasted on it is removed from the surface of the shell. Preliminarily, the paper is carefully moistened with water using a brush (Fig. 2, d1). After some time, the soaked paper is easily separated from the shell (Fig. 2, d2). In the places of docking, small seams sometimes remain, into which small shells are glued.
At the next stage of work on the mosaic set, they begin to identify craquelure. In this case, the background is painted in any color, for example, black, dark brown, dark blue (Fig. 2, d3). For these purposes, it is convenient to use ink. The composition of the carcass includes an alcohol solution of shellac, dyes, glycerin, bile and antiseptics. Due to the presence of bile - a surfactant - the mascara easily penetrates into the smallest cracks, dragging all the other components with it. Filling the cracks between the individual shells, the ink not only colors them, but also fastens them together. This is facilitated by shellac, which, after drying, does not dissolve even with water.
For reference: Crackle is a network of thin cracks on any surface, a method of visual aging of interior items with the help of special varnishes, additional processing or the use of shells.
Craquelure (French craquelure) - a crack in the paint layer or varnish in a painting or varnish coating of an arts and crafts object.
After making sure that the mosaic set is evenly colored, remove excess ink from the surface of the shell with a slightly damp cloth or swab (Fig. 2, e1). After waiting for the remaining ink to dry completely, they begin to polish the mosaic with fine-grained sandpaper, reinforced on a wooden block (Fig. 2, e). Grind the surface of the shell very carefully - after all, the eggshell is so thin that in some places it can be easily removed completely. After finishing grinding, sandpaper is replaced with ordinary writing. It also has abrasive properties due to the presence of koalin and chalk in it. The polished surface of the eggshell acquires a soft sheen and vaguely resembles old ivory or marble. The dark matte background emphasizes and enhances the expressiveness of the mosaic set (Fig. 2f).
Mosaic set with mastic background

If the background occupies a significant place in the mosaic set, as, for example, in the composition with the image of owls, then it makes no sense to completely paste over the surface of the decorated object with the shell (Fig. 3, a). After all, about half of the glued shell will have to be removed later. In this case, it is better to paste over with a shell only those areas where the mosaic images will be directly located.
Work on a mosaic set begins with the fact that the prepared drawing is transferred to a wooden base. Then generalized silhouettes are cut out of the shell with scissors and glued onto the base. After the glue dries, the excess shell (it is shaded in our figure) is removed with a scalpel or cutter (Fig. 3, b). Usually, cutter marks degrade the surface of the background, and in large areas this is very noticeable. However, flaws can be removed by filling the background with a layer of special mastic flush with the pasted shell (Fig. 3, c). As a mastic, epoxy glue with a filler of graphite, stone dust, brick powder is most often used. You can paint mastic with any dry pigments, as well as oil paints.
Mastic is carefully applied to areas of the background with a wooden spatula or a sculptural stack. As soon as the mastic has completely hardened, the mosaic set is carefully leveled with a file. Then the mosaic is moistened with clean water. Cigarette paper pasted with a paste on the shell gets wet and easily separated from it. It remains only with the help of a brush and ink to reveal craquelure shells on the surface. If the mastic is colored, for example, in dark blue, then blue ink is also used to develop craquelure (Fig. 3, d). Finally, the set is ground and polished. The entire surface of the mosaic, including the background, acquires an even soft sheen.
Mosaic with multicolor background
The background can not only emphasize the beauty and expressiveness of the material used in the mosaic, but also actively participate in the color scheme of the composition. In this case, the details from the shell will serve as a sort of partitions separating one part of the background from another (Fig. 4, a).

Mastic of three colors - brown, black and red - is prepared in different jars. First, the background areas are filled with brown (Fig. 4, b), and then with dark red mastic (Fig. 4, c). To obtain a mottled background, black mastic is mixed with shells crushed in a mortar (Fig. 4, d). To prevent the mastic from spreading, edges of thin cardboard are glued along the edges of the plank with a mosaic set. After the mastic has hardened, the sides are removed, the mosaic set is carefully leveled with a file and the remnants of tissue paper are removed. The shell is covered with black ink. As soon as it penetrates deep enough into the cracks of the shell, its excess is removed with a slightly damp cloth. After a few minutes the ink dries, and the set is sanded with fine-grained sandpaper mounted on a wooden block, and then polished. The black mottled background of the mosaic will appear to be made from many individual shells.
The use of a shell of one shade or another will depend on the nature of the image and the task facing the artist.
Mosaic on turning products
Woodwork made on a lathe can be successfully decorated with eggshell mosaics (Fig. 6). When turning on workpieces, small indentations of no more than 0.5 mm are pre-selected with a cutter. Mosaic elements are glued to the surface to be decorated, carefully rubbed against it with a trowel (Fig. 6, a). Then the product with the mosaic set glued to it is tightly wrapped with some kind of tourniquet (belt or rope), tightly laying coil to coil (Fig. 6, b). So that the glue protruding from under the shell does not stick to the tourniquet, the product is pre-wrapped with newsprint.

After the final drying of the glue, the tourniquet is removed, and the areas where the shell is not glued are filled with epoxy mastic (Fig. 6, c). When the mastic hardens, start grinding the mosaic set. Grinding can be done directly on a lathe, observing the necessary precautions, or by hand, strengthening the sandpaper on a wooden block with a grooved recess corresponding to the diameter of the workpiece (Fig. 6, d). After identifying craquelure on the shell and subsequent polishing, the wooden parts of the product are painted in a dark color with a stain. In conclusion, the entire product is rubbed with wax mastic or varnished and polished.
Easter is coming, which means that every home will have a lot of colored eggs. So, it's time to learn a new needlework technique: eggshell crafts.
Eggshells are a great material for creativity. And we offer you two options for its use:

Materials and tools for eggshell crafts
- eggshell
- pva glue and brush
- thick cardboard or other surface (box, vase, etc.)
- tweezers
- a small wooden stick, for pressing the shells (a manicure stick is great)
- acrylic paints if the mosaic is made from white shell
- decoupage napkin (if necessary)
First you need to prepare the material. To do this, the collected eggshells are washed in warm water (and for better degreasing, you can even lower them into boiling water with a soda solution). After that, the shell must be dried, the inner film removed from it and sorted by color.
Professionals use shells from raw eggs, because the shell that has undergone heat treatment loses its hardness, its surface becomes more loose. But for children's crafts, you can use any shell, including those left over from boiled Easter eggs.
eggshell mosaic

To make an eggshell mosaic with your own hands, you will need a template for the future drawing. If you have artistic abilities, then simply draw a template on a piece of paper. If not, you can take any drawing intended for coloring in children. All contours are clearly drawn there and usually a large number of colors are not required. Glue the sheet with the pattern on thick cardboard.
Now we start gluing the shell. To do this, grease a small fragment of the picture with PVA glue and put a piece of shell on top. If the shell is too large, then you just need to press on top with a stick, the shell will crack and fall apart into several small pieces. Make sure that there is approximately the same distance between the shells.

Having filled one fragment of the picture, we move on to the next.
After filling the entire pattern, set it aside until the glue has completely dried. If you used a white shell, then only after drying, the drawing can be painted with acrylic paints.
Finished work must be varnished. The result is a kind of eggshell appliqué.
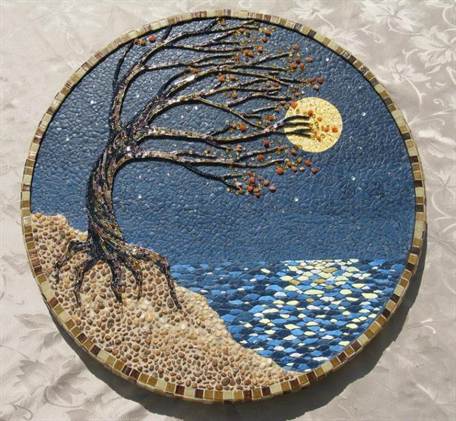
See what wonderful paintings made of eggshells by real craftswomen!


If you decide to do decoupage using eggshells, then first select a blank for future crafts. It can be a box, a key holder, a bottle and even a vase.

Master class on decoupage on an eggshell wooden box

This box is wooden, so first we sand the entire surface (both internal and external) with sandpaper. If you have taken up the decoupage of a bottle with an eggshell, then the surface must first be degreased with alcohol.


It depends only on you how large the pieces of the shell will be and the distance between them.

We fill the entire surface in this way.

And once again cover everything with a layer of PVA glue.


After that, we cover the entire workpiece in several layers with white acrylic paint.

And we move on to gluing the napkin, that is, directly to the decoupage itself.

Let me remind you that three-layer napkins are usually used for decoupage. We only need the top layer - the one on which the drawing. Lubricate the work surface with PVA glue. If the surface is very large, or you are working with rounded objects (a vase, a bottle), then it is better to cut the napkin into two or three fragments. We apply a napkin element to the surface and immediately apply PVA glue on top. We draw a brush from the center to the edges to expel the air from under the napkin.
Thus, we glue the box on all sides.

Set aside for a while to dry completely.
And then - two options (depending on your imagination). The finished work can simply be varnished. And you can also age the box. To do this, you can ask the shells with silver acrylic paint, and apply black pastel to the edges of the box with a foam sponge.
Easter is coming soon, which means people will paint eggs and go to visit each other with them. Then we invite you to master a new type of needlework - do-it-yourself eggshell mosaic, a master class is attached. Egg shells are a great crafting material. Today we will analyze a few master classes that will allow you to understand how to work correctly in this technique.
Preparation for work
We collect the eggshell, put it in a deep container. In the meantime, prepare a 5% solution of baking soda. Fill them with shells and wait 5 minutes. Then we drain the liquid and wash the shell under running water.
It is best to use shells from raw eggs, because when cooked, they lose their rigidity. For example, any shell is suitable for children's crafts.
To make a picture using the eggshell technique, you must first remove the film from it. Leave it on the tray for a while to dry. Then you need to color in food coloring. After that, we clean them in plastic containers, having previously sorted them by color. Due to the fact that the shell is not always evenly stained, with it you can depict not only pictures, but also, for example, make beautiful decoupage on a bottle with any drink. It will not be a shame to present such a gift to your friends on any of the holidays.
egg painting
- eggshell;
- PVA glue;
- Brush;
- Cardboard (or any other surface, everything will depend on what exactly you want to do);
- Tweezers;
- Wooden stick;
- Acrylic paints;
- Napkin for decoupage.
Step by step instructions for doing the job:
- First you need to make a template according to which the eggshell will be laid out. Draw it on a plain sheet of paper, or if you don't know how to do it, just take any drawing and print it out.
- On a sheet of cardboard it is necessary to glue a sheet with a pattern.
- We proceed to the application of the shell. We do it as follows: grease a small area of the picture with glue and lay the shell on it. If the size of the shell is very large, then take a stick and press it on it. Because of what it will crack and crumble into several small fragments. The distance between the shells should be the same.
- With this action, we fill the entire drawing completely.
- We clean in a place inaccessible to children and wait for complete drying.
- After the drawing is completely dry, decorate it with paints.
- At the end of the work, it is necessary to cover it with varnish.
On this master class came to an end.

simple flowers
To work, you will need the following tools and materials:
- Plain sheet;
- Simple black pencil;
- A set of felt-tip pens;
- PVA glue;
- Ready-made eggshell;
- Watercolor paints;
- A set of brushes;
- Non-spill;
- Wooden skewer.
The technology of work is as follows.
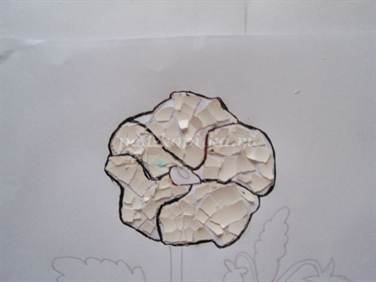
We draw a sketch on a regular sheet, in our case these are violet flowers.

After the drawing is completely ready, we move on to the technique itself. Lubricate the flower petal with glue, as shown in the photo.

Lay the egg shell on it. For this action, it is better to use a whole shell. We lay it so that it covers the entire surface that was smeared with glue.
From a slight pressure, the shell cracks, thereby filling the pattern. Just be sure to see that the pieces of the shell are broken into more uniform pieces.

For a more even laying, you can use a wooden skewer.

We circle the finished petals with a bright felt-tip pen, we chose black. This is necessary so that the border of the petals does not merge.

Do the same with the other petals.

After the flower is completely ready, outline it with a contour.
We do the whole drawing in the same way.


Here, the picture is almost ready.

In a small small bowl, you need to grind the eggshell into a fine powder.
We coat all the details of the drawing with glue, and sprinkle with shell powder on top. Thus, we fill in the empty spaces that were formed during the work.

Let the painting dry completely. Then we move on to painting. This will require brushes, paints and a non-spill.
We color according to the sketch, which was originally transferred to a plain sheet of paper. We had it like this: one of the colors is yellow, the second is blue (purple). Let the painting dry completely. And we apply different shades on the petals themselves.
Eggshell can act as a material for making unique works of art. This skill can be the perfect solution for starting your own business.
eggshell mosaic
Previously, in the East, eggshells were used to translate creative ideas. Talented craftsmen turned this waste into a one-of-a-kind material from which they created masterpieces. The shell is a very fragile material; when working with it, original cracks form. This allows you to create patterns with the effect of antiquity, which are called "crackle", and the cracks themselves - "craquelure".
The creation of such a mosaic refers to scrupulous work and requires high skill. Although the pattern is created from a fragile material, the end result of its manufacture is quite durable, and can last for many years. Any person who expresses a desire to perform a simple mosaic can create a real miracle if he takes this creative matter seriously, taking the time and showing accuracy and diligence.
Eggshell is an excellent material not only for creating mosaics on flat surfaces, but also for decorating household items that have a variety of shapes - vases, dishes, stationery stands, plates.
Just imagine that you can create unique masterpieces from this "garbage". This facing material has a unique decorative property and most of all resembles ivory on the finished product.
Materials that will be needed for work:
shell of chicken eggs;
base (plywood, chipboard, thick cardboard);
PVA glue or "Moment";
paste made from flour;
tracing paper;
paints;
sandpaper;
scissors;
cloth for cleaning shells from glue;
solid wooden stick with an absolutely smooth cut.
Technological process
To do a beautiful job, you need to have enough material available. The shells are thoroughly cleaned of egg residues, degreased in a soda solution, and then dried. In this form, they can be stored in dry and clean cardboard boxes until a sufficient amount has been collected to allow experimentation in the creative process.
Where can I get money to start my own business? This is the problem faced by 95% of new entrepreneurs! In the article, we have revealed the most relevant ways of obtaining start-up capital for an entrepreneur. We also recommend that you carefully study the results of our experiment in exchange earnings:
It is necessary to decide on the choice of glue. As mentioned, you can use PVA or "Moment", but in each case there are some nuances. Both adhesives will firmly bond the shell to the surface you place it on. But, using PVA, it will be enough to apply glue only to the shell or to the base. And when working with Moment glue, it will be necessary to spread both the shell and the base, and only then connect them. The second option, like the first, will provide high strength of the finished product, but you will have to endure a pungent odor.
The next step in the work is flattening and smoothing. Examining the eggshell, you can see a thin film on its inside, which serves as a bonding material. This means that if you crush the shell, it will not crumble into small fragments, but will only break into particles connected by this film. It is very good to work with the shell glued to any base, for example, to a paper sheet. It is convenient to cut such particles with ordinary scissors into the necessary pieces - the shell does not crumble.
The work of fixing the shell is a very long and monotonous process. Its essence is to sort the source material by color, separating each shade, gluing the shells on separate sheets. For example, we lay out the snow-white shell and glue it on one sheet, with a yellowish tint on the other, and brownish on the third.
Such a color distribution will allow in the future, when compiling a mosaic, to quickly choose exactly the shade that is needed. When the gluing work is over, it is necessary to cover each sheet with plywood and press on it without applying much force. Under pressure, the shell will crack and flatten. It is necessary to continuously press the plywood onto the sheet for one minute in the case when gluing was carried out using PVA glue, and only a few seconds if Moment glue was used.
Before starting a business in this business, it is necessary to study the points of sale well and calculate the final income from the products. It should be noted that it is recommended to take on such work for those people who have a well-developed creative potential. Having gained initial experience and skills in this area, you can implement your work around the world. The profit from such goods is quite high, and a person who opens his own business will not regret that he devoted time and money to this kind of creativity.
Examples of photos with works from eggshells:


