Recently, the use of aged wood in furniture and interior decoration has become fashionable. Even the simplest cheap wooden furniture will look stylish and expensive after it has been artificially aged. This article will reveal several simple and not very expensive ways to age wood with your own hands for furniture and other wooden products.
Under natural conditions, wood ages under the influence of sun, wind, rain and other phenomena. And this process occurs over a long period of time. We will make the process of aging wood artificial, which will significantly reduce the time and improve the final result. If we describe the whole work briefly, it will consist of two stages: mechanical processing of the wood (light damage, removal of soft fibers) and painting with varnishes and paint.
To age wood, you will need:
- hard metal brush;
- circular brush;
- large and small skins;
- savvy;
- several brushes;
- wood antiseptic;
- white spirit;
- dark Pinotex or dark Belinka azure;
- white Belinka azure;
- big sponge.
With a set of these tools and materials, we can age wood in five different ways. Let's take a closer look at each of them.
The first way to age wood is to remove soft fibers and paint

You can artificially age a wooden surface using a hard brush, which removes soft wood fibers and thus creates a relief, the lines of which will be emphasized by the color of the wood.

The wooden surface is first sanded, then it is processed along the grain with a circular brush (using a special attachment for an angle grinder) or a metal hand brush, as a result of which soft wood fibers are removed from the surface.

Sawdust is removed with a special brush with soft bristles, but in no case by hand to avoid splinters.

The tree instantly changes its appearance, acquires a beautiful relief and contrasting color, which is specially emphasized by painting in two layers.

For painting, use translucent Belinka glaze, which is applied to the cleaned surface using a brush or roller.

The tree will already have a rather attractive appearance.

After a few minutes, take a sponge and use it to carefully remove the layer of glaze, as a result of which the wooden surface acquires a relief. You can leave the surface as is and cover it with clear varnish if you like the color of aged wood.

But if you want to add a Provence style to the coloring, then another thin layer of Belinka white glaze is applied on top of the first layer.

After a few minutes, we carefully remove the fresh azure with a sponge, as a result of which we get bleached aged wood, with the help of which we create a stylish interior a la Provence. When the glaze is completely dry, the surface can be coated with varnish having the same base as the glaze, or another layer of colorless glaze can be applied.

This method of aging wood is ideal for beams and other elements of wooden structures to create an antique style.
The second method is the relief of antiquity and multi-layer painting of wood

Using this method, the wood is specially given the appearance of an old, antique thing, worn out by time. For this purpose, multi-layer painting of wood is used.
First, the surface of the wood must be specially subjected to all kinds of minor damage: it is beaten with a hammer, pierced with an awl, torn with a saw, sealed with screws or steel rods, and everything possible is done to give it the relief of antiquity.

Then the surface is primed with a layer of Pinotex. After it dries, it is covered with a continuous thick layer of tinted paint (antiseptic).

Since Pinotex has a thick consistency, it can be applied unevenly, as it is much thicker from Belinka glaze. It is used in cases where it is necessary to create a thick bottom layer on aged wood.

Belinka's glaze is more liquid; it spreads easily and evenly over the entire surface of the wood, creating an even surface color.

When the first layer has dried, it can be intentionally subjected to minor damage: rub it with fine or coarse sandpaper, or brush it with a wire brush. The main thing is not to overdo it. The amount of time spent here should be minimal. According to experts, the most reliable effect of antiquity is achieved by painting with Pinotex in an uneven layer.

After the procedure of deliberate aging by scratching with sandpaper or a metal brush, a translucent layer of white glaze is applied to the surface so that the dark lower layer is visible through it. It is not necessary to apply the paint in an even layer.

After the top layer has dried, use a metal brush to scrape off the top layer of white glaze using longitudinal movements, resulting in a relief pattern of aged wood. This pattern has a very contrasting color, which is very far from the natural color of aged wood. To bring the color to a more perfect tone, you need to make it a little muted. To do this, the white glaze is diluted halfway with white spirit and the wooden surface is covered with this mixture.
Aged wood, created on the basis of Belinka glaze, has a calm, warm tone after final processing. Pinotex gives a more interesting decorative effect, with a deep dark base color. It is used in creating aged furniture, as well as in finishing elements.
The third method is brushing and white glaze

This method of aging wood is the easiest and fastest. The wooden surface is treated with a wire brush, then covered with a layer of white glaze.


After the glaze has dried, the surface is again treated with a metal brush. As a result, we have a bleached wooden surface, slightly aged with a relief pattern from a metal brush.
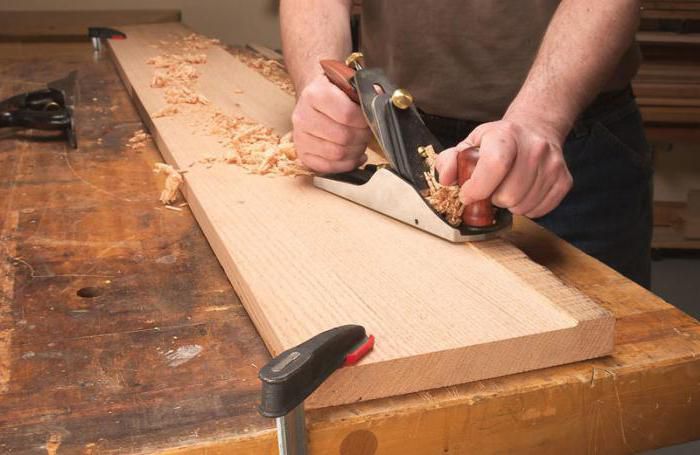
Master class: “How to age wood?”

Let's look at another way to age wood with your own hands. The photo above shows the stages of the work, and below I will describe them in detail.
1. You need to choose the right wood for aging. You should not choose young wood; due to its small fibers, it has no decorative value. Resinous wood will be difficult and long to process. The tree must have a pronounced structure and healthy knots.
3. Using a chisel, you need to make shapeless notches on the edges of the board, as if using an ax.
4. To remove soft wood fibers, you can use a drill attachment with hard nylon fibers. At the same time, you should not be too zealous and put pressure on the tool; the pressure should be light so that the efficiency of the work does not decrease. You can also use a metal brush for processing - in this case the result will be rougher.
5. You can add the effect of wormholes, but this is not for everybody. Using a core or a blunt nail, we make holes 1-2 mm deep.
6. Now you need to clean the surface and open it with Pinotex Uitra paint-varnish. This coating will be resistant even to atmospheric conditions. You can also use Senezh aquadecor.
7. After the paint has dried, the surface needs to be sanded with fine sandpaper No. 80. The result will be a very beautiful effect when the depressions in the wood remain dark and the protrusions are light, that is, we will highlight the volume and structure of the wood.
8. The final stage is re-opening the redwood.
Aging wood with fire
You can age wood with a gas burner.
And here there are three main ways:


1. Aging without preliminary mechanical treatment of wood. That is, we simply emphasize the texture of the wood by burning it. Then we go through it with fine sandpaper and open it with varnish.


2. First, the wood is mechanically processed - soft fibers are removed, and then fired. This method will give the tree a relief and volumetric look, which will certainly look chic.


3. Intensive burning of wood, which will burn out soft wood fibers and subsequent mechanical treatment with a stiff brush.
Finally, I want to give some advice:
- Aged products made from old boards will look more beautiful and impressive. If you don’t have such material, ask your neighbors or friends; often you can get such material completely free of charge, and it will be much easier to work with.
- Different types of wood will age and stain differently when using the same materials. This must be taken into account when assembling wooden structures.
- Now in stores you can buy ready-made aged boards without performing the operations described above.
Artificially aged wood is a unique finishing material. Practical, inexpensive, fully retaining its strength characteristics, but at the same time possessing original beauty and antique charm. The scope of application of such wood is wide: interior design, furniture manufacturing, finishing of facades, gazebos, stairs, even fences are made from it. The most important thing is that wood processing does not require special knowledge or experience, and anyone can do it. Let's take a closer look at how to age wood on your own, and what you need for this.
There are three effective ways to age wood - mechanical, chemical and thermal. Depending on the chosen method, the end result has certain differences.
The mechanical method includes two types of processing - brushing and patination. Both types can be used together or separately, depending on the material and the desired result:
- brushing - the surface is treated with a wire brush to remove soft fibers and expose the annual rings. As a result of this treatment, the top layer acquires a pronounced relief, which is further emphasized by applying glaze compounds. This method is the most labor-intensive and is used mainly for hard wood - pine, larch, spruce, oak, walnut;

- patination – surface treatment with coloring compounds followed by polishing. It is used for soft species, as well as wood with a weak texture - maple, cherry, beech and others. Wood wax and stain can be used along with paint to give a brighter pattern.

The chemical method involves treating the top layer of wood with various compounds that change the color of the fibers. Ammonia and products containing alkali, such as stove or drain cleaner, are suitable for this. This method can only be used for species containing tannins, that is, deciduous. Chemical treatment of coniferous wood will not give the desired effect.
The thermal method involves burning wood with a gas torch or blowtorch. The type of tree does not matter. They do not burn it too much, just so that the texture of the fibers appears more clearly, and then remove the carbon deposits with a metal brush. Next, cover the surface with stain or varnish to give the wood a more decorative appearance. In general, the process is not complicated, but it requires caution and compliance with safety precautions.

Brushing technology

Tools and materials for processing
During the work you will need:
- hand plane;
- chisel or small hatchet;
- steel brush;
- Angle grinder with brush attachments;
- sandpaper, coarse and fine;
- paint brushes;
- dense sponge;
- tinting antiseptic for wood (for example, Pinotex);
- white azure;
- soft bristle brush.


Prices for cordless drill/driver
Cordless drill/driver
Rough cleaning should be done with a steel-bristle nozzle, but for finishing, nylon and copper are better suited. There is a special attachment called “Piranha”. It is a polymer-abrasive brush that can effectively remove soft fibers from the surface and leave hard ones. The grinder can be replaced with a drill; such attachments are also available for it. As a last resort, you can get by with hand tools, but this is time-consuming and tedious.

Piranha brush
The wood should be dense, strong, not damp. Resinous boards should also not be taken, as the resin makes processing difficult. The presence of knots is welcome, as they make the design more pronounced and decorative. If you have no experience in such work, take a small piece of unplaned board or timber, up to half a meter long.
During such work, a lot of fine dust is always generated, so it is best to do it in the fresh air. If the weather does not allow it, take care of the possibility of ventilating the room and be sure to prepare a protective mask or at least goggles.
Step 1. The workpiece is laid on a flat surface and processed with a hand plane. It is better not to use an electric tool, as it leaves small transverse stripes, which reduces the naturalness of the design.
Step 2. Using a chisel or the corner of an ax, you need to make random, shallow and shapeless chips across the entire surface to give the material a rougher appearance.
Step 3. Now you need to remove the soft fibers with a wire brush. The brush should only be moved along the grain, pressing the tool firmly against the board.


Advice. To reduce dust formation, it is recommended to slightly moisten the surface of the workpiece with water. But before sanding and impregnation, the wood must be dried.


Step 4. When the relief begins to appear, the manual brush is replaced with an angle grinder with a metal brush, and work continues. The nozzle should be positioned perpendicular to the surface being treated, movements should be made strictly along the fibers. If you don’t need too rough a texture, immediately use a Piranha brush or a nylon-bristle attachment and do not press too hard on the tool while working. Go around the perimeter of wormholes and knots in the tree to emphasize the contours.


Step 5. Use a soft brush to sweep away the resulting dust, and then begin sanding. You can sand the wood manually or using a grinder, the main thing is to remove protruding fibers and sharp protrusions. Finally, clean the workpiece from dust again.
Step 6. Now the material needs to be given color. To do this, the surface is first coated with Pinotex primer, which is applied with a brush along the grain. You can use both stain and dark azure - any coating with color that will not hide the texture.

Step 7 After applying the composition to the workpiece, give it a few minutes to absorb, and then carefully wipe off the top layer with a sponge. There is no need to rub hard, just smoothly move it 2-3 times along the fibers. After this, all the recesses will remain darker than the protruding edges, and the relief will appear more clearly.


A distinctive feature of good quality stains is that they reveal the texture of wood


Then there are two options: leave this color and cover the wood with a transparent varnish, or add another layer and give the material the appearance of old bleached wood. The second option is suitable for processing elements in the Provence style. To do this, you need to wait until the impregnation is completely dry and apply a very thin layer of white glaze with a brush. After it has dried, the wood is lightly sanded with the finest sandpaper, cleaned of dust and coated with colorless varnish.

This method is also used: after brushing, the workpiece is covered with a dense layer of white glaze, dried and brushed again with a metal brush, but now not so intensively. Finally, a layer of clear varnish is applied.

Applying white paint


To make dark wood rather than bleached wood, instead of white glaze, the surface is thickly covered with stain or Pinotex, and the layer is made uneven. Next, use a brush or sandpaper, depending on the finish you want. Sanding produces light, blurry abrasions, but after brushing, rough grooves remain and the wood looks more brutal.

Prices for different types of stains
How to do patination
Primary processing is carried out using the technology described above: soft fibers are removed, relief is given and the surface is polished. Only after this the workpiece can be patinated.
Step 1. Take any wood primer and carefully apply it to the wood with a brush. The primer should penetrate well into all grooves and recesses. Allow the workpiece to dry.

Step 2. Apply the first coat of paint. Acrylic paint is best suited because it is not prone to peeling, adheres well to the surface, and does not leave streaks.


The choice of color depends only on your preferences; you can take any shades, the main thing is that they are rich and contrast with the patina shade. The paint is applied with a brush, evenly distributing the composition in a thin layer. The base coat must dry completely, so take a break from working for a day.

Step 3. Sand the workpiece with fine sandpaper. Wipe off the dust and apply a layer of patina with a brush. It is best to choose a patina for wood in the color of bronze or gold, with a metallic tint. Here it is not necessary to distribute the paint evenly; on the contrary, the difference in coating density will only emphasize the aging effect.


Step 4. When the patina begins to set, you need to take a dry cloth and wipe down individual areas. After the paint has dried, the wood is coated with clear varnish.


Types of patina for wood
| Type of composition | Characteristics |
|---|---|
| Water-soluble composition, characterized by slow drying, odorless and a wide variety of shades. Easy to apply and shade, ideally highlights the surface texture |
| A very thick composition with a pearlescent sheen. Apply to protruding areas with a dry brush, and to recesses with a sponge. Easy to rub and gives maximum antique effect |
| The composition is dark brown, most often used to shade relief. Easy to apply with a brush, does not smear, wipes well with a soft cloth |
| It has a paste-like consistency and is applied with a dry brush or thick cloth. It is considered the most optimal option for patination of wood |


Thermal aging
First of all, take care of safety precautions. When burning wood, there should be no flammable objects or liquids nearby, and it is better to generally carry out such work in the fresh air. Be sure to check the serviceability of the burner or blowtorch.
Prices for various types of gas burners and blowtorches
Gas burners and blowtorches
Step 1. The workpiece is placed on a non-flammable surface or placed vertically, after which it is fired with a burner. The material is processed as evenly as possible, the top layer should be charred approximately 2-3 mm in thickness.


Step 2. After cooling, the charred carbon deposits are removed manually with a brush or using a grinder. The intensity and duration of this treatment depends on the desired texture.

Step 3. Having formed the desired relief, take the grinding attachment and process the workpiece again. Here it is important not to overdo it and not remove excess, otherwise the aging effect will be insignificant.
Step 4. Since the color of the wood changed during firing, dark and light areas appeared, there is no need for painting. Now all that remains is to coat the material with colorless varnish or protective impregnation.

The use of chemically aggressive substances requires special care and precision in work. Protective gloves must be used and the room must be well ventilated. The workpiece is pre-treated with coarse sandpaper and wiped from dust. Then apply alkaline agents or ammonia with a brush and leave for several hours. To slow down drying, you can cover everything on top with film. Under the influence of ammonia and alkalis, the surface acquires a gray tint, characteristic of old weathered wood.

When the color of the workpiece has completely changed, it is rinsed with water and then wiped with a vinegar solution (a tablespoon per glass of water) to remove the remaining alkali. If ammonia was used, a vinegar solution is not needed. After drying, the wood is brushed, sanded and a protective coating is applied. There is no need to paint such material, because then there is no point in chemical processing, and it is easier to do everything mechanically.

External use of aged wood
This decorative material is perfect for decorating rustic-style facades. First of all, this is the German half-timbered style: the original decoration of the walls involves the use of wooden beams of rough texture, giving the building a characteristic appearance.
Country-style finishing also allows for the use of aged wood: the cladding itself, shutters, entrance doors, as well as decorative elements.


Railings, steps, support pillars at the porch - all this can also be made using the described wood processing methods. After practicing on small pieces, you will be able to handle any surface without much effort. Of course, large-volume elements, such as house trim, are not so easy to process manually, but there are special machines on sale for this purpose. The most important thing is to have the desire, and then everything will definitely work out.
Video - How to age wood
Video - Patination of wood
Video - Aging wood by firing
Video - Chemical method of aging wood
Find out how to age wood with your own hands in the loft style at home with your own hands and you can use it anywhere in production: for a wooden kitchen, Provence furniture, tables, etc. This makes a wonderful color that will enhance the decor of any home! The use of modern wood in the design is, perhaps, a win-win option.
This is an incredibly attractive, breathable, pleasant to the touch natural material. It has a beneficial effect on the formation of the microclimate in the home, has bactericidal properties, and is useful for human energy. Wooden ceiling beams and individual decorative elements will look great in any room.
This wonderful material lends itself perfectly to a variety of types of processing.: It can be left natural, painted, aged, and much more.
There is no specific, unambiguous answer to this question.
This procedure is carried out for different purposes, most often these are:

How to make wood look old: brushing
There are many different ways to process wood to achieve the desired result. Brushing, or texturing, is one of the most actively used.

The word brush is of English origin and means brush. From this comes the name of the technique, which consists in using the mentioned object to remove soft, pliable fibers of the material. Very similar processes occur as a result of natural aging, but in this case they take a fairly large amount of time. This method is considered the closest to natural changes occurring in the material.
With its help, wood acquires a distinct woody texture.
What kind of wood can be aged: species
It is quite possible to give the surface of a wooden material an aged look using brushing on your own, at home. The problem is that not every type of wood is suitable for such processing.
Maple, cherry, beech, pear, and certain varieties of exotic plants do not lend themselves to this method of aging.
 It is also not suitable for products and surfaces made of MDF. What to do if there is no suitable material available? You will have to use a different method, chemical. Coniferous wood is best processed mechanically.
Brushing is a rather labor-intensive procedure. The main tool for its implementation is an elastic and durable metal brush. You won't be able to quickly change the appearance of a tree with its help, so you can speed up the process.
To do this, you will need either a drill with a special brush made of hard wire.
It should be noted that the use of electromechanical tools for wood processing can be very unsafe. The fact is that during the event quite strong vibrations occur, which can cause not only wood chips, but also metal elements to tear off and suddenly fly off.
Therefore, it is important not only to know how to age wood, but also to be able to do it safely, without risking your own health. All activities are carried out in a special protective suit; eyes must be covered with camouflage goggles or a face shield. The airways are closed with a special respirator.
Chemical treatment during aging process
 Is it possible to age wood by hand without using special devices and tools? You will need coarse sandpaper to clean the surface. Ammonia (ammonia solution) is applied to the prepared material, which makes the wood noticeably darker.
Thanks to this treatment, the wood texture becomes more distinct, while the noble darkening gives the material a touch of refined antiquity.
Such processing can be superficial and fairly light in nature.. In this case, a polymer coarse brush is used. If the tree is subjected to deep processing, even the annual rings of the wood become noticeable.
 Chemical method
 The main thing is not to overdo it when performing this operation. Otherwise, the result of the effort spent will not be an elegant textured surface, but loose, indefinite wood.
Regardless of the chosen processing method, after rough initial cleaning, the wooden workpiece must be restored to its original aesthetics. Irregularities and burrs are carefully removed from the surface of the object, then using a special abrasive brush. Then the material is further lightened and given a gloss, for which thin sandpaper is used.
Aged wood effect: patination
Mechanical processing alone is not enough to achieve the desired effect of aged wood. What to do with the material next? You can coat the product with one of the types of varnish. The material looks very interesting after special processing - patination. It allows you to make the surface of the material even more embossed. Patina is a peculiar, unique gloss acquired by a material over time.
 Applying patina: the process
 Recreating it with your own hands requires considerable effort, and is carried out in several separate stages. What is the patination process?
This is the application of special stains and compounds to the surface being treated. In each case, they are selected individually, in accordance with the desired shade and color of the product.
The compositions should be applied in such a way that they end up in the pores of the wood, which open during mechanical processing.
The essence of this method is to make the deep pores of the material appear contrasting and dark against a lighter background. To carry out this procedure yourself, you need to choose a paint that matches the color. The prepared surface is completely painted over, and, without waiting for complete drying, part of the top layer is removed with a cloth or sponge. This wood looks noble and looks like antique wood.
But patination is not the only way to achieve a similar or similar result. It is absolutely wonderful to age products using special enamels. This method will allow you to get a real work of art that looks little different from a genuine antique.
 A layer of enamel of a certain color is applied to the surface. When it dries, it’s time for the next coloring. For secondary application, you will need a composition of a different shade and a more liquid consistency.
When the treated rock has completely dried, its surface can be easily processed with sandpaper. In some places the initial layer appears, forming elegant abrasions.
Toning and varnishing
The patination process must be completed by tinting. To carry it out, you will need special compositions containing resins and natural ones. As a final finish, treated wood is coated with a double or triple layer of varnish. After drying, the surface is treated with a soft cloth to give it a special shine.
 This varnishing consolidates all previously carried out manipulations and gives the product a finished, finished look.
And although the process is quite complex and time-consuming, anyone can master the art of working with wood.
The main thing here is to carefully study the technology, understand the sequence of steps, and strictly follow the instructions.
Secrets of high-quality brushing: how to age wood
How to competently carry out the brushing process so that the resulting result is pleasing to the eye? You need to know some of the nuances of the process.

Aged wood: use in the interior
 Wood treated in a special way cannot be found in every home. The fact is that it is not enough to simply age the wood.
The ability to correctly use it for interior design is of great importance. But the use of the described brushing method allows us to produce completely unique products, actually exclusive.
These can be individual pieces of furniture, or entire sets and sets.
Chests of drawers, candlesticks, bookshelves, antique sideboards, frames for mirrors and pictures, country furniture and kitchen units look especially interesting. This method of wood processing is excellent for making individual doors and partitions.
The wood brushing method is great for giving special effect to flooring and parquet boards. Often this material is used for designer decoration of the walls of saunas or home baths, billiard rooms, retro cafes, bars and non-standard premises.
 Set of chairs and tables
 Various methods of wood aging technology are no secret today. Throwing- not the only method, there are others. They differ from each other in the amount of time required to carry out the process, as well as the complexity of the technology. But no matter what method is used to achieve the desired effect, in any case, aged wood is capable of creating a completely unique atmosphere of warmth and comfort in any room, and ennobling the interior with the sophistication of antiquity.
How to age wood at home? This wood finishing technique is popular among gardeners, designers and self-taught craftsmen. With its help you can create a unique interior and exterior design.
This article is intended for persons over 18 years of age
Have you already turned 18?
How to age wood: main points
To add age to a tree with your own hands, you need to know how to work with natural materials and stock up on tools. Tools you need to have:
- metal brush;
- electric or manual plane;
- sandpaper;
- Bulgarian
In addition to the tools listed, you must also have dust protection. This could be a respirator or goggles. Since there will be a lot of dust during the creation process, you should think about ventilation methods. It is advisable to carry out this work outdoors. If this is not possible, then it is recommended to slightly moisten the wood before abrasive treatment. But before opening the varnish it must be dried. Also, do not forget that it is strictly forbidden to sweep away the resulting dust from the surface with your hands, in order to prevent the appearance of splinters. You should also not touch the surface with your hands in order to feel its relief. This can only be done after the dust has been completely removed.
In the interior, this technology is used very often. It combines well with stone, metal and ceramics. Without it, the Provence interior style is unthinkable. But then special painting of the boards is required.
Aged wood is used inside the home for steps, benches, and to create a designer lamp or dresser finish. It can be used to make furniture, such as a table or chairs. It also makes unique boxes. There are many ways to use old wood in the interior; the choice depends on the design style and aesthetic tastes of the owner.
Artificially aged wood should resemble as much as possible natural wood that has been exposed to sunlight, wind, rain and other natural phenomena. Therefore, here it is necessary, if possible, to use only hand tools and manual processing of the material. It is also important to choose the right varnishes and paints for the external coating. Today there is a huge range of them, so it is important to make the right choice depending on the desired result.
To achieve the antique effect at home, it is recommended to first practice on a piece of wood. This will allow you to evaluate the result and avoid mistakes. For training, you need to take the type of wood from which the entire structure will be made in the future.
To make a beautiful and durable wooden structure with an antique effect, it is important to choose the right type of wood. Coniferous trees are not suitable for this idea, as they contain resin, which interferes with the creation of the effect. It is also worth giving up birch, cherry, maple, pear, and juniper. It is better to pay attention to ash, larch, oak, wenge, merbau, and doussia.
In order to properly create the effect of aging wood, you need to take old boards. They are the easiest to machine and absorb paints and varnishes well. It is desirable that they have knots. This will add even more beauty to the craft. If you don’t have such boards in your house, you can ask your neighbors or friends. Surely someone stockpiled these, but didn’t find a use for them. You can often get them for free. Young wood does not have many fibers, so it is difficult to process; it is better to leave it until the right time.
A master class on creating aged wood can be easily found online. There are many videos and detailed descriptions of the process. So don't worry if you have no experience working with natural materials. In just a few hours of studying the information, you can understand the essence of finishing and choose the simplest and most beautiful method for yourself.
There are many ways to create the aging effect. Among them are the simplest ones, which take several hours, as well as more complex ones, which require several days to produce. Everyone chooses for themselves, based on their stock of tools and the expected result. There are ready-made boards with an antique effect on sale, but the process of creating them at home is much more exciting and enjoyable.
How to age wood with paint?
Painting is a necessary part of all methods of creating aged wood. If paint is not used, then the outer layer is covered with clear or colored varnish. This is to protect the outer layer and give it a nice texture. Translucent Belinka glaze is the base on which other layers of paint can be applied. It covers the surface after mechanical treatment. Before coating with varnish or white paint, the surface must be treated with a soft brush to give relief. A colorless varnish is applied to the slightly dry paint. This results in wood with a slight antique effect. It comes out light in color and without gross damage.
If you like aged aggressive effect, then you can’t do without multi-layer painting. Also here the boards should be subjected to all kinds of damage: beaten with iron rods, scraped, holes made with an awl. If you want to completely achieve naturalness, then you can make wormholes, but this option suits the most daring and creative.
Tree, Painted several times, it acquires a deep color. Pinotex is often used for priming; it covers the surface unevenly. It also serves to create a thick color for the lowest layers of the board. After it has dried, you need to make minor damage to the surface and begin further processing.
Usage white paint is welcome in some cases. It will help create a craft in the spirit of Provence and give it a beautiful shade. Since it can give a glossy sheen, it is recommended to dilute it with white spirit.
How to age wood in Provence style?
To create an interior in Provence style, you cannot do without old white boards. They have a variety of purposes: used for shutters, furniture or steps. After the main coat of primer, the surface is covered with white paint. It does not have to be applied evenly. After drying, you need to brush it to further achieve the antique effect.
Loft involves the use of gray aged boards, reminiscent of concrete as much as possible. They can be made gray using acrylic paints of the desired shade.
How to age wood with your own hands in white?
If you need to paint the board gray, you can do without paints. The chemical aging method involves the use of alkaline agents or ammonia. Using this method, you need to take care of your safety: wear a mask and gloves. After treatment with alkali, the future product can be covered with film to reduce the drying speed. When the craft is dry, traces of alkali should be removed: to do this, it must be rinsed with a vinegar solution and treated with a brush. The last stage is coating with colorless varnish.
How to age wood using decoupage technique?
To make cracks on a product using the decoupage technique, the surface is treated step by step with special paints. For the first layer, you need to take paint that will be visible through small cracks. Next you need to apply craquelure varnish to the dried first layer. It should be applied in a thick layer. After waiting for almost complete drying or speeding it up by drying with a hairdryer, you need to apply the top layer with confident strokes. For small cracks, it is recommended to dilute acrylic paints. Craquelure on a craft can be considered ready after the paint has dried (30-40 minutes).
How to quickly age wood?
The fastest way is to heat treat the wood and then varnish it. A blowtorch or torch will help achieve the desired effect very quickly. The top layer of burning must be removed to make painting easier.
How to age wood with patina?
Aging wood with ammonia is a cheap way to achieve a patina effect. You can also use special paints with gold, bronze or silver particles to enhance wood. You can also achieve patina with stain. It is used for full or partial patting. The stain will protect the wood from moisture, fungus and mold. Of the disadvantages of its use, only one can be highlighted - the result is only a dark color.
Aged wood effect
Imitation of wood damaged by the sun and rain is popular for decorating country houses and modern apartments. You cannot do without such wood when creating certain styles in the interior. It is also successfully used for decorating facades.
When choosing a suitable room design, it has become fashionable to give wood products an antique effect. There are several technologies that will visually add age and make decorative details uniquely handmade.
They are easy to use, so you can do it yourself, saving money from the family budget.
Why is this type of processing needed?
The entire human world around us is filled with electronic assistants and artificial materials. Under these conditions, it is not surprising that among city residents it has become popular to use wood in interior design in order to get at least a little closer to nature.
By processing an antique board or timber, the owner receives an exclusive product, because each tree has its own unique relief.
In addition, aging technology significantly increases the strength of raw materials, in contrast to the natural influence of the environment and time.
And by coating the wood with protective solutions and varnishes, its service life is extended; in addition, the paint or varnish prevents insects from entering and prevents the process of wood rotting.
This type of decorative finishing is used for ceiling beams, flooring, and furniture.

However, it is important to understand that not all lumber is suitable for this type of work. The aging technique cannot be used for the following types of wood:
- cherry, pear (other fruit types);
- maple;
- alder.
Therefore, for antique wood processing, it is better to purchase hardwood, which is perfect for:
- nut;
- ash;
- larch;
- pine.
And by performing high-quality tinting of the product, you can get an imitation of an expensive type of wood, using inexpensive pine or ash as a basis.
Important! Old trees require more careful processing because they have many layers with different densities. Therefore, in order to accurately determine the age of the raw material, you need to pay attention to the number of rings on the cut: the more there are, the older the tree.
What aging methods should you pay attention to?
You can create antiques from furniture using three methods, these include:

But wood patination is also distinguished, when special paints, waxes or stains are applied to the raw material in several layers, which, when absorbed, visually age the surface of the product.

Craftsmen who will practice such imitation with their own hands for the first time are recommended to practice a little on pieces of boards or timber in order to clearly understand all the nuances of the process.
It should be noted right away that if it is necessary to process the finished product, then it would be correct to initially disassemble it so that the entire surface has a uniform coating.
And to create an original masterpiece, you should pay attention to wood slightly damaged by insects and the external environment, where there are knots and chips, because in the end such a product will look luxurious. Therefore, it will perfectly complement the kitchen, veranda, living room in the “Country” or “Provence” style.
Thematic material:
Mechanical method
This type of aging is called wood brushing, since brush in English means brush. It is this building element that performs the bulk of the work.
With the help of brushes, soft layers are removed from the surface of the wood, and the material acquires relief. However, the desired effect will only be achieved if the stripped raw material is treated with paint or varnish, emphasizing and giving contrast to the design.
Important! For brushing, it is necessary to choose wood with a clearly defined fibrous structure, otherwise the entire processing process may come to nothing.
To carry out this aging method, you need to have the following tools on hand:
- Bulgarian;
- electric drill;
- hard and soft metal brushes;
- sandpaper;
- paint brushes;
- stain;
- acrylic paint;

And in order not to cause harm to health, all operations must be performed in an open space, adhering to safety regulations.
Important stages of brushing
Mechanical aging simulation consists of 3 main steps. Among them:
- Chernova. An attachment made of a metal brush in the shape of a circle is installed on the grinder. The surface is processed along the fibers, and the hand pressure should not change so as not to damage the relief of the material.
- Finishing or grinding. An electric drill is equipped with a brass brush; an angle grinder with a less rigid metal brush is also suitable, but the rotation speed of the tool must be reduced. The entire surface is processed, as a result of which various burrs and roughness must be eliminated. And to make the wood pleasant to the touch, it’s better to go over it a couple more times with sandpaper.
- Painting and polishing. The final step, thanks to which the product acquires the expected antique look. A layer of stain is applied to the material, then carefully washed off with a rag, due to which only the soft parts of the raw material acquire color. If desired, you can add paint in bright colors. After drying, the wood is polished and varnished.

An option for aging products can be the use of craquelure varnish. After applying this varnish, cracks appear on the surface into which paint can be rubbed and the raw material acquires a contrasting pattern.
Wood burning
Exposure of raw material to high fire temperatures allows you to achieve an antique effect in a short time.
It is better to use a gas burner as a tool, since a blowtorch will produce a lot of smoke, which can damage the surface being treated.
Operating procedure:
- The material is burned with a burner to a depth of 3 mm evenly over the entire area. In this case, you should carefully watch so that the tree does not catch fire.
- The charred layer of raw materials is removed with a metal brush.
- The surface is sanded with sandpaper.
- In this case, painting is not necessary; you can simply apply a clear varnish to the product.
But you need to understand that burning indoors is prohibited and life-threatening.
Chemical method
If you decide to use this processing method, you should immediately stock up on rubber gloves and a protective face mask so that toxic fumes from the solutions do not cause poisoning.
Alkalies, such as stove cleaners, are suitable as the main substance. The tree is covered with a solution in several layers and left for about 12 hours, no longer, depending on the substance and type of wood. Then it is thoroughly washed with a vinegar solution. Its concentration is no more than 1 tsp. for 200 ml of water. When the surface dries, it needs to be sanded. Acrylic paint is applied to the treated material or varnished.
How much does it cost to age wood?
The average price for brushing ranges from 350 to 1 thousand rubles per 1 m 2. The cost of services depends on the region, breed and size of the material. For example, processing 1 m2 of unpainted hardwood boards will cost 50–100 rubles more than the same lumber from pine or spruce.
If the client wants to immediately order painting of the raw materials, then the cost of the work can be safely multiplied by 2. The consumer can find photos of the services offered on any website of the company of interest.
Of course, the prices for such imitation antiques are high. Therefore, you can stock up on the necessary set of tools, patience and make an antique masterpiece from wood at home, the quality of which will not be inferior to factory-made analogues.


, Islam, Judaism How do temples of different religions differ")


