One of the main buildings in the country after the house and outbuildings is the gazebo. This is a place of relaxation from the bustle of the city and communication with nature.


Features of a gazebo for a summer residence
Gazebos for summer cottages can be different, depending on the needs and possibilities. If the gazebo serves as a decoration of the site, then it is built thoroughly and elegantly, with a Russian or Finnish stove, with a fireplace, barbecue or barbecue. But in most cases, an inexpensive gazebo is needed, which you can build with your own hands. How it will look and what it will be made of depends on the taste and skills of the owner, as well as on the availability of material.


The design of the gazebo consists of four main parts:
- gender;
- frame;
- roofs;
- finishing.


You can make a gazebo:
- stationary - concrete, brick, wooden beams, iron corners and pipes, slate are used for it;
- portable - PVC pipes, aluminum structures, polycarbonate, tarpaulin can serve as a material;
- collapsible - you can disassemble completely, or you can leave only the frame permanently;
- grown - to create it, trees are planted instead of a frame and climbing plants instead of walls and a roof.


Construction technology
To begin with, choose a place where they will put a gazebo. It can be attached to a house, shed or fence, located in a secluded corner of the site, be a dividing structure between the courtyard and the garden or vegetable garden, be located opposite the kitchen windows of the house or next to the pool.
Then find out the composition of the soil: chernozem, gray soil, sandy, peaty, clay. This will determine what kind of floor is needed and whether it is needed at all. Then the material from which the frame will be made is selected, and the finish. They make drawings of the floor, frame and roof, taking into account the size of the purchased material, so that there is a minimum of scraps.


An estimate is made and components are purchased: fasteners and tools.

Floor for gazebo
Work begins with the cleanup of the site. With the help of a tape measure, marking is done according to the plan. To do this, pegs are driven into the ground, on which a nylon thread is pulled. The marking is checked with a rope stretched obliquely - two diagonals must be equal.
If the soil is sandy, you need to remove the top fertile layer of the earth to the sand, and fill the perimeter with the same sand. On such a pillow, you can simply put boards impregnated with protective compounds. The service life of such a floor is small, but it is easily replaced. As a rule, a well impregnated and painted inch board on a sand cushion lasts at least 5 years.


The perimeter with the removed earth can be covered with fine gravel or the floor plane can be laid out with well-impregnated wooden stumps 10–15 cm thick. The stumps are sprinkled with sand mixed with fine gravel.
If there is a natural stone in the area, which has one side flat, then the floor can be laid out from it. Brick or paving slabs are also suitable. You can lay them on a carving (dry cement mortar), using a rubber mallet for leveling.


One of the ways to mount the floor, if the gazebo is stationary, is to fill it with concrete. This will be one of the options for the foundation. This approach makes it possible to use the fill as a finishing floor and as a rough base, on which tiles or logs for a wooden floor are laid. The thickness of the fill must be at least 8 cm.


Along the perimeter, after cleaning the top layer of the earth, formwork is placed from unedged boards. It is simply inserted by surprise along the edges, and after the concrete has hardened, it is removed. For durability and strength, a cushion of gravel or sand is made in the prepared perimeter of the gazebo and is well rammed using water. Such a pillow will act as a drainage.
Pegs are cut from iron fittings with a diameter of 8-10 mm and driven into the ground every 0.5-1 m to fasten the strapping from the same fittings. The supports are tied with burnt wire. A standard concrete solution is prepared: cement, sand, crushed stone in a ratio of 1/3/6. The perimeter is poured, tamped during the pouring process to avoid air bubbles. If the gazebo will be closed for use in the cold, you can make a warm cement floor. To do this, when mixing the solution, wood sawdust is added instead of crushed stone.

Filling the floor is a rather laborious process that requires a lot of time. It is much easier and faster to apply a columnar foundation. This is the most common type of fixed installation. A wooden floor is placed on it or it simply serves to fasten the frame, and the floor can be anything.
A variety of raw materials are used for the columnar foundation.
- Asbestos-cement or metal pipes. Large diameter PVC pipes can be used. With the help of a construction drill, a hole is made at the location of the frame pillars and the pipe is fixed in it by bottling or pouring concrete. The bottom of the pipe is insulated with hot resin or bituminous mastic. A wooden log is driven into the center of the pipe, which will be the place for fastening a horizontal or vertical frame.


- Concrete. To do this, they dig a hole, around which a formwork is built. For heaving soil, the depth of the pit should reach the level of soil freezing, otherwise the gazebo may “walk”. A frame pre-assembled from iron reinforcement is inserted inside and poured with concrete. A threaded pin can be welded to the frame for fastening the outer frame.
- Brick. In this case, the pin is driven into the pit and lined with bricks.
- Handy materials. For example, you can use used car tires. They are simply placed on a cleared horizontal piece of land and covered with sand. On them, a horizontal frame is assembled from a wooden beam along the perimeter of the gazebo, which is the basis for mounting the remaining parts of the gazebo.


Summerhouse frame
For a person who knows how to handle a welding machine, it is easiest to make an iron gazebo. To work, you will need the apparatus itself, a level, a grinder and a screwdriver. This frame is suitable for any roof. The material can be used pipes, corners 30x30 or 50x50 mm, metal strips. It can be decorated with forged spans. Polycarbonate, profiled sheet, wood, PVC products are easily attached to it.


The simplest summer arbors can be made from a common and affordable material - wood. It is easy to process and looks beautiful. It does not require special construction skills, therefore it is suitable to make a gazebo quickly with your own hands. For the construction of the frame, rectangular beams, round timber and fasteners in the form of brackets, metal corners, nails and self-tapping screws are used. For an owner who knows how to carpentry, you can assemble such a building without a single nail. Sheathing such a frame is even easier than made of metal. It will withstand a roof of any material.


In city apartments, repairs are often made in which doors are replaced. Old doors are usually taken to the trash cans as unnecessary. But 8 used doors are already material for the gazebo frame. They are placed at an angle of 90 degrees, with the end of one door to the plane of the other and tightened with self-tapping screws. So it turns out four reliable bases for any type of roof.


You can assemble the frame from any improvised material, for example, from plastic products. The bottom of plastic bottles is cut off and the pillars are assembled, putting one bottle on another. When assembling, you can use Moment glue. If the roof is of medium severity, then during installation the tanks are filled in stages with sand to increase strength. Such poles can simply be dug into the ground. There is an option to lay out the whole wall in this way, tying the posts together with nylon twine.


Plastic pipes are also easily and quickly dug into the ground and filled with sand. For a massive roof, cement mortar is poured into the pipe instead of sand.
For the frame, plastic commodity boxes are also suitable. They are well inserted into one another and fastened together with soft wire or nylon twine. They can also be used to assemble benches and tables.


Stepladders can also be attributed to improvised materials. If the gazebo is needed only for the weekend, and work on the site using stepladders is not planned, they can be used as supports for the gazebo with a light roof. To do this, one tree growing on the site and two stepladders or two trees growing side by side and one stepladder are enough. The stepladder is installed using rope struts with pegs, which are driven into the ground into an interference fit according to the principle of setting up a tent. The edge of the tarpaulin is tied to the tree and thrown over the stepladders. Fasten the tarp with a rope. This method is very simple, the structure is quickly assembled and disassembled.


If you cut down a few trees when clearing a site, they do not need to be immediately thrown away or burned. They make charming supports for the gazebo. To do this, the tree is cut as low as possible near the ground, small branches are removed, and an exclusive column is formed from thicker ones. You can install it on any floor by isolating the heel of the tree with roofing felt or mastic. Depending on the condition of the bark and the type of wood, it is either removed or left and varnished.
Of course, a brick frame looks beautiful and reliable. If a place in the village is chosen for a summer cottage, a house with an old stove is often taken along with it, which is dismantled as unnecessary. It is not necessary to throw away a brick, because a good gazebo will come out of it. True, this option is not suitable for simple buildings, but cost savings and good quality are guaranteed.

Roof for gazebo
The top of the gazebo is covered in order to hide from the rain and from the sun's rays. The roof is light, medium and heavy. For a light roof, dense woven panels, awnings, and polyethylene are suitable. It is not necessary to make a frame for them. The advantages of such structures are the simplicity and speed of installation, but the design and functionality leaves much to be desired.
The opening of the summer season implies not only the beginning of land and planting work, but also outdoor recreation, away from the bustle of the city. And so that no bad weather or the scorching sun interferes with a good rest, you should get a small house or a summer gazebo in your summer cottage.
It is good because it consists of a simple and lightweight design. In addition, the gazebo will not only be protection from inclement weather, but also the highlight of the site. There are an incredible number of options for summerhouses, both in design and in price category.
But if there was a decision to build a miracle house with your own hands, then before this undertaking it is recommended to inquire about some of the intricacies of work, to consider projects.
From the article we will learn how to build a summer gazebo cheaply and beautifully.

Choice of materials and design
Wood remains the most budgetary material for the manufacture of a summerhouse. But despite the low cost, such a summer house will last for a long time. Especially if the wooden bars are also treated with various antiseptic impregnations, which will save the wooden structure not only from the effects of the external environment, but also from unwanted wood pests and prevent it from catching fire.
The creation of such a gazebo will not take much time and will not be difficult. The approximate production time with unhurried work will be about three days.

A country gazebo based on metal structures will also last for decades, but the cost of such an invention will be many times more expensive. And besides, from time to time it will be necessary to treat metal pipes with various protective agents for metal.
And the owners of summer cottages are more concerned about the creation of high-quality, low-cost gazebos that do not require much effort to manufacture.

Therefore, before building a gazebo with your own hands, it is recommended to draw up an estimate and a drawing of the future design, where all measurements and materials for manufacturing will be indicated. And then you should familiarize yourself with the projects of buildings. So, how to make a summer gazebo cheaply and beautifully for and what is needed for this? Before construction, you need to choose a suitable place for the structure, where, before starting work, the top layer of earth should be removed by about 10-15 cm and compacted.


It is important to know that the cheapest option will be a gazebo made of wooden structures without the use of metal components.

But before creating it, some nuances should be taken into account. For example, if a concrete foundation is made for a wooden gazebo, then the service life of such a structure will be no more than 5 years. Since prolonged contact of wood with concrete leads to further decay due to damage, despite the previous treatment with antiseptics. And, as a result, further destruction of the structure.

The best way to protect a wooden gazebo is to treat wooden supports with bitumen or roofing material.
If you nevertheless decide to make the base of the structure concrete, then it is recommended that small metal pipes be placed in the right places when pouring, so that the ends are at least 30 cm from the base of the concrete. Further, holes are made in them for fasteners, which will later support the structure for many years.

For further protection from strong winds, it is not necessary to build brick fences. It will be enough to make a fence from eurolining about 80 cm high, strengthening it with two longitudinal bars. Such a fence will completely protect against gusty winds.


Polycarbonate structures
Protected from wind, sunlight and rain will help cellular polycarbonate. They can easily sheathe the wooden structure of the gazebo. Cellular polycarbonate has a lot of positive qualities:
- shockproof;
- waterproof;
- sunscreen;
- lightweight;
- flexible;
- variety of color (from transparent to dark tones).

With the help of cellular polycarbonate, you can not only sheathe a gazebo, but also build a high-quality fence. In addition, it is not necessary to make a wooden frame at the same time; polycarbonate is attached to a metal structure no worse. When creating such a gazebo with your own hands, you can resort to the help of the Internet. You can find a large number of photos of polycarbonate gazebos with complete manufacturing instructions.


Usually, polycarbonate gazebos are installed near dense trees. Due to its transparency, sunlight will flow in sufficient quantities.

You can sheathe a gazebo from a wooden or metal structure using wave slate.
Do you know how to build gazebos?
Vote
But there are several nuances:
- The arbor should have a length that is a multiple of one meter.
- The slope of the structure is made 1.75 m long.
- When laying the ramp in several rows, it should be overlapped by about 10-15 cm.
Let's find out how else you can build a summer gazebo, consider cheap and beautiful projects.

Features of the construction of simple arbors
A gazebo made of cellular polycarbonate is not only low-cost, but also easy to manufacture. For its construction on the basis of a metal frame, you will need a corner of a metal structure, a strip of metal, polycarbonate and a planed board. And also you need to pre-fill the foundation base, concreted into it the corner supports. The next step is welding.
It is necessary to weld a corner of metal to the supports. One corner band should be welded to the bars for the roof base. Two belts are welded in the middle part.

The flexibility of honeycomb polycarbonate makes it easy to work when creating an arched roof. It should only be bent with light movements and fixed to a metal structure in the form of an arch.
The roof of the gazebo will look chic from pieces of shingles. You just need OSB panels 3-4 pieces. They will serve as the basis for the future roof. The panels are quite rigid, even at a thickness of 10 mm. Therefore, additional protection in the form of bars is not required. The panels can be fixed on the strapping beam of the structure.


This gazebo does not need an additional frame frame, as it is quite light. The floor covering is usually reinforced with a metal mesh concrete screed. On such a surface, you can easily install a barbecue.
In order to use such a gazebo in winter, it is recommended to insulate the floor with wood and sheathe the walls with cellular polycarbonate. Thus, this building will be protected from snow and rain getting inside.


Advice! Having installed a fireplace inside, as well as creating comfort and coziness, you can not only spend here in the future, but also just relax with your soul and body.

Garden gazebo made of wood
It is not difficult to build a garden gazebo with your own hands. Wooden structures look very beautiful and expensive. Using simple drawings and projects, it is possible to build a fairly high-quality and cheap gazebo. How to do this, see below.

For the construction of a wooden gazebo, you will need materials such as:
- timber 1 cm x 1 cm;
- roofing sheets;
- packaging of self-tapping screws;
- edged boards;
- slats.
For the construction of the structure, you will need a screwdriver, a circular saw and an electric planer.
In such a gazebo, you can build a safe place for a future barbecue or make a summer kitchen.
It is better to install such a summer building away from a residential building, so that in the future smoke and noise do not cause inconvenience.

Construction of a wooden structure
To create a cheap and beautiful wooden structure with your own hands, you should thoroughly study all the nuances and understand all the intricacies of such arbors. So, how to build a summer mini-house, consider the original project below.
For the future construction of a gazebo from a wooden structure, 11 recesses should be made in the ground under the racks for further installation of a columnar foundation. To do this, you must have a construction drill in your arsenal. Then, the recesses are filled with reinforcing strapping and poured with concrete.

The next step is to assemble the frame. With the help of metal corners, at a distance of half a tree, it will be necessary to fasten wooden bars together. Then, you should lay the logs under the flooring.
The assembled frame from the timber must be treated with protective antiseptic agents.

The next step will be laying the floor boards.


Installation of rafters
Before installing the rafters, cuts should be made on the bases of the gazebo at the points of contact and sign the products with a marker.

- To fix the vertical racks, it is recommended to use building corners. It is always necessary to check the perpendicularity of the position of the racks.
- Then horizontal screeds are mounted along the contour from above and fastened with self-tapping screws to the supporting logs.
- All the main parts for the final installation of the roof are tightened and fixed, and after that the support should be sawn off flush in the center.
- In the future, lay the crate and it is allowed to proceed with the installation of a fireplace or the manufacture of a summer kitchen.
- Before this, it is necessary to prepare the harness to the base in order to install the crate later.
- The walls of the structure are covered with roofing felt for safety and poured with concrete.
- After this procedure, when everything dries up, you can do wall cladding with clapboard or blockhouse.
- The roof can already be covered with soft tiles and proceed with the interior decoration. The gazebo can be painted in all sorts of bright colors to make it stand out from other buildings, or simply treated with a protective impregnation and leave the structure of the tree, which is now very fashionable.

Interior decoration can be done at your discretion, the main thing is that it is comfortable and cozy with family and friends.
Good afternoon, I am starting a series of articles on the construction of wooden gazebos for summer cottages. We will do with our brains. This article sets itself two goals - to turn on your brain, and to awaken the desire to CONNECT your hands to it.
In short, I have a goal fall in love with an idea make a gazebo with your own hands and give you faith that it is easy and simple. And I will succeed. Anyone who reaches the end of the article will become infected with a construction itch and will not calm down until a new wooden arbor appears in his dacha .
Since this topic is quite extensive, it would be prudent not to shove all types of wooden arbors into one article, but to divide the lessons into parts. This will give us the opportunity to understand in detail each type of gazebo, study its design and learn how to make such a gazebo ourselves - from the first to the last step.
- Today we will build wooden arbors CUBIC - with FLAT roof.
- In the second article - we will learn how to make a gazebo
- In the third article - we will figure out how to do it yourself
- In the fourth article - we will deal in detail and slowly with the principle of construction arbors with a FOUR-STROKE roof (with a roof in the form of a pyramid).
- And in the fifth article - we will make rounded HEXAGONAL gazebos with a complex device of a CONE roof.
So, let's not pull the cat by the rubber. Let's start to delve into.
What is a gazebo?
- This is, firstly, LEGS (pillars)
- Secondly, the ROOF, which is supported by these legs.
- Thirdly, the WALLS, which are nailed to the legs (sometimes the walls are absent, sometimes they are replaced by a holey crate).
The named parts are absolutely any gazebo and wooden and metal.
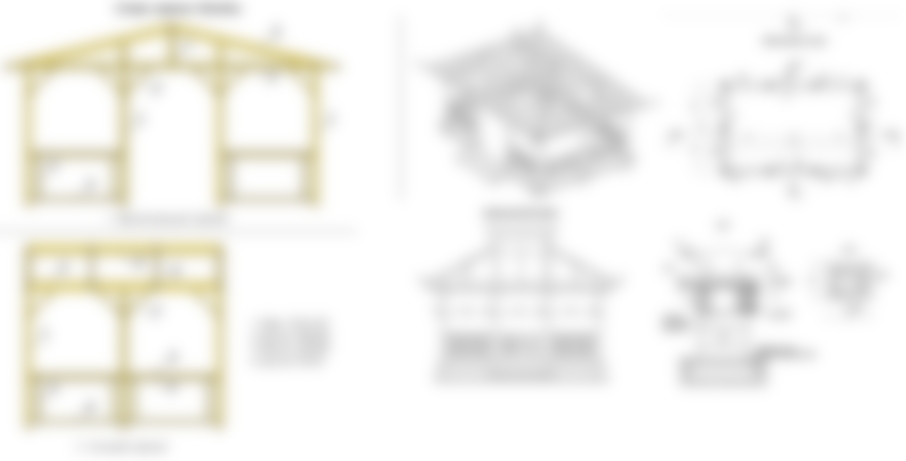
Look, below we see different gazebos - with a flat roof, and with a gable roof, and a four-pitched roof, and a gazebo in the form of a hexagon.
Any gazebo has pillars, a roof and walls. And the constructive difference of all arbors from each other is their roof.

Today we will build gazebos with our own hands with a flat roof. That is, let's start with the simplest design.
And you will find the rest of the articles-lessons on making arbors for every taste in the form of a list of links below under this article.
2 TYPES of arbors with a flat roof.
The designs of all wooden arbors WITH A FLAT ROOF can be divided into 2 TYPES.
FRAME GUNS - based on a cubic frame made of timber.
PERGOLA GUNS - based on the classic Italian pergola.

In this article we will consider the first type of arbors. And I took out the pergola designs of arbors in the second article of our series of lessons on the construction of arbors -
Model #1
Flat roof gazebo
on a FRAME BASIS
Let's look at a rectangular gazebo made of timber with a FLAT ROOF. And then I'll MAKE IT step by step.

Below you see three different designs country gazebo with a CUBIC frame. Visually, the gazebos seem to be different, but their construction scheme is the SAME. because they all have the same frame in the form of a cube.
We can make a gazebo as a simple hollow cube of timber, without walls (as in the photo below) - such gazebos simply enclose the recreation area from the rest of the wild countryside nature.
Such hollow gazebos even the roof is not covered with roofing material- they simply fill the slats between the beams of the upper frame (so that they cast a light shadow on the vacationers).
However, later you can make a roof from the rain for such a gazebo (from polycarbonate sheets or awning fabric) - later in the same article there will be a chapter on roofs.
But you are right cover the roof with boards, put slate sheets or other roofing material on top (as in the photo below).
And also sheathe this cubic arbor with wooden slats- from one windy side, or from several sides. Wall sheathing can be continuous, or at intervals (according to the principle of blinds).
Such work is easy and simple to do with your own hands.

If we want to isolate ourselves from curious neighbors in our country gazebo, we can sew up all the walls - but not completely, but to a certain height, so that light enters the gazebo, as well as a fresh summer breeze (as in the photo below).

And yet ... the walls can not be sewn up with boards, but hung with a TENT CLOTH (awning fabric can be bought at hardware stores or directly from the supplier company (look in online stores). A suitable awning fabric must be cut into pieces of the desired size and fixed on the frames - spans of your gazebo.
And if you use your brains and Google search, then you can create a simple mechanism with your own hands that allows the canvas to fold like a roman blind(in wide folds), if you pull the rope. It's simple - there you need rings and a rope, and spend several evenings slowly sewing rings to the back of the canvas.
Either you can wind the awning onto a metal pin - with a roll, like toilet paper on a sleeve. Drive the pins-sleeves into the fasteners between the piers of the gazebo. The steel pin will spin freely in the fastener and unwind the tent fabric - it will be like a do-it-yourself roller blind.

We can make a very small wooden gazebo - for one sun lounger (if you love yourself and do not like guests). And we can increase the footage of the building, so that it fits a table and chairs, a sofa and something else. That is, our country gazebo does not have to be a CUBE - it can be an EXTENDED RECTANGLE of any size you need.

We can further increase the footage of the future building so that comfortable lockers fit in a cozy gazebo, where you can store dishes in the summer, conveniently put frying pans, electric barbecues and other useful kitchen utensils (as in the photo below). You can make furniture for the gazebo with your own hands from scraps of timber and boards.

And at the same time, pay attention to how beautifully the wooden flooring on the floor is decorated here - with boards on squares of the transverse direction. I also like the idea of decorating a country gazebo with tall potted flowers and a lantern with a candle hanging from the roof eaves.
HOW TO MAKE A FRAME
for such a FRAME gazebo.
You can start building a frame for a cubic FRAME GARGO in different ways ...
Take your time, choose the most convenient way to create a frame. The one that you clearly imagined and you can definitely do it with your own hands without difficulty - thoughtfully and slowly.
Let's look at the types of frame, and decide which is right for your country gazebo
THE FRAME of the gazebo is ON DIGGED PILLARS.
We can start by saying we dig the SUPPORT PILLARS directly into the ground, filling them with cement(step 1), then put on these pillars CROSS BEAMS (step 2), we will strengthen the transverse beams with short supports with STICKS (step 3).
HERE IS THE MAIN FRAME AND READY. If you want, put slate on top, if you want, make a crate with roofing boards on top, or pull an awning canvas over the top frame of the summerhouse.
Below I will show what roof options for a gazebo you can do with your own hands.

DISADVANTAGES OF THIS METHOD - these are difficulties with wood processing - before pouring wooden beams with cement, you need to tar them, wrap them with roofing material (to protect them from rotting underground).
Although there is a way out - simple and fast. Here he is in the photo below. It is possible to deepen into the ground not the pillars themselves, but metal thrust bearings with a long and sharp lower part. And already put wooden support bars on them (as in the photo below).

And you can also install a country gazebo on a reliable and strong foundation - ON THE FOUNDATION. Let's see what types of foundations are suitable for such a frame gazebo and how to make them yourself.
THE FRAME of the gazebo is ON CONCRETE.
You can install poles on pre-prepared CONCRETE SCREED. And then it's better to put them on steel thrust bearings(as in the photo below). See, the pillars stand on metal heels?

To do this, you need to fix the thrust bearings directly into the concrete screed. This can be done in two ways - in already dry hardened concrete, or in still wet.
Installation of thrust bearings in dry hardened concrete.
you can buy anchor thrust bearings . They are installed on an already dry concrete substrate. A hole is drilled in concrete to match the size of the anchor. Excess drilling debris is blown out of it. A thrust bearing with an anchor is inserted into the hole. Next, a bolt is screwed into the anchor, due to which the anchor expands in the concrete and firmly holds the thrust bearing in place.

Or you can do cheaper to buy simple thrust bearings with fittings , and concrete them in still damp concrete. The photo below shows how the crooked legs of the thrust bearing circle into a round formwork filled with raw concrete, and freeze in it.

Such thrust bearings in raw concrete can have a different design. The main thing is that they all have the lower part of the reinforcement, which is buried in the concrete solution and firmly adheres the thrust bearing to the base.

As you can see, a country gazebo can even be placed on a pavement made of paving slabs. Everything is simple, if you figure it out, mentally imagine all the steps in the correct sequence, make sure that they are reasonable, and then take it and do everything with your own hands already in reality.
The design of your future country gazebo can be supplemented with interesting stone buildings. And then you can install support posts directly on these high stone sides. And here, too, it is better to use thrust bearings. So you will be sure that even with the passage of time your support column will not lead to the side, as it is securely fixed. And such a support column will not rot - there is nowhere to accumulate moisture.

THE FRAME of the country gazebo is ON THE WOODEN PLATFORM.
And you can do it yourself in advance make a wooden deck- under the future gazebo. And then the pillars on such a wooden base are attached on conventional square bearings.
And if there is no suitable bearing under your support beams. Then you can use any perforated fasteners in the shape of the letter L (that is, corners) as on the very right of the drawings below.


Of course, for this method, you first need to arrange such a wooden base. That is, level the ground, make boards from boards, fill the boards with crushed stone, optionally put a reinforcing mesh on crushed stone, pour concrete. And then put draft thick beams on a frozen concrete screed. And already on them to fill the floor boards.
And then anchor points for poles gazebos should coincide with the place where a thick draft beam lies under the floorboard. So that the gazebo stands on a solid foundation, and not on a hollow place on a wooden platform.


Here is another photo below, where the country gazebo stands on a wooden platform - and is attached to it with metal thrust bearings.

FRAME of the gazebo - ON SCREW PILES.
And you can also assemble the frame of the gazebo starting not from the pillars, but from the bottom frame, which you put on screw piles. Here in the photo below, we see that the frame of the country gazebo lies on black legs sticking out of the ground. This is the screw pile foundation.

Below is a picture of what it looks like foundation quick fix under the gazebo in the country. You can search Google for ways to build such a pile foundation in your area. And come to the conclusion whether it will be convenient and affordable for you.

NOTE. On these high legs screwed into the ground, we do not put vertical pillars of support - but a ready-made knocked down the lower frame of the gazebo (i.e. horizontal beams).
And already on the very bottom frame we fasten support bars. Attach them here on such steel plates in the form of CORNERS. Plus, you can add more metal plates along the other edges of the support bar.

THE FRAME of the gazebo is ON BRICK LEGS.
Or you can cast the same high legs but out of concrete, or lay out the supporting columns of brick in pre-dug holes.

Here in the photo above we see the frame frame of the gazebo, which rests just on such brick pillars support- a cheap point foundation is located in those places where support is needed for a frame made of timber. This is an economical version of the foundation for an inexpensive summerhouse. And everything is done simply and easily with your own hands.
Then such a gazebo frame can be sheathed with a floorboard, the roof can be covered with a transparent polycarbonate sheet, and the walls can be sewn up with slats or hung with an awning. It's beautiful and elegant. You see how interesting it is to beat the simplest frame of bars.

So ... we figured out the types of base for our frame. Now let's see how we can FASTEN THE PARTS OF THE FRAME to each other.
We assemble a cubic arbor.
We fix the upper transverse beams.
Now let's see how to do top of the frame our frame gazebo. That is, let's say we already have a foundation. Let's say we have already placed the vertical pillars of the support. And now our final task is to put on these pillars and FIX the transverse horizontal beams.
Here in the photo below we see the most easy way fix the cross beam. It's just to put it on the poles and secure on perforated steel PLATES. L-shaped plates, or straight ones, are suitable for this purpose (then they will need two on each side).
On sale there is a variety of perforated fasteners. Google it and find out exactly which plates are just perfect for the size of your timber.

Here is the second way to lay the top bars of the roof. When a notch is cut at the end of each wooden beam - and then the notch is placed in the notch (as in the drawing below). This method is called "in the paw" - like putting the ends of the bars into the paw.

So that the top beam does not sag under the weight of itself, or if you are planning a heavy roof decking, you can add SUPPORTS - BRACKETS. That is, small diagonal cuts of beams that need to be placed at the corners of our frame, as in the photo below.

Next, if on the roof additional wooden crate from narrower beams, then they fit into specially stuffed metal fasteners - “supports for beams”. We see such supports in the photo below.

Support fasteners for beams can be of different shapes. Open supports - with ears to the sides. Closed - with ears turned inward. And a support with a hidden bracket - with an inner plate.

And if we want to increase the FRAME GARGO.
Below we see a model of a wooden gazebo, made by hand, which is mounted not on four, but on six support pillars. Six pillars allow you to make an elongated summerhouse, under which a long dining table can fit, and you can also put a barbecue oven (by the way, I will have a separate article about this).

If you choose such an enlarged gazebo, then here is a photo of how to lay the upper beams on the middle pole. We see that the beams with their ends are laid on a pole and each is held by an additional jib (short beam obliquely).

The foundation for such long arbors can be any (choose options from those proposed above). Below in the photo we see a country gazebo on a pile foundation (a frame made of timber is placed on the piles, support bars are installed on the frames, and on top there are transverse beams with jibs, and only then a plank flooring and lath roof lathing).

Types of wall cladding for FRAME GUNS.
And now let's look at the ways of cladding the walls of our country gazebo. Here are a few options for sheathing the walls of the gazebo with your own hands.
The easiest way is to fill horizontal slats - like blinds.
And if you are not afraid of painstaking work, then you can stuff the slats diagonally - cross to cross - to get such a crate in a box, as in the photo below.

You can fill a solid mesh wall. Or you can fill low frame sides with such a crate on the sides of the gazebo, and put a climbing plant along the square.

Part of the wall of the dacha gazebo can be covered with a solid stuffing of boards (as we see in the photo below, just the sectors of the walls below are covered with a board).

And here is a sample of the walls, where the wooden mesh occupies only the upper part of the solid plank wall of the gazebo.

At the same gazebo, you can combine the height and shape of the batten walls, as well as the lattice pattern itself.

HOW TO COVER THE ROOF for the gazebo.
You yourself can easily and simply make a roof for a gazebo with your own hands - from any roofing material.
The roof can be sewn up with boards and covered with roofing felt (it's cheap), you can put slate on the roof.
And best of all, transparent sheets of POLYCARBONATE - this is how the light of the sun will penetrate through the roof (see photo below).

And at the same time: pay attention to how the roof slope is arranged in the photo below (to allow water and snow to drain) - the SUPPORT PILLARS of the facade wall of the gazebo are 15 cm higher than the SUPPORT PILLARS of the rear wall of the gazebo. And so the roofing boards lie on a slope.
Also you can do tarpaulin roof. The photo below shows a great way to simply attach the awning to the edges of the gazebo roof. Along the edge of the awning make holes(better in the workshop, such special metal rivets with a hole). We put a rope in the holes. On the longitudinal beam at the side of the roof we fill fasteners with large caps. And then we hook the rope threaded into the holes of our tent fabric by the caps of the clogged hardware products.

And also the awning canvas can be stretched between the densely packed laths of the crate. As in the photo of the gazebo below. This is an Italian version of the roof.

I mean, I want you to understand one thing. Roof - you can make ANY. Wall cladding (boards, awning or wooden lath) - you can do ANY ALSO. And it's very simple. Even a woman cope.
The main thing is to put the FRAME of the gazebo. The backbone to which we can nail all this even with female hands.
The frame is the basis from which you can fashion any design of a summerhouse. Knocking down a frame from a bar is 80% of all work. And that's what a man needs. It's time to call him.
Good luck with your home building.
Olga Klishevskaya, specially for the site
There is no such land owner who would not dream of equipping it in the best possible way, equipping cozy places for outdoor recreation. A gazebo is a traditional element of landscape design, but there are a lot of varieties of these light buildings, and therefore it can be difficult to decide on the choice of the desired model, as well as decide on its independent construction without at least theoretical training.
The question of how to build with your own hands has always been and remains relevant, as more and more urban residents move out of town for permanent residence or acquire summer cottages. Starting the construction of any building, first you need to decide how it should look, which is why it makes sense to consider several design options for gazebos, which you can easily raise yourself.
Popular types of gazebos
These summer buildings may differ in style and design, size, and material of manufacture. And the optimal model is selected depending on the size and design of the site, as well as the personal preferences of its owners.
Lattice gazebos

Gazebos sheathed with bars along the diagonal of the walls are quite popular for summer cottages and private territories, as they give a good shade, and at the same time do not interfere with the flow of fresh air. An important condition for choosing the installation site of such a building is an enclosed space where there is no draft, otherwise the gazebo will be built in vain, since it will not be very comfortable to be in it. If the summer cottage has not yet been planted with trees and there is no area that is not blown by the winds, then it is recommended that the lee side of such a gazebo be made “deaf”.

Such arbors are most often built so that, over time, stems of climbing perennial plants can climb along the lattice walls, which will create protection from the wind and fill the space under the roof with constant freshness. If you plant flowering plants around the building, then, relaxing in it on a hot day or a cool evening, you can enjoy your favorite aromas.
The disadvantage of such an arbor, until it is entwined with vegetation, is its openness and exposure to jets of oblique heavy rain, so it will not work to hide in it from such bad weather.

Another version of an already larger gazebo with two rear “blind” walls that completely cover its interior from the eyes of neighbors also has a lattice sheathing - in the lower panel part and under the roof itself. After climbing plants planted around the building climb along the lower crate, you can stretch the ropes from it to the finish under the roof at the right distance from each other, thereby forming “windows” framed with greenery and flowers.
The roof of the gazebo shown is covered with transparent polycarbonate, which has a green tint, which gives a calm, pleasing to the eye lighting inside. This factor will certainly contribute, in combination with fresh air, to the most comfortable rest.
Due to the fact that the gazebo is quite large, it is raised above the ground by about 200 mm on a columnar foundation. This will help keep the floor boards from the harmful effects of moisture, as the space under the building will be constantly ventilated.
Small original gazebo

This original design of a summer vacation spot will not leave guests indifferent, and the residents of the house will be convinced more than once of the comfort of such an arbor. The building has a simple design with, but it is quite roomy, and it may well accommodate a seating area and a table. If desired, the size of the gazebo can be calculated for a specific set of furniture. The blank rear walls of the building will close the space from the wind, and the round entrances in the other two walls will contribute to the ventilation of the room. If desired, round openings can be equipped with waterproof or mosquito-proof curtains, which will allow you to stay in the gazebo in any weather or even stay in it at night when the house gets too stuffy.
Arbor - summer house

This gazebo deserves the name "summer house", which can be used for living in the warm season. For example, if you plan to build an economy version of a house on a summer cottage, then this design is perfect for this purpose.
You can also build such a structure on the site of a private house, since in the summer you want to spend more time outdoors, and thanks to large windows and a door that opens wide, there will be plenty of it indoors.
To build a similar version of the gazebo, more costs will be required, since the design includes windows and glazed doors. But it is thanks to these elements that you can achieve complete comfort for relaxation, both in the daytime and at night, and in any weather.
Arbor - pergola

The pergola came to Russian landscape design from the Italian style of garden design, where, in accordance with the peculiarities of its design, it could serve as a canopy, arch or extension. Thanks to domestic improvements, this kind of garden structures has become a real decoration of many summer cottages and territories of private houses.
The pergola is installed in order to create a support for climbing plants, as protection from the hot sun for a certain place on the site, a gazebo for relaxation, or simply as a decorative element of the garden. Therefore, the model of this building must be chosen depending on what tasks will be assigned to it, but most often it is used for several purposes at once.
The first photo shows a covered pergola installed as a canopy over a recreation area. In fact, she created an open gazebo, under which a massive table fits, just enough for a large family to gather around it, as well as a grill built into the back wall. The convenience of the design lies in the fact that under the covered space you can not make a foundation - it will be enough to lay or lay garden plastic panels on top of the ground. The basis will have to be done only for the supporting pillars.

In this case, the pergola performs three functions at once - a passage arch, supports for a rose bush and gazebos, which successfully complement each other. The benches in this recreation area are located at such a distance that a table can easily fit between them, so it will be great to spend evenings with family tea drinking in such a cozy place. In addition, a gazebo entwined with greenery is a great place to relax on a hot day, where you can hide from the sun, sitting comfortably with a book.

This version of the pergola is designed as a support for climbing plants that will cover a small gazebo, which is sure to become a favorite place for some family members who love privacy. For this version of the gazebo, it is also not necessary to arrange a foundation, due to its low weight, which significantly reduces the overall amount of work. The roof can be left open, as is the case with classic pergola construction, or it can be covered with lightweight roofing material such as plastic slate.
Construction of garden arbors
Having prepared all the necessary tools, you can purchase building materials for the selected gazebo model and proceed to construction work.
jigsaw
Required Tools

When erecting any model of a gazebo, you cannot do without special tools and fixtures, so you will need to prepare for work:
- Circular saw, electric jigsaw and hacksaw.
- Miter box for sawing structural elements at an angle.
- Electric drill and a set of drills.
- Screwdriver.
- Hammer, tape measure, folding rule, construction square, pencil for marking.
- Building level, plumb.
- Pincers and cutters.
- Drill for making holes in the ground for the installation of foundation pipes.
- Staircase.
Rectangular gazebo

A rectangular gazebo can be called a traditional version of a summer building, since quite often such a design is chosen for installation on a site. It should be noted that such a gazebo is quite comfortable to use and aesthetic in appearance. In addition, if desired, you can make your own adjustments to the design, for example, close one of the walls completely or raise the fence to a higher level.
The building does not have too much mass, so it is installed on or even just on well-packed soil, reinforced with a layer of rubble, which also provides good drainage.
The depth of laying the foundation, if provided, depends on the characteristics of the soil in a particular area.
Since wood in outdoor conditions will constantly be negatively affected: ultraviolet rays, moisture, wind, etc., it is recommended that the finished parts be carefully treated with water-repellent compounds. Such protection will protect the material from decay, from insects, and maximize the durability of the building.
The diagram below shows a drawing of a gazebo. All its parts are assigned letter designations - they are painted in the table of necessary materials. Further, in the course of the description of the assembly process, drawings will come across in which the dimensions are in inches. To convert to metric: 1 inch = 2.54 cm or 25.4 mm.
For the construction of this gazebo, the following materials will be required, which have letter designations on the diagram, the dimensions on the diagrams are given in inches: 1 inch \u003d 2.54 cm or 254 mm.

| Necessary materials | Dimensions of parts, mm | Quantity, pcs. | |
|---|---|---|---|
| Pillar foundation (A) | Asbestos concrete pipes | Ø 200÷250, length 1200÷1500 | 9 |
| Racks (B) | wooden beam | 100×200×3250 | 8 |
| Bottom rail of the structure (C) | bar | 100×150×3600 | 2 |
| 100×150×4725 | 2 | ||
| Intermediate beams of the floor frame (D) | bar | 100×150×1655 | 4 |
| 100×150×4550 | 1 | ||
| 100×150×2240 | 2 | ||
| Floor joists (E) | bar | 50×150×1750 | 10 |
| 50×150×2325 | 8 | ||
| Floor decking (F) | Boards | 50×100×2400 | 40 |
| 50×100×1800 | 52 | ||
| Upper harness (G) | bar | 50×150×3600 | 2 |
| 50×100×4725 | 2 | ||
| Gazebo fence (H) | Boards | 20×100×675 | 92 |
| Beam (tying) | 50×100×2230 | 9 | |
| 50×100×1630 | 12 | ||
| Roof ridge (I) | bar | 50×150×2445 | 1 |
| 50×100×1930 | 2 | ||
| Diagonal rafter legs with a 60 degree cut at the ends (J) | bar | 50×100×2760 | 4 |
| Ordinary rafters (K) | bar | 50×100×2450 | 10 |
| Rafter legs with ends cut at an angle of 34 degrees (L) | bar | 50×100×1375 | 4 |
| Rafter legs with ends cut at an angle of 45 degrees (L) | bar | 50×100×800 | 4 |
| 50×100×1360 | 4 | ||
| Base for roofing material (M) | Plywood | 15×120×2400 | 11 |
| Roof waterproofing material (N) | Ruberoid or membrane | based on 27 m² of roofing, with the necessary margin | |
| Roofing material (O) | bituminous tiles | ||
| Expendable materials | Nails, screws and screws. |
Work on the construction of this gazebo occurs in the following order:
| Illustration | |
|---|---|
 | The first step is marking the territory at the site chosen for construction. To do this, pegs are installed along the perimeter of the future building, on which the rope is stretched and fixed. The corners of the marked area must be measured very accurately, they must be perfectly straight. To make sure the markup is correct, you need to measure the diagonals of the rectangle and, if necessary, make adjustments. The diagonals must be equal to each other. The presented illustration shows an example of calculating and marking a place for construction, however, with different sizes, but the principle does not change from this. |
 | Next, holes are drilled for installing the pipes of the columnar foundation. Their depth should be 150 mm more than the freezing level of the soil. The height of the pipes above the ground can be different, depending on the desire of the master to raise the gazebo to a certain level. If necessary, the excess of their height can be cut off with the help of a grinder. On average, for the base for the gazebo, the pillars go deep into the ground by 500 ÷ 700 mm. Having installed the pipes in the drilled "nests", they are set exactly vertically in level and the soil around them is strengthened with crushed stone and soil, which is well tamped. Then, the pipes are filled with cement-gravel mortar for ⅔ of their volume. |
 | The next step is to install rack bars in the foundation pipes. It is recommended to pre-treat the lower part of the beam with bituminous mastic. The beam is set according to the level (plumb). Inside the foundation pipe, it can be supported with fragments of rubble or wooden supports can be installed, securing them to stakes driven into the ground. Then the pipes are supplemented with concrete mortar to the top, and this structure is left until completely solidified. |
 | After the mortar has hardened, before fixing the lower trim beam, it is recommended to lay a waterproofing material around the vertically installed beams, for example, roofing material. Further, the beam prepared in size for the lower strapping is fixed in the lower part on the vertical posts with self-tapping screws 90 mm in size. To avoid splitting the timber, before screwing in the fasteners, holes are drilled for them 2 mm smaller than the diameter of the self-tapping screw. When fixing the strapping, you should carefully control the horizontal installation of the timber using the building level, since the correct location of other elements of the building will depend on this. |
 | After the strapping beam is fixed, intermediate beams are installed and fixed, which will divide the area of \u200b\u200bthe floor of the gazebo into four parts and give the necessary rigidity to its structure. |
 | The next step is to install logs on the strapping and intermediate timber. To increase the strength of the floor, the logs are fixed in such a way as shown in the diagram. Logs are installed in 400 mm increments, ideally horizontally, according to pre-made markings. |
 | Fixing the log is carried out on special metal supporting elements, which are screwed with self-tapping screws 50 mm long to the inside of the strapping beam and floor beams. Moreover, they must be fixed strictly at the same level, otherwise the floor will turn out to be uneven. |
 | Supporting element for the installation of a beam-crossbar. Such parts are available in different sizes in height and width. |
 | Further, flooring is made from floorboards on the logs. If the prepared base is reliable and even, then laying the boards will not be difficult at all. The boards are fastened to the logs with nails or galvanized self-tapping screws 60 millimeters long. The heads of fasteners should be flush with the main surface of the board or recessed into the wood by 1.5 ÷ 2 mm. Since the building will be located on the street under the influence of moisture, the wood may well swell, therefore it is recommended to leave a gap of 3 ÷ 5 mm between the boards. Such slots will also contribute to the timely removal of water and moisture from the boards and their rapid ventilation. |
 | When the floors of the gazebo are ready, the upper trim of the structure is fixed on top of the racks. It is also fixed with self-tapping screws 90 mm long, on the outside of the beam. To check the horizontalness, a building level is used. |
 | Having a ready-made, well-mounted frame of the gazebo box, you can proceed to install the fence. The first step in the installation of this part of the building is the installation of horizontal bars, fixed between the racks. They are installed in two rows, one of which runs along the bottom edge of the racks, and the other rises to the level planned by the project. The crossbars are set according to the level and fixed on the racks with self-tapping screws. Additionally, they can be reinforced with metal corners, which are attached to the crossbars from below, and then screwed to the uprights. |
 | Further, balusters are mounted between the rungs. These can be ordinary sanded boards, as presented in this project, or round classic balusters can be carved from a bar, which, if desired, is given its own configuration. Flat balusters are fixed on the lower transverse beams with nails or self-tapping screws screwed from the inside of the gazebo from top to bottom. In the upper part of the balusters are fixed through the crossbars. If round balusters, machined from a bar, are chosen, then they are mainly mounted, both from above and from below, on the dowels to be glued. After completing their installation, railings are fixed to the upper rungs. They are first glued with wood glue, and then fixed with self-tapping screws, sinking their hats into the wood. |
 | Any roof for the gazebo can be chosen: - shed, for which it will be necessary to raise the front part of the building, fixing short racks of 200 ÷ 250 mm on the upper trim; - gable or, as presented in this project - four-slope hip. You need to start installing such a roof with the creation of a truss system consisting of diagonal and middle rafters and a ridge beam. The rafters can be prepared at the bottom, and then raised to the top harness. To simplify your task, you can temporarily fix the rafter legs and the ridge beam in the desired position until the final fastening by installing supports from the floor of the gazebo to the ridge. |
 | The fixed initial frame of the truss system begins to be strengthened from the hip sides - rafters (spiders) are installed and screwed on them at a distance of 600 mm from each other. Jocks on the hips begin to be fixed from the center of the triangle. |
 | The next step is to fix the rafters on large, trapezoidal slopes, starting from the middle of the ridge beam, and then moving to the diagonal rafters. The upper side of the rafters is fixed on the ridge beam, and the lower side - on the beam of the upper trim of the gazebo structure. |
 | If a light material is used to cover the roof, for example, bituminous or plastic wave slate or polycarbonate, then it is fixed immediately to the crate, which is made of boards (for example, 100 × 25 mm), installed with the desired step on the rafters, perpendicular to them. |
 | In the event that the work will be carried out strictly according to the project being demonstrated, using bituminous tiles to cover, then a solid crate of plywood 15 mm thick, pre-cut with a circular saw, is first fixed to the rafters. The fixing of this material is carried out with self-tapping screws 30 mm long with a step between fasteners of 150 mm. A gap of 1 ÷ 1.5 mm must be left between the sheets for the thermal expansion of the material, in order to avoid its warping. |
 | A waterproofing material is laid on top of the plywood - it can be roofing material or one of the types of modern membrane materials. Waterproofing sheets are mounted from the eaves in horizontal strips, overlapping each top sheet on the one below. The waterproofing is fixed with staples and a stapler. On top of the waterproofing, starting from the cornice, bituminous tiles are mounted. It should be installed according to the manufacturer's instructions. This diagram shows the installation of bituminous shingles - it will also require the creation of a crate. Sheet shingles can be laid directly on plywood prepared for this operation. |
 | Upon completion of the installation of the roofing material and fixing the ridge element, a decorative strip is fixed along the eaves. |
After the gazebo is ready, small details are adjusted, such as sealing holes and recesses with wood putty or a composition of epoxy glue mixed with fine sawdust. The putty should dry well, after which all irregularities and roughness should be sanded with fine-grained sandpaper.
In the next step, all wooden structural elements are covered with stain and yacht varnish or paint, which will additionally protect the wood from external influences and give the gazebo a finished aesthetic appearance.
Pergola construction

A pergola can be a great place to relax around the pool, in the garden or as an extension to the house. This type of light building is sure to add a "zest" to the overall design of the site.
classic pergola

To build a pergola, fewer materials will be required than for a traditional gazebo, but if desired, the list can be supplemented with roofing and slats for diagonal cladding, as well as other elements.
The diagrams below show dimensions in feet and inches. In the table of materials, they are already converted to millimeters.
| The main structural elements of the pergola | Necessary materials | Dimensions of parts, mm | Quantity, pcs. |
|---|---|---|---|
| Column Foundation | Asbestos concrete pipes | Ø 200÷250, length 1200÷1500 | 4 |
| Cement, sand, gravel or crushed stone for filling pipes. | Depending on depth | ||
| Racks | bar | 100×100×2400 or 150×150×2700 | 4 |
| Embedded anchors (if needed) | 4 | ||
| support beam | Board | 50×150×3600 | 4 |
| Cross beams | Board | 50×150×3600 | 13 |
| crossbeams | Board | 50×150×3250 | 5 |
| Fixing support beams | screws | M6×175 | |
| Fastening for cross beams | self-tapping screws | 150 | |
| Crossbar fastening | self-tapping screws | 75 |
Work on the construction of a classic pergola is carried out in the following order.
| Illustration | Brief description of the operation to be performed |
|---|---|
 | The construction of a pergola begins in the same way as any building - with the marking of the territory, after which holes are drilled in the ground for a columnar foundation. Hole diameter 250÷300 mm, depth 900÷1000 mm. At the bottom of the prepared pit, crushed stone is poured with a layer of 80 ÷ 100 mm thick and thoroughly compacted. |
 | Asbestos-concrete pipes are installed in the pits, leveled, and then soil mixed with crushed stone is compacted around them. After that, the solution is kneaded, which fills the inside of the columnar foundation supports. |
 | Pergola posts can be fixed to foundation piles in two ways. The first of them is their installation in poured concrete and fixation with spacers - until the solution has completely set. |
 | Another option for fixing the racks on the foundation are embedded anchor metal holders with a leg, which are embedded in the concrete that has not yet hardened. |
 | The holder embedded in the pole looks like this. |
 | Concrete poured into asbestos-cement pipes should set well, it needs to be given at least three to four days for this. This time can be used to decorate the space that will be covered by the pergola elements installed in the form of a roof. |
 | This area can be cleared of the upper fertile layer, covered with sand and cultivated with paving slabs. In addition to this option, there are other modern garden coverings that do not require time-consuming preparation of the base, but simply fit into the place chosen for them. |
 | After the concrete has hardened, the pergola racks are installed and leveled to the building level. The racks are fixed in the holders using M6 screws with wide washers. |
 | The support beams are given a classical shape in advance - it may differ somewhat in the shape of the sections. Further, they are fixed on racks in pairs. |
 | Having fastened together two racks, the support beams give the structure the necessary rigidity. Their installation is carried out according to the scheme using bolts or self-tapping screws. They are installed in such a way that they protrude beyond the perimeter indicated by the racks by 250 ÷ 400 mm - the value of such an overhang will depend on the preference of the master or the owner of the site. |
 | If you imagine this process schematically, it will look something like the one shown in this picture. |
 | Having fixed the support beams, they are perpendicularly blocked by transverse beams, of which 13 pieces are provided in this project, and they are installed in increments of 300 mm. However, it should be noted that there may be more or less of them, and how much the space under the pergola will be shaded depends on their number. Boards for beams must be perfectly even, as their curvature will immediately catch the eye. |
 | In order to make the structure strong and rigid with the help of transverse beams, two grooves are cut in these elements on each side at ⅓ of the height of the beam, on which it is installed on the support beams, as shown in this figure. After they are installed, they are fixed from above to the support boards with self-tapping screws 150 mm long. |
 | To make the installation of transverse boards less complicated, you need to accurately measure all the distances and depth of the grooves. If the markup is carried out correctly, the installation will go smoothly. To make the grooves neat and even, cuts are made in the boards to a marked depth, and then the cut piece of wood is selected with a chisel and a hammer. The best option is to make one template beam, fit it exactly, and then cut out the required number of “clones” on it. It is immediately necessary to drill vertical holes for self-tapping screws, which should fall exactly in the center of the selected grooves. |
 | After the installation of the cross beams is completed, five crossbeams are installed perpendicular to them and parallel to the supporting boards. They are also fixed on measured and cut grooves - according to the same technology, which was mentioned a little higher. |
 | If there are 13 cross beams, then the same number of grooves should be cut. Moreover, the crossbars should be put on with grooves on the crossbars freely, so the grooves are made slightly larger than the thickness of the boards on which they are installed. After that, the assembly of the pergola can be considered complete. |
As you can see, the assembly of such a pergola is quite simple. The main thing is to prepare high-quality material and be very careful about the manufacture of parts.
Miniature pergola gazebo

This is the most compact version of the pergola, which at the same time will serve as the basis for liana plants, will decorate the site and create a secluded place for privacy lovers.

To make such a mini-pergola gazebo, you will need the following materials:
| The main elements of the design of the gazebo | Necessary materials | Dimensions of parts, mm | Quantity, pcs. |
|---|---|---|---|
| Pillar foundation (if needed) | Asbestos concrete pipes | Ø 200÷250, length 1200÷1500 | 4 |
| Cement, sand, gravel or crushed stone for filling pipes. | Depending on depth. | ||
| Racks (A) | wooden beam | 50×100×1800 | 4 |
| Seat frame (B) | bar | 50×100×1625 | 2 |
| 50×100×460 | 3 | ||
| Bench back (C) | bar | 50×100×1625 | 2 |
| 25×100×275 | 13 | ||
| Cross beams (D) | Board | 50×200×1800 | 2 |
| bar | 50×50×840 | 9 | |
| Seat (E) | Board | 20×100×1625 | 6 |
| Lattice cladding (F) | bar | 50×50×1350 | 4 |
| 50×100×410 | 4 | ||
| Expendable materials | Nails, screws and screws. |
In order not to repeat ourselves, it must be said right away that for this gazebo, as well as for previous buildings, a foundation is being laid. Since this version of the structure has a very small weight, it is most likely not necessary to make a deep foundation. If the site has a cemented or tiled platform, then this small pergola can be installed on it by inserting the racks into special stands that are fixed to the base. In addition, it is recommended to cement the lower part of the stand so as not to accidentally injure your leg on a sharp metal corner.
screwdriver

Further installation operations are carried out as follows:
| Illustration | Brief description of the operation to be performed |
|---|---|
 | The racks on which all other structural elements will be fixed must be prepared by making cuts in their upper part - they will be needed to install the cross beams. |
 | The next step, in order to ensure the rigidity of the structure, is to assemble the seat frame and attach it to the uprights. The fastening must be reliable, so it is advisable to use metal corners for it, which are installed on the underside of the frame frame. Installation height is indicated on the assembly diagram. |
 | Further, the back of the bench is assembled from the timber and boards, which will strengthen the rear pillars of the structure. It is recommended to assemble this element separately and fix the backrest on the rear pillars of the structure in finished form. Since there will also be a large load on the back, it may also be worth using metal fasteners that need to be installed from the back of the back, connecting it to the support posts. |
 | When the racks are securely fastened at the bottom with the seat and back frames, you can proceed to fastening them at the top. In this model, curved parts are made for the longitudinal beams - a 50 × 200 mm board is used for them. A curved beam is cut according to a pre-drawn pattern using an electric jigsaw. After that, the beams are cleaned and polished with sandpaper of different grain sizes. The finished parts are installed in the cuts, equipped in the upper part of the support posts, and then fixed in them with the help of self-tapping screws. |
 | Further, longitudinal cladding boards are screwed onto the frame frame of the seat in three places with self-tapping screws 30 mm long. They are distributed evenly on the frame bars, and between them it is necessary to leave gaps of 5 mm wide for good water drainage and ventilation of the wood. |
 | For the manufacture of side lattice panels, a beam of 50 × 50 mm is taken, from which a frame is made, on which a finished lattice ordered from professionals is fixed. The grate can also be made independently, for example, by spreading the beam with a circular saw into slats 5-7 mm thick. The grille is mounted on a frame made of timber between two wide glazing beads, which will ennoble the grille and make it neat by closing its edges. |
 | The next step is to mark the installation step on the curved crossbars, and then fix the perpendicular boards with cuts and self-tapping screws, which are installed on the edge. If desired, the roof can be covered with roofing material. |
 | To protect the wood from moisture and transform the appearance of the pergola, it is covered with paint or stain and varnish. The color is chosen depending on the general design of the landscape of the site. |
After getting acquainted with the manufacturing technologies of gazebos of various designs, it is possible to choose the one suitable for your own site, objectively evaluating your capabilities in carpentry. After that, you can safely get to work - the main thing is not to rush and make all the parts and their connections as accurately as possible.
And at the end of the publication - an interesting video in which the master shares his secrets of the quick construction of a garden gazebo.
Video: a master class on the quick construction of a gazebo
A gazebo in the country or in the courtyard of the house is a place for tea drinking and gatherings in the summer. In buildings slightly larger, it can be installed. Then you can think about glazing it: barbecue in winter is a rare pleasure, and the barbecue will simultaneously warm the air inside. They usually start with simpler and cheaper models: they build a gazebo with their own hands, most often there is not enough time. Hence the choice. We will talk further about how to do it correctly, about materials, methods, methods of construction.
A little theory: what are gazebos
Nothing complicated: let's talk about the types of gazebos and the materials from which they are built. First of all, buildings of this type are divided into open (summer) and closed (glazed). This does not mean at all that there are only two of these types: there are also combinations with removable glazing, and there are also awnings made of transparent film, which, if necessary, are stretched over the frame of the gazebo. Another option - some of the walls are closed, some are open. Choose the one that is closer to you.
With or without floor
More gazebos can be divided into those with and without a floor. Gazebos without a floor are placed on a prepared platform made of paving slabs, filled with concrete, lined with paving stones, etc. Although no one bothers to build directly on the grass. Only the framework must be treated accordingly: direct contact with the soil requires enhanced protection measures. If we are talking about a wooden arbor, it is impregnated with rot and fungal infections, if it is made of metal, it is treated with a rust preventative.
Pergolas with a floor suggest the presence of a foundation. Most often do columns. They can be folded from brick or buta, poured from concrete, put foundation blocks. If you have large flat-topped boulders to lean on, use those. But all this - if the building is light - on a frame made of wood or metal. required, albeit a shallow laying (20-30 cm below the level of the fertile layer).

This is also a gazebo made of wood, but with a wooden floor. That's why she's up on her feet. The upper part is originally finished in it - the binding from processed thin boards looks great
If you want to tile the floor in the gazebo for a summer residence, you will have to fill in the insulated slab with concrete, and put frost-resistant types of tiles on it. Moreover, the insulated slab must be at least 50 cm wider in all directions than the building on it. And these 50 cm are made at a slight slope so that moisture drains. This is actually, which will not allow the soil to freeze under the gazebo. So the tile will not turn out and it will not crack.
materials
The frame of garden or country arbors is made of three materials:
- wooden bursa or round timber of small diameter;
- steel pipe (from a profile it is more convenient);
- polymer pipes (PVC).
The only material that does not require protection is polymers. They do not rot, are not affected by fungi. Some species tolerate freezing and thawing without much harm. So they can stay over the winter. That's just to make the gazebo for giving PVC pipes durable, they need a solid diameter and with a thick wall. And even in this case, you don’t need to rely on the frame: you will have to install such furniture that will not put pressure on the plastic. Well, the brazier will need to be put aside (if provided).

In order for a wooden garden gazebo to remain attractive for a long time, all the wood that will be used in construction must first be coated with a protective impregnation in one or two layers. The cheapest today are the SENEZH and Usadba impregnations, and the reviews about them and their protective properties are very good. These manufacturers also have tinting compositions.
This is the whole theory in a nutshell. There may be some other special cases: there are many materials, as well as the possibilities of their combination. We will publish the most interesting original gazebos from non-standard materials at the end of the article. And now - practice.
How to make a gazebo with your own hands
Most often, we build garden arbors made of wood on our own. The second place in popularity is with metal ones. Everyone else does it infrequently. Brick and from other building materials due to the fact that they are expensive, from PVC pipes - because there is no confidence in the material.
We will analyze an example of building a frame gazebo made of wood. But even if you are going to make it out of metal or PVC, the procedure will be the same. Another principle of connecting frame materials, but otherwise, everything is the same.
When working with wood, it must first be treated with antibacterial and flame retardant (reducing the combustibility of the material) impregnations. Only after the compositions have dried can you work. If this is not done, the wood will darken very quickly and lose its attractiveness.
Drawing
Two similar projects were implemented, of the same type: a quadrangular gazebo under a gable roof, only with different sizes and they were designed differently. A drawing of one of them, see the photo below.

Rectangular gazebo with a four-slope roof (in one project, the roof was replaced with a gable roof)
Step by step instructions with photo
It all starts with site preparation. If there is sod, it is removed, and the fertile layer is also removed. If this is not done, the roots, greens and all leftovers will rot. On sandy or sandy loamy soils, screenings, crushed stone or broken construction debris are poured into the pit, everything is tamped down, covered with sand from above. On clay soils, on which water does not drain well, it is better to fill the pit and compact your own soil (clay, but without a fertile layer). Otherwise, water will accumulate and stagnate in the pit, which will lead to an unpleasant odor. Not what you need at all.
The choice of the type of foundation and the lower trim
If there is not much time, the fastest way is to install ready-made concrete blocks on a compacted pillow. More time will have to be spent if you fold brick columns, even more - pour them out of concrete. The distance between the supports should be no more than 1.5-2 meters. More specifically, it depends on the thickness of the timber from which you will make the strapping. Under a bar 100 * 100 mm, the distance is 1.5 meters, under a metal profile pipe 60 * 60 mm can be placed every 2 meters.
When all the supports are installed and level (use pegs, a stretched string and a building level), waterproofing is laid on them. This is roofing material or roofing felt, rolled up in two layers, or bituminous mastic, which is also impregnated twice with the surface. Then the lower trim of the gazebo from the timber is laid. Everything is hammered together with nails of at least 150 mm in length or connected with wood screws. For greater strength, corners are used (if you find reinforced ones - as in the photo - it will be great). Although the gazebo is built initially as a summer arbor, after some time the majority decides to glaze it. That's when a margin of safety is needed.

Rack installation
At this stage of the construction of the garden gazebo, it is important to place the racks strictly vertically. It is undesirable to use the building level: it has a large error, especially for household models, which are usually used by developers. Therefore, we take the good old plumb line and put it on it. Check the vertical from two adjoining sides so that the racks do not fall anywhere.
Fix the racks with jibs (see the photo). If they interfere with you in the future, you can make a temporary option, as in the photo on the left. If the sheathing below is opaque, do it thoroughly: cut down the beam at 45 ° (it is more convenient to use a miter box) and nail it with two or three nails obliquely. Check if it has gone astray after each mowing installation. These small triangles give rigidity to the whole structure and it stops staggering.

Two projects and two ways to set the corner bars correctly. On the left - temporary jibs, after installing the strapping they will be removed, on the right - permanent
Top trim and floor boards
Further, after all the racks are installed and fixed, the upper harness is mounted. There shouldn't be any problems here. To increase the reliability of the connection, use the corners. Racks, by the way, can also be fixed on the sides with corners. Especially if there are no permanent mowings. Otherwise, your design from lateral loads may develop.
After that, the floor boards are laid. It is very desirable to treat them on all sides with antibacterial impregnation for wood in direct contact with the ground. Senezh has two such squads. One of them is called "Senezh", the other "Senezh-Ultra". They differ in that "Ultra" does not stain the wood, and "Senezh" gives it a greenish color. If you cover everything with a dark stain, the greens are invisible, such a composition is not suitable for a light one.

After laying the floor, it is better to paint the boards, otherwise, by the time you finish the construction, they will get dirty. Therefore, take the time to apply varnish or oil-based tinting paints - the best option for outdoor wood. Do not confuse with oil paints! These compounds are often called wood oil, because the base is oil, to which protective substances and coloring pigments are added. As a result, the wood takes on a different shade (even pink or green, if you so desire), but the texture becomes clearer, and not painted over.
Medium strapping
The next step is to install the middle strapping, if there is one for the project. A quarter is taken out under the beam in the racks - a small recess, in this case, with a beam of 100 * 100 mm, a quarter is 25 mm.

Making a roof
While the frame of the wooden gazebo dries, you assemble the truss system. It is a triangle (see the photo below).

They are installed on the frame. This project does not include a roof overhang. Therefore, they are simply placed strictly vertically and nailed directly to the beam of the upper trim. Such a roof is easy to install, but the rain will pour heavily inside even with a slight wind.
If you do with overhangs (the roof protrudes beyond the perimeter of the gazebo), then in the beam you will have to cut out “seats” under the rafters. They look like triangles (see photo).

Two options are shown. In fact, there are more of them, but since the roof is small, the first, the simplest, will be enough. In order not to mess around with each triangle, sawing the wood at the top, make a template. Take a piece of board, cut out a hole of the desired shape, try it on, check it, adjust it. Then you just put it in turn to all the rafters, draw around with a finely sharpened pencil and cut it out. What's the best way to cut? Electric jigsaw, but you can also use a hand saw. Having prepared all the triangles, throw them up and install (with long nails obliquely from the spirit of the sides, you can still fix them with corners). Before fixing, do not forget to check the vertical and horizontal.
After installing the triangles, the crossbars are stuffed: two on both sides of the ridge, and then with a step that depends on the type and type of roofing material. Under, for example, a solid crate is generally needed. Then the entire truss system is painted. And then the roofing material is mounted (in this case, a metal profile).
Finishing
The bottom trim is nailed last. In this project, lining was used, which was then painted with wood oil.

This country gazebo is from the category of "simple, fast, cheap." Having it as an example, you can make something of your own, more, in your opinion, attractive. Here, for example, what happened according to the same project, but in a different design: sheathing of the veranda from a blockhouse, which is painted in a light color, and the frame is dark.


And also - such an option: country gazebos for this project turn out to be completely different
We will lay out several more complex projects with drawings and dimensions below, and even more interesting photos, but without drawings at the very bottom. Might be useful to someone...
Sketches of gazebos with drawings and dimensions
Available sizes can be scaled up or down proportionally. It is important that you understand that with a significant increase in size, a more powerful frame is required. Do not forget about this, and everything will work out for you: a gazebo made by yourself will be beautiful and reliable.
simple wooden gazebo
Almost the same project, but with different dimensions: the upper point of the roof is raised higher, which makes it visually lighter. The gazebo is also quadrangular, the roof is hipped.

When constructing such a roof, the most problematic are two places (nodes) indicated by circles. How to do them, see the photo below.


Chinese style gazebo (with drawings and dimensions)
A project with all dimensions, foundation layout, roof truss system, etc. Arranged in a photo gallery.
" data-link="file" data-itemtag="dl" data-icontag="dt" data-captiontag="dd" data-columns="0" data-size="large" data-width="600" data-auto="false" data-max-width="100%" data-ratio="1.1029411764706">
Main façade - height from floor to top rail 2.160 m Main façade without roof: vertical posts 150*150 mm  Cross section of a wooden arbor. In the photo on the right - how to make raised ends of the roof Installation of floor beams (the numbers are the designation of the material from the specification) Detailing node 2 - how to install racks How to make steps to the veranda - node 2 Attaching the truss system to the upper trim - on wooden pins
Large gazebo on the foundation
Before you build this gazebo is required. Its parameters depend on the soils, on the material that you are going to use for the frame: metal or wood, and what you are going to glaze it with. In general, the width of the tape is about 20 cm, the depth of occurrence is 20-30 cm deeper than the level of the fertile layer. On heaving soils, it is better to do the so-called.

Drawing gazebo-swing
The swing arbor requires special attention: it is fixed very firmly so that the resulting variable loads do not loosen and turn the structure over. To do this, you can extend the legs down, dig a hole under them, fill them with rubble, tamp, and then pour everything with liquid concrete. If you make the frame from a pipe, there are no questions; for a tree, you can use “P”-shaped fasteners with a pin mounted in the lower part. Here it can be bent and poured with concrete.
For even greater reliability, crossbars are attached to the legs, which turn out to be slightly recessed into the ground. They are hammered with U-shaped staples.

Photo of original wooden gazebos without drawings
This option is both stone and wood. Oprahs made of timber are installed on columns made of rubble. The style is the same - dried trees are used as supports.


