? Even the most experienced photographer would probably be baffled by something like this. Reasoning will begin that is incomprehensible to a beginner: what, they say, are needed, four of them, and then you need to look at what to photograph - this depends on what to buy for use. And the culmination of the reasoning may even be that it is generally better to start with one illuminator. Having only one lighting fixture in his arsenal, a beginner will quickly figure it out, understand and decide what equipment for a photo studio and what kind of light he needs to buy, and how professionals generally handle studio light.
But many years of sales experience suggests that the requirements of beginners who want to join are simpler:
- small but sufficient power of devices;
- versatility;
- low price.
It’s rare that someone will immediately say: “I will only do subject photography, and I’m not interested in portraits.” The neophyte wants to try all types of studio shooting. Which one should you choose then? What to prefer - a set of pulsed light or constant? The main thing is to ask the right questions. So, the main questions that you need to answer yourself are as follows:
- budget size;
- what camera do you have;
- How skilled a user are you?
The available budget will tell you which class of devices to choose, the quality and quantity of accessories. A camera, and the ability to use it, helps determine which one to choose. - or . If your photographic skills can be improved fairly quickly, then changing a camera on a small budget is most often critical.

Let's look at the issue in more detail.
If you have a compact camera that cannot shoot in manual mode and does not have a hot shoe, then only constant light will suit you for shooting in the studio. Or, before, you will have to change the camera to a SLR. Don't look for workarounds; you won't match the pulsed light with your point-and-shoot. This will be torture!
If you don’t yet know what shutter speed, aperture and manual mode are, you are quite happy that everything on the camera can be done with one button - your choice, again, should be only constant light.
If the photographer’s enthusiasm is enough to study the instructions for the DSLR, then you can already think about purchasing a studio light kit for a photo studio with a pulsed source?
And, of course, if you are an experienced user of your SLR camera, you know what exposure is and the word “stop” does not make you want to stop, but only the question “how many stops?”, then all the paths of the studio dao are open to you!
If you cannot make a choice, you should contact the specialists of the Photogora store, here you will be given qualified advice over the phone. And we, the Photogor blog team, will definitely continue to do reviews in which you can read about different studio lighting products; compare brands and studio light kits to make it easier for photographers to make the right choice. Follow our reviews here on the website. And if you are registered on social networks, then subscribe to our groups to quickly receive the latest information.
Let's look at the basic properties of pulsed and continuous light.

How to make a choice?
Today the choice lies in two things.
Firstly, the price/quality of studio lights. In principle, as in any production, among studio equipment manufacturers there are: justifiably well-known brands; popular brands; there are new, little-known, but high-quality ones.
Secondly, an important factor is the functionality of the illuminators. From this point of view, there are also a lot of parameters that affect functionality. It will suffice to give a simple example. The most famous parameter of any illuminator is power adjustment. So even this is not the case with all devices, but this is one of the main parameters that helps the photographer control the light. Whether it's pulsed light or constant light. The presence of adjustment is a definite plus, but it is also necessary to pay attention to the depth of adjustment. On the simplest, amateur devices, you can often see a value of 1/8 of the full power; modern professional illuminators already have 1/128. And if 1/8 allows you to control light within 4 apertures, then 1/128 up to 8 apertures.
That’s why, even a seemingly powerful, but non-adjustable light source from a well-known manufacturer may not be much more interesting for working in a studio than a construction spotlight.
GregoryVasiliev , photographer, specialist in “Studio equipment”
Here you go. Congratulations. You have finally bought yourself your first real “good” camera. Exactly the one you have been wanting to buy for a long time! Now you get creative. Now you can move mountains! Now you will take your photography seriously.
But we will moderate your passion a little. Don't rush. It's not that simple. Buying a good camera, unfortunately, entails a lot of other purchases. What exactly should you buy first? What range of photography equipment is produced by the manufacturer on the market today? We assure you, and you yourself probably know, the choice is quite large. Very big.
What exactly will you need for work besides the camera itself? This is what we will discuss in our article today.
The beginning of a creative journey
Yes, indeed, when you have decided to take up creative photography, you may even become scared of how much you can see on the shelves of specialized photographic stores. As they say, my eyes widen. And if you look at the price lists of these photo stores on their websites, you can go crazy. Including the cost of everything offered to you by these stores.
We dare to assure you that it is almost impossible to take any photographs without this or that specific equipment. Alas, this is true. But, if you think about it, it becomes quite obvious that some of the equipment you have does not take part in creating this or that picture.
Today we will try to tell you how you can, as they say, “squeeze” the maximum out of photographic equipment. We think that our advice will be useful to many. Mainly, of course, for those who do not have the opportunity to purchase expensive and varied photographic equipment from various prestigious manufacturers.
1. Five-in-one reflector

The main thing in photography is light. It’s not for nothing that photography is translated as light painting. But sometimes it is precisely this, light, that the photographer lacks to create this or that picture. There is not enough there, in that specific place where exactly it is needed. Want an example? Please. Portrait on the street. On the street, as you know, the main source of light is the sun. Therefore, almost always the main flow of light comes from above. Well, and, naturally, with such lighting, dark circles appear under the eyes of the person being portrayed and under his eyebrows. How to get out of this situation? It's not difficult at all. You just need to redirect the sunlight in the direction you need. So to speak, turn the river back. And make the sun shine on the model’s face not from above, but from below. This is easy to do using a reflector. You can simply give the reflector to the model and show her how to hold it correctly. And if you are filming a person who is sitting, for example, on a bench in a park, place the reflector directly on his lap. And then you are guaranteed to be free from unpleasant and unsightly shadows, including under the nose and under the eyes.
A five-in-one reflector is a very good helper in redirecting light. Plus, it's very inexpensive. This photographic accessory is based on a steel folding ring on which a diffusion material is stretched. There are usually four other surface options attached to the surface of this ring.
The basic diffusion material of such a reflector itself is perfect for making a bright shadow out of the sun. This option for working with a reflector is very suitable for photographing small objects, as well as portraits at close range. In some cases, such a reflector can be used to diffuse the light of a pulsed source, in other words, a flash.
Typically, a five-in-one reflector kit includes three surfaces. The first one is white. It serves to softly fill an object with light. The second one is silver. This one is for strong, rich filling. And finally, the third one is gold. It is necessary in order to make the light flux somewhat warmer. Plus, in some cases, these three surfaces also include a black surface. It serves to eliminate excess light in order to return the shadow to some uniformity.
Five-in-one reflectors are a very affordable accessory for any photographer. It is inexpensive in cost and quite small in size - it can easily fit even in a small pocket of your camera bag. We strongly recommend purchasing such a reflector. For whom? For those who have a limited budget. For photographers who like to work in natural light. Cost: 20-50 dollars. The price depends mainly on the size of the reflector.

2. Lens with fixed focal length 50 mm.
The most important part of your camera is its optical system, that is, the lens. It is the lens that creates the photographic image on the sensor. The matrix only fixes it. It just so happens that choosing a lens for a camera is a kind of compromise between its many parameters. This includes aperture ratio, focal length, quality of the created image, and much more. The cost of the lens is also important in this regard. Unfortunately, lenses, like any other high-precision optical and mechanical system, have always been very expensive.

Now we will talk about a lens with a fixed focal length of about 50 mm. Now everyone is accustomed to lenses with variable focal lengths, but 15-20 years ago such lenses were rare. They were called zoom lenses back then. Now, on the contrary, few people, except perhaps specialists and advanced photography enthusiasts, know about the existence of so-called “fixes” - lenses with a fixed focal length.
“Fix” can be safely called a necessary thing in a photographer’s arsenal. It's hard to name the best of them. But, nevertheless, it can be called one of the most popular and widespread among photographers. This is a Canon 50mm f/1.8. Lens with a fixed focal length of 50 mm. Sometimes such a lens is called “fifty” in slang, or even more simply, “fifty kopecks”. Several companies produce similar lenses. But the Canon 50mm f/1.8 can be called the best for several reasons. First of all, it is quite small in size, but thanks to its wide aperture (f/1.8) it is quite fast. Canon 50mm f/1. creates a very sharp and good quality picture. Well, and, which is very important for some, it is not at all expensive for its price. So, if you have set yourself the goal of purchasing the ideal lens for shooting portraits, then choose this model. In addition, it will greatly help you take decent quality pictures in poor lighting conditions.
Of course, like any other thing, the Canon 50mm f/1.8 prime has its downsides. Without weaknesses, especially in technology, it is simply impossible. The first disadvantage is the cheap plastic case. Of course, this reduces the cost of the lens and its weight, but in no way increases mechanical reliability and longevity. Protection from bad weather conditions, dust and moisture is also a weak point of the Canon 50mm f/1.8. Another disadvantage is that in low light conditions this lens focuses rather slowly. Also, this “fix” does not have an image stabilization function. And the focus ring is also very small and inconvenient to use. But, despite all its disadvantages, the Canon 50mm f/1.8 attracts, first of all, the quality of the image created and, of course, its low price.
For whom? For those who want to purchase an inexpensive but fast lens with excellent image quality.
Cost: 100-200 dollars. The price depends on the manufacturer.
3. Good reliable tripod

As we already wrote today, very often when working, photographers are limited in the amount of light. With insufficient lighting, all sorts of compromises have to be made. This mainly concerns settings. If you need to take photographs with long exposures, then when shooting handheld you always have an increased risk of ending up with a blurry picture in the photo. Even an extremely experienced photographer will not risk shooting handheld at a shutter speed longer than 1/15 of a second. Vibration in the hands is inevitable for any person.
Problems of this kind can easily be resolved by using a tripod. When shooting from a stable and motionless support, vibration is virtually eliminated. So you can work even at the longest shutter speeds, up to several tens of minutes and even several hours (if necessary). Solving problems with camera vibration when shooting is far from the only opportunity that a tripod provides a photographer. A tripod significantly expands the author’s creative possibilities. For example, without using a tripod it is impossible to create some interesting special effects.
In short, a tripod is perhaps the most versatile and versatile accessory for both professional and amateur photographers. It allows you to do things that are simply impossible to do without it. There is no substitute for a tripod.
But, nevertheless, when buying a tripod, let me warn you about something. Buying a tripod is like walking through a minefield. This topic should have been studied in advance and separately. The fact is that industry around the world produces a huge range of tripods. From very bad models to very expensive ones. For your first time using a DSLR, we recommend purchasing a model from the end of the standard line from one of the well-known brands.
Look for this information yourself. This will expand your knowledge and experience in this area. But, nevertheless, we will still give one piece of advice: you should not buy a tripod in department stores. A purchase made at a specialized retail outlet is much more reliable. For whom? For those who want to get into macro photography, who like to shoot landscapes in low light, still lifes and portraits, for those who like various special effects when shooting.
Cost: $100-200 for a first-time purchase model.

4. External flash on hot shoe or wireless flash

This accessory most often becomes the first of a number of purchases made after purchasing a camera. But, unfortunately, inexperienced and novice amateur photographers sometimes take very serious risks in their haste. The thing is, it's very easy to end up paying a lot more for a flash than you need. This mainly happens for this reason. The popular flash models from Canon and Nikon are very expensive. Their price also includes a huge number of various functions that a novice photographer does not need at all. And, to be honest, even experienced professionals use these functions quite rarely.
To begin with, we recommend purchasing an inexpensive flash from a not very popular manufacturer, which would allow you to manually adjust the flash power. The E-TTL automatic exposure system found in expensive flash models is, of course, very convenient. But manual power adjustment is not at all difficult to master. And the difference in the cost of these two proposed purchase options will allow you to save quite a lot. You won’t believe it - to such an extent that instead of one top-end flash, you can buy two or even three, but not from such popular brands. In addition, manual flashes are fully compatible with many radio sensors available today, giving you the perfect opportunity to work with them without mounting them directly on the camera. A kit like this will give you a lot of new creative possibilities.
A good flash makes a photographer quite flexible in his work. Especially when you have to take pictures in low light. But you will only really get a taste for working with flash when you remove it from the camera. Two or three flashes, a radio sensor, as well as all sorts of light modifiers can radically change your approach to work and change your photographs beyond recognition. Plus, several wireless flashes will add a lot of creative possibilities to you, you can master non-standard shooting techniques. And if you combine all these advantages with shooting from a tripod, then there will be no price for your creative work, there will be no ceiling for your creative flight.
Summary: if you study this issue thoroughly and consciously and competently approach the purchase of a flash, then for the same money, instead of top-end Canon or Nikon, you can purchase almost the entire set of pulsed lighting devices described above.
For whom? For those who need to take photographs in difficult lighting conditions, in low light conditions. For those who like to experiment when shooting and create unusual images.
Price. 100 - 200 dollars. Depending on the brand and technical capabilities.
5. Main lens

Most likely, if you purchased your first SLR camera in a specialized store, and not in the market or under the counter from a dubious person near a liquor store. This means that your purchase was equipped with a so-called kit lens. That is, a lens that is basic and basic for this particular model. Usually such lenses are quite decent. There is no reason to be intimidated by the opinions of non-specialists in this matter, who very often criticize kit lenses. Moreover, if your device came from the factory of a well-known manufacturer who tries to keep the quality level of its products high. But, nevertheless, do not forget that these same companies, for example Canon and Nikon, also produce other, higher quality lenses.
Many of the basic lenses are not fast enough. Their second common disadvantage is that they create a not very sharp picture. They are also most often made of plastic. And if you have set such a serious goal as to achieve success in photography, then you will probably want to purchase a few more lenses.
The main lens of a photographer can be called the lens with which he works most often, which is inserted into his camera almost constantly. That lens that you take out of the camera only in case of special need, when you need to photograph something non-standard, unusual. Your primary lens will be the one you use to take the vast majority of your photos. Most often, it is this main lens that, after some time, begins to dissatisfy the photographer. It becomes “small” for him in terms of its capabilities, the quality of the created image and many other parameters. This is why primary lenses are most often changed, not additional ones. Once you have experience, once you begin to feel the camera as an extension of yourself, you will most likely want to buy another lens.
And imagine that such a moment has come to you. And financial opportunities are shaping up favorably. You have come to a specialized photographic store to purchase a new main lens. Of course, the choice of lenses, as well as other photographic accessories, is very large today. We have already talked about this above. So, before making such a responsible and expensive purchase, we advise you to think a little. Think about what exactly you need, what is especially important to you in this lens.
So, you need to evaluate, first of all:
- lens weight.
- How often will you use it in low light conditions?
- What do you dislike most about your current lens?
- Do you want as many objects and elements as possible to fit within the boundaries of your frame, or do you, on the contrary, want to bring closer what is located far from you?
All these factors should primarily influence your decision when choosing the main lens you need. Let's say right away: such a lens is very expensive. A good lens is a very expensive pleasure. If we are talking, of course, about a high quality lens, with wide technical capabilities and produced by a well-known manufacturer.
With so many parameters and technical characteristics, with such capabilities of modern technology, modern industry, in this case it is very difficult to give any recommendations. At least, it’s definitely not possible to fit all this into one article.
But we will still give you at least some recommendation. It's short. Before you purchase your primary lens, be prepared to sift through a sea of information. Learn as much as you can about modern lenses. Read specialized books and magazines, visit photography sites, try to pester experts and high-class professionals. Understand everything to the maximum. And only after that stop in your choice. Remember that if the purchase is successful, the lens will delight you with wonderful pictures for many, many years.
For whom? For those who have decided to seriously devote themselves to photography, as well as professional photographers. Cost (very approximate): 300 - 1800 dollars.
Subject photography at home is possible not only in fantasy, but also in reality. Many photographers, especially beginners, think that subject photography can only be done in a specially equipped studio. But they are completely wrong. Even at home, it is quite possible to create a small but effective photo studio to take high-quality photographs.
Required equipment
A table for product photography is the simplest option. You can use it to photograph small objects or shoot still lifes. This table is very easy to build by hand. Even an inexperienced photographer can cope with this easy task. First, you need to purchase a fairly large sheet of white cardboard. Secondly, you need to find. To do this, you can take any thick book, vessel or any other large thing, since the support will not be visible in the frame. It is better to place a table for product photography on a wide windowsill. Particular attention should be paid to the incident light from the sun. After all, if the subject being photographed is located in a bright strip of sunlight, it will cast rough and deep shadows on the table, which will not lead to the desired result in the picture. That is why a window that faces the shady side is the best place to organize a specimen table.
How to make a photobox?
There are special professional photo boxes for subject photography. Their price is quite high, so there is no point in purchasing such structures for one-time work. A high-quality photo box can be made at home. To do this you will need a cardboard box and a sheet of Whatman paper. It is desirable that the selected cardboard box has a cubic shape. Next, the bottom of the box is removed, leaving the back intact. It is necessary to make large square cutouts on the top of the box and on its sides and seal them with whatman paper. The inside back of the box and the bottom itself should also be covered with a sheet of white paper. Based on the above steps, making a photo box at home will not be difficult at all.

Ordinary background
Product photography at home does not require the photographer to work with a photobox or table. It is quite possible to do without these things. Many amateur photographers choose the simplest method of shooting. Before starting work, it is necessary to determine which section of the wall of the home is the lightest. If the wall is not a single color, it needs to be covered with a background (for example, a sheet of whatman paper or a piece of fabric). The subject to be photographed must be placed on a stool, which is covered with the same material from which the background is made. It is better to photograph various jewelry on polished granite, then the beauty of the jewelry will be clearly visible in the photo thanks to the reflective surface of this aristocratic stone.

How to properly organize lighting?
A great activity for a novice photographer is product photography at home. Light, correctly selected for the upcoming work, can radically affect the result of filming. Lighting directly depends on the selected equipment for work. If subjects will be photographed on the windowsill, then the main sun will be. If additional lighting is needed, a reflector can be used. You can make it yourself using cardboard and foil. If such items are not at hand, then even an ordinary white sheet of paper can serve as additional illumination. In addition, absolutely any light-colored surface can act as a reflector.
Lighting in a photobox
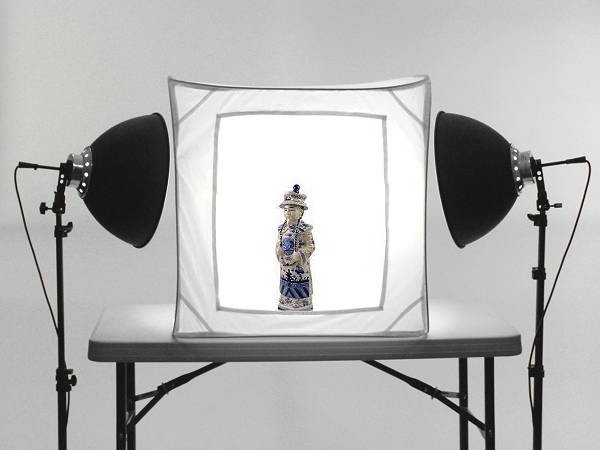
Product photography at home, which uses a photobox, requires a minimum of three light sources. Thus, the object will be illuminated through the walls of the photobox from all the necessary sides, that is, from above and on the sides. The result is a great looking photo with no harsh or unsightly shadows. If you pay more attention and time to setting up the right lighting, shadows in the photograph can be completely avoided. Additional light sources can be table lamps or any lamps that can be found in almost any home.
What photographic equipment should be used?
In product photography, clarity and sharpness of the subject is of paramount importance. To get beautiful and contrasting photos, you need to use a tripod. This is a simple accessory that will help avoid camera vibration when shooting at long exposures. If there is no way to purchase a tripod, then you can use some kind of fixed support instead. In addition, without a camera remote control, the shooting process can become quite difficult. In extreme cases, the remote control can be replaced with a cable to perform a contactless shutter release.

Correct composition
Product photography often involves painstaking work with composition. After all, it is not always necessary to place only one object in the frame. To correctly arrange several objects, you need to create a multi-level space. For this, various supports are used, which can be either visible or hidden under some background material. If you need to highlight one object among many others, then you need to emphasize it with the help of light or the location of the object in the foreground.
Product photography at home on a white background is the best solution for a beginning photographer. After all, white color will help create a clear and contrasting image. For uniform illumination, the background is usually illuminated from the front and back sides. To create a clear reflection effect, glass mirrors should not be used. They make the reflection double. For this purpose it is necessary to use polished material. If you need to secure a small product while working, you can use a miniature hot glue gun. First, glue is applied to the object itself, and only then the object is attached to the background.

Getting started
In order for subject photography at home to please you with an excellent result, you need to pay attention not only to the working equipment, but also to the object being photographed itself. The subject should be beautifully located on an improvised mini-site for filming. At this stage, you need to make all the necessary settings in the camera. Manual mode is the best choice for product photography. In photographs taken in automatic mode, exposure flaws are often visible. If the subject chosen for work is colorful and bright, and the background is dark or even black, then manual mode will be an excellent choice for shooting. A rather painstaking process is subject photography at home. White balance and sensor sensitivity settings are also extremely important. The ISO value should not exceed two hundred units. To reduce the noise level in a photograph, you need to lower the ISO number. This action is of great importance in the work of a photographer. After all, as a result, the object in the image should look natural and harmonious.
First shot
To get a high-quality photo, you need to turn off the flash on the camera. For good results, enough light from a window or table lamps. After the first test shot, you need to pause the photographing process. The resulting image must be carefully examined and analyzed. If there are visible problems in the photo such as exposure errors, unclear sharpness, incorrect lighting, then you need to correct all the errors by changing the camera settings or the light. If the repeated subject photography turned out well, then you can safely continue working.

A few secrets
Quite often, photographers are faced with the problem of lifelessness in their photographs, although at first glance everything looks perfect. If the photo needs to be creative, then you can make the image more dynamic. For example, you can add small sprays from a spray bottle that will create volume. An interesting addition could be confetti, feathers or even It is important that the auxiliaries do not fall on the camera lens. These secrets of product photography will help you achieve the necessary “air” in the final image. If the photo should be full of colors, you can try placing a New Year's garland near the subject. Thus, by choosing the flickering mode, it is possible to achieve interesting color accents. It is necessary to take a series of frames, and then select the most harmonious ones from them. As you work, you must constantly brush off dust from the objects you are photographing so that they look perfect in the photo. Product photography at home without expensive studio equipment is real. You just need to use the above tips and a good result will not keep you waiting.
Quite often, a photographer has to work in a studio. Recently, the practice of renting out studios has become very common. It looks like this. If the studio is rented, and usually on Internet sites where such a service is indicated, you call the studio and agree with the administrator for a certain time, if it is free. Then make an advance payment, come at the appointed time and rent for the allotted amount of time. Payment for a studio, for example, in Chelyabinsk, Yekaterinburg or Moscow ranges from three hundred rubles per hour and more. Prices may vary in other cities.

So, you have come to the studio and you need to briefly get acquainted with the equipment that is in it. Understand why it is needed and how to use it.
What should be the first thing in the studio? The first and main thing, of course, is the light sources. These sources come in continuous light and pulsed light.
Constant light sources These are ordinary spotlights, incandescent lamps.

Pulsed light sources are powerful studio flashes. For example, a flash with an umbrella attached. A large umbrella gives a soft, wide stream of light. It is mounted on a rail system attached to the ceiling and is easy to move from place to place.
Another common source is softbox. More precisely, it is not a source, but a nozzle.
Softboxes come in different shapes, but their purpose is the same - to soften and direct the flow of light in the desired direction.
Studio flashes need to be controlled somehow. What is used for this? The camera just won't light the flash. For this purpose, a special device is used, which is installed in the hot shoe of the camera and is called a synchronizer.
Synchronizers There are different types: infrared and radio synchronizers.
When you press the shutter release, the infrared synchronizer gives a pulse of invisible radiation, to which the light traps of the flashes react.
Radio synchronizers work differently. A special radio transmitter attachment is placed on the camera, and a receiver is installed on the flash, which gives an impulse to fire the flash.
The advantage of a radio synchronizer is that it operates at a long distance. The range of the infrared flash is limited.
In addition, the studio must have backgrounds. They are different, there are fabric and also paper.
Fabric backdrops are more durable. They can be washed and reused. But paper backgrounds are much smoother and if you highlight them, you get a smooth surface. The same cannot be said about fabric backgrounds. They need to be tightened tightly or additional means are used. Or process it in a graphics editor so that the background looks even.
The background can be a wall painted neutral gray. Backgrounds can be given any color.
In addition, the studio uses various stands and fasteners. And also screens and curtains to direct the light in one direction or another.
Below we provide a detailed business plan for a photography studio and consider the following important points of business organization:
- How to open a photo studio for rent and choose the right premises;
- How to open an individual entrepreneur for a photo salon, preparation of documents;
- Equipment for a photo studio, its cost;
- How to open a photo studio in a small town, and make it popular and profitable, methods of promotion.
Register best, it's easier and cheaper. Required codes OKVED: 74.20.– “Activities in the field of photography” and 47 – “Retail trade, except trade in motor vehicles and motorcycles.” The second code is required if the studio plans to sell goods.
The activity is not licensed. It is also necessary to register with the Federal Tax Service. The cost of the registration procedure is no more than $60.
Services
Main services of the company:
- Photo for documents;
- Carrying out studio filming, including interior photography;
- Filming for business, subject photo sessions, food photography;
- You can profitably rent out a photo studio for photo shoots;
- Printing photos from removable media;
- Development of graduation albums, photo retouching;
- Sale of related products - flash cards, batteries, disks, albums, etc.
Market analysis
In order to carefully plan how to open a photo studio, where to start and calculate the costs, you need to decide on the target audience. The main clients are photographers who rent a salon for filming, young people, couples with children, future newlyweds (Love Story filming). Average age category of visitors: 16-35 years.
Room
The best location for your studio is as close to the center as possible, an additional plus is the availability of a parking space. Most often, the studio is located in a business center, less often in shopping centers.
Additional clientele for printing will be obtained by locating near universities, migration services, and other government agencies. The area of the room is 60 square meters. Of these, 40 sq. m – studio, 15 sq. m – reception with an administrative desk and a small shop, 5 sq. m - bathroom.
Studio requirements:
- Warm floor, you should use laminate or commercial linoleum as a covering;
- Ceiling height – from three meters;
- Large windows draped with dark fabric. Drapery is needed for shooting with shutter speed and lighting. It should be possible to easily remove the fabric from the windows;
- Monochromatic wall decoration;
- Availability of air conditioning;
- Fire safety system, evacuation diagram, fire extinguisher.
Renting a premises requires monthly costs of $800-900. In how to open a creative photography studio, design is of great importance. You need to make your establishment a popular and fashionable place. Repairs and finishing will cost about $1,500.
Equipment for a photo salon
What do you need to buy to open your own photography studio?
Professional equipment
For a small company you will need:
- Digital camera and two removable lenses– $2500-2700. Good cameras are offered by Canon and Nikon, lenses - Sigma, Tamron;
- 4 light sources of various powers (aka flashes or monoblocks) 400-800 J each - $1200-1300. Falcon Eyes, Profoto, Bowens, Godox;
- 4 flash stands. Of these, three are standard (2-4 meters), one is a crane stand. Total cost: $150. Manfrotto, Falcon, Godox;
- Three softboxes different sizes – $130. Bowens, Green Bean, Lumifor, Dedolight;
- 2 photo umbrellas– 80-90 $. Lastolite, Elinchrom;
- Two stripboxes– 150 $. Falcon Eyes, Godox, Hensel;
- Two reflectors(1 with curtains) – $200-230. Profoto, Elinchrom, Bowens;
- Octobox– 130-150 $. Hensel, Fujimi, Godox;
- beauty plate– 120-130 $. Lumifor, Falcon Eyes, Godox;
- Two reflectors– 25 $. Lastolite, Westcott;
- Jelly color filters for flashes (6 pcs.) – $90-100. Maxilite, Falcon Eyes, Bowens;
- Radio synchronizers for flashes (2 pcs.) – $80-100. Youngnuo, Aputure, Godox;
- Set of paper backgrounds different colors – $150-200. Polaroid, Savage, Colorama;
- Backdrop holder automatic – $150-170. Manfrotto, Phottix;
- Accessories(memory cards, batteries, cables, fasteners) – $100. DigiCare, Fujimi, Nikon, Prolike, Transcend;
- Photo printer– 70-100 $. Zebra, Conica, Canon;
- Computer or laptop– 450 $. Asus, HP, Lenovo.
Furniture and software
To open a small photo studio, you will need to purchase furniture and display cases for the reception area. It will cost approximately $700 to purchase display cases, a cabinet, a table, a chair, a sofa for visitors, an air conditioner, a telephone and a cooler.
To process photos, retouch, create collages, you will need to buy licensed versions of programs such as Adobe Photoshop, Lightroom, Studio Pro. You will have to invest about $600 in software.
You should budget approximately $170-200 for the renovation of a bathroom.
How to open your own interior photography studio from scratch
In a small room it is possible to design five interior zones. The most popular options: an area with a fireplace for family photo sessions, a boudoir option with a mirror and a bed, a cozy area with a wide window and blankets/pillows, a brick wall and a leather sofa, a bar counter, etc. Themed corners are created for the holidays: New Year's, Christmas, etc. Valentine's Day, Halloween, etc. It is convenient to style an area with a fireplace.
Don't forget about the children. Opening a photo studio for children means dooming yourself to too narrow a focus, but it’s worth setting up a children’s corner. There is always a stable demand for family and children's photo sessions.
For a standard photo zone with removable paper backdrops, 2-3 square meters is enough; for interiors, a space of 4-5 square meters is required. m.
To open your own photo studio with decorations, you should carefully consider not only the interior of the area, but also accessories, decorative details. For example, candles, LED garlands, gift boxes, retro records, decorative pillows, etc.
The cost of equipping one site with decorations ranges from $200-300. In total you will need from $1500.
Pay special attention designing a corner with a dressing room mirror and special lighting. This is a good place for a makeup artist to work and an additional photo zone. Such a mirror with a dressing table costs $160-200.
Pricing
How can a beginner open a photo salon and navigate the prices correctly? Analyze the average prices of similar establishments in the city and form your own price list based on them. To get started, put the following price tags:
- Shooting, including interior photography, with a studio photographer – $60. The premium service includes the work of a makeup artist, printing of several photos and costs from $70-80;
- Studio rental – $13/hour;
- Retouching – $5/photo;
- Creation of photo books and albums – from $23.
Staff
The studio staff consists of three people. Photographer, sales administrator and technical assistant, exhibiting light and advising clients.
Almost every photographer dreams of becoming a professional photographer and opening a photo studio, so there are many who want to work with you on a permanent basis. The photographer receives 50% of the cost of shooting, the salary of the administrator and assistant costs $700 per month.
Marketing plan (advertising)
Step-by-step instructions on how to open an interior photography studio and promote your business include the following activities:
- An outdoor sign for a company will require an investment of $300-400;
- Creation of a logo and corporate identity – $100;
- Printed promotional materials (business cards, flyers) – $100;
- Website development, detailed description of services, studio portfolio – from $100.
Sales promotion methods and promotion channels
A good advertising move is to distribute gift certificates at a discount. Promotions for regular customers, discounts on the second and third hour of studio rental, etc. work great. You should look for your first clients among members of photo clubs and advertising agencies. Most on the Internet: website promotion, .
Costs and profits
To properly open a photo salon, calculate your business investment in detail:
- Documents – 60 $;
- Rent of premises for six months in advance, repairs, decoration, necessary communications – about $7,000;
- Purchase of equipment, furniture, design of photo zones – $10 thousand;
- Promotional events – $700.
Capital costs are approximately $18,000. Monthly costs (salary, utilities, rent) – $1600. We add here the purchase of goods for sale - $1,500. Total $3100.
The studio will receive a minimum profit if the salon is rented daily for at least 2-3 hours, 10-12 orders for shooting by a full-time photographer, and the production of several albums. Together with sales of related products, the monthly net profit will be about $600-800. This figure is increasing every month.
A detailed plan on how to open a small photo salon will allow you to foresee all costs and plan the work of the company. Such a business will only expand and prosper over time, gaining popularity and fame among clients.


, Islam, Judaism How do temples of different religions differ")


