New Year and Christmas celebrations will fly by quickly, and after a little more than a month, another wonderful winter holiday will come - Valentine's Day. And all representatives of this category will puzzle over gifts, come up with romantic surprises, and look for instructions on how to make a Valentine. However, the postcards themselves usually remain undeservedly forgotten - they are bought ready-made, often at the last moment (). But to make valentines with your own hands out of paper is quite simple - it will not take much time, and your loved one will receive a card filled with the warmth of the giver and one of a kind - like himself.
A simple instruction on how to make a valentine with your own hands
Of course, the main shape of any valentine is a heart. So the question of the form is not worth it, but then you need to know exactly how to make a valentine. If you can draw and are sure that you can draw the perfect heart, you only need paper and a pencil. If not, then a template should be added to them.

So, in order to get a blank that is used to make beautiful valentines, you need to use nail scissors - with their help it is easy to make a neat cut, and then cut out the heart completely. After that, you just have to choose a beautiful paper for your valentine, put your blank on it, circle it with a pencil and cut it out. With how to make a Valentine at this stage, everything is clear.  When such a cute and neat paper heart for a valentine is ready, it needs to be decorated.

There are many ways to use these hearts. But how to make a valentine with them amazing? You can cut them out bigger and fix them on a piece of cardboard, you can decorate them with buttons (to which you can attach a beautifully cut strip of paper with a confession), or you can even create a whole picture out of them - everything is in your hands. In fact, you can attach almost anything that comes to hand to a heart. 
Using a drawing: how to make a paper valentine interesting
Knowing how to make a lovely patterned Valentine doesn't have to be a pencil and brush genius. It is so simple that even a child can do it. For drawing a picture, it is difficult to choose the basis of any light color, including white.

So, first, on such a heart, you need to draw various patterns that you know how - curls, a simple ornament, flowers and similar cute little things. Then you need to decide how to make the Valentine unique. To do this, you need to take the most ordinary paints and carefully paint over some of the charms depicted. The result is a unique postcard created by your hands and imagination. It's amazing how easy it is to make a Valentine! It can be given not only to your soul mate, but also to other loved ones - friends, relatives and even colleagues.

And if you want to amuse your loved ones and make them think, write "XO" on the heart several times. You don't even know what that means? Everything is very simple: "kiss (X) and hug (O)". Here's how to make a paper valentine mysterious and fun.
Original do-it-yourself valentines made of paper: stamp in hand!
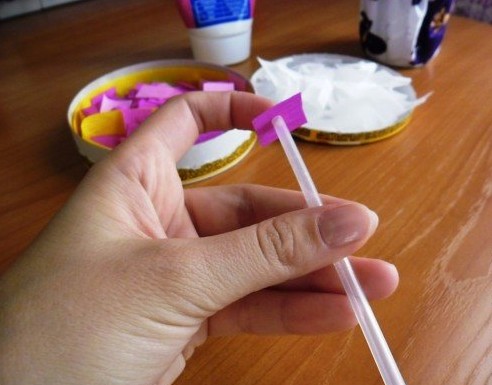
You can also use a stamp to make a cute heart shaped paper card for Valentine's Day. With it, a lot is possible, but how to make a Valentine?

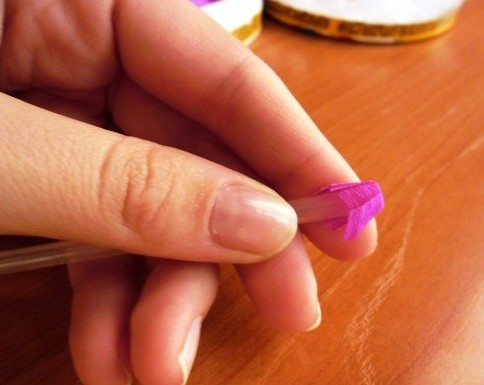
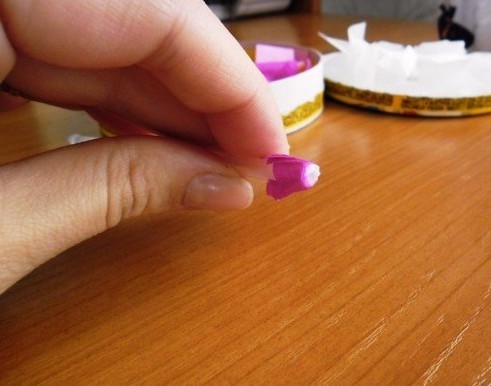
There are many different types of stamps on the market today, which differ in both sizes and shapes of impressions, so it will not be difficult to find one that matches your idea. If you still couldn’t do it, do it yourself, it’s as easy as making a Valentine later. A utility knife, a wine cork, a little patience - and your exclusive stamp is ready. Now it remains to learn how to make a valentine with your own hands and with his help. Draw an image of a simple shape on the cork, for example ... a heart. Then carefully cut it along the contour with a clerical knife, and it is best to use gouache for coloring: apply it on a sponge, press your stamp into the sponge and try to leave an imprint on paper. Happened? Now you can make wonderful beautiful valentines!

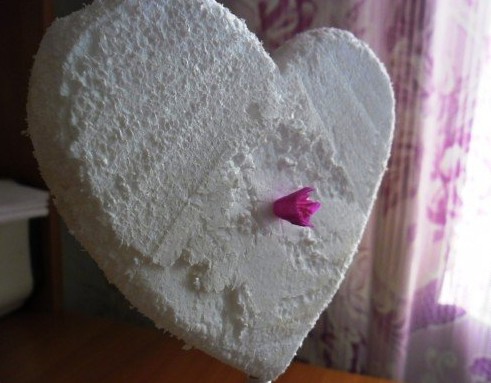
For it, you will need a blank for a postcard (ready-made version or just a sheet of cardboard folded in half), best of all - a light color, a template with a cut out heart and a small piece of masking tape. With these materials, you can start making paper valentines. With the help of the latter, you need to attach a template to your blank, and then fill the entire surface of the heart with prints - it will turn out more interesting if you use several colors, for example, shades of red from burgundy to pale pink. With such a palette, you can decide how to make the Valentine more romantic or passionate.
The next step is to be a little patient and let the paint dry. Then the template is removed as carefully as it was attached, and it remains only to add the most sincere words of recognition to the unique product. As you can see, making paper valentines with your own hands is very interesting.
How to make a DIY Valentine with toilet paper

Another interesting option for using a homemade stamp will be a very large postcard - a sheet of drawing paper. Curious how to make a valentine out of paper this size? In fact, everything is simple. For the stamp, in this case, an ordinary cylinder of toilet paper is used - it must be bent in the shape of a heart, the result obtained must be fixed with adhesive tape and dipped in paint - this is how a lot of original hearts with congratulations, confessions and just warm words addressed to a loved one will appear on a piece of drawing paper. So, we learned how to make a valentine with our own hands and in a few simple ways. If you are confident in your abilities, you can try to do more subtle and painstaking work.
Fashion cards: how to make a valentine out of scrapbooking paper
A slightly more complex version of a holiday card for Valentine's Day involves the volume and use of scrapbooking paper, the very process of choosing which already easily turns into a holiday, and even making beautiful Valentines out of it is an incomparable pleasure.

You will need a card stock, scrapbooking paper, a heart-shaped hole punch, glue, double-sided tape, and a sewing machine. So, how to make a valentine in a trendy style? You need to choose one type of paper for the bottom layer of hearts and a variety of different ones for the top. As is already clear from the explanation, the hearts on the card will consist of two layers, so there should be twice as many blanks as you planned to place on your valentines on February 14th.

Using a hole punch, cut out cute paper hearts so they are the same size. Then, on the workpiece, carefully mark where they will be located and, using adhesive tape, carefully fix the bottom layer in the marked places. But how to make valentines two layers? The top layer of hearts is simply sewn to the bottom on a sewing machine. This stage is not so much difficult as painstaking, requiring patience, care and accuracy.

The same way to make do-it-yourself paper valentines can also be used for small cards - here an interesting result will be the use of three or four layers of paper, as well as just valentines-hearts without a base.

Since not everyone has a machine, we offer the option of manually stitching postcards. But how in this case to make a valentine neat? To make everything work out in the best way, you need to put your workpiece on a soft fabric surface (for example, an ironing board or just a complex cloth), and make holes at an equal distance with a needle. When the job is done, all that remains is to fasten the blank with a thread - and the hand-sewn valentine is ready! If you were wondering how to make a valentine with your own hands - here is the answer.
Step by step instructions on how to make an origami valentine

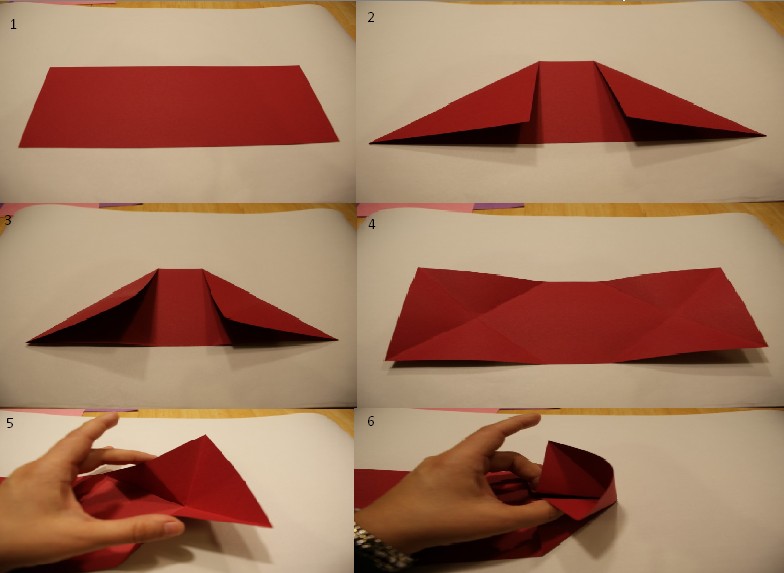
However, a Valentine's Day card does not have to be only in the shape of a heart. A very interesting option is kissing lips folded in the origami technique, which are glued to a blank for a postcard. Such ideas for valentines have not yet become widespread, so you will shine with originality. For them, you will need colored paper of any of the shades of red. Cut a square out of it and fold it in half diagonally so that the colored part is on top. Mentally or using a ruler, divide the bottom edge of the resulting triangle into three parts and fold it to the left so that you get an indent of one third.

But how to make a valentine if there is no ruler at hand, but there is trouble with the eye? Fold the paper in a Z-shape and press lightly. Such an interesting little secret of how to make an origami valentine with a minimum of tools at hand.


 Making origami valentines requires patience. After that, carefully bend the corners that go beyond the edges of the "envelope" down and inward.

Now the paper needs to be unfolded and put up with the non-colored side - half of the process for making a postcard is completed. To learn how to make valentines with your own hands in this technique to the end - read on. Now you need to start the second part of making an unusual Postcard. First, fold the tip of one of the lower corners, then fold the rest of the corner on both sides inward.

The same must be done with the corner on the opposite side.

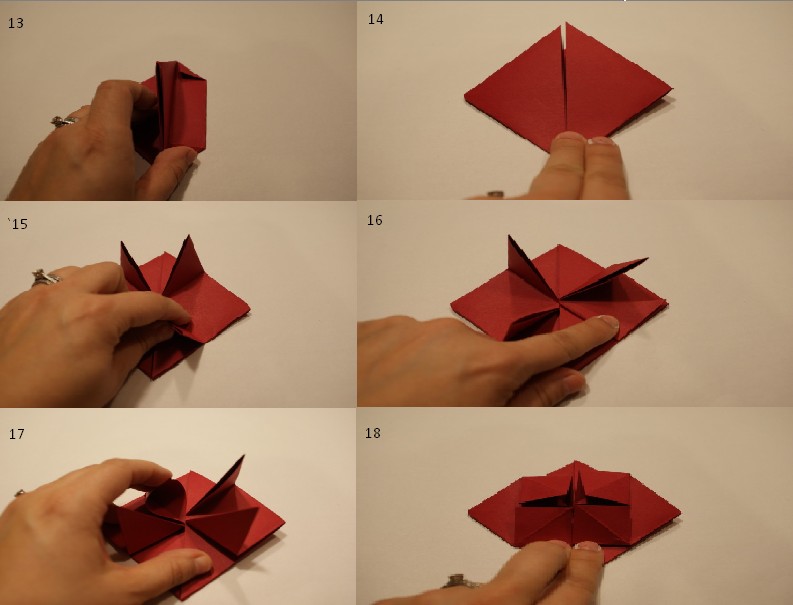
Further, according to the instructions on how to make an origami valentine, you should turn the sheet over so that the colored side is at the top and fold it with the tips of the “lips” to each other along the folds that remained from the previous folding.

Needless to say - making origami valentines is not easy, but the work is almost finished - it remains to fold the corners inward, and then, also inward, bend the edges of the workpiece. It remains to glue the sponges on the postcard - and you can be sure that no one else will get this one.

If you can’t figure out how to make a Valentine, don’t worry, you can watch the master class and try again.
Master class: Valentine's card-origami lips
New trends: quilling valentines for a loved one
But the ideas for valentines do not exhaust themselves on this. Another very interesting technique for making voluminous postcards on February 14 is quilling. But how to make such a Valentine? This original postcard is easy to make and even inexperienced needlewomen will succeed in it - you will need a sheet of cardboard, a few simple elements (curls, flowers, etc.), the number of which will depend on the size of the postcard, and glue.

The prepared elements (multi-colored or one tone), you just need to stick to the workpiece, laying out in the shape of a heart. You can talk a lot about how to make valentines with your own hands using the quilling technique, but it’s better to use your imagination, and we will just give you a few basic ideas.

You can make a heart outline from multi-colored curls and decorate it with flowers inside or outside. You can make a big red heart entirely from curls, or you can make a flower field, in the middle of which attach a curl heart. You can find several photos of similar postcards and copy them. In any case, such quilling valentines will be an unusual gift.

Whether you choose one of the proposed options or come up with your own, the card will in any case be unique and each element in it will speak about your feelings.
Master class: how to make basic quilling elements part 1
Master class: how to make basic quilling elements part 2
How to make a Valentine magical? Give her your heart
Telling your loved one about your feelings for him is not necessary on a specially designed day. But who knows - perhaps on February 14, a card made with loving hands will become a real magical gift, and the words written on it - written from the heart and with real feeling - will remain in the heart of your soul mate forever. And it doesn't matter how the Valentine is made - let the card with the heart tell him everything about what you experience when he is near and when he is far away. Love, give and be there!

Valentine's Day is a traditional time for love letters and notes. According to legend, the priest Valentine reconciled the quarreling lovers, helping the legionnaires write letters. Since then, the name Valentine has been inextricably linked with love letters. But, despite the commercialization of the holiday, it is customary to make valentines with your own hands, because handmade better conveys the sincerity of the donor's feelings.
So, how to make a valentine with your own hands? There are many ways!
Everyone will be delighted with a delicious valentine. Heart-shaped cookies or heart-shaped cake, waffles or cupcake - take your pick! There are a great variety of forms for baking - you can choose what suits you.

A traditional Valentine's Day cookie is heart-shaped gingerbread cookies.

And you can make hearts from puff pastry and without a shape. To do this, the dough is rolled on both sides, cut into thin pieces and slightly flattened to make famously twisted hearts, and baked in the oven.
Even with the help of crispy and fragrant toast, you can confess your love!

Even ordinary cookies can be packaged in a festive heart-shaped box - and the gift will immediately become thematic. You can buy a gift box, or you can make it yourself.
And if you break an egg in a frying pan into a heart-shaped mold, you get a “hearty” scrambled egg) Why not a Valentine? In the shape of hearts, you can bake pancakes or cut out sandwiches and waffles. Even pizza can be baked "hearty"!


Do-it-yourself original valentines are a great occasion to show imagination and handicraft talents.
Don't limit yourself to one handmade valentine. Make a lot of different ones and put them in different secluded corners of the house, then your loved one will certainly be delighted
How nice to receive on Valentine's Day, which is celebrated on February 14 and is dedicated to Valentine's Day, a small present in the form of a heart - the so-called "Valentine"! During my youth, such a holiday was unknown in Russia, and we gave gifts exclusively on February 23 - for boys, and on March 8 - for girls 🙂
But the wonderful holiday of St. Valentine, not tied to any political dates and official celebrations, quickly fell in love with many, and became very popular in our country. Give and receive valentines, notice the symbols of hearts everywhere and plunge into the atmosphere of general light insanity - why not?
Appeal to mothers and grandmothers!
If you are young in soul and body, if you are in love, give and accept signs of attention! If you are only young in soul, and the body no longer wants to fit into the atmosphere of a youthful holiday, spit on his grumblings and take glue and paper in your hands - is your body still capable of this ?! Make a beautiful and unexpected valentine with your own hands, show your children and grandchildren a master class, prove that there is still “gunpowder on our street”!
And even though there was no such holiday in our youth, we knew how to make handicrafts better than the current “generation of computer geniuses”. Hands remember!
Of course, you can buy a ready-made postcard. But is it so pleasant for both the giver and the one who receives the gift? After all, spending effort, thinking about who you are preparing a gift for, creating a surprise with your own hands, you experience unique feelings of joy and anticipation - and this is the same, unique atmosphere of a REAL HOLIDAY!
Moreover, such an amazing thing as the World Wide Web offers us many options and ready-made solutions, even in the photo, even on the video, in step-by-step lessons and master classes, with a detailed description and demonstration of the result.
I have prepared such a selection for you today - choose the most interesting version of the Valentine for you and - forward, to creative success!
Do-it-yourself valentine envelope made of paper - we do it with children!

Such funny animals that give valentine hearts can be easily and simply made from plain paper, along with children - I think they will at least not be bored! After all, you can invent and create absolutely any animal - a bear cub, a kitten, a bunny, and even one that no one else has invented before 🙂 Show imagination in the image and accuracy in work - and you will get a wonderful original valentine in the form of an envelope with a secret message for the holiday February 14, and not only!
What to cook:
- sheet of cardboard or thick white paper
- red paper for a heart
- glue
- colored pencils or markers or paints
- scissors, ruler, pencil
- Take a regular sheet of thick paper or white cardboard.

- Bend in half, make a fold.

- Make a cut along the fold with scissors - we get 2 blanks for our valentines.

- Lay out the rectangle as in the photo. Mark with a ruler with a simple pencil 2.5 cm from the vertical edge two points and connect them with a line.

- Do the same on the other side. It turns out, a kind of field of 2.5 cm wide.

- Now, from above, set aside a line in this way 5 cm from the top edge, putting two points and connecting them with a line.

- Everything above the line will be the muzzle of our character. On the side, you need to outline two semicircles - paws with which he will hold the envelope. Draw the paws below the horizontal line, stepping back from it by about 1 cm. Down

- Here is such a muzzle and paws of the future dog turned out on a sheet.

- We take scissors and carefully cut out all the contours along the lines of the pencil. If you are making a valentine with children, help them cut out difficult places - as in our example, the dog's ears.

- We bend the lower part up - corner to corner. We paint the pencil muzzle with colored felt-tip pens or pencils. You can also make an application from colored paper - here only your imagination will tell you how best.

- We bend the paws on top and draw claws on them.

- From a piece of red paper, cut out a heart of any size you like, and glue it in the center. Be sure to use red - it's traditionally happened on Valentine's Day - for some reason, hearts are always red or pink.

- Now we will make an imitation of an envelope - we will draw diagonal lines from the corners to the heart.

- Open our valentine envelope and draw lines for writing inside our gift with a colored pencil or felt-tip pen.

- You can draw a few hearts - it will be even more interesting. Well, do not forget to write the message itself - after all, any Valentine is a declaration of Love and Friendship!

- Here are some funny little animals you can create. Colored parts can be painted or glued with an additional layer of paper of the desired color.

Do-it-yourself volumetric paper valentine - 3D hearts for Valentine's Day.

Very beautiful, voluminous valentine card with 3d hearts. The postcard is beautiful, but quite difficult for possible beginners due to the numerous folds and slots - everything needs to be done carefully, so immediately make sure your hands are clean, press the paper not with your fingers, but with a plastic handle of scissors or another object. You will have to tinker, but we will definitely cope with you, because we have step-by-step photos of the whole process!
To make it, we need to take:
- 2 sheets of beautiful red paper for hearts
- 2 sheets of white cardboard (heavy paper) of a standard size
- black marker or felt-tip pen for tracing hearts
- strips with rhinestones on sticky tape for decoration
- a simple pencil, ruler, scissors, double-sided tape (but glue is also possible)

- We fold each sheet of cardboard in half, precisely combining the corners so that there is no skew.

- We will set aside one cardboard box, we will work with the second - with the base. Lay the folded sheet with the fold toward you and measure a 4 cm high line that is 3.5 cm from the edge. We symmetrically make the same line on the other side. The incision is made exactly along these lines.

- Now we remove the concept of two-dimensional space from our heads and move on to volumetric 3D modeling - we bend the fold between the two slots in the other direction. You should get such a design, as in the photo below.
 This is the outer side, and on the inside (open our postcard, as you open a book) - it turns out such a step. Did you manage? Wait to rejoice, it's still flowers!
- Now let's wrap our step inside the postcard and close it by going to the outside. From the outside, our postcard should look like this. Now we must do a similar procedure with the inner fold of the postcard - set aside from the edges of the fold 2 cm inwards and 3 cm upwards.

- We make cuts again along the marking lines.

- To make it easier to bend the sheet in this place, attach the ruler to the ends of the cuts and wrap the sheet on the ruler, iron the fold line.

 Now open the postcard again and redirect our fold in the opposite direction - to again get a ledge-step on the inside of the postcard.
  Do this on the other side - now we should have 3 steps.
- At this stage, we could already stop, but we are not looking for easy ways. Let's take another step! Along the inner fold, we again set aside the markings for the last cut - 2 cm from the edge and up.

- But we will cut through only one upper fold (and not the entire thickness!).

- Thus, we have another upper small step. Phew, you can exhale, then everything will go much easier!

- We take our first cardboard box - it will be the outer, front side - we need to attach our “stepped” model to it. It is convenient to do this with double-sided tape, but you can get by with ordinary glue - the main thing is not to pour a lot of it so that our valentine does not wrinkle or warp. We glue both parts and get a smooth cover on the outside and a stepped design inside the valentine. Now you need to decorate it with hearts.

- Let's make a heart template - best of all 3 different sizes. Two or three large hearts, many medium and two or three small ones.

- Outline our pencil sketches of hearts with a black marker and cut them out with scissors.

- Now is the time to show your artistic abilities - beautifully and highly artistically, with the taste of a true designer, you need to scatter our hearts on different levels so that it looks beautiful. If you can’t trust your taste, do it exactly according to the photo, perhaps it will be fine.
 It is very convenient to attach hearts to pieces of double-sided tape, but you can also use glue.

- Well, this is how it all looks. Everything already looks elegant, but there is no limit to perfection - let's do the last part of the design - decorate with strips of rhinestones.

Here we have such a “heart-strass” splendor! True, there was no place left for text congratulations, but with such an abundance of red hearts, words would probably already be superfluous! What do you think? 
“Heart in the palms” is a very simple and quick paper valentine. Can be done with children.
What materials are needed:
- red and white paper
- glue, pencil, ruler, scissors
- pink or red pencil (felt pen)
- needle and thread

- We take our (or someone else's!) hand with the thumb pressed, put it on a piece of paper and circle it. Cut out the hand stencil.

- We bend thick white paper (or cardboard) in half and lay our stencil on the fold line so that the “little finger” is along this line. We cut everything to the fold so that the card can open like a book.

- From red, double-sided dyed paper, cut out the same squares, about 6 cm each side. On one of them we make a diagonal fold and draw a half of a heart. This will be our template.

- We also bend the remaining squares, fold them one by one and, applying a template, cut out hearts.

- We sew the resulting stack of hearts with a fold in the middle onto the inside of the fold of our “palms”, leave a knot of thread on the side of the hearts. Then we will close it.

- Glue the halves of the hearts to the palms with glue.

- We also glue together the two halves of the uppermost heart, at the same time hiding the traces of stitching.
- We circle the “palms” with a pink felt-tip pen, not forgetting to paint on the details inside - folds and lines on the fingers. All! Our voluminous paper valentine is completely ready - you can give your loved one your heart in your palms!


Making this valentine is very simple, but there are some tools that will need to be prepared. In particular, it is difficult to do without a hole punch - to create the same even holes, and special curly scissors, since cutting all these waves by hand on many details is not at all interesting and it will not work out exactly - but the sameness of details and accuracy are important here.
We will need:
- pink and white paper
- acrylic paints (yellow and white)
- glue
- green pencil or marker
- round head pin
- a piece of pretty ribbon
- hole puncher
- curly scissors
So let's get started!
- We “clone” the heart template of the size we need to the number of 7 pieces from a sheet of pink paper.

- Glue a pink heart on a larger white sheet.

- With the help of curly scissors, we make a beautiful edge treatment, so that a white wavy outline appears around the pink heart, reminiscent of braiding when sewing.

- We need 7 pieces of such blanks.

- Each heart needs to be decorated with daisies. To do this, take a pin with a round head and, dipping it in yellow paint, draw the centers of the flowers - 3 daisies, as in the photo below. Around each middle, draw white petals in the same way.

- With a green pencil we add leaves - two for each flower.

- We make neat holes in each heart with a hole punch. We pass a piece of festive ribbon through them.

- We tie a bow and cut exactly the edges with sharp scissors.

- Our gentle valentine with chamomile mood is ready. It remains to write on the reverse side of the first heart the name of the object of our donation, and on the remaining ones - your wishes, and everything that you would like to convey in words.
Exquisite valentine using the scrapbooking technique - Master class with step-by-step photos.
This is what a closed valentine card looks like.
 Turning the paper lever, we open our postcard and there we see a surprise message.

To make this stunningly beautiful and sophisticated valentine, we will need materials that are sold in craft stores or scrapbooking departments (in bookstores). There you can always find all the necessary parts, accessories and tools. It is good that now all this can be ordered directly through online stores.
What to cook:
- pink and white paper for scrapbooking (can be used for watercolor, or other thick paper)
- semi-beads on a sticky basis
- artificial flowers for scrapbooking
- piece of lace, piece of lace
- rivet with split ends - brads (these are stud buttons with a flat flexible forked leg made of soft metal)
- glue and glue gun (can be replaced with colorless superglue)
- curly and regular scissors
When everything you need is prepared - the process of creating a valentine heart will not cause us any problems - everything is quite simple.
- From plain white paper, we cut out the shape and size of the heart we need.

- According to the template, cut out a heart from pink thick paper.

- Tint the edges of the heart with a slightly pink pencil, of a darker shade, to visually darken the border.

- From red thick paper with a template applied to it, using curly scissors, cut out the blank. Cut out so that the wavy edge protrudes beyond the edge of our template size.

- We glue a pink heart on a red blank with a curly edge.


- Cut out a rectangle from red paper and glue it on top of the pink layer.

- Now cut out a slightly smaller rectangle from white paper and glue it on red.

- And on the corner we will glue another small red heart. Our blank number 1 is ready.

- Now we will transfer the heart template to red paper with a pencil, but we will not cut it out yet. Our task is to make another red heart, a little smaller than our template. To do this, manually draw another one inside the pencil contour - a little less. On it we will make a crop. This will be the second piece.
 This is how it should look like when applying the second blank to the first.
- For the second heart, you need to make a decoration-bouquet. Let's start with the ribbon - make two loops and glue them together at the base.

- From the lace braid we will make one larger loop and place it at the base, on the bottom layer. Glue this beauty on a heart - place it not in the center, but a little asymmetrically, as done in the photo below.

- Now we need 3 flowers. If there is a stalk, cut it to the very root. Attach three flowers to the base of our decoration on the glue gun, covering the cut and fastening points of the braid.

- We transfer one half-bead to our heart, gluing them along the edge of the heart.

- Now we cut out a “lever” from pink paper - cut a strip of paper in the shape of an arrow, cutting off the corners. Glue on the back side of our second blank.

- We combine both blanks and with a sharp knife we make a small hole at the base of the heart.

- Pick up our rivet and insert the legs into the hole from the front side.

- On the reverse side, spread the legs of the brads to the sides and press firmly against the paper.

- So that these legs do not stand out, we close them with an application in the shape of a small red heart.

- Check how our "mechanism" works - the top heart should move easily over the bottom, revealing to us a secret message ... Which still needs to be managed to be written on a small piece of white paper. But that's a completely different story... 🙂

Valentine card with moving rainbow hearts - Master class on video.
The fastest and easiest valentine in 2 minutes!
If you “slept through” the whole of February and realized it only on the 14th, when it’s too late to prepare surprises, and you definitely need to give something .. catch a simple way - How to quickly and easily make a valentine out of paper with your own hands in just 2 minutes. This video clip has been going on for exactly that long, and by repeating all the simple steps behind it, you will definitely cope!
Here are the hearts you can draw yourself or download as ready-made templates.
 |
|
 |
Download stencils of hearts of different sizes (for cutting out of paper) from the link below - they can be printed on any printer, they are selected in the large size you need for printing.
Tricky question!
PS. Please share in the comments examples of your valentines - what did you give or did yourself, and what did you give? And, by the way, I have had an unresolved question for a long time - what is more pleasant - to give gifts yourself or to receive them from other people? What do you think?
Hi all! I want to remind everyone that soon we will have to celebrate the next holiday called Valentine's Day, which is celebrated every year at the same time on February 14th. What do you think is most often given on this day? Of course, small and cool paper valentines that resemble postcards, but they are made in the form of hearts and decorated with love and care.
Nowadays, you can safely go to the store and buy such a charm, but still there is nothing more beautiful to make such original pictures and give them to your loved ones.
Do you know where this holiday came from, write your stories below under this note? I think so, so I will not dwell on this issue, but I will immediately start from the most important and basic, I will teach you and show you step by step various ideas for crafts for Valentine's Day, so let's get started.
Of course, you can knit such creations, or even sew them, I recently saw how they made a heart from beads and even from felt. By the way, for those who are fond of felt toys, I suggest looking into this
It is no secret to anyone that even a child can make paper products, because every home has such material, the main thing in this matter is to approach it competently and do everything as the author recommends. Therefore, watch this step-by-step instruction and repeat, the result will be simply stunning and very beautiful.
I propose to make the first option for two halves at once, for example, a husband and wife, and hang such an ornament over the bed.
We will need:
- paper
- paints
- ribbon
- scissors
Stages of work:
1. As you can see, everything is quite easy and fast, dip your fingers into the paint, that is, apply it to the surface of your palms, and then make an imprint that will resemble a heart symbol.
2. Cut out with decorative scissors and thread the ribbon through.

The next way to make a valentine from what you have, so to speak, from improvised materials, is to take cardboard, preferably pink or red, and plus colored paper. You will also need glue, a pencil and scissors.
We will need:
- colored red cardboard - 1 sheet
- a sheet of pink colored paper - 1 pc.
- pencil
- scissors
Stages of work:
1. Everything is extremely simple, fold a sheet of cardboard in half and cut out a heart, then you have to make thin strips from pink colored paper, which you cut as if you were making grass or something similar, twist each such strip on a pencil.

2. Glue flowers on the layout and you can also decorate with sparkles and something else to your taste if you wish. It turns out a slightly voluminous and at the same time elegant craft, which you can gladly give to your mother, sister and say how much you love them.

And a similar idea, which also captivated me, it also uses the weaving of strips of paper:

But that's not all, if you turn on your imagination, then you yourself can come up with your own patterns, because there is nothing difficult here, see what can happen. Well, if you think that you can’t do it, then contact me and I will send you stencils that you can use to make these lovely creations.

I really liked these views, there are enlarged stencils. By the way, such crafts are called interlaced paper hearts.

The simplest thing is that you can do this and decorate this ordinary heart with any decorations, letters, rhinestones, etc.

Paper valentine master class for children
Undoubtedly, there is still such a tradition in schools today how to put up mailboxes and throw anonymous wishes there, which everyone then receives. You will agree that it is so cool and tempting, which makes this holiday unique for everyone.
Therefore, most schoolchildren, and just preschool children, love to create magnificent postcards, and then give them to all those they love and adore.
Therefore, if you have children, then you can easily make such a gift with them.
For children in kindergarten and at home, by the way, you can use this type of work as a group to make such a drawing, crumple the shape of a heart from ordinary toilet paper capsules, and then dip it in paint and fill the entire paper. Even a child of 2-3 years old will cope with such a task.

And if you still have not learned how to draw a heart, then you can use this stencil.

After all, children can simply decorate it with felt-tip pens or pencils and draw their own patterns, or use nothing else. Drawing antistress, or as it is called coloring.

You can find various ideas if you want a bunch of such anti-stresses, of course, this work will be more addressed to high school students and schoolchildren. I have several coloring pages in my piggy bank, if you are interested, write.

Or make a bookmark for this topic, cut out paper hearts on your own, and the child should glue them in an example, but something like this.

You can also make origami, because such an activity will certainly please the kids. Make a boat with them, and instead of a sail, a symbol of lovers on a stick.


Original postcard Heart for February 14 with a scheme
While preparing for this article, I found several ways of how you can beautifully and unexpectedly surprise your loved one or loved one. After all, on this day you really want something that will make your head spin. For example, if your betrothed gives you a ring, but not just like that, but in a purse. It will look dignified and at the same time romantic.
You will need to cut out of paper using ordinary sharp scissors two such figures:
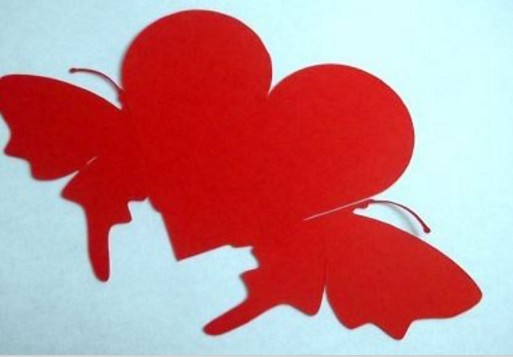
And then connect them together, but in advance you will need to fold them in half, where you see symmetry, make a small incision, where the antennae of the butterfly are.

You will get something like this:

Now it remains to stick a ribbon or make it out of paper and put a cherished gift with wishes or a bill.

More difficult, I can offer such a craft, who is familiar with the technique of cutting stencils, it will be easy for him, this is a method of poking with a special knife, as they say among the people of vytynanki. You can get the stencil itself for free, if you write a comment below, I will definitely send it to you.

Also, in a hurry, you can build such a masterpiece using your palms. I think that the process of making such a product is already clear.


Looks gentle and of course with love. Your loved one will definitely be delighted and smile and give you a kiss.

In America and other countries, they often give their loved ones paintings related to this topic, you can use newspaper publications, you don’t need to be an artist to create such a work, see for yourself.

Well, another type is vytynanki, they are also appropriate to apply here. And I will write about them below. To be honest, such a souvenir can be taken to a competition in a kindergarten or school.

Here is her template, cut it out with a cutter or a special sharp knife.

We make voluminous valentines at home
As for such large and seemingly voluminous figurines for this holiday, I suggest that you first go the easiest way and make a heart outline out of cardboard, and then with the help of woolen threads, you can take different colors, or you can use one color. Tie, that is, wrap, as shown in this photo.

In the first version, we made flowers and glued them to the workpiece, you can also do it in this case.

You can also easily and quickly cut out according to such a finished pattern, and then glue the sides, the box.

And then decorate it with all kinds of decorations, such as scrapbooking kits. I found a similar option in this video, I share with you:
While writing this note, one idea came to my mind, and it came to me for a reason, my eldest son was sitting and collecting a mosaic from puzzles, so that's what I came up with. How do you see?

Video on how to make crafts for Valentine's Day
Make such a romantic postcard in the form of your pens, everything will be clear without words.
Or do something more interesting:
Volumetric valentine in the style of origami
There are a lot of crafts on the Internet on the theme of Valentine's Day, especially using such a famous technique as origami, you can add hundreds of different patterns.
You can make an origami heart yourself using this step-by-step diagram, follow it and you will succeed. After all, it looks really beautiful and original.

The steps are simple as always, you just need to fold the paper correctly.

And after the result will not keep you waiting, first practice folding these lovely valentines on plain white paper, and then move on to color.

Or use something like this.

You can also bake a very tasty one, and then stick special toppers on sticks into it. To do this, you just have to cut out hearts from paper, and then fold them with an accordion and stick them on a stick.

Catch these templates, you can copy them, and then easily print them yourself on a printer.

3D hearts are very popular now, you can also make them if you watch this video from YouTube:
You can request a stencil for this video from me below in the comments, I will definitely send it to you.
And also very original and super cool origami hearts with flowers, which I liked very much.

Do you know how these are made? Now I will show you the instructions with which you can make this wonderful little thing.
Repeat the entire sequence, the main thing is not to rush and be careful.

Then everything will certainly work out.
Happened? Then move on to the next steps.

Glue a strass and make a handle. Voila, beauty.

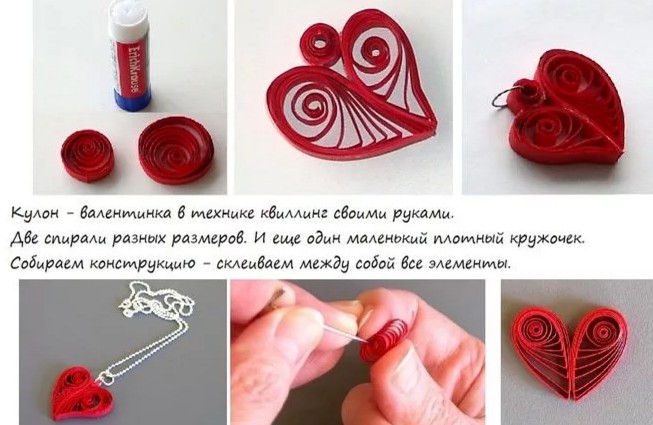
Quilling heart
Do you know what this unique and at first glance interesting word, quilling, means? In fact, a technique that helps to fold paper in the form of small funny things in a very funny way. I think that all those who love creativity and crafts are familiar with this type of work or have you ever seen such cute souvenirs.
If you know how to use and make such valentines, please share your work with us, I can only offer you ideas that I liked myself.

I suggest you make a photo frame and something else, look and decide for yourself what is closer to your soul.
Or make such a small but nice thing out of stripes:

We will need:

Stages of work:
Take a ready-made heart template, or make it by hand with a compass, or something round. Then attach the stencil to thick cardboard, and cut out the blank. Next, attach the blank to colored paper and make some more stock, as shown in the figure.

Glue on this green cover. Then cut out a heart from red colored paper and glue it on the back of the workpiece. On this side you can write a love note or a poem.
After making figures for quilling, wind strips of paper on a pencil, use a special ruler and a toothpick.

When the puck turns out, leave it in the circle of the same engineering ruler.
Take your love photo and trace it to the desired shape, and then stick it on double-sided tape or tape.
Now it remains to glue all the elements. And that's how wonderful and magical it looks.

And you can also build such a red pendant, a symbol of love.
Greeting card with corrugated paper roses
Well, now I offer another fairly common option of roses, which are easy to twist if you take the right type of paper, we are talking about corrugation.

There is also a great idea for a very large valentine, which is made in the style of toppiary, looks great, at first glance you might think that such a charming invention is beyond your power, but in fact, believe me, your eyes are afraid, but your hands do.

Now you will see the necessary basics and based on this information you can easily build such a little thing. And after all, it can be presented not only on Valentine's Day, but also on March 8 or Birthday.
Stages of work:
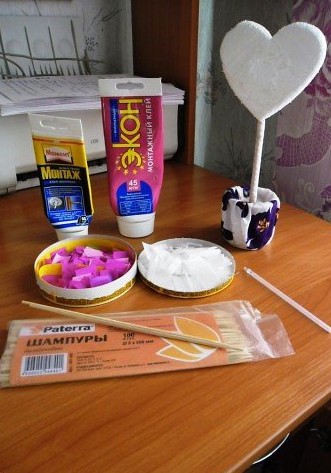
1. Take a regular foam and cut out a symbol of love from it, the thickness should be about 3 cm.
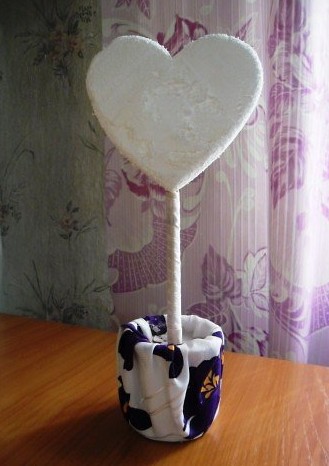
2. Next, take a stick or pencil, barbecue sticks are very suitable for this purpose and stick it into the heart. Hide the stick using a decorative ribbon. After inserting the stick into the jar, you also need to decorate it, wrap the dishes with cloth or paper, in general, with improvised means, you can even use plasticine.
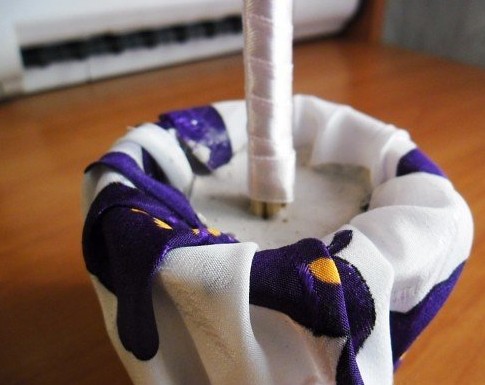
So that the stick does not fall in the pot, fill everything with plaster.
3. Now prepare the following materials for work, this is glue, it is better to take something like liquid nails, it is more convenient for them to work. Then you will need corrugated or crepe paper and a core from a gel pen.
4. Now do the facing. The word at first glance is not easy, but there is nothing difficult.
5. Insert the rod into the middle of the rectangle (cut the paper into small pieces of the same size) and then crumple.
6. Now aim straight for the heart, glue the blank to the foam.
Remember that glue is best applied to the paper blank itself.
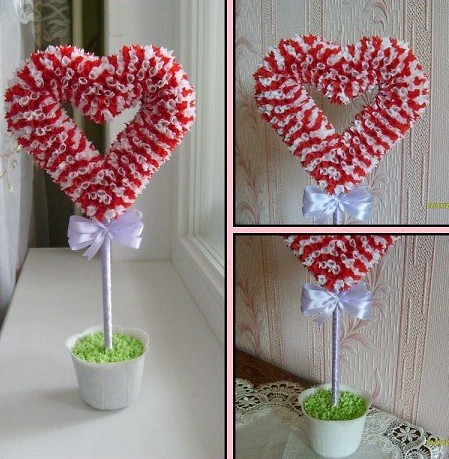
Using this method of trimming, you can also make such a fluffy and voluminous postcard on cardboard.

Pictures and templates for printing
So we got to the very last option, it will be unexpected, but also pleasant at the same time. In one magazine I saw such a cool cool novelty for the interior, decor in the house.
I remember that when the new year came, many of you asked me to send them templates for the window, so why not implement it here too, decorate the window with the necessary symbols by February 14, these can be hearts, angels, doves, etc. Like you look at it, see how you can do it in an original way.


I really like this incarnation, and write your suggestions and feedback to you))).

And I honestly really liked these images of a girl and a boy. And you? There is also a scheme of cupid and fairy, as in the photo on the window. There is a boy and a girl kissing in a heart in my piggy bank and much more.

Therefore, if you also want to decorate your apartment with your children, then you can request all the schemes and templates for free, as always, I will send them to everyone by e-mail.
Well, for those who didn’t like such a creation, I give you small blanks that you can also print on a printer and present to your beloved relatives and friends.


Here is a compilation, I hope my findings will be useful to someone. Have a good day, good mood and positive! Bye!
Sincerely, Ekaterina Mantsurova
In Russia, this holiday began to be celebrated widely and everywhere quite recently, about twenty years ago, but on the other hand, on a grand scale and with pleasure, because this is a great occasion to once again confess your love to a dear person.
Valentines- an integral attribute of St. Valentine's Day, which is celebrated by all lovers on February 14. Nowadays, a card to a lover on this day is called a Valentine. The first valentines appeared in the Middle Ages, when lovers spoke or sang words of love to each other. Written valentines appeared in the 15th century. The oldest of them is exhibited in the British Museum. Paper valentines used to be exchanged instead of gifts. They have gained particular popularity in England. They were made from colored paper and signed with colored ink. Ever since mass production of valentines was launched in 1800, they have become an integral part of the holiday, and now, by the day of all lovers, shops are simply littered with them of various colors and sizes: from small to real masterpieces.

There are many options for valentines - for sure you will come up with them yourself. To make valentines with your own hands, you can use beads and rhinestones, sparkles and pieces of fabric.
One of the Valentine's options will be a beautiful card, decorated with many hearts of different sizes, cut out of velvet red paper in different shades. After these hearts must be glued to a sheet of thick paper folded in half and write words of congratulations. You can sew a red velvet heart by attaching a leaf with a tender love confession to it.
To make valentines, you can use gift wrapping (cut out hearts), stickers, postcards - the main thing is that you will do all this with love and the desire to bring joy to the person to whom it is intended.
Of course, now you can buy a Valentine card with a ready-made congratulation, but it’s still nicer when it’s handwritten in your own words. Valentine cards can contain poems, short wishes, and even comic ones. It can be either a few lines or small compositions that convey the feelings of the messenger.


Thus, you can prepare for the holiday in advance and approach it creatively: make your own valentines because it is always more pleasant to receive a gift made with your own hands and from the bottom of your heart. Do not be shy, experiment, make a valentine yourself - please your loved one!
We offer you an overview of very interesting findings that have been found in the literature and the Internet.
Valentine accordion

Making such an original valentine is quite simple and quick: fold the sheet with an accordion and decorate with hearts, and you can hide notes of love content in the folds of an accordion.
Postcard "Three hearts"

For this postcard, you can use ordinary paper or colored thin cardboard. Cards or magazines with illustrations of flowers, candy wrappers, ribbons, beautiful wrapping paper, colored confetti made by you or bought in a store, etc. can come in handy.
In our case, we will make a postcard that will be put into an envelope. If you do not need an envelope, then you can not stick to special sizes.

1. Select an envelope and cut a strip 5-7mm smaller than the width of your envelope. This will be the base of your postcard. Measure the height of the envelope and set aside 5-7 mm less. It is advisable not to draw with a pencil, but to draw a strip with the tip of scissors. Don't press hard. This strip will then help you easily fold in the right place while leaving a clean and professionally aesthetic edge. Next, you need to set aside two more heights of your postcard. In our case, the height of the envelope is 10 cm, the finished card is about 9.5 cm, so set aside two more times about 4 cm. As in the previous time, do not make stripes with a pencil, but draw a line with the sharp end of the scissors.

2. Fold the card like an accordion, as shown in the picture, its base is ready. Now you need to cut out the hearts. Do them first on a draft. It is possible that right away you will not get the right size and beautiful shape, so you will need to practice. After the shapes and sizes are chosen, don't forget to make two more hearts (one smaller than the other).

3. Decorate the hearts. Here you can fantasize. Glue the hearts in decreasing order on each step. You can sign each heart with tender words or write a love message on each step.
In such a card, the number of hearts can be more than three.
Valentine card "Mouse in love"
Why do we give only hearts, angels and doves on Valentine's Day? What about other attributes? Let's dream up a little and make a mouse in love. Such a mouse can be presented as a Valentine to your loved one. It will turn out a very original and unusual gift for Valentine's Day.

To create such a valentine, you need red paper or any other, scissors, glue, a small pompom for the mouse's nose.
Valentine card ″Amulet″
This valentine can be made by hand, it is a heart-book in which you can write a confession for your loved one. It can also be worn around the neck as an amulet. It will make a very original gift for Valentine's Day.

Valentine card "Nostalgic"
For her, you will need your joint photos, a sheet of white cardboard, glue, scissors, a felt-tip pen.
1. Cut out images of your joyful faces in different ways - diamonds, circles, squares, triangles - and fold all the pieces like grooves.

2. Cut out a heart from colored (red or pink) cardboard.

3. Stick photo fragments on one of the sides

4. Inside the heart, write your wish. For example: "Keep this heart and remember us always! With love on Valentine's Day - yours forever - me!"


Valentine's card "Winged"
This is easy to do! It turns out the message "flying on the wings of love."
For it you will need white and red cardboard, scissors, glue, marker.
1. Cut out a scarlet heart. 2. Draw wings on paper and cut out with scissors


3. Glue the wings to the heart. And on top of them is another similar heart so that the tips of the wings are not visible.


Valentine card "Merry"
For her, you will need a white sheet of cardboard, felt-tip pens or pencils, a red paper heart, scissors or a blade.
- Draw a wreath or someone else (optional).
- Cut with the blade where you marked with a fat marker.
- Separately, make a heart and insert it into the paws of the lion cub.
1. 2.
2.
3. 4.
4.
Valentine ″ Tied-tied″

From a sheet of cardboard, bend the future postcard, and close the "entrance" with a heart and tie it with a ribbon. Inside is a secret, it must be guarded.
Valentine ″ You and me ″
You can stick your photos on the back of the hearts.

Wreath of valentines

You will need cardboard, tape, colored paper, glue, scissors.
Cut out a circle from cardboard. This will be the base on which the hearts cut out of paper are then glued. Please note that if the colored paper has an ornament or a geometric pattern, your project will greatly benefit from this. If you can't find colored paper with a finished design, make an appliqué over the cut out heart. When the wreath is ready, as a final touch we tie it with a ribbon.

Valentine card with heart in hands
This is a 3D valentine in the form of a postcard. If you open it, then hands will appear, giving you the heart of a loved one.

Use a ruler to draw straight lines at the top and bottom of the drawing. And then cut along this line from the edge to the beginning of the pattern.


Using the notches at the top and bottom as guides, fold the paper over and staple the halves together.


Carefully cut out the blank and fold it as shown in the photographs.


A greeting card with a declaration of love is ready.

Wicker hearts and leaves
1. In order to make each wicker leaf, pick up paper in two contrasting colors (double-sided is better).


2. First, build a pattern. Draw a square with a side of 4-12 cm. (The optimal size, convenient for weaving, is 8 cm). Place the leg of the compass in the middle of the upper side of the square and draw a half circle with the same diameter. Divide the top and bottom sides of the square into 8 pieces. Now, if we draw lines at equal distances, and then weave, we will get the familiar plain or checkerboard weave. But let's try to make an unusual weaving. Draw lines, making the middle stripes twice as wide as the rest.


3. Lay sheets of paper in two colors on top of each other. The pattern can be drawn directly on one of the sheets. You can also draw on a separate sheet or print a template. You need to cut two or three sheets (with a template) at the same time. You can use staples to keep them from moving.
4. Place one blank on top of the other. Pull out one work strip (yellow) and place it on top. Pass it between the red stripes, weaving in a checkerboard pattern.


5. When you bind all the strips, gently pull them up, trying to make sure there are no gaps. Now, with a glue stick, glue all the ends of the strips on both sides.
6. Trim the edges. It turned out to be a perfect heart. To turn it into a leaf, cut out the cloves along the edges (one at a time or with curly scissors) and glue the leg.

7. You can make the pattern differently, leaving the two extreme strips wide.

8. This is how leaflets with plain weave and stripes of different widths look like.

9. Try changing the shape of the strips. Divide half of the upper side into 4 parts, and the lower side into 5. Connect the dots with raised lines.


10. It turns out such a sheet.
11. Draw two pairs of lines concave towards the middle.


12. The leaflet will be like this.
13. Divide the top and bottom sides of the square into 9 parts, and the two sides in half. Draw three convex lines.


14. After weaving, you will get a pattern with a volume effect.
15. Divide the horizontal sides into 8 parts, and the vertical sides into 4 parts. Draw identical arcs between the points of intersection of the lines.


16. The pattern is unusual.
17. Divide all sides of the square into 4 parts. Use a compass to draw 4 semicircles in the marked places. What do you think the pattern will be after weaving?


18. You will get a flower with four petals inside the leaf.
19. Divide all sides of the square in half. Draw the middle lines. Divide all sides into 5 parts and draw auxiliary lines. Draw straight lines and draw semicircles on the markup.


20. The pattern on this leaf is a flower inside a flower.
21. Divide the top and bottom sides into 8 parts, and the sides into 2 parts. Draw two diagonals. The intersections of the diagonals and vertical lines indicate the points from which the corners are built in the center of the pattern. If you make a pattern in the shape of a heart (completed with another semicircle, as shown in blue) and do not cut the right side of the square, then after weaving it will turn out ...

22. It will turn out such a figure, resembling a flower, with a wicker core.

23. And finally, one more example. Divide the top and bottom sides into 8 parts, and the sides into 4 parts. Use a compass to draw semicircles that form wavy lines.


24. Isn't it an unexpected result?
Experiments with figured weaving are extremely exciting, they can be continued further ... Try to come up with your own shapes!
Volumetric Valentine.


This is a simple three-dimensional postcard - Valentine's card for Valentine's Day. It is easy to make and is suitable for art lessons with young children.
Materials:
White thick paper, red paper, glue
How to make a postcard:
- Cut out the card itself from white paper.
- Fold the red paper like an accordion and cut out hearts.
- Glue the ribbon of hearts to the card.
- Sign the Valentine card and you can hand it.


If you want to please and surprise your loved one, then a Valentine card made by yourself is the best gift!


 in the near future - forecasts and expert opinions")


 in the near future - forecasts and expert opinions")


