When replacing an old floor covering or when installing a new floor, a floorboard is the best option, which is practical, affordable and safe to use. Despite the popularity of the floorboard, the installation process for many seems quite complicated. Therefore, we will consider the features of laying the floorboard further.
Manufacturing technology and advantages of the floorboard
The floor board differs in high operational and technical properties. Based on its attractiveness, it is on a par with more expensive laminate and parquet boards. In the manufacture of a floorboard, the wood is thoroughly dried to a certain point in its moisture content. Therefore, this material has a long service life.
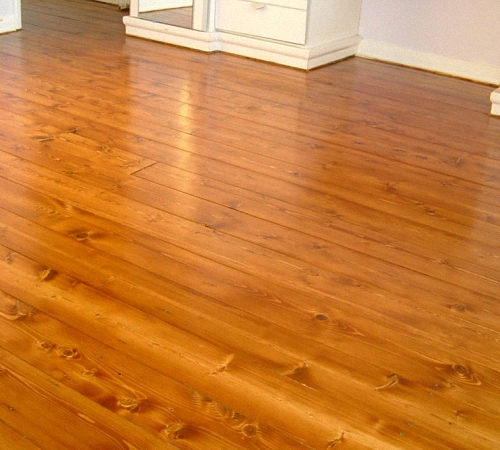
Among one of the undeniable advantages of the floorboard is its affordable cost, which makes it so popular. In addition, it has a high thermal insulation capacity and provides good sound insulation.
The floorboard fits perfectly into any type of interior, does not change shape during operation and has an attractive appearance.
The main components of this material are:
- spikes;
- grooves;
- grooved ventilation ducts.
The most optimal type of wood suitable for the manufacture of floorboards is larch. Due to its strength, durability, it has good performance characteristics.
If we compare the installation of a laminate with the installation of a parquet board, then the second one requires less time for laying. At the same time, it is environmentally friendly and harmless, since no foreign impurities are added to it during the manufacturing process.
The floorboard has the appearance of a massive product, which is made from solid trees. If the length and width of the products are compact, then the laying process is quick and easy, since special grooves have been developed in it to ensure the connection of the boards. The procedure for installing a floorboard on large areas does not take more than two days.

The main indicator of the quality of the floorboard is the material from which it was built. But, almost all types of floorboards have the following advantages:
1. The low coefficient of thermal conductivity and sound conductivity allows you to keep warm for a long period of time and provides comfort for people living in the house.
2. Subject to all the processes of drying the wood and the technology of its preparation, the floorboard has a high coefficient of strength, the duration of its use is twenty years or more.
3. Free of chemicals, harmful ingredients and other impurities, great for people who suffer from allergies.
4. If we compare the cost of a floorboard with similar materials, then its price is much lower and more affordable.
5. If the wood coating is present in the room, then a healthy microclimate is provided for it, since the tree is able to accumulate moisture when it is in excess in the air, and give it away when it is deficient.
6. Does not require lengthy preparation for installation. Quickly installed and removed. For work, a standard set of tools is required.
7. Unpretentious in care, well washed and cleaned.
There are several categories by which the quality of the floorboard is distinguished:
- A-class;
- B-class;
- C-class;
- Extra class.

They differ in the quality of the wood used in the production process, in the number of knots, notches, cracks, chips, and also in price. Extra-class floor board has the lowest cost.
After cutting down the tree, it enters the drying chambers for storage and drying. When the finished products are already dried, the process of sorting them into classes takes place. Sorting depends on the number of defects that the tree acquires in preliminary processes.
Before installing the floorboard, it is necessary to build a base in the form of a subfloor. The main requirements for it are high strength in order to avoid deformation of the material.
When buying a floorboard, choose options that are made from larch, as they have the highest strength and are almost as good as a floor made from solid oak.
Varieties of bases for laying floorboards
Arrangement of a plank floor is arranged over any type of ceiling or support pillars. There are such types of bases that are suitable for laying the floorboard:
- concrete pavement, pre-leveled with polymer or concrete screeds;
- the surface of the log, installed on brick supports or any type of coating;
- surface made of moisture resistant plywood;
- old wooden flooring;
- rough floor from waste lumber.
Installing a floorboard is most often the final stage in arranging a room. Before this process, windows, doors, walls and ceilings are usually replaced. When installing the floorboard, keep in mind that it is very unstable in the face of high humidity. Before installing it, measure the humidity of the subfloor, which should not exceed twelve percent.

At the same time, the humidity of the air in the room should not be more than sixty percent, and if the humidity is less than forty percent, the boards will dry out and crack.
Considering the design of a floorboard laid on a concrete base, it should be noted the presence of:
- hollow core slab;
- technoflora;
- waterproofing;
- screed made of cement-sand mortar;
- floorboard directly.
Tip: Before installing the board, you should remove it from the boxes and put it in the room for at least 24 hours. The material must adapt to the microclimate of the room.

Varieties of rough coatings for laying floors from boards:
1. The most common floorboard installation scheme is its laying on logs. Logs are called wooden block boards having a rectangular cross section. Their fixation on the rough base occurs with the help of mastic or a self-tapping screw. Laying the lag takes place in a perpendicular direction to the installation of the floorboard.
After installing the lag, the process of their alignment takes place. To do this, chips are placed under them. In addition, there is a special system of adjustable logs, allowing mechanical alignment of the necessary sections.
2. When arranging the floor from moisture-resistant plywood, it is laid on almost any base, including logs, if necessary, in additional strengthening of the multilayer structural parts of the floor. The standard set of works for installing a floorboard on such a coating involves its preliminary alignment. Laying plywood sheets, cut into longitudinal parts, occurs diagonally in relation to laying floorboards. Plywood is fixed with screws or dowels. It is recommended to leave seams for technological purposes when arranging a plywood floor in order to compensate for its expansion and contraction with temperature changes.

Installation of such a floor includes the presence of:
- draft base;
- insulating substrate;
- directly moisture resistant plywood;
- floor covering;
- boards.
Tip: If the flooring is concrete with a sand-cement screed, then ordinary glue is used to fix the plywood. When choosing an adhesive, make sure it is suitable for both plywood and concrete. This procedure is also acceptable for wooden floors.
Once the plywood is in place, it is sanded to remove all dirt and dust. Before installing the floorboard, the surface is treated with a primer, and then the boards are fixed. The main floor also needs to be sanded, varnished and oiled.
3. Installing floorboards on an existing floor involves checking the old floor for defects, the reliability of fasteners and the strength of the base. If necessary, old worn boards or damaged fasteners should be replaced.
Tip: Install the floorboard over the old floor in such a way that they are connected perpendicularly.
Experienced builders give recommendations on dismantling the old floor and arranging a concrete screed, since such a floor can last much longer, but if financial resources do not allow this, then it is quite possible to install a floorboard on an old wooden floor.
In addition, a lot of attention should be paid to the choice of insulation and waterproofing. These materials must be of high quality. The insulation must be inedible for rodents, moisture resistant and not shrink. Waterproofing should differ in the duration of operation.
If the floor is located in the building of the first floor, then its insulation is mandatory. It is allowed not to insulate the floor of the first floor if there is a basement with heating. For insulation, it is recommended to use basalt or mineral wool, it is characterized by vapor permeability and good thermal insulation characteristics.
Thermal insulation is laid in the space between the lags, while ensuring its tight fit. Vapor-permeable waterproofing is installed on top of the thermal insulation. Please note that between the subfloor and these layers it is required to leave a space up to four centimeters thick, which provides natural ventilation of the floor. Otherwise, fungus and mold will form on the floor, which will lead to its premature deterioration.

To protect the multilayer structure from moisture coming from below, it is recommended to use waterproofing membranes with high vapor permeability. If the vapors circulate freely in the underground space, the tree will last much longer.
The best floorboard is made of Siberian larch or oak. These types of trees are resistant to ultraviolet radiation, moisture and temperature changes. In a room in which people stay intermittently and there are small loads, for example, in a nursery or bedroom, a floorboard made of aspen or alder wood is used. Quite rarely, floorboards are used, the basis of which is pine or fir. They are more suitable for the construction of rough floors or reels.
The shape of the floorboard depends on the personal preferences of the owners of the room. Based on the strength, the best option is to use a forty-millimeter board. Too thick boards can deform over time, because due to the large thickness, moisture remains in them during the drying process.
The choice of floorboards belonging to a certain grade is influenced by the purpose of the room, the laying area, the subsequent finishing and the financial possibilities of the owners. The floorboard of the highest grade has a flat surface and a beautiful, clear pattern. Therefore, after installation, such a floor is opened with varnish. The variants of the first or second grade have a small number of knots, which also look beautiful without painting. If subsequent painting of the floor is planned, then undoubtedly choose a floorboard of the third or fourth grade.
When laying floorboards, in most cases, only sheet pile materials are used, which are easy to work with and easy to install. Straight boards deform after a certain period of time and cracks appear in them.
Laying grooved flooring
A tongue and groove board is a standard board design that has grooves that snap into place on top of each other as they are installed. Thus, it turns out to achieve better fixation and a strong connection.
When choosing the direction of laying the floor, you should focus on the luminous flux. Boards are laid parallel to it. If you plan to install the floor in the vestibule or in the corridor room, then you should proceed from the movement vector along which the floor is installed.

There are two ways to lay boards:
- with offset elements;
- without shifting elements.
When laying floorboards, a perfect undercut of the boards is required. Lack of experience in this matter will not help to achieve perfectly even right angles, therefore, in this case, it is better to trust a specialist. When laying boards in this way, it is recommended to purchase or make a template version, according to which the undercut will be made. Along the edges of the room, it is also required to maintain a certain indentation. To ensure longitudinal movements, it is necessary to have an interval between the board and the wall, the size of which is from 0.5 to 2 cm. At the end of the installation, the plate is attached.
For a clearer understanding of the process of installing a grooved floorboard, we suggest that you read the brief instructions:
1. The presence of a mounting or ledge on the boards allows you to connect them to each other. But, when laying the first tongue-and-groove board, the ledge should be exactly near the wall. Such an installation will facilitate the process of fastening subsequent boards.
2. The connection of the second board with the first occurs with the help of a tongue-and-groove contact. It is not recommended to use nails during this procedure, as they are subject to corrosion, which will be provoked by frequent washing of the floor, there is a risk of their caps coming out, leading to injury.
3. As a retainer, use self-tapping screws with an optimal diameter of four millimeters and a length of up to seven centimeters.
4. There are two ways to fix boards:
- with the presence of a self-tapping screw of forty-five degrees;
- without tilt - while all the caps of the screws are sealed with a sealant.
The first option is distinguished by aesthetics, and the second - by reliability.
5. The fastening of the extreme parts of the boards located near the walls is carried out exclusively with the help of self-tapping screws.
Finally, the floor is sanded. This will require sandpaper or a grinder. In the presence of large irregularities, scraping is required. Next, the surface is opened with varnish, and when done, it is painted.

Laying floors parquet board: technology and features
For the manufacture of parquet boards, wood is used. There are several types of parquet boards:
- massive - has three layers, for the first, hardwood is used, for the second - hardwood of coniferous species, and for the third - soft wood;
- extra board - the first layer is also hard, but for the manufacture of the second and third, waste components or soft woods are used.
To stylize the parquet under the wood texture, another top layer is glued onto it. In relation to the thickness, parquet is from 7 mm to 2.5 cm. The quality of sound and heat insulation, as well as the ability to withstand certain loads, depends on the thickness of the parquet board.
When laying boards up to two centimeters thick, an even concrete base is required. If the thickness exceeds this limit, the parquet board is laid on logs.
When the parquet board has already been purchased, it is necessary to unpack it and leave it for a day in the room where it will be installed. Before installing it, it is necessary to complete all repair work, especially wall decoration. Since it will be tightly adjacent to them.
If the parquet board is installed on an old wooden base. It is recommended to check it for unusable boards and replace them. If there are large gaps, it is recommended to use PVA glue to fill them. The next step is the process of sanding the floor.
If the parquet board is installed on a concrete base, make sure that it is even and that there are no large drops. The concrete coating should not be wet, to check it for moisture, you should use a plastic film that covers the floor for a day. If, after removing the film, there is no condensation, feel free to proceed with laying the parquet, but before that, apply a primer to the concrete base.

Conditions for installing parquet boards:
- the temperature in the room is about +17 degrees;
- air humidity from 45 to 60%.
If these parameters are observed, the coating will last longer.
There are two ways to install parquet boards up to 2 cm thick:
1. Floating - first, a polyethylene film is installed, with an overlap of 18 cm, adhesive tape is used to fix them, then polyethylene foam or a cork substrate is installed, metallized cattle is used to glue the joints, then the parquet board is installed.
The parquet board is installed perpendicular to the window. The first board is laid with a spiked base to the wall, which is pre-cut, for a tighter fit of the boards. The spacing between the wall and the plank depends on the total length of the room. For a length of one meter, a one and a half centimeter gap is required. To fix the board against the wall, you need to install special pegs.
2. Adhesive - suitable for spacious, large rooms. This method involves the installation of moisture-resistant plywood on a rough base, on the surface of which glue is applied, and then a parquet board is installed.
Wooden floors allow you to keep warm in the house using minimal technical and material means. It is thanks to this feature that such floors have remained and remain the most common throughout their centuries-old history and do not yield their leadership even to the most modern high-tech flooring and coatings.
Floors made of high-quality wood, with proper care, retain their performance characteristics for centuries, are relatively inexpensive, versatile (they can be installed on any type of base), harmless to the human body and look very impressive. If necessary, they themselves can serve as the basis for a different type of flooring. In addition, wooden floors are quite easy to install and can be installed in a private house or apartment by just one person.
General principles for wooden floors
Directly sexual boards are always laid on logs, but the logs themselves can be laid both on a concrete or even earthen base, and on supports - usually these are brick, wooden or metal poles. Rarely, but still, a technology is used in which the ends of the log are embedded in opposite walls or laid on specially provided ledges near the walls and are operated without intermediate supports. However, in this case, it is very difficult to block wide spans - logs of a very large cross section and weight are required, and it is almost impossible to install them correctly alone ...
Installation of wooden floors on a concrete base practically no different from the arrangement of floors in an apartment with floors made of reinforced concrete slabs. Much more difficult is the case with floor installation on the first floor of a private house, since in this case it is highly desirable to arrange a ventilated and DRY underground. Its presence largely determines the strength and durability of the finished floor, especially in cases of high groundwater.
A few words about the tool
From the chosen method of floor installation depends on what tool you need for work. But in any case, you can not do without:
- laser level; in extreme cases, you can use the hydraulic level, but you will need an assistant to work with it;
- conventional or cross building bubble level with a length of at least 1 meter; the cross level is preferable, since it allows you to align the plane simultaneously in two directions;
- hammer weighing no more than 500 g;
- chain or circular saw, or a good hacksaw.
- jointer and (or) grinders.
The usual carpentry tool will not be superfluous - a square, a small ax, a planer, a chisel, a nail puller.
Floor installation on support poles
Traditionally, a wooden floor is assembled from the following "layers" (from bottom to top):
- the basis of all flooring is logs;
- rough ("lower") floor;
- waterproofing layer;
- thermal insulation layer;
- directly wooden floor (finishing flooring);
- finishing flooring.
This whole multi-layered "sandwich" is usually kept on supporting pillars - concrete, brick, wood or metal.
Installation of brick pillars
 The best choice today is brick pillars that have acceptable strength characteristics, are quite affordable from a financial point of view and do not require much labor during construction. The only limitation is the height of such supporting pillars should not exceed 1.5 m; if it is larger, in order to maintain the strength of the supports, it will be necessary to increase their cross section, which will lead to a sharp increase in the required amount of bricks and, accordingly, an increase in material costs for construction. With a height of pillars up to 50-60 cm, a section of 1x1 brick is enough, with a height of 0.6-1.2 m, the section is made at least 1.5x1.5 bricks, columns up to 1.5 m high are laid out at least 2x2 bricks.
Anyway under the brick supports it is necessary to pour concrete "pyataks", the area of which exceeds the cross-sectional area of \u200b\u200bthe columns by at least 10 cm in each direction. The distance between the centers of the platforms is selected within 0.7-1 m ALONG the log and 0.8-1.2 m BETWEEN the logs with a section of 100 ... 150x150 mm. After marking, holes about half a meter deep are pulled out in the places where the pillars are erected; the main thing is that the bottom should be below the fertile layer of the earth. At the bottom of these mini-pits, a sand and gravel "cushion" is made, on which the concrete mixture is poured. It is desirable that the surface of the resulting "penny" is a few centimeters above ground level.
It is at the stage of laying out the supporting pillars the horizontality of the future floor is laid, and it is at this stage that it is best to use a laser level. With its help, the level of the LOWER EDGE of the LAG plus 1 cm is marked on the walls, a construction cord is stretched between opposite walls along this level, and the height of the pillars is already adjusted to its level. It is not necessary to bring it strictly down to a millimeter - a gap of a couple of centimeters is quite acceptable. When calculating the total thickness of the floor, it should be taken into account that at least its upper plane must be higher than the level of the basement of the building - otherwise it will be extremely difficult to avoid "cold bridges".
Some features of the pillars
It is worth considering them the presence of fasteners for beams-lag. Usually, as such fasteners, vertical “studs” with a thread or anchor bolts embedded in 10-20 cm are used - later, through holes are drilled in the logs in appropriate places, with which the beams are “put on” on the resulting pins, and are attracted by nuts with washers. The protruding excess of the "thread" is cut off by the "grinder".
The lateral surfaces of the columns and, especially, their upper plane on which the lag will be laid, preferably cover with a layer of durable plaster- it will additionally strengthen the structure and play the role of additional waterproofing. On the surface of the finished columns is laid 2-3 layers of small pieces of roofing material.
After the masonry mortar has completely dried and hardened (it takes about a week), logs can already be laid on the finished support pillars.
Laying lag on brick columns
The length of the lag is selected depending on the design of the floor. When laying on supporting pillars, there are only two options for such structures - “floating” and rigid.
Floating or hard floors?
In the first case, the entire "sandwich" of the floor lies and rests exclusively on the posts, without being rigidly tied to the walls or. In the second, the ends of the log are rigidly attached to the walls in one way or another; this design virtually eliminates the “walking” of the flooring, but when the building subsides, it may well lead to deformation of the finished floors.
With a "floating" version of the floor, the length of the log is 3-5 cm less than the distance from wall to wall. In the second case, the gap should be no more than 2 cm - otherwise the logs will be difficult to rigidly attach to the walls. If necessary, logs can be made from two or more pieces, connecting them into "half-paws" - but the joint must necessarily fall on the support post and be nailed or (for a lag section of up to 10x100 mm) screwed with self-tapping screws.
If the final length of the lag is less than three meters, then they can be laid directly on the supports (not forgetting the roofing material waterproofing gaskets!); however, it is much better between the roofing material and the lower plane of the beam-lag to lay flat a piece of board with a thickness of 25-50 mm. In the case of butt lags, this must be done!
Log alignment
After laying out the lag on the prepared support pillars, they must be "set" in level. This is done as follows: with the help of wooden spacers of small thickness two extreme beams are laid strictly horizontally, according to a pre-calculated and marked height level. Gaskets are still used only on the extreme support pillars, while you can ignore the intermediate ones. The ends of the exposed logs are nailed to the walls; in the case of "floating" floors, this fastening will be temporary.
On both sides, at a distance of 0.3-0.5 m from the walls, on the upper planes of the laid lag tightly the construction cord is pulled. All other intermediate beams are displayed on it; then, if necessary, gaskets are installed between the remaining posts and lags. ALL gaskets must be RIGIDLY tied (nailed) to the joists, and, if possible, to the support posts. The beams should lie tightly on the pillars, in extreme cases, gaps of no more than 2 mm are allowed - but not on adjacent pillars.
Draft floor
 After laying the log, a draft floor is made. To do this, along the entire length of the lower cut of the log, a narrow bar (“cranial” bar) is nailed on each side of it. Raw boards with a length equal to the distance between the lags are laid on it between the lags. After laying these boards “solidly” they are covered with a vapor barrier film, on which insulation is applied or filled up. From above, everything is completely covered with a windproof cloth.
Underfloor ventilation
When arranging the floor on brick pillars in the underground space ventilation must be provided- forced (with a large cubic capacity of the underground) or natural. An obligatory element of such ventilation is the so-called "perfume": Through holes in or walls below floor level. Such openings should be available along the entire perimeter of the building and under internal partitions, the distance between them should not exceed 3 m.
 The dimensions of the vents are usually chosen 10x10 cm, the center of the hole should be at a height of 0.3-0.4 m from the ground level (above the thickness of the winter snow cover). Be sure to provide for the possibility of overlapping the ducts in the winter. In addition, in order to protect against rodents, the openings of the vents are closed with a mesh with a fine mesh.
When unless the underground is too deep(no more than 0.5 m) and the installation of products is difficult, ventilation holes are made in the floor itself - usually in the corners. These openings are covered with decorative grilles and must always be open.
How to properly lay floors
Before laying the floorboards, the insulation is covered with a windproof sheet. The choice of board depends on what kind of surface the finished floor will be. If it is conceived as natural, a tongue-and-groove floorboard (with a lock) is required; if linoleum or laminate is to be laid, it is quite possible to get by with an ordinary edged board. BUT IN ANY CASE THE WOOD MUST BE WELL DRY!
We fasten the grooved board to the lags
 The first board is placed with a gap of 1-1.5 cm from the wall, and not close to it, with a spike to the wall. The following boards are pressed against the previous ones with the help of some kind of stop (clamps, for example) and a pair of wooden wedges. Boards, especially if they are thicker than 25 mm, are nailed - self-tapping screws are not suitable in this case, they do not attract the board to the upper surface of the log. The specified gap of 1-1.5 cm must be maintained around the entire perimeter of the room. The existing joints of the ends of the floorboards must be staggered.
Floor finishing
After laying the floorboard, the floor is ready for finishing, which consists in its sanding (sanding) and coating with paint or varnish. It is almost impossible to do this manually - you should use an electric jointer or grinder. After this very dusty procedure, all “opened” Treat cracks and crevices between boards with wood putty made on the basis of drying oil. The last operation before painting is fixing the baseboard around the perimeter of the room.
The polished surface is painted or varnished, for example, yacht; modern paints and varnishes allow you to imitate almost any type of wood or material surface. Usually at least two layers of coating are applied, a paint roller and a good respirator are used for work. If you want to get not a glossy, but a matte floor surface, you can use wax or oil.
Do-it-yourself wooden flooring is quite possible, if you first study the instructions for this work. Boardwalk has always been more popular than floors made from other materials, as it differs from them in its natural warmth, environmental friendliness and the ability to create a specific, especially healthy microclimate in residential premises.
Most often, coniferous wood is selected for flooring in the house. Mostly larch is used, which shows particular resistance to both temperature extremes and high humidity. Due to the natural antiseptic qualities of this tree, destructive fungal formations do not appear on it, which means that the processes of decay and destruction are excluded.
Gender Requirements
Wooden flooring must meet certain requirements, without which the floors will not last long and will not be comfortable for residents. These criteria can be safely attributed to:
- Effective soundproofing and thermal insulation of rooms.
- Reliability and durability of a wooden covering.
- Wear resistance, and therefore - the durability of the floor.
- Moisture resistance and hygiene - cleaning the floor should not cause any particular difficulties.
- The aesthetics of wooden flooring - it should become a decoration of the room.
- Ease of installation work.
To achieve all the mentioned qualities of a wooden floor, you need to choose the right material for its installation.
Material selection criteria

In order for the floors to serve for a long time without drying out the boards and their deformation, when choosing wood, you need to pay attention to the following material parameters:
- grade. For a finish coating, it is better to choose the highest or first grade of the board, and for rough flooring, grade 2 ÷ 3 is usually bought. If the finished floor is covered with paint, then second-rate material is quite suitable for it.
The quality of the wood will directly depend on the grade of wood. Even when purchasing the highest grade material, it is necessary to pay attention to the presence of possible defects, such as chips, cracks and knots - they must either be completely absent, or be in a minimal amount.
- It is very important to pay attention to the drying of wood. It must have a certain humidity, otherwise, over the years, gaps will appear between the boards, and the floorboards themselves will become deformed. Humidity for finishing boards cannot exceed 12%, and for roughing - not more than 17%.
- The length of the bars and boards should ideally correspond to the length and width of the room where the floor will be laid.
- The standard thickness of floorboards is 120×25mm and 100×25mm. This parameter is selected depending on the step of laying the lag on which the boards will be fixed. According to the existing technology, these distances should be selected in accordance with the data given in the table:
| Step between lags in mm | Floorboard thickness in mm |
|---|---|
| 300 | 20 |
| 400 | 24 |
| 500 | 30 |
| 600 | 35 |
| 700 | 40 |
| 800 | 45 |
| 900 | 50 |
| 1000 | 55 |
When buying any building material, after the necessary calculations have been made, it is necessary to add 15% in reserve to this amount - this rule has been verified by experienced builders, therefore it is recommended to follow it.
Wood preparation
Before the process of installing the lag and flooring of the floorboards, they must be prepared. Usually, flooring material is sold already planed, but if burrs are detected during inspection, they must be removed with an electric planer.

Their installation is started only after the material has completely dried.
The choice of floor design
Knowing all the requirements that apply to the coating material, you need to decide on the design of the floor, since for each specific case, its own option is suitable, depending on the conditions in which the installation will take place.
There are several main types of wooden floor designs:
- Floors on logs laid on floor beams. In this case, plywood or boards can be used for the finishing floor.
- "Floating" construction - boards laid on a concrete base, but not attached to it .
- Coating fixed on logs laid on the ground.
These methods of arranging a wooden floor have become the most popular, as they give creative freedom to the master, who can bring his own adjustments to the design. But, one way or another, for each room it is necessary to choose the only option that suits it to a greater extent.
Floor beam system
- Logs, as the basis for the floor, can be fixed to floor beams, which, in turn, are laid on a columnar or strip foundation. This is permissible if the room where the floor is arranged has a width of no more than 2.5 ÷ 3 m.

- To create an air gap, floor beams are often raised above the ground to a certain height, laying them on top waterproofed foundation surface. They can be rigidly fixed to it or simply securely laid on top. The second option is chosen in the event that the foundation has not yet had time to shrink, and when it does, it will not pull the floor system along with it, which will certainly begin to deform from such an impact.

- With a large width of the room (more than 3 meters), columns can be additionally installed between the walls, which will create rigidity for the floor system. Waterproofing is necessarily laid on all supporting structures under the beams of the base of the floor, so that the wooden parts serve as long as possible.
What should be the thickness of the lag and floor beams? This mainly depends on the width of the free span (distance between adjacent support points). Usually proceed from the following indicators (see table):
- After the floor beams are installed, the logs need to be fixed on them. The distance between them, as already mentioned, is calculated according to the thickness of the selected floorboards.

- When arranging such a “floating” floor structure, the logs, and then the boards, should be located at a distance of at least 12 ÷ 15 mm from the walls, that is, be independent of them. A material is laid in the opening between the walls and the floor system, which will not allow cold air to enter the room, allow the wood to “breathe”, and expand freely when temperature and humidity changes.
- When laying logs consisting of two separate sections, their overlapping by 400 ÷ 500 mm should be on the support posts or on the beam. The logs should be aligned with the building level, if necessary, to achieve an ideal horizontal, small pieces of wood are placed under the logs.
- After the logs are set and fixed, it is recommended to arrange a subfloor, for which low quality boards are quite suitable. To install them, cranial bars 30 × 50 mm in size are screwed on the entire length of the lag from below.

- The boards of the subfloor are not always fixed to the cranial bars, usually they are simply laid tightly to each other. A vapor barrier film is laid on top of the subfloor, fixing it with staples to the logs and boards.

- Between the lags, the vapor barrier is tightly laid - it can be mineral wool in mats or rolls, as well as dry filling from expanded clay or slag.

- Another layer of vapor barrier film is laid on top of the insulation. Its individual sheets are glued together with adhesive tape, and then the film is attached to the logs with staples.

- The top layer of vapor barrier is necessary so that dust and particles of insulation material cannot enter the living quarters. On top of this entire floor system, floorboards or thick plywood will then be laid.
Prices for various types of timber
Logs fixed to the concrete pavement
Often, to create a layer for the floor in apartments, a wooden floor on logs is also arranged on a concrete base. Here, the whole difficulty lies in leveling the lag on the surface, especially if it is planned to raise the wooden covering a few centimeters above the concrete slab.
If the apartment is located above the first floor, then most often the logs are laid out, leveled, and then fixed to the concrete base using anchors.

Both in the first and in the second version, the lags are drilled through. To raise the log above the base, use different metal and plastic elements. In this case, the photo shows the studs. They allow you to raise and lower the logs on one side or the other, aligning them in level. The extra piece of the hairpin, after removing the lag to the desired height, is cut off with a grinder.
In each of the options, a heater can be laid on the concrete between the lags, which will add thermal insulation to the coating, and also help to drown out the noise, both from the lower apartment and from the rooms where the logs are installed under the wooden floor. Mineral wool, polystyrene or can be used as an insulating material.
Flooring on concrete floor
Sometimes a wooden floor is laid on a concrete floor without the use of a log. As a covering, floorboards or plywood are used. It is advisable to lay a thin insulating material under such a floor - most often foamed polyethylene is used for this, but it is better to choose one that has a foil coating.

Separate sheets of the substrate material are fastened together with adhesive tape to create a solid coating - it will make the floor warmer and drown out noise. If plywood is used for flooring, you need to remember that it is necessary to lay a decorative coating on top of it. Floors made of sufficiently thick boards will look respectable if they are varnished, waxed or of high quality paint.
Floor board installation
Having chosen the boards of the required thickness, it is important to determine the correct direction of their laying on the floor. As many years of experience show, the best option for laying boards is in the direction of natural light, that is, from the window. Therefore, planning the laying of the board should begin with marking and fixing the lag.
Floorboards have different types of connection:

1. Connection using an insert-liner in the grooves of two boards.
2. Groove-thorn connection in the presence of tongue-and-groove boards.
3. Connection "in a quarter".
The last type of connection is the easiest to install, so floorboards with such an attachment are most often used. In addition, the "quarter" connection creates a single coating with almost imperceptible gaps between the boards, so it optimally retains heat in the room.
Boards can be fixed to two ways of fastening:

- Nails or self-tapping screws can be driven into the groove located on the side of the board, at an angle of about 45 degrees, with the cap recessed into the wood. Some craftsmen prefer to do the opposite, driving the screws at an angle into the edge of the spike.

- In the second option, nails or self-tapping screws are driven in or screwed into the front plane of the board.
- Starting to install floorboards, it is necessary to step back from the wall 12 ÷ 15 mm. Later, a strip of insulation is laid in this gap, and closed with an installed plinth. It is necessary for the tree to expand with changes in humidity and air temperature.

- The board is attached to the joists with nails 80 ÷ 120 mm or self-tapping screws 70 ÷ 100 mm. Hats are driven under zatay”, later they are sealed with putty matched to the color of the wood.
- If insufficiently seasoned wood is used, then the laid floor requires a drying period that lasts 6 ÷ 8 months. During this time, the coating will shrink and shrink, gaps will increase between the boards, and therefore it will be necessary to carry out the process of relaying it. In this regard, during the initial laying of the flooring, all the floorboards are not completely nailed to the joists, but only the fifth - seventh board is attached. After drying the boards, they must be shifted, pressed as tightly as possible to each other and nailed to the logs.

- If boards with a tenon-groove connection are chosen, for a tighter connection, a mallet is used, with which, through the bar, the spikes are driven into the grooves. Often, special clamps are used for this master, especially in cases where, due to the slight curvature of the boards, the installation goes with smearing the grooves and spikes with carpentry glue.
- For a tight connection of the last board, installed against the wall, temporary wooden wedges are used, they are driven in between the wall and the board.
- The gap between the boards should not be wider than 1 mm. If the board is not installed in the groove to the end, then, most likely, a burr or some kind of roughness remains on the canvas, and this flaw must be removed, the spike must be adjusted to the groove.
Find out and also review the causes of squeaking and how to fix it, from our new article.
Video: flooring with clamps
flooring prices
Floor coverings
Floor surface treatment after final laying
After the floor has been sorted out and secured, it may be necessary to scrape its surface. This process is carried out if, during the drying of the board, it led a little, and the surface became uneven.
The starting varnish helps to reveal insufficiently smooth areas on the surface of the boards, and therefore, after it dries, it is easier to find roughness and carry out their additional sanding.
After grinding, skirting boards are installed, which will well hide the gaps between the wall and the floor boards. If, as a result of this operation, gaps remain between the floor and the plinth, then they are sealed with putty to match the color of the wood.
Now that the floor is prepared in this way, you can proceed to the final coating of the surface with wax, oil, varnish or paint.
The plank flooring is covered with a finishing composition not only to give it aesthetics and respectability, but also to protect it, which means maximum long-term operation.
Oil treatment
If the boards have a beautiful pronounced textured pattern, then special oil is often used to cover it. It makes the floors warmer, not as slippery as when coated, and also gives it antistatic properties. The oil penetrates into the structure of the wood and reliably protects it from the penetration of moisture from the outside, practically repelling it.

Wood coated with oil is less susceptible to various damages, and existing flaws become virtually invisible. The oil does not clog the pores of the wood, preserving its naturalness, allowing the material to "breathe", which creates a favorable microclimate in the living room.
Floors that are covered with oil must be protected from dust until it is completely absorbed. During operation, such a floor requires special care with special means. It is very important to remember that it is not recommended to place furniture with metal legs on such a surface, as there is a risk of unwanted reactions, as a result of which dark spots may remain on the wood.
Oil flooring is recommended in rooms with high humidity - this is a bathroom, terrace and kitchen. Such a coating is also well suited for a hallway or corridor, since boards impregnated with such a substance are more resistant to abrasion.
There are flooring compositions that do not consist of pure oil, but with the addition of liquid wax to it, which gives the floor a matte, soft sheen. Pure oils are also applied to the surface of wood, they are well absorbed into the surface, economical in application and do not require a long wait to dry.
Floor oil can be colorless, or it can have different shades that make the wood darker or give it a special, pleasant and warm color.
The oil is applied in two or three doses. It can be rubbed or applied with a brush, and its excess is immediately erased to avoid the formation of a film on top, which will create an uneven coating.
The oil composition can be applied hot and cold in several layers. The faster the wood absorbs the oil, the more layers will need to be applied. The heated composition penetrates much faster and deeper into the pores of the tree, and such a coating lasts much longer than with a cold application method.
Waxing the floor surface
Wax is most often combined with an oil coating. So, sometimes waxing occurs with a composition that consists of natural beeswax and linseed oil. Such a coating protects the floor surfaces well from scratches and dirt, as well as from absorbing moisture, but will not protect the wood from cracking and intense mechanical stress. Wax coating gives the surface a pleasant matte sheen and a golden hue.

Wax is applied to the cleaned floor with a wide roller in several layers. The first of them must be very thin in order to be well absorbed into the surface. Next, the floor is sanded, and then it is covered with another layer of the composition and sanded again.
Wax combined with oil is an environmentally friendly topcoat and is very good for use in children's rooms and adult bedrooms. Wood that has undergone such processing has the properties to "breathe", so the floors will last a long time and create a favorable microclimate in the room.
Wood floor varnishing

- The varnish can be applied by brush, roller or trowel at room temperature, moderate humidity and without drafts.
- On the cleaned surface, the first layer is applied nitrolac, which will serve as a kind of primer for the finishing layers of the composition. It is applied in a thin layer along the textured wood pattern. If necessary, the primer can be applied in two layers.
- After the primer dries, the surface is well sanded with sandpaper. After that, the floor is washed with soapy water, thoroughly wiped and dried.
- After that, proceed to the application of finishing layers. There can be two or three of them, and each of them is dried and polished.
Applying varnish to floors is a rather complicated undertaking that requires careful selection of the composition for a particular type of wood. Therefore, if this particular method of processing a wooden floor is chosen, it is better to entrust the work to a specialist who will determine the amount of work and select the necessary materials.
The lacquer coating is quite fragile, which is easily damaged by mechanical stress, so it is undesirable to walk on thin heels or move furniture on it. In addition, varnishes are most often produced on chemical bases, which, by clogging the pores of wood, do not allow it to “breathe”.
Staining a wooden floor
Recently, paint is rarely used to cover a wooden floor, but it still happens, especially in cases where a special interior style is chosen. In addition, paint is used in cases where it is necessary to cover a not very attractive view of wood, since such a coating completely covers the floor surface. For such finishing, you can choose paints on different bases: oil, enamel, nitrocellulose, as well as acrylic, water-dispersion and latex.

Water-based paints are preferable for residential premises, as they do not contain solvents and additives harmful to the human body. They are produced in different color shades, so there is always an opportunity to choose the one that is more suitable for a particular interior.
Enamels and other paints based on chemical solvents are also used for living rooms, but after their application, the premises require long-term ventilation, as these fumes can pose a threat to human health.
Before painting the floor with water-based compounds, the boards are coated with a special primer. For the rest of the coating materials, preparation of the base is required with the help of impregnating compounds, in which drying oil usually acts as the main component.
The paint can be applied in one, two coats or, last resort, at three o'clok. It is recommended to choose the “golden mean”, since the paint, applied too thin, will quickly begin to wear out, and thick, on the contrary, peel off. Each coat of primer or paint must dry well before the next is applied.
It is described in great detail in the corresponding publication of our portal.
So, if you have the basic concepts of working with wood, as well as the necessary materials and tools, it is quite possible to try to lay the floors from boards or plywood on your own. If you have any questions, you can always turn for clarification and advice to articles that will help solve any problem. And at the end of the article - another interesting video on the technology of laying a wooden floor.
Video: how to prepare and lay a wooden floor
Plank flooring is the perfect solution for creating a feeling of coziness and comfort in the room. Laying the floorboard, you can do it yourself, and perhaps contact the company for services. One such organization is the San Sanych repair company in Moscow.
Considering all the nuances of the room where the laying of the floorboard is planned, several methods can be used:
- Use of lag;
- Use of plywood;
- Using a screed.
Before starting work, the specialists of the repair company will help prepare the floor for laying, organize the correct temperature indicators, as well as the humidity in the room. After coating the surface, the workers will carry out the final processing processes. The price of laying directly depends on the preparation process, the chosen laying technique and the materials used.
Cost of work
Using lag at work
The log is used mainly in those rooms where it is possible to raise the floor level. This method has a number of advantages:
- Significant time savings during work;
- It is possible to place heat and sound insulating materials;
- Can hold wires;
- The floor air circulation is greatly improved.
Among the shortcomings, it can only be noted that with this method, the height of the room decreases.
Use of plywood
Laying on plywood is done only after the floor base has been prepared. Plywood is fastened with screws or dowels. For greater strength, it is possible to use glue. Immediately after the installation of plywood, the surface should be carefully sanded and primed. Then you need to clean up.
Advantages:
- Significantly saves time during installation;
- Immediately after the installation of plywood, it is possible to lay;
- The floor becomes more even.
This type of installation cannot be done independently. But specialists in this type of activity will do everything quickly, reliably and efficiently.
Using a screed at work
When using a concrete screed, you need to make sure that there are no fragments that can peel off. If there are any, then you need to remove them and level the surface. For strength, the concrete screed and boards are connected with a special primer, which includes a two-component adhesive and solvents.
Advantages:
- Simple execution technique;
- Saving money;
- Reliability and durability;
The main disadvantages of this method:
- Long execution associated with the drying of the surface;
- Dirty and wet mounting method.
Professional floor board installation
When deciding on the installation method, do not forget that excessive frugality can lead to rather unfortunate consequences. Among them, the most widespread violation of the geometry of the floor, the appearance of an unpleasant creak and backlash, as well as the loss of wear resistance and aesthetic appearance when using low-quality paintwork or violation of the technology of their application.
In our company, the laying of floor boards is carried out by specialists who are perfectly familiar with the peculiarities of working with wooden coatings, which require a special approach and knowledge.
Before starting the installation, it is necessary that the materials acclimatize. This means that they must get used to the microclimate in which they will be for many years. This is done in order to prevent the appearance of irregularities, gaps that appear over time.
Usually the acclimatization period lasts at least three days. That is, if the board will be laid indoors, it means that it must first lie there for at least three days.
An important point is the level of moisture content of the material. In our case, the floorboard. It should vary between 6 and 10%. If the humidity is 12% or more, then this is no good. After some time, the floor may undergo deformation. In order for it to turn out to be of high quality, the choice of a suitable material will have to be taken seriously.
Laying the floorboard is made on any basis, but each of them has its own characteristics. The bases are as follows: old wooden floor, plywood, various wooden structures, concrete, logs.
It is clear that the laying of the boards begins at the very end. Before that, you need to finally finish with the supporting structures, windows, doors, properly align the walls and, of course, the screed. The humidity of the walls should not exceed 12%. And the air can vary from 40 to 60%. At the construction site, these parameters are measured by instruments. But what to do at home? How to correctly determine the level of humidity?
We glue a piece of polyethylene 1x1 m in size with adhesive tape or adhesive tape to a concrete screed. After 24 hours, remove this piece. If a wet spot is visible at this place, it means that the screed has not dried up yet. If there is no desire to mess around and stick cellophane with tape, there is a more simplified version. We cover the screed with a rubber mat.
Remove the rug after 24 hours. If this place is darker than the rest of the concrete, then the humidity is high. But this method works when using light-colored concrete. On a dark one, the wet spot is almost imperceptible, so it is unlikely that it will be possible to correctly determine the humidity.
When the screed has reached the desired level of humidity, it's time to start arranging the flooring. This is the next step. Immediately it will be necessary to make a moisture barrier, it will separate various kinds of materials, in this particular case, concrete from wood. It is done like this: the primer is applied with a roller. Or polyethylene is superimposed on a concrete base, so that there are no gaps, overlapping.
In the technologies currently used, a film 3 mm thick is used, overlapped (at least 5 cm). This option is considered the most optimal.
When arranging the base, the following options are used:
- Plywood base.
Bars 50x70 mm, or 55x100 mm, in fact, there are logs. When laying, the lags are used exactly the same, that is, in length, and in width, and in thickness.
Their humidity level should be less than or equal to 12%. They are fastened to concrete with screws. And the screws should be at the same distance from each other. The logs are located perpendicular to the boards, which, in turn, will subsequently be laid on them. The distance between them is 50 cm, and 30 cm along the axis.
Screws must be sunk into the surface by about 3 mm. Logs are also recommended to be glued to the base with glue, bituminous mastic. This option is better to prefer if there is a risk of injuring the communications hidden inside. It is important to choose a mastic that matches the one used to create the moisture barrier.
The lags should be absolutely even. They achieve this result using a banal planer, or by placing wood chips in those places whose level is lower. Which method to choose - everyone decides individually. Appearing cavities are usually filled with some kind of insulation. This creates additional insulation. At the end, a film is laid that protects against moisture. And now you can lay the boards.
Plywood as a base
Such a base is made of moisture-resistant plywood, the thickness must be greater than or equal to 18 mm. Large sheets (standard 1220x2440 mm) are cut into strips, their width should be about 40-60 mm, usually along the smaller side. This moment does not matter if the plywood sheet is square 1.5x1.5 m.
The strips are placed diagonally with respect to the future floor, fixed with screws, dowels. It will take an average of 15 pieces per square meter. Until the laying of the floorboard has begun, it is advisable to grind the plywood base with a grinder. Then the surfaces must be cleaned of dust.
Old floor as a base
This option can only be used if the already existing “old” floor can withstand the loads. A new floor is being made to improve the aesthetic appearance. If there are any doubts about reliability, then it is better to get rid of the old floor and do it all over again.
And only with 100% confidence in the existing coating can a new floor be laid on top of the old one. Start with leveling and subsequent grinding of the existing coating. A mandatory point will be moisture and heat insulation. The base is covered with plastic wrap. It is also noteworthy that laying the new floor in the same direction as the old one will not work without special preparation. This preparation consists in laying plywood as a base. Plywood sheets are used with a thickness of at least 12 mm. They need to be well sanded.
Massive boards are laid on a prepared base and fixed with self-tapping screws (step-25-30 cm). It is advisable to make holes for self-tapping screws in advance.
If the board lies directly on the base, then it can be attached with an adhesive specially designed for parquet. But this option should not be the only mount. This, of course, will improve the hitch, but you still have to add screws.
The floorboards are joined to each other both lengthwise and across. To make the docking tighter, wedges are sometimes used. When attaching an elite coating, self-tapping screws are driven inward by 1 cm, and the hole is closed with special corks made of wood. The cork must be of the same species as the flooring. This will give an aesthetic look to the plank floor.
grinding
The final stage is grinding the floor from the boards. The purpose of this process is to eliminate installation defects. In addition, grinding makes it possible to achieve the perfect cleanliness of each of the floorboards. Before proceeding to this stage, you need to carefully examine and check everything. All self-tapping screws must be recessed into the wood, otherwise you risk damaging the grinder. The polishing process itself does not take much time.
The result is an absolutely even coating without any defects. Joints and irregularities should not be. After that, the surface is treated with a protective compound. This measure is essential. When using a transparent or translucent tonic mixture, which are offered on the market today, you can maintain the natural appearance of the array. This is a kind of decoration.
With the help of an antiseptic, the surface will be protected from the effects of fungus and mold. As an alternative, use paint, varnish. These coatings protect the floor from external aggressive factors. But the lacquered coating needs constant care, as well as systematic updating. In addition to the above, oil solutions based on resins and olive oil are used.
And only after that the laying of the floor from the boards is completed. In general, nothing complicated. The work doesn't take long. The main thing is to follow the instructions. This is the only way to get a strong and durable floor. Natural materials will always decorate any room and will serve "faithfully".


