Friends, in anticipation of the holidays, the wonderful ideas of hobbit houses, I think, will be the best way to set you up for a fabulous perception of life. Similar buildings in your summer cottage or country house can be used both as children's play areas, and as a pantry, and as a cellar.

It can be a simple frame sheathed with plywood and treated with a protective impregnation. The roof can also be made of clapboard or wooden boards coated with a layer of wax or varnish.

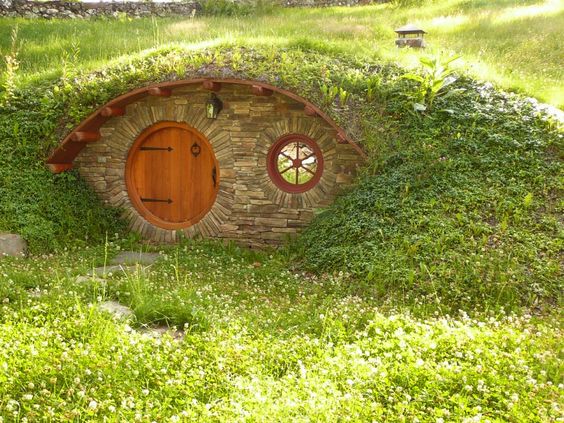
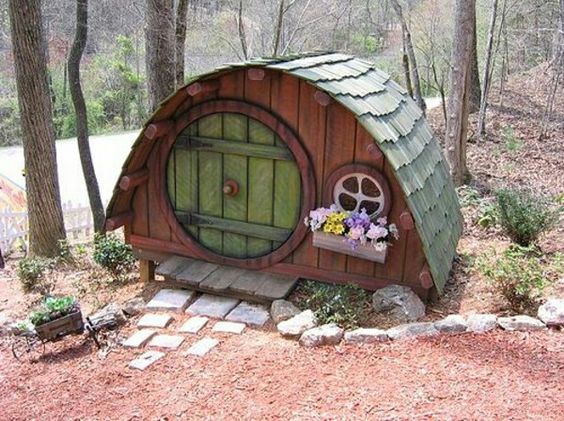
Do not forget about the traditional round doors and windows for hobbit houses. This will make the building very attractive and cozy.

Let's take a look inside the house! Windows - portholes are recommended to be made on both sides, shelves can be arranged on the side slopes.

A beautiful solution that also combines raised stone flower beds, plus a small window in the roof.

In some cases, for example, if you decide to make a cellar, it will be appropriate to cover part of the roof with earth. In this case, even in the summer, the ideal temperature for storing food will be kept indoors.

In some projects, the windows are of a classic square shape, but note that the door is still round!
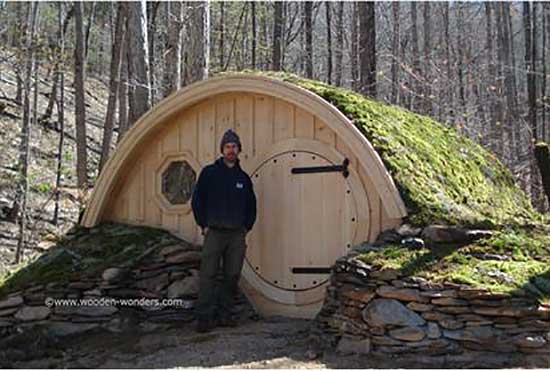
In the West, there are enthusiastic people who make similar hobbit houses to order. It's amazing, but it's in high demand! Beautiful cellar, isn't it?
Or here's another option, in general, almost completely buried in the ground. The walls in this case are made of stone.

Or like this, a children's version for games. The house is installed on a wooden platform, sheathed with a board, on top of which, on the roof, a flexible tile is mounted.
In general, it must be admitted, such a house can become an excellent place for solitude and creativity, I affirm this as an artist who needs space for painting, his own workshop.

A beautiful house, with a door and windows, in combination, resembling an animal's paw.

Cellar houses with an earthen roof, dug into the hills, are, of course, labor costs. But such a structure can certainly be used to store their supplies.

Amazing ideas, it seems to me, of course, you can only admire, but to do on your site, probably simpler, lighter options, without land.

A beautifully designed, painted, similar house will delight you and give your children a lot of summer impressions from relaxing in the country, and from the opportunity to be in a fabulous hobbit house.
The value of the crop harvested in the country, directly depends on its safety. To insure the family budget from unnecessary expenses and to serve a fresh vitamin harvest to the table all winter - these are the main tasks that the cellar performs. No home refrigerator, even the size of a linen closet, can replace it.
The word cellar is most often associated with a country house. Here on the veranda or in the kitchen there is a hatch leading to the basement or a shallow pit.
Separate cellars outside the house for storing vegetables, fruits and conservation are less common and many summer residents are practically unfamiliar with them. This article will help you evaluate the benefits, study the varieties and understand the features of the construction of such structures.
The difference between a cellar and a cellar
Despite the same purpose, a detached cellar is structurally different from the basement. Placing storage in the open air requires a reliable roof and powerful insulation.
The need to build a cellar on the territory of the cottage arises in two cases:
- With a high level of groundwater.
- For storage of a large volume of fruits and vegetables.
The type of structure depends on the water saturation of the soil. Surface storage is built in cases where it is impossible to go deeper into the ground by more than two or three “bayonets” of a shovel.
If the maximum level of soil water rise is at a depth of 1.5-2.0 meters, then the structure is buried in the ground at half its height. With a deep aquifer, the repository can be completely dug into the ground, leaving a sloping roof covered with sod on the surface.

Entrance to a semi-buried cellar
Someone might say, why should I make a cellar in the yard when I can dig it under the floor of the kitchen or veranda? There are several serious objections to this argument.
First. The cellar under the house is best dug during the construction of the building. In the existing dacha, it will be necessary to dismantle the floors, after which, in cramped conditions, manually remove tons of earth.
Second. The construction of a bulk storage under the house can disturb the soil conditions of the foundation and cause the building to settle.
Third. The ground may contain radioactive gas, radon, which will enter living quarters.
Fourth. The dimensions of the basement are limited by the size of the room in which it is arranged. For a street cellar (storage) there are no such limits.
Fifth. In winter, the heat from the house significantly increases the temperature and humidity in the basement, worsening storage conditions and activating the process of potato growth.
General information on the device of the cellar
As we said above, deciding which cellar is better to do depends on the level of groundwater. If they are close to the surface of the earth, then the only way out is ground storage.

Ground cellar - the best option for wet soil
The original appearance of the ground cellar is liked by lovers of rock gardens and other miniature "mountain ranges" created in the country.
As the “top water” moves away from the surface of the earth, the storage for vegetables and fruits can be lowered deeper.

The lower the water, the deeper the vault

Along with an increase in the depth of the summer cottage, the problems inherent in all underground structures are exacerbated: the need for high-quality drainage, waterproofing of walls and ceilings. To solve them, a trench is dug along the perimeter of the pit, filled with rubble and sand. This reserve "pocket" will collect excess moisture that has fallen into the ground after melting snow or heavy rains. The walls are backfilled not with earth, but with a gravel-sand mixture that drains water into a drainage trench.
Regardless of the quality of the drainage, an outdoor cellar needs waterproofing. Today it is easy to make it. On the market you can find many hydrophobic impregnations and mastics that protect the bottom and walls of the building from soil moisture.

Water protection is needed inside and out
Any summer resident knows that a certain temperature and humidity is required for long-term storage of the crop. In winter, the temperature in the country cellar should be from +2 to + 4C with an air humidity of 80 to 90%. It is easy to control it using a thermometer and a hygrometer. But how to ensure that the room is warm enough and not too damp?
The first problem is solved by warming. In surface and semi-buried storages, this role is played by the soil, with which the walls are lined.
The best natural heat insulator is peat. Unfortunately, it is quite rare. Therefore, having decided to build a cellar in the country with your own hands, buy polystyrene foam plates 5 or 10 cm thick to insulate the floors and walls. They are covered with earth from above, and fixed to the walls with glue or bituminous mastic. To prevent erosion of the embankment soil, it is sown with grass or covered with layers of turf cut from the soil.
Humidity in the storage is regulated by the simplest system of natural ventilation. It consists of a long supply pipe and a short exhaust pipe.

Pipe A - supply, pipe B - exhaust
There is a very effective and cheap way of accumulating cold in storage - a glacier. Our great-grandfathers successfully used it to store meat and dairy products. This is a shallow pit with ice (in our time, its walls are made not of wood, but of concrete). There is nothing tricky in the design of the glacier, but the return of cold from ice blocks is very impressive and lasts for several months.

What are the cellars?
The simplest cellar is a wooden frame made of logs, on which a slab reel rests. A layer of roofing material is laid on it and soil is poured.


It looks like a wooden vegetable cellar
Wood, even antiseptic, will not stand in a deep storage for more than 15 years. Therefore, most often the walls of the cellars are built of brick, cinder blocks or monolithic reinforced concrete. The ceiling is made from standard hollow core slabs or concrete pouring over the reinforcing cage is used.
Sometimes wooden beams are used for overlapping, between which expanded clay insulation is poured or mineral wool is laid.

Overlapping of a concrete storage from wooden beams

Ceiling insulation with expanded clay
For an in-ground storage of vegetables, in addition to concrete and brick, metal or plastic can be used. A ready-made cellar for a summer residence is a container with stiffeners, which is buried in the ground to a predetermined depth. The metal is treated with bituminous coating before installation. Plastic does not need additional protection.

Metal cellar in the process of installation
During the period of the seasonal rise of the “perch water”, a powerful buoyant force acts on the cellar-caisson (the law of Archimedes). Therefore, a prerequisite for its trouble-free operation is the use of ballast - a monolithic or prefabricated concrete slab. It is placed with a crane or poured at the bottom of the pit before mounting the tank and attached to it with anchors.
When considering purchasing pre-fabricated plastic or metal storage, the following considerations should be taken into account:
- The price of a container for storing fruits and vegetables (with installation) is higher than the cost of building a structure made of concrete or brick.
- Despite the high factory readiness of the caisson, you will not be able to completely abandon earthwork and concrete work (a pit and a ballast plate are necessary).
- It is problematic to drive a crane to a well-equipped summer cottage to install a stove and a container without damaging green spaces, paths and a fence.
The only real advantage of plastic and steel construction is absolute tightness - an important factor for a buried cellar.

The average cost of a 5 cubic meter plastic cellar (without installation) is 95 thousand rubles. Installation work will cost 50 thousand rubles.
The estimated price of a metal storage of the same volume (walls made of steel sheet 5 mm thick) is 85 thousand rubles. For installation, you will have to pay at least 45,000 rubles.
In search of an inexpensive option for an outdoor vegetable store, look for concrete rings. They are used for septic tanks and other underground structures. By making a concrete base and installing a few rings on it, you will get a reliable shelter for the grown crop.

Factories make not only round, but also rectangular concrete sections
The floor in the cellar of prefabricated rings and its walls must be treated inside and out with a waterproofing compound (coating or impregnation). A prerequisite for tightness is the presence of docking locks on concrete sections.

Underground storage nearing completion
You do not have to manually cast a concrete cover for such a cellar. It can be bought with rings.
If the old slate is lying idle on the farm, then the problem with the cellar can be considered solved. Having made a frame from a corner or pipes, it is lowered into a prepared pit. After that, the slate sheets are fixed with self-tapping screws to the profile.

A slate cellar on a metal frame is a simple and inexpensive option
Having made sand and gravel preparation and installing a reinforcing mesh, the bottom is poured with concrete. The next stage is the laying of electrical wiring, coating the slate and frame with bituminous mastic. The work is completed by concreting the ceiling and backfilling.

Monolithic slate roof
Regardless of the type of material used to build the walls, a well-executed cellar floor design includes several layers indicated in the diagram.

floor construction
In conclusion of our review, we will consider two options for ground-based mini-storages. The first of them is a “box” made of boards with a gable roof and a door. By insulating the space between its outer and inner lining with mineral wool (at least 150 mm thick), you will get an inexpensive and functional storage.

The second version of the ground mini-cellar is a structure attached to the wall of the house. The benefit of this solution is twofold: saving space and one finished wall.

The ceiling here is made of boards covered with crumpled clay and a layer of roofing material. The embankment is made with soil, which, after laying, is moistened, rammed and lined with turf.
On December 1, the premiere of The Hobbit: The Battle of the Five Armies took place, completing the trilogy about the adventures of Bilbo Baggins and the 13 Dwarfs. On the screens of Russian cinemas, the picture will be released on December 11 this year. For fans of fantasy and adventure, we decided to make a selection of amazing buildings inspired by the works of John Tolkien.
The Hobbit Village scenes were filmed in the Matanama Hills in New Zealand. Today, these little houses have become a tourist attraction, as well as shelter for sheep from a nearby farm. The interiors were filmed in a film studio, so you are unlikely to find anything interesting inside the premises, but there is something to do in this place - you can go to the sheep farm and pet the lambs.


Briton Ollie Wotherspoon built a “hobbit hole” behind the family home in the garden for his children. The creation of housing based on the book of John Tolkien took 2 weeks and 4 thousand pounds. A wood-burning fireplace, carved furniture and a secret tunnel are dug into the ground by about 1.2 m. The height of the ceilings inside the hobbit house is almost 2 m.


Simon Dale from Wales erected a house that looked like a hobbit hole. The work cost only 3 thousand pounds and took about four months. The self-taught builder used only local natural materials, and also made some of the furniture with his own hands. The hobbit house is equipped with a stove, cellar and solar panels.


Steve Michaels created the Hobbit House Hotel in Montana. The author spent 410 thousand dollars on the construction of the hotel. The main house of 93 square meters is hidden in a hill at a depth of 9 meters. In addition, 8 hectares of property are equipped with a troll house, several small holes, as well as many sculptures and products.


Bilbo Baggins' home in the hobbit village is charmingly cozy, but unsuitable for adults. But the children will have a place to frolic and feel like in a magical world.

Architect Peter Archer designed a holiday home in Chester County, near Philadelphia, USA. A team of artisans have built a magical home inspired by The Lord of the Rings and The Hobbit.


Specialists from Christian Muller Architects and SeARCH have created an unusual “hobbit house” with all the comforts of a modern home. In addition to the recreation area and the guest room, there is an underground tunnel in the room.


The Hobbit House Bilbo Begins
The home of the Hobbit can always be recognized from afar due to the large round door. By the way, you can buy a metal door with installation. This strange and very nice structure is more like a beaver hole than a human house.
But not that hole, where the abundance of worms and the roots of neighboring trees stick out, but quite a comfortable, cozy hole with all amenities.
The Hobbit House: From fairy tale to reality

Almost 80 years have passed since the first memories of the dwelling of "Bilbo Begins" appeared in the manuscripts of the English inventor J. R. R. Tolkien.
Contrary to the nihilism of architects and art critics, the bizarre buildings of the professor not only took root in world literature, but also began to appear in our environment several decades later.
Attractiveness is the first thing that catches the eye of people who are tired of city bustle and exhaust gases.
Reminiscent of respect for nature, modern Hobbit homes are environmentally friendly and very comfortable. They have everything - heating, electricity, communications, bathrooms and even a security system, and their construction requires very little investment.
Tolkien fans have done everything to turn the fabulous "burrows" into luxurious apartments.
How is the Hobbit house different?

Over the past 10 years, most of the British and Americans have begun to build such structures for their children, as playgrounds.
Indeed, what could be better than a fairy tale in reality?
One of the first people who had the idea to build a Hobbit house was (designer) Ashley Yates from the UK in 2003.
According to Ashley, after the project was completed and it began to write about it in the newspapers, in just one week more than 30 tourists called the editorial office, willing to pay hundreds of dollars to spend the night in the green Burrow.
A few years later, Hobbit houses for children actively spread throughout the world.
We will now tell you about how to quickly bring to life one of the most fabulous projects of our time.
Do-it-yourself Hobbit house (in the country)
Due to the fact that do-it-yourself hobbit house it should turn out to be round, it is best to take a metal or concrete pipe as a basis, the cost of the latter is much more expensive, so the conclusions are obvious.
It is good when the metal pipe is corrugated.
The preferred length is 2 - 3 m.
Diameter 4.5 - 5 m.
To install the pipe, you need to clear a potential site for the house, and dig a small pit to a depth of 0.5 - 1 m. Install the pipe using a crane. Thus, the main part of the construction of the house can be said to be completed.
The next step is the embankment

Hobbit House (in the country)
The issue needs to be resolved at the expense of the earth dug under the foundation pit.
A rented mini-excavator will easily and quickly cope with the task in 30 - 60 minutes.
The surface of the pipe will eventually be completely dug into the ground, and the slide will get a rounded shape.
By the way, during the embankment (on both sides of the “entrance”), it is necessary to install temporary OSB walls so that the earth does not get inside the pipe.
Now Foundation
On both sides of the pipe, dig small recesses up to 0.5 - 0.6 m to install a strong concrete foundation.
To form the future entrance to the fabulous house, cut out the entrance form from the OSB plate and install it close to the pipe.
The porch is best made of cinder blocks, beams for the entrance itself are securely installed in them.
The seams between the OSB and the pipe are sealed with a building mixture, as a result we get a strong and stable structure.
And then the floor

The main installation work is completed, so the next stage of work is the finishing of the floor, walls, windows and doors. (fascinating, right?)
To fix the base of the floor to the pipe - use cement and a pair of cinder blocks (see photo).
Next, fix the beams, and slopes (slopes are attached diagonally, so as to prepare a flat and stable surface for the floor).
As a floor, it is best to use OSB boards. (Fix the plates with self-tapping screws and a screwdriver).
Lighting "Nora"
Candles and other stand-alone lighting systems are pointless and safe. Therefore, for maximum comfort of children, it is best to conduct an electrician in the Hobbit's house.
By the way, electricity can be brought from the house using a cable channel installed and buried in the ground.
The roof remains
Be sure to install a small decorated canopy over the porch to drain moisture during rains. It will help to waterproof the entrance to the "Nora" and get rid of the problems associated with dampness.
The most important thing is the door.

Door in do-it-yourself hobbit house, must be round.
The material is definitely wood.
The color is predominantly green.
We recommend using water-repellent paint for door painting.
You need to fasten the door to long forged curtains. Be sure to install a beautiful round handle. A small diamond-shaped window can also be provided in the door.
Interior decoration of the house

Divide the “Nora” space into 2 parts, you can even into 3 if it’s not a burden for you to work, and you would like to make a corridor and a cozy kitchenette near the door.
Sheathe the walls and ceiling with flexible wood panels, you can still glue the wallpaper.
On the back wall (on the other side of the pipe), pour the foundation, install cinder blocks and fix the OSB board. Here you need to install a beautiful window. As well as the door, it is best to order it from an experienced craftsman.
When the window is installed - securely seal all seams.
Only the hill remains

If you decide to take on this project, be sure to decorate the artificial hill outside. Otherwise, a better title than a dugout, do-it-yourself hobbit house will not wear.
To take root in the lawn - open the entire embankment with good fertile soil, and sow the grass.
If this seems too time-consuming and time-consuming process, we recommend laying out dug turf instead of grass. (The first time, be sure to water it with water, so it will quickly take root, and the natural bright result will come much faster).
By the way, inside do-it-yourself hobbit house it is always warm and cozy (you can spend the night even in cold autumn and spring), and in winter the slope can serve as an ideal slide for sledding.
Yes, yes, furniture

Wicker chairs, a table, a sofa, anything are perfect. For communication, the child can use a laptop (electricity is still present).
DIY Hobbit house and will justify any hopes and will last a long time.
As a child, a child will be able to play in it, as a teenager, go about their business, invite friends to visit and relax, and as an adult, there will be something to remember and praise their parents for.
How much will the hobbit house cost
Let's calculate how much it will cost do-it-yourself hobbit house, in Russia.
After all, if you have a suburban area, it will be very difficult to refuse this idea, just let the children know.

And so, the Corrugated pipe, the average cost of 1 m, in Russia is 1500 rubles. That is, if a luxurious fabulous room can occupy (3 - 4 m), at a price it will cost 45,000 - 60,000 rubles.
Truck crane services (up to 14 tons), cost about 1000 rubles per hour.
Soil with delivery (needed for embankment), 1 tone - 150 rubles.
10 sheets of OSB, 1 sheet - 500 rubles, respectively 5000 rubles.
1 kb / m of concrete will cost 3000 rubles.
Window and door under the order (approximately), from 6,000 to 10,000 rubles.

Furniture, beams, boards and artificial turf, in fact, are interchangeable things, not expensive and can be found in everyone who has a dacha. That is, the final cost of a solid house will cost about 80,000 Russian rubles (900 dollars). Plus or minus, own or hired labor.
That is, compared with modern prices for simple plastic houses, this is quite adequate money for a high-quality, reliable, and, most importantly, a cozy room.
Have you ever thought about how to build a house without violating the environment? But it is possible! Indeed, there are technologies that allow you to build houses from ... the earth!
The history of the construction of dwellings from the earth goes into the deep past. Once people built dugouts and lived in them, but dugouts were not full-fledged houses. Then adobe construction appeared (the earth was mixed with clay and straw, and walls were erected from the resulting mixture.
The most famous adobe building in Rus' is the Priory Palace in Gatchina. When the Russian Emperor Paul I became the master of the Order of Malta, he needed a residence, and he instructed the court architect N.A. Lvov to build a palace. ON THE. Lvov was an enthusiast of earthworks and personally created the project and supervised the construction of this palace (1797-1799). The composition of the soil mass, from which the walls of the 2-story palace were erected, was as a percentage by volume: gravel with a particle size of 3-7 mm - 4%; sand - 58%; fine earth (dust) - 20%; clay - 18%. Organic impurities and cement were not added. The strength of the ground at N.A. Lviv has survived to this day.
The technology of adobe construction was further developed in the construction of buildings from bags of earth (Earthbag Building). Its founder is considered to be an American architect of Iranian origin Nader Khalili, who created the Cal-Earth Institute in Southern California, which develops the construction of houses from the earth and teaches this technology, which is extremely simple. Polypropylene bags are filled with moistened soil, laid on a foundation consisting of a layer of gravel, reinforced with barbed wire and rammed. And so, row after row, the walls of the building are erected.
These photos show earthen houses built in Europe by architect Peter Wegsh.
And, such projects of environmentally friendly houses are being implemented.

TECHNOLOGY OF CONSTRUCTION of earth houses with polypropylene bags.


TO Of course, we are more interested, so to speak, in practical application on our sites. It seems to me that such a house, as shown below, is suitable both for storing inventory and for storing food, crops ... If groundwater is close to the site and it is useless to dig a cellar, then this hut is just for you. And, even now it has become fashionable to arrange small ponds-reservoirs in the country, that's where to put the land. I think it will be beautiful - on the edge of the reservoir there is a hobbit house. If there was a larger area - I would have done it !!!
HOUSE FOR INVENTORY
.jpg)
Consider as an example the construction of a small domed house (architect and builder - Owen Geiger, California) for storing inventory. The plan of the house and the section are shown in fig. 1.


First, Geiger made a foundation, which was a trench filled with rubble. Excavated soil was used to fill the bags. The first rows of bags were filled with crushed stone to provide drainage (Photo 7).
Next, the bags were stacked with barbed wire reinforcement and their subsequent tamping (photo 8). To equip the arched opening of the door and the visor above it, an old car tire and legs from the “table” were used (photo 9). The bags were stacked with an offset inward so that a dome was gradually formed (photo 10). The door frame was fixed on pre-inserted between the bags
T-shaped inserts (photo 11).


 The most common types of sockets in different countries")


