In a room such as a bath, the ceilings should have high heat-saving properties. In addition, they must be protected from exposure to high humidity. Consider how to make the ceiling in the bath warm and durable, while spending a minimum of the family budget.
There are three main requirements for the ceiling of the bath:
- Structural strength
- Reliable thermal insulation
- Protection against water and steam (water condensate destroys metal and wood)
When the room box is erected, the question arises - how to properly make the ceiling in the bath. For a bath, three types of ceiling devices are used, however, they have certain limitations and differ in the price component:
- Shield or panel ceiling
- Decking ceiling
- false ceiling

It is important to know! It is recommended to use dry lumber made of coniferous wood for the installation of the bath ceiling. Beams and boards should contain a minimum of resin.
Shield or panel ceiling
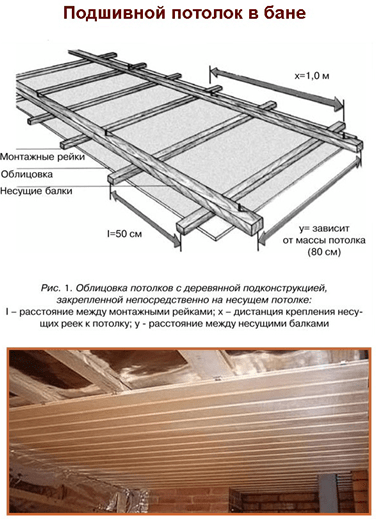
For the device of a panel ceiling, pre-prepared shields from edged or tongue-and-groove boards are used. They are knocked down across them with two bars 40 x 40 mm or 60 x 60 mm. Along the perimeter of the shield, nails knock down a board with a width of at least 100 mm.

A layer of vapor barrier is laid on the shield (polyethylene film, roofing material, roofing felt, wax paper). A layer of heat insulator (glass wool or basalt wool) is laid on top. A layer of waterproofing (polyethylene film) is laid on the heat insulator.
It is important to know! When water gets on mineral wool, it loses its thermal insulation properties. Its fibers become brittle and break down. Therefore, vapor barrier and waterproofing are performed with great care.

From above, the shield is sewn up with a board with a thickness of at least 25 mm. The shields are laid on the floor beams, on which the lathing of the timber is pre-stuffed from below. The shields are tightly fitted to each other.
Between them, a heat insulator made of felt wrapped in polyethylene is necessarily inserted, or foil insulation is used. A floorboard is laid over the shields or fiberboard or plywood with a thickness of at least 10 mm is laid. From below, a vapor barrier layer is attached to the ceiling and the finishing work is completed.

You can also use ready-made wall panels, but they are expensive. In general, the shield ceiling is not a cheap and laborious pleasure.
Decking ceiling
The floor ceiling is carried out in small rooms or in rooms with a common partition. Everything is limited by the length of the ceiling board. When arranging such a ceiling, the boards are laid directly on the brick wall framing.
Important to remember! The thickness of the board for the floor ceiling must be at least 50 mm. The width of the span is limited to a length of no more than 2.5 m.
Such a ceiling does not have special strength, therefore it is used in cases where there is no attic room in the bath.

Edged boards are tightly fitted to each other, and along the perimeter of a bar or board, delaying sides are made. A layer of vapor barrier is placed on the board. It is fixed with a construction stapler or small nails. A heater is laid on the vapor barrier. In this case, the use of expanded clay or a mixture of clay and sawdust is recommended.
When using expanded clay as a heater, it is recommended to use a mixture of grains of different fractions. Large granules are mixed with the same amount of small granules. Small grains will wedge large ones and prevent shrinkage of the insulation.
In the case of using a mixture of clay and sawdust, two parts of clay and three parts of sawdust are mixed. Water is added to the dry mixture and mixed thoroughly. The finished solution is laid on top of a vapor barrier with a thickness of at least 100 mm.

The drying time of the clay is 30 days, after which all cracks on the surface are rubbed with a liquid solution of clay and sawdust. From above, the ceiling is covered with a board, roofing material, after which slate or tiles are laid. From the inside, a layer of vapor barrier is attached to the ceiling with a stapler or small nails and sewn up with wooden clapboard.
The advantages of such a ceiling include the use of inexpensive heat-insulating materials (clay, sawdust or straw). The disadvantages are the limitation on the size of the overlapped room.

false ceiling
The most common type of ceiling manufacturing for a bath is a hemmed ceiling. This method is distinguished by the use of relatively inexpensive materials and moderate labor costs for its production.
Before performing work, all wooden parts of the future ceiling (board and beams) must be treated with an antiseptic composition. If it is not possible to buy such a composition, you can use the usual deep penetration primer or drying oil.
The technology for manufacturing a false ceiling is as follows: load-bearing beams are laid on the brick strapping of the bath. Do this in increments of no more than 1 m and not less than 0.5 m. The optimal size of the beam: thickness 50 mm, height 180 mm. The span can reach up to 5 m. The height of the ceiling in the bath should not exceed 2100 - 2200 mm.
From below, a rough ceiling is hemmed onto the beams. The length of the edged board depends on the spacing of the beams. The boards are fixed along the lower edge of the beam with 60 mm wood screws. Do this with a screwdriver, two screws on each side.
The boards fit tightly together. When the entire inter-beam space is covered with a draft ceiling, the vapor barrier of the bath ceiling is covered. It is laid out in strips between beams with an overlap on an adjacent beam of 10 cm.
It is necessary to walk on the vapor barrier very carefully so as not to damage the material with shoes or dropped tools. If this happens, seal the hole with wide tape.
Fastening is carried out with a stapler or small nails. Between the beams, mineral wool is laid. It is produced in the form of mats or rolls. The heat insulator is laid in such a way that 3-5 cm remain to the upper edge of the beam.
This gap is necessary for ventilation and evaporation of possible condensate. It can form due to temperature fluctuations. A layer of waterproofing of the bath ceiling is laid on top of the beams. Attach it in the same way as the vapor barrier.

Cover the ceiling with a floorboard or plywood 10 mm thick (can be fiberboard). After such preparation, any floor covering can be laid on the ceiling from the attic side. From below, a vapor barrier film is attached to the ceiling of the bath with a stapler.
How to sheathe the ceiling in the bath? Usually the work is completed by finishing the ceiling with a clapboard. This environmentally friendly and natural material (pine) with bactericidal properties will create a cozy atmosphere for visitors.
The construction and finishing of the ceiling in the bath is an important process on which the stable supply of hot air to the room and the durability of the building depend. Next, we will talk about the arrangement of the ceiling and the choice of materials for it.
Requirements for the height of the ceilings in the bath

The purpose of the premises in the bath is different, because of this, the ceilings are built at different heights.
When determining the height of the ceilings in the bath, use the following recommendations:
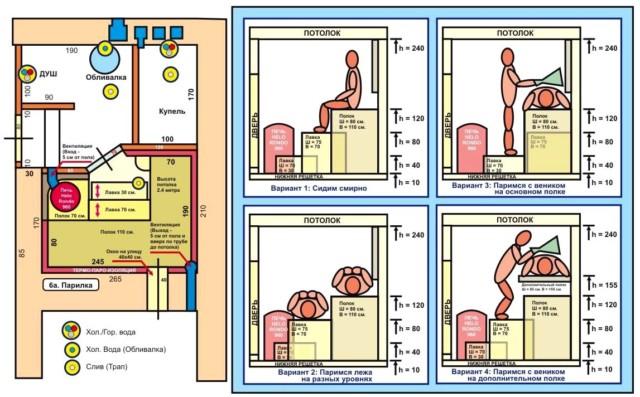
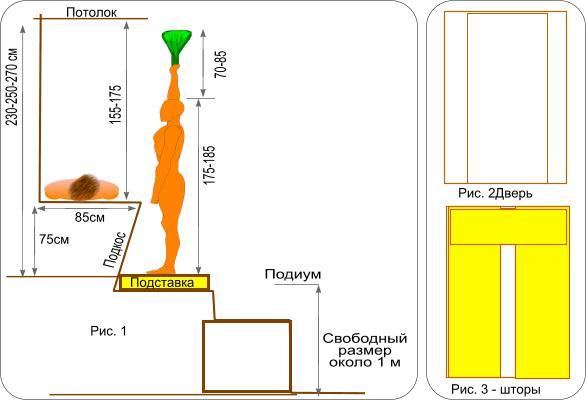
- in the steam room temperature is always observed. The lower the ceiling, the faster it will warm up. The distance to the ceiling in the steam room is determined by the height of the tallest member of the family or company with the addition of 0.5 m per arm span with a broom.
- In the washing the temperature should be kept at 37-39 degrees. The height of the ceilings is not regulated: the higher, the more air and easier to breathe. The most common height in this room is 2.5 m.
- In the rest room The height of the ceiling is also not regulated, in this case it all depends on the design of the room. For example, a hipped ceiling is located at a height of more than 3 m from the floor.
- In the waiting room, the ceiling is built, as in a living room.
Types of ceiling structures in the bath
Ceilings are built in one of three ways, depending on the purpose of the room.
False ceilings for a bath

Gained popularity due to ease of manufacture. They are used for ceiling installation in the steam room and washing room, but can also be used in other rooms. From the side of the attic, insulation materials are laid between the supporting beams of the attic floor to protect the room from the loss of steam, heat and cold. The insulation is covered with boards on top. From the side of the room, the ceiling is sheathed with clapboard.
Advantages of a false ceiling in a washing bath:
- Simplicity of design, work can be done without carpentry skills.
- It is possible to use the attic for storage of household utensils.
- If necessary, ceiling repairs are carried out quickly.
Panel ceilings in the bath

They look like "troughs" from the boards. The width of the structure is 50 cm. A vapor barrier and insulation are laid inside the panel. Each panel is made separately, then attached to the ceiling. The gaps between them are sealed with a moisture-resistant insulator, for example, felt with a layer of polyethylene. From below, everything is sewn up with clapboard.
The disadvantages include the large weight of the panels, which leads to significant loads on the supporting structures.
Benefits of panel ceiling:
- High-quality wood is not required, cutting boards can be used.
- It is possible to use the attic to store bath accessories.
Floor ceilings in the bath
Used in rooms with a small area. The design is simple: the ceiling is formed by boards that rest on load-bearing walls. The gaps between the boards are sealed with crumpled clay 2 cm thick. First, an insulator from steam is laid on top, and then a heater, which is covered with a croaker. From the side of the room, the ceiling is sheathed with clapboard. The negative side of this design is the low carrying capacity of the ceiling; only brooms can be stored in the attic.
Bath ceiling insulation

Before you make the ceiling in the bath, choose a heater for it.
You can use the following heat insulators:
- Jute insulation is considered the best option for ceiling insulation. Does not rot, is not affected by high temperatures, maintains a healthy atmosphere in the building. It is a natural material without synthetic additives. To insulate the ceiling, a jute insulation 6 mm thick is used, the density of the material is 600 g / m. The length of the fiber of high-quality insulation is 2-3 cm.
- Mineral wool slabs and mats are also used as insulation. This lightweight durable material is considered a classic option for thermal insulation.
- Expanded clay is an inexpensive material, but it must be poured at least 30 cm thick, so the ceiling is reinforced with powerful beams. For expanded clay insulation, it is necessary to make a draft ceiling from boards, on which an insulator is poured.
- Glass wool, tow, felt, moss are also suitable. These materials allow air to circulate freely and seal well.

Disadvantages of natural insulation:
- May be affected by moths.
- They dry out quickly.
- Installation takes a long time.
- For installation, only dry samples are used, otherwise they will rot.
- Natural ingredients are often impregnated with chemicals that are harmful to humans.
Do not cover the insulation in the washing room from above with anything, otherwise it will not dry out.
The design of the ceiling in the bath of reinforced concrete slabs has its own characteristics. If the walls of the bath are made of bricks and the ceiling is made of concrete slabs, the ceiling is insulated as follows:
- Fasten mineral wool 10-15 cm thick from below to the slab in any way.
- Cover the wadding with aluminum foil.
- Along the perimeter of the wall, under the ceiling, fix the 10x10 cm bars, which will serve as support for the crate.
- To the bars, fill the crate for lining with a step of 50 cm.
- Sew up the ceiling with clapboard.
- From the side of the roof on the ceiling, lay a layer of insulation 10-15 cm thick. Lay flooring from boards on top of the insulation, then the attic can be used to store bath utensils.
- It is not necessary to waterproof the attic floor, a waterproof material under the roof is sufficient.
- If the steam room and washing room are separated by solid walls, another, cheaper vapor barrier material can be used instead of foil.
Bath ceiling vapor barrier

The best vapor barrier for the ceiling of a wooden bath is a foil vapor barrier material. This is an expensive product, and often it is used only in the construction of the ceiling in the steam room. In other rooms, it is cheaper to use polyethylene film with a density higher than 140 microns for vapor barrier.
In the dressing room and the rest room, where the temperature is low, you can lay roofing felt, glassine and roofing felt as a vapor barrier. These substances are not used to protect against steam in the steam room; when heated, they emit unpleasant odors.
When making a vapor barrier, use the following recommendations:
- Joints and seams of vapor barrier materials are sealed from above with adhesive tape based on aluminum foil.
- There must be a gap of 2 cm between the vapor barrier sheet and the finishing material. With this technology, the facing material will not be additionally moistened from possible condensate on the vapor barrier.
- The vapor barrier must not allow steam to penetrate the insulation, otherwise it will collapse.
- It is forbidden to use a breathable film or membrane instead of a vapor barrier.
Materials for the ceiling in the bath
For sheathing the ceiling, wooden or plastic lining, boards are used.
Wooden lining for a bath ceiling

Materials for the ceiling in the bath should have low thermal conductivity. Such properties are typical for linden, aspen, alder and some other types of wood. Wood paneling is used for the ceiling in the dressing room and rest room.
In the steam room, it is preferable to sheathe the ceiling with wooden clapboard, it can better withstand high temperatures. Do not sheathe ceilings with pine and spruce boards. Resin released from the boards at high temperature will drip onto the head.
Do not make the ceiling of chipboard and fiberboard. Under the influence of heat and moisture, they release a pair of phenol-formaldehyde resin.
Plastic PVC lining for the ceiling in the bath

Imitates wood, has ideal properties for use in a car wash:
- The tight fit of the seams of the lining makes the coating impervious to steam.
- The lining does not require antiseptic coating, it does not rot.
- Sheets have simple geometric shapes and connecting points, which facilitates assembly.
- A product with a cellular structure 5 mm thick, therefore it is considered a good insulation.
- The panels are strong enough to lay mineral wool on top of them for insulation.
- Installation of lining is simple, you can sheathe the ceiling in the bath with your own hands, even without much experience in such work.
Combined materials for the ceiling in the bath

There are modern combined materials on the market that have the properties of a heater and a heat and steam insulator. They are sold in the form of plates, fixed with nails or a stapler. Able to withstand 150 degrees. After the installation of the plates, the ceiling is sheathed with clapboard.
The use of antiseptics to cover the ceilings in the bath

Be sure to cover the wooden ceilings in the steam room and washing room with a special antiseptic for the bath, which protects the wood from fungus and insects. These products include antiseptic SENAGE SAUNA and varnish Dulux Celco Sauna. They withstand temperatures up to 120 degrees, have no smell. The lacquer also forms a smooth, durable film on the panels that protects the ceiling surface and makes it easier to clean the surface.
In the steam room, unsightly traces remain on the ceiling after spraying aromatic oils and water, sweat secretions, so a smooth varnish film will facilitate cleaning of surfaces. In other rooms, it is also possible to treat the ceilings with an antiseptic if the panels are not made of coniferous wood. In this case, the resin will protect the material from moisture.
Do not paint ceilings unless they are designed for hot, humid areas. Conventional paints, when heated, emit fumes harmful to humans.
How to make a ceiling in the bath - look at the video:
The correct installation of the ceiling in the bath will ensure a qualitative improvement in the entire building. Follow the suggested recommendations - and the ceiling will not let you down.
Bath is a place where you want to spend time in comfort. In order to achieve such an effect, it is necessary to responsibly approach the installation of this rather complex structure, which provides for non-standard conditions during use. In particular, in the built bath, it is necessary to competently approach the question of how to sheathe the ceiling in the bath inside, to its insulation, sound insulation and waterproofing.
The fact is that the wrong arrangement of the ceiling space in the bath, the fuel consumption for heating, the microclimate in the heated bath and the duration of its heating will be very long and large. It is in order to reduce and improve these indicators that it is necessary to make a high-quality ceiling.
Preparation for the arrangement of the ceiling
Immediately before the start of finishing the ceiling in the bath, it is necessary to carefully prepare the project in order to avoid mistakes or undesirable consequences in the future.
The ceiling in the bath must meet several requirements:
- Serve as a heat insulator;
- Look nice;
- Do not give out fumes that spoil the pleasure of going to the bath;
- Have a long service life;
- Serve as a layer of thermal insulation against moisture.
Before arranging the ceiling, you must also decide on its height. For most modern bath rooms, a height of about 2.5 m is ideal. For bath structures made of wood, there is also a gap, as the material shrinks.
After that, you need to decide on the materials with which the ceiling will be finished, the necessary lighting and the installation method of the selected finish.
Options for finishing materials
 The most commonly used means of finishing the ceiling space of the bath room is wood. The most commonly used panels are from species such as aspen or linden. The fact is that they contain less resin than conifers. Due to this, the panels have increased sound insulation and heat resistance, as well as significantly reduce the thermal conductivity of the material.
In addition, at first, the resins in the facing material can melt at high temperatures and cause inconvenience to people who soar.
It is important that the cladding elements are of high quality, without defects and well dried.
 It is also necessary to treat the ceiling inside the room with antiseptic compounds in order to avoid the formation of mold and fungus that are dangerous to human health.
The vapor barrier material can be a thick polyethylene film or aluminum foil. Of the modern types of finishes, construction stores offer penoplex or isospan. Here the choice is only for the owners.
Among other things, the ceiling space must be insulated. There are many decent options out there.
Insulation options
Old methods - clay, sand, sawdust
Many, taking care of the environmental friendliness of the bath room, decide to cover the ceiling in the bath with such old methods as clay, sawdust, sand or mixtures of various natural materials.
Despite the fact that such methods are very effective, they have a number of disadvantages. For example, sand will eventually begin to fall on the heads of steaming people, and rodents and insects that harm a person can settle in clay and sawdust.
New methods - mineral wool, foam plastic, penoizol
Modern materials presented in the construction markets and in stores are polystyrene foam, penoizol, mineral wool.
- Mineral wool
 Most often, mineral wool is used to warm the bath room. And this is not surprising: it is extremely easy to install, inexpensive, fireproof, microbes do not breed in it and insects and rodents do not nest. In addition, it is very lightweight. That allows you to mount it with your own hands alone.
A significant disadvantage of this material is only its fear of moisture. When wet, mineral wool loses all of its thermal insulation properties. Also, when deformed during transportation or during installation, mineral wool will also become worse in terms of performance.
 Foam boards are also very popular for warming the ceiling space in the bathhouse. This is due to its light weight, easy installation, good sound and heat insulation, low cost, water resistance and other excellent performance.
The main and significant disadvantage of such a material is its fragility and easy flammability, as well as the release of gas dangerous to the human body during combustion. These properties make its use undesirable in bath rooms.
- Penoizol
Penoizol is an alternative to polystyrene offered by modern construction markets and shops. This type of insulation is a substance in liquid form, which is sprayed onto the surface of the ceiling.
The main advantage of such a heater is its ability to fill all the cracks and cracks on the ceiling surface. This is a relatively inexpensive method of thermal insulation, and its performance properties are much higher than those of polystyrene and mineral wool.
Ceiling installation options
There are three ways to arrange the ceiling in the bath:
- Decking ceiling;
- Suspended ceiling;
- Panel ceiling.
Decking ceiling
This is the simplest and fairly cheap option for decorating the ceiling space. But this finish option also has a number of disadvantages. For example, it is suitable only for small rooms, no more than 2.5 meters wide. And also it is not possible to equip an attic on the roof with such a finish.

But, if you still decide to make the ceiling in your own bathhouse in this way, you need to follow some technology.
- The first step in installing the flooring should be laying boards 50 mm wide. Laying should take place tightly, between the boards there should be no gaps and cracks. Boards are securely attached to the walls of the bath room.
- After laying the plank wooden base, a vapor barrier layer is laid. It is important to lay it with an overlap on the walls of the bath room, approximately 15 - 20 cm.
- The selected insulation is laid on the vapor barrier layer. Most often, mineral wool or expanded clay is used here, but everyone is free to make their own choice of material, depending on their own preferences.
This completes the installation of the floor ceiling in the bath room. This is a quick and easy way to finish, which is suitable for small bath rooms and steam rooms.
false ceiling
This design method requires more time and money will be a little more expensive than the flooring option, but this will more than pay off with its reliability and durability, as well as excellent performance. At the same time, the construction of such a ceiling can be easily done with your own hands.

The installation scheme involves several important steps:
- Firstly, a supporting crate with a section of 5x15 cm is mounted on the walls of the bath room. The chimney is also lined with a frame of beams. Upon completion of work around the entire perimeter of the ceiling, a supporting frame of beams should be obtained, securely fixed to the walls and beams.
- Secondly, the ceiling is lined with eurolining. Fasteners in this case are best placed in the grooves. And not in the middle of the lining.
- Then a vapor barrier layer is laid on the eurolining, which is fastened with a stapler to the supporting beams. The insulating layer must necessarily overlap the walls of the room by about 15 cm. If several layers of insulating material are laid, the next layer must be 20 cm larger than the previous one.
- After that, lay out a layer of insulation between the beams.
- The thermal insulation layer is covered with a waterproofing layer, for example, aluminum foil or polyethylene film.
- From above, a flooring of boards is installed, which must be fixed to the load-bearing beams with nails with a wide hat.
After all the manipulations, the ceiling is ready. It is noteworthy that the scheme can be changed and the work can be carried out exactly the opposite. This finish option will be ideal for baths with an attic space.
panel ceiling
 This type of finish involves laying panels on the surface of the ceiling. It also assumes several steps for the manufacture of such a ceiling:
- Two beams are laid on the surface parallel to each other and at a distance of 0.5 meters from each other. The edges of the beams should rest against the rail.
- Boards 60 cm long are nailed across the beams to the beams. The boards should fit snugly against each other.
- The structure is turned over and lined with vapor barrier from the inside.
- Then a tourniquet is laid on the walls of the bath; when attaching to the beams, the tourniquet must also be installed on them.
- The panels are stacked one behind the other.
- A heat-insulating layer is inserted, which is covered with a waterproofing layer.
- The gaps between the panels are laid out with a moisture-resistant heat-insulating material.
- From above, the panels are covered with a boardwalk, which also connects the shields to each other.
- Inside the room, the ceiling is decorated with eurolining.
This finishing option is very time consuming and it is impossible to produce it only on our own, you will need 1 - 2 assistants. In addition, this finishing option is more time-consuming than other options.
- If the ceiling in the bath involves the use of an attic space. Do not forget about the presence of a hatch with a retractable or attached ladder;
- Finishing the ceiling should be done after finishing the floor, but before finishing the walls;
- The ceiling is the most vulnerable place in a steam room, so special attention should be paid to its thermal insulation;
- The first plank of the ceiling trim must be laid perfectly, as it serves as a guide for the rest of the planks.
Bathroom ceiling lighting
A modern bath room also implies the presence of lamps in the steam room. It is important to consider here that the lamps must be heat-resistant.
The use of energy-saving lamps and fluorescent lamps is strictly prohibited. The most preferred option are incandescent lamps.
Remember to install wooden protective boxes near the lamps to protect against contact. The best solution would be to install lamps under the ceiling, preferably in the corners of the room.

So, we examined several types of ceiling decoration in the bath with our own hands. All of them have their pros and cons, and are also diverse in terms of pricing and installation time.
Only the owners of the bath room decide which ceiling is suitable. The choice of materials for finishing the ceiling space in the bath also depends entirely on the preferences of the consumer.
So what is better to make the ceiling in the bath? Experienced craftsmen still recommend paying close attention to the option of a false ceiling. This is a fairly simple and cheap finish. Which can be easily built on your own, with only some skills and a small set of tools available in every home.
The ceiling in the bath with your own hands must be equipped, strictly observing the technology. The steam generated in the steam room accumulates at the top. If there is a poor heat-insulating cake under the lining, condensation will appear upon contact with cold air. Moisture will eventually destroy the insulation and wooden floor elements.
Bath ceiling installation
To get an effective ceiling in the bath with your own hands, even before starting work and purchasing materials, you need to know exactly what nodes it consists of:
- Overlap. Concrete floor slabs can be laid on cinder block, brick buildings. However, most often baths are built of wood. The cover is made from the same material. The stacked beams form the framework of the structure.
- Facing. From the inside of the bath, the ceiling is lined with clapboard. Inside the steam room, only a wooden board is used. Plastic is suitable for sheathing other rooms.
- Vapor barrier. The canvas is laid under the cladding to protect the thermal insulation from steam.
- Insulation. A thick layer of heat-insulating material is laid between the floor beams under the skin.
- Waterproofing. Moisture-proof material protects the thermal insulation from the side of the attic.
None of the listed layers can be excluded from the overlap of the bath.
Important! There are membranes for vapor and waterproofing with one-sided passage of moisture.
The canvas removes steam from the thermal insulation, but does not let it go in the opposite direction. Such membranes must be correctly positioned in relation to the insulation.
Bath ceiling height
For a home building, the height of the bath from floor to ceiling is calculated by the simplest formula: the tallest person in the family stands at full height, stretches his arms up and add another 50 cm to the resulting value. The average height to the ceiling is from 2.2 to 2.6 m .
Sometimes, by lowering the ceiling in the bath, the owner solves the problem of accelerating the heating of the room. The idea is correct. However, it is impossible to lower the ceiling below 2.1 m for a number of important reasons:
- Hot air is constantly at the top. Inside the bath with a low ceiling, there is an accelerated mixing of cold and warm streams, which affects the well-being of steaming people.
- In a bath with a low ceiling, it is more difficult to equip high-quality lighting, ventilation, and maintain optimal humidity.
If you adhere to the standard, the ceiling height in the bath should be 2.1-2.4 m. The indicator varies depending on the size of the building, the expected maximum number of visitors, and the functional purpose of each room.
Advice! It is impossible to overestimate the ceiling of the bath. The consumption of energy resources will increase.
Separately, the height of the ceiling in the steam room is calculated, which is associated with the location of the shelves. It is customary to install sunbeds in two or three tiers. The visitor chooses the most comfortable place. The higher the shelf level, the hotter the ambient air.
If we take into account the norms of SNiP, then a minimum distance of 1.1 m should be maintained between the lounger of the upper tier and the ceiling sheathing. For steam rooms of public baths, the indicator has been increased to 1.85 m.
The ceiling in the bath: what is better to do

When installing the ceiling in the owner's bath, the question is what materials will be needed. For an accurate answer, we must again return to the layered construction:
- Cover frame. Create a draft ceiling in the bath from coniferous wood. Pine is considered a budget and easily accessible material. Cedar or larch has an extended service life.
- Facing. Sheathe the ceiling in the steam room can only be wooden clapboard. The board is used from wood that poorly transmits heat: linden, aspen or alder. In other rooms of the bath, pine lining is suitable. It can be sheathed with plastic, which is especially good for a shower room.
Important! It is impossible to sheathe the ceiling with fiberboard, MDF and other materials from pressed wood waste. From exposure to dampness, the lining swells, deforms, and rots.
- Vapor barrier. For all bath rooms, except for the steam room, any vapor barrier material is suitable. Inside the steam room, the ceiling is sheathed with a membrane that can withstand elevated temperatures up to + 120 ° C.
- Insulation. From natural materials, expanded clay, kneading clay with straw or sawdust, peat are used. For reliable insulation, a layer with a minimum thickness of 300 mm is needed, which is unprofitable due to the reduction in attic space. For modern baths, when sheathing, non-combustible thermal insulation made of mineral wool is used.
- Waterproofing. When using natural heaters, it is possible to cover the ceiling from the attic side with roofing felt or film. The purpose of waterproofing is to protect the thermal insulation from water in the event of a roof leak. If the ceiling is sheathed with mineral wool, it is better to cover the thermal insulation from the side of the attic with a membrane that can pass steam in one direction. Through such waterproofing, the remnants of accidentally penetrating moisture will evaporate from the insulation.
When covering the ceiling, all elements of the pie will need to be fixed. Nails and hardware are used only with a galvanized coating. Inside the steam room, the lining is sometimes nailed with copper-plated nails.
Important! The main requirement for the choice of material for sheathing is fire safety, environmental friendliness.
What materials can not be used

The bathhouse is a building for a specific purpose. Aggressive environment will not allow using any material for sheathing. Cladding boards and panels made from compressed wood waste are not suitable for every room. From the slightest moisture, they are deformed. Flammable materials must not be used as insulation. Styrofoam and expanded polystyrene are only suitable for warming the floor of a dressing room or washing room, but it is advisable to fill it with a concrete screed.
PET film, roofing material is not used when lining the bath. The material can be laid instead of waterproofing the ceiling from the side of the cold attic. However, it is better to cover the area above the steam room with a heat-resistant membrane.
It is impossible to use wooden lining with signs of mold for sheathing. In a humid environment, the fungus will quickly spread to all structural elements. Inside the bath there will be an unpleasant smell of rot. The ceiling will collapse quickly.
Attention! It is unacceptable to use mounting foam inside the steam room to seal joints and seal gaps.
Ceiling device in a bath with a cold attic

Cold roofing consists of lathing, waterproofing and roofing. Thermal insulation in such a pie is not provided. The general arrangement of the ceiling in a bath with a cold attic consists of the same layers of sheathing, but they can be laid in two ways:
- Outside. The whole cake of sheathing from steam, heat, waterproofing is laid from the side of the attic to the ceiling of the bath. From above equip a rough floor.
- From within. The sheathing pie is attached to the ceiling from the side of the bath on an additionally mounted frame, and sheathed with cladding on top.
The heat-insulating cake occupies useful space. On which side to place the skin, the owner himself decides.
Types of ceilings in the bath
Depending on the selected materials and the design of the building, one of three types of ceiling is equipped inside the bath. With the design are determined immediately at the stage of construction of the walls.
false ceiling
The hemming type design is used in a log cabin. The ceiling is durable, regardless of the size of the building. The design is ideal for a two-story bath with an equipped attic for a rest room.
The basis of the false ceiling is formed by strong beams. Usually they are made from the same log as the log house. The filing of the ceiling elements is carried out from below to the beams. A rough or finishing floor is attached from above. The second option is chosen for the residential second floor. Between the skins, the void is filled with thermal insulation.
Important! In addition to the log house, the hemming construction is suitable for a bath made of bricks, foam blocks and frame type.
panel type ceiling

The panel type of construction is convenient in terms of economy. Sheathing is assembled in the form of separate boxes from scraps of tongue-and-groove boards. The internal void is filled with the remnants of the existing thermal insulation. Attach the sheathing boxes to the ceiling of the bath, where the frame is pre-equipped. The advantage of technology is to simplify repairs. To change the rotten area, you do not need to remove the entire skin. It is enough to dismantle the problematic box, and install a new element of the same size in its place. Of the minuses of the skin, the difficulty of sealing the joints between each box is distinguished.
Bath ceiling floor type
A specific type of sheathing is applicable for small baths. The design difference is the absence of floor beams. They are replaced by boards laid on brick or block walls. In the case of a log house, the elements are cut into the logs using the selected groove. For a large bath, the overlap is not suitable, as long boards will sag. The difficulty arises with the arrangement of reliable vapor and thermal insulation. You can neither walk in the attic nor use the space for storing things.
Do-it-yourself ceiling insulation in the bath

Rural residents in the old fashioned way sometimes insulate the ceiling in the bath with their own hands with natural material. The choice of such thermal insulation is explained by availability. Baths built according to modern projects are sheathed with factory-made insulation. The material has a lower thermal conductivity, due to which the thickness of the ceiling cake decreases.
Material selection
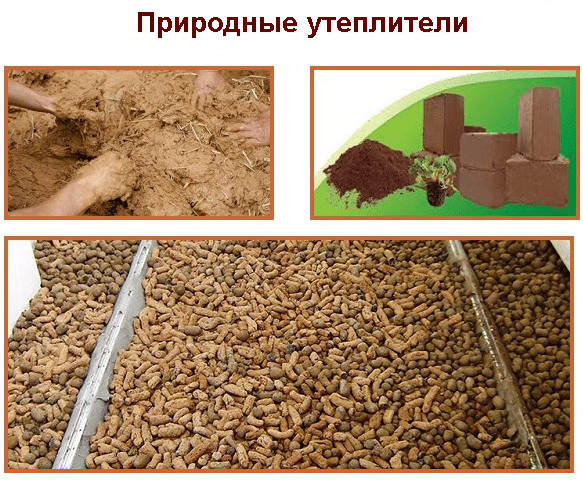
Natural heaters are environmentally friendly. Most of the materials are provided free of charge. The most popular insulation is brown clay mixed with straw, wood shavings or sawdust. If there are peat bogs nearby, you can get another natural insulation for free. Expanded clay will have to be bought, but its advantage is low weight, which reduces the load on the floor.
The natural material is resistant to steam. It easily absorbs and does not interfere with the evaporation of moisture. The disadvantage is the high thermal conductivity. A thick layer will have to be poured onto the ceiling, and this is already an extra load on the walls and foundation, reducing the useful space of the attic or bath.

Mineral wool is used from factory-made thermal insulation for a bath. The material is non-flammable, environmentally friendly, lightweight. Rolled mineral wool is more difficult to fix. It is easier to lay basalt slabs between the beams. Mineral wool is produced with a foil coating, which is ideal for insulating a bath. The material has only one drawback. Mineral wool is saturated with moisture if the vapor barrier is broken.
The video tells about the choice of insulation for cladding the bath:
Required Tools

To sheathe the ceiling, a complex tool is not needed. The list is limited to the essentials:
- wood saw;
- screwdriver;
- roulette;
- level;
- construction stapler;
- a hammer.
A jigsaw, a grinder, a circular saw will help speed up the sheathing process. Aluminum tape, self-tapping screws, staples for a stapler, nails are prepared from materials.
Step by step installation
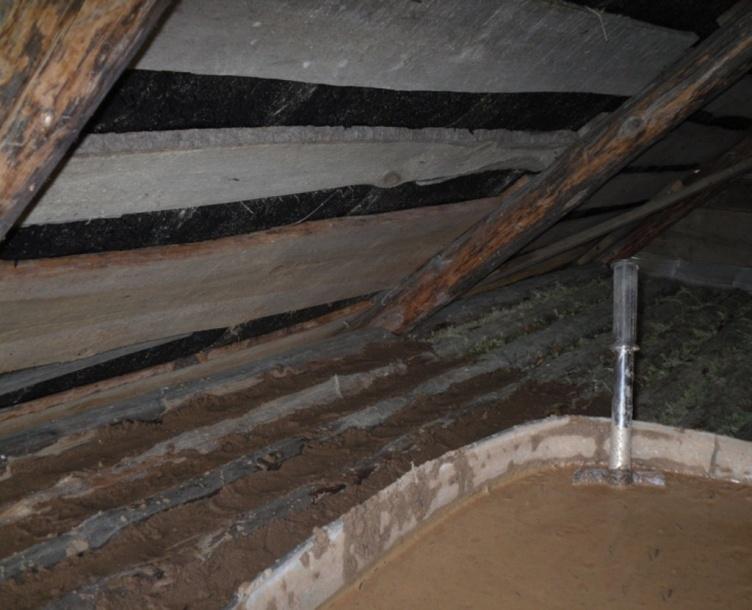
All natural heaters are laid at least 30 cm thick on a layer of clay putty, which acts as a vapor barrier. Another layer of putty is applied on top. If the attic is non-residential, the cake is left in this design. When the top floor is an attic, the cake is covered with a vapor barrier, a subfloor is laid. Above is a cake made of artificial thermal insulation and a finished floor.

Basalt wool slabs are placed in the cells of a wooden frame. On both sides, the thermal insulation is covered with a vapor barrier. The slab should fit snugly between the beams. From the side of the bath, the cake is pressed with slats of the counter-lattice, on which the lining is attached.
Bath ceiling decoration

Sheathing of the ceiling in the steam room is carried out only with wooden clapboard. It is preferable to use linden, alder, aspen. Plastic is suitable for other bath rooms, but natural material is better for sheathing.
If the ceiling is made with a draft ceiling, the need for sheathing is determined by its quality. Well-fitted boards will last without cladding. However, the draft ceiling is less beautiful and has flaws.
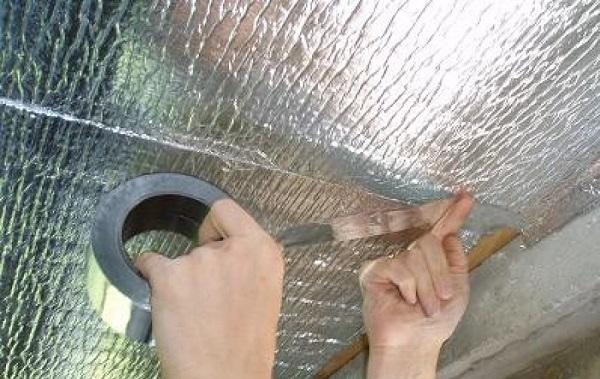
The ceiling is being finished in a bath with sheathing with foil material. First, rails 40-50 mm thick are attached to the draft ceiling. The foil vapor barrier is shot with a stapler. Joints are glued with aluminum tape.
How to sheathe the ceiling in the bath clapboard
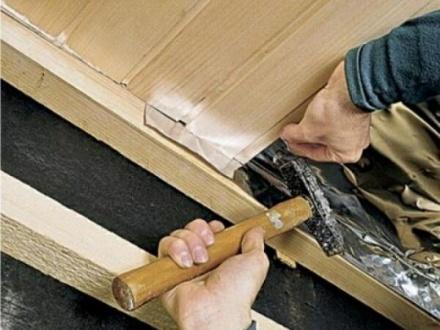
They sheathe the ceiling in the steam room with their own hands with a clapboard of class "A" or "B". Boards are more expensive, but they are perfectly smooth without knots and other defects. Fasten the lining to the bars of the counter-lattice with nails or hardware with a stainless coating. Near the walls around the entire perimeter of the room, a gap is left for ventilation of the space formed between the cladding and the draft ceiling.
At the end of the sheathing, the lining is treated with protective impregnations and a special varnish for the bath. Materials are water-based and do not emit toxic fumes. A good protective impregnation is linseed oil.
More information about the arrangement of the bath ceiling is told in the video:
Conclusion
The ceiling in the bath with your own hands is not hastily done. Sheathing is carried out simultaneously with the walls. If the materials were correctly selected and laid, the lining in the steam room will last more than 15 years. In other rooms, the life of the skin is much longer, but it all depends on the quality of ventilation.
Everyone who started building a bathhouse with their own hands asks the question - how to make the ceiling correctly? Indeed, the microclimate in the steam room, washing room or rest room will directly depend on its design.
The ceiling should hold heat well, dry quickly, not support the spread of fungus and mold, and also have enough durability so that it does not have to be redone a couple of years after construction.
Let's look at the types of ceilings in log baths in this article, what and how they are made of, consider the main structural elements, and also talk about some of the features that you should know when starting construction.
In order for bath procedures to be enjoyable, certain accepted norms should be followed in terms of choosing the height of the interior.
In addition, the service life of the bath itself depends on the height of the ceilings.
The determining factor here is the ease of use of the steam room by people of different heights. For example, in order to climb onto the top shelf and not bury your head in the ceiling, you will need a free space of at least 110 cm, but it is better to have a small margin in height so as not to get injured when visiting the steam room. In addition, if you like to bathe with a whisk, you need to take into account the free space that allows you to freely wield this bath accessory.
Thus, it turns out that the minimum ceiling height in a Russian log bath should be at least 220-240 cm.
The figure below shows the rationale for choosing this height:

What should be the ceiling
Features of the microclimate largely determine the requirements for the ceiling of the bath. The heat generated during bathing procedures, high humidity, hot steam rising up - all this should be taken into account during construction.
The main requirements for the ceiling are:
- the ability to retain heat well;
- resistance to high temperature and humidity;
- sufficient strength;
- aesthetic appearance.

If the ceiling does not hold heat well, then most of it will simply go nowhere. In other words, you will heat the air around the bath. To avoid this, the ceiling is made as energy efficient as possible using heat-insulating and waterproofing materials that ensure its normal operation.
The strength of the ceiling is necessary in order to hold a layer of insulation without deformation, which can have a significant mass.
You should also take care of the beautiful appearance of the ceiling. After all, the overall impression of the bath procedures will depend on this. After all, it is much more pleasant to bathe yourself or invite relatives and friends to the bath if the interior looks aesthetically pleasing, which is called "pleasing to the eye."
What material is better to make a ceiling in a log bath?
Another important issue in the construction of the ceiling is the choice of material.
As mentioned above, the strength, durability and aesthetic appeal of the room will depend on the material.
The ceiling material should easily withstand high temperatures and not rot under the influence of humidity.
Due to the high temperatures in the steam room, the use of synthetic materials is excluded, since many of them release toxic polyphenols and other harmful substances when heated. Therefore, the construction of the ceiling should be considered only from environmentally friendly natural materials, the best of which is hardwood - larch, linden, aspen, alder.
It is not desirable to make a ceiling from coniferous trees because of their high resin content. When heated, the resin becomes liquid and, if dripping down, can cause severe burns if it comes into contact with the skin.
To prevent the wood from rotting, before starting to construct the ceiling, all wooden elements should be carefully treated with an antiseptic and fire retardant. The antiseptic will prevent woodworms from eating wood and protect against the spread of rot and mold. and flame retardant will help to significantly reduce the risk of fire of wooden structures.
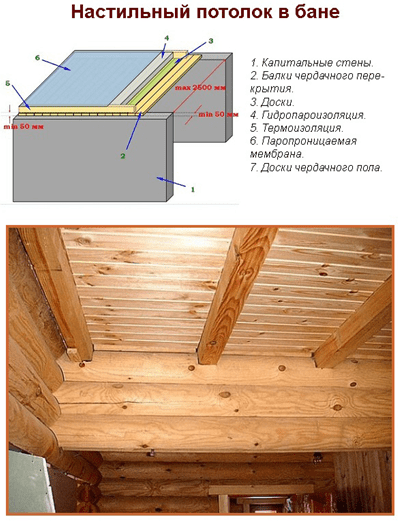
As a rule, in log baths, the ceiling is made of boards that are hemmed to the beams or laid on them. A board with a thickness of 40 mm is quite enough. Its strength is quite enough to hold its own weight and the weight of the insulation.
A layer of insulation is arranged over the boards, which saves heat, preventing it from escaping. And so that the insulation does not get wet, it is protected on both sides with a layer of waterproofing.

In general terms, the diagram of the device of the flooring can be seen in the video below:
How to insulate the ceiling?
Ceiling insulation is one of the most important stages of its construction. It is the quality of the insulation that plays a significant role in creating the necessary microclimate that allows you to enjoy bathing procedures.
In order to keep the heat in the bath, you can use both traditional folk materials and modern efficient types of insulation.
If you have access to a sufficient amount of sawdust, then you can fill the ceiling with a layer of sawdust and lay a layer of clay on top, as our distant ancestors did. This method of insulation is quite effective. But its big disadvantage is the combustibility of sawdust and high hygroscopicity (the ability to absorb moisture).

In the event of a violation of steam or waterproofing, sawdust will absorb wet steam and soon rot may appear in the layer of such insulation, which will be very difficult to get rid of.
Much more reliable are modern mineral materials produced in the form of rolls and plates. They are non-combustible, made of stone or glass, being a completely harmless environmentally friendly material with a high coefficient of heat transfer resistance, which allows you to perfectly keep the heat in the room.
Mineral (basalt) wool has the following advantages:
- Light weight, which reduces the load on building structures.
- Does not support the spread of mold and mildew.
- It is not eaten by woodworms and other harmful insects.
- Does not burn and does not support combustion.

The only disadvantage of mineral wool can be considered its ability to absorb moisture. Therefore, you should take care of the device reliable vapor and waterproofing.
Another material quite often used in the construction of the ceiling in baths is expanded clay. This is a light porous material obtained by firing clay or slate in special drum kilns.
The advantages of expanded clay include:
- high mechanical strength;
- high resistance to heat transfer, providing high thermal insulation properties;
- frost resistance;
- incombustibility and fire resistance;
- chemical inertness, environmental friendliness;
- durability.

Do not insulate the bath from foam. Despite its high thermal insulation characteristics, this material is unacceptable for use in a bath due to the release of harmful substances during heating. in addition, the foam is flammable and can cause a fire.
What is the ceiling vapor barrier made of?
Vapor barrier is needed to prevent the penetration of hot wet steam from the steam room into the insulation layer.
In the simplest case, ordinary polyethylene film used to cover greenhouses and hotbeds can be used as a vapor barrier.
The only disadvantage of polyethylene is its complete impermeability to moisture. If condensate falls on the inside of the film from the side of the insulation, and the insulation is also covered from above with an impermeable polyethylene film, it will have nowhere to go - it will not be able to evaporate freely from the insulation.
To avoid this, you can use modern membrane materials that allow the insulation to "breathe", working to allow moisture to pass in one direction (out of the insulation) and not to pass it to the other (inside the insulation).

To understand the difference between vapor barrier and waterproofing, we recommend watching this video:
As you can see, from the side of the room, the insulation is protected by a vapor barrier that prevents the penetration of moisture vapor into the insulation. And from the side of the attic, the insulation is closed with waterproofing - a membrane material that does not let water droplets through, but freely passes wet steam, allowing the insulation to dry out.
Of the modern types of vapor barrier, Izospan (membrane), Thermofol (metallized fiberglass), Megaflex (foil on kraft paper), Yutafol can be advised.

The joints of the vapor barrier sheets are carefully sealed with special tape, and the vapor barrier itself is fastened with a stapler to the floor beams.
Which ceiling is better - floor or hemmed?
As mentioned above - most often the ceilings are made flat or hemmed.
The hemmed ceiling consists of a lining or edged planed board, which is nailed (sewn) from below to the beams, which go in steps of 0.5-1m.
A vapor barrier is spread on the boards, insulation is laid, all this is covered with waterproofing from above and can be sewn up with another lining from the lining.
Also, a false ceiling can be made in the way shown in this video:
The floor ceiling is often made in small baths with a span between the walls of no more than 2-2.5 m. It consists of boards laid with their ends on the walls of the log house. Ceiling beams in this case may not be at all.
You can watch the construction of a flooring in a log house in this video.


