Compost box. How to make a compost box with your own hands: drawings, photos, videos, options for making a composter.
This homemade product will be of interest primarily to summer residents and owners of garden plots, because we will talk about fertilizers for the soil, in particular compost.
Compost is a product of the decomposition of organic matter under the influence of microorganisms, in fact, compost is the best organic fertilizer.
To get high-quality compost, when building a compost box with your own hands, you need to follow simple rules:
The main condition for the maturation of compost is the flow of oxygen into the compost heap, oxygen is necessary for the vital activity of microorganisms, therefore, when making a compost box, it is necessary to provide side ventilation holes in the structure.
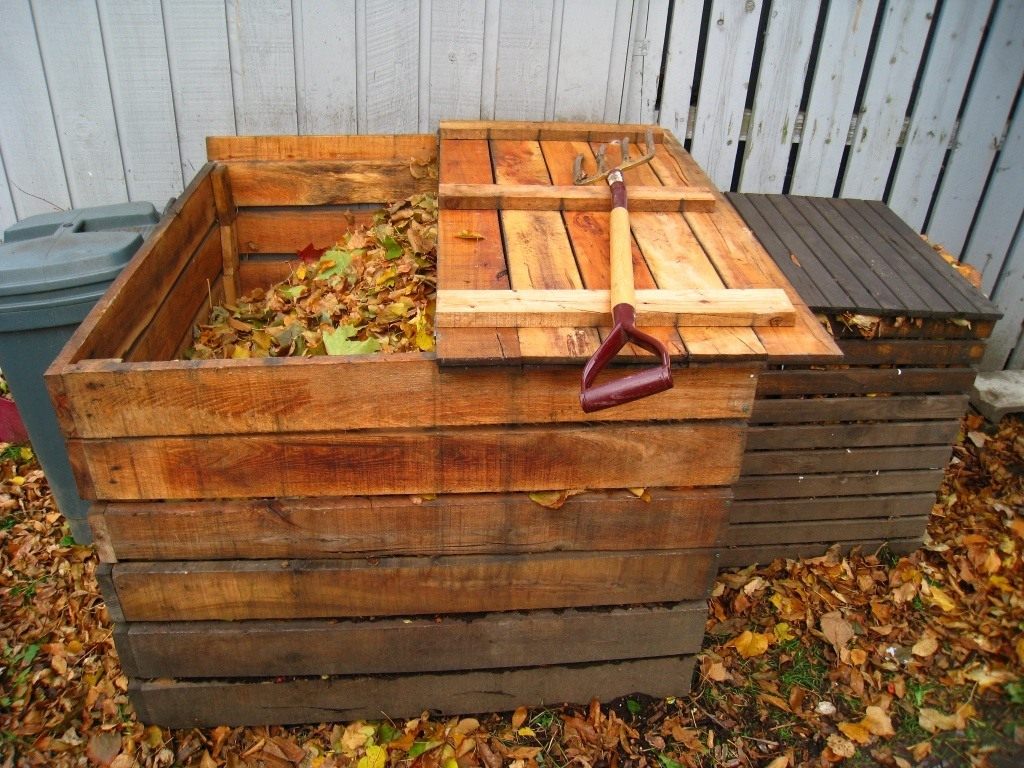
Another advantage of using a box is that precipitation will not wash fertilizers into the soil, all valuable substances will remain in the box, and you will get really good compost. Therefore, it is desirable to equip the box with a lid.
Compost matures faster at the bottom of the compost heap, so you need to think about access to the bottom layer in the box, equip the box with a door or removable boards.
For compost maturation, the best place to place the compost bin is in a shady area at the edge of a vegetable garden or orchard.
Drawings of a box for compost.
Consider a few blueprints for making a wooden compost box.
One piece compost bin.
Multi-section compost bin.
You can build a box from old boards, timber, you can use boards from wooden pallets, you can use any wood that is on the farm.
The composter can be made 2 - 3 x sections, while fertilizer ripens in one section, ready-made compost can be used in the other.
Making a compost bin.
Consider, for example, the manufacture of the simplest composter. The design of the box consists of supporting pillars that are dug into the ground, the optimal height of the ground part of the pillars is 1.2 m. The pillars can be made from a bar 100 x 100 mm or logs.
But the lower part of the supports must be treated with an antiseptic, or used engine oil, so that the wood does not quickly rot. Alternatively, you can use the old-fashioned way, part of the pillars that will be in the ground can be charred at the stake, charred wood is more resistant to decay.
We attach the side walls to the supports, stuff the boards with nails or fasten them with self-tapping screws, it is advisable to leave a small gap of 1–2 cm between the boards for ventilation.
It is desirable to make the front wall of the box openable, this will greatly simplify the unloading of compost, it is enough to open the front door and you can collect compost with a shovel without much effort. Instead of a door, you can make removable boards, you need to nail the guide rails to the support posts and insert them into the grooves of the board.
For the composter, it is desirable to make a lid, we attach the lid to the box with canopies, we make a handle. Since wood is susceptible to decay, the box must be treated with a safe anti-fungal impregnation and preferably painted.
The do-it-yourself compost box is ready, the final stage is laying the compost. A layer (hay, grass, leaves) is laid on the bottom of the box, then tops and vegetable waste can be laid.
DIY compost bin options.

A garden composter is a source of free, environmentally friendly, organic fertilizer, as well as a disposal site for grass clippings, weeds, branches, and other vegetation. This indispensable element of the garden plot can be made of any materials, any shape and size. However, traditionally it is made of boards in the form of a box with a lid. A compost bin with a lid is the simplest option, makes good compost easily and lasts for many years.
Before you start building, you need to decide on the size. The optimal volume of a garden composter is 1 cubic meter. m., i.e. it is necessary to make a compost box with a size of 1x1x1 m. This design is quite enough for a summer cottage with an area of 5 acres.

Fig.1.

Fig.2.
To obtain high-quality compost in a short time, sufficient humidity must be maintained in the box and there must be an influx of fresh air to the contents. Also, the design should provide easy loading and unloading of organic residues. The best constructive variety of a garden composter is a box with a lid, a removable front wall and holes on the sides for aeration.

Fig.3.

Fig.4.

Fig.5.
Making your own garden composter is very easy. This will require boards 20 - 25 mm thick, 1 m long and 4 beams with a section of 50x50 mm or more. The assembly order is as follows: first, two side walls are assembled, then the assembled shields are connected with boards. This forms the back and front wall. Not all boards can be installed on the front wall, but only 1-2 bottom ones. In this way, an easy loading of organic residues will be ensured. As it fills up, you can install additional boards. All elements of the compost box are fastened with self-tapping screws.

Fig.6.
When assembling the tray, it is important to leave a gap between the boards of 1 - 2 cm. This gap will ensure aeration of the compost. If the boards are installed tightly without a gap, the bacteria involved in the production of fertilizer may not have enough oxygen, as a result, aerobic bacteria will die, and the mass will turn sour.

Fig.7.

Fig.8.
A lid on the compost bin is essential to prevent excess moisture evaporation and rain protection. Excess or lack of moisture directly affects the number of aerobic bacteria, and as a result, the quality and speed of fertilizer production. The lid is made from the same boards as the garden composter itself. It can be hinged or removable.

Fig.9.

Fig.10.
If the compost bin is installed in the shade, then you can do without a lid. To preserve moisture and protect against precipitation, the compost can be covered with a sheet of iron or a piece of old linoleum (roofing material).

Fig.11.

Fig.12.
A convenient design solution is a collapsible front wall. In the previous version of the tray, the front wall was assembled from boards that were fastened with self-tapping screws. It is possible to assemble and disassemble such a wall only with the help of a tool. Undoubtedly, this is a disadvantage.

Fig.13.

Fig.14.
You can make a front wall that can be assembled and disassembled without tools as follows. To do this, a groove should be made on the side walls 1.5 times the thickness of the board. Boards will be installed in this groove as they are filled. The groove can be made from two bars. Those. as in the previous design, I collect all the walls except the front. On the front side of the box, an additional 1 bar is installed on each sidewall. Between the bars leave a gap of about 30 mm. Boards will be inserted into this gap, which will form the front wall.

Fig.15.
Given the high humidity of the compost and the duration of its production, the wood from which it is made will be in an aggressive environment. The boards will be attacked by aerobic bacteria and can quickly turn into fertilizer themselves. Therefore, it is very important to treat the wood with impregnation from decay before starting operation.

Fig.16.
If you are not the owner of large planting areas, but prefer a lawn and flowering plants, then you will not have large volumes of organic waste. In this case, it is not advisable to make a composter of large dimensions. It is reasonable to make a small structure from a metal mesh.

Fig.17.
This option can be made not only in the form of a cube, but also in the form of a cylinder. The optimal size is 1 m in height and 60 - 80 cm in diameter. You will need a metal mesh about 1 m wide and 2-2.5 m long. The mesh must be rolled up in the shape of a cylinder, and the ends must be tied with wire. In order for the cylinder to hold its shape, it is necessary to install two bars, as shown in the photo below.
If there is enough bad land on the summer cottage or near the house, on which little grows, you need to start enriching the soil. It will be very easy to bring black soil, but today it is not always possible to get it, which is especially true for houses within the city. It is also unprofitable to introduce "chemistry"; in the end, you will have to consume the fruits with its particles. We recommend doing only one thing: you can equip a compost heap. Doing such work with your own hands is quite simple.
Choosing a place for a compost heap and features of its arrangement
At the first stage, it will be necessary to choose the most convenient place for the location of the heap. Most often, these are zones located behind outbuildings, where the view of the pile and waste itself will not spoil the exterior of the site.
As the only nuance, it is necessary to highlight the following: you need to monitor where the drains will flow. They should not fall in the direction of the well, if there is one, otherwise rotting products can penetrate there, which will negatively affect not only the quality, but also the taste of the water.
Choice of arrangement option

You can choose from two arrangement options if you need a compost heap. With your own hands, you should dig a deep enough hole into which the raw materials will be placed. The second option involves the creation of a wide box, which is made of wooden boards. It should have removable walls that provide ease of use.
Work technology
If you still have not decided which of the above options to use, you should listen to the opinion of experts who recommend using a deep hole. It is more convenient because the plant material will be in the ground, thus it will not spoil the appearance of the site. However, it is worth remembering that compost under such conditions will take longer to prepare, in addition, it is much more difficult to mix it.

If, nevertheless, this option suits you more, then it is important to do the work correctly, only in this case the decomposition of organic matter will begin to occur in a normal way. This requires a certain amount of oxygen. For the reason that the underground compost heap will be equipped with your own hands without the involvement of qualified help, you must use the recommendations below.
Features of the work

First you need to take out the soil, deepening by 1 meter, while in length such a pit should have a parameter equal to 3 meters. The width should be equivalent to 1.5 m. From the walls of the pit, you need to retreat 20 cm in each direction in order to knock down a wooden box. In the corners you need to dig 4 columns and nail planks to them. Between these elements there should be a distance of 5 cm to ensure ventilation of all layers of the compost. It must be divided into two equal parts using a wooden shield, this will only fill one half of the structure. It is important to line the bottom with thick branches, straw, and also bark. These materials act as a drain that will remove excess moisture. Among other things, such manipulations are necessary in order to help the compost to ventilate at the bottom. The height of this layer should be 15 cm.
Working on the compost bin
If you are going to equip a compost heap with your own hands, then you need to think about making a box. Another bookmark option involves the use of this element, which can be made of unpainted wood, factory plastic is also quite acceptable. In appearance, it is identical to traditional boxes, but the design must have an impressive size.

When creating a frame, one should not forget to leave gaps between the boards, one of the sides should be removable, this will make it more convenient not only to mix, but also to lay the raw materials. Alternatively, you can hang a door. As for the plastic composter, it has perforated doors on each side at the bottom. Ventilation will be carried out through them, however, it is necessary to moisten the waste yourself.
Before you make a compost heap with your own hands, you need to take into account the fact that the above structures have been made for many years. Therefore, the floor can be concreted, while drainage is laid on top. It should be the same as in the hole that was described above. Some owners lay plastic or wooden shields on the bottom. However, over time, wood becomes unusable, there is not a single eternal material. At the last stage, it will only be necessary to fill the prepared place with raw materials, which will rot and become high-quality compost.
If you are thinking about how to make a compost heap with your own hands, then it is recommended to install two boxes side by side. This will ensure ease of use: you can transfer humus for ventilation from one compartment to another, while the area will not become clogged.

If you will be making a compost heap with your own hands, it is recommended to carefully consider the photo. This will allow you to get the job done right. The size of the pit must be determined based on the estimated amount of waste that may accumulate during the year. After all this will rot. Removing and mixing humus for the hosts should be quite simple, so it is important to choose the right height of the walls, which have their own limitations.
The pit can be open or closed, among other things, it can have only one section. The compost should be free of weeds and their seeds. The content in general should be taken very seriously, it should be freely penetrated by worms.
It is necessary to equip a convenient approach. This will ensure convenient removal of humus. Iron can be placed at the bottom, which will benefit the compost over time. The smell from the closed pit should not leak out.
If you will equip a compost heap with your own hands, you can view manufacturing options in this article. However, be that as it may, it is important to locate the pit in a place where the waste will not be exposed to direct sunlight.

If it is intended to equip a compost pit only for the release of organic waste, it can be done according to the simplest scheme. To do this, a hole is dug, the depth of which can vary from 40 to 60 cm. It must be no more than 70 cm wide. A layer of straw and dry grass is laid on the bottom. After each dumping of debris, a layer of grass should be laid on the surface. This will eliminate the possibility of breeding flies and the occurrence of an unpleasant odor. Such a pile should be located in a remote part of the site.
concrete compost heap
If you are thinking about how to properly arrange a compost heap, the photo is definitely worth considering. They are presented in this article. The most time-consuming structure is considered to be one that is built of concrete. In this case, it is necessary to equip two equal compartments, one of them will be intended for old compost, while the other will be used for regular replenishment. Such a design should have a lid that rises when a set of fertilizers or debris is needed. In order for the compost to be of the highest quality, it is better not to use weeds, because this can lead to harmful seeds in the soil. It is necessary to provide access for earthworms, otherwise you will face the problem of long maturation. It is not recommended to plant climbing plants and cover the structure with dense foliage, in this case it will lose the penetration of fresh air, and ventilation will be impossible.
Stages of work
If you are faced with the question of how to properly arrange a compost heap, then it is important to consider that when using cement mortar, manipulation will be more difficult. It will be necessary to level and remove the top layer of soil. After that, a hole breaks out, the depth of which can vary from 60 to 80 cm. The same 3 meters are chosen as the optimal length, while the width can be 2 meters.
At the next stage, formwork is being constructed, which is necessary for pouring the walls with cement mortar. You can use concrete, the wall thickness should be 10 cm.
If you equip a compost heap in the country with your own hands, then you can choose a closed type of construction. At the same time, it is important to properly prepare the concrete, otherwise it will be very difficult to correct errors. In order to obtain the correct solution, it is necessary to use cement, river sand, gravel, and also water. To begin with, gravel must be poured into a 20-liter container and shaken well, after which you must immediately start adding water. For 20 liters of gravel, 10 liters of sand should be used. Such a solution should contain as little water as possible. This will prevent the appearance of air bubbles. Otherwise, a huge number of voids in the concrete walls are formed.
You can build a pit with one compartment, but it is recommended to make two. In the latter case, it will be more convenient to use the design, as for those cases where there is no desire to use drugs to increase the rate of maturation.
Alternative compost heap construction with wooden walls
Before you make a compost heap with your own hands, the photo must be considered. They will allow you to understand which design to use in your work. You can use wood for manipulation, while building walls will be quite simple. Racks must be installed at the corners of the pit, the base for them is made of pipes, while the part that is located on the surface of the earth can be made of timber. The cross section of the latter should be equal to 10 cm. One edge of each bar must be sharpened so that it matches the size of the pipes.
It is necessary to impregnate wooden elements with a special solution, this will eliminate the processes of decay and decomposition. At the next stage, the bars are driven into the pipe trimmings. Transverse boards are strengthened on their upper part, they will act as the walls of the pit. Fixing the boards must be done using self-tapping screws or steel corners, this will allow you to get a more reliable grip. After the wall can be covered with paint. It is desirable that it be acrylic.
If you make a compost heap, do-it-yourself organic fertilizer can be prepared with it. The simplest option for a removable cover is a plywood sheet, which is fixed in the back wall of the structure with hinges. It is preferable to use an airtight lid, then the compost will ripen better, but it must be opened from time to time to ventilate. Raw vegetables, hay, bark, plant roots, sawdust, fruits, berries, herbivore manure, shredded paper, straw, and ash can be placed in such a pit.
Conclusion
The correct do-it-yourself compost heap must be made using one of the technologies described above. However, it is also important to use it correctly. At the same time, it is impossible to lay tops from potatoes and tomatoes, greens after treatment with pesticides, excrement of carnivores, as well as any synthetic waste.
Everyone knows the truth - plants develop best and bear fruit on fertile soil. But where can I get it if plants are planted on the site from year to year that absorb useful substances from the earth. To nourish the soil, many chemicals have been created. But do not forget that this is chemistry, and everything that you put into the soil will also go into the crop. But there is an alternative - make your own compost.
What is compost and how to make it yourself
"What is compost and how to make it?" - such a question is often asked by novice gardeners. Compost is an organic fertilizer obtained by the decomposition of various raw materials of plant or animal origin.
You can make your own compost at your summer cottage. There are two options for the manufacture of natural fertilizers for the garden.
- Compost heap. This is the most common way to get compost, it is also cheap and easy. You will need to make the frame in such a way that air and moisture get inside. The best material for manufacturing will be wire mesh. Preparation of compost from the beginning of laying and until full maturation takes place in time from six months to 9 months.
Compost heap at home
- In a special box for obtaining organic fertilizers. You can buy it in the store departments "Garden-Ogorod". Such a device is protected from ingress of insects. Inside the box is a drum that turns the substance. In addition, in the middle of the container there is a hose for moistening the waste.
How to make compost?
Experienced gardeners recommend preparing organics with their own hands. The options that give the most effective results are the compost heap or compost pit. In these cases, the decomposition of waste, their decay, is best of all, because inside the layers the temperature and humidity are practically unchanged. The timing of the maturation of organic matter directly depends on the volume of filling: the most filled pits and large ones become more quickly ready for use.
Compost heaps with the following parameters are considered the most acceptable:
- width - 1.5 m;
- length - 2 m;
- depth is about a meter.
You can double the size and make two compartments: one for storing finished compost, the second for laying a new one.
Placing a compost heap is also possible directly on the ground. It will also be well ventilated in natural conditions. Excess moisture must be avoided. Putting waste in a pile, do not get carried away, the optimal dimensions for it:
- base perimeter - 1x1 m;
- in height - 1 m 20 cm.

compost box
Necessary ingredients for a normal composting process:
- oxygen;
- water;
- nitrogen.
In the presence of these factors, beneficial bacteria begin to act, which are involved in the course of decomposition, and thus composting occurs.
How to start preparing compost?
Before starting composting, you need to prepare a shallow pit (approximately the depth of a spade bayonet). The lowest layer in the pit should be small twigs cut from fruit bushes or trees. This layer performs the function of drainage, allowing excess fluid to flow down.
If you already have ready-made compost, then a small part of it should be placed on the branches. This will speed up the decomposition process, beneficial bacteria from the finished humus will fall into new layers. For all subsequent layers, food plant waste or grass, leaves from the site are used. They are evenly distributed on the surface, trying to tamp, and watered. Sprinkle with earth on top.
So that the pile does not fall apart and is not carried by the wind, it is worth enclosing it with a fence of boards or wire mesh with large cells. From above it is covered with a special covering material (spunbond), in extreme cases, straw is used. So we got a ready-made composter with our own hands.

Making compost for the garden
What are the components of compost?
Compost is a natural nutrient that helps restore soil structure and increase its fertility. But first you need to know how to properly compost. T It is required to create certain conditions for composting to proceed normally:
- Creating an optimal moist environment inside the compost heap. It should approach the readings from 45 to 70%. But if it is not possible to measure the humidity readings, then this is done "by eye" - the normal moisture of the substance resembles a squeezed sponge. The temperature indicator is also important - in the range of 28-35 degrees. Over-dried waste will not decompose, and too wet waste will begin to rot. In hot and dry weather conditions, the compost needs watering. If it constantly rains, then you should definitely turn over the contents of the pit. Overheating of the substrate over 60 degrees is unacceptable, because at this temperature regime all beneficial bacteria die.
- A prerequisite is the access of oxygen to all layers of the compost heap. To do this, it constantly (about 2 times a month) needs to be shoveled, and the lower layers should be lifted up, the side layers should be moved to the center.
- The presence of bacteria and earthworms in the compost pit will have a positive effect on the process of composting biomaterials. They are involved in the decomposition of waste.
Observing all the conditions, you can make compost in the country with your own hands quickly and easily.
What ingredients can be used to make compost?
We learned how to make compost, now we need to figure out which ingredients are suitable for this. Symbolically, all components can be attributed to two varieties:
Components with an increased level of nitrogen, otherwise they are called green mass. These include:
- cultivated herbs;
- massive parts of vegetable and fruit plants;

Making green compost
- food waste of plant origin;
- bird droppings, pet manure.
In the summer cottage, where vegetables, fruits and berries are constantly grown, additional feeding is always needed. It is not advisable to use ordinary mineral fertilizers for your family, except in small quantities. They change the physical and chemical parameters of the soil and contribute to the acidification of the site.
Organic fertilizers are more expensive, but they restore the soil well and stimulate crop growth. One of them - compost - can be made from components that can be found in abundance in any summer cottage, and building a compost pit with your own hands will require small financial costs and a little time. But at any time on the site there will be something to feed the plants.
The benefits of compost and how fertilizer works
Compost is plant residues processed by soil microorganisms and earthworms. Passing through the digestive tract, useful nutrients - nitrogen, potassium, phosphorus and other trace elements receive an organic shell.
In it, they are better preserved and better absorbed by plants. People have learned to produce such fertilizers artificially. They are called chelate, but they are expensive. A large area requires a lot of complex mixtures, which significantly increases the cost of the crop.
If you make a compost pit correctly, and learn how to lay the compost for maturation, you can significantly reduce the cost of renewing the land and increase the yield for free.

Raw materials for composting
Everything can be composted:
- leaves;
- green freshly cut grass;
- manure;
- branches, sawdust, bark, paper;
- algae and other pond plants;
- peat;
- fecal matter from the sewer.
It is better to take several components. It is desirable that the composition includes nitrogen and carbohydrate ingredients, as well as land from the site. Nitrogenous substances include: fresh grass, manure or dung, fresh vegetables, fruits. Carbonaceous components include paper, dry grass, sawdust, straw, cardboard.
Adds nutritional value to ash. To make the compost more saturated, mineral complex or single-component fertilizers can be added at the end. Either way, compost will help increase the amount of humus in the soil and revitalize the soil with bacteria.
Composting methods - with and without oxygen
There are two types of composting - aerobic and anaerobic. In the first case, microorganisms work, which need oxygen for life. Such bacteria live in the soil and decompose plant residues - grass, roots, manure.
To get aerobic fertilizer, you need to know how to properly make a compost pit with your own hands to ensure air access. In addition, the mixture must be periodically loosened and turned over so that oxygen enters all components. The downside of the aerobic method is that some of the nutrients are weathered or oxidized and do not benefit, as well as time consuming.
Video: How to make a compost pit with your own hands
Another method is anaerobic. This fermentation of components without air access. How to make a compost pit in the country so so that oxygen does not penetrate inside:
- the material must be tightly knocked down, and from the inside you can make a lining with a film;
- the components are packed tightly and compacted to remove excess air.
From above, such a collar is hermetically sealed with a film, which is pressed down to the ground with heavy stones or earth. Further, the process occurs without human intervention. The advantage of this method is that almost all nutrients are preserved. Minus - it is difficult to achieve complete tightness of compost pits. Sometimes it is better to buy a container for laying raw materials.

Varieties of composters
A simple do-it-yourself compost pit can be made in one day. No special materials or tools - everything that is at hand will do - boards, slate, plastic panels, plexiglass, mesh.
It is necessary to decide which method of making compost will be a priority: aerobic or anaerobic. If the first, then there are more options for making a compost heap with your own hands. If anaerobic, then every effort will have to be made to make the structure airtight. You may have to apply concreting, but such a collar will last a long time.
Classic earth pit
A compost pit is being made in the ground as a recess not more than 50 cm, so that it is convenient to care for the ripening mixture. The sizes are arbitrary. Any length and width can be made.

More often, this design is used for anaerobic fermentation, but for this it is necessary to concrete the walls and bottom. The fact is that during the decomposition of plant residues, the liquid flows down. If the bottom is left open, then the nutrients will disappear, soaking into the soil. But if a layer of earth, straw or peat is laid on a closed bottom, then they will be preserved and will benefit the plants.
The easiest way to make a compost pit is from a concrete ring. For this:
- Digging a shallow hole 60 cm
- The bottom is poured with a solution and allowed to dry.
- Using a crane or tractor, a concrete ring is installed 90 cm high.
- Plaster the connection between the bottom and the ring.
The convenience lies in the fact that the edges will rise above ground level and prevent precipitation from falling into the compost. Concrete can be painted any color or decorated as desired to make a beautiful compost pit - you can plant tall plants around the concrete ring and they will hide the storage. If desired, a cover with a hole for the hatch is installed on the ring.

Burt from slate
If the old slate is lying around, it can be strengthened on the boards and make walls for the compost pit. It will not be quite a hole, since it is located on the surface of the earth. Rather, a collar or a pile, but decorated and protected. A do-it-yourself slate compost pit is suitable for the aerobic (oxygen) method of making compost.
Stages of work:
- Choose a place and carry out preliminary marking - length, width. The height of the collar should be no higher than 1.5 m. At higher altitudes, air will get in worse and maturation will slow down. Raw materials can even rot or turn sour.
- Dig holes in the corners with a drill and put up poles.
- Between the pillars, nail the boards on which the slate will hold.
- Using a drill, carefully make holes in the slate and attach it to the boards.
On the one hand, the height is made smaller so that it is convenient to get the finished compost. The roof is made mandatory, because rain will disrupt the maturation of the mixture.
The bottom is made at will - open or closed. Peat, soil, chopped branches or sawdust, straw can be used as drainage.
Do-it-yourself board composter
A do-it-yourself compost pit from boards is the most common way. First, marking is done and corner posts are installed. Here is one of the options:
- the arrangement of the boards is dense, without air holes - more suitable for cold storage of manure or anaerobic composting;
- with air holes - they can be up to 5 cm wide.
It is better to make a composter mobile - on wheels, so that in the winter it can be hidden in a warm place. When the temperature drops, the bacteria slow down their activity and the maturation of the mixture is disturbed. In the heat, the process continues and by spring the fertilizer will be ready.
If used for composting worms, the most effective species are red Californian worms. They breed quickly and eat a lot, but they cannot tolerate low temperatures. They die in the middle latitudes. Vermicompost is prepared in a warm room with good ventilation. In summer, the box is put outside, and in winter it is cleaned in heat.
Grid compost heap
An economical version of the composter - from a conventional metal mesh. It is fixed on poles or metal pipes dug into the ground. The advantage is that the shoulder is completely open on all sides for air. To speed up the maturation of the compost, it is advisable to add a solution of EM preparations when forming the layers.

Sealed plastic container
Sealed containers are used for anaerobic fermentation of components or grass ensiling. Such composters look presentable and aesthetically pleasing, do not spoil the appearance of the site. Minus - you can not increase the volume, and you will also have to loosen the layers when preparing aerobic compost.

Waste well as a composter
There is a technology in which fecal masses are processed by anaerobic bacteria and become organic fertilizer. But for this, the condition must be observed: do not drain water with detergents and chlorine into the well, since these substances cause the death of microorganisms.


 Constellation Scorpio description")


