Buying a new bathtub means not only placing the accessory in the bathroom, but also connecting and securing it. Today we will tell you how to fix the bathroom with your own hands, following all the rules.
At first glance, installing a new bathtub seems like a very simple process, but there are nuances that, if not followed, can lead to certain problems. For example, if you install the bathtub out of level, the water will not drain into the sewer, and will constantly accumulate at the bottom, if the bathtub is not installed securely, it will stagger, which means that drain failures, loosening gaskets and leaks are possible. To prevent this from happening, the bath must be installed in accordance with all the rules, and today we will learn how to do it together.
We have already considered several ways to install a bathtub in our previous articles, but today we will study the algorithm for fixing bathtubs made of steel, cast iron and acrylic separately.
You should not save on means and materials for fixing bathtubs, because they give the structure rigidity, strength and durability.
How to fix a cast iron bath?
A classic bathtub of great weight, with many positive characteristics and an original appearance. It is necessary to install this slowly and very carefully, because any mistake can lead to breakage or, God forbid, to injury.
Installation of a cast iron bath takes place on legs, a brick base or a metal frame. The most correct solution would be to install a bath on bricks. Thus, you will make a really reliable base under the bathtub, from which the cast-iron bathtub will not go anywhere. You can fix the cast-iron bath with auxiliary elements.
So, the installation itself takes place on brickwork of a standard height, so that a siphon and other necessary equipment can easily fit under the bathroom, and there is also little space to install, for example, a shelf or make a niche for accessories. At the same time, it is worth considering that the bath should not be too high, its height should be equal to ease of use.
During the installation of the bath, you can think about fixing it to the walls on metal corners. This will not cost you a large amount and will not take much time, but will specifically increase the strength of the installation. The place for installing the corners is marked after fitting the bath on bricks, they are fixed to the wall along the perimeter, or on both sides of the bath, on dowels or anchor bolts. Further, the bath is simply installed again on the bricks and receives an emphasis in the form of metal corners.
The enviable strength of the installation and fixing of the bath is already provided, but you can always add rigidity by applying one interesting trick - installing a shield on the facade of the bath or a convenient screen. Thus, you can tie together the bathtub, the frame and the stiffeners, as well as fix the bathtub with high quality and decorate the niche under the bathtub.

How to fix a steel bath?
As a standard, a steel bath is mounted on adhesive legs, bench legs or ordinary legs on bolts that are screwed to the bottom. Just imagine a tub half full of water and add your weight to it. Isn't it scary to install such a bathtub on legs that are attached to glue? We would be afraid, since it is better not only to install the bathtub with high quality, but also to fix the bathtub, than at some point to be with it and all the liquid on the floor.
Naturally, manufacturers will promise high quality and sustainability, but it’s not for nothing that people began to install bathtubs on bricks and metal frames. Agree, this does make some sense.
So, how to install and properly fix a steel bath? Bricks are far from obligatory here, since the bath itself is light in weight, unlike cast iron, which means that a metal frame boiled out of a corner is enough. Having correctly removed the dimensions and made the frame, try on the bath and make an additional frame for the bath from the metal profile. It is very fast and inexpensive, and besides, it will provide excellent stability.
The metal profile frame is mounted to the wall, strictly under the bathroom, strictly according to the markings in order to maintain the correct height and all levels. Further, you can apply the technique described by us earlier, connect this frame with the frame under the screen, and in one fell swoop fix the bathtub for its stability and install the decorative panel on the bathroom facade, closing the niche qualitatively. Also, if there are legs left in the kit, and they take up space in the pantry idle, you can also screw them, but only after installing the bathroom on the frame, choosing the height of the legs already according to the finished design.

How to fix an acrylic bath?
Everyone says that an acrylic bathtub is very light and easy to install. But this is only if the acrylic bath is standard, but if it is oval and one and a half size, or angular, and even with jets for simple hydromassage, then everything is a little more complicated. It seems to us that the size and additional equipment add a little weight, which means that fixing the acrylic bathtub should be more deliberate.
Of course, the set always includes legs or even a frame for installation, depending on the model of the bathtub, the manufacturer and the cost of the accessory. But we would advise installing an acrylic bathtub on bricks or even a podium, so as not to transfer weight only to certain points, which causes deflections and cracks, but to distribute it evenly over the plane. Well, in principle, there will be no problems with this, but they will be with the correct installation by level. Here, everything should be calculated very accurately, since, having installed the bathtub unevenly, you will immediately see a not particularly pleasant gap between the bathtub and the floor, or you will feel discomfort from the fact that water lingers in the bathroom. In general, everything is as usual here, with clear dimensions and compliance with levels.
The work will be more difficult and it will take more time. The complexity will ensure the fragility of the accessory, but if everything is done without haste and wisely, then everything will work out for you. Install the bathtub on bricks, make a frame from an ordinary metal profile, as is the case with a steel bathtub, and fix the bathtub with high quality.
The finished design, especially if it is one, will have enviable rigidity and strength, which means that your bath will remain in place until you decide to replace it.

How to fix a hot tub?
Spa direction baths, jacuzzis, ordinary hot tubs are installed in much the same way as standard ones, but there is one very serious nuance here - if you do something wrong, the product may fly out of warranty, and if it costs decently, then this is highly undesirable . Incorrect installation, incorrect connection, non-compliance with technology - and that's it, you are alone with problems that may not be with a new accessory, but they can happen at any time.
We suggest entrusting the installation and fixing of the spa baths to specialists, preferably the sellers of expensive bathroom accessories themselves, as it will be much more correct.

In addition to installing and fixing the bath, do not forget about other rules - the obligatory observance of levels and dimensions, the correct connection of the water supply and sewerage, and so on.
As you can see, there are no difficulties in this process, but only if you are confident in your own abilities, have certain skills and you have everything you need in your pantry to carry out such a process. If not, then here you have to choose, learn to fix the bath with your own hands, through nerves and mistakes, or pay the masters and get the result.
The bathroom is the face of every home, the appearance of which speaks of the wealth, economy and style of the homeowners. The central place in the bathroom is occupied by a bathtub, which is used for taking hygiene procedures or washing. The choice and installation of a washing container is the most important stage in the repair in this room. To save money on calling a professional craftsman, you can install the tank yourself. In this article, we will tell you how to fix the bath so that it does not swing, but stands steadily.
Bath selection
A bathroom is a large-capacity sanitary container that is used for washing, washing and other household needs. Some time ago, they tried to replace this device with showers, however, they were defeated due to their lesser functionality. Bathtubs are made from such materials to support the weight of water and the person using it, so that it retains heat for a long time, and retains its appearance and tightness when in contact with water.

They produce 3 types of sanitary containers:

Note! In order for the bathtub to stand level and not sway after installation, it is necessary to choose the right size of the container. The length of the bathtub should correspond to the distance between the walls minus 3-5 cm. When deciding which bathtub to choose, give preference to models that are as close as possible to the calculated dimensions so that after installation is completed there are no gaps between it and the walls through which water penetrates. The correct choice of the size of the container will greatly facilitate the fastening of the bath to the wall and floor of the room.
Mounting Features
The question of how to fix the bath so that it does not play or sway worries most homeowners if they do their own bathroom renovation. The process of installing a sanitary wash tank has its own nuances and tricks, but you can cope with this task on your own, taking into account the features of attaching various types of bathtubs:

Important! During the renovation process in the bathroom, the bathtub is installed in place only after finishing the floor with ceramic tiles. To provide access to the floor under the bathroom, the container is lifted and then placed on bricks or wooden blocks.
Installation rules
When purchasing a bath, be sure to pay attention to the mounting system with which it is completed. After purchasing a sanitary container, carefully read the instructions, familiarize yourself with the installation method recommended by the manufacturer for this model.

In most cases, the bathroom installation process is as follows:
- Before fixing the steel bath, it is necessary to prepare the site for installation. If ceramic tiles are used as a finish, then it is necessary to lay the tiles on the floor and walls where the container is located.
- The bath is turned over on its side, and then carefully placed on the floor, since in this position it is much more convenient to connect the drain and overflow pipe.
- Without changing the position of the sanitary container, the floor siphon is connected to plastic pipes using a sealant or sealant.
- The legs are screwed or glued to the bottom of the bathroom, adjusting the supports in height.
- The bath is placed in such a way that the siphon can be connected to the sewer system.
- If necessary, a podium of bricks or other moisture-resistant materials is built under the bottom of the bathroom. They make a frame in order to hide the pipes behind a decorative screen.
- Lastly, you need to hermetically seal the joints between the walls and the sanitary container using a sealant, a moisture-resistant solution or a plastic corner.
After the installation is completed, experienced craftsmen check the quality and reliability of fastening. To do this, the sanitary container is completely filled with water in order to check whether the drain works correctly, does not swing or flow.
Video instruction
- 1 Cast iron, steel and acrylic - what's the difference
- 2 Fixing bathtubs and communications to them
- 3 Wall mounting options
- 4 Large gap from the wall - what to do
- 5 Videos
One of the most important elements in bathrooms is a bath, despite the fact that relatively inexpensive showers are considered more popular today. Many people are interested in how to fix the bathtub to the wall in such a way that water does not flow along the wall under the bathtub, and the bathtub itself does not stagger. For this purpose, special fasteners are used, they can differ markedly, given the difference in types of baths.
Cast iron, steel and acrylic - what's the difference
Cast iron baths. During installation, you will feel that these bathtubs weigh a lot, so they must be installed on a solid and stable base.
Steel baths are fixed on a podium, the walls of which are made of bricks. A bathtub installed inside the podium will never sway and will become very solid on its base. However, if you fix the bath in this way, then noise during its filling with water cannot be avoided.
You can reduce the sound during the filling of the bath by treating its outer part with mounting foam or putty. Then the sound of water will not be heard, in addition, the heat will remain in the bath longer.
Those who install an acrylic bathtub know that it retains heat much better than its cast iron counterparts, plus its non-slip surface. Acrylic bathtubs are also known for their pleasant appearance, although, however, the degree of its strength is not so high. Given that an acrylic bathtub has a flexible bottom, a metal frame should be made for such a bathtub, otherwise the bottom of the bathtub will sag under the weight of a person. It is also necessary to use special legs, which are part of the frame for bathtubs made of acrylic and steel.
Fixing bathtubs and communications to them
Regardless of which bath will be installed, you need to learn a few basic principles that will help you install the bath correctly:
- Drain pipes are more convenient to fix when the bath is on its side. Turn it on its side carefully, otherwise there is a risk of damaging the coating of the bath. After that, overflow and drain pipes are mounted to it.
- The next step is to connect the siphon with pipes (usually plastic and flexible).
- Legs are attached to the bath in its supine position, and it is installed on them so that it is easy to connect the siphon pipes to the sewer.
- The bathtub is placed on its legs only after the installation of the drain.
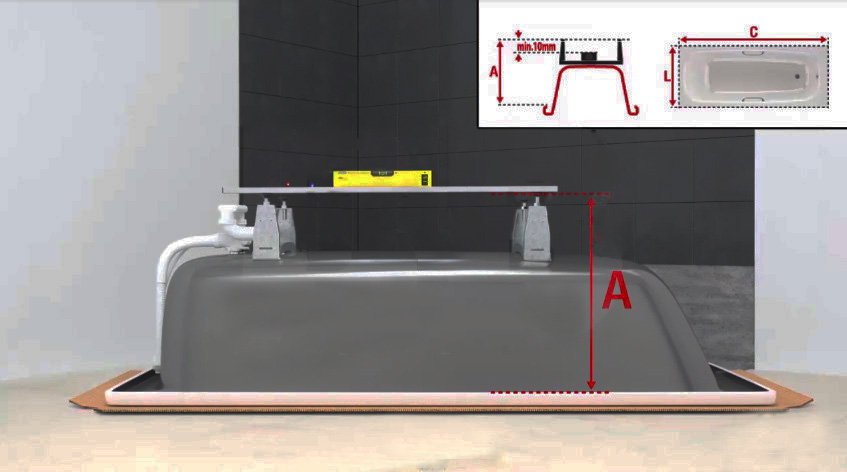
- Once in place, the bathtub is leveled horizontally using a spirit level (to do this, adjust the height of the legs).
- After the installation of the drain system is completed, it must be checked for leaks. To do this, put water into the bath, and then check if it has leaked onto the floor. If there is a leak, the shortcomings must be eliminated - seal the seams with silicone or simply fit the pipes more tightly at the joints.
- Then, if necessary, a drywall frame or a special podium made of foam blocks is arranged, which will hide the bottom of the bath.
How to install bathtubs from different materials? Now let's analyze this in detail.
Cast iron bathtubs are often installed on four legs. These legs are connected to the body with the included wedges, or the tub legs can be bolted on. If a cast iron bath needs to be installed on an insufficiently strong loose surface, then metal plates should be used, which are placed under the legs and allow you to properly distribute the weight of the bath over the surface of the base.
The diameter of such a lining must be at least 5 cm, and the thickness must be 5 mm or more.
Steel tubs don't weigh as much as cast iron tubs, so it's a little more difficult to stabilize them. It is better to install them on bricks to increase the area of \u200b\u200bsupport. The acrylic bathtub is attached exclusively to the wall, otherwise a slight backlash or wobble cannot be avoided. In addition to the fact that a frame is being assembled, with the help of which the whole structure will be somewhat strengthened. In the video below you can see how the acrylic bathtub frame is mounted in the bathroom:
Wall mounting options
There are several ways to secure a bathtub to a wall.
Insert into a niche. If the installation of the bathtub is carried out in a bathroom where there is not even a rough finish yet, then a niche can be omitted if, given the size, this is not necessary. The bath is simply installed, the walls are plastered, they are finished and the joint is treated with sealant so that it does not run along the wall. If you are going to install a bath in this way in a bathroom where there is already a rough wall finish, you need to purchase a bath of the appropriate size and prepare a niche in the wall for it. The diagram shows how to properly install the bath in this way.
In principle, the first method is also possible, but it is not as reliable as installation if the tile is already lying. In this case, the bathtub is attached to the wall only due to sealant and decorative plinth.
Installation on a metal corner. Cast iron and steel bathtubs can be installed on a metal corner, it is attached along all walls, and the sides of the bathtub are installed on it. Further, if desired, a plinth is installed, the joints are treated with sanitary sealant. Why can't you attach an acrylic bathtub to the corner? Because the side can be deformed, since it is not supported by anything from the inside, as a result, the sealant will move away from the wall, and water will seep onto the floor.
Mounting on hooks or brackets. This is the best way to fix acrylic bathtubs. To install an acrylic bathtub on hooks or brackets, you need to install the bathtub in place, leveling it. Stepping back 20 cm from its corners, make marks. Then the bath is moved aside, the thickness of its sides is measured, this distance is measured down from the marks on the wall and holes are made for one or two dowels. Install fasteners. Then the bath is simply mounted on hooks or brackets with sides. Everything - the bath is rigidly fixed. A plastic or ceramic plinth is glued on top of the seam, the joint is treated with a sealant.
Large gap from the wall - what to do
It often happens that after the bath is already installed, a decent distance remains between it and the wall. Since the bath in this case does not touch three walls, it will stagger. In order to fix it rigidly, it is necessary to create a frame that can be used simultaneously as a shelf for shampoos and various jars.
What will be needed? First of all, a frame is assembled using metal profiles. Then it is sheathed with drywall. For this purpose, a special moisture-resistant drywall is used. Be sure to make a niche with a door so that you can get to the plumbing system.
Alternatively, instead of a frame, you can attach a bar to the wall so that its top is slightly higher than the level of the bath. A shelf is made on the bar, which will lie on the bath. At the same time, it should have a slight slope towards the bath so that water does not accumulate.
This video shows how to use the special fixings for mounting acrylic bathtubs:
In this article, we will look at how to fix a cast iron and acrylic bathtub to walls and floors.
When performing work on repairing a bathroom and replacing plumbing, apartment owners face a rather difficult question of installing and fixing a bathtub. Of course, the product package most often includes a mounting kit, but its quality and reliability are far from ideal.
The choice of fasteners must be approached with all responsibility - they must correspond to the material used in the manufacture of the bath. The most popular are steel, acrylic and cast iron bathtubs, for each of which appropriate fastening systems are used, as well as various methods of fastening.
The concept of a standard height for installing a bathtub simply does not exist. The installation height of models from various manufacturers can vary between 0.5-0.6 m. This indicator is determined by the height of the legs, but in some cases this is not a dogma. Standard fasteners often do not ensure the reliability of the installation of the bath, which makes it necessary to abandon the use of legs altogether, replacing them with a brick or other podium.
Fixing the bathtub depending on the material
Bathroom material is the main criterion that influences the choice of fixing method and the type of fasteners used. Bathrooms of these types are usually fixed as follows:
- Cast iron bathtubs themselves are considered quite stable due to their impressive mass, so they can be installed anywhere in the room. Usually installation is carried out on standard legs, securely fixed to the body. In this case, the supports can be fixed both with the help of steel wedges and with the help of bolt fasteners. Additionally, you can fix the cast-iron bath thanks to the construction of a brick base, as well as metal corners screwed to the wall.
- Steel baths must have several points of support, so they must be installed against the wall. Standard legs do not provide structural reliability, so a brick podium, polyurethane foam, a metal profile or a wall tie-in will help increase stability.
- When fastening acrylic bath it is important to ensure uniform distribution of the load, otherwise, in case of overload, the bath may simply crack. It is best to install the bath on a podium or bricks; fastening with brick or metal frames will also be effective.
Mounting foam
Mounting foam is the easiest and most affordable way to attach a bathtub to the floor and walls at the same time. After adjusting the height and level with the help of legs or a brick frame, the bathtub connected to the drain should be installed in such a way that there is a gap of at least 0.75-1.5 cm along the wall. After that, the container must be filled with water and the gaps between legs and floor, as well as between the body of the bathtub and the walls.
It should be noted that the mounting foam expands significantly, so the main thing is not to overdo it so that the structure does not change its position. The curing time of the foam is 12-36 hours, however, finishing work can be started after 6 hours.
Fastening with a brick frame
This method is best suited when the product does not include legs, but it can also be used to increase the reliability of the structure. It should be noted that brickwork can be used both along the bath and across.
When laying transversely, the bath is installed directly on the brick; in this case, additional fastening to the walls using a metal corner should be provided. To do this, a steel or aluminum corner should be attached to the wall with dowels so that the edges of the bath receive an additional point of support.
Longitudinal brickwork suggests the creation of a kind of trough, in which the bath is installed. The cavity between the walls of the trough and the bathtub should be filled with mounting foam - this will increase the stability of the product against tipping over.
If you continue laying the front wall, you can completely hide the bath, preparing it for tiling with ceramic tiles. In this case, before starting work, you should use a plumb line to mark the bottom row of masonry so that it is 1.5-2 cm recessed below the edge of the bath - this distance is necessary for laying the tiles “flush”. It should be noted that the last row of bricks will not fit entirely, so it will have to be cut in half with a grinder and a diamond wheel.
When performing work to hide the bath using the front brick wall, it is necessary to provide for an inspection hole that provides access to the siphon. Later, this hole can be closed with a piece of moisture-resistant drywall or a special plastic door can be installed.
If it is necessary to clad the walls of the bathroom with ceramic tiles, then the front wall can not be laid out of brick, but ready-made screens can be used. Sufficient rigidity of the installation will be achieved due to the fact that the end and wall lapels of the bath are securely fixed by the tile resting on them.
Fastening with a metal frame
This method is most often used when fixing acrylic bathtubs. As a rule, steel frames are included in the kit, but such an accessory can be purchased separately. The mounting strips are attached to the bottom with self-tapping screws, this is done in certain places that have thickenings. Next, the legs are bolted to the guides.
After that, the bath should be put in place and mark the places where the sides touch the wall - here you should install the fastening strips. In this case, it is recommended to leave a vertical gap between the bar and the side of 2-4 mm, which will disappear when the bathtub is filled with water. It should be noted that the mounting plate does not increase the strength of the side, but only prevents the possibility of tipping over.
Niche recessed bathtub
In small apartments, it often happens that the bath simply does not fit into the room. On the one hand, this can be considered a real problem due to the significant complication of installation work, but the fastening of such a product is the most rigid and durable.
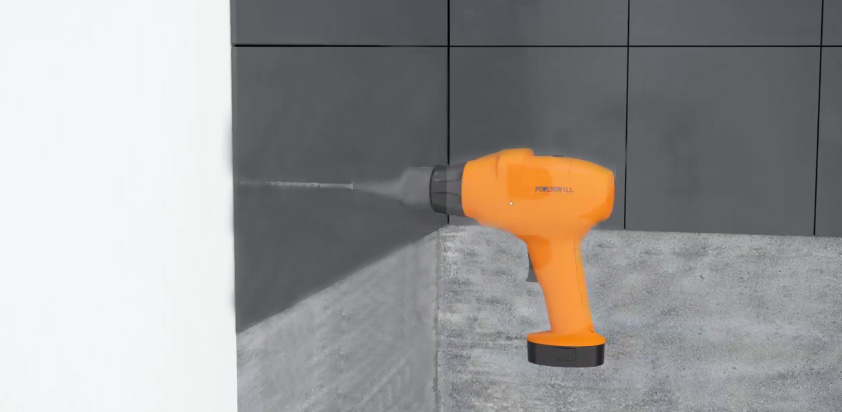
To install and fix the bath, you will need to cut a groove in one or both opposite walls using a puncher or a grinder with a diamond disc. Insert the bathtub lapels into this groove. With this method, maximum rigidity is achieved due to the complete absence of backlash.
If the legs are weak enough, then you can additionally install a transverse wooden or metal profile, on which the bath lapels will rest.
findings
Summing up, we can say for sure that the most durable and reliable fastening of the bath to the floor is installation on a brick frame. In addition, a metal corner or a wooden beam screwed to the wall, on which the bathtub lapels will rest, will help prevent the possibility of tipping over. Thus, the combined fastening of the bathtub simultaneously to the walls and the floor is considered the most reliable.
Ceramic tiles are the best flooring solution for bathrooms. It has many undoubted advantages and advantages, which allows you to install plumbing equipment of various types and sizes on it. Bathtubs are considered one of the most complex and demanding accessories. The technology for fixing a bathtub on legs depends on the characteristics of the floor in the room.
Before starting direct work, you should briefly familiarize yourself with the differences in flooring.
| Type of tiled floor | Description of technical characteristics |
|---|---|
| The most durable coatings that can withstand significant forces. Only on such floors is it recommended to install heavy cast-iron or stone bathtubs. The tile is laid on a leveling cement-sand screed on concrete, there is no insulation layer. If various heaters were used to reduce thermal conductivity, then it is not recommended to mount heavy containers. |
| Ceramic tiles are installed on sheets of plywood or OSB. Wooden beams are used as load-bearing elements. Such a base does not have high rates of physical strength; it is not recommended to install heavy bathtubs on them. The fact is that wooden structures change linear dimensions due to fluctuations in relative humidity. As a result of such movements, the degree of adhesion of tiles and glue is significantly reduced. Loads from the legs of the bathtub speed up this process and increase the risk of tile delamination. |
| In terms of strength, they occupy an average position. The thickness and strength of the screed over the heating system cannot guarantee the integrity of the coating; chiseled loads from the legs of the bath can cause critical damage to the coating. |


Be sure to consider the features and specifications of the floors before buying a bath.
General tips for fixing a clawfoot bathtub on a tiled floor
Each type of device has its own characteristics, we will talk about them below. But for all there are general requirements, compliance with which is a prerequisite for proper installation.
The quality of the flooring. Before installing the bath with a long level, check the levelness of the floor. Despite the fact that all the legs have their own adjustments, they cannot level out large irregularities. In addition, if the legs have a large variation in height, then this significantly worsens the appearance of the room, especially if the bathtub is freestanding.

Another important point. After you have decided on a specific location for the bath, make sure that the tiles under the legs are laid according to the technology. To do this, tap the ceramic tile with any hard object, the presence of a drum sound indicates the absence of glue under it. Such tiles are likely to crack, before installation, special measures must be taken to increase the bearing performance of the coating.

Make sure the legs are strong. In many cases, they are not designed for constant loads, but should be used as additional elements during the exposure of the bath and its installation on more reliable stops.

Assemble the legs in strict accordance with the manufacturer's recommendations. If there is a desire to make changes to the design, then this must be done correctly, otherwise the stability of the bath will deteriorate.

We will look at detailed instructions for installing a bathtub on legs for several cases: the legs are used as the main stop, the legs are used as an additional stop, the bathtub is freestanding or mounted in the corner of the room. Each type of work has its own characteristics of fastening, pay attention to them.
Tarkett floor tiles prices
tarkett floor tiles
How to fix a bathtub on a tiled floor on legs with an adhesive backing
Read the attached instructions, make sure that all items are complete and in good condition. Check the condition of the flooring using one of the methods described above. This type of bath can be mounted on both concrete and wooden supporting structures.
Step 1. Tip the bathtub upside down, making sure that the distance to the drain hole will ensure a good connection to the sewer pipe.

Practical advice. In order not to damage the tiles on the floor and the coating of the bath, put cardboard or wooden spacers between them. Installation work is much easier and faster to do with an assistant.

Step 2 Degrease the bottom of the bathtub at the locations of the double-sided tape. It is better to degrease with special solvents, if they are not available, then it is allowed to use alcohol or vodka. After vodka, the surfaces must be thoroughly dried. Places for gluing adhesive tape are marked on the bottom of the tub.

Step 3 Remove the protective oiled paper from the tape on the legs. Place them carefully along the lines and press firmly. Do not rush, work with utmost care. If you make a mistake, then tearing off the legs will be problematic. In addition, the adhesive surface will significantly degrade its original properties, fixing will be unreliable. You will have to change double-sided tape, and it is quite difficult to find high-quality in stores, and you will have to lose a lot of time searching.


Step 4 Tighten the adjusting bolts on the legs until they stop and check their location with a level. They should lie in the same horizontal plane, if this is not the case, then readjust them.

Step 5 Assemble and install a siphon on the bath, the specific work algorithm depends on the design features of the equipment.
Step 6 Measure the distance from the legs to the sides, it is necessary to mark the location of the side stops of the bath.

We have already mentioned that light steel and acrylic baths cannot be fixed to the floor only on legs. This is due to the fact that such structures are very unstable, during use they can tip over or slide on smooth ceramic tiles. It is possible to specifically fix the legs to the floor with anchors only in some cases for bathtubs installed in the middle of the rooms. And then such work is not recommended for two reasons: you need a lot of practical experience in installing bathtubs and you have to drill holes in the tiles.
If it becomes necessary to replace or move the bath to another place, the drilled tiles must be changed. This is quite difficult for two reasons. Firstly, most often you will not be able to buy exactly the same replacement tiles, there will be traces of replacement on the floor. Secondly, it is difficult to dismantle well-laid tiles from the base, there are high risks of damage to nearby ones.
Step 7 On the walls of the room under the level, draw lines at the height of the sides. Make sure all corners are at 90°.

Step 8 Temporarily put the bath in place and mark the fixing points for the side stops. Move the tub aside and drill holes for the dowels.


Step 9 Apply a layer of silicone sealant along the drawn lines, install the bathtub on hangers. The thickness of the sealant must be such that all the irregularities of the tile are covered. Squeezed out excess material should be leveled and removed.


Step 10 Finally align the legs and attach them to the floor. If it is made of wood, then it is enough to tighten the screws. If the floor is made of ceramic tiles, then for fixing it is necessary to pre-drill holes for the dowels and, after installing the bathtub, drive the dowel-nails into the plastic parts.

Step 11 Check the tightness of the siphon connection. This can be done under pressure using special equipment or by gravity. Fill the bathroom before the overflow of water begins, place sheets of paper under all piping connections. Open the valve and wait for the water to drain completely. Remove the paper, if there were minor leaks, then wet spots will appear on it. If problems are found, they must be corrected immediately.

The final step is the installation of a decorative screen. It can be made from masonry materials or shields, tiled with ceramic tiles or plastic panels can be used.


How to fix a wobbly bathtub
We have already mentioned that the legs are not recommended to be used as the main stop. They create significant point loads on the tiles, the surfaces of thin-walled acrylic bathtubs sag, etc. There is another significant problem with such stops. In the case of long-term operation and heavy loads, the threaded connections of the legs gradually loosen, over time, the fluctuations become critical and can cause leaks at the junction of the siphon with sewer pipes. In addition, the sealing of the joints of the bathtub with the walls is constantly violated, water penetrates into the cracks with all the negative further consequences.
What to do if you have just such a situation, the bathroom began to stagger on the tiled floor? There is a way to fix the problem without dismantling the bath and without damaging the ceramic tiles.
If there is a decorative screen, then it should be dismantled. The removal process depends on the materials of manufacture, the most difficult with masonry materials. You will have to completely break the structure. During work, make every effort to preserve the floor and materials, with proper skill, they will all be recyclable.
To perform the work, you will need a car jack, bricks or aerated concrete blocks, ceramic tile adhesive or a cement-sand mixture, a trowel, a mortar container, an electric drill with a mixing nozzle.
Step 1. Unscrew the nut that connects the siphon pipe to the drain hole of the bath. Remove the hose from the sewer pipe.
Step 2 Using a jack, raise the container 5-8 cm above the set level. In order not to damage the bathtub, place a wooden chock or any small piece of board between the jack and the bottom.

Important. Do not rush to immediately raise the bath, first find the balance point. If the container tilts to one side or the other during lifting, lower the bath and change the position of the wooden lining and the jack.
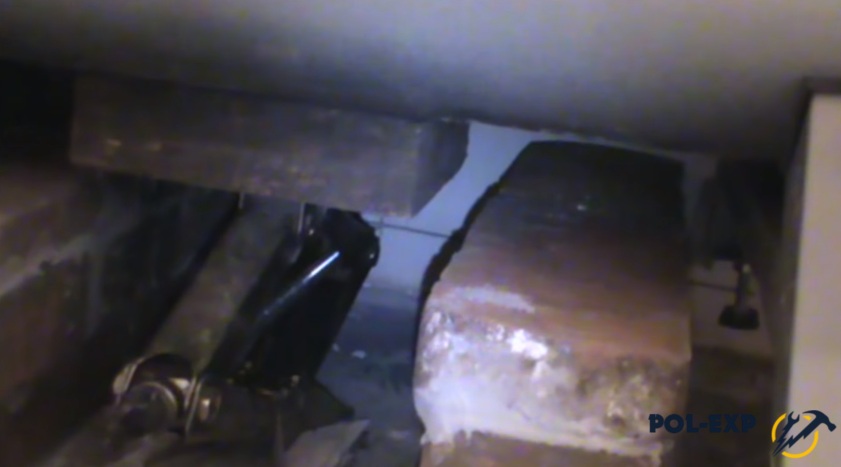
Step 3 Lay two rows of bricks around the edges of the tub. Select the height of the masonry so that there is a gap of about 1 cm between the surface of the bricks and the bottom of the bath.
Step 4 Coat the top surfaces of the bricks with tile adhesive or cement-sand mortar and slowly lower the tub onto it. Make sure that the container lies on the mortar with a maximum area and evenly. Check its position with a level, if deviations from horizontal are found, correct the problems.
After the glue or mortar has completely hardened, connect the siphon drain pipe to the sewer. This method of attaching bathtubs on legs is considered universal; it is not necessary to make stationary stops around the perimeter. For a guarantee, you can tighten the adjusting bolts of the legs until it stops with ceramic tiles.
Practical advice. If the bathtub has a decorative screen, then it is recommended to smear the floor under the legs with tile adhesive. The glue adheres tightly to the tile and forms a recess under the legs, which eliminates the spontaneous movement of the bathtub on the slippery floor.
Next, proceed to seal the gaps between the wall and the bathroom. If they are large, then they must first be laid with any suitable building materials. Small gaps are covered with silicone sealant. Use antibacterial compounds, black mold does not appear on their surfaces.


Practical tips for fixing a clawfoot bathtub to a tiled floor
After securely attaching the bathtub with legs to the tiled floor, repair work and dismantling of plumbing equipment become much more difficult. In order not to create problems for yourself while using the bathroom, do not rush to start work, carefully study the recommendations of professional plumbers. What should you pay more attention to?
Stack of water. It depends not only on the parameters of the siphon, as many inexperienced builders think. The main condition of the stack is that all curved siphon tubes and the drain in the bath must be located above the level of the sewer pipe. The greater the elevation difference, the faster the water will leave. The rapid flow of liquid automatically cleans the pipelines, as a result, it will be necessary to do preventive inspections and repairs much less frequently. Raise the adjustable feet as far as possible before fixing the bathtub. At the same time, make sure that the comfort of use does not deteriorate, the distance of the sides to the floor should be in optimal values and not impede the use of the bathroom.

If possible replace the corrugated flexible siphon connection hoses with smooth plastic pipes.

It is much easier to work with flexible hoses, there is no need to strictly observe the dimensions, they can always be bent into the desired position. These are the undoubted advantages of such elements. But they also have a significant drawback. Dirt quickly accumulates in the folds of the corrugation, it will not be possible to remove it from there by simple washing, you will have to disassemble the siphon.

Frequent disassembly of the siphon can cause damage not only to rubber seals, but also to threaded connections. As a result, serious damage occurs that requires a complete replacement of the device. It is extremely difficult to perform these works on a bathtub firmly attached to a ceramic floor. It is necessary not only to lie down under the bath, but also to carry out all work with extreme caution in conditions of limited visibility and accessibility.
Practical advice. To increase the reliability of using the bathroom, it is recommended to buy siphons without a separate sump. It brings more trouble than good. Buy those types of siphons in which the ordinary bend of the tube performs the function of a sump. Such a device does not allow unpleasant odors to enter the room, is much less likely to become clogged and, if necessary, is simply cleaned. It is not necessary to disassemble the siphon, it is enough to clean the pipe with an ordinary rubber plunger.

Try to buy baths from imported manufacturers. Domestic, unfortunately, are often of poor quality. This applies not only to enamel, but also to geometry. Check the corners of the sides with a long square; in domestic products they are rarely straight. An error of only a few tenths of a degree turns into a few millimeters over a long length of the bath. Due to this, a wedge-shaped gap is formed between the side and a perfectly flat wall. It is not recommended to close it with a silicone sealant, errors become too visible. You have to use special plastic or ceramic skirting boards for bathtubs, and they should only be mounted on fixed surfaces. At the slightest fluctuation, the corners come off; it is useless to re-glue them without securely fixing the bathtub.


Keep in mind that all repairs in the operated premises are much more difficult and expensive than taking timely measures to prevent problems during operation.
To increase the area of support of the legs against ceramic tiles, various durable linings can be used. But this mounting option is only suitable for those baths that have decorative screens. It is much more reliable to lay tiles for outdoor work, it has increased indicators of physical strength.
Be very careful when attaching the legs of freestanding bathtubs. The best option for such devices is installation on floors with concrete bases and thick, extra-strong tiles. If there is a possibility of the container shifting horizontally during use, then the legs can be fixed to the floor with small anchors. But remember that manufacturers do not provide for this possibility, the lower parts of the legs will have to be redone a little, and additional nuts should be used to adjust the height and horizontal. These works are very complex, it is better to use the services of professional plumbers. If possible, buy free-standing bathtubs without legs, such models rest against the floor with the entire surface of the bottom.

When marking holes in ceramic floor tiles, make sure that the holes are not located at or close to the joints of the tiles. In these places, the risks of cracking during drilling of holes increase significantly. Pay attention to the position of all four legs, not just the visible ones. During installation, it is always possible to move the container a few centimeters in any direction and select the desired position of the lower elements of the legs.

remember, that the adhesion of tile adhesive to the front surfaces is much lower than to the working ones. Before additional fixation of the position of the legs on the surface of the tile with glue, they should be thoroughly cleaned of dirt, dust and grease. If the fasteners are not visible, then it is recommended to remove the glaze from the surface in several places, this can be done with a grinder with a diamond disk or with sharp blows of a chisel. Never rush, cracked tiles will create big problems.
Very heavy bathtubs are much more appropriate to install on a concrete base, and only then lay ceramic tiles on the floor. The only possible problem with this technology is the difficulty in replacing an old bath model with a new one. But do not despair, no one in the world has yet been able to provide optimal solutions for all occasions.

And the last tip. Modern bathroom equipment often has live parts. To prevent accidents steel and cast iron baths must be grounded. If the house has a three-wire wiring - great. If the wiring is old, then proper grounding cannot be done.

Important. Never use metal pipes as grounding, this is strictly prohibited by the PUE.

We talked about the main methods for attaching bath legs to ceramic tiles. If you follow professional recommendations during use, no problems will arise.
Video - Installing a bathtub on legs


