The bedroom is a place of rest, stress relief and relaxation. Therefore, we should try to make the decor of this room cozy, so that the time spent in it brings us pleasure. The canopy bed plays a leading role in the interior. It's hard to believe, but it will be an original find in interior design in many styles.
In what cases it would be a good idea to buy a canopy for an adult bed, how to arrange this element of decor and how you can do it yourself - we will talk about this below.
Advantages and disadvantages of a canopy over the bed
The canopy has its supporters and opponents. The latter, as a rule, simply underestimate its benefits.
Let's take a closer look at their arguments.
Advantages:
- this bed looks unusual;
- knowing a few simple rules, the canopy can be adapted to any interior;
- a canopy over the bed, especially in summer, is ideal as mosquito nets that protect against insects;
- in the morning he refracts the rays of the sun passing through him, which turn from scorching into caressing;
- in the evening, a veil, tulle and organza falling from above will help create a romantic atmosphere that stimulates the senses;
- many people have problems falling asleep, a canopy over the bed in such situations helps to define the sleeping area and gives us a feeling of intimacy and comfort in the bedroom;
- Delicate fabric above the bed will create a place where you can forget about the stresses of everyday life.
disadvantages
- It should be remembered that this decor loves space. In a small, cramped room, a four-poster bed will dominate, reducing the feeling of space.
- It should also be remembered that the canopy, regardless of the material used, collects dust, so it must be vacuumed and washed frequently. It is especially important to keep it clean for people who are allergic to dust mites.

Combined with wooden elements, small baubles and soft, light fabrics, this décor adds warmth and intimacy and makes falling asleep easier. The main thing is not to forget to wash it and remove dust during it.

Canopy for an adult bed - photos of different styles and types
So, we decided on this unusual decor in our bedroom! The canopy above the adult bed reminds us of a palace chamber, but today it can also be made in a retro style. There are ideas in which it will perfectly fit into the interior of a bedroom in a modern style, with an oriental atmosphere or with a romantic climate. Below are a few options on how to use and play with this theme in your own home.
A bed or canopy holder for an adult bed can be bought today in many furniture companies. On sale you can find various models in different styles.
The most classic choice would be a wooden frame, with carved decorations on the pillars. The material that should be selected for them should be thick enough, with a slight sheen and ornament. Falling floors of fabric can be tied at the corners of the bed, like a curtain drapery.
In a romantic setting, we focus on a canopy made of delicate tulle and light, light-colored organza. The holder can be made of wood or forged metal with elegant shapes. You can also use rustic lace to add accents. Thanks to them, the interior will become warm and cozy.
The holder itself can then be presented in the form of a circle attached to the ceiling, such a design is sufficient to withstand a small light veil.
Modern style loves simplicity, so a steel frame bed with an ascetic canopy is a good idea. Fine linen fabric is ideal, which emphasizes its raw character. These simple options are also ideal for smaller interiors, as they won't overwhelm them or reduce the space visually.


Modern and minimalist interiors in Scandinavian style are not associated with metal and glitter, it is an atmosphere with natural accents. A Scandinavian-style bed should be made of wood, like a canopy frame. We choose delicate fabrics for this style - thin, white veils, linen and cotton in pastel colors.
An oriental and bohemian style bedroom with oriental accents will take on an amazing look with fabrics with Indian patterns or hand-dyed fabrics. If we cannot find such materials, we can opt for white cotton, which also offers us interesting possibilities.
A canopy over a bed with hints of oriental or bohemian should please us with richness of design, bright colors and shimmering golden threads of shiny organza. A red, purple, orange or gold dome creates a mysterious and dreamlike atmosphere.
Colonial-style furniture is made from local or exotic woods. The frame of the canopy can resemble bamboo or thin tree trunks, and natural fabrics of light colors will become its decoration.


The recipe for decorating a colonial bedroom is motifs inspired by nature. Neutral fabrics paired with satin sheets will create a tropical climate like Out of Africa, The Secret Garden or Gone with the Wind.


The French atmosphere is reminiscent of oval, elliptical shaped beds full of decorations. Their carved or forged frames should be set off with thin, delicate fabrics that will let in a stream of fresh air from the window.

In an English-style room, as a rule, there are checkered or floral patterns, creating an aura of romance and artlessness.

In a fashionable shabby chic style, ethereal organza with delicate lace will play, which will help create a romantic atmosphere. You can look in the closet of grandmothers for fabrics for a canopy from already unused lace curtains. They will create a fantastic effect! The veil can only be thrown over the bed frame and draped gently.

How to make a canopy over the bed with your own hands?
If we do not have a goal in the nearest future to buy a new bed with a canopy frame, we can still fulfill our dream of this decorative element. Instead of a large structure, you can use a metal or wooden frame attached to the ceiling above the bed and wrapped in fabric in a decorative manner. For a decorative form, as a fastener for a canopy on an adult bed, you can also use a flexible string attached to the headboard.

Such a dome will not surround the entire surface of the mattress, but will also be presented imposingly, adding a cozy climate to the interior and warming the atmosphere a little. This is the perfect way to make significant changes to your décor without spending a lot of money.


Such a do-it-yourself canopy on an adult bed can be hung on rods suspended above the bed, which must be attached to the ceiling. In ethno style - it can be bamboo, in oriental style - forged rods.
In order to make such a canopy with your own hands, you will need:
- 2 brackets that are installed on the ceiling;
- 2 rods, the length of which must be adjusted to the width of the bed;
- 2 hooks with pins and screws adapted to the type of ceiling in your bedroom;
- piece of fabric.

It can also be used as a holder for a regular or flexible curtain rod for wall or ceiling mounting.

The main thing is to accurately mark the attachment points of the canopy. The easiest way to determine their position is to determine the long axis of the bed and take all measurements relative to that axis. The canopy should hang symmetrically about the longitudinal axis of the bed. It can also be narrower than a mattress and slightly shorter than a bed. This decor will look easier.
Another variation on the same idea is for the fabric to fall behind the bed along the wall to form a headrest. In this case, it is better to fix the rod on the wall, and not on the ceiling.

Another solution that will bring us closer to the feeling of sleeping under a royal canopy is a mosquito net. Ready-made kits can be purchased for a small price. This is usually tulle and a plastic hoop, which is attached to a hook in the ceiling. The material surrounds the entire bed.
In addition to the decorative effect, in summer this design protects us from insects, and in winter it adds a feeling of warmth. We can experiment with it, creating interesting fabric compositions. Undoubtedly, it will be an interesting and original element of interior design, which in the warm season will effectively protect our sleep from attacks of nasty mosquitoes and mosquitoes.
A four-poster bed in the bedroom gives a cozy feeling. Such a canopy with complex fabrics can change the style of the entire interior. It is important to choose the right not only the frame, but also the fabric. For example, thin tulle would be a good choice for a small bedroom because it doesn't overwhelm the space.
When it comes to style, white tulle will look good in both modern and romantic interiors. A modern bedroom will look beautiful with a canopy made of fine linen woven fabric. These fabric-decorated beds are associated with castles, the charm of ancient times, exotic countries, they bring a little romantic character to the bedroom.


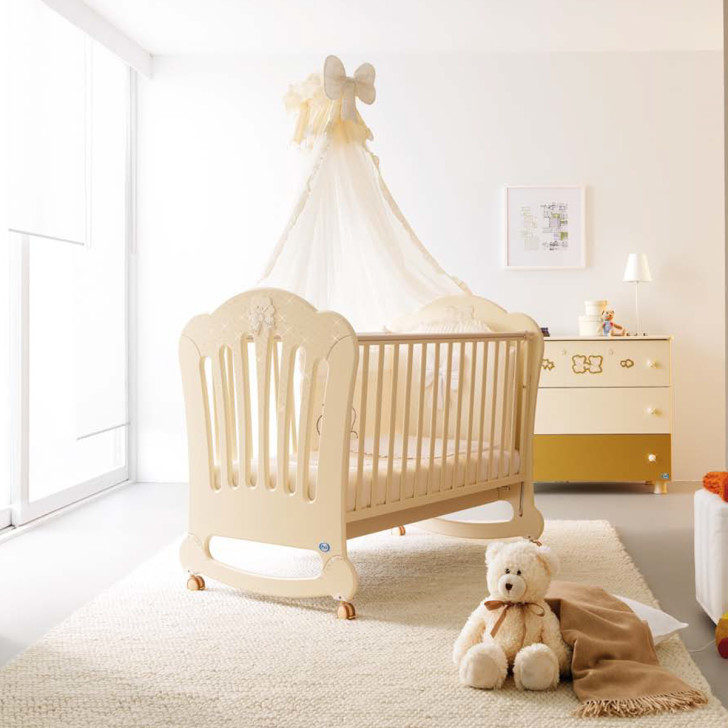
The four-poster bed is reminiscent of romantic bedrooms from the Tale of 1001 Nights and rooms from the Baroque era or the bedchamber of a native of Versailles. Today, such a canopy fits into any interior, from luxurious mansions to modern and minimalist decor. The decorative dome reduces the high ceiling in the bedroom, separates the bed from the large space and gives the interior a more welcoming atmosphere. Choosing the right fabric and fixing system will help to adapt this decor to any interior style.
The first news about the addition of the family causes stormy emotions in young parents. A little later, after the mothers get used to their new position, they begin to think about buying children's things and accessories, choose “transport” and a crib. Of course, do not bypass their attention and children's bed linen, canopy.
The canopy for the crib is not only an original element of the interior, but also the protection of the baby from the sun's rays and the views of strangers, if they appear in the house
Many future mothers opt for ready-made factory products, and some needlewomen prefer to sew curtains for a crib for newborns on their own. Considering that tailoring does not require great knowledge and skills, every mom can devote a little time to this activity.
What is the purpose of this accessory?
Why do you need a canopy for a baby's crib (see also:)? This device not only looks beautiful, but also performs the function of protection against insects, protects the baby's sleep from drafts, bright lighting and extraneous noise. The canopy above the bed creates comfort in the room, a sense of protection from the outside world, and allows the baby to rest calmly and fully.
The canopy over the bed is a beautiful, original and practical accessory in the children's room. Having understood the basics of sewing this simple thing, having familiarized yourself with our master classes, you can step by step make a canopy for your baby with your own hands or please your friends with such an original “hand made” gift.
Such curtains over the children's bed are multifunctional and practical, in addition, they can be used to add originality to the interior of the room, stylize it as a castle for a princess or a ship for a pirate.
A set of necessary materials
A crib, decorated with a hand-made canopy, will undoubtedly be the pride of any mother-needlewoman. To bring the idea to life, it is enough to show a creative approach and be patient.
First of all, choose the type of fabric. Give preference to natural materials that will provide good air ventilation. The use of chiffon, organza or tulle is also acceptable. A denser chintz will help make the nursery cozier, and the light shade it creates in the crib will allow the baby to sleep soundly and calmly.
 When choosing a fabric, you need to focus on natural options - for example, chintz. It is quite dense, therefore it will create a steady shadow in the crib, it will become a reliable protection against insects. Artificial fabrics look beautiful, but they are not breathable
 To sew a convenient accessory of standard sizes yourself, you will need 2.5–3 m of fabric 1.5 m wide. In addition, in order for the accessory to be made with high quality and securely fastened, you must purchase in advance:
- Frame or hoop of large diameter. These items are sold in all children's goods and sewing accessories stores.
- A frill for edging the edges of an already sewn product. Only 5.5-6 m, choose the width to your liking, an average of 6-7 cm.
- To fix the top of the canopy over the bed, you need 3.5 m of strong tape. If you plan to make a decoration in the form of a bow, you need to purchase 4 meters of ribbon. Depending on your preferences, you can use butterflies, flowers, ruffles or other decor for decoration. All decorations can be found in any craft store.
Workshops and sewing scheme
So, if we sew a canopy for a crib, then at the beginning of sewing we need to cut out all the necessary parts. Numerous examples of patterns and photos of patterns are presented on the Internet, or they can be searched in periodicals on cutting and sewing. Having the skills of sewing and cutting, you can cut the canopy for the bed yourself according to your own project. When the cutting stage is over, a frill should be sewn along the lower and side cuts. If the edges of the tape are not finished, be sure to overstitch them with an overlock or zigzag stitch.

 Decorative ribbons can be not only functional, but also beautiful. Their use will help to give the product its own zest, make it unusual and author's
Pay attention to the junction of the edges of fabrics and frills, do not forget to process them too. Then proceed to sewing on the decorative ribbon. It is worth attaching it, retreating from the edges of about 5 cm, so that the elements of the frame can be easily threaded between the seams.
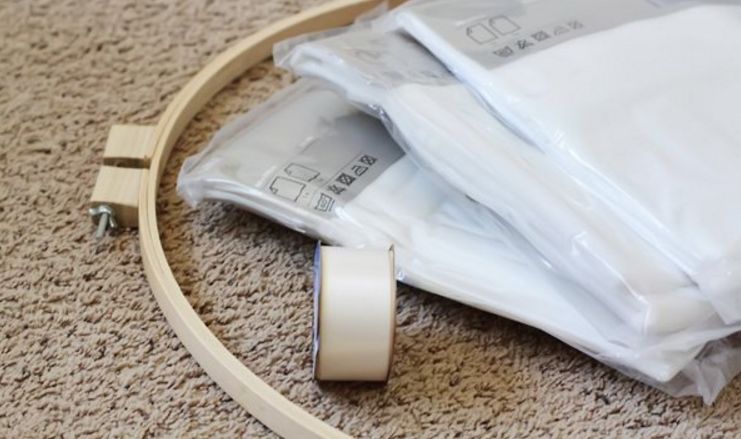
We know how precious every free minute is for a young mother, so for our master classes we will use ready-made curtains that we bought at IKEA. It is affordable, and most importantly - very quickly and without unnecessary troubles!
Lush canopy awning in 10 minutes
So what we need:
- 3 pairs of curtains. We used three packages of IKEA LILL, the size of 1 curtain is 280 x 300 cm - the total cost is 837 rubles. This material is ideal for creating multi-layer structures, it transmits daylight well, scattering it and providing protection from prying eyes. You can choose any lightweight curtain with sheathing at the top.
- 1 spool of tape.
- Hook.
- Plastic bag as a handy material.
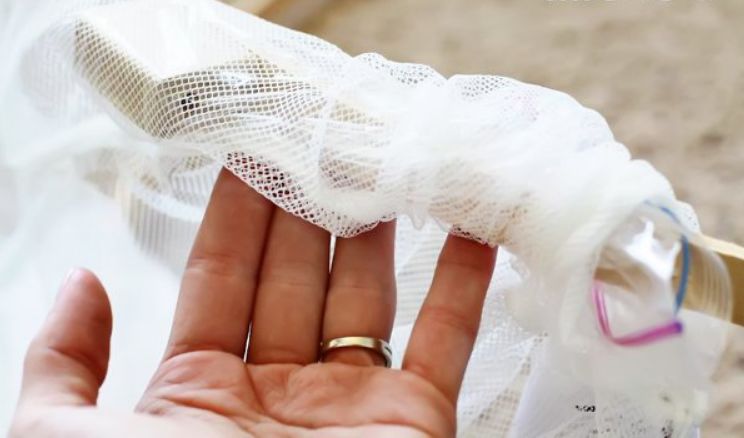
The instruction is very simple, let's start with the hoop: we will disassemble them completely and put aside the mounting mechanism, we will need it a little later.


We put our bag on the end of the hoop, fix it tightly with an elastic band. This design will allow us to quickly put on the mesh curtain fabric without making a single puff.


We string all 6 curtains, remove the bag and fasten the hoop, evenly distributing the curtains.
We take the tape and cut off 3 equal pieces of about 120 cm. You can vary the length of the segments depending on how low you want to fix the canopy to the crib.

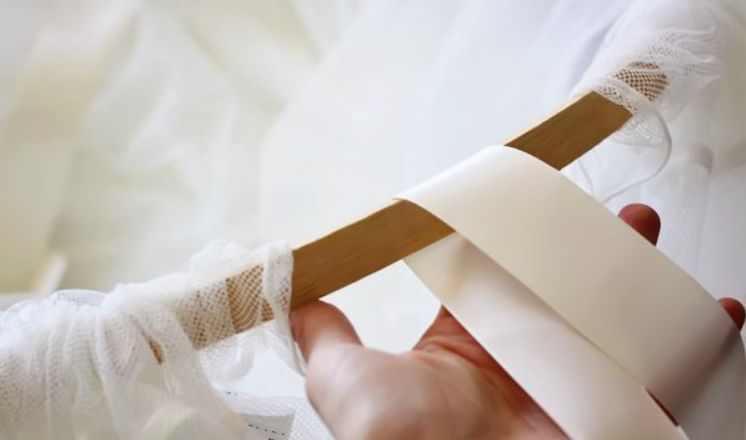
We wrap the ribbons around the hoop, distributing them every 2 curtains.We fold the segments in half and combine the ends into a tight knot.


Do not forget to cut off the labels, this could have been done from the very beginning.Now you can resort to the help of a husband, brother, father, in a word, anyone who is not indifferent, or arm yourself with a drill. We accurately determine the point on the ceiling where we will mount the canopy. We drill - we drive in the dowel - we screw in our hook.
We hang a canopy, a couple of strokes - and our work is ready. The product can be used for its intended purpose, or as a tent for a child's "secret" games, where every girl can feel like a real princess or bride!
Classic canopy in 60 minutes
So what we need this time:
- Large diameter hoop - 60 cm.
- 1 pair of curtains. We used one package of IKEA VIVAN, the size of 1 curtain is 145x300 cm - 990 rubles.
- Finishing tape, at least 6 m, for processing both curtains.
- Threads to match the finish.
- Ribbons or fishing line.
- Hook.
Instruments:
- sewing machine;
- scissors;
- set of needles.
So, we take the right curtain, we move from the top, setting our finishing tape along the left edge, so that the tassels (or any other decorative element) hang down in the right direction. We fix with needles every 15-20 cm until we reach the end of our curtain. We cut off the excess.

Fasten perpendicular to the braid and the edge of the curtain. Then, you can sew the trim right on top of the needles without removing them. Do the same with another curtain, this time along the right edge (so that the tassels on the edges hang facing each other).
We install our thread with the selected color in the sewing machine, scribble in the center of the fixed braid until we reach the end. We fix the end: we raise the needle, turn the curtain and go back and forth a couple of times. We cut off the excess thread and remove our needles after the trim is securely sewn. We repeat the same with the second curtain.

Let's get down to the hoop: remove the mounting mechanism and the inner hoop, which we don't need at all. We put our curtains on the hoop, starting from the edges with braid (so the fasteners will remain behind and will not be visible).

We close the hoops. Fastening according to the same principle as in the previous master class: securely fasten the hook above the bed and hang the canopy on a ribbon or fishing line. This option is also ideal for a girl, for boys, use blue tones and flowing satin ribbons as decoration.

Children's canopy decoration
To decorate the product, you can use various methods and techniques that will give the canopy over the bed originality. Sew freely falling satin ribbons onto the main material of the product, decorate them with appliqués with images of animals or toys, or beautiful frills along the free edges.
Depending on your perseverance and fantasies, you can make lace ruffles with your own hands or decorate the canopy with homemade ruffles. Perhaps a newborn baby will like musical toys suspended from a canopy (see also:). It’s good if you have two or three options for curtains - in case you change during washing or cleaning.
Even a beginner in the field of cutting and sewing will be able to make a beautiful canopy for a crib on their own. Dust in the air, mosquitoes, flies, drafts and bright lighting - these factors prevent the baby from fully resting, but the canopy above the bed reliably protects from them. Do not forget that you need to remove it for washing at least once every 10 days so that it benefits and always looks fresh.
Now you know how to quickly and easily sew a canopy for a crib: the photo selection below will inspire you to create even more original curtains for girls and boys.


The basis for such a canopy can serve as an outer circle from a large diameter hoop. If you have suitable ready-made curtains with a drawstring, use them to make a canopy.
You will need:

Ready-made curtains with a drawstring;
Braid for decoration;
The outer circle is from a large diameter hoop;
Sewing machine;
pins;
Scissors.
1. Pin the ribbon to the bottom of the curtains.

2. Sew the tape on the sewing machine.

3. Remove the attachment from the hoop.

4. Place the curtains on the hoop.

5. Put the mount back in place. The canopy is ready, it remains only to fix it on the wall above the bed.

2. Canopy on a hula hoop base for a crib or chair

It is a little more difficult to sew such a canopy, but the result is impressive - it is practically an awning that can comfortably cover a crib or chair from the light.
You will need:

Two types of canopy fabric;
plastic hoop;
Velcro tape, she is "Velcro";
Sewing machine;
pins;
Scissors;
Cardboard and pencil for making a template.
1. Determine the desired length and width of the fabric for the main part of the canopy. The length will be equal to the length of your canopy plus hem and seam allowances. The width will be your hoop girth x 1.5 for the drapery (if you want more pleats, multiply the hoop girth by 2), plus seam allowances. Cut out the detail of the main part of the canopy.
2. Determine the length and width of the trim strip for the canopy. The length will be equal to the girth of the hoop plus allowances for seams, the width - according to your desire (for example, about 30 cm). Cut out two pieces of blanks for the canopy bar.

3. Draw a template to create the zigzag edge of the canopy plank. To do this, divide the length of the bar (recall, it is equal to the length of the girth of the hoop) by the number of corners of the zigzag you need. This will be the width of each corner. Draw a pattern on cardboard like the one you see in the photo and cut it out. Then transfer the design to the fabric using the template.
4. Cut out the corners on both pieces of the canopy trim.

5. Lock one of the parts of the canopy plank into a circle with the right side inward and pin it off.

6. Attach the second piece of the canopy strip to the first one face to face so that the corners match, and pin it together.

7. Stepping back 1 cm from the edge, stitch the details of the canopy strip along the side with zigzag cutouts.
8. Cut off the protruding corners and make cuts on the inner corners so that the edge looks neat after turning out.

9. Turn the piece of the canopy bar inside out, straighten the corners and iron.
10. Sew the top piece.

11. Cut out the loop detail for which the canopy will be hung.

12. Fold buttonhole piece in half right side in and sew. Unscrew the hinge piece.
13. Fold the part in half, as shown in the photo, and iron.

14. Cut out 8 triangles to form the top of the canopy. Formula for constructing triangles:
Width of base of triangle = 1/8 of hoop circumference + seam allowances
The length of the triangle (from the middle of the base to the top) = ¾ of the diameter of the hoop
15. First sew the sides of 4 triangles. Then sew the other 4 in the same way. Before connecting both resulting canvases into a cone, firmly sew a loop to one of them, as shown in photo 15.

16. Now you can stitch both fabrics into a cone.

17. Spread the finished cone on the work surface and place the hoop on top. Trim the corners.

18. Assemble the main part of the canopy.
19. Fold the three parts - the main, planks and cones - in the sequence shown in the photo, and pin them together. Sew all the details on the machine.

20. Sew pieces of Velcro to the canopy on the inside.
21. If your hoop doesn't match, you can paint it or wrap it with colored tape or tape to match. It remains to attach the hoop to the canopy from the inside and hang the canopy by the loop.


3. Canopy in vintage style: a master class

Such a canopy performs primarily a decorative function, making the bed more comfortable. If you want the canopy to cover the entire length of the bed, you can lengthen its free edge (respectively, more fabric will be needed).
You will need:
Canopy fabric;
Braid for decoration;
Scissors or cutting knife;
Sewing machine;
pins;
Something round - as a template for building the rounded edges of the canopy (large bowl, pot lid, and so on).
1. Decide on the length and width of the canopy and cut out the part.

2. Using the template, round off the corners of the free part of the canopy.


3. Finish the edges of the canopy.

4. Sew decorative ribbon on three sides of the canopy.

5. Using two cornices, hang a canopy over the bed.

4. Canopy in a romantic style: master class

For such a canopy, it is best to use tulle or other thin translucent fabric.
You will need:
Canopy fabric;
Ribbons or braid in color;
Hooks for hanging the canopy;
A pair of sticks for hanging the canopy;
Round plugs for decorating sticks from the ends;
Threads with a needle;
Pencil and ruler.
1. Mark on the ceiling where the 4 canopy hooks will be attached.

2. Screw the hooks into the ceiling.

3. Tie a braid or ribbons to the hooks - two long free ends should remain.

4. Tie the ends of the ribbons and thread your canopy fabric through the loops formed - this way you can measure the right amount of fabric. Also mark the places where the canopy is attached to the sticks.

5. Cut the fabric.

6. Fasten the fabric on the sticks - first pin it off, then sew it on by hand.

7. Decorate the ends of the sticks with plugs, putting them on glue.

8. Tie ribbons or braid to the ends of the sticks.

9. Attach the string to the hooks on the ceiling by hanging the canopy. Ready!
The desire to create and make your home cozy, comfortable and at the same time beautiful is inherent in every modern person. We strive to select high-quality modern furniture that has increased functionality and makes our life easier. We buy or make our own whimsical decor elements and harmoniously combine them with the main color scheme in the room in order to give the house originality. And such transformations are most often carried out in the living room or kitchen, that is, in those rooms that are accessible to the eyes of relatives or guests. And what about the bedroom?
Let's try to transform the rest room with the help of a simple, but such a popular building - a canopy.
A bit of history
A cute textile curtain for a bed originates from the time of the dominance of the eastern rulers. Such a veil primarily played a protective function:
- protected from annoying insects;
- created a certain microclimate in the area of the bed covered with a canopy;
- played the role of a visual barrier, which formed a feeling of closeness from prying eyes, peace and solitude.
Today, a canopy for a bed is more often used in the design of a children's room. However, its use will be relevant in the room for an adult. Especially if the bedroom is made in oriental or Moroccan style.
In general, with a certain amount of imagination and creativity, you can competently design a canopy for a bed in almost any interior. And we'll give you ideas.
Choosing textiles: how not to harm your health
Along with the many advantages that a beautifully designed canopy provides, there is one strong point that opposes such a curtain - its airtightness and tendency to accumulate dust.
In this regard, some requirements are imposed on the textiles that are used to create the canopy:
- The fabric must be natural.
- The structure of textiles is preferably looser (free weaving of threads).
- It is necessary to use a sufficient amount of fabric, but to avoid the formation of layering.
- It is better if the textiles for the canopy are light shades or designed in the same color scheme with the main tones of the bedroom.
For a good canopy, which will bring exceptional benefits, the following types of fabrics are suitable:
- natural silk;
- light cambric;
- weightless satin;
- elegant cotton types of fabrics;
- tulle (subject to use as a light decorative element).
Important: shake the finished canopy every day. And if possible, get yourself a second set of fabric to change the curtain. And change it as often as you change your sheets.
Types of frames and their compatibility with the interior
In the world of designer fashion, there are several basic types of frames for attaching a canopy over a bed. And you can use them at will, but you should be careful: not every frame will fit perfectly into the interior of a particular bedroom.
So, the “crown” frame, made of a ring with a fabric attached to it, is most often attached to the ceiling space in the center of the bed and creates the illusion of a kind of crown. In this case, the falling waves of textiles form an aura of mystery and mystery. Such a frame is relevant for a bedroom in a classic or Moroccan style, as well as in Provence or Romantic styles. You should not use this design to create a canopy in a modern or high-tech bedroom. In this case, the prevailing romance will negate all the efforts of the designer and negate the originally set style.
Such a canopy will turn any bed into a truly "royal bed"
A simple “arc” canopy design, mounted at the head of the bed in the ceiling space, can fit perfectly into the styles: classic, colonial, baroque or provence. Wherever smooth rounded lines are appropriate, a canopy on a semicircular frame will harmoniously complement the interior.
Elegant canopy-arc will fit into almost any interior
A frequently used fastener for canopy textiles is bed posts, which allows you to create truly bold and interesting design solutions. Such a frame will look most interesting in a bedroom decorated in modern, hi-tech, classic, Moroccan or Mediterranean styles. A bed with just such a canopy will resemble a real bed of an eastern sultan.
Such a canopy will suit both the high-tech bedroom and the “bedroom of the eastern sultan”
If you want to get creative, and only cords are available from improvised means, then it is best to create such a canopy in the bedroom of a country house or in a teenager's room. Bold decisions, wild imagination and the desire to decorate the house will allow you to use cords for the original canopy.
The lightest design, in which ordinary cords are used as supports
If you mount the canopy on an independent circuit, then we are talking about using various improvised means. These can be cornices for curtains, mounted under the ceiling at the head and opposite side of the bed, and durable tree branches, processed and varnished, and simple crossbars, assembled into a single structure with bed posts. In all these cases, it is enough to arrange fasteners for the canopy in the same style with the interior of the bedroom. The result will impress you.
A contour of any shape suspended from the ceiling can become a frame for a canopy
Master class: do-it-yourself hanging canopy
The simplest design for attaching a canopy over a bed is hanging. Based on the name, we understand that we have to hang something somewhere. And hang, of course, to the ceiling mount.
Tools and materials
So, for the work we need:

Stages of work
- On the ceiling, directly above the bed, markings must be applied. To do this, we measure the length of our planks / cuttings (each). Note that it must be identical. And on the ceiling we mark the places of fastening of the anchors, which should be located in pairs and parallel to each other. That is, two on the right and two on the left. The distance between these rows of anchors should be about 50-70 cm (in general, depending on the width of the bed, you can take an average value. For example, if the width of the bed is 1.5 m, then the distance from the plank to the frame plank can be 70 cm, and if the width of the bed is 2 m, then the distance can be increased to 1 m. In general, improvise.
Ceiling markings
- We drill holes in the marked places and drive anchors into them.
- We tie the ribbon to the resulting fasteners in such a way that each piece of braid forms a kind of decorative loop.
Loop garter
Adjust the length of the loops depending on the height of the ceilings. So, if the room has a standard height of 2.8 m, it will be enough to make loops 40 cm long. Accordingly, if the ceiling height is greater, then the loops can be extended.
- Now we place the textiles prepared and hemmed along the edges on the floor. It should be a single piece of wide fabric, the length of which will be equal to two room heights plus 2.5-3 m.
- In the center of the cut, it is necessary to mark a piece with a width equal to the distance between the rows of anchors. To this value, add a few tens of centimeters for a beautiful sagging canopy over the bed. As a rule, this is at least 40 cm.
The easiest way to measure the required length of the fabric is with the support bar of the frame.
- At the marked points, it is necessary to stitch the fabric, forming a special move for threading a wooden plank into it. That is, two blanks of the type of cornices will be inserted into the piece of textile.
In order not to be mistaken with the width of the pocket, it is better to sew it up with a strap inserted inside
- We hang the canopy strung on the frame by the loops, prying the cornices on each side. Along the edges, the cornices can be fixed with decorative plugs so that the hinges do not slip during the operation of the canopy, and the structure remains in its original form.
Planks with fabric are hung on loops hanging from the ceiling
- Place the hanging fabric nicely on both sides of the bed, making a free drapery.
Hanging canopy is ready.
Now an ordinary bed looks much more romantic
Using the same suspension structure, you can equip a round frame for a canopy. For these purposes, a standard hula hoop is perfect.
Canopy on racks - step by step instructions
There is another simple way to equip a canopy over the bed - to place textiles on a special wooden frame, the basis for which are beautiful decorative racks. This process is somewhat laborious, but the result will amaze you and your guests. The bedroom will turn into real royal chambers.
This design is suitable for both modern and classic bedrooms.
Tools and materials
So, you will need:
- Finished wooden racks with a section of 58x58 mm. Ideally, choose a material with ready-made U-shaped grooves for the frame. You will need 4 of these racks.
- Frames - 4 pcs. Two of them are equal in length to the width of the bed, two are equal to the length of the bed. It is better to buy blanks with already formed spikes for a reliable connection with the racks.
- Joiner's glue.
- Screws or self-tapping screws.
- Decorative tips - 4 pcs.
- Wooden gaskets for them - 4 pcs.
- Dowels - 4 pcs.
- Lacquer for wood coating.
- Textile - at least 10 m (5 m of fabric on each side of the frame).
Stages of work
In fact, the creation of such a canopy consists in installing a frame-frame over the bed. It can be either wooden or metal or plastic. In our case, consider the variant of the tree.
Learn how to make a canopy over the bed with your own hands in the children's room, in the bedroom. See photos of different options for canopies. Read the instructions on how to make a canopy over the bed with your own hands.
Today we will dive into another section of the interior of your bedroom. Let's talk about interesting facts of ancient design. We will give detailed information on how to embellish your favorite house or apartment on your own. And we will talk about the "canopy" over the bed.

You will find answers to these questions here:
- Canopy over the bed, what is it?
- Canopy options.
- Is it easy to do it yourself?
- How to make a canopy for a girl?
- How to make a canopy over a crib?
- How to make a canopy over an adult bed in the bedroom?

But before moving on to the analysis of the points, let's find out the historical side of the fabric design. Colorful, bright and pleasant to the touch, they adorned the Ancient East in the 12th century. They served as canopies over royal thrones, church altars and front doors.
This is the Italian name for silk fabric, which was made in the city of Baghdad. Previously, people who had such canopies made of natural silk were only kings, princes and khans. But for a long time everything is not so, and the fabric began to be used by everyone. Decorate and harmoniously fit into the textiles of the premises.

An excellent use of the canopy was found for bedrooms. They are hung on special wooden cornices above the beds:
- It makes the room cozier. It takes on an expensive and pleasant look.
- The fabric covers those who like to sleep with an open window from drafts.
- There are special materials that do not let mosquitoes, insects and midges through.

Well, an addition for adults - you can hide from children's curious eyes, if the fabric is stronger weaving and not transparent. And for children - it will become a warm, beloved nest. It will protect against insects, direct sunlight and sleep will become completely calmer.

Beautiful fabric can be seen in expensive hotels where newlyweds often come. The canopy will add to the bedroom not only warmth and comfort, but also add romance to a couple in love.

The fabric from which the canopy itself is made should be very light and transparent.
We advise you to make from: tulle, chiffon, silk, chintz. The fabric of calm warm and cold tones looks better (white, pale pink, pale blue, grayish, pale yellow, pale green). Since this is a sleeping place, it should soothe the human body and go to sleep. Catchy, exotic colors are not suitable for a canopy over the bed and look ridiculous.
Canopy mounting options

- Four supports - this design is perfect for large rooms where there is a lot of space. The mounts are attached to the floor or the base of the bed, and are connected from above by a frame. The design, although large-scale - but you can do it yourself. It looks great if your bed is located in the middle of the room, opposite the panoramic windows with incredible sunsets and sunrises.
![]()
- On horizontal bars. It is attached to the wall on both sides of the bed, with metal or wooden rods. There are fasteners at the end, thanks to them the canopy will not fly out when moving. Very light fabrics are usually hung on this option. Beams should not sag under their weight. This version of the canopy is suitable for single beds.

- Canopy Canopy - Attach it to the ceiling, focusing on the center of the bed. You can also make it hanging. Hang the circle on special rope mounts, lowering it from the ceiling by 40 centimeters. Slide the finished canopy inside (fixing it on a hook in the ceiling). And the bottom that covers the bed is tied to the side beams of the bed. And it’s impossible to install the canopy-dome option if you already have a stretch ceiling installed.


- Ceiling cornice - a similar mounting model with horizontal rods. They also require lightness of the attached material. Attached to the ceiling, repeating the contours of the bed. If a stretch ceiling is installed, then the option with a ceiling cornice is not suitable.
How to make a canopy with your own hands?
- Select the desired mounting option. Choose the support that suits you best
- Choose a loose fabric that is light, pleasant and simple in color. Choose the right dimensions: length, width of the canopy. Cut off the excess and sew the contours.
How to make a canopy mounting option “two horizontal rods”.
- Using a tape measure, measure the height from the bed. The width of the bar from the bar. Make sure they are perfectly parallel. With special fasteners, fix them to the wall. This can be done with a puncher, and then with a screwdriver, driving the screws through the bar into the wall. Or the rods can be attached to the ceiling itself initially, making them not sagging sticks, but a strong cornice.
- Use a hair dryer to blow out the remaining sawdust so that it does not fall on your head. Hang the canopies on the beams.

Canopy over the bed for girls, instructions
Not only little kids want to feel secure, but little ones also dream of their own castle with toys, coloring books and lanterns. Why not give them this miracle?
For a girl, it is worth finding a very soft, pleasant to the touch and color fabric. Silk and tulle are perfect.
Remember! Do not choose textiles and designs without a child. She should sleep in her own bed, support her choice. If it is unsuccessful (too bright), point to more pleasant tones and explain why it is better to choose something else. And you need a hypoallergenic fabric material that does not have a smell.
Canopy mounting option


Canopy-dome mount:

- To do this, you can take a regular sewing hoop.
- Attach it to the center of the bed on hanging ropes.
- Take the canopy and fasten it along the hoop.
- If the circle is wide, immediately fasten the mini structure to the ceiling where the hook is already hanging, and attach the fabric to it, and the circle will give shape.
- Together with the children, you can decorate with paper butterflies, lanterns, flowers - using pins or a needle and thread.


Fastenings of the canopy "sailboat":
- To do this, take two wooden rods
- Measure enough length
- Attach one cornice to the ceiling in the center of the bed or closer to its end
- Hook the second bar against the wall itself (above the wall of the bed)
- Attach the fabric to the central rod, put the curtain mounts on the sides.
- Pass the fabric through the top of the second cornice so that it sags slightly.
How to make a canopy over a crib, instructions
- Fabric not too long.
- Mounts.
- First, let's make a design - let it be just sticks without tips.
- Connect them together using corner tubes (they are sold in plumbing, find the right size)
- Paint in the desired color with paint, or even better with a spray can. Let dry.
- Attach to the ceiling with fasteners at each corner of the quadrilateral.
- Hang up the fabric.

Another option:
- To one side of the rectangle, attach two more rods in parallel. The design will resemble the letter "G" and fasten to the crib.
- Fasteners for the fabric itself can be picked up in the form of wooden rings - it looks very cute and calm.
- Fabric - choose calm tones, soft and pleasant to the touch, odorless.
How to make a canopy over the bed for adults in the bedroom, instructions

- You can make a section of 8 beams;
- On four vertical supports;
- Put the main cornice;
- Enter the selected fabric.
For an adult room, you can choose a brighter fabric. But it also should not be catchy and poisonous. It is better to choose pale blue, pale crimson, aquamarine, emerald, white, or make the pendant transparent.
Design:
- Form a rectangle of 4 rods of wooden blocks.
- Attach the anchors to the base of the bed with screws.
- Glue the beams to the base with a special glue for wood.
- Paint in the color you want.
- Attach horizontal bars to each corner of the finished quadrangle
- It turned out a very voluminous letter "P". Now we need to combine the design to the bed - also thanks to the fasteners.
- Hang your chosen fabric.
Do not be afraid to experiment, do something with your own hands! Believe in your success, and luck will not bypass you. And we thank you for reading this material and wish you success in your work, and then a pleasant rest!


