Paper is the most popular and environmentally friendly pure material for crafts. From it you can make almost anything that your imagination wants. In this article we will look at: how to make paper gifts for March 8 with your own hands.
You will need: colored paper, scissors, needle, ruler, glue stick.
Master Class

Roses from money

You will need: printed banknotes of any denomination, wire.
Master Class

Box with a surprise

You will need: 3 A3 sheets, black pastel paper 50x65 cm, 2 types of scrapbooking paper (red and with flowers), Moment Crystal glue, pencil, ruler, red satin ribbon, mug, 4 bars.

Master Class
- Take a sheet of A3 format and redraw the diagram of the box.

- Take another sheet of A3 format and redraw the side edges of the box.

- Take the third sheet of A3 format and redraw the diagram of the box lid.

- Cut out pieces from 3 sheets.

- Glue the sides of the box.

- Fold 2 times inside the edge of the lid.

- Fix with glue.

- Cover the sides of the box with black pastel paper.

- Cut out a blank from black paper according to the lid pattern.

- Cover the lid with black pastel paper.

- Cut out 4 rectangles measuring 15x16 cm from black pastel paper.
- Cut out 4 rectangles measuring 13x14 cm from red scrapbooking paper.

- Paste with black rectangles inner part boxes.
- Attach a piece of red ribbon to each side.

- Glue the red rectangles to the inside of the box over the ribbons.
- Cut out a 15cm x 16cm rectangle from floral scrapbooking paper.

- Glue it to the center base of the box.
- Cut out a 13x164 cm rectangle from floral scrapbooking paper and glue it onto the lid.

- Arrange 4 bars on the sides and tie with ribbons.

- Place the mug in the center, raise the edges and close the lid.

- Decorate the lid with ribbon and tie a bow.
giant flower

You will need: colored thick paper, a sheet of cardboard, scissors, glue.
Master Class

Ship of money

You will need: 7 sheets of A4 format with the image of different banknotes (euro, dollars, hryvnia, rubles), white sheets of A4 format, silicate glue, scissors, glue gun, thick cotton threads, skewers 20-30 cm long, polystyrene foam, a flat box half as wide as the bottom of the ship.

Master Class
- Fold the boat from a sheet of paper, as shown in the photo.

- Carefully turn the boat inside out so as not to tear.
- Fold and iron the boat.
- Outline the boat on another sheet, then draw a dividing line and cut out 2 pieces.

- Coat them well with glue and stick to inside boats to get two-layer sides.
- Cut the money sheets into strips 1.5 cm wide.

- Tape the boat with money stripes.
- Thoroughly coat the entire boat with glue for strength and leave for 2 hours to dry completely.
- Fold the same bills side by side and glue them. Make 3 of these - out of five, out of three, and out of four bills. These will be the sails.

- Carefully thread the sails onto the skewers and fix the joints with glue so that they do not slip.
- Take the boat and glue 3 pieces of Styrofoam inside.
- Insert skewers into foam for front and rear yards. The front yard should be 1/3 longer than the back. Make sure the lines are even, then secure with a glue gun.
- Insert skewers with sails, placing them at the same distance. It is worth noting that the deck should be smaller than the stern.

- Fold the threads in 2-3 layers the length of the sail and additional centimeters for the ties.
- Tie the threads to the skewers as shown in the photo.
- Cut 2 bills diagonally and fold the edges 0.4 cm.
- Glue banknotes (sails) to the rail threads.

- Make the sails to the stern in this way: do not twist the bill into a tube, bend the edge, then glue it.
- Fold 3 bills in half, shape them into flags, then glue.
- Cover the deck with banknotes.

- Make a ship stand out of a flat box.
- Glue the desired background onto the box.
- Glue the ship.
Corrugated paper tulips

You will need: corrugated paper of your favorite colors for buds, green corrugated paper for leaves, Raffaello sweets, double-sided thin tape, green teip tape, satin ribbon, packaging material for a bouquet, scissors, wire, pliers, wooden stick, optionally to create dew - transparent beads, glue gun, tweezers.
Master Class
- Prepare the wire by doing right amount stems of the same length.

- Cut long strips corrugated paper, cut into 2 parts a long strip of corrugation, then cut into 4 parts. You should get 8 strips, 6 of them will be needed for the tulip bud.
- Turn each strip around the center, bend in such a way that the front sides of the strip are directed in one direction.

- Make 6 blanks in the same way.
- Attach Double-sided tape to the end of the wire.

- Attach the candy to the end of the wire.
- Collect the tulip bud in this way: take the first petal and attach it to the adhesive tape. Place the second and third petals near the candy and, holding with your fingers, fix with tape tape.

- Attach the remaining petals in the same way, forming a tulip bud and securing with tape.
- Trim excess crepe paper at an angle at the base of the bud.
- Wrap the stem with tape.

- Cut off a strip of green crepe paper.
- Cut into two almost equal parts.
- Fold each part 4 times and cut out the leaves.
- Pull each leaf out in a spiral using a wooden stick.

- Place a short leaf, and lower on a longer one. Secure each leaf with tape. Tulip is ready! Make the right amount of tulips in different colors.
- Collect tulips in a bouquet in this way: connect 2 tulips and pull them together with teip tape, then add one tulip one at a time, placing the colors in a checkerboard pattern.
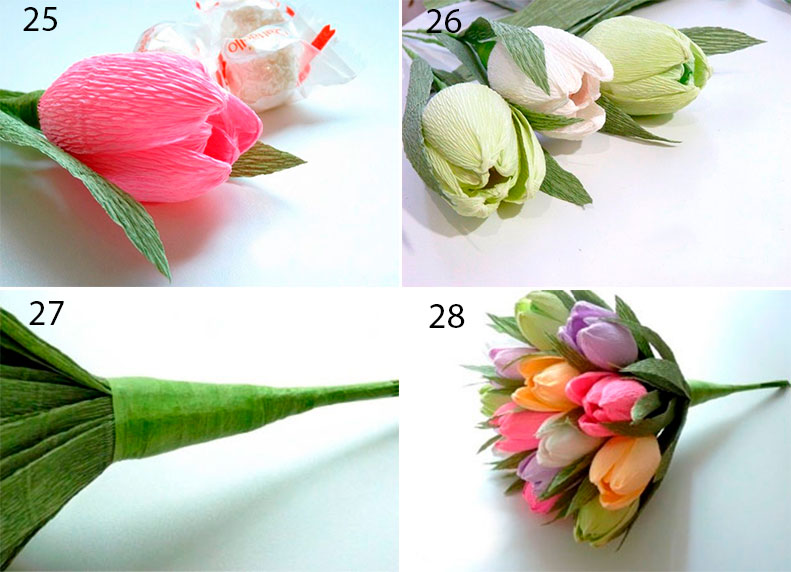
- Cut 20 leaves, and arrange them around the perimeter of the bouquet, fixing with teip tape.
- Wrap the bouquet in wrapping paper and tie with ribbon.

- Create dew drops on tulip buds by gluing clear beads using tweezers and hot glue.
Papier-mâché plate

You will need: plate, newspaper sheets, brush, pva glue, bowl of water, gouache, scissors, transparent nail polish.
Master Class

Chinese papier-mâché plate is ready! I recommend watching the video tutorial!
Papier-mâché cup

Every year on March 8, children try to please their beloved mother with a handmade gift. The crafts we offer can be created not only for the International women's day but also for any other holiday. If you work as a teacher, you can invite the children to make one of our crafts. Moms will love the original masterpieces. They are performed from simple materials. The child can do many elements on his own, and you only need to help him. If you are a mother, then you can offer the teacher an idea for creating crafts for March 8 with your own hands in kindergarten.
In addition, if a child likes to create original things, then he can make our crafts and give them to his mother at least every day.
Flower bouquet
All women love flowers. Try to make this craft. For its manufacture you need:
- paper harvester;
- wire;
- teip tape.

Pay attention to the flower pattern.
Twist the wire and wrap it with teip tape. Wind the paper around the wire as shown in the picture. The button is made in the same way.

We offer a master class on making crafts for mothers on March 8 in kindergarten. If you follow the instructions, then everything will work out for you
Flowers for your beloved mother can be made from cotton swabs. Such original solution opened up great opportunities for many people. Using cotton pads, many of us did not even know that beautiful compositions can be created from them.
See what DIY crafts for mom on March 8 in kindergarten can be made from such a simple material.

For work you will need the following materials:
- teip tape;
- glue;
- thin wire;
- cotton pads;
- water;
- gouache;
- brush;
- starch.
So let's get started.
Step 1. Weld the paste. Pour some cool water into a container and add a spoonful of starch there. Mix everything thoroughly, then pour a glass of boiling water in a thin stream. Don't forget to stir constantly.
Step 2. Soak cotton pads in the paste.
Step 3. Dry the material.
Step 4. Paint the discs with paints.
Step 5. Cut out petal-shaped details from them.
Step 6. Glue all the elements together, highlighting the middle with yellow and white paint.
Step 7. Place some cotton wool in the core, then paint it white.
Step 8. Make a stem by wrapping the wire with tape. Petals are made in the same way.
Step 9. Connect the parts together.
The result will be beautiful flower. Do you want to give a bouquet? Then make a few of these flowers.
Here is how origami is made. Any child can fold such a flower.
Any mother has jewelry and other small things at home. An original gift will be a box made by the hands of a child. It is easy to perform. For its manufacture you need:
- toothpicks;
- thick cardboard;
- yarn.
Step 1. Cut out a heart of the size of the box from cardboard.
Step 2. Insert toothpicks at the same distance from each other around the entire perimeter of the heart.
Step 3. Pass the yarn through all the toothpicks in a zigzag pattern.

STEP 4. Do this all the way to the top.
Step 5. Decorate the box with beads, rhinestones, ribbons or any other decoration.
From simple materials, a very beautiful box is obtained. Every mom will love it.
Apron
Mom is the mistress of the house. If an adult helps a child, then you can make a cute apron with a picture of a cast of the child's hand. We offer step by step instructions for manufacturing.

And working on such a photo frame, the child will receive a lot of emotions. Multi-colored buttons are glued around the entire perimeter of the frame. The result is such a masterpiece.

Candle for memory
For such work, the following materials will be required:
- parchment paper;
- candle;
- paints.
Step 1. On parchment paper, apply the desired pattern.

Step 2. Attach the patterned paper to the candle and hold well.

Step 3. Treat the surface warm air. This is necessary so that the drawing is well fixed. In this case, a hair dryer will help.

The result is such beautiful candles.

Postcard to mom
Such a card can be made by a child aged 4 to 6 years. paper crafts on March 8 in kindergarten are often made of paper. This work includes cutting according to a specific pattern and without it. Such arts and crafts is called appliqué. Invite your child to make a beautiful shiny card.

Prepare the following materials:
- plasticine;
- scissors;
- colored cardboard;
- glue;
- Double-sided tape;
- ready-made eyes;
- metallic colored paper.
Step 1. Make the base. Fold a sheet of cardboard in half. Cut along the fold line, then fold again.
Step 2 Glue the Square white color on double sided tape.
Step 3. Take metallic colored paper and draw a flower on the back of it. Cut it out.
Step 4 Glue a circle cut out of colored paper on top.
Step 5. Cut out eyes from blue paper, mouth from red paper and glue the details onto the circle.
That's all. You have an original postcard. It should be noted that the mouth can be molded from plasticine, and paper eyes can be replaced with the eyes of any toy. Then the card will come to life.
There are many variations of postcards, look at one of them.
When something is done with your own hands, it acquires individual features. How an artist puts a particle of the soul, leaving it in each of his paintings, how a writer shares his inner world. Such things immediately acquire their own unique features, their own aura, which makes them priceless. Consider what crafts for March 8 do it yourself, the most beautiful you can do.
Purchased surprises do not have such an aura, because they are made by faceless craftsmen for the masses. That's why mothers usually keep their children's crafts, the first postcards, plasticine figurines, sewn toys. Albeit crooked and simple, but truly priceless.
Many people use plasticine for a comfortable and soft base, where you can stick spoons and other craft materials. It’s easy to come up with your own gift idea by looking at examples. simple crafts. For example, daisies with petals collected from the same white spoons, complemented by wide tubes left over from cocktails, or collect the whole picture using spoons.
Here, only the frame is taken separately and finished, everything else is a flight of thought and improvised materials.
You can make any flower, depending on what the recipient likes. Whether there will be poppies or chrysanthemums, the main thing is to know the shape of the petals and the design.
We will repeat again: a gift that you make with your own hands, for loved one will be priceless. After all, at least you put the warmth of your hands and a small piece of your soul into it. And even if a million are already sold in stores today ready surprises, we offer to make your mother, grandmother or sister really nice. You have probably already appreciated our ideas for making chic postcards with your own hands. Now let's get to the giveaway!
- several coffee filters;
- some flower wire;
- small pliers;
- high quality watercolor.
On a note! Not everyone has coffee filters, which means you need to know how to replace them. Beautiful crafts for March 8 are also made from corrugated paper (or any other thin paper). The shape is more important here: the paper should be round.

- So, if you are using coffee filters, then prepare four to eight of them. In this case, you get one flower. The splendor of our flower depends on the number of sheets of paper or filters.
- We put all the filters or sheets of paper in a pile and bend in half, then again, and again.
- Now you need to cut off the edges so that the future petals take shape. Use a wavy shape or experiment with different patterns.
- Now half of the filters need to be set aside, and the other part should be cut a little more (by four to five centimeters). If there are fewer filters in the center of our future flower, then it will look more realistic.
- Now put all the filters unfolded on the table. Small parts should lie on large ones (as in the photo below). Now we draw a wire through the center of all the blanks, bend it and pierce the paper again. The distance between the two holes should be at least five millimeters. To secure the wire, twist it around the back of the flower.
- Now squeeze the paper and lift it up, without stopping twisting a little. This should be done with every filter. See how it's done in our photo tutorial. Now the base of our bud needs to be wrapped with wire.
- Now, with the help of green adhesive tape, the flower must be wrapped, starting from the bud and ending with the tip of the wire. It is desirable to give filters a pleasant shade. Coloring them is easy: use watercolor, which can be diluted with water, then the colors will turn out to be more delicate. You can use not one color, but several at once. Ready! This is how quickly and simply unique beautiful crafts on March 8 with their own hands.


You will need:
- several sheets of thin colored paper (can be replaced with corrugated paper);
- some wire; sharp scissors.

- From the paper of the chosen color, you need to cut circles. There should be three of them, use different tones. The diameter of the part should be an average of six centimeters.
- Now we take the wire. You need to cut off a piece and bend it in the shape of a circle (as in the photo below). The length of the wire should be about twenty centimeters.
- Now take yellow paper and cut out a couple of small circles. They need to be glued to the bottom and upper parts our bud.
- All the circles now need to be folded and in their middle make a small hole through which you can pass the wire. As for the crown of the flower, a small loop can be made from the tip of the wire there. Our stylish flower ready! Such crafts in the form of flowers on March 8 will perfectly decorate festive table, so do several things at once.


You will need:
- sharp scissors;
- adhesive tape Green colour;
- several skewers;
- glue;
- several old magazines.

- For work, not all pages of magazines are suitable for us, but only the most colorful and bright ones. Pull them out and fold them in half. Then we turn all the halves to the fold in the center, as in the photo below.
- On the side where the folds, carefully cut the fringe. There should be at least one centimeter to the base.
- The paper blank is wrapped around our skewer, as a result we should get a bud. Now, with the help of adhesive tape, the bud needs to be fixed at the base. The green ribbon is used to turn the skewer into a stem.
- We dissolve the fringe so that our bud is as lush as possible. Giving one such flower is cute, but the bouquet will look much more spectacular. Crafts for March 8 mom do it yourself!


Original do-it-yourself craft: we make a rose in a waffle cone
You will need:
- a few waffle cones (you can buy them at any point where they sell ice cream);
- stationery knife;
- a little hot glue (you can also use standard PVA glue);
- sharp scissors; a couple of sheets of colored paper.

- We take colored paper, from which we need to cut a quarter of a circle. With this blank, we wrap our waffle cone. The ends are carefully fixed with glue.
- Now with the help of colored paper we make a rose right size. However, not necessarily a rose - be guided by your taste. As for the rose, it is done simply: we take paper, cut out a couple of types of petals. Note that the petals should be in the shape of a quarter circle or heart. We glue them all together (see instructions below).
- Around the skewer glue the petals in a checkerboard pattern. Now add a little glue to the edge of the cone, attach the bud.
- Now you will need green colored paper. Carefully cut out the leaves and use glue to attach them to the cone. By the way, it is not necessary to make a flower with your own hands, you can use beautiful natural or artificial flowers.


You will need:
- several sheets of thick cardboard (thickness should be about three millimeters);
- a few thinner cardboard - about two millimeters;
- glue (you can use hot glue or the standard Moment, the main thing is that it holds very well);
- a tube of PVA glue;
- sharp clerical knife;
- some masking tape; brush for glue;
- a couple of pieces of fabric. Choose the colors of your choice, however, for the top, we recommend using a dark fabric with a floral print, and for the decoration inside the box - a light fabric in delicate shades.
- scissors;
- stack
- white paper (one sheet).

- So, first we need to cut the blanks. For this we use a clerical knife. All the right dimensions we have shown in the photo below. If you have no desire to make the base of the box with your own hands, then just buy a ready-made box. It is only important that it be made of durable cardboard.
- If you are working on our blanks, we assemble the cover and walls of the future product and carefully glue it with glue (as in the photo). The corners inside and outside for strength should be pasted over with masking tape.
- Let's get to work with the fabric. To decorate the walls of the box, you need a piece measuring approximately 46 by 9 centimeters. As for the lid, cut out a piece measuring 21 by 26 centimeters.
- We glue the box with pieces of fabric. To do this, you need to smear the lid with glue (now PVA) and attach a cloth. Take a look at the photo, how to properly arrange the corners so that it looks aesthetically pleasing. The corners are aligned with the help of stacks.
- We can proceed to the design of the side details. The corners need to be turned inward. If there is too much fabric, feel free to cut off the excess.
- To decorate the cover, you also need to grease it with glue, attach a cloth and carefully glue the corners.
- White paper is cut out the same size as the bottom of our box. A piece of light fabric should also be the same size. The corners are cut, everything is neatly glued. At the bottom we glue the workpiece with paper down. You can align all this with a stack. By the same principle, we work with the edges of the lid and side walls. The box is ready! Of course, this is much more difficult than, for example, crafts from napkins on March 8th. However, the one to whom such a present will be presented will definitely be delighted. And it's worth the effort! And finally: if you wish, decorate the lid of the box with beautiful rhinestones or large beads. Large pearls will look especially elegant.


You will need:
- several standard nails;
- thick thread;
- your joint photos with your mother;
- paper clips or stylish clothespins;
- simple pencil.

- First you need to carefully mark the places where the nails will be hammered. We advise you to first mark on a piece of paper a diagram of how the threads and nails will be located. It is much easier and faster to cook crafts if you also indicate the direction in which you will wind the threads with arrows.
- Now carefully drive in the cloves and wind the thread around them. The color of the thread is best chosen based on the tone of your walls. If the walls are light, then the thread should be as dark as possible, but if the walls are dark, then choose a lighter thread. In general, play on the contrast: our gift self made should stand out as much as possible. As for nails, it is better to take smaller and thinner options: they will not be so noticeable. It is not necessary that the thread be of the same color - our original wall frame can be multi-colored.
- Print the cutest and most beautiful family photos featuring mom. The size of the photo should not be very large, be guided by the size of the frame. You can attach them to the threads using decorative clothespins - these are often sold in shops with souvenirs and all sorts of little things to decorate gifts. Ready! Everything ingenious is simple.


Do-it-yourself postcard for March 8: we make an original drawing A super-simple idea that even a child can handle (probably easier, only crafts from the test for March 8). Your own postcard print is created almost instantly - rate it.
You will need:
- one head of simple cabbage (can be replaced with Beijing cabbage);
- a small piece of foam rubber; paint of the chosen color (it is better to choose more juicy tones: red, orange, blue, burgundy);
- sharp knife;
- rag or piece of paper.

- So, part of the cabbage is cut off with a knife.
- Now we take the foam rubber and thoroughly soak it with the paint of the selected color.
- The cut cabbage is dipped in foam rubber and tightly fixed in the form of a seal (see photo below). Now you can create any original postcard!


Below are some more photo ideas for inspiration.


 chancre look like?")
")


