Often the first structure erected on the site allocated for construction is a toilet. Very often it is done in haste, as if temporarily, and then other, more important concerns appear, and hands do not reach it. The toilet must be built immediately - permanent, hygienic, comfortable and economical.
As a rule, the toilet booth has an area of 1 × 1 m - this is enough for normal functioning. However, it is more rational to make it somewhat more spacious, 1.2 x 1.5 m or even 1.5 x 1.5 m. Increasing the area will make the toilet double, as well as equip open or closed racks for storing fertilizers, chemicals, etc. In winter while the toilet booth can be used to store a collapsible greenhouse, watering hoses, inventory and other things.
For various reasons, the idea of arranging a cesspool under the booth should be rejected. The cesspool will become a problem for the owner when he has to coordinate with the sanitary and epidemiological supervision service when registering the construction. An excellent solution would be powder closet.
How to replace a cesspool
The function of a cesspool is performed by a metal container (for example, a bucket) with a capacity of 12-15 liters. As it is filled, the contents of the container are sprinkled on top with a certain amount of ash, peat or sawdust from a box specially installed for this purpose. The approximate period for filling the collection tank is 10-14 days.
It is better to empty the prefabricated containers into the ground to a considerable depth (about 1 meter).
It is done like this. With the help of a garden drill, a hole with a diameter of 200 mm and a depth of about 1 m is drilled in the ground at the border of the near-stem circle of a fruit tree or at the level of its crown. There is a kind of sealing of feces in the main soil. The next emptying can be done nearby, retreating in a circle by 20-25 cm.
Before emptying the collection tank, a small amount of slowly decomposing waste (broken glass, ceramics, etc.) can be placed in the drilled hole.
Construction of a toilet in the country
Country toilet project 
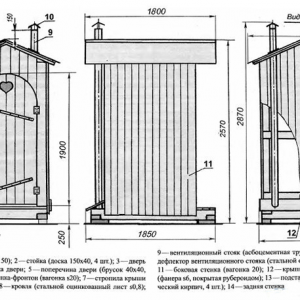
Making a toilet booth is akin to building a model of a house: blueprint (sketch), marking on the ground, foundation, bottom trim, walling, top trim and rafter system, roofing, flooring, door hinge, glazing, interior decoration and exterior decoration. All elements of construction are simplified, minimized, almost toy, but they allow you to gain experience and work out working methods.
The project (sketch) determines the shape, basic dimensions of the toilet, as well as the initial building materials and their quantity. The appearance of the future structure is determined by the presence of one or another building material.
Usually the toilet is made of wood, but you can use asbestos-cement slab (flat slate) and even foam concrete blocks. The most common form of toilet - "birdhouse" - is the most rational: it is technologically advanced, has a large functional volume.
If the project (sketch) is drawn up, that is, the main dimensions are determined, the site is marked on the spot: pegs are hammered and cords are pulled that define the boundaries of the structure. The squareness of such a small area can be set using an unfolded newspaper sheet, and the accuracy can be checked with a tape measure, measuring the diagonals.
Below you can see a few examples drawings of country toilet projects. To view, click on any of the images.
Drawings of country toilets


Toilet foundation
For most designs of toilet booths, four 260x330x440 mm concrete blocks, installed at the corners, will be suitable as a foundation. To install them, you only need to remove the top soil layer (15-20 cm). It is important that the top surfaces of the blocks lie in the same plane.
Plane control can be carried out using a level and a piece of a suitable board. Two or three layers of roofing material are placed on top of each block for waterproofing.
The lower trim is installed on the foundation blocks. The easiest way to make it is from pieces of timber, connected “in half a tree” and pulled together with brackets (the bar of the bracket is recessed into a specially hollowed-out nest on the surface of the bars). It is preferable to use an edged board for the lower trim (thickness 40 or 50 mm).
The sides of the lower trim are made from two pieces of edged board, knocked down with nails through a spacer of the same thickness, as shown in the figure below.

In this case, grooves are naturally obtained in the lower trim, into which the spikes of the enclosing walls can then be inserted. The fastening of the sides of the lower strapping is carried out using capercaillie screws (diameter 8-10 mm).
Walling
The walls of the toilet booth, due to their small size, can be made in the form of panels from upholstery (lining). Pieces of upholstery board of a given size are stuffed onto two planed frame boards, which have the same thickness as the bottom trim boards. The front shield is stuffed onto three boards so that you can decorate the doorway.
To give the shields rigidity between the frame boards, it is necessary to cut a strut. The pictures below show the front, rear and side shields. The parts of the frame boards protruding in the lower part of the shields are spikes, which, when mounting the booth, are inserted into the grooves of the lower trim. 

The installation of the walls consists in the consistent installation of the shields in the grooves of the lower trim and the fastening of the frame boards of adjacent shields with the help of capercaillie screws (3-4 pieces per corner). In fact, these capercaillie screws perform the function of the upper strapping, as they give the necessary rigidity to the entire building.
The roof of the country toilet
The rafter system is just two boards embedded in the upper part of the side shields (figure below).
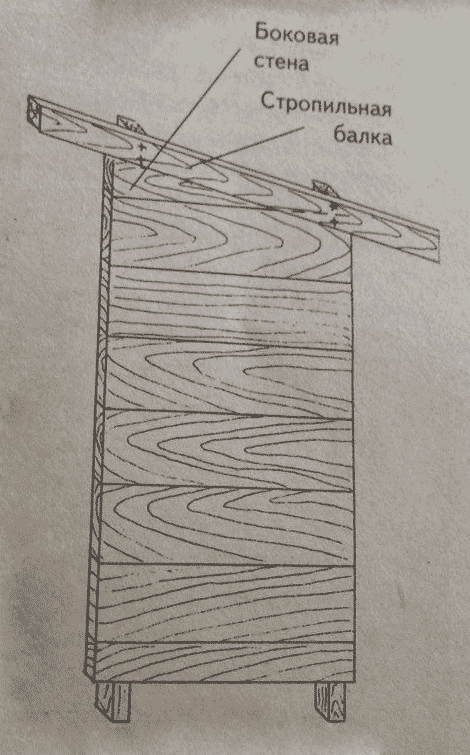
A crate is stuffed onto these two boards, which is best made solid from the lining face down. In this case, it is not necessary to hem the ceiling and roof overhangs.
A reliable and simple roof is obtained from two layers of roofing material. Ruberoid is attached to the crate
felt buttons with a frequency of 15-20 cm.
Flooring
The floor is laid from a cut board 50 mm thick. The front and side surfaces of the floorboards are cleanly trimmed and nailed to the inner boards of the lower trim with gaps (slots) of 5-10 mm. The gaps will facilitate ventilation, as well as drying the floor after wet cleaning.
door hardware

The door to the toilet consists of a frame with a brace and trim. The brace cuts along the diagonal of the frame, passing from the upper corner of the narthex to the lower loop. Sheathing is made of lining, located vertically. It is advisable to equip the door with a padlock for locking at the end of the season.
Container for toilet
The collection container is placed in the frame shown in the figure below. 
The frame is made of bars with a section of 40 × 40 mm or 50 × 50 mm. In the frame, the front wall is completely sewn up with clapboard, and the upper wall, in which a hole is cut, is made completely removable. In this form, this structure is the most convenient for hygienic cleaning (washing and roasting in the sun). The removable top cover allows you to conveniently fix the simplest "apron" (a piece of vinyl chloride film). In the powder-closet booth there should also be a box or other container with peat, ash or sawdust.
Flat slate toilet

Flat slate toilet
Wood, of course, is the most accessible and technologically advanced material, but if it is supposed to use an asbestos-cement slab (flat slate) for other buildings (garage, utility block), then it is suitable for a toilet booth.
To work with an asbestos-cement slab, you will need an electric cutting machine (grinder), equipped with an abrasive stone or diamond cutting disc. Asbestos-cement sheets 8-10 mm thick are cut so that the front, back and both side walls of the toilet booth are obtained (similar to Figure 2 above). These walls are assembled on screws using frame boards, and then the installation is carried out in the same way as described above. In this case, the door leaf is also made of an asbestos-cement sheet fixed on a wooden frame, which is used for inserting hinges, locks and other mounting devices.
For the convenience and safety of using products from asbestos-cement sheets, it is desirable to cover them with film-forming compounds (varnish, drying oil, paint, etc.).
Video
Do-it-yourself country toilet
Do-it-yourself country toilet and shower
Do-it-yourself toilet in the country: powder closet without a cesspool
If you plan to build a summer house, you should not forget about the device of a country toilet with a cesspool. There are several types of country toilets, while the most popular is the construction with a cesspool.
Where is the best place to build a pit latrine?
As a rule, any place is not suitable for the construction of a country toilet. It must be placed following certain norms and requirements, as there is always a risk of groundwater pollution. When constructing a structure, it is necessary to take into account not only the location of your source of water consumption, but also the neighboring one.
The device of a simple toilet in the country with a cesspool
In the construction of a toilet pit in the country, depth and width are of great importance, while the most important thing is to comply with the following requirements:
- the distance of the toilet from the source of water, whether it be a river, a well or a well, must be at least 25 meters. In the case of an uneven summer cottage relief, namely the presence of drops and slopes, a cesspool should be made in a place that is below another level. As a result of this solution, the risk of dirty sewage getting into drinking water is significantly reduced;
- the toilet should be located at a distance of 12 meters from the house or other structure;
- if there is a bathhouse or an outdoor shower on the territory, then the distance to the object must be at least 8 meters;
- distance to barns with animals - 4 meters;
- the toilet is located at a distance of 4 meters from the trees, and 1 meter from the bushes;
- the fence should be at a distance of 1 meter;
- when choosing a place for a toilet, you need to take into account the direction of the air, in the worst case, unpleasant odors will spread throughout your summer cottage;
- the front door should not be directed to neighboring windows;
- if groundwater is located at a depth of 2.5 meters, then you can build a toilet of various types. If this figure is higher, then you can not make a cesspool. In such situations, an excellent option would be to install a backlash closet, dry closet or powder closet. Such structures are harmless to the environment, since the waste does not come into contact with groundwater.
When choosing a place to build a toilet in a country house, you need to take into account not only the placement of your objects on the territory, but also those of your neighbors. It should be noted that the above norms apply only to those latrines for which it is planned to make cesspools. It is also important to correctly determine the direction of the wind.
 device toilet house in the country
 What are cesspools?
If a specific summer cottage is not connected to a central sewer, then it is imperative to install a local sewer system. There are two main types:
- a system with the accumulation of effluents;
- storage system with the possibility of bio-treatment of wastewater.
In addition, local sewerage can be non-volatile or volatile. In the first case, the flow of liquid will occur naturally, and in the second - with the help of a pump.
The simplest storage systems are presented in the form of sealed tanks that can be bought without any problems. If a decision is made to independently build, then a simple pit is made with a special drainage bottom.
Simple cesspools
Such a structure is a reservoir with an earthen bottom, through which there is a natural filtration of effluents. This type of structure is considered convenient and simple for a summer cottage, while there is no need to frequently pump out waste. Despite some advantages, the liquid is absorbed into the ground rather slowly. If there is a large volume of drains, then the pit is not the best option. In accordance with sanitary standards, the maximum volume of waste for such pits is 1 m3. In addition, it should be said that such pits can be dangerous to the environment. As a rule, dirty water, getting into the ground, is cleaned with the help of bacteria that live in the ground, and if the volume of effluents is exceeded, they will not be able to fully cope with their functions. Thus, there is a risk of untreated effluent entering the ground. If they mix with groundwater, well water can become contaminated.
To prevent the risk of contamination of drinking water, when installing a pit latrine, it is imperative to take into account all sanitary and building codes for this type of structure. The distance from the drinking well to the pit should be at least 20 meters in the case of clay soil, 30 meters for loam and 50 meters for sandy soils. Soil characteristics also affect the rate of runoff absorption. For example, in the case of highly clay soil, frequent pumping of the pit may be required.
Sealed storage systems
In fact, this is a sealed container that can be made of brick, concrete, wood or concrete rings. Plastic products of various sizes are also often installed.
For the construction of such pits, there should be a slight slope of the bottom in the direction of the neck. Due to this design feature, the process of pumping out waste will be facilitated.
 assembling a toilet house over a cesspool from tires
 The functioning of storage systems of a sealed type is as follows:
- household and fecal waste enter the pit through a sewer pipe;
- when effluents accumulate to a certain limit, they are pumped out using a sewage machine.
If it is planned to build just such a pit, then it is necessary to foresee the possibility of the entrance of special equipment.
For such pits, there are also their own norms and requirements, namely:
- the distance to the extreme boundary of the site must be at least two meters;
- remoteness from a residential building - 5 meters;
- the maximum depth of the storage pit should be 3 meters. If it is larger, then pumping out wastewater may be difficult.
To minimize the risk of explosive gases in a sealed structure, it is important to provide natural ventilation. To create it, you need to prepare a pipe with a diameter of 10 cm. It is raised above the ground to a height of 60 cm. If you do not make a ventilation outlet, the methane formed as a result of waste decomposition can ignite spontaneously.
septic pits
Cesspools of this type are considered the most rational. Country toilets equipped with such facilities do not need to be pumped out throughout the entire period of use.
In fact, these are recesses with sealed walls made of brick, concrete or plastic. A drainage layer of stones, crushed cinder block or bricks must be laid at the bottom of the structure. Gravel and other materials can also be used as drainage.
These filters not only clean household and faecal effluents, but also provide an excellent breeding ground for the bacteria needed to decompose fecal waste.
Biological treatment systems
These systems are volatile, they consist of a sealed container, which is mainly made of plastic. Due to a special filtration system and forced air intake, the decomposition of harmful substances in the pit is noticeably enhanced, so the output is almost completely purified water. Since these systems operate offline, they do not require frequent maintenance.
Installation of local sewers
The easiest and fastest way to build an efficient cesspool is to install a plastic container. Despite all its advantages, such a solution turns out to be expensive. In this case, the work will be carried out according to the following algorithm:
- first you need to dig a hole of a suitable size;
- prepare a base of sand and concrete;
- now you can proceed to work on fixing the plastic container on the prepared base. This must be done so that the lightweight structure is not pushed out by heavy soil over time;
- after that, the structure is covered with earth and well tamped.
It is desirable that the inlet of the pipe into the tank be movable and non-rigid. This can be done by treating it with bitumen or a special compound. By performing such actions, the risk of depressurization of the joint during soil settlement is significantly reduced.
 arrangement of a toilet house with a cesspool made of concrete
 There is another good way to arrange another version of the cesspool, which requires serious labor. It is proposed to make a cesspool using concrete rings.
Separate concrete elements will be installed in the pit using a truck crane or a special manipulator. Usually, for the construction of this type of septic tank, it is required to prepare three concrete rings, while the height of each will be 0.9 meters, and the diameter can vary between 0.7-2 meters. Butt joints between the rings must be treated with concrete mortar. It also requires internal processing of the finished structure using bitumen. At the end of the work, the structure is covered with a concrete cover, in which there is a hatch for the possibility of pumping out waste. Only after these works can the septic tank be covered with soil.
This design is most often used to create a sealed cesspool, while a concrete or earthen base is possible.
Brick cesspool
Before you dig a hole for a toilet, you need to choose a place for its placement on the territory of a summer residence or a suburban area. In order to correctly determine this issue, it is necessary to take into account building and sanitary standards.
As mentioned earlier, latrine pit latrines can be airtight or not airtight. Let's consider these two options in more detail.
Sealed brick pit
To prevent runoff and waste from entering the sources of water intake through the soil, it is recommended to build a sealed cesspool, in particular, this concerns the creation of reliable walls and the bottom of the structure.
For the construction of such a structure, it is necessary to adhere to the implementation of such an algorithm of work:
- the chosen place is cleared of grass thickets and everything else that may interfere with work;
- a pit is being dug, the size of which will depend on the volume of effluents. As a rule, the larger the pit, the less often you have to pump out waste;
- the bottom of the cesspool must be well tamped and a layer of sand is poured, after which a concrete screed is made with the addition of gravel. In order for the structure to gain better strength, it is recommended to use a reinforcing mesh. For a screed device, it is worth preparing cement and sand in a ratio of 1: 3. You will also need water. For better strength and waterproofing, liquid glass can be added. Now the screed should harden properly;
- at the next stage of work, it is necessary to build the walls of the structure. The result should be a rectangular shape. The brick must be laid out in a dressing or on an edge. To obtain the required degree of sealing, such a cesspool must be plastered and treated with bitumen.
If the work is done correctly, the top of the brickwork will protrude about 10 cm above the ground. This must be provided to reduce the risk of melt and rain water entering the pit.
After laying out the walls of the pit, you need to consider the convenient location of the toilet cubicle. For example, the back wall of the structure may rest on the side ledges of the cesspool, but for the front of the structure, a foundation will have to be made. For these purposes, you can use a brick.
Leaky cesspool
For a device of this type of structure, it is not necessary to fill the bottom with concrete, it will be filtering. As this layer, you can use sand and coarse gravel.
 arrangement of a toilet in a country house with a cesspool
 The principle of operation is that waste enters the cesspool and is removed into the ground by means of a filter layer, while only liquid leaves, so over time the bottom may become silted. As a result, its transmittance deteriorates. To prevent this phenomenon, it is recommended to lay a brick with a distance between each element equal to 5 cm.
The toilet cubicle can be installed in the same way as in the first case.
Features of the cesspool device
- A cesspool must be dug, taking into account the number of people living in the house. If the question is asked how deep the pit for the toilet should be, it must be said that a depth of up to two meters is considered optimal, while it is important to make a slope towards the back wall.
- The bottom of the pit must be compacted and a clay layer about 20 cm thick must be created.
- In some cases, the bottom can be concreted, and the walls can be sheathed with wood or finished with bricks. If the level of groundwater occurrence allows, then it is not at all necessary to seal the internal surfaces of the structure, a clay layer will suffice.
- The base for installing the toilet can be made of wooden beams, which are pre-treated with an antiseptic. Instead of wood, concrete blocks or a curb used for laying sidewalks are used.
- You also need to make a flooring of wooden boards over a dug and trimmed pit. Next, a frame is assembled from the bars. As a result of such work, free space should be formed for the convenience of cleaning the pit. It is necessary to take into account the fact that the flooring will go beyond the toilet cubicle.
- Under the flooring, a layer of roofing material or other similar material is made.
- When installing the toilet frame, you need to make a folding roof behind its back wall. In fact, it will be a kind of hinged hatch for the convenience of cleaning the pit. In this case, the roof structure is hinged, pre-treating it with an antiseptic.
- A ventilation pipe must be removed from the cesspool. It is better to place it behind the back wall of the cabin of the country toilet. If the work is done correctly, the ventilation pipe will be mounted on the roof of the toilet, having a branch height of 10 cm. A standard pipe is suitable for creating ventilation. To prevent the possibility of precipitation and pollution entering the pipe, a special cone-shaped visor must be installed above it.
The pipe must be fixed to the back wall of the toilet using clamps. In the lower part, it should go into the pit under the floor level by about 0.2 meters.
To prevent the risk of flooding the cesspool, a blind area is made around the toilet to drain rainwater.
If periodic cleaning of the cesspool of the country toilet is required, then it is imperative to ensure that the sewer truck can access the facility. When resorting to the services of vacuum cleaners, you need to take into account that the length of the sleeve for cleaning septic tanks and cesspools is 7 meters.
In the vast majority of cases, the cesspool plays the role of a storage tank for a country toilet, because not everyone is ready to mess around with a septic tank and a filtration field.
It is not difficult to equip such an object, however, it is extremely important to choose it and its location correctly.
Indeed, in case of an error, the accumulated sewage will poison not only the soil, but also the life of the unlucky summer resident, as well as his neighbors.
Let's find out where it is located and what parameters the pit should have for: depth - width - length.

When planning the construction of a cesspool, it is necessary to take into account the location of various objects both on your own and on neighboring sites. The list of these objects looks like this:
Sources of water supply
The worst thing that can happen if the sewage collector is not properly placed is the poisoning of water or a surface reservoir where water for drinking and cooking comes from. To prevent this from happening, you need:

- Locate the pit at a sufficient distance from such objects. Sanitary standards consider a colossal distance from the point of view of an ordinary summer resident to be “sufficient distance” - 50 m. It is obvious that only in some areas there is a physical opportunity to comply with this requirement. Therefore, in real conditions, the minimum allowable distance is reduced to 25 - 30 m: as practice has shown, with such a distance, the presence of a pit does not affect water quality.
- Place the pit below the source. The logic is clear: in case of overflow of the sump, sewage should not flow down the ground to the well. In general, the lowest point of the site can be considered the best place for a cesspool, because the appearance of sewage in any object is undesirable.
- Take into account the flow of groundwater. This factor is perhaps more important than the terrain, especially if the pit is not airtight. The direction of groundwater flow is determined by a special study. It is clear that the projection of the pit onto the aquifer must be downstream relative to the source.
Once again, we draw the reader's attention to the fact that we are talking about water sources not only on our own site, but also on neighboring ones.
House and other buildings with a foundation
In order to avoid undermining the foundation, it is allowed to build a cesspool no closer than 5 m to the buildings. If there is a basement under the building, the limit is increased to 12 m. But if we are talking about a house, then you need to understand that you should not move away from it too much.
The fact is that the sewer pipe, through which drains from the kitchen, washbasin and toilet are discharged into the pit, must have some slope. Accordingly, the farther we take the pit from the house, the deeper it will have to be done.

Ready pit
It is not allowed not only to reduce the slope, but also to increase it. In the first case, the effluents will move reluctantly through the pipe, in the second case, the liquid will run off too quickly, as a result of which solid fractions will remain in the pipe.
In addition, it is highly desirable to place the pit so that the sewer pipe leading to it is straight. Each turn will become a place for the possible formation of a blockage, which is why it will be necessary to build a revision well here.
Other objects
- bath or shower: 8 m;
- the border of a neighboring plot or a fence: 1 m;
- trees: 4 m;
- shrubs: 1 m.

Location of elements of the sewer system
Not the last role in the choice of a place for a cesspool is played by the prevailing wind direction.. This structure, regardless of the design, will exude an unpleasant odor to one degree or another, and I would like it not to be constantly thrown by the wind into the residential area.
If groundwater rises above a depth of 2.5 m in spring, the construction of a cesspool is not allowed.
But you can dig an absolutely sealed container into the ground, for example, plastic. Just keep in mind that a light polymer tank will be squeezed out of the ground (the process is called "floating") if it is not attached to some kind of anchor - a concrete slab laid from below or pins driven into the ground.
Those summer residents who, due to the high level of groundwater or for other reasons, cannot build a cesspool, can be recommended to install one of the varieties. Such a product has its own sealed storage tank in which the waste is processed in one way or another, so that their disposal is relatively easy.
Calculation of a country cesspool
Having chosen a suitable place for a cesspool, its geometric parameters should be determined. Let's go in order:
Volume
 According to the requirements of sanitary standards, the minimum volume of a cesspool should be 2 cubic meters. m. If it is built only for an outdoor toilet, this value will be quite enough.
It is another matter if it is supposed to collect drains into the pit not only from the toilet, but also from the kitchen with a bathroom, and the waste is also washed off with water.
In this case, you need to make a simple calculation: it is believed that the daily volume of domestic wastewater is 0.2 cubic meters. m per person. This value is given in sanitary standards, that is, if three adults and one child live in the house, 3x0.2 + 0.1 = 0.7 cubic meters per day will enter the pit. m of drains (children's norm is half that of an adult).
- The pit will have a draining bottom with a filter bed of crushed stone, that is, the liquid fraction will partially go into the ground. In this case, its volume should be taken equal to the triple daily volume of effluents, that is, in our case it will be V \u003d 3x0.7 \u003d 2.1 cubic meters. m. With this volume, the liquid will have time to soak into the ground and the pit will not overflow. Note that building a pit according to this principle is not the best solution, since dirty water seeping into the ground will poison it. It would be more correct to build a septic tank in which water is cleaned by settling before being discharged into the ground.
- The hole will be sealed. In this case, the volume of the structure should be taken in such a way that pumping should be performed no more than once a month.
For 30 days, the family taken as an example will produce 0.7x30 \u003d 21 cubic meters. m of drains, therefore, such a useful volume (below the tie-in of the sewer pipe) should have a pit.
Depth
The depth of the cesspool should be taken taking into account the length of the hose of the sewage machine, which is usually 3 m. Thus, it is advisable to make the pit no deeper than 2.5 m in order to ensure that all sediment is pumped out from the bottom.
Width
The width of a small cesspool, intended exclusively for an outdoor toilet, is taken equal to 1 - 1.5 m.
When building larger structures, it is necessary to take into account what materials will be used for the flooring device, because the pit is blocked exactly in width.
If thick boards are used in this capacity, it is advisable to make the width no more than 2 m.
In the presence of a reinforced concrete slab (it can be cast independently on the spot), the width can be taken equal to 3 m or more (depending on the brand of the slab).
Even if the dacha is just a bare piece of land without a single building, you still can’t do without the main thing - the toilet. The need for this uncomplicated building arises after a few hours of staying at their summer cottage. Despite the fact that we all imagine how a toilet should look like and what needs to be done, it’s still not worth rushing. First of all, you should study the site in order to understand what type of country toilet can be built in a particular case, because there are several of them. Then you need to decide where exactly you can put the toilet, while observing sanitary rules and regulations. And only after that you can proceed directly to the construction. There is nothing complicated in making a country toilet with your own hands. However, it is not necessary to make a toilet box yourself. The modern market can offer ready-made toilet houses for every taste. In this article, we will analyze the instructions on how to make a toilet with your own hands, starting with choosing the type of toilet and ending with making a house.
What kind of toilet in the country can be equipped - types and features
In a well-equipped dacha, where there is a house and you can actually live, it is advisable to have two toilets - one in the house and the second on the street. The toilet in the house is convenient to use at night or in bad weather when it rains. Still, the house is warmer and more comfortable. An outdoor toilet for a summer residence is necessary in order to use it during the day after gardening work on the site and not carry dirt from the street into the house.
In total, there are several types of toilets that can be used in the country:
- Outdoor toilet with a cesspool.
- Powder closet.
- Backlash closet.
- Dry closet.
- Chemical toilet.
The choice of toilet is influenced by such an indicator as the level of groundwater. If the water is far away (deeper than 2.5 m) and never rises above this mark, even during the rainy season or spring floods, then any of the proposed toilet options can be used. If the groundwater level is high, the water is close to the surface, then it is impossible to equip a toilet with a cesspool.

Outdoor pit toilet- the good old time-tested design. It is a cesspool up to 1.5 m deep, on top of which there is a toilet house. Impurities in the pit accumulate and gradually decompose. If the intensity of use of such a toilet is high, then the filling of the pit occurs rapidly, the sewage does not have time to ferment. Previously, such a problem was solved simply - they rented a toilet house, dug in an old hole, and dug a new one in another place and put a toilet on top. Now they prefer to clean cesspools either with the help of a sewage machine or manually.

Powder closet- a toilet option for areas where water is close. In its design there is no cesspool at all. Instead, a container (bucket, barrel, box) is used, which is installed immediately under the toilet seat. So that sewage does not remind too much of itself with an unpleasant odor, after each trip to the toilet they are sprinkled with dry peat, sawdust or ash. The process itself resembles powdering, from which the name of this type of toilet "powder-closet" came from. After filling, the container is taken out and emptied into a compost pit, heap or other place. Over time, sewage, sprinkled with peat, will turn into a wonderful fertilizer.

play closet- a toilet with a sealed cesspool, which is cleaned with a cesspool machine. Usually backlash closets are equipped directly in the house next to the outer wall of the house. The cesspool is located outside, sewage enters it through a pipe. The pit itself has a slope away from the house for easy cleaning.
dry closet- a booth familiar to urban residents with a container into which active microorganisms are poured to process sewage. Probably the easiest way to equip a toilet in the country, since you don’t need to build anything - you can buy a ready-made dry closet of any size, both outdoor and home.
chemical toilet differs from a dry closet only by means of sewage processing. Chemical reagents are used here, so the contents of the container after processing cannot be used as fertilizer in the garden, unlike a dry closet.

peat toilet- This is a homemade version of powder closet. In fact, the powder closet is also a peat toilet, because in it peat is used to powder feces. The home peat toilet is a modernized achievement of civilization. It is very similar to an ordinary toilet, only in the water tank instead of water there is dry peat, and instead of sewer pipes, a sewage container.

Such a toilet can be safely installed inside the house. To eliminate unpleasant odors, ventilation is provided in its design, which must be taken outside.
The choice of a toilet for a summer residence depends entirely on your personal preferences and on the conditions that dictate the rules of SanPin.
There are certain restrictions on the placement of an outdoor toilet. First of all, they concern those toilets in which sewage can come into contact with soil and groundwater.
- There must be at least 25 m from the toilet to the water source. Whether it is a well, well, lake, stream or other water body. If the summer cottage is located under a certain slope, then the toilet must be installed below the source of water intake. This will prevent effluents from entering drinking water.
Important! Please note that you should consider not only your source of water, but also the nearest neighbors.
- From the toilet to the house and the cellar or basement there should be at least 12 m.
- From a summer shower or bath, sauna at least 8 m.
- The distance from the building for keeping animals to the toilet should be 4 m.
- From tree trunks - 4 m, from shrubs - 1 m.
- From the fence to the toilet should be at least 1 m.
- Also, the wind rose must be taken into account when choosing the place and location of the outdoor toilet, so as not to annoy either yourself or your neighbors with unpleasant amber.
- The door to the toilet should not open towards the neighbors.
- If the groundwater is below 2.5 m, then any outdoor toilet can be equipped. If it is higher than 2.5 m, then a toilet with a cesspool cannot be made, only a powder closet or backlash closet, and dry closets can also be installed. Such structures are safe in the sense that sewage cannot enter the groundwater and pollute it.
Please note that when choosing a place for a toilet, you need to focus on objects not only on your site, but also on the neighbor's. This applies to trees, and sheds, and houses, and everything else. For toilets of the powder-closet and backlash-closet types, the above restrictions do not apply, since sewage does not come into contact with the ground in them. The only thing that will have to be considered when placing them is the wind rose and ease of use.
Do-it-yourself toilet in the country - instructions for building a powder closet
It’s not so difficult to equip a country toilet with your own hands, it’s enough to have basic carpentry skills, engineering thinking and stock up on the help of a friend. Let's consider an example of building a toilet in a country house like a powder closet. As we already wrote, its peculiarity is that there is no cesspool under the toilet. And this makes the task much easier. Firstly, such a toilet can be located next to a residential building. Secondly, the construction technology itself is somewhat easier; you don’t have to dig a foundation pit. Thirdly, groundwater pollution is excluded.
The construction of the toilet must begin with a drawing so that all elements and details have the appropriate dimensions, and not by eye. Due to the fact that there is no cesspool in the powder closet, only the design of the toilet house will be shown in the drawing.
Schematically powder closet can be represented as follows:

The dimensions of the toilet are selected so that it is convenient to use. For example, the most common size: width 1.5 m, depth 1 m, height 2.2 m. Dimensions can be increased if the dimensions of the owners require it. The material for making a toilet can be different: the most common are wooden toilets, but you can sheathe the walls with a metal profile, slate or other material, as well as build brick walls.
Country wooden toilet - sectional drawing.
Example 1.


Example 2.

You can use the ready-made drawing, or you can make your own. The main thing is compliance with the dimensions during construction.
Foundation and support for the toilet

A country toilet is a structure that does not require a heavy foundation. In some sources, you may come across a proposal to fill a strip foundation under the toilet. In fact, this is superfluous, especially if the toilet is wooden. A support for a toilet house can be made in two ways: the first is to bury the pillars, the second to lay bricks or concrete blocks around the perimeter.
As pillars-supports, you can use both a wooden beam or a log, and concrete columns. The latter are more resistant to aggressive environments and will last longer.
- First of all, we mark the area. It is extremely important to accurately determine the angles of the structure.
- We take 4 asbestos-cement pipes with a diameter of 150 mm and coat them outside with bituminous mastic.
- In the corners of the toilet house, we dig wells and bury the pipes to a depth of 50 - 70 cm. The depth of the pipes may be more, it depends on the structure of the soil. Can be made 90cm or 1m.
- To a height of 1/3 of the pipe, they must be poured with concrete mortar. Carefully compact the concrete to remove air bubbles.
- Inside the pipes we insert wooden or concrete pillars-supports. To fix them, add concrete mortar.
Support pillars in this case can also act as a vertical part of the frame, i.e. they must be driven to a height of 2.3 m from the ground. It is also necessary to constantly check that the location of the pillars is even relative to the corners.
There are cases when it is enough to fix concrete blocks or bricks as a support, on which the frame will then be installed. In this case, it is necessary to remove the top layer of soil to a depth of 20 - 30 cm and compact the base tightly. For greater reliability, a layer of sand can be covered at the bottom. Concrete blocks, bricks or concrete curbs are installed on top.
We make the frame of an outdoor toilet

The frame of a country toilet can be made from a wooden bar 50x50 mm or 80x80 mm. It is not necessary to take a thicker and more massive timber 100x100 mm and more. You can also use metal corners.

The frame should be a structure:
- 4th bearing vertical supports.
- Toilet roof lining. The longitudinal bars for the roof should protrude 30 - 40 cm beyond the toilet body. In front, the canopy will serve as a visor, and in the back - to drain rainwater away from the toilet.
- Strapping or screed at the level of the future toilet seat. Usually, the strapping bars of the toilet seat are attached to the bearing vertical supports. The height of the toilet seat should be comfortable - 40 cm from the floor of the toilet.
- Diagonal struts for structural strength on the rear and side walls of the toilet.
- Frame for fastening the door. Two vertical supports to a height of up to 1.9 m and a horizontal lintel on top at the same height.
Be sure to calculate the height of the toilet seat, as too high a seat will be uncomfortable, especially if there are short people among the owners. Indicate at what level the final floor in the toilet will be, and set aside 38 - 40 cm from it upwards. Please note that on top of the strapping there will be a sheathing 20 - 25 mm thick.
We sheathe the body of the toilet, make the roof
Further construction of the country toilet is to sheathe the frame. Since wooden toilets are always popular due to their original beauty, convenience and comfort, the walls of the country toilet can be sheathed with wooden boards.

Wooden boards 15 - 25 mm thick are nailed to the frame, tightly fitting them to each other. Boards must be placed vertically. Since the roof will be sloped towards the rear wall, the upper part of the sheathing boards will have to be carefully cut at an angle.
Instead of wood, you can use sheets of corrugated board, slate or other material. They are much easier to work with, as you only need three sheets for the back and two side walls. But in such a toilet it is much less comfortable to be than in a wooden one. And all because there is no natural moisture and air exchange through the walls.
On the back wall of the toilet, it is necessary to make a door through which it will be possible to remove the container with sewage. Usually it is made over the entire width of the back wall to a height of 40 cm (up to the height of the toilet seat). Such a door is fixed on hinges. You can make it from the same wooden boards.
The roof of a country toilet is usually covered with the same material as all the buildings on the site so that the buildings do not stand out from the composition. You can use sheets of corrugated board or metal tiles. A hole must be made in the roof for the ventilation pipe, which should then be carefully sealed.
If you want to make the roof of the toilet wooden, then it must be covered with roofing felt or other rolled material so that the tree does not get wet.
We hang the door
The door for a country toilet is usually made of wood. We hang the door on hinges. The number of hinges 2 or 3 depends on the severity and massiveness of the door. The heavier the door, the more hinges should be. The mechanism for closing the door to the toilet, everyone does as he likes: a latch, a hook, a latch or a wooden latch. A latch must also be installed inside the toilet.
A window should be made above the door through which natural light can penetrate. Usually it is made as close to the roof as possible so that water does not get inside during rain. The window can be glazed, then neither rain nor insects that often fly through such windows will be terrible. What a country wooden toilet looks like can be seen in the photo.
Country toilet: photos - examples


We equip the toilet seat
The seat or toilet seat in the country toilet is made of wooden boards, lining or moisture-resistant plywood. It is better to use pure wood without additives, so we exclude plywood. The frame of the future toilet seat was made at the stage of arranging the frame, so now it is enough to carefully sheathe it with wooden boards and paint it. In the middle we cut a hole through which we will relieve ourselves. Be sure to check at what depth from the beginning of the toilet seat a hole should be made so that it is convenient to use it.

Under the toilet seat we install a container for sewage with a volume of 20 to 40 liters. By the way, the toilet seat cover can be made reclining on hinges, or it can be stationary.
We hang a container for peat on the wall in a convenient place. At the bottom we put a bucket for toilet paper. A washbasin can be installed inside the toilet, if the dimensions of the building allow it. Then we install a bucket for slops under the washbasin.
How to build a toilet in a country house with a cesspool

The construction of a pit latrine is somewhat more complicated, as a waste pit will have to be equipped. The toilet house for this type of toilet is no different, so we will not touch it. We will only indicate how to make communications. The diagram shows how the cesspool should be located relative to the toilet house. Based on this, we carry out the marking of the site and proceed to earthworks.

- We dig a cesspool with a slope towards the rear wall of the toilet with a depth of 1.5 m.
- We tamp the bottom and walls of the pit with clay with a layer of 15 - 25 cm. Some people make the walls of the pit from wood, brick or concrete instead of clay. If the groundwater is at a sufficient depth, then it is not necessary to make the walls of the cesspool completely airtight. Enough clay castle.
- We knock down the base for the toilet from a wooden bar 100x100 mm. You can also use a sidewalk curb or concrete blocks, laying them on the ground. If you use a wooden beam, then it must be treated with an antiseptic.
- Above the cesspool we equip the flooring from the boards. First, we knock down the frame of the bars. We make such a distance between them that it is convenient to clean the pit. Please note that the flooring is done outside the toilet house, there is free space under the house of sufficient size for sewage to fall into the pit.
- The flooring must be upholstered from below with roofing material or other rolled material.
- Behind the toilet we install a hatch, which is a hinged lid. The hatch will be used when clearing the pit. We treat the wooden hatch with an antiseptic.
- We lay the ventilation pipe from the pit. We install it next to the back wall of the toilet, display it 70 - 100 cm above the roof of the toilet. For these purposes, you can use a regular sewer pipe. We fix a visor on top of the pipe so that water and debris do not get inside. We fix the pipe to the back wall with clamps. The bottom edge of the ventilation pipe should be 15 - 20 cm below the level of the toilet floor.
- A toilet house is installed on top.
- Around the toilet with a cesspool, it is imperative to make a blind area and drain rainwater so that it does not flood the sewage pit.
If in the future it is planned to clean the cesspool with the help of a sewage truck, then the toilet must be located on the site so that the car can drive up to a sufficient distance. Remember, the sleeve of such a machine is only 7 m.
Country toilet backlash-closet and its features

Most often, a country toilet of the backlash-closet type is installed next to a residential building or inside the house. The sewer pit is located outside the building, behind its walls. A toilet of this type can only be built where it is possible to heat the sewage pit in winter. If they don’t use the toilet in winter, then before the end of the season, the cesspool must be completely cleaned.
The main difference between the backlash closet and other types of toilets is that the cesspool in it is completely sealed and is regularly cleaned using a cesspool machine. Here are a few differences in the construction of a backlash closet:
- A sealed pit so that sewage does not soak into the ground. You can fill a pit of concrete, make it out of brick and plaster, or you can use ready-made plastic containers - caissons.
- There must be a ventilation pipe from the cesspool. It must be carried out through the chimney of the stove or fireplace. In turn, a pipe should go from the chimney into a pit through which warm air will flow. This is necessary so that the pit does not freeze. The material of the exhaust pipe is asbestos-cement or ceramic.
- If the house does not have a conventional stove or fireplace, but only gas heating, then the cesspool must be heated using a low-power electric heater.
- A cover / hatch is made over the pit. To prevent the lid from freezing, it is made double: the upper one is metal or cast iron, and the lower one is wooden. Between the covers we lay heat-insulating material.
- The slope of the pit should be away from the house for easy cleaning.
Recently, peat toilets for summer cottages have become increasingly popular. Their convenience is that they can be safely placed in the house in any room. Peat toilets are easy to clean, practically do not emit a smell, even a fragile woman or an elderly person can cope with them. Also, such toilets can be made on the street, the same powder-closet is just the predecessor of the modern peat toilet.


