The arrangement of a modern bathroom in a wooden house requires the use of special construction measures to protect architectural elements from the negative effects of moisture. In this case, any technological error can be critical and cause irreparable damage to the structure. It is advisable to provide a bathroom device in a wooden house at the design stage. During the calculations, it is necessary to take into account the large weight of the bathroom and, therefore, to strengthen the elements of the floor. In addition, to improve the operating parameters of the premises, an effective natural or forced ventilation system should be made, the issue of water supply and sewage disposal should be resolved.
The calculated maximum load on the floor beams should increase to 460 kg / m2, to ensure such indicators, beams of increased cross section are taken. In addition, they should be located slightly lower than the beams in other rooms. And another very important feature of wooden houses is significant shrinkage. The arrangement of the bathroom, unlike residential, can be started only after the complete completion of shrinkage, and this requires at least a calendar year.
The bathroom is the place where all the engineering systems of the house are concentrated, some of which require periodic maintenance. This complicates the tasks for the builders, they must isolate the pipelines in such a way that they do not restrict access to them for inspection and maintenance.
What are the features of the installation of elements to ensure safe and long-term operation of the bathroom?
| Name of elements | Description and technical requirements |
|---|---|
| Condensation forms on pipes with cold water, negatively affecting all surrounding wooden structures. To reduce the amount of condensate for water supply, it is recommended to use only plastic pipes, they have a lower thermal conductivity compared to metal, which minimizes the amount of condensate. Pipes should not come into contact with wooden walls, they should be mounted taking into account the possible ingress of condensate. If possible, plastic water pipes should be thermally insulated with special polyurethane foam tubes. | |
| Special requirements are put forward for tightness. The main problem is that under all wooden buildings there are necessarily air ducts for natural ventilation. This means that in winter there is a possibility of sewer pipes freezing, to prevent this phenomenon they must be buried in the ground. One more problem. Sewerage works without pressure, leaks are difficult to notice due to the small amount of water flowing out. But that doesn't make leaks any less dangerous. To increase the life of wooden buildings, all pipe connections must be completely sealed. | |
| The bathroom has a high relative humidity. Under such conditions, the open contacts of the electrical wiring quickly oxidize, the resistance at the junctions increases and the temperature rises. The degree of heating can become critical and cause a fire in wooden structures. According to the requirements of the PUE in such places, the connection of electrical cables should be as reliable as possible, all limit switches are covered with a layer of tin. | |
| Wooden structures must have reliable vapor and waterproofing, it is advisable to use modern materials that allow the elements to "breathe". Due to this effect, the moisture that has fallen on the tree can evaporate naturally. | |
| An obligatory element of arrangement of all bathrooms in wooden houses. Some developers do not pay due attention to ventilation, they believe that heat losses increase significantly because of it. Regulatory documents require at least 5 air changes in bathrooms. This means that the entire volume of air must be replaced five times within an hour, such an indicator can only be provided by high-quality ventilation. |
bathroom ventilation
These special requirements must be taken into account when furnishing a bathroom in wooden buildings.
Step-by-step instructions for arranging a bathroom
For example, we will consider the most difficult arrangement option: the premises are old, it is required to dismantle the walls, ceiling and floor, revision of engineering networks. With new construction, some operations can be skipped. Old finishing materials from the walls must be removed to the tree, the floor must be cleaned and the old ceiling dismantled.
Step 1. Remove the entire decoration of the room up to the skeleton of the house, check the condition of the wooden structures, and if problem areas are found, fix them. The ceiling must be released to the floor beams, and the floor to the log.
Step 2 On the draft floor, make a screed with a semi-dry mortar, the screed plane should lie at the level of the log. A semi-dry screed has a relatively low weight and good heat-insulating performance, which is why it is recommended to use this material for work. The leveling of the surface is carried out by the rule, the log surfaces serve as beacons. Allow time for the material to dry.
Step 3 Cover the screed with two layers of 200 µm polyethylene film. Around the perimeter of the walls, it is necessary to provide inversions with a height of about 15–20 cm. It is better to make inversions with a margin, and then carefully cut the film than to allow the mortar to come into contact with wooden elements. The film is fixed using an ordinary stapler.
Practical advice. Other modern materials can be used for waterproofing. We recommend using film for two reasons: it has the lowest cost, and in terms of efficiency, the material is in no way inferior to expensive analogues.
Step 4 Attach damper tape to the walls. It is needed to compensate for the linear expansion of concrete screeds. If it is not installed, then there are great forces between the walls and the floor. As a result, the screed can swell and crack. The thickness of the tape is about 4-5 mm, it is also fixed with a stapler.
Step 5 Lay reinforcement to increase the strength of the concrete screed.
It is necessary to use only construction reinforcement of a periodic profile. To raise the bars above the floor, you can use pieces of plastic pipes with a height of five centimeters. Lay the bars once across the room, and the second time along the top. The dimensions of the reinforcement must correspond to the dimensions of the room, the distance between the bars is approximately 20–25 cm, the diameter of the bars is 8 mm. To prevent the bars from moving during the pouring of the screed, tie them together with wire. You do not need to knit often, it is enough to fix each rod in three places in a checkerboard pattern along the reinforcement surface.
Practical advice. To increase the strength of concrete, you can additionally use a chain-link mesh and put it on reinforcing bars. But professional builders consider it a waste of time and money. The strength of the mesh is much lower than the strength of building reinforcement; it does not have any noticeable effect on the final performance of the concrete screed. Especially since it lies on top of the armature.
Step 6 Make holes for the sewer, insert temporary mortgages into them. In the future, they are removed and permanent sewer pipes are installed.
Step 7 How to fill the screed? This is a simple process, but some inexperienced builders make gross mistakes - they make a screed in two layers. The reinforcement is poured first and the beacons are placed on the second and the surface is leveled. This is explained by the fact that it is difficult to install beacons on the reinforcement, especially if a chain-link mesh lies on top of it. Doing so is strictly prohibited.
Why? Firstly, the adhesion values between two different layers are much less than the strength of a monolithic layer. Secondly, in most cases, the reinforcement is located in the middle of the screed, and in this position it does not work. The reinforcement should be located at 1/3 of the layer thickness, it does not matter if it is above or below. But not along the axis of symmetry. Only in this position does it compensate for bending forces to the maximum by binding the concrete layer into a single monolithic structure. Conclusion - you need to correctly place the reinforcing layer in height, and pour the screed immediately over the entire thickness. It is more difficult to make lighthouses with fittings, but you do not need to pay attention to this.
If the installation of beacons interferes with the chain-link mesh, then they will have to be done in two stages. At the first, throw the solution in heaps a little above the grid, give time for the solution to solidify. After setting, increase the height of the poured solution under the beacons to the required height. For beacons, you can use metal or wooden slats. The bathroom is small, there should be no problems with the exact installation of beacons. First, mark the zero level of the floor on the walls; for these works, you need to use a water or laser level. Reiki are set along the marked lines, the position is controlled by the level.
Step 8 Prepare a cement-sand mortar and make a screed. If the bathroom is small, then in this case, you can use a semi-dry mixture. Alignment is carried out by the rule; after completion of work, the slats can be removed or left in the solution.
The work on preparing the floor base for the slab is completed, you can proceed to wall and ceiling decoration.
Step 1. Treat the walls with an antiseptic and a primer, it will increase the adhesion of the surface to the plaster. It is better to process with a pneumatic spray gun, the jet moves at high speed and penetrates into all recesses.
Practical advice. If the bathroom has a main wall, then it is recommended to insulate it with pressed mineral wool at least five centimeters thick. Mineral wool is glued to the wall with a special adhesive (can be glue for ceramic tiles), which ensures a tight and durable fit.
Keep in mind that you should not allow a gap between the insulated surface and the insulation. Air moves freely in the gap, and this sharply reduces the effectiveness of insulation. To increase the stability of fixing the mineral wool, nail it to the wall with long nails; pieces of sheet metal can be used as large hats.
Step 2 Finish the front surface of mineral wool with waterproofing mastic to protect it from moisture. Mineral wool has a lot of advantages, but also two significant drawbacks. With an increase in humidity, thermal conductivity increases sharply. In addition, it dries poorly, and prolonged contact of wet mats with wooden structures causes putrefactive processes.
Step 3 Insulate the ceiling of the bathroom according to the same algorithm. If two rows of pressed mineral wool sheets are required, they should be staggered to cover the joints.
Step 4 To vapor barrier the ceiling, finish it with any foil material. The overlap between the vapor barrier strips must be at least ten centimeters; adhesive tape is used for complete sealing. Carefully and very well isolate the ceiling, during the adoption of water procedures, it is affected by the maximum amount of steam. Wrap the vapor barrier on the walls, the width of the ceiling should be approximately 10 cm.
Step 5 Start mounting a metal mesh on the walls under the plaster. The mesh is fastened with a large pneumatic stapler or carnations.
Grid for plaster. Lighthouses installed. A photo
Important. Be sure to go around the corner with the mesh, and do not make joints in this place. Due to this technique, the likelihood of cracks in the plaster in the corners is excluded.
Between the mesh and the wall, make a gap of several centimeters, use various improvised gaskets.
Step 6. Install beacons. It is easier to do this with wood screws, a metal rail and a laser level. If you do not have it, then the beacons can be set with an ordinary plumb line.
- With an even rule, determine the most convex place on the surface, for this, apply it to the wall in several places. This parameter sets the thickness of the plaster layer.
- Screw a self-tapping screw under the ceiling, attach an ordinary plumb line to it and screw the lower self-tapping screw according to its level. Under a flat rail, fix the hardware in one line. If you have enough practical experience in plastering, then instead of a plumb line, beacons can be set to an ordinary level.
- Do the same operation at the opposite corner of the wall.
- Screw the metal bar on the screws, use special metal plates to fix it.
- Pull the ropes between the two extreme rails and install all the remaining beacons along them. The distance between them should be 20–30 cm less than the length of the rule.
Step 7 Check the position of the metal mesh, it should not touch the surface of the walls, if such areas are identified with pliers, bend the wire. According to the electrical wiring diagram, fix the wiring boxes, sockets and switches on the wall. After the wires are pulled inward, the cases should be closed, this will prevent the solution from getting inside.
Step 8 Install electrical cables, while strictly complying with the requirements of the EMP. If you do not have enough knowledge, then you need to seek help from a professional electrician.
Walls can be plastered without pre-installed boxes, but then you will have to hammer and close special holes under them. If you do all the work yourself, then you should not create unnecessary problems for yourself. At the same time, put mortgages under water sockets, water supplies, etc. Mortgages are needed for all communications that are available in the bathroom.
Step 9 Check the correct installation of the elements, everything is in order - proceed to plastering the walls. This can be done in two ways: traditional manual using a column and modern mechanized using a hopper bucket. The first method is very labor-intensive, the second allows you to perform work much faster and at the same time minimize the amount of labor-intensive work. Ordinary plastering has long been known to everyone, we will tell you how to work with a hopper bucket.
Important. Before preparing the solution, the sand should be sifted through a fine sieve. Otherwise, there will be problems with the mechanism for applying the mixture to the wall.
Remember that the thickness of a single layer of plaster cannot exceed 1.5 cm - when a thick layer dries, deep cracks will definitely appear. If your plaster is thicker in some places, then you will have to do the work in two stages.
- Cover the floor with cardboard or plywood scraps, protecting it from liquid plaster. Thick layers of dried plaster will be removed from the floor screed without problems, and if you level it with your feet, then the coating will have to be cleaned for a long time.
- Prepare the plaster mix. For one part of cement, add 4-5 parts of sand, water as needed.
- Take a portion of the solution with the hopper bucket and throw the first contact layer about one centimeter thick on the wall.
- Allow time for a slight hardening of the plaster and, as a rule, remove the excess.
This completes the first stage, you can continue only the next day. During this time, the solution will harden a little and excess moisture will evaporate from it. If cracks appear - not a problem, the second layer will close them. The finishing layer of plaster is also thrown with a hopper bucket. Work in sections, immediately remove excess plaster as a rule. Pull it along the beacons from the bottom up, at the same time move it slightly to the left / right. Throw off excess solution back into the container with the mass. The small remaining recesses can be thrown over with a cell and again leveled with a rule.
Important. When working with the hopper bucket, be sure to use personal respiratory and eye protection.
If the walls are planned to be finished with ceramic tiles in the future, then nothing more needs to be leveled. Before painting, the surface must be perfectly leveled with grout. This completes the plastering process, you can proceed to the next stage of arranging the bathroom.
Laying ceramic tiles
Start working only after the concrete surfaces are completely dry, this will take at least two days. Be sure to prime the dry screed to improve the adhesion coefficient.
- Mark up the tile placement. At the same time, keep in mind that the seams on the floor and walls must completely match. The axis of symmetry of the layout of the tiles on the floor is placed in the middle of the front door, and not in the middle of the room. This is the axiom of laying tiles in any room.
- Start laying tiles from the floor, prepare a special solution for gluing, fully follow the recommendations of the manufacturers.
Checking the evenness of laying floor tiles
Practical advice. Trimming tiles should be done at the invisible junction of the wall with the floor. As a rule, in the place where the bath, plumbing, washing machine and other equipment will be installed. If this option is not possible, then trimming the tiles is done symmetrically on both sides, this method somewhat complicates the process of laying the flooring.
Wall tiling
The last stage of arranging a bath is finishing the ceiling. You can use cheap plastic panels, they are not afraid of moisture, easy to install and quite durable. In addition, there is a huge selection of different types of panels in the implementation, which makes it possible to create any interior in the room. Plastic panels are fixed to the metal frame. If you want to make a frame from wooden slats, then they need to be impregnated at least twice with effective antiseptics.
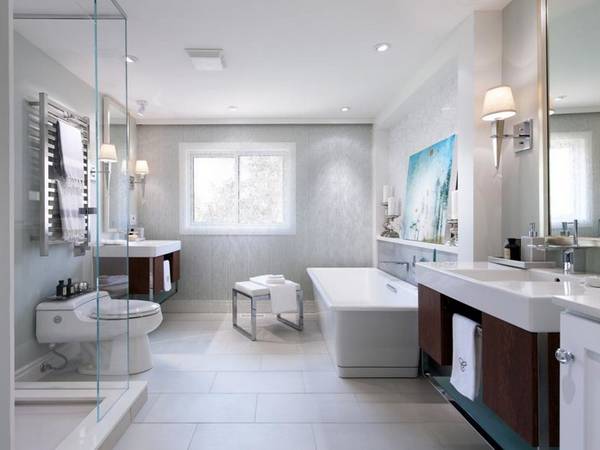
It is difficult to imagine a modern home without such already familiar amenities as a bathroom and a bathroom. It doesn’t matter if the bathroom is located in a private house outside the city or in an apartment, in any case, the creation of its design must be approached responsibly. Properly selected colors and thoughtful interior will provide a relaxing atmosphere where it is nice to find yourself after a hard day. Of considerable importance is the correct selection of materials, as they must be resistant to moisture. In today's article, we will learn how to make a beautiful bathroom design in a private house, and also look at interesting design options in the photo selection below.
Bathroom in a private house - layout of the room
The big advantage of a private house, compared to an apartment, is that it is possible to set the dimensions of the bathroom on your own, as well as place it in any part of the house. This significant advantage allows you to implement the most daring design solutions and equip the bathroom with additional accessories.
Whether you're building a house from the ground up, or just looking to redecorate your existing bathroom, the amount and extent of prep work required varies.
With new construction, even at the stage of creating a design project, it is worth deciding on the location of the bathroom. This is necessary in order to immediately carry out the necessary communications during the construction process, such as water supply and sewerage, as well as perform waterproofing. At the next stage of construction, a ventilation system is created. Provided that the exhaust system is done correctly, this approach will eliminate unpleasant odors relatively quickly, reduce humidity and minimize the destructive effect of moisture on the finish of the room. When the above steps have been fully completed, then proceed to the decorative decoration of the room. Often, a bathroom in a private house has a fairly large area, which makes it possible for creativity in planning and decorating the room.
If you are planning to renovate an existing bathroom, then this will require much less effort and investment. The main preparatory actions include the dismantling of old plumbing equipment, as well as finishing the floor, walls and ceiling. To better navigate the modern design trends, we suggest looking at the photos of bathrooms in private houses below.


Installing a window in a private bathroom
The main advantage of installing a window in the bathroom is the additional possibility of airing the room. Even with an exhaust system, an open window will help to get rid of the steam much faster after taking a bath. Another plus is the increase in the level of natural light, which saves money on lighting during daylight hours. In addition, often a window sill is mounted under the window, on which several decorative elements can be placed. If your house is located in a picturesque place, then another nice bonus will be a beautiful view from the window. See how the windows of the bathroom in a private house are originally inscribed in its design in the photo selection below.


Beautiful design of bathrooms in private houses: photo of finishing ideas
Before proceeding with the direct finishing of the bathroom, it is necessary to insulate the walls and floor. These actions will help to avoid the formation of a large amount of condensate, and therefore fungus with mold in the future.
Since the bathroom in a private house is a “wet” room, the most moisture-resistant materials should be used for its decoration, of which, today, there are a large number. All these materials have their advantages and disadvantages, and of course, they differ in price. If you are thinking about how to make a bathroom in a private house fashionable and modern, then you need to know what finishing materials are the most popular today.
Ceramic tile for bathroom
This material is recognized as the most popular today, because it has many positive characteristics. This is an excellent moisture resistance, resistance to damage, as well as a huge variety of color and texture solutions. All these advantages allow you to create interiors in almost any style, it all depends on your imagination and financial capabilities.


Plastic bathroom panels
Plastic panels are the cheapest way to finish a bathroom, which is perfect for giving. The advantage of this finish can be called a large selection of colors and sizes. The main disadvantage is that the panels are easily damaged.


wall painting
It is easy to create a very original design by painting walls, combining different shades or using special stencils for decoration. Before painting, the walls must be plastered and primed. Only after preparation, a special moisture-resistant paint is applied to the walls.


natural wood
Finishing the bathroom with natural wood will make it stylish and very comfortable. For such a finish, you need to use only moisture-resistant wood species, as well as additionally treat them with special means to protect against moisture.


Wallpaper in the bathroom
To finish the bathroom, you can also use special moisture-resistant wallpaper. However, in places where there is direct exposure to water, it is better to combine with another, more moisture resistant material, such as ceramic tiles.


Transform your bathroom from an inexpressive nothing, not representing in a bathroom that is pleasant to be in.
I want, with pleasure, to show the process of how it is transformed.
So, let's go to see how the bathroom renovation was done in a private house "Before and after" photos and learn about the project.
This is what the bathroom looked like before the renovation.
Bathroom before renovation
Dismantling
Well, let's get started ... There is a lot of work, but as the proverb says, you can willingly hammer a nail into a stone.
We clean the bath, cut off the battery.
Water supply and sewerage
From polypropylene we breed pipes for water supply and heating (on a heated towel rail)
Instead of a bathroom will be made do-it-yourself shower cabin, so we lay out a podium made of bricks and install a sewerage system with a drain ladder into it. At the same time, a heating pipe will pass through the floor, which during the heating period will serve as a kind of warm floor.
Electrician
We install three outlets. For water heater, washing machine and near the mirror. When installing sockets and working with electrical wiring, safety measures must be observed; given the high humidity of the room, the electrical wiring should only be hidden, and all wire junctions should be carefully insulated. The sockets themselves must be waterproof.
In addition, we separately pull the wire to electric fan ceiling mounted
Light in the bathroom. There is not much light.
- Functional lighting above the mirror and night lighting
- interior lighting niches behind the toilet
- background lighting covers the entire room with a ceiling lamp (the lamp has not been installed here yet)
Walls
Wall cladding with plasterboard
To determine the amount of materials, you can use the program for calculating plasterboard structures
We cover the walls moisture resistant drywall. We putty the joints. Installing a new door.
Now you can install the washing machine during the wash. But it will have to be removed several times during the repair and put it again until we lay the tiles and paint the walls
We glue glass wallpaper on moisture resistant glue
Ceiling
We install a ventilation duct with a diameter of 125 mm under electric fan. We carefully foam the gaps with mounting foam and silicone sealant and mount the ceiling from plastic panels of color on a wooden frame white gloss.
In the shower cabin it was decided to do mosaic floor from the remains of ceramic tiles.
Before laying tiles, be sure to: priming and waterproofing
We put the coating waterproofing higher on the wall.

You should not think that the owners of private houses are deprived of all the benefits that apartment owners are provided with. On the contrary, in private houses there is more space and opportunities for the implementation of ideas. It is only worth remembering the nuances when building a bathroom in a private house. These include the selection and installation of communication and ventilation systems. Let's find out what should be the design of a bathroom in a private house.
In this design, finishing materials and color scheme are very well chosen.

In a white bathroom, you can put a black bathtub and add some wood to the interior.

Ceramic tiles with a flower pattern look very beautiful in the design of the bathroom
If you are going to make repairs by adding a bathroom to a private house, you need to take care of the layout. Choose the quantity and appearance of plumbing fixtures and furniture that you are going to install. Private houses are most often built for large families, so you need to decide on the number of bathrooms. If you have a two-story house, it is advisable to install them under each other.


In the bathroom, you can combine large ceramic tiles and mosaic tiles.
Before furnishing a bathroom, study the advice of interior design experts:
when installing the sink, make sure that there is 20 centimeters of free space on the sides for comfortable use;
in front of the toilet bowl at least 60 centimeters of free space, on the sides - 40 cm;
the sink is installed at a height of approximately 80 cm, the main factor is the parameter of the people living in the house;
to the sink you need a section of free space measuring 70 centimeters;
in front of the bath (shower) a distance of 70 centimeters is set.
These recommendations will help not only save space and make the room comfortable, but also visually increase the space even in small houses. If you do not keep the distance, even in a large private house, the bathroom will look small and uncomfortable.

In the bathroom, you can combine completely different colors

A white bathroom with wood elements will be especially beautiful.

Wall decoration in the bathroom is made of chocolate-colored ceramic tiles
Bathroom communication in a private house
One of the most important stages is the arrangement of sewerage and water supply systems. If you do not have a centralized water supply, you must purchase a pumping station, which is installed in a well-heated room. It must be located above the floor level, and to minimize vibration, it must be fixed on a flat area of concrete.
Sewerage is another issue that cannot be passed by. Recently, the cumulative skeptic has become popular, which is an environmentally friendly option, while its low cost. The owner of the house can lay sewer pipes without the help of specialists.
Also an important element is the ventilation system, which removes moist air from the room. If this system is not installed, a favorable zone for the formation of mold is created.

Wood can be used in the bathroom

Wall decoration in the bathroom is made of ceramic tiles
Finishing work
Finishing is an important component of comfort in any room, especially in the bathroom, due to temperature changes and high humidity. At the same time, it is necessary to pay attention to the resistance of materials to household chemicals and the ease of cleaning materials. You should not choose cheap and low-quality options, because of the nature of the bathroom, they will not last long, you will have to spend money again. Private houses have a huge advantage over apartments - bathrooms are usually much more spacious, which allows you to experiment with design.

Very beautiful bathroom design with wood

The design of the bathroom is made in a modern style using wood.

Bathroom design in Provence style
How to decorate the walls?
Ceramic tiles are often used to decorate walls. A huge number of different shapes and sizes enable the owner to design rooms, embodying the most unusual ideas. The best solution for wall decoration is tiles: small options can significantly expand the space, large ones are used for spacious bathrooms.
Decorating a wall is incredibly fun: you can lay out a mosaic to create an incredible picture, combine materials of different sizes and colors, creating a unique style. A great solution for spacious bathrooms would be wood trim. The wood looks incredibly beautiful and is additionally varnished, which allows for high moisture resistance.

Soft walls in the bathroom will make it very unusual

The design of the bathroom is made in one color scheme.
Finishing materials for the ceiling
Manufacturers have made sure that the owners of private houses have a wide choice in finishing ceilings. There are an incredible variety of options, the most common and versatile is the stretch ceiling. Its advantages over other options: able to withstand both low and high temperatures, moisture resistant and easy to clean. Buyers have an unlimited choice, more and more types of stretch ceilings appear on sale every year, depending on the style of the bathroom and its size.

In such a bathroom you will get double pleasure.

Wall decoration in the bathroom is made of ceramic tiles

To choose the right color for the bathroom, you can use the color wheel
Floor
When choosing finishing materials for the floor in the bathroom, pay attention to the level of resistance to moisture. The best solution is ceramic tiles, which are much thicker than wall tiles and have a smooth surface. It is necessary to choose models that can withstand high loads, while with anti-slip properties. The marble floor looks beautiful, but it needs a spacious bathroom.
What style to decorate the room?
It is necessary to determine the style long before the construction stage. The table of design options will help you with this.
You need to choose a style solely from your desires and preferences. Mixing elements from different styles is encouraged to create a unique design.

Contemporary bathroom design with wood

The walls and floor in the bathroom are made of ceramic tiles, and the ceiling is made of wood.
Should you use wallpaper in the bathroom?
Most people are afraid to use wallpaper in the bathroom, which is explained by the main drawback - the paper base quickly absorbs water vapor. Over time, the material begins to swell, which leads to peeling off the wallpaper. Due to temperature changes, the glue begins to lose its properties, so many are afraid to glue wallpaper in the bathroom.
It is worth paying attention to the advantages that overlap the disadvantages:
wallpapering will cost much less than using tiles;
unlike finishing with plastic panels, wallpaper can be glued on your own without involving specialists;
the material is easy to update, in case it starts to move away, and a complete design update will take a minimum of time and effort.
The main difference between all materials available on the market is the technology by which the production takes place. For the living room or bedroom, it is better to use paper options, but they are not suitable for the bathroom, because there is too much moisture there. Washable wallpapers are gaining popularity, which are easy to clean from dirt, and a protective coating increases their service life, protecting them from delamination from high humidity.

The design of the bathroom is designed in the same style

The bathroom walls are finished with ceramic tiles and decorative plaster.

The design of the bathroom is made in a modern style with wood elements and illuminated shower cubicle.
There are the following types of wallpapers.
Liquids are only conventionally called wallpaper, because this is a mixture that must be diluted with water and applied to the wall after priming. Advantages - easy application, no leveling of walls required, ease of repairing damage. Remember that before applying, it is imperative to treat the walls with a white primer, and such wallpapers must dry for at least two days.
The non-woven type is made on a basis that looks like paper, while it is made from natural mixtures. Such wallpapers are easy to glue, you can choose any color and they are environmentally friendly (especially important if there are children in the house). It is easy to find plain and non-woven wallpapers on sale.
Glass fiber is a relatively new option on the Russian market. They are made from fiberglass. Compared with other options, cullet has high strength, environmentally friendly, dirt can be washed off using detergents. This explains their popularity in bathroom design.
Wallpaper is indeed one of the cheapest options for finishing, but not always. The latter option requires huge expenses for the wallpapering process: first, the walls need to be leveled, wallpaper, the prices of which have been rising lately, and buy a lot of paint, because you need to paint with a thick layer of paint.

In a white bathroom, you can make some places black

Wall decoration in the bathroom is made of ceramic tiles
The choice of decor for the interior of the bathroom
Decor is everyone's choice, there are no rules. Some love minimalism, others love baroque splendor. Some people prefer classic decor, while others are delighted with a non-standard combination of styles. It's easy to find hundreds of bathroom décor ideas and photos, all unique and special in their own way. But there are some decor items that are definitely worth using in bathroom design.
The interior can be made saturated by playing in contrast. For example, use lights and mirrors in a different style than the walls. You will immediately notice how bright the room looks. If there is enough space, it is worth buying a massive stone countertop, on which perfume and shampoo bottles will look original. It is worth using flowers, because they bring freshness and make any room cozy. You can buy artificial bouquets, but live plants are the best option. A large vase with fresh flowers can be placed on the floor.
Definitely a bathroom in a private house is much more interesting to create. It requires additional time and money, but the field for creativity is greater in comparison with an apartment. Use all the tips and create a unique bathroom interior design in a private house.
To make a bathroom in a wooden house is within the power of any owner of a country house. To realize their plans for the arrangement is quite within the power of each person. This is where we spend most of our lives. But in order to do everything qualitatively, it is necessary to make every effort and carefully study the technology of construction and decoration.
An important constituent element when decorating a bathroom in a wooden house is a careful consideration of the design. The state of not one room, but the entire country house depends on how well the project will be done. Properly laid sewerage and drainage systems will not allow moisture to spread over the surfaces and save the premises from possible deformation. In addition, the external interior and bathroom amenities are of great importance for all family members.
Properly selected interior, material and equipment will help to realize the most daring ideas. It is necessary to start the arrangement of a room in a wooden house with waterproofing. Because of how well the protection against moisture is selected, further operation will occur.

The design of the bathroom can be planted by placing pots of flowers throughout the room.

Constant humidity and temperature changes can destroy the composition of even the hardest wood species, not to mention other materials. Therefore, it is desirable to prevent all the consequences of incorrect processing at the very beginning than to deal with troubles after the completion of all arrangement work.
Improperly installed waterproofing or its absence will lead to fungus infection of all surfaces of a wooden house and the development of mold, which can move to other surfaces, and the finish itself will begin to quickly collapse.

The flooring in the bathroom is made of ceramic tiles.

Modern bathroom design with bathtub lighting
Floor laying and its features
To protect surfaces from moisture, it is better to approach comprehensively. Careful layering will not only protect the surfaces from unwanted moisture, but will also help reinforce the floor structure - this is necessary because the equipment installed in the bathroom has more weight than ordinary furniture.
Accordingly, the bath will be filled with water, which means that the mass of the load will increase. Therefore, the design of the floor structure must be carefully considered.
To prepare the base for the future bathroom, we divide the space between the lags:
- Lay a special waterproofing film as the first layer. Spread a mixture of gravel and sand on it and compact it well. The height of the layer should be about 15-20 centimeters.
- Lay the next layer up to the height of the upper beams with expanded clay, also carefully tamp and fill with liquid concrete or cement. The result should be something like a two-layer cake. Wait for everything to dry before moving on to the next step.
- Install moisture-resistant plywood on top of the beams and secure it. Choose a material with a thickness of approximately 15-50 mm. Apply a waterproofing film to the plywood layer and leave an additional 10-15 cm overlap on the walls to provide protection against leakage in the sides between the wall and the floor.
- Pour a special mixture intended for floor screed onto the laid insulation. Pre-arrange the beacons, after drying they can be removed and discarded;
- For convenience, you can make a slope towards the sewer or leave and connect the hole in the floor with the drain pipe. Additionally, equip the hole with a grate or cork - this is necessary so that small objects do not get into the holes, and a closed cork will become a barrier to unpleasant odors;
- The resulting screed is treated with a grinder and a waterproofing solution.
The choice of floor surface depends on the preferences of the owner. Many people choose tiles because the laying process is not complicated and it will not be difficult for an ordinary person to lay. An alternative to a tiled surface can be a moisture-resistant laminate or linoleum.

A wooden bathtub will become the main highlight of the bathroom interior

Bathroom design made of light wood

The floor and shower are finished with mosaic tiles in different colors.
|
Building features When laying an additional top coat, contact the professionals. They will help to install the floor quickly and efficiently. |
Interior solutions To give the house its own special style, you can decorate the bathroom room with a tree. Larch, aspen, teak look good. The floor installed and treated with antifungal agents can also be laid out with mosaics or porcelain stoneware. The floor covering of their adhesive cork with a layer of shiny varnish applied on top looks very nice. |
Bathroom ventilation in a wooden house
The functionality of the room and the temperature regime depend on how correctly the system is installed. The ventilation pipe outlet installation is usually placed in the upper part of one of the corners of the wall and is led out through the ventilation pipe. You can connect it to an air duct, and then the flows will go out into a pipe in the attic or roof.
For additional supply of fresh air, a fan can be installed. It will help dry the room quickly.
In addition to installing an exhaust system in a wooden house, it is necessary to provide fresh air. For this purpose, a small gap is additionally installed between the outer threshold and the lower part of the door (approximately 15-20 mm). An improperly installed air vent system can cause condensation to accumulate on all surfaces, causing the material used in the decoration to gradually deteriorate and swell, which leads to the appearance of fungi and bacteria.


A chandelier in the interior of a bathroom in a wooden house will create a special atmosphere
Ceiling and walls - choose the material
Finishing surfaces that fit into the interior of a bathroom in a wooden house are various models of panels and drywall. In terms of their qualities, they are not inferior to other materials, but they look beautiful and are much cheaper than tiles or stretch fabrics.
Lighting for the ceiling of the bathroom consists of several lamps connected to each other. They are mounted in a canvas attached to the base, and help to evenly distribute the light rays inside the room.
If the room is large, you can hang a chandelier in the central part and hang several sconces (small lamps) separately in places where light does not penetrate. This design will give the bathroom comfort, warmth and an atmosphere of mystery.

Dark wood combined with white in the interior of the bathroom looks very beautiful.

The bath is made in the form of a barrel

Wooden bathroom design with shower
For wall decoration, in addition to high-quality waterproofing, wood materials are suitable. They fit perfectly into the design of the room and create a unified style. In addition to wooden panels, tiles are also widely used. It is a versatile finishing material and has long occupied a leading position among bathroom coatings. The main qualities and advantages when using tiles are:
- durability;
- practicality;
- big choice;
- ease of use and maintenance.
We install plumbing
Before you start installing the equipment, make a preliminary plan of the room in which places the plumbing will be located. If the area allows, you can install a bath in the middle of the room - it will look spectacular and beneficial in relation to other equipment.
Such an arrangement requires preliminary preparation for strengthening the structure and capital strengthening of the floor. This is necessary in order to reduce the increasing loads on the logs and beams.

Dark wood in the interior of the bathroom looks very unusual and beautiful.

Wood in the interior of the bathroom will harmoniously complement the design
If the floor has a regular base, place the equipment along the walls. Choose sinks preferably of medium size. If there are more than three people in the family, install two models.
If the walls of the bathroom are decorated in a wooden style, you can finish the plumbing with a similar material. To do this, use special coatings with impregnating substances that protect the finishing surfaces from moisture and fungus. If you install large tubs on separate legs or a jacuzzi in the middle of a room that has extra space, then they will look very impressive and stylish.

The design of the bathroom is designed in one color scheme.

The flooring in the bathroom is made of porcelain tiles.

Porcelain tiles combined with wood look very beautiful
How to choose furniture
In private houses, compared to the area of small apartments, the footage of the bathroom allows you to install sanitary equipment, as well as cabinets and open shelves for linen. The open environment allows you to beautifully put together various everyday things:
- towels;
- house dressing gowns;
- hair dryers;
- brushes;
- cosmetics;
- household chemicals.
When choosing furniture for design, pay attention to non-standard things. For small children, stable chairs or portable steps are suitable so that they can safely reach the sink. Modern manufacturers offer a large selection of different models for price and quality.

Finishing the floor in the bathroom can be made of porcelain tiles

Wall decoration in the bathroom is made of ceramic tiles in combination with wood
The mirror is an important attribute in the bathroom. Traditionally, it is customary to hang it above the sink in a wooden house, but you can hang it wherever you want. Installed in full height, it will make your interior elegant and emphasize its individuality.
In addition, you need to take care of the little things. The following details will fit the design well:
- boxes for storing various items (household chemicals, detergents);
- hooks for clothes and bathrobes:
- shelves and racks for bath accessories;
- laundry baskets;
- heated towel rail.
Little things and details thought out in advance will make your stay comfortable and enjoyable.

The wood in the interior of the bathroom looks amazing

Wood bathroom design looks very nice

The wood and white color in the interior of the bathroom will be very beautifully combined.
Room styles
Country
Most often, country houses are decorated in this Provencal style. Surfaces of walls, floors and ceilings are wooden. Windows (if any) with large checkered curtains or small flowers. Bathrobes and towels are also kept in the same range. In addition, you can install dark wood shelves, lay a wool rug and add a holder for soap and toothbrushes, as well as other accessories on the subject.
Classic
This style is characterized by light colors. The walls and floor are usually tiled, the ceiling is stretched. Exquisite sanitary ware will perfectly fit into such a bathroom design. Furniture, bathroom accessories, linen will suit a light shade.

Bathroom wall decoration made of wood

Bathroom design in dark wood
Empire and modern
For these styles, bathrooms with a large area and where significant amounts of money can be spent on equipment and materials are suitable. Here it will be typical to use gilded parts of fittings, sculptural models in the form of angels and nymphs. Large mirrors, expensive chandeliers and floor lamps. The bath is usually placed in the central part on separate raised legs. This style is characterized by a combination of gold and white - this design gives the design of the bathroom a chic look.


