Having their own house outside the city, many people think about building such a cozy and useful house next to it. After all, you must admit that a chic garden, well-groomed beds and neat paths with impeccable fences do not create a complete picture of a garden plot without a cozy gazebo on it. Today, it is a rare case when a country house does without a full-fledged recreation area on the territory or a small garden gazebo. The construction of a country gazebo is a great way not only to decorate landscape design, but also to create an additional place for complete unity with nature. In the gazebo you can have a great breakfast with the whole family in the early morning, enjoy evening tea, or accommodate guests invited to a picnic. Under the roof of a cozy building, you can hide from the scorching sun or shelter from the rain. The design of the gazebo is another chance to show the talent of the designer and give comfort to your possessions.
The main types of gazebos
Let's look at the main options for making gazebos located in the territories of a country house.
An open gazebo is the easiest to assemble. The simplicity of the design allows you to meet in the shortest possible time and create a full-fledged recreation area. An open gazebo for a summer residence is assembled from supporting posts and a hinged roof, after which it is decorated with decorative elements and partitions between the posts. Inside the gazebo, you can place a comfortable table, benches or chairs with pillows and blankets, and next to organize an area with barbecue and grill.


In an open gazebo in warm weather, it is very pleasant to enjoy the singing of birds and the gentle sun, this is the best option for family meetings.
However, in cool weather there is a risk of freezing in the open air, so in winter this design loses all its relevance.


A closed gazebo is a house, closed on all sides by walls. In such a gazebo, bad weather and insect raids are not terrible. You can sit up in it until late at night and not disturb those who went to sleep.
However, closed space will not allow you to fully enjoy nature and in order to breathe fresh air, you will have to periodically go outside.


Particular attention should be paid to the design, which should not only shelter people from rain, snow and sunlight, but also be aesthetically attractive.

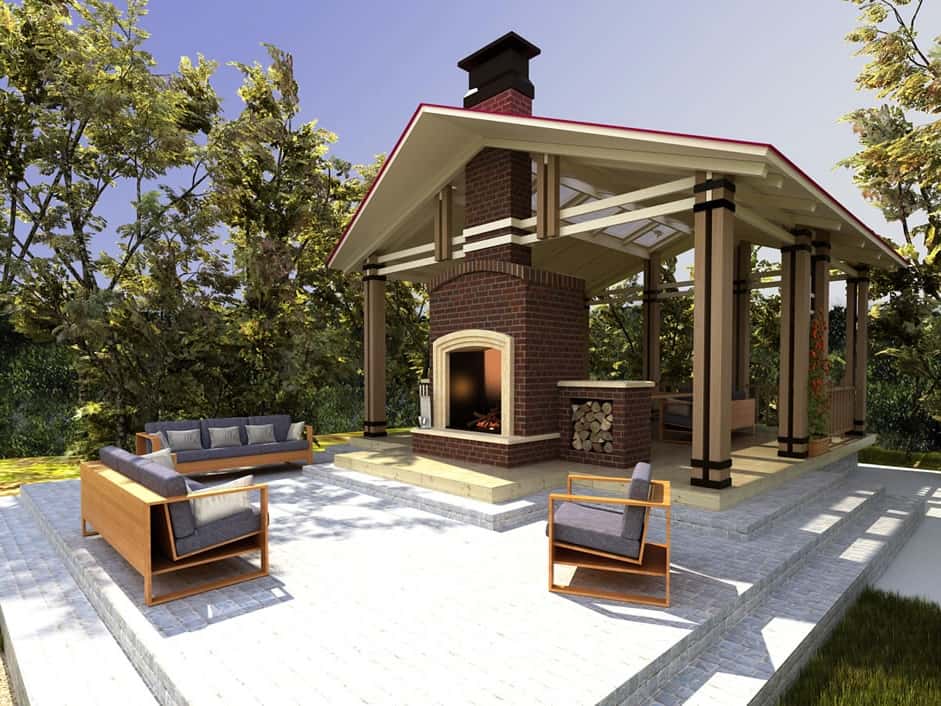
A gazebo with a barbecue area - solves the problems of cooking on an open fire. Such a gazebo is equipped with a special barbecue and a high-quality chimney.
It can be equipped with a full-fledged kitchen area with a stove, cabinets, a table for cooking and a separate dining area.


A living gazebo is a lightweight structure, the main part of which is climbing plants that create dense green walls (hedges). In such an arbor, a complete feeling of unity with nature is preserved, it is pleasant to enjoy the smell of plants and invite friends. With proper care, such gazebos can please the eye for more than one season.
Also, such an arbor can be decorated with grape seedlings, the fruits of which will hang in beautiful clusters, while creating a natural shadow.

Materials for manufacturing
Wooden gazebo. Wood is the most popular material in the construction of buildings of this type. It is easy to make a structure from it with the desired design and various shapes, the main thing is to correctly determine its dimensions, and impregnation with water-repellent agents will make it possible to preserve the original appearance of wood for a long time.
Usually, spruce or pine is used for the construction of wooden arbors, less often oak. Wood is a fairly light building material, so it is not necessary to build it for construction.


A stone or brick gazebo is a great option for building any type of gazebo in which you plan to place a barbecue. Brazier and barbecue can be placed on a special stand or podium made of stone and brick.


Fabric gazebos for summer cottages will become your favorite place to relax. A gazebo in the form of a tent looks very interesting, attracts attention and allows you to diversify an ordinary yard.
It can be equipped with soft pillows and then it will become a real decoration for your site.


Metal arbors - you can buy relatively inexpensively from manufacturers, both in finished form, and make it yourself, while realizing your dreams and fantasies.
Usually these are very simple, not overloaded with details designs made of wrought iron, which gives them a special charm.
Choosing the right style for summer construction
Classics - nothing superfluous, everything is concise and strict. A gazebo of a regular shape, a rectangle, without additional decor, furnished with the simplest pieces of furniture. This is a simple option for giving, where it is planned to spend little time and not arrange frequent long gatherings.


Rustic style is an interesting design with carved windows, shutters, a real stove and various details like a samovar, tablecloth, dried herbs and candles instead of lamps.

Building a gazebo in a rustic style is a rather complicated process that requires special flair and certain knowledge.

Oriental style - an exotic design for a country gazebo. The basis can be a real Chinese pagoda with light walls and a multi-tiered roof. The decor welcomes the presence of pillows and a lampshade, as well as many Chinese lanterns.


You can decorate a country house for relaxing on the territory of your site in any style that the owner of the estate likes.
There you can put a rocking chair, a table with your favorite books, an old gramophone with records. In any case, the presence of such a house will sometimes allow you to feel in complete harmony with nature and spend some time alone with yourself.
Country buildings in most cases do not require frills and aesthetics. Enough comfort and practicality. That is why today we will consider budget options for gazebos that you can implement on your site with maximum savings in money and time.

The main thing is to avoid SUCH consequences in the pursuit of the budget
First of all, we will consider photos of inexpensive country houses.
At the end, instructions will be provided for the construction of a budget gazebo with a brick foundation and a frame made of edged boards.
When the cost of the purchase comes to the fore, it is usually difficult to choose anything. Either the quality is not satisfactory, or the materials are “collective farm”, or you won’t look at the structure without tears.

From dark wood
In view of this, there are many options, and few of them are sensible. We tried to select the best in terms of price, quality and appearance, but this is our subjective opinion, which may differ from yours.

We prefer inexpensive buildings made of wood (100 by 100 timber or edged board), with the simplest foundation and inexpensive roofing. Depending on the size, the price varies up or down. Small buildings will always cost much less than large ones.
 In the garden
  With poles
  from logs
  Country version of corrugated board
  From the boards
  Garden option with crate
  from wood
  in the trees
  Canopy
The cost of gazebos in the store
I would like to give a few examples from the online store " Green Gazebo". We often recommend their builds not because they have commissioned advertising from us. It's just that they are one of the most serious players and, in addition, they have an online store with easy navigation.
Look!
Garden gazebo 3 by 3 "Cozy House" (43,000 rubles)

Cozy house 3×3 meters
- Foundation: foundation blocks.
- Floor: 38 mm pine board.
- frame: timber 100 by 100 mm.
- sheathing: eurolining.
- Roof: double slope.
- rafters: timber 100 by 50 mm.
- Roof: ondulin.
- Decor: wooden crate.
- Cost with installation: 43,000 rubles.
Open hexagonal gazebo 3 × 3 (55,000 rubles)

Open hex 3×3
- Foundation: foundation blocks.
- Floor: 38 mm pine board.
- frame: timber 50 by 100 mm.
- sheathing: imitation of timber or logs.
- Roof: six-sided.
- rafters: timber 100 by 50 mm.
- Roof: soft tiles.
- Cost with installation: 55,000 rubles.
Japanese-style wooden gazebo 3x3 (60,000 rubles)

Japanese style gazebo 3×3
- Foundation: foundation blocks.
- Floor: 38 mm pine board.
- frame: timber 100 by 100 mm.
- sheathing: eurolining.
- Roof: double slope.
- rafters: timber 150 by 50 mm.
- Roof: soft tiles.
- Decor: wooden crate.
- Cost with installation: 60,000 rubles.
Choice of cheap material
What material will make the cheapest gazebo? There are different solutions, but for the most part it comes down to one thing:
- which you have in stock.
- Boards or timber 100 by 100 mm for the frame.
- OSB or for sheathing.
- or metal roof tiles.
The rafter system should be the simplest - or. We will use a brick as a base, although you can overpay a little and purchase foundation blocks. They are much more reliable.
Construction of a budget gazebo
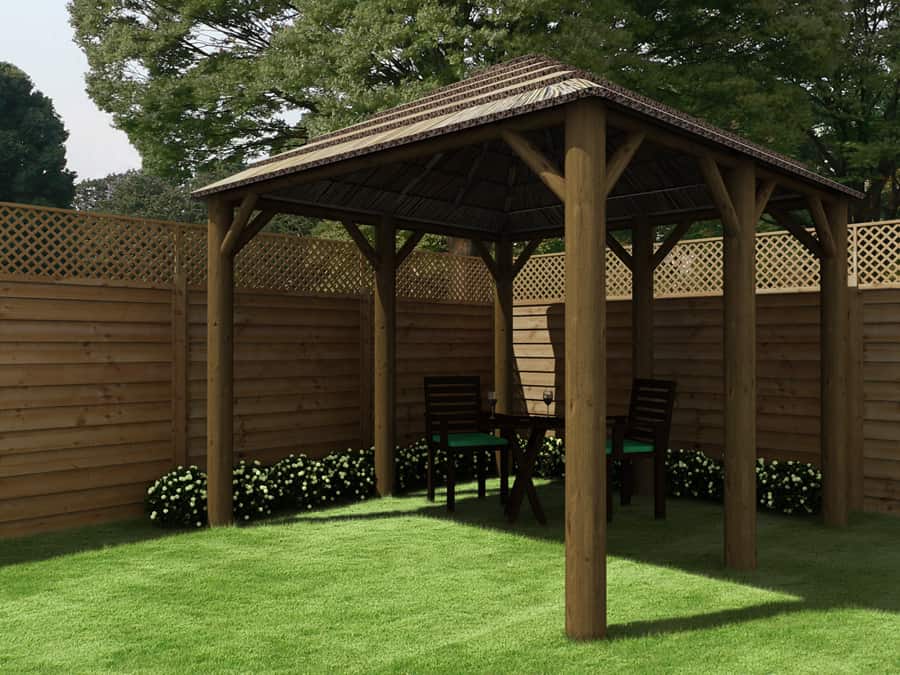
Below you will find step-by-step instructions for building a wooden gazebo. First of all, let's look at the final result that you should get after following all the recommendations.

Interesting, small and budget building with a crate. What else do you need for a real summer vacation? 🙂
Foundation
The wildest and most purely country option is to install bricks as a base. In general, it is a risky business, but it costs a penny and is put well.
Alternatively, we can offer 20 by 20 by 40 cm, which will create a more solid foundation for your future gazebo.


 Lubrication of joints with bitumen and installation of a log
Frame erection
The rectangular shape of the building involves the installation of pillars around the perimeter. For this, satisfied thick boards are used (it is best to use the "fifty") in the amount of seven pieces.
It is assumed that the entrance to the gazebo will be only on one side, so the second will be covered with a sheathing.
Roof and roof installation
The gable truss system can be assembled on the ground, then lifted up and secured. Either all work should be done at a height, but it is advisable to prepare the material in advance anyway.

Start laying the floorboard
The floor was painted green, which will fade over time. It is recommended to treat all wood material with an antiseptic to delay the rotting process for several years, and only then cover it with paint.
Video instruction
Several thousand views of this video on Youtube-channel " Сchildren of Siberia 55” prove that the idea of this building has the right to life. In general, reviews about the construction are positive, so we also recommend this approach to you.
The only thing that bothers me is the brick base. Still, the bearing capacity of a brick is very large, but a few pieces for a whole gazebo with people ... To tell the truth, this business annoys me. Apparently the guys really know what they're doing.
Gatherings with guests, dinner with the family in the fresh air, relaxation after work in the garden and vegetable garden - an economy class summer gazebo in any of these situations will be very useful to you. It is far from always advisable to make it large-scale and roomy, in most cases a small and budget building is enough, which will delight you and your guests.

The classic dimensions of the summer gazebo
The optimal size of a small summer gazebo is 3 by 3 meters. This is enough for a family circle, and for a small group of people.
Today's problems are:
- How to build a budget summer gazebo with your own hands?
- What materials can be used to make a summer structure at the lowest cost?
- How much would such a construction cost?
This publication will consider a step-by-step process of erecting a small gazebo from a bar with dimensions of 3 by 3 meters from a photo and video. This option is one of the cheapest and most practical for construction, but if for some reason it does not suit you, at the end of the publication I will provide links to similar articles on construction.
Before proceeding with active actions, I propose to study the final result of the work and its technical characteristics.
Most budget gazebos are built on the same principle, the cost of materials is also about the same, but still I would like to focus on this - it is important to understand what and from what we are going to build.
Technical characteristics of the finished gazebo
The photo is presented to the right of the characteristics. Clicking on a photo will open it in a larger size.

End result of construction
- Material: Beam 100 by 100 mm;
- Dimensions: 3 by 3 meters;
- Foundation: columnar (made of bricks);
- Roof: single slope;
- Roof: euroslate (ondulin), but you can use a more budget option - corrugated board;
- wall cladding: oriented strand board (OSB);
- Floor: board 40 by 100 mm "magpie";
- Painting: antiseptic Senezh Ultra in 3 layers.
Materials for construction are used the simplest and cheapest. Nevertheless, they are quite enough for a reliable and strong building, which will stand for more than one year and withstand more than one hundred rains.
Foundation
For such a structure, a columnar foundation was chosen. It consists of nine brick pillars, which are the basis for the entire gazebo. The process of building the foundation is as follows:
- 9 holes are dug with a depth of 70 cm;
- The first 30 cm are covered with sand (ideally put a little crushed stone on the bottom) and compacted;
- The remaining 40 cm are covered with construction waste and poured with concrete;
- Two bricks are laid on top of the concrete (ideally, fired ceramic red);
- A layer of bitumen is applied over the bricks and, ideally, a sheet of roofing material is laid.

Finished foundation pillars
Such a foundation is extremely reliable for small buildings. A summer gazebo is an ideal building for such a foundation. Therefore, it was he who was given preference during construction.
Bottom trim
On top of the foundation, the lower harness is laid, which consists of wooden bars fastened together. The fastening of the beam to each other is carried out "in the floor of the tree." The connection must first be treated with an antiseptic or bitumen. Four self-tapping screws are screwed over the connections for reliability.


In addition to the four beams along the perimeter, one additional one is installed in the center - the so-called "lag". In the future, it will be needed to attach the floor board to the harness (more on this in the chapter on the floor).

Finished bottom harness
Poles and top trim
Poles are installed on the lower trim, which will serve as the basis for the walls and the upper trim. Four posts are installed at the corners of the gazebo, and one additional post is installed next to the entrance to the height of the railing.
The height of the front pillars is 230 cm, the height of the rear pillars is 200 cm. This is done for the further construction of the roof slope.

Fastening poles to metal corners
The upper harness consists of two beams that are installed parallel to each other on top of the pillars. The fastening is identical to the lower harness - to the floor of the tree.

Installed poles and top trim
Roof erection and roofing
The whole process will be more clearly described in the form of a phased approach:
- We fasten 9 rafters on top of the lower strapping in increments of 30 cm;
- Parallel to the rafters, we install 9 boards also in increments of 30 cm;
- If you did everything clearly according to the instructions, then you should get a roof in the form of bars;
- We lay sheets of ondulin or corrugated board on top of the roof, depending on your capabilities.

rafters

crate
The rafters are attached to the strapping on metal corners and self-tapping screws. It turns out a fairly reliable design that can withstand not only the roof, but also winter snow.

finished roof
Floor
After installing the pillars, you can start laying the floor. You will need about 30 boards 3 meters long, some of which will need to fit under the posts. The floor is fastened with self-tapping screws to the lower trim and the log in the center.
The secret to a level floor is to place the first plank evenly. If you succeeded, then the process will go more fun.

finished floor
Railings and sheathing with OSB boards
For railings, a beam with a section of 50 by 50 mm is used, which is mounted at a height convenient for people. In addition to the beam, it will be necessary to install additional supports, on which the oriented strand board will be attached in the future. All this is clearly shown in the photographs that will be presented below.

Attaching railings to corners

Finished railings
The OSB board is attached to self-tapping screws, plus they are additionally pressed down with bars in the center. This creates not only reliability, but also additional aesthetics.

Laying the first OSB boards
A few words about antiseptic and paint
The proposed version of an inexpensive gazebo turned out to be extremely beautiful and spectacular. The main secret lies in a well-chosen color, which plays in contrast between the dark and light shade of the tree.
You can use your tree protection options, but the owner of this building recommends antiseptic Senezh Ultra, which is applied to three layers. This will allow you to achieve reliable protection of the tree and a beautiful appearance.
Video
I express my deep gratitude for the submitted video to the user of the channel with the name " Vasya Vasin". It was he who prepared this video on construction, and also commented on some of the questions that he was asked in the comments.
If you have any questions, you can ask them both in the comments to his video and in our feed after publication. We can send him your questions, and then receive and write you his answer.
Photos of summer arbors

Wooden gazebo with decor for summer holidays
In one of the publications on our website, we examined in detail the variety of summer arbors made not only of wood, but also of other building materials.
You can see options with different types and designs, as well as pick up some idea for your dacha, at the link below.
Construction options for other structures
For various reasons, this construction option is not suitable for everyone. In view of this, I offer you building instructions similar in style to writing, in which the process of building a gazebo with your own hands is also clearly and clearly chewed.

Several links are provided below.
Among the options presented, all buildings are made of wood and in a fairly budget format. Any elite building materials such as decorative plaster or wild stone are not used here.
Good afternoon, I am starting a series of articles on the construction of wooden gazebos for summer cottages. We will do with our brains. This article sets itself two goals - to turn on your brain, and to awaken the desire to CONNECT your hands to it.
In short, I have a goal fall in love with an idea make a gazebo with your own hands and give you faith that it is easy and simple. And I will succeed. Anyone who reaches the end of the article will become infected with a construction itch and will not calm down until a new wooden arbor appears in his dacha .
Since this topic is quite extensive, it would be prudent not to shove all types of wooden arbors into one article, but to divide the lessons into parts. This will give us the opportunity to understand in detail each type of gazebo, study its design and learn how to make such a gazebo ourselves - from the first to the last step.
- Today we will build wooden arbors CUBIC - with FLAT roof.
- In the second article - we will learn how to make a gazebo
- In the third article - we will figure out how to do it yourself
- In the fourth article - we will deal in detail and slowly with the principle of construction arbors with a FOUR-STROKE roof (with a roof in the form of a pyramid).
- And in the fifth article - we will make rounded HEXAGONAL gazebos with a complex device of a CONE roof.
So, let's not pull the cat by the rubber. Let's start to delve into.
What is a gazebo?
- This is, firstly, LEGS (pillars)
- Secondly, the ROOF, which is supported by these legs.
- Thirdly, the WALLS, which are nailed to the legs (sometimes the walls are absent, sometimes they are replaced by a holey crate).
The named parts are absolutely any gazebo and wooden and metal.
Look, below we see different gazebos - with a flat roof, and with a gable roof, and a four-pitched roof, and a gazebo in the form of a hexagon.
Any gazebo has pillars, a roof and walls. And the constructive difference of all arbors from each other is their roof.

Today we will build gazebos with our own hands with a flat roof. That is, let's start with the simplest design.
And you will find the rest of the articles-lessons on making arbors for every taste in the form of a list of links below under this article.
2 TYPES of arbors with a flat roof.
The designs of all wooden arbors WITH A FLAT ROOF can be divided into 2 TYPES.
FRAME GUNS - based on a cubic frame made of timber.
PERGOLA GUNS - based on the classic Italian pergola.

In this article we will consider the first type of arbors. And I took out the pergola designs of arbors in the second article of our series of lessons on the construction of arbors -
Model #1
Flat roof gazebo
on a FRAME BASIS
Let's look at a rectangular gazebo made of timber with a FLAT ROOF. And then I'll MAKE IT step by step.

Below you see three different designs country gazebo with a CUBIC frame. Visually, the gazebos seem to be different, but their construction scheme is the SAME. because they all have the same frame in the form of a cube.
We can make a gazebo as a simple hollow cube of timber, without walls (as in the photo below) - such gazebos simply enclose the recreation area from the rest of the wild countryside nature.
Such hollow gazebos even the roof is not covered with roofing material- they simply fill the slats between the beams of the upper frame (so that they cast a light shadow on the vacationers).
However, later you can make a roof from the rain for such an arbor (from polycarbonate sheets or awning fabric) - later in the same article there will be a chapter on roofs.
But you are right cover the roof with boards, put slate sheets or other roofing material on top (as in the photo below).
And also sheathe this cubic arbor with wooden slats- from one windy side, or from several sides. Wall sheathing can be continuous, or at intervals (according to the principle of blinds).
Such work is easy and simple to do with your own hands.

If we want to isolate ourselves from curious neighbors in our country gazebo, we can sew up all the walls - but not completely, but to a certain height, so that light enters the gazebo, as well as a fresh summer breeze (as in the photo below).

And yet ... the walls can not be sewn up with boards, but hung with a TENT CLOTH (awning fabric can be bought at hardware stores or directly from the supplier company (look in online stores). A suitable awning fabric must be cut into pieces of the desired size and fixed on the frames - spans of your gazebo.
And if you use your brains and Google search, then you can create a simple mechanism with your own hands that allows the canvas to fold like a roman blind(in wide folds), if you pull the rope. It's simple - you need rings and a rope there, and spend several evenings slowly sewing the rings to the back of the fabric.
Either you can wind the awning onto a metal pin - with a roll, like toilet paper on a sleeve. Drive the pins-sleeves into the fasteners between the piers of the gazebo. The steel pin will spin freely in the fastener and unwind the tent fabric - it will be like a do-it-yourself roller blind.

We can make a very small wooden gazebo - for one sun lounger (if you love yourself and do not like guests). And we can increase the footage of the building, so that it fits a table and chairs, a sofa and something else. That is, our country gazebo does not have to be a CUBE - it can be an EXTENDED RECTANGLE of any size you need.

We can further increase the footage of the future building so that comfortable lockers fit in a cozy gazebo, where you can store dishes in the summer, conveniently put frying pans, electric barbecues and other useful kitchen utensils (as in the photo below). You can make furniture for the gazebo with your own hands from scraps of timber and boards.

And at the same time, pay attention to how beautifully the wooden flooring on the floor is decorated here - with boards on squares of the transverse direction. I also like the idea of decorating a country gazebo with tall potted flowers and a lantern with a candle hanging from the roof eaves.
HOW TO MAKE A FRAME
for such a FRAME gazebo.
You can start building a frame for a cubic FRAME GARGO in different ways ...
Take your time, choose the most convenient way to create a frame. The one that you clearly imagined and you can definitely do it with your own hands without difficulty - thoughtfully and slowly.
Let's look at the types of frame, and decide which is right for your country gazebo
THE FRAME of the gazebo is ON DIGGED PILLARS.
We can start by saying we dig the SUPPORT PILLARS directly into the ground, filling them with cement(step 1), then put on these pillars CROSS BEAMS (step 2), we will strengthen the transverse beams with short supports with STICKS (step 3).
HERE IS THE MAIN FRAME AND READY. If you want, put slate on top, if you want, make a crate with roofing boards on top, or pull an awning canvas over the top frame of the summerhouse.
Below I will show what roof options for a gazebo you can do with your own hands.

DISADVANTAGES OF THIS METHOD - these are difficulties with wood processing - before pouring wooden beams with cement, you need to tar them, wrap them with roofing material (to protect them from rotting underground).
Although there is a way out - simple and fast. Here he is in the photo below. It is possible to deepen into the ground not the pillars themselves, but metal thrust bearings with a long and sharp lower part. And already put wooden support bars on them (as in the photo below).

And you can also install a country gazebo on a reliable and strong foundation - ON THE FOUNDATION. Let's see what types of foundations are suitable for such a frame gazebo and how to make them yourself.
THE FRAME of the gazebo is ON CONCRETE.
You can install poles on pre-prepared CONCRETE SCREED. And then it's better to put them on steel thrust bearings(as in the photo below). See, the pillars stand on metal heels?

To do this, you need to fix the thrust bearings directly into the concrete screed. This can be done in two ways - in already dry hardened concrete, or in still wet.
Installation of thrust bearings in dry hardened concrete.
you can buy anchor thrust bearings . They are installed on an already dry concrete substrate. A hole is drilled in concrete to match the size of the anchor. Excess drilling debris is blown out of it. A thrust bearing with an anchor is inserted into the hole. Next, a bolt is screwed into the anchor, due to which the anchor expands in the concrete and firmly holds the thrust bearing in place.

Or you can do cheaper to buy simple thrust bearings with fittings , and concrete them in still damp concrete. The photo below shows how the crooked legs of the thrust bearing circle into a round formwork filled with raw concrete, and freeze in it.

Such thrust bearings in raw concrete can have a different design. The main thing is that they all have the lower part of the reinforcement, which is buried in the concrete solution and firmly adheres the thrust bearing to the base.

As you can see, a country gazebo can even be placed on a pavement made of paving slabs. Everything is simple, if you figure it out, mentally imagine all the steps in the correct sequence, make sure that they are reasonable, and then take it and do everything with your own hands already in reality.
The design of your future country gazebo can be supplemented with interesting stone buildings. And then you can install support posts directly on these high stone sides. And here, too, it is better to use thrust bearings. So you will be sure that even with the passage of time your support column will not lead to the side, as it is securely fixed. And such a support column will not rot - there is nowhere to accumulate moisture.

THE FRAME of the country gazebo is ON THE WOODEN PLATFORM.
And you can do it yourself in advance make a wooden deck- under the future gazebo. And then the pillars on such a wooden base are attached on conventional square bearings.
And if there is no suitable bearing under your support beams. Then you can use any perforated fasteners in the shape of the letter L (that is, corners) as on the very right of the drawings below.


Of course, for this method, you first need to arrange such a wooden base. That is, level the ground, make boards from boards, fill the boards with crushed stone, optionally put a reinforcing mesh on crushed stone, pour concrete. And then put draft thick beams on a frozen concrete screed. And already on them to fill the floor boards.
And then anchor points for poles gazebos should coincide with the place where a thick draft beam lies under the floorboard. So that the gazebo stands on a solid foundation, and not on a hollow place on a wooden platform.


Here is another photo below, where the country gazebo stands on a wooden platform - and is attached to it with metal thrust bearings.

FRAME of the gazebo - ON SCREW PILES.
And you can also assemble the frame of the gazebo starting not from the pillars, but from the bottom frame, which you put on screw piles. Here in the photo below, we see that the frame of the country gazebo lies on black legs sticking out of the ground. This is the screw pile foundation.

Below is a picture of what it looks like foundation quick fix under the gazebo in the country. You can search Google for ways to build such a pile foundation in your area. And come to the conclusion whether it will be convenient and affordable for you.

NOTE. On these high legs screwed into the ground, we do not put vertical pillars of support - but a ready-made knocked down the lower frame of the gazebo (i.e. horizontal beams).
And already on the very bottom frame we fasten support bars. Attach them here on such steel plates in the form of CORNERS. Plus, you can add more metal plates along the other edges of the support bar.

THE FRAME of the gazebo is ON BRICK LEGS.
Or you can cast the same high legs but out of concrete, or lay out the supporting columns of brick in pre-dug holes.

Here in the photo above we see the frame frame of the gazebo, which rests just on such brick pillars support- a cheap point foundation is located in those places where support is needed for a frame made of timber. This is an economical version of the foundation for an inexpensive summerhouse. And everything is done simply and easily with your own hands.
Then such a gazebo frame can be sheathed with a floorboard, the roof can be covered with a transparent polycarbonate sheet, and the walls can be sewn up with slats or hung with an awning. It's beautiful and elegant. You see how interesting it is to beat the simplest frame of bars.

So ... we figured out the types of base for our frame. Now let's see how we can FASTEN THE PARTS OF THE FRAME to each other.
We assemble a cubic arbor.
We fix the upper transverse beams.
Now let's see how to do top of the frame our frame gazebo. That is, let's say we already have a foundation. Let's say we have already placed the vertical pillars of the support. And now our final task is to put on these pillars and FIX the transverse horizontal beams.
Here in the photo below we see the most easy way fix the cross beam. It's just to put it on the poles and secure on perforated steel PLATES. L-shaped plates, or straight ones, are suitable for this purpose (then they will need two on each side).
On sale there is a variety of perforated fasteners. Google it and find out exactly which plates are just perfect for the size of your timber.

Here is the second way to lay the top bars of the roof. When a notch is cut at the end of each wooden beam - and then the notch is placed in the notch (as in the drawing below). This method is called "in the paw" - like putting the ends of the bars into the paw.

So that the top beam does not sag under the weight of itself, or if you are planning a heavy roof decking, you can add SUPPORTS - BRACKETS. That is, small diagonal cuts of beams that need to be placed at the corners of our frame, as in the photo below.

Next, if on the roof additional wooden crate from narrower beams, then they fit into specially stuffed metal fasteners - “supports for beams”. We see such supports in the photo below.

Support fasteners for beams can be of different shapes. Open supports - with ears to the sides. Closed - with ears turned inward. And a support with a hidden bracket - with an inner plate.

And if we want to increase the FRAME GARGO.
Below we see a model of a wooden gazebo, made by hand, which is mounted not on four, but on six support pillars. Six pillars allow you to make an elongated summerhouse, under which a long dining table can fit, and you can also put a barbecue oven (by the way, I will have a separate article about this).

If you choose such an enlarged gazebo, then here is a photo of how to lay the upper beams on the middle pole. We see that the beams with their ends are laid on a pole and each is held by an additional jib (short beam obliquely).

The foundation for such long arbors can be any (choose options from those proposed above). Below in the photo we see a country gazebo on a pile foundation (a frame of timber is placed on the piles, support beams are installed on the frames, and on top there are transverse beams with jibs, and only then a plank flooring and lath roof lathing).

Types of wall cladding for FRAME GUNS.
And now let's look at the ways of cladding the walls of our country gazebo. Here are a few options for sheathing the walls of the gazebo with your own hands.
The easiest way is to fill horizontal slats - like blinds.
And if you are not afraid of painstaking work, then you can stuff the slats diagonally - cross to cross - to get such a crate in a box, as in the photo below.

You can fill a solid mesh wall. Or you can fill low frame sides with such a crate on the sides of the gazebo, and put a climbing plant along the square.

Part of the wall of the dacha gazebo can be covered with a solid packing of boards (as we see in the photo below, just the sectors of the walls below are covered with a board).

And here is a sample of the walls, where the wooden mesh occupies only the upper part of the solid plank wall of the gazebo.

At the same gazebo, you can combine the height and shape of the batten walls, as well as the lattice pattern itself.

HOW TO COVER THE ROOF for the gazebo.
You yourself can easily and simply make a roof for a gazebo with your own hands - from any roofing material.
The roof can be sewn up with boards and covered with roofing felt (it's cheap), you can put slate on the roof.
And best of all, transparent sheets of POLYCARBONATE - this is how the light of the sun will penetrate through the roof (see photo below).

And at the same time: pay attention to how the roof slope is arranged in the photo below (to allow water and snow to drain) - the SUPPORT PILLARS of the facade wall of the gazebo are 15 cm higher than the SUPPORT PILLARS of the rear wall of the gazebo. And so the roofing boards lie on a slope.
Also you can do tarpaulin roof. The photo below shows a great way to simply attach the awning to the edges of the gazebo roof. Along the edge of the awning make holes(better in the workshop, such special metal rivets with a hole). We put a rope in the holes. On the longitudinal beam at the side of the roof we fill fasteners with large caps. And then we hook the rope threaded into the holes of our tent fabric by the caps of the clogged hardware products.

And also the awning canvas can be stretched between the densely packed laths of the crate. As in the photo of the gazebo below. This is an Italian version of the roof.

I mean, I want you to understand one thing. Roof - you can make ANY. Wall cladding (boards, awning or wooden lath) - you can do ANY ALSO. And it's very simple. Even a woman cope.
The main thing is to put the FRAME of the gazebo. The backbone to which we can nail all this even with female hands.
The frame is the basis from which you can fashion any design of a summerhouse. Knocking down a frame from a bar is 80% of all work. And that's what a man needs. It's time to call him.
Good luck with your home building.
Olga Klishevskaya, specially for the site
The simplest wooden gazebo, photo report of the building.
A gazebo in the country is an ideal place to relax, every summer resident can build it, it does not require special skills in construction, just look at step-by-step photos of building a gazebo.
This time we will make a simple arbor from timber and boards with a gable roof with a slate ceiling.
We build a gazebo with our own hands photo.
STEP. 1. We make a columnar foundation, it is enough to fill in 6 supporting concrete supports. The device of the columnar foundation is described in detail in this article. Supporting concrete pillars must be covered with waterproofing material, such as pieces of roofing material, otherwise the wood will draw moisture from the concrete.
STEP. 2. We make a strapping from a bar, at the corners the bar is fastened with a spiked joint and self-tapping screws.

STEP. 3. We install the supports and make the upper harness from the timber. The supports are attached to the strapping with metal corners and also with self-tapping screws. We cover the lower trim with used engine oil, which will serve as an excellent antiseptic and protect the wood from decay and insects.

STEP. 4. We fix the rafters for the gable roof. The slope of the roof slopes must be at least 30 degrees.

STEP. 5. We fill the crate of boards on the rafters and lay the covering material, in this embodiment, slate was used, but it is better to work with corrugated board, it is much easier and easier to install.
The scheme of laying slate, first the bottom row of slate is laid, then the upper one with an overlap, the laying direction is towards the most windy side.


We lay a wooden floor, fasten the side walls of the gazebo and the gables of the roof.


