Everyone has heard of such a concept as bonsai- Japanese art of growing a miniature tree in a bowl. But you can grow a very decorative bonsai tree in the garden, trees of our middle zone such as maple, willow, apple, hawthorn, pine, spruce, juniper, etc. are perfect for this.
Garden bonsai or niwaki (as the Japanese call it) is a wonderful landscape design element, especially suitable for a Japanese-style garden or for a small area where everything needs to be placed very compactly.
Of course, it is easier to form bonsai from deciduous trees, but pine creates that very unique spirit of the Japanese garden, and also fills it with a coniferous aroma.

Which pine trees are suitable for bonsai?
Take a simple forest pine ordinary. You can, of course, and something more exotic: mountain pine or cedar, but in the middle lane, ordinary pine adapts and forms well.
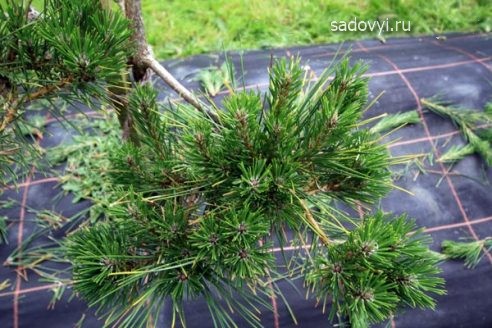
Bonsai planting technique.
To form a compact tree, it is necessary to limit the growth of the root system. Therefore, it is better to resort to a special landing method. At the beginning, a rather deep hole is dug into which a large stone is placed. It is sprinkled with 30 cm of earth and a tree is planted. In this state, the tree grows and adapts for a year, it has not yet been touched. Then you need to start trimming the growing roots. They are cut with a shovel. So that the tree does not suffer, 1/4 of the roots are cut off per year.
Formation of bonsai from pine.
Traditionally, the Japanese tree is formed in the form of a scalene triangle. Branches should be inclined horizontally or towards the ground. Branches growing upwards are removed. Powerful branch endings are also cut off. Pine has two periods of active growth per year. The first in late spring, when the buds begin to sprout, forming "candles" and the second at the end of August, when the branches stretch and thicken. It is better to do the main pruning before the second growth period, i.e. in the middle of August.
To form a lush crown in the form of balls on branches, in the spring in May, when the “candles” have not yet blossomed, they should be cut with scissors or pruners by 1/3.

After such pruning, the tree no longer stretches so much in height and forms lush rounded balls.
To give the tree the desired shape, cut off the upper part of the trunk and extra side branches.

Young shoots are cut off or broken off when the branches are already quite stiff.
To give the tree a sinuous shape, you can use stiff wire.
To fix the branches in the right direction, you can stretch them with rope spacers. for this purpose, by the way, women's tights are well suited.

In such a fixed position, the branches arrive throughout the year.
To form a branch horizontally, you can use straight sticks, tying branches to them.

By the way, branches after pruning trees can be brewed into tea or a bath. This is a healing agent.
Bonsai is an ancient oriental applied art. Its history spans over twenty-two centuries. At its core, bonsai at home from pine is the creation of miniature copies of coniferous trees.
The first records of this ancient art of decoration date back to the Tang Dynasty. But it gained the greatest distribution in Japan during the heyday of the design of living gardens in the palaces of the ruling dynasties.
With the development of bonsai, the size of the plants constantly decreased. Thanks to this, we have trees in their current form. At the moment, a ready-made plant can be bought at any flower shop. But the care doesn't end there. It is necessary to form a crown constantly.
Growing bonsai
So you can take either seeds or seedlings. Pine seedlings are very suitable for this.
Small pine seedlings must be dug up in the forest in autumn. In order to be able to form bonsai in different styles, respectively, it is necessary to dig up seedlings of various shapes.
Initially, they must be in natural conditions for some time. Once you have brought your seedlings home, transplant them into flower containers and place the pots outdoors. The diameter of the container should not exceed fifteen centimeters.
Your future bonsai must be securely covered from drafts and wind, it is advisable to cover the flower pots with mulch. The process of forming pine crowns at home can begin after the plants come out of dormancy in the spring.
bonsai shaping
With the onset of spring, seedlings will need to be cut. At the same time, only ten centimeters are left. After such circumcision, lateral sprouts begin to actively grow. The trunk gradually becomes thicker.
Pruning pine seedlings is necessary with sharp scissors. The cut must be made at an angle of 40-45 degrees. The remaining needles on the plant should be thinned out as much as possible.
After trimming the trunks of your bonsai, use the frame wire to give the trunk of the plant the desired shape. For this, aluminum wire with a thickness of three millimeters is suitable. Gradually, the barrel will reach the required size and begin to crash into the wire. It will need to be removed and a new frame made.
The shape of the new frame should not be changed.
It is very important to follow the wire when forming the trunk. It should not damage the pine needles. If you decide to grow several bonsai at home, it will be interesting to give them a different shape. You can pick up interesting styles from special literature or information posted on Internet resources.
Flower pots with your seedlings will need to be put on an elevated place in your garden.
Plants must also receive enough sunlight.
Watering plants
To grow a beautiful bonsai, you need to pay special attention to the irrigation regime. The substrate must never dry out.
Pine trees will need to be fertilized periodically. It is not recommended to cut them again. And already with the onset of the cold season, bonsai should resemble the outlines of mature trees in nature. With the onset of the onset of the winter period, the plants are covered with mulch.
By the third year in mid-spring, pine seedlings should be transplanted into larger flower pots. Their diameter should be twenty-five centimeters, and a depth of at least fourteen centimeters.

Substrate preparation
To grow bonsai, you need to make good soil. To do this, take two parts of pure sand and two parts of perlite. You also need to add one part of the humus. So that excess moisture drains well to the bottom, drainage is poured.
Root care
Great attention should be paid to pines. The roots are carefully straightened when transplanting seedlings. Also in many sources you can find information that the roots need to be trimmed. Although many growers in the early stages do not do this, and leave the roots as they are.

Only damaged parts need to be trimmed. After transplanting into a pot, the flower is covered with a dry mixture of "Kornevin".
- Throughout the third year, the plant should be regularly watered and fertilized. Before the onset of cold weather, pines are pruned at the level of the upper shoots. For the winter, flower pots are again covered with mulch.
- During the fourth year of the life of seedlings, you can begin to form the crown of your tree. Here you can show your imagination and form some interesting bonsai. Ideas can be taken from specialized literature.
- In the future, every year the main attention should be paid to the formation of the crown and trunk of the tree itself. To do this, you need to do a constant trimming of the pine and pinching the branches. In order to direct the growth of branches in the right direction, a wire frame can be worn on separate parts of the plant.
Growing bonsai at home is quite difficult. Don't expect to get satisfactory results right away. This requires patience and constant work. Don't give up on this hobby. A little training, and your work will bring you a lot of pleasure.
How to grow a juniper bonsai tree in a pot at home How to make and grow a money tree bonsai at home? Types of bonsai that can be grown at home
The ancient oriental art of bonsai is the cultivation of a copy of a particular tree that is many times smaller. Today, many domestic gardeners are passionate about this. You can grow bonsai from both deciduous and coniferous trees. For example, in this article we will look at how you can make pine bonsai. There are many nuances in this art, having studied which, you can decorate your garden or house with a very beautiful plant of an unusual shape.
How to grow pine bonsai?
The first step is to select the source material for growing bonsai. It can be a seedling bought in a store, a young forest tree or an ordinary seedling.
It must be understood that dwarfism is given to plants due to the artificial creation of a flat root system. To do this, the roots are cut, and the pine is planted in a container about 12-15 cm in diameter (slightly larger than the root system). This is best done in the fall, leaving the future bonsai in a pot until the next growing season.
In the spring, the tree will need to be pruned to activate the growth of side shoots. Cut at a height of 7-12 cm, holding a sharp pruner at a 45° angle. At the same time, it is not necessary to touch the needles, and even more so to cut them off. The maximum that can be done is to thin out long needles if they sit too often. This technique will make the lighting of the remaining more uniform.
And, of course, the most important part in creating pine bonsai in the garden is the framing. Use a special copper wire or an aluminum wire ligature from an electrical cable. The tree should be bent carefully so as not to damage the needles and the trunk itself. The winding is removed when it starts to crash (grow) into the pine trunk. By the way, the scars on coniferous trees overgrow within a couple of years, giving the bonsai tree a certain charm.
Further care of the bonsai pine consists of periodic transplanting into larger pots and spring pruning of the tops (“candles”). And, of course, do not forget about watering, fertilizing and pest control.
The formation of a beautiful dwarf tree from an ordinary one is not just some kind of agricultural technique. This is a long mediation process that will bring you the pleasure of communicating with a green pet.
Related articles:
|
Bonsai - types
Many gardeners dream of growing a bonsai with their own hands - a miniature version of a large-sized tree. But, before choosing a plant for planting, you should think about the style in which you want to create a composition. The article will tell about the main styles of bonsai. |
Japanese bonsai tree
Bonsai is the Japanese art of growing miniature trees. Contrary to popular belief, bonsai are not a specific variety or species, they are common types of plants in special conditions. The article will tell you more about Japanese bonsai trees. |
|
juniper bonsai
Growing bonsai is a popular hobby that has spread from Japan all over the world. Miniature trees copy the appearance of adult plants growing in nature. Juniper is one of the most popular bonsai plants. |
Tomato "Bonsai"
Miniature tomato bushes that do not require a garter and are able to grow with equal success both in open ground and indoors are called "Bonsai". Due to their compact size and unpretentiousness, such tomatoes can be grown both in a pot and in open ground. More details in the article. |


4.9 out of 5.0 stars on Amazon"Upon finding that I work as a professional bonsai artist, many people will remark that they once had a bonsai, but it died and with some regret, they gave up". Based on the Bonsai Basics section of the hugely successful Bonsai4me.com website and an e-book of the same name, ‘Bonsai Basics: The Foundations of Bonsai’, written and developed over the past 15 years is out now! All copies are signed by the author. Order your copy here! |
Page 1 of 2:
OVERVIEW
Pinus is a genus of approximately 120 species of monoecious, evergreen, coniferous trees or shrubs, widely distributed throughout the world particularly occurring in mountainous and arid conditions where they are able to thrive.
Pines are a classic bonsai species in Japan and the world over, they are not however, easy trees to care for and style without experience. Pines have their own growth patterns that differ greatly from deciduous and common coniferous species; these growth patterns need to be understood before successful styling and pruning can be carried out.
As can be seen in the accompanying pictures; pines are not only used for bonsai in Japan, they are also very often seen cloud-pruned in Japanese gardens.
Pine foliage is in the form of needles that are most commonly formed in bundles of two's and five's. Some pine species have long and/or curved needles that make them difficult to style effectively as bonsai, however Pinus species that display short needles are nearly always suitable.
There are large numbers of pine species suitable for bonsai though for the purposes of this article I will outline the four most frequently used for bonsai;
 PINUS MUGO/ MOUNTAIN PINE
The mountain pine originates from the mountain ranges of Central Europe. The species itself is very variable and botanists have sub-divided it into a series of sub-species and varieties.
Pinus mugo is very tough and is able to withstand the harshest of conditions. They have evolved to withstand extremely cold winter temperatures and hot, dry summer conditions. In favorable conditions, they will form dense bushy shrubs or small trees but given a poor situation they form scrubby, semi-prostrate twisted trees.
The main features that distinguish the mountain pine from the more familiar Scots pine (P. sylvestris) are the resinous buds and the shiny-green to purplish bark on young wood. P. mugo produce paired needles, 2-5cm long that are dark green and slightly twisted. Cones start as violet-colored flowers that grow in large numbers along new shoots.
More information on Pinus mugo/ Mugo or Mountain Pine
PINUS THUNBERGII/ JAPANESE BLACK PINE
P. thunbergii is a native of Japan and is arguably the classic bonsai pine species. The Black Pine is a very vigorous tree commonly grown Japan in parks and ornamental gardens where heights of anything up to 25metres are commonly reached.
Black Pines are very tolerant of poor conditions, surviving in nature on barren, stony soils. P. thunbergii has thick, dark gray-green needles up to 7-15cm long, though quite long, the needle-size can be reduced in length with the use of bonsai pruning techniques. Bark is purplish-grey and becomes very craggy and fissured with age.
White pines are frequently grafted onto the more vigorous Black pine/ Pinus thunbergii rootstock to improve vigour and growth-rate.
PINUS SYLVESTRIS/ SCOTS or SCOTCH PINE
Native to western and northern Europe, the Scots pine is a conical to columnar tree, which frequently loses its lower branches with maturity and takes a natural literati form. Needles are twisted, blue-green or yellow-green 5-7cm long and borne in pairs. Bark becomes flaky, red-brown with age.
Pinus sylvestris has given rise to a number of dwarf cultivars such as P.s. ‘Beuvronensis’ and P.s. ‘Waterii which are both excellent subjects for bonsai.
 PINUS PARVIFLORA/ JAPANESE WHITE PINE
A conical or columnar tree, often with a spreading crown native to Japan. 2-6cm long leaves are a deep-green color with whitish blue inner sides, giving rise to the name, the White Pine. White pines are frequently grafted onto the more vigorous Black pine/ Pinus thunbergii rootstock to improve vigour and growth-rate.
Japanese White Pine/P. parviflora Pruning and Care Guidelines
>>Pine Bonsai Species Guide: Page 2 of 2
Cut or pinch: we form conifers
Conifers now - at the height of fashion, they are in almost every garden. And many of us are not averse to cutting and plucking Christmas trees and pines with our own hands, creating the desired shape of the crown. We asked an experienced professional, head gardener of the Apothecary Garden Anton Dubenyuk, to instruct enthusiasts: when to pinch, how and whether it is worth taking on this responsible task?

An important feature of conifers, which should certainly be taken into account, is the apical type of shoot growth. It is he who creates the characteristic correct silhouette of the crown. The main continuation shoot always grows from the uppermost (central), well-developed bud. Therefore, we cannot simply shorten the branch when pruning next year. Recovery buds usually form in a dense group around the central bud, forming a characteristic whorl, and only occasionally along the length of the shoot. The general rule is that on mature wood of a perennial branch, restoration buds no longer germinate. Therefore, usually a branch of a coniferous plant dries up to a branching node (below the whorl located) with a full-fledged branch. From this fact we should proceed.
Individual approach
The secret detour in the formation of woody conifers is to pinch the growing shoots. While the young shoot is not lignified, and the needles continue to grow, their axillary buds are not yet suppressed and are able to form well for the formation of the next year's shoot. Thus, the gardener has the opportunity to get shoots of the planned length, to stimulate (or stop) the growth of branches in the right direction.
This technique of minimal intervention is especially important if you need to correct the shape of the crown of a young plant. Just two or three movements allow us to remove unnecessary shoots and avoid painful pruning in the future. By removing or shortening the most powerful shoots, we have a chance to grow a more compact and dense plant than it would be without our intervention.
The most grateful objects for shaping: pines, spruces, larches, partly fir and pseudo-hemlock. We have two methods at our disposal: pinching or shearing. The right choice can only be based on an individual approach. For example, if the number of shoots in a plant is too large, as in shrub forms, pinching becomes too time consuming and ineffective. Therefore, for a thuja, juniper or yew, a classic haircut is more suitable.

And now about pinching. The simplest and fastest bringing visible results - solid pinching tips of growing shoots or breaking out of awakening central buds in early spring. It's just like a haircut. In this case, all shoots are pinched, and if necessary, the main buds in whorls are removed. In this case, instead of one long shoot of continuation, several shorter branches grow from the rudiment of the whorl where the central bud has been removed. This creates more compact and dense plants with an even crown shape, for example, dense "balls" from whole coniferous trees or on their individual branches.
However, before moving on to technology, I advise you to take an individual approach to yourself: is it worth taking on this business at all? With today's variety of conifer varieties, it may make more sense to simply select a variety that meets your requirements. There are many compact dense varieties that do not need painstaking shaping. Remember that with a long break or cessation of care, all the work will go down the drain and, most likely, nothing can be fixed, the decorative effect will sharply and irrevocably decrease. Without fear, you can only influence young plants with active growth, directing the energy of the tree to increase the number of shoots. In this case, as the crown grows and the annual growth decreases, the plant itself will establish the correct balance of growth.

On the other hand, having mastered the principles and techniques of pinching, you can begin to work with complex crown shapes.
The Japanese example is contagious
The most impressive results can be seen in Japanese gardens, where pines and cryptomeria are found, which have been pinched every year for many decades. The Japanese work most often with fairly large trees, giving them fantastically beautiful shapes. Maintaining such plants requires a huge amount of labor and high skill. A team of gardeners can hang high above the ground for days on end and methodically pluck buds, shorten shoots, guide and tie branches to supports. Are you ready to follow their example? Of course, you can just buy garden bonsai, which still look like a rare and wasteful miracle in our gardens. They say that the process of creating bonsai is mesmerizing. So maybe it's worth the risk? Of course, you will have to be patient, but sooner or later a tree will appear that bears the imprint of the personality of the master who created it. It will be the pride of the whole family.
What you need to know to get garden bonsai blanks? First you need to choose the form you will strive for. I'll give you three possible options.
Curved trunk. To obtain a beautifully curved trunk, the apical shoot is partially removed (shortened). In this case, the buds are often laid along the length of the remaining part of the shoot, without forming a characteristic whorl with symmetrically arranged branches. In the future, only well-located buds are left with some margin, and at the beginning of growth, some of the best shoots (usually growing in the right direction, but not central ones) are left to grow intact, the remaining ones are greatly shortened over the next 2-3 years, gradually clearing them crown, cutting into a ring. This is done just to create an openwork crown with beautifully curved branches that are clearly visible.
Extended form. For this form, bonsai leave one of the side branches and pinch the rest, inhibiting their growth, but not removing them until the stem has gained sufficient thickness in the opinion of the gardener.
Umbrella. For a small garden, one of the best formations is the umbellate. And, I emphasize, not a grafted weeping form, but created on the spot. It is especially effective in Scots pine. In this case, you need to form a vertical stem without large branches. For this, one central shoot is left intact for several years, protecting it from damage. It must be tied to a support to protect it from breakage by birds and treated with insecticide against pests. All lateral shoots in the whorl are shortened, and the competitors to the leader must be broken off, preventing large branches from forming.

In this case, all the energy of growth goes up, but the trunk does not remain without food and also grows in thickness. Upon reaching the desired height, usually 2.5-3 meters (for free movement of people under a tree), the central bud is immediately broken out and a crown is formed from symmetrically arranged radial shoots. In this case, the main task for the next few years is to achieve dense branching in the horizontal plane. It is only necessary to take into account that over time the branch will become heavier and itself will lean down.
Formation of bonsai from willow and pine
In fact, the gardener simply accelerates the appearance of the characteristic umbrella-shaped crown of an adult pine.
Time has gone!
From the point of view of plant physiology, the best moment for shortening the shoots comes at the beginning of their lignification, when the shoot itself is juicy and dense, like a fresh cucumber, and the needles have already moved out of the sheath, but have not yet stopped growing.
In this case, at the bases of several needles that have become upper, replacement buds quickly form, and the wound at the top of the shoot is covered with resin and quickly overgrows. It's usually calendar second half of May. Technically, it is best to simply break off the top of the shoot, bending it over your finger, as if breaking a pencil.

It must be remembered that the needles live from 2 to 5 years, and if they are shortened or damaged during pruning, the tops of the shoots will not look very neat for a long time, the tips of the needles will turn yellow. That is why the breakout is preferable. If, nevertheless, a pruner is chosen for pinching (tweezing), then you should use a tool with the narrowest blades or garden shears. The blades of the tool should be tried to stick between the growing needles. When removing an entire shoot, it is best to do this as early as possible. It is optimal not to let the shoot develop at all, by breaking out an unnecessary bud in the spring before the shoots begin to grow. In this case, you need to firmly grasp the kidney with two fingers and unscrew it from the plant. Unnecessary side buds easily break off with a simple side pressure. Soft shoots that have already begun to grow break out even more easily.
In the first or second season after planting, due to problems with survival, the shoots of coniferous plants may have uncharacteristic sizes and the advisability of additional intervention should be carefully weighed. However, when planting young medium-sized plants from a container, you can start shaping immediately.

Return to the section School of topiary craftsmanship

Many people think that pine is not the most suitable tree for a summer cottage, because, growing up, it creates a continuous shadow over a large area. Under it, only a few of the ornamental plants survive. However, with proper pruning, pine can become a worthy decoration of the site, and both young and adult specimens can be pruned.

Types of pruning pine
Coniferous trees, like any others, need care, one of the elements of which is the removal of part of the shoots or branches. Depending on the purpose, there are four main types of pruning of Scots pine:
- rejuvenating
- formative
- healing
- combined.
Healing pruning
This procedure is performed if there is already an adult tree on the territory, which is decided to be left on the site. At the same time, old dry branches, shoots affected by various diseases are removed. It often happens that skeletal branches are also cut if the crown is too thick, and the owners want to make it more openwork and visually lighter, or to give symmetry.
Sanitary pruning of pines is also carried out to balance the trunk growing at an angle. In the latter case, the procedure acts not so much as a therapeutic, but as a preventive measure.
Pruning that defines the shape of the pine crown
This type of plant care is conditionally divided into two types - shaping and decorative pruning. We say "conditionally" because both options allow you to give the tree the intended shape. Only in the case of molding pruning of Scotch pine, the crown grows as naturally as possible, and with decorative pruning, it is given the shape that best suits the landscape design. For example, when they want to introduce elements of the Japanese style into landscape design, in particular, garden bonsai - niwaki.

Anti-aging pruning
Healthy trees and shrubs with a developed root system begin to actively grow new branches in case they experience a lack of sunlight.
This property is used to rejuvenate old plants. Thanks to this kronirovanie all useful microelements are used to build new greenery, and not to maintain the vital activity of old branches.
Combined pruning - crowning, which solves not one, but two or more tasks, for example, rejuvenation and healing.
You do not know how or do not know how to properly carry out this procedure? You do not have enough time, strength and health to independently perform the removal of old branches?
Bonsai pine
No experience of working at high altitude, and the pine has already grown quite tall? Call our landscape studio M.Art. Our arborists will professionally and quickly perform all the necessary work.
When to prune Scotch pine?
Pine crowning can be done in spring and autumn. The choice of season depends on what goals you need to achieve.
The formation of a common pine in spring by pruning is done if it is necessary to obtain a decorative crown or treat the tree. It should be remembered that it is possible to make a “haircut” for Scotch pine only when the frosts have ended and the active growing season has not yet begun.
In other words, from March to June. In autumn, pruning is done only in order to slow down the growth of the plant, and it is undesirable to touch adult plants. It should be remembered that you can not do kronirovanie if the temperature drops below 3-5°C. Dead branches can be removed all year round.
In autumn, the ends of old branches are cut off, and those branches on which there are no growth points are also removed. At the end of spring, the so-called candles are removed by a third - shoots on which the needles are still soft, unfluffed. In the first years after transplantation, the plant should not be crowned, since the thickness of the trunk depends on the number of branches.

M.Art Landscape Studio will help you trim young and old trees. To do this, we have modern equipment and experienced arborists who know the techniques of industrial mountaineering.
The art of creating bonsai originated in ancient China and Japan more than one and a half thousand years ago. The inhabitants of these countries still believe that the tree must be chosen according to the ancient calendar, taking into account their date of birth. This is how the close relationship between man and nature is realized. The roots in the earth are the past, the branches stretching towards the sun are the future, and the trunk is the link between the past and the future. So a person, they believe, must always go forward, knowing the harmony of the world around, and without losing touch with the past.

Bonsai masters believe in the calendar. Therefore, they often wander through forests and gorges for months until they find the desired shape and size, even if it is a tree beaten by winds and rains. Then, for decades, they surround him with love and care. During this time, a stunted sprout turns into a luxurious bonsai.
If there is no time to wander in search of the treasured tree, you can buy it in the nursery.
In Japan, there are several types of miniature trees, each of which is grown under certain conditions. In other countries, the creation of bonsai is more
democratically. Most importantly, the tree should look natural, but not like an old and rotten stump. The ratio of trunk and branches (edabari), roots (nebari) and leaves (hase) should be proportional. For example, when pruning branches, you need to trim the ground part of the roots. And vice versa. What does a mighty tree look like in nature? Powerful roots, a huge trunk and a lush crown. This is what a bonsai should look like - a miniature copy of a forest giant.
When choosing a tree, you should consider the conditions in which it will grow. If you intend to grow on a balcony or in a covered greenhouse, heat-loving trees can be used. Any frost-resistant trees are suitable for planting in open ground: pine, birch, aspen, etc.
Do not forget about the growth rate of the tree and its ability to quickly sprout close to the cut. For example, if you take an elm or a maple, they very quickly have new buds and shoots. There is no need to be afraid that the tree will wither. As for the pine, it is by no means possible to cut it below the first branch - the tree will die. The trunk of a birch, lilac or cherry is also not recommended to be chopped off "under the stump".
Bonsai pine - the art of unique trees
In this case, young shoots will begin to grow straight from the roots.
Trees growing outdoors are more exposed to wind and weather conditions (sometimes not entirely favorable). They are forced to cling tightly to the ground with their roots so as not to tip over. The open air "temperates" them. That is why the mini-tree grows faster and "gets fatter" in the open air.
It is worth paying attention to how quickly the thickening of the trunk occurs. Take, for example, azalea. If you try to create a bonsai at home, it is unlikely that you will be able to form a thick trunk. But a ficus or a money tree in just a few years can become the pride of the master.
It is better to start growing bonsai from a small sprout. Larger trees (up to 5 years) can also be used.
stem shaping
First you need to decide what style the bonsai will be. Then draw an approximate scheme of the tree and stick to it throughout the growing period. If the tree changes during the growth process, the scheme should be corrected.
After landing, there is a lot of work to create the form. One of the most painstaking and time-consuming work with the trunk is considered. Even a tiny bonsai should have a trunk whose thickness in the lower third (at the base) is at least 1/6 of the height. It will take more than one year to create a thick bonsai trunk. Several methods are known. If you follow them exactly, the tree will not grow in height, and the trunk will grow gradually. Let's take a closer look at the most famous of them.
1. Leader (phased) trimming of the trunk
Suitable for straight (not curved) deciduous trees. The result is a bonsai with a lush crown and a thick, almost straight trunk. Where to start?
On the diagram, you should indicate (except for the thickness of the trunk and the height of the tree) the bending points. The first point is usually located at about 1/3 of the height of the future trunk.

Next, you should plant a tree in a bulk container and grow it, feeding it abundantly with fertilizers. Continue until the thickness of the trunk at the very bottom reaches 2/3 of the desired one (the one indicated in the diagram). Then cut the stem at 45°. The cut must be positioned in such a way that the lower part of it subsequently becomes the outer part of the bend. Ideal if there is a small branch near the top of the cut. But if it is not there, do not despair - soon sprouts will appear from the "sleeping" buds. Don't cut them, let them grow. Among the young branches, choose one. She will become the "leader", or a continuation of the trunk. The longer the "leader" branch grows, the thicker the trunk located under the cut. This usually takes several years. Upon reaching the desired thickness of the "leader" at the base, it should be cut off in the same way as the main trunk was once cut. Choose a new extension of the trunk and again wait for it to grow to the desired thickness.
Place the bending points according to a certain rule. Its essence is as follows. Each new leader should be placed at a height of about 1/3 of the distance from the top of the tree to the previous branch. Simply put, the higher the stem segment, the shorter it is. Growth-cutting operations continue until the desired, cone-shaped bonsai is obtained. Since each new leader grows at an angle to the previous one, the bonsai has a smooth curve at the cut points.
During the growth of the leader, it is better not to touch the rest of the branches growing below the cut point until a certain time. They help to achieve the desired thickening of the trunk. As soon as the "leader" grows to the sizes indicated in the scheme, these branches are removed. It is allowed to cut several branches in case of their high concentration in a certain place. If this is not done, a swelling may form on the trunk and the cone will no longer work, which will negatively affect the appearance of the bonsai.
The shape and arrangement of the branches should be dealt with after the "created" the desired thickness and height of the trunk. It is undesirable to leave many branches during its formation and growth. Otherwise, after a few years, these branches will become thick and massive, which will spoil the beauty of the tree.
Pruning "leaders" to produce before bud break. It is at this time that the tree is stored energy for further growth. All the nutrients will go to the emergence of new shoots and rapid growth. Above the branches and crown, on the contrary, it is better to practice after the leaves bloom. During this period, the energy reserve has already been used up. The branches will grow neater and thinner.
2. The method of using auxiliary trunks with their subsequent trimming

In nature, trees with a regular cone-shaped trunk in its lower part are rare. In the nursery, such trees are also a rarity. Usually the trunk of trees 5-7 years old has approximately the same thickness over its entire height. In order to increase the thickness of the trunk and give it the desired shape, this method is used. Its essence lies in the fact that the required thickness of the barrel is achieved with the help of a "top". This is one or more additional shoots. The section of the trunk located "under the top" in a short period of time acquires the desired thickness and conical shape.
If there is already a cone, but the trunk is not thick enough, you can grow an additional shoot just below the top of the tree.
Care must be taken to ensure that the top does not grow. Otherwise, it will weaken the trunk or become the second peak. To avoid this, it is necessary, starting from the bottom and further, at the "top", remove all branches and leaves.
After the final formation of the trunk section, the "tops" are cut off. The next operation (as in the first method) is the formation of branches. Thickening them with the help of an additional shoot should be done very carefully, preventing its excessive growth.
Both of these methods are great for trees that are transplanted from a container into the open ground.
 3. Crown cutting
This method gives good results when forming bonsai with a straight trunk from coniferous trees.
A tree placed in a special container with holes at the bottom is planted on the site. The holes are designed to allow roots to grow into open ground. All this time, bonsai must be well fed with fertilizers. With proper care, the trunk will be quite thick in relation to the height of the tree.
When the tree reaches the desired height, cut off the top of the head to the height necessary for the formation of the crown. The tree is then transplanted into a bonsai container. If there are curves and extra branches, they need to be cut.
It is allowed to form bonsai from coniferous trees by leader pruning.
Growing bonsai with the last two methods allows you to get results in a few years. With phased pruning, the formation of the trunk and branches can take more than a dozen years.
But bonsai of amazing beauty and impeccable shape grows precisely with leader pruning.
If it is assumed that the thick bonsai trunk will be curved, then you need to start working with a young tree (not older than 1-1.5 years). The soft wire is wound in uniform turns at about 45° to the barrel. Then it is bent together with it to give the desired shape.
4. Metol "ringing" the trunk
For this method, you need to make a ring on the trunk right at the beginning of the trunk exit from the ground. Some craftsmen (as shown in the photograph) take an ordinary metal cover of small diameter (5-10 cm), drill a hole in the center, exactly the same as the diameter of the trunk, then a slot is made from the center, the drilled hole in the cover to its edge, so that this put the lid on the trunk, make small holes in the lid, with a nail or awl, so that when watering through the lid, it does not prevent water from penetrating to the roots.

5. The method of splicing trunks.

Some trees can grow together, ficuses perform well in this method. To do this, you will need several trees of the 1st type. We "dump" all the trees that we will splice, do the standard procedures for cutting the roots, and also remove diseased roots, if necessary. Next, we fasten all the trees into a "bundle", choose the most attractive sides, form a lush tree. At the base of the trunk, we tightly wrap the place of future fusion with a dark film (duct tape, a piece of cloth). The winding place can be pulled together with plastic ties or soft wire, you need to tighten it carefully so as not to damage the tree trunk and not to transfer it, since the trees are young and their trunks are soft. For this method, only healthy tree samples should be selected, as if one of the trees begins to die, this can lead to the death of the rest of the trees in the "bundle".
This operation should be carried out in the spring. Since during this period the tree trunk grows faster both in height and in thickness, make sure that the wire does not cut into the tender bark. At the first sign of barrel compression, loosen the winding. Further bending of the trunk is possible by applying wire in the right areas.
Sometimes, when cutting branches, very large cuts are obtained. They not only worsen the appearance of the bonsai, but also cause decay and death of the tree. To prevent this from happening, the cut can be covered with garden pitch or sealant.
midori tsumi- pinching the point of growth. By shortening the shoot, you provoke the laying of new buds below the pinching point, thus obtaining dense paws with many branches. Depending on what kind of trees you are working with, the time of work changes:
- for hardwoods - pinching begins during the period of active growth of shoots and lasts until mid-summer. On the remaining branch there are 2-3 leaves (buds). They finish work at the end of July, so that the regrown branches prepare for the winter;
- for conifers - pinching begins when the branch is in the “candle” mode, but the needles have already moved away from it at an angle of 45 °.

Kiri modoshi- pruning all the shoots of the last year to form dense brushes. It is produced at the beginning of sap flow, before the buds open.

Hamu-siri– thinning needles – is used only for pines. All the needles of the previous year are plucked, and the remains are thinned out by half or less (depending on how many shoots you want to get).
Fuse-zukuri- special techniques for changing the shape and direction of growth of shoots.
For these purposes, the branches are bent in the right direction to the required angle and fixed.


When bending, the main task is not to damage the tree, therefore, at the slightest crackle, the slope is reduced, and the branch is fixed. Bamboo spacers, soft copper wire, twine, burlap are used to protect branches from damage. They carefully monitor that the strapping does not grow into the bark - as soon as the branches thicken, they are tied up. Full fixation of the branch occurs after 2-3 seasons.
Shitate- barrel bending technique. Such niwaki styles, like mogi, kengai, syakai require that the barrel is not located in a vertical plane. To give shape, use spacers, stretching, bending to the ground, followed by fixation with pegs.

The trunk can be formed in two ways:
- setting the right direction for a young seedling from year to year (for example, planting a plant at an angle);
- changing the shape of the rootstock in a mature tree (usually used to reinforce existing bends).
There is a risk that the unnatural position of the trunk may cause the root system to not hold it, so the extensions are installed as follows:
Where to start?
We advise a novice bonsaiist to first practice on trees and shrubs growing on the site. Nivaki can be formed from both a young and a long-growing tree. They begin work in early spring, before the buds open. At this time, the shape of the tree, natural curves, strong and weak shoots are clearly visible. For bonsai, choose a healthy plant that can survive the stress caused by drastic interference in its life.
Operating procedure:
- at a tree or shrub, cut off all diseased, broken and dry branches;
- choose the style in which the nivaki will be formed, paying special attention to the age of the tree and the natural shape of the trunk;
- decide where the front side of the composition will be, mark the branches of the first order (bases) and the topmost branch crowning the nivkai.
Skeletal branches should emphasize the levels as much as possible - for this they are placed in a plane parallel to the ground, using the techniques described above.
After that, all excess shoots are removed, leaving on the skeletal branches those that will later form the crown. If necessary, stretch marks are installed, directing the growth of shoots in the right direction.
The next stage starts only next year:
Examples of elementary niwaki
Jasmine. The shrub gives abundant shoots, and without corrective pruning after a few years has an unsightly neglected appearance. What can be done? Remove all excess growth, leaving a few of the strongest vertical shoots. Pull them together with a soft wire - at the top you will get a compact “hat”, which in the spring will turn into a wonderful white cloud with a delicate aroma.

Spirea. The lush blooming "Rich Bride" is an excellent material for bonsai. Leaving a few skeletal branches, weave them together, and cut off all excess at the root. Give the stems the desired height, form the side shoots in the form of a ball.


Lilac. An ordinary bush can become a garden barefoot masterpiece if you work a little:
- cut out all the shoots and remove the stem branches under the root, leaving one, the strongest or crooked shoot;
- cut it to a height of no more than 1.5 m;
- using the fuse-zukuri technique, form a crown from young shoots in the form of a bowl, shell or cap at the top of the main branch;
- try to direct the growth of young upper shoots parallel to the ground, tying a load to them;
- be sure to remove all excess growth at the root and adjust the top growth point.

After flowering, be sure to remove all dry candles - this stimulates an increase in peduncles for the next year.
Holly maple. The bright red leaves of this plant are good on their own. But if you give the tree the desired shape, you will get a unique composition that will decorate the shore. artificial reservoir or alpine slide. Plant two young seedlings side by side, which can later be intertwined with each other, or you can grow a tree in the sokan style - with a forked trunk.

Don't be afraid to experiment! For an enthusiastic person, there is no such plant that could not be turned into a masterpiece to the envy of all neighbors.
The ancient art of growing bonsai in pots has spread throughout the world, turning from an amusement of the Japanese aristocracy into a mass hobby. Over the centuries, the Japanese have learned to form miniature copies of naturally growing trees. In Japan, this art has reached tremendous development and today it represents a whole science with numerous schools and shaping techniques that make it possible to obtain plants of various configurations: straight, asymmetrical, oblique, “wind-bent”, “weeping”, cascading and others. These forms are inspired by the very nature of Japan, where, in a special climate, plants acquire harmonious, perfect silhouettes.

Recently, Russian gardeners are increasingly using oriental style in design, and the creation of bonsai in the open field is undoubtedly a fashionable and promising direction. The formation of a garden bonsai differs little from the traditional one, however, familiar methods of working with woody plants are used: pruning, pinching and grafting.
The sizes of the garden bonsai, unlike the canonical Japanese, are arbitrary. The source material can be an old fruit tree, an unsightly twisted shrub in the corner of the garden, an unusual specimen found in nature, and, of course, a young plant. Take a closer look at the plants in your garden, maybe one of them is already ready to make a bonsai out of it?

It happens that within just a few years of targeted pruning from a nondescript tree with bare trunks and sticks sticking out in all directions, attractive unusual oriental-style trees can be created.
Many in the gardens probably grow old apple or cherry trees, which have not been pleasing with crops for a long time and look sloppy. Try to remove all the small branches on the bottom of the crown so that the main trunk is clearly visible, and in the spring cut the top of the crown parallel to the ground. Repeating these steps annually, you will form thick caps of foliage at the top of the crown on a graceful curving trunk. Soon you will see how the silhouette of the tree changes, and you will enjoy this very easy garden work.
With coniferous plants, the result can be more spectacular, but the formation process is longer. For example, the dense and dense crown of mountain pine, which has pleased you for many years, begins to become sparse and loose. Great excuse to get started!

The formation of coniferous plants takes time, but gives impressive results. Author's photo
Look inside the crown and highlight several branches that form a beautiful silhouette. Cut the remaining branches without regret, and at the beginning of summer, when the buds start to grow, pinch them, leaving 1-2 cm. By the next season, many new buds will be laid in the upper part of the crown, and they will give rise to a new beautiful crown in the form of a cloud.
The same can be done with Scotch pine. The only thing is that along with pinching the shoots and thinning the crown, the branches of the Scotch pine will have to be fixed in a horizontal position. Usually they use thick wire, tie loads or pull ropes. This is necessary to maintain the tiered shape of the crown, otherwise - without fixing - the branches begin to "bulge", the space between the tiers closes.

I note that of all conifers, Scotch pine and mountain pine are the most suitable material for garden bonsai in the middle lane. Do not be afraid to cut out extra branches, because pines are very plastic trees, it was thanks to their abilities that they were able to adapt to the harsh conditions of nature - the withering winds of the highlands and the harsh frosts of the north.
Pines with great pleasure take the desired shape, the main thing is to help them. At the same time, the gardener himself will comprehend harmony and develop taste, bringing the form to perfection. In addition, working with the form is a hobby for many years, and the result is an exclusive and unusual plant that pleases the hosts and surprises the guests.

In addition to pines, other conifers are also suitable for creating garden bonsai. European larch is very resistant and tolerant of pruning, varieties of Chinese and medium juniper, pea cypress are well formed. You can try to work with varieties of common spruce.
Remember that pines do not know how to lay buds on lignified shoots of last year, so you can only pinch young shoots at the beginning of summer, and junipers, larches, spruces and cypresses can be cut at any time even with scissors.

Of the deciduous for our climate, hawthorns, maples, oak, as well as fruit trees - apple trees, cherries are suitable. Despite the small assortment, these trees are stable in our climate and tolerate shaping well.
Recently, ready-made bonsai grown in a nursery and suitable for planting in open ground have appeared on sale. These are usually multi-stemmed versions of Scots pine or mountain pine, on which dense green caps of needles are formed. Such plants, as a rule, are very expensive and do not always look harmonious, so they can be considered as material for creating a more perfect tree from the point of view of the owner. In any case, after planting, you will have to take care of them, continuing the work started in the nursery - annually pinching the shoots and cutting out extra branches, otherwise your bonsai will turn into an ordinary tree.
If you know the grafting technique, then the process of creating a bonsai can be somewhat accelerated: several cuttings of a dwarf variety can be grafted onto a tall stock (for example, pines), thus creating a multi-tiered plant at once. The advantage of this method is that in the future it will not be necessary to pinch the shoots, since the grafted variety is dwarf.

When creating a bonsai, do not forget that this is not only a formed tree, but also its harmonious combination with the surrounding space. Bonsai is a self-sufficient work of art, closely related to the rest of the composition, as it imitates a piece of nature in miniature.
Agree that your masterpiece will look a little ridiculous if nettles or beds of strawberries grow around. Therefore, to give an oriental flavor and support the overall style in the garden, cut everything in a row! Favorite shrubs - spireas, barberries, dogwoods and even perennial curtains will be an excellent addition to shaped trees, if you give them smooth, streamlined outlines with regular shearing.
In addition, plants that are similar in appearance to plants of the Japanese flora will add zest. For example, instead of moss, you can grow saxifrage, stonecrop, azorella, some types of bryozoan, and astilbe will look good in the shade. Strive to make the composition harmonious, and the garden itself will tell you what changes are needed.
Konstantin Korzhavin


 Constellation Scorpio description")


