Sheets of pressed and glued wood veneer are the main material of all modeling enthusiasts. This material is easy to cut, well processed, and you can find drawings of plywood ships on the Internet, since it is from plywood patterns that many craftsmen begin to get acquainted with this art.
Self-creation of ship models is not the easiest task, but doable. You will need some knowledge and skill. In the article we will talk about the basic methods of work, and if you wish, you will hone your skills on your own.
Necessary materials
If you want to make a small ship model, you will need the following materials:
- Wood - linden, walnut, cedar or other species, preferably non-fibrous and soft. Wood blanks must be smooth, without damage and knots. Wood can be used as a material for the main parts of the model - the deck and hull, as well as for small elements.
- Plywood. This material is the most in demand. For ship modeling, balsa or birch plywood is used, as they are less prone to chipping during sawing. Model ship plywood usually has a thickness of 0.8-2 mm.
- Veneer - thin plates of natural wood of expensive species. As a rule, they are used for veneering, that is, pasting surfaces from inexpensive materials.
- Fasteners - laces, thin chains, brass and copper studs, threads, etc.

You will definitely need wood glue, tracing paper and cardboard to transfer templates. Small parts are made of metal. As an alternative to metal, you can use colored polymer clay.
Each work must begin with preparation, and modeling is no exception. First you need to decide what you are planning to build. If you have not come across ship modeling art before, we recommend that you first find the drawings of a plywood ship on the net: they usually contain the information you need and even a beginner will understand them.

On sale you can find ready-made kits that allow you to assemble a ship from finished parts. Beginners should be interested in such kits, although they are sometimes quite expensive. It is better to master the technology from the very beginning.
Print the drawing and make patterns of the main elements according to it. We transfer the templates to plywood, and then proceed to sawing.
Detail cutting
Blanks can be cut with a manual or electric model jigsaw. The latter is more expensive, but with it you will have less hassle when cutting out small elements:
- We make a starting hole in the plywood sheet and insert a canvas or a jigsaw file into it.
- We cut out the part, moving along the intended contour.
- We process the created workpiece with a file, removing small chamfers along the edges and removing burrs and chips.

When working on one part (sides, deck, keel, etc.), you immediately need to cut out everything you need. So you spend less time and the work will move faster.
When everything is ready, you can start assembling.
Assembly sequence
Work must be done in the following sequence:
- First, we put on transverse frames on the keel (longitudinal beam). At the bottom of each of them there is usually a groove for attaching to a plywood keel.
- For connection, you can use standard glue, but you can use special glue mixtures that are designed for ship modeling.
- We fix the upper parts of the frames on the deck. For simple models of ships, the deck consists of a single sheet of plywood, while for complex models it can be multi-level.
- After the glue has dried on the frames, you can proceed to sheathing the side with thin strips of plywood. The thickness of the material should not exceed 1.5 mm, since only in this case you can bend the skin without the risk of damaging it.
- To bend veneered plywood, it can be heated and moistened. After that, the material bends easily, and eventually takes on a stable shape.

You can paste over the body for painting with a solid sheet. To imitate plank sheathing, it is better to use strips up to a centimeter wide, depending on the scale.
Fix the glued plywood with clamps and clamps, and leave to dry.
Final finishing
When the hull is assembled and dried, you will need to do the following:
- Make deck superstructures from thin plywood and secure them.
- The sides must be increased so that they protrude above the plane of the deck.
- We paste over the surface of the deck with wood veneer or line it with an awl, imitating plank sheathing.
- Make and install all small elements such as the steering blade and steering wheel.
- Fasten the masts with additional devices (spar), set the sails and stretch the structure with the help of rigging threads.
In conclusion, plywood elements must be treated with stain and varnished. This will provide the souvenir with at least a couple of decades of complete preservation.

findings
The first thing you need before creating a wooden ship with your own hands is desire. Almost anyone can make a simple plywood boat with their own hands - you need patience and minimal skills with a jigsaw. If you decide to implement a complex drawing with many small details, you will need to work hard. That is why we recommend starting with the simplest models. Gradually improving skill.
Frigate Scarlet Sails
Step-by-step instruction
manufacturing
CHINESE JUNK
CHINESE JUNK
So we got to the most important part of the site.  I will give you approximate sizes.
  since I made the ship by eye and did not pay much attention to the size. I didn't write them down exactly, but there are some. I will not torment you with marine terms, because I myself am not strong in them, but I will write in a generally accessible language. Well, you know the basic terms. Such as deck, mast, yardarm, keel. Here we will begin our work from the keel. But first we will do some preparatory work. We take a sheet of veneer and lay it on some kind of plywood or board, and smear it well with glue. We fix with buttons so that the sheet does not curl up when it dries. Getting to the keel, length 45 cm
  the height of the front part is 12 cm, the back is 8 cm. If the dimensions in height are more than anything terrible, you can always cut off the excess. After the keel has been cut out, we will process it with sandpaper a little. We will remove the gloss, and if there is a texture coating, then we will remove it completely.
  Spread glue on one side and leave to dry. You can spread with two, whichever is more convenient for you. While everything is drying, we are marking the edges of the ship. We make one blank template. The width of the rib is 16 cm, the height is 6 cm. The depth of the slot for inserting the keel is 1.5 - 2 cm. The width of the slot is equal to the thickness of the veneered keel. Next, we proceed to the veneer of the keel. Who doesn't know how it's done
  I tell. The veneer is cut into strips slightly larger than the width of the keel. We turn on the iron at full power, but so that the veneer does not burn during veneering. We put the veneer on the keel and smooth it with an iron until it is completely glued. We cut off the excess veneer and clean it with sandpaper stuffed on a bar.
  After the keel has been veneered, we will make the deck and we will make the rest of the ship's ribs. The length of the deck is 45 cm, the width is 16 cm. We measure 15 cm on one side, this will be the beginning of the rounding of the bow. We measure 11 cm from the back, this will also be the beginning of the rounding. The width of the back of the deck is 4.5 cm. Photo 5 shows the deck. Now we begin to trouble with the rest of the ribs. Since our keel is curved on the inside, the height of the ribs will naturally change in relation to the inside of the keel to the deck. I'll try to explain the best way to do it. Myself
  I understood only when I made the fifth ship. And so let's get started. We lay the keel on a piece of fiberboard as shown in photo 1. We mark 8 cm from the front as well as from the back. And we draw stripes on the keel. It should go something like this
  rear side 8 cm, front 5 cm. On the front of the keel we make a step to stop the deck (photo 5). Next, try on the deck, cut off the excess, and turn the keel to the top. We find the lowest point between the keel and the deck and set the first rib. Immediately make marks on the keel and on the deck where you install the ribs. We make the next edge. It will be installed at the beginning of the rounding of the front of the deck.
  The width of the rib is 16 cm. We measure the height from the deck to the keel, taking into account the slot. Example. The width of the rib is 14 cm. The height from the inside of the keel to the deck is 3 cm + the depth of the slot is 2 cm and that is 5 cm. Next, we take the first template blank. We lay on the rectangle of the future edge, combining the upper part and the upper right corner. We outline along the contour. We do the same with the left corner. The workpiece height will change but the main configuration of the rib
  will remain. We also do the back part and one edge between them. After that, we make the ribs of the bow of the model. The approximate distance between the ribs is 3 cm. The same is true from the back. After the ribs are ready and fitted, we glue them, let them fix and glue the deck.
  When all this is done, we make inserts between the ribs around the entire perimeter. Next, we clean everything and make bevels on the ribs from the bow and rear of the ship. After that, we cut off a piece from the veneer sheet according to the size of the central part of the ship, coat it with glue, let it dry a little and glue it with an iron. We proceed to the most time-consuming work, veneer the bottom of the ship with stripes. I have them
  the width is 6 mm. We take the prepared sheet of veneer and cut it. After the strips have been cut, it is necessary to process the edges, clean out the burrs and small irregularities. Glue stripes in the central part
  ship one to one to the bow and to the back of the ship with an overlap. Preliminary prayers with fresh glue of the place of gluing. Here's what we got. Now we will clean everything up and proceed to the manufacture of additional decks. The front part of the deck starts from the beginning of the rounding and protrudes by 3 cm. The width of the bow is 9 cm. The width of the part from the rounding is 16.6 cm. After gluing, it will be processed, rounded and will be equal to the width of the main deck.
  The back part also starts from the rounding, it is equal to 16.6 cm, protrudes by 4 cm. The width of the back part is 9.5 cm. The additional decks are now glued in the current order (you can also glue them with an iron).
  We glue the front of the deck first. Then we fan it. After that, we veneer the main deck before rounding and installing the back of the additional deck. Next, glue the back. It can not be veneered as it is covered with deck superstructures. The decks are glued, rounded off and we proceed to the manufacture of the sides of the rear of the model. We cut off two strips 4 cm wide. You will determine the length yourself. Starting from the point of curvature. The back of the board has a deployed
  angle 105 degrees. After the strips are cut out, we make cuts on them in the place where they will be
  bend along the contour of the deck and smear with glue. The glue has dried, we begin to veneer. We cut two strips of veneer in width and glue them with an iron, while bending them along the contour of the deck. The side boards are done, but since they need to be deployed, we carefully grind them at an angle, trying them on to the deck. Then we glue them. Making the back of the board will not be difficult for you. Next, we move on to
  deck superstructure at the rear of the model. The photo shows how it looks. The superstructure deck configuration must be integral. A little explanation for the photo. Side
  the pads should be 1.5 cm longer towards the back of the model. After we made the deck, we make an insert with windows and other inserts in the openings for the stairs. When we have all the inserts ready and fitted, we glue them to the deck and then glue the deck itself. The deck was glued and after that we veneer it. Next, we make the following sides of the deck superstructure and an insert with windows. The back of the sides will no longer be deployed, but at a right angle. After the last deck was made, glued and veneered, we make
  final boards. With the rear deck superstructure finished, we move on to the bow of the model. We also do the front sides with
  angle of 115 degrees. They also start from the beginning of the additional deck. The boards were installed and glued. We proceed to the manufacture of an insert with windows and an upper platform. Top platform dimensions. Length 15 cm, (excluding the balcony) the width of the front part is 12 cm. It protrudes 6 cm. The back part of the platform is slightly wider than the sides by about 7-8 mm on each side. After we made a platform and an insert with windows, we glue them. Then we veneer the site. Next, we make the sides of the central part of the model. Cut off 2 strips, veneer them on the inside, mark
  cannon ports and cut through them. The port size is 1.5 cm by 1.5 cm. The gap between the ports is also 1.5 cm. The ports are 5-6 mm above the deck level.
  With the sides finished, we proceed to veneer the outer part of the ship. After veneering the ship, we make ladders. With the ladders finished, we move on to the railing. Strip mode 4 mm wide. We veneer them from three sides, glue them 1 mm away from the edge, sawing them down. Next, we mark them out and drill holes for installing pilasters under the railings themselves. After that, we make the railing ourselves. The same strip mode but only the edges are veneered. A little trick. The photo shows that the corner pilasters are slightly higher than the rest. This is to make marking easier.
  They drilled a hole, tried it on a pilaster, marked the rest of the points for the pilasters. Once all railings are in place. Cut off the excess, clean and
  veneer. We do the same in the bow of the ship. Next, we veneere the edges of the sides of the ship and clean the entire ship. We proceed to the marking and installation of masts. The length of the masts is up to you. The diameter of the mast at the bottom is 10-12 mm. At the top 4-5 mm. To be able to drill a hole for installing a flagpole from a toothpick. The ship is completely ready and we proceed to its staining. We fix those parts that you consider necessary. Finished with the stain. We make 2 additional fastenings for ropes (photo 24) and two blocks for raising the sails (photo 25). It remains to varnish the model, make the sails, and then install them. For sails, we need material, a piece of drawing paper for a pattern, wooden round skewers and the nearest workshop for tailoring and repairing clothes. I hope you cope with the manufacture and installation of sails.
If this is your first ship model kit, then we recommend paying attention to Amati and Occre. Since we have translated the instructions into Russian for almost all models, and the price / quality ratio is higher than that of other manufacturers.
Content
Recently, decor items that are made from recycled materials or from materials that are conditionally called garbage, for example, cardboard boxes from used appliances, have been in fashion. On the other hand, it has become fashionable to create various figures and models of equipment from paper. In this article we will try to create some interesting cardboard ship models. For some of these models, you will need ready-made templates, and some products can be created without diagrams, using your imagination. At the end of the article, you will definitely find a video tutorial that will help you consolidate your knowledge and create an interesting product from improvised means. Let's not waste time, prepare materials and start creating.
Templates
Let's first try to create a ship using templates. They are easier to work with. What you need:
- thick cardboard (you can use an old box);
- scissors;
- pencil;
- ready template;
- glue or tape;
- colored paper and other decor.
First you need to print the template and transfer it to the main material. By the way, if you are using not too thick cardboard, then the template can be printed directly on it.
You should get the following details:
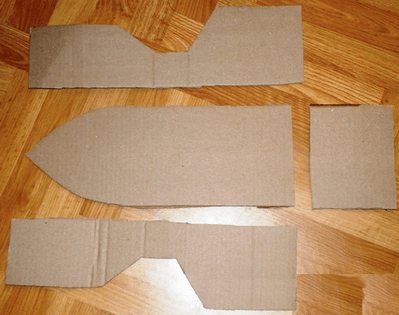
Next, you need to dilute a little PVA glue with water, cut plain paper into pieces and stick them to the base of the ship by dipping them into the solution. Remember the papier-mâché technique. The parts of the ship themselves are best connected with adhesive tape.
It remains now to arrange the blank with a prepared decor. It can be colored paper, wrapping paper, fabric. The ship can also be painted with ordinary watercolors.


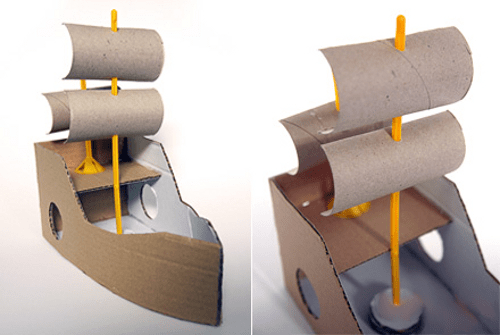
You also need to make a mast for the ship. You can use a regular twig and a few round logs made of thick cardboard.
Every ship should have a flag. For it, use a fabric and an application made of paper or material. The sail can also be made from cardboard, use toilet paper rolls.
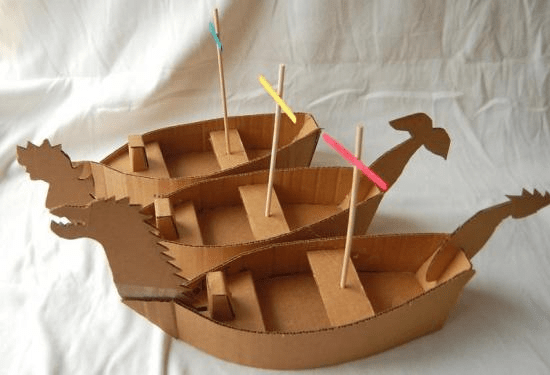
Making a big ship
This option is suitable for young children who love exciting games. For such a ship, you will need a large box. It can even be packaging from under the refrigerator or from a large TV.
First you need to connect the valves of the box and make a sharp bow of the ship. On the sides you need to cut out a few round timber to make impromptu portholes. Use a thick stick and fabric to make a flag. Use paint to paint the ship.

Do not forget about details such as the anchor - it also needs to be made of dense material and decorated. A large do-it-yourself cardboard ship is ready to sail through the vast expanses of the apartment.
We use matchboxes
Let's call it modeling, because we will create a whole ship from several matchboxes. What will be required:
- cardboard;
- glue;
- matchboxes;
- wooden skewer or thick paper;
- colored paper;
- markers;
- scissors.
First you need to glue together two matchboxes with short sides. Glue another box on top in the middle.

Now you need to cut a rectangular piece of paper and glue it to the top of the structure.
Now you need to cut out a strip from thick colored cardboard, with which we will form the bow of the ship.

Now you need to cut out a piece of cardboard that will fit the contours of the ship, take a look at the photo:

Now the bottom and top of the ship need to be fastened with glue. Next, you need to make a mast. You can use a wooden skewer or twist the A4 sheet very tightly and secure the tip so that the sheet does not unwind.

A hole must be made in the upper matchbox of the ship so that the mast can be inserted. Don't forget to use glue.
Now it remains to cut out the sails from colored paper, paint them and attach them to the mast.

The matchbox ship is ready! It can be made wider and taller if more matchboxes are used. If you use very thick cardboard for the bottom of the ship, then it is quite possible to launch it on the water and participate in competitions for the title of the fastest ship.
DIY cardboard spaceship
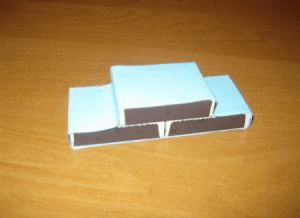
We suggest using a fairly simple option that will literally create a 3D model. To do this, it is necessary to cut out several identical parts from cardboard, but of different sizes. The parts must be fastened together, but laying between them either a thin piece of foam rubber, or a small piece of thick paper. It will turn out something like this:

Or like this:

An entire space station can be made using cardboard toilet paper rolls and scotch tape.

Use silver foil, compasses, black felt-tip pen, and a simple pencil to give the spaceship a realistic look.
Cardboard is a fairly convenient and easy-to-use material, but if you know a few nuances, the work will seem even simpler, and the product itself will turn out to be neat:
- when working with very dense material, use rather sharp scissors, and even better - a clerical knife;
- before bending the cardboard parts, it is better to draw along the dotted lines with the non-sharp side of the scissors or an old pen that does not write, then the material will bend neatly and evenly;
- Not in all cases, you can use a glue gun. For example, if you are working with thin material, then it is better to use stationery glue or PVA;
- work in a room where the humidity is not too high, otherwise your products may delaminate or parts will not stick together;
- the room should be light, it is desirable that there is a window that can be opened and ventilate the room;
- and we always advise you to work only in a good mood.
How to make a ship out of cardboard with your own hands - a few more interesting options
We want to offer some more interesting and beautiful options for ships that you can do with your own hands.


In this case, a milk carton, cardboard boxes and a sleeve were used.
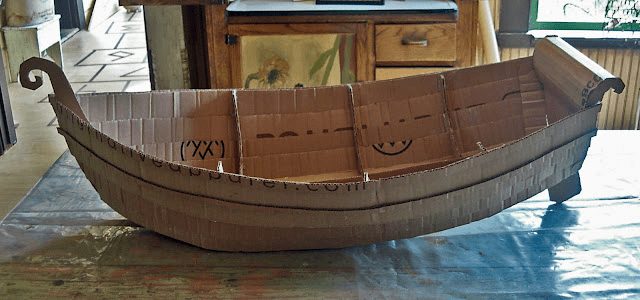
And this is a luxurious boat made from an ordinary cardboard box.

A little practice and imagination, and you can get such a beautiful do-it-yourself cardboard pirate ship. We always advise you to involve children in creativity. They will be especially pleased to know that they are creating a boat just for themselves. In parallel, you can think about a pirate costume, as well as make a spyglass, a hat and a cardboard knife out of cardboard. Such participation of children in creativity helps to develop their imagination, attentiveness, perseverance, the desire to create something with their own hands for themselves. Be sure to involve the children in cleaning as well. Explain to them that they need to put all the materials after themselves, put them in their places, and also need to clean the workplace so that later they can do creativity again.
Assembling a ship model can be interesting not only for avid ship modellers, but also for beginners. Assembling a wooden model, you will learn a lot about the structure of ships, enjoy seeing how a set of wooden blanks turns into a real sailboat. To make the assembly enjoyable, we recommend starting with the simplest models. Call us - we will be happy to help you with the choice.
Each wooden ship is unique and often carries a piece of history. We have colonial ships, fishing boats, and majestic warships - for every taste and color. We offer high-quality models at low prices - these are foreign models of Mamoli, Corel, Mantua, Amati, Artesania Latina, Billing Boats, Constructo brands, and ships for assembly from Russian manufacturers - Master Korabel, Falconet, LS Model.
What is inside?
Each set contains materials, drawings and instructions - in general, everything you need to assemble a model of a wooden ship. On the other hand, tools, as a rule, are not included in the kit - this saves money for those who already have tools. For everyone else, our store offers a wide variety of modeling tools. Usually, everything that needs to be purchased to assemble a model from scratch, we indicate in the "related products" subsection on the product page.


