A paper butterfly can become a decoration for walls or clothes, it is also suitable as a gift. These crafts are always in fashion and relevant for the holidays. Making a paper butterfly with your own hands is easy. It is enough to arm yourself with the necessary tools and materials, learn a few secrets and turn on your own imagination.
Butterfly stencils for cutting
Openwork paper butterflies especially attract attention. They are beautiful and unusual, so they are perfect for decorating the room. To make such a product, you need a stencil. It is easy to do it yourself. To do this, a silhouette is drawn on the cardboard, and in the middle a drawing is created at its own discretion. First, the butterfly itself is cut out along the contour, and then the pattern inside. Thus, a stencil is obtained that can be used repeatedly. It is enough to attach it to paper of any color, circle and cut it out.
On a note! When making a stencil, we cut it out carefully, otherwise all the flaws will be constantly reflected in the finished products. To do this, it is convenient to use a small sharp knife. To add volume, you should not strictly adhere to symmetry. You can make the wings a little different, but not too conspicuous.
To date, the Internet has ready-made sketches of butterflies for cutting. First, they will have to be downloaded and printed, and then transferred to cardboard, as in the previous case.


Another option is to purchase ready-made stencils.

On a note! Openwork crafts will look more interesting if you cover it with glitter varnish.
Paper butterfly templates
In fact, the template is the same stencil. But sometimes they take an ordinary sketch for it, without an internal pattern. Templates are used similarly to stencils. They can be created manually by connecting fantasy.


There are ready-made templates on the Internet that will eliminate the need to show your artistic abilities.

Cut out the butterfly along the outline of the template
First, they need to be attached to the paper for the manufacture of the product, circle the outline, and then cut out along it. So you can make products of completely different sizes. It is recommended to involve children in the process, they will find this activity interesting.
On a note! With the help of such products, you can design a layout, decorate a wall, curtains, dot the floor with them, fill a vase. It will not be difficult for a person with unlimited imagination to find a use for them.
How to make an origami butterfly
A multilayer volumetric craft is obtained using the origami method.
Step by step the product will be performed as follows:
The paper square is folded in half (horizontally and vertically) and then diagonally on both sides.
The workpiece is folded into a triangle.
The upper part of the triangle is bent towards the crown.
The workpiece is turned over so that the top of the triangle looks down. Then it is bent so that it passes behind the base.
The result will be a small end of the triangle that will peek out slightly. It is necessary to bend it and fix it with glue on the back.
The product is almost ready, it remains to be slightly modified to get the desired shape. To do this, the craft is bent in half on the side where the small triangle is located. Antennae can be made from wire.
It may not be possible to immediately understand the whole principle of action. For clarity, a step-by-step photo is presented.

The picture below shows how original the decoration turned out to be.
Using the origami method, you can make an accordion craft. For this you will need:
- ultra-thin brush;
- thread (depending on the idea);
The following sequence of actions is performed:
A square sheet of paper is folded in half, resulting in a triangle.
From the middle of the figure, you need to start creating an accordion by bending the material. Similar actions are repeated with another paper square.
The resulting accordions are folded and wrapped in the center with a ruff. It is necessary that it serve not only as a fastening element, but also be used as antennae.
"Wings" are slightly unfolded to make them larger in size.
The pictures below will help visualize the process of making such "accordions".

From the many such elements you can make a beautiful garland. To do this, they are connected by a thread that runs in the center of each craft.
Video: how to cut a paper butterfly
Below is a short video showing how to cut a paper butterfly.
And another video of making unusual crafts to decorate the wall
From paper, sometimes you can make unusual and beautiful things. To do this, the Internet is filled with master classes, video instructions and other material that will help in this craft. For those who do not want to start from the basics, ready-made templates are offered that greatly simplify the task. With the help of them, it is possible to create figures of flowers, turtles, cats and much more. In the future, products can be designed at your own discretion. Some use varnish for this, others use paints, and others paste over with a cloth. In this case, there is room for fantasy to roam. A paper butterfly is one of the simpler crafts that require a minimum of experience and time to complete.
Elena Kandakova
Dear friends and guests of my page, I propose volumetric butterfly master class, which the children and I did for collective work. I will write about this lesson in the next post. Now watch and try with us.
So, for us to work need:
colored paper in different colors,
simple pencil,
sample butterflies.
1. For the main template, take the cut out butterfly from a piece of old wallpaper.

2. Fold the template in half and circle it on a white sheet paper. us for butterflies you need to prepare three templates of different sizes. With dotted lines we draw the outline of a smaller template, stepping back from the edge of 0.5 cm.

3. Here's what we should get. Three templates for butterflies.

4. Templates in expanded form.


How to make a flying butterfly out of paper?
The flying butterfly looks very interesting and harmonious. The main task is to make an elegant insect that will be as close to the present as possible. After hanging on a thread vertically, it should give the impression that the insect is flying.
You can see how to make a flying butterfly in the video.
VIDEO: Flying paper butterfly
Basically, such applications are used to create paintings. Also, a paper butterfly will be an excellent option for developing fine motor skills of the hands of preschool children. Depending on the age of the baby, the complexity of the application is selected. For toddlers, it's best to cut out the templates yourself. Kids should only glue the details. Below are several options for applications for children of different ages. Usually voluminous applications made using the lace technique look beautiful. Such techniques should be performed by children from 4 years old.


VIDEO: Paper Butterfly Application
Butterflies are called winged flowers, they are able to give the room airiness and some windiness. It is very easy to make a panel of paper butterflies. The easiest option is a picture with glued paper butterflies.
Materials:
- Scissors
- The basis for the panel
- Paper of the desired color
Instruction:
- Decide on the size of the panel and the drawing itself. Also find out what kind of drawing you will create.
- After choosing a stencil, cut out butterflies from colored paper and glue to the base canvas
- It is advisable to mark in advance with a pencil the line along which it is worth gluing butterflies


Such decorative elements are made of paper and can either be glued or hung over the wall. Such butterflies can be mounted on furniture, a wall or hung on threads.
Butterfly decor options:
- Fluttering butterflies under the ceiling
- Butterflies on the wall or furniture
- Decoration of chandeliers and lamps with butterflies


Silhouettes on the wall can be both voluminous and flat. Initially, a base silhouette is selected. Most often, butterflies resemble a flock, sometimes small butterflies make up a huge moth. It can be a cup with flying butterflies or a watch. In this case, butterflies symbolize the transience of time. A swirl of butterflies also looks harmonious and interesting.


Butterflies made of colored paper will be a great addition to the interior. They are made using the technique of origami or quilling. These are insects made by folding and gluing pieces of paper. Openwork butterflies are obtained. It looks very nice, especially if you combine colored paper. Below are templates and photos of colored paper butterflies.


Such figurines are used to decorate the children's room. They look very gentle and unusual. Such butterflies are hung on threads and decorate play areas with them. Such butterflies are very cute combined with bright and colored lighting. It can be side lighting or direct beams.


Large butterflies are used for wedding or holiday decor. Despite the cheapness and simplicity, such decor can significantly improve the room and make it festive. Usually thick paper is used, which holds its shape well. This prevents the wings from bending. Such butterflies are hung on ropes, fishing lines or threads.


If you do not have such experience, then it is better to carry out such decor on painted walls or non-woven wallpaper. In this case, if you do not really like the result, you can remove the butterflies. It is best to attach butterflies not to glue, but to double-sided tape. It goes well against wallpaper and painted walls. Do not use it in the case of paper wallpaper.


Decorating a room with paper butterflies is quite simple. You need to stock up on patience and materials.
What to do if the design of the room is tired, and there is no money or effort for repairs? The fastest and not very expensive way is to change textiles and decor elements. And not all decor needs to be bought. For example, butterflies for decoration will help to bring an element of lightness. They make panels, wall compositions. Larger and brighter "live" on curtains or flowers.
What are they made of


Another option with a big butterfly…

Colored tornado….


A major overhaul of a house or apartment requires a decent financial investment, and sometimes you really want to update the interior of your home! You can breathe newness into the design and slightly embellish it without spending money, simply by calling on creative thinking to help. One of the spectacular and inexpensive ways to decorate is wall decoration. Panels, collage, fabric paintings, paintings, drawings, butterflies ... That's just the last type of decor we'll talk about today.
After all, making butterflies on the wall with your own hands is simple, and most importantly, low-cost! You only need ready-made stickers or hand-made applications.
Fluttering beauties are widely used in the interior. They decorate ceilings, chandeliers, frames of paintings and mirrors, but most often decorate walls. It is no coincidence that they are preferred. Butterflies not only bring a special zest to the design of rooms, but, according to the canons of Feng Shui, are the messengers of mutual love and joy, symbols of natural beauty and rebirth. Their placement in the bedroom will bring new meaning to the relationship, awaken long-forgotten romance, and be able to rekindle the fire of love. At the same time, fluttering moths should not be attached singly, they should be arranged in pairs or whole compositions. DIY wall butterflies are made from a variety of materials: colored paper, vinyl film, thin cardboard, fabric, and even metal. They can be of various sizes, shapes, colors. As for the type of accommodation, it all depends on your imagination. A chaotic round dance, a swift whirlwind, airy compositions, various moth figurines - the options are unlimited and are welcome in the interior in any interpretation. Harmony with design Butterflies will become an appropriate interior decoration in any style, whether it is technological high-tech, sophisticated classics or ascetic modern. But they will give a special charm to rooms decorated with a cute rustic comfort, in a country style. The main thing at the same time is to keep the color balance, otherwise the design will “crush” with tinsel and hint at a lack of taste. Bright, colorful moths are the perfect complement to a monochrome interior. For example, red or green butterflies on a beige background. Luxurious decoration of light walls (white, gray, pastel) will be black applications. Moth compositions can be kept in one color or delight the eye with multi-colored magnificence. Often the beauty of the decoration is enhanced by neon lighting, which creates the illusion of a 3D decoration. Designers recommend decorating the bedroom and nursery with butterflies. Although, if desired, they can decorate the walls of the living room. Having prepared the material you like, draw butterflies of the desired size on it. At the same time, do not get carried away with art, drawing the most complex curves and ruffles on the wings - all this will create difficulties when cutting. Also take care of the method of attaching applications to the walls - glue, decorative pins, push pins. As mentioned above, the picture of the location of the moths on the wall can be different, but with the condition of combining the decor with the pattern on the wallpaper, decorative plaster and other interior elements. A whirlwind, scattering, flocks, clusters of butterflies in the form of a bouquet of flowers or a heart will fill the room with the freshness of spring and the desire for romance. Having recreated in your head a clear vision of the decor, mark the main points / lines of the moths on the walls with a pencil or chalk. This will help you not to deviate from the intended pattern in the process of fixing jewelry. This is the easiest way to plant fluttering beauties on the walls. The basis for the decor can be plain or colored paper. The drawing can be drawn by hand or created using graphics programs on a computer. A significant plus of this method is the low price of the material. The paper is also easily and securely fastened, and the wings of the moths acquire dynamism, effectively fluttering from air currents. An annoying decoration can be removed at any time without damaging the design and without regretting the money spent. The first thing to do is to make a stencil out of cardboard. By applying it to colored paper, you will outline the outlines of butterflies, and then cut them out. If you prefer bright, multi-colored moths, turn to the help of read glossy magazines with colorful drawings. There is another option to make butterflies on the wall with your own hands - find photographs of moths on the Internet and print them on a printer. To make the decorations temptingly glow in the dark, you can cover them with luminescent paint. Finished moths are attached to the wall with pins, glue or double-sided tape. Only the center of the layout is fixed, while the wings are left free in order to beautifully sway from air currents. Butterflies made of thin cardboard will be much stronger and more reliable than paper ones. Although cutting them out will take much longer than the first option, cardboard moths will take and keep any shape you specify. The wings can not only be beautifully bent up, but also give them a rounded look. To implement this idea, slightly wet the cardboard and bend it, pressing it down with a heavy object. After drying, it transforms into the model you need. Cardboard moths can be cut out of notebook covers, old geographical atlases, packages from under nylon tights. Since this material is heavier than paper, it is necessary to fix it on the walls in reliable ways. One of the surest ways to make the decor original is to make butterflies on the wall with your own hands from old vinyl records. They will turn out to be more voluminous and durable, and most importantly - glossy, luxuriously sparkling and shimmering under any light source.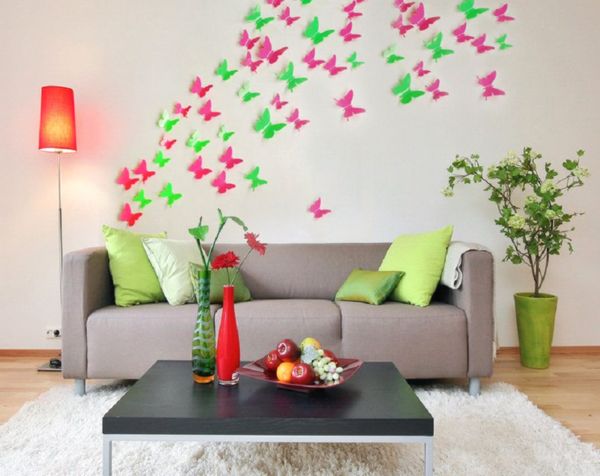
Preliminary actions
Butterflies on the wall with their own hands. 7 ways to decorate:
From paper
From cardboard
From vinyl records
Usually when it comes to decoration, this implies high costs. The same can be said about the dwelling, the renovation of which takes a lot of time and money.
But if you approach this issue creatively, then you can decorate any room without big expenses.
You can decorate the walls with paintings or panels, handmade, or you can decorate one or more walls with simple paper butterflies.
On our website you will also find:
- 10 simple works that can decorate any wall
- Beautiful and inexpensive crafts on the wall with your own hands
Having created such a decoration, you will be amazed at how beautiful it looks.wall decoration, which gives the impression that someone is sitting on your wall to restmany bright, rare butterflies.
You can also create a whirlwind of butterflies, which as if floating in the air, flapping wings in synchronized dance.
Such crafts will undoubtedly please the eye. Moreover, butterflies can be not only paper - you can draw them on the wall, which will also look very attractive, especially if you use luminous paints.
Paper butterflies on the wall. Option 1.
You will need:
Colored paper or self-adhesive film
Bright magazine pages
safety pins
Scotch tape or PVA glue
Scissors
Pen or marker
1. Prepare one or more cardboard templates.


2. Using templates, start making butterflies - circle the stencil on colored paper or self-adhesive film (which will be easy to stick to the wall).
* The number and size of butterflies you choose yourself.
3. If you are using self-adhesive film, then you are almost done - you just need to peel off the paper layer so that the body of the butterfly becomes sticky. Now just stick the butterflies on the wall as you like.

If you used colored paper, then you can attachbutterflies to the wall with pins, glue, or regular or double-sided tape.
Wall decor with butterflies. Option 2.


You will need:
Colored paper (preferably two-sided)
Scissors
Pencil
Double-sided tape
1. Draw an image of a butterfly on colored paper and cut it out. Use this blank as a template for other butterflies. You can also make several templates of different sizes.


2. Attach templates to colored paper, circle them and cut out new butterflies. To cut out several butterflies at once, simply stack several sheets of paper, fold them in half, draw a half of a butterfly and cut it out - when unfolded, you will have several butterflies at once.
3. When you have prepared the required number of butterflies, lay them out on the floor first to figure out how they will be located on the wall.
4. Start sticking double-sided tape to each butterfly, and then start gluing the butterflies according to the pattern that you came up with in advance.
* Butterflies can be glued close to the wall, or you can slightly bend the wings to create the effect of butterflies fluttering.
DIY paper butterflies on the wall. Option 3.

You will need:
Colored or origami paper
Pencil
Scissors
Double-sided tape.
1. Fold several sheets of colored paper into one pile and fold them in half, and in half again to make a lot of butterflies when you cut out.

2. Draw a butterfly on a sheet of cardboard and cut it out.
3. Use the cardboard butterfly to draw a butterfly on the top sheet of the stack, tracing around the cardboard template.
4. To stick paper butterflies to the wall, use double-sided tape.

Glowing butterflies on the wall using stencils
For such a butterfly, you need a light wall and a bright light nearby - a table lamp, for example.

You will need:
Butterfly stencils
Phosphor paint (in this example, 3 colors are used - yellow, green and blue)
Pencil
Sponges and brushes or sponge brushes (one for each paint)
Palette
glue spray
1. Make some butterfly stencils. It is desirable that each paint has its own stencil (or several stencils).
2. Use spray adhesive to stick the stencils to the wall in the desired order.
3. Prepare a sponge, cut it into several pieces and attach each piece to the handles of the brushes. You can buy sponge brushes and then you skip this point.
Read also:
Repair is expensive and not everyone has enough money to do it often, but you want to change something in your apartment. There is a great idea - to decorate the wall with butterflies made of paper, cardboard or vinyl film. This design looks very interesting, the room turns into a kind of summer garden, it will be warm and cozy even on winter evenings. Blanks can be bought at the store, and it is better to make butterflies on the wall with your own hands. It takes very little time and effort, but the result will please the whole family.
What are butterflies made of
There are many materials from which you can make butterflies on the wall. The simplest and most affordable of them is plain paper. You can take a white sheet, and then draw a pattern on it with paints. You can use colored paper and decorate the wings with appliqué. Or make them openwork. A very interesting wall decoration with butterflies is obtained by cutting out stencils from old magazines or using photographs printed on a printer. And as a material, you can take pieces of old wallpaper. The only drawback of such wall decor with butterflies is fragility. Paper can quickly lose its shape, deteriorate from moisture, and tear easily if not handled carefully.
Butterflies on the wall are also made of cardboard. It is more difficult to work with it, but the products will be strong and durable. A butterfly stencil can be made from paper, found on the Internet and printed on a printer. Then it is transferred to cardboard. To make the butterfly voluminous, to give the wings the desired shape, you need to moisten the cardboard a little and dry it under load. This shape of the product will be stable and will not change as easily as the shape of a paper butterfly.
Butterfly walls can be made using plastic wrap. It is advisable to take a thick film, a beautiful color. It is quite easy to cut out of the film, it is much more difficult to give the product a three-dimensional shape. Therefore, polyethylene butterflies are glued entirely to the wall. But their glossy surface will shimmer beautifully under the rays of light.
You can use fabric to decorate the wall with butterflies. Best of all, such a decor will look in combination with liquid or. The fabric is taken dense so that the butterfly takes shape and does not lose it. From thin fabric, you can also make magnificent butterflies on the wall with your own hands. Only it needs to be soaked in PVA glue and give the desired shape.
How to attach butterflies to the wall
Before you decorate a wall with butterflies, you need to think carefully about how to attach them there. The most popular method is glue. Take ordinary PVA or special wallpaper glue. With it, you can attach products from any material. Also, the adhesive is suitable for any surface, whether it is whitewashed wallpaper, fabric upholstery or wood paneling. So wall decor with butterflies can be done regardless of the type of coating.
You can glue the butterflies on the wall directly, or you can attach them to a small piece of foam. Then it will seem like butterflies are in the air. True, this method has its drawback - the foam is fragile and can crumble over time. But the part that is glued to the wall will remain. It will be very difficult to tear it off without damaging the surface.
An excellent decoration with butterflies with your own hands will turn out if you attach them with pins. The pin itself can become a decoration, because they are made with different beautiful heads. True, this method is not suitable for every wall. The pins will stick to the wallpaper, they fit perfectly into a drywall wall and even into a wood panel. But you can’t stick a pin into a brick wall or into a concrete panel, you have to take glue.
How to decorate a wall with butterflies so as not to spoil its surface? You can just hang them by strings to the eaves. For reliability, instead of threads, you can use a thin fishing line. This wall decor with butterflies will be especially original. Indeed, at the slightest movement of air, they will “flutter” as if they were alive.
How to decorate a wall with butterflies
Before decorating a wall with butterflies, you need to consider their location. The easiest option is several groups of 3-5 butterflies in different places. A flock that flies out of the box will look very nice. The box layout can also be cut out of cardboard or paper and glued to the wall. If you know how to draw at least a little, wall decor with butterflies can be supplemented with flowers, a tree branch or a flashlight.
Another option for butterflies is a flock that flies from one end of the room to the other. It is important that the small butterflies are in front and the large ones are in the back. Then a sense of perspective is created. You can place them on the contrary, then the flock will "fly" into the room. Butterflies can be placed in a circle or in a spiral. Decorations look good if they are placed in the form of different geometric shapes. From small butterflies, you can add one big one, it will also turn out very original.
Wall decoration with butterflies, step by step instructions
Making walls with butterflies with your own hands begins with the preparation of tools. You need to take scissors, glue, paper (cardboard, fabric, film), prepare a butterfly stencil in advance. With their own hands, those who have artistic talent can make it. Those who are not so lucky should not be upset. A suitable drawing can be found on the Internet, printed on a printer, cut out and the stencil is ready.
Regardless of whether you want to decorate the wall with butterflies made of paper or other material, the stencil should be made from cardboard. First, the drawing is made on paper, then it is cut out, applied to a piece of cardboard, outlined, and cut out again. Such a butterfly stencil will be stronger, it can be used many times. It is worth drawing or printing butterflies of different sizes in advance, then the decor will look more natural.
When all the blanks are made, you need to proceed to the next step - gluing the butterfly to the wall. If they are made of polyethylene, then they should be glued completely. It will turn out very beautiful and. Paper or cardboard butterflies need to be bent in the middle, their wings can also be bent a little so that they look almost like real ones. Then, with glue or a pin, it is attached to the surface of the wall. It is necessary that the butterfly be fixed in the center, and the wings remain free. This is where the decoration of the wall with butterflies ends, you can admire the result of your work.


Butterflies in the interior are always a festive mood, a reminder of summer. Paper butterflies are very easy to make. This material allows you to transfer not only a two-dimensional image. There are several ways to convey the dynamism of this beautiful insect. Butterfly manufacturing technologies are diverse. It differs in quality and the paper from which they can be made. For some models, plain cardboard with a velvety surface is ideal, while other models can be assembled from sheets of glossy magazines.
Butterflies in the interior are always a festive mood, a reminder of summer
To make this butterfly, you can take any thin paper that will hold the fold lines. Such crafts turn out to be the most spectacular if you use colorful pictures from glossy magazines as the material for their manufacture.
When choosing thinner paper, small corrugated butterflies can be hung on a fishing line under incandescent lamps, they will sway when the lights are on. The only caveat: Butterflies should not be close to the light source, otherwise they will light up.
Paper butterflies: a simple stencil for cutting
The simplest stencil for making a butterfly with wings of different lengths and shapes consists of the simplest shapes - a square and a circle.

- The ratio of the sizes of the figures is two to three. More can be both a square and a circle.
- The large figure is a blank for the lower wings. Smaller for the top.
- When building a template, in any scenario, you need to draw a square. Only one of its corners should be in the middle of the bottom of the sheet.
- When choosing the point of the center of the circle, you need to take into account that the upper corner of the square goes to the part of the circle.
- The blank is built, it remains only to cut the circles and assemble.
Butterfly formation process:
- It is necessary to fold the workpiece with an accordion. The corrugation pitch can be different for the upper and lower parts. So the craft will look more interesting.
- The lower blank is decorated with large folds. The formation of convex elements starts from the bottom of the workpiece.
- The circle folds into an accordion from above towards the connection point with the second part.
- Having folded the blank like an accordion, it remains to assemble it in the middle into a ring from a glued thin paper strip of a contrasting color or on decorative tape.
- From ornamental wire, you have to twist the antennae of a butterfly, pass them through a paper ring. The head will be made from a large bead.
- The bead is fixed simply - it is installed on the top of the workpiece. The ends of the antennae are threaded through its hole in the opposite direction.
- Their upper ends are twisted into a thin pencil.
Volumetric butterfly
The middle of the room, the space in front of the window can be decorated with hanging multi-layered butterflies. They will be a good addition to the shiny balls on the Christmas tree. The main thing in their manufacture is to choose the optimal size.

Using this stencil, you can cut out all the details from paper of different colors without much effort. The most difficult process is to assemble the butterfly:
- In order for the craft to turn out neat, it is better to use a glue stick. With it, only the middle of the workpiece is smeared.
- Stencils are superimposed on each other in descending order.
- As a decoration for the wings, you can use sequins or elements cut out of foil. They will gleam in the sun and under artificial lighting.
- If you need to decorate a wallpapered wall with butterflies, you will need French pins with bead-shaped tips. This ball will help to make the butterfly a voluminous head.
The pin must be stuck in the direction of the body of the paper insect.
Butterfly: paper origami (video)
How to make a DIY butterfly pattern
The easiest solution to making an openwork butterfly is to print a finished drawing from the Internet. But there are many opportunities for a person who cannot draw to make a template with the help of objects at hand. One of the easiest options for drawing beautiful even curls is to use the patterns used by dressmakers. Such rulers, as a rule, are in the work folder for high school girls.

Butterfly drawn on a pattern
The size of this stencil allows you to make a large application.
- Details marked in red will become a field for gluing decorations. The ideal material for this application would be velvety thick paper.
- Areas that need to be cut with a blade are highlighted in yellow.
- The blank with slots can be glued onto a sheet of cardboard in a contrasting color. This will give the butterfly a visual volume.
How butterflies of different sizes are obtained from one drawing
If you need to make a postcard, the large format is inconvenient. You can reduce it using a computer. You don't need to use any special software for this.
Reduced drawing
Enough:
- Copy the picture to a word document;
- Select it with a mouse click;
- At the top of the window, above the toolbar, the “work with drawing” tab will open.
- By clicking on it, you will open the corresponding toolbar.
- It remains to find the format tab and click on the arrow under the sizes, indicating "down", until the size of the picture suits you.
Stretched pattern
Using the same drawing, there is always the possibility of slightly correcting the shape of the image. You do not need to spend precious minutes on this, drawing elements again, changing their direction.

In order for the butterfly wings to be stretched up, and not to the sides, you need:
- Copy the image you like into a Word document;
- Click on the picture;
- Having placed the cursor on the square located on the picture frame, drag the manipulator (mouse) down.
With the help of such simple manipulations with one pattern, you can get many identical butterflies of different sizes. If you work only to reduce the stencil, then the openwork butterfly can also become multi-layered.
Attention! To reduce the image when printing, you can use the scaling function. Each subsequent copy is reduced, for example, by 10% of the size of the previous one. This method is faster, but not economical in terms of paper consumption.
Silhouette for an openwork paper butterfly
To make a stencil of an openwork butterfly, with a size that differs from that specified by the original pattern, it must be printed on a thin sheet of white paper. A thin sheet that transmits light is necessary in order to clearly copy the contour and all the delicate elements, the thinnest lines.

A projector is required to change the aspect ratio when transferring an image. In its absence, a home-made fixture is suitable, consisting of a table lamp with a ceiling on a flexible or adjustable tripod and a frame for placing the picture in a horizontal position.
- Having set the frame against a vertically fixed blank sheet of paper on which the image is planned to be projected, it is necessary to find the position of the lamp in order to achieve the necessary increase or decrease in the original image.
- When changing the angle of incidence of light, the image may stretch or expand.
- Also, under the influence of oblique rays, it is possible to achieve a reduction in one part of the pattern, while increasing its opposite side. This method is used to create a dynamic image. In the case of butterflies, this is the effect of flight.

Using only the direction of light on one original drawing, you can get completely different angles of the butterfly. Thanks to this, all the details of even the most unusual openwork on her wings will be as organic as in a photograph taken at the appropriate angle.


