Due to gross violations of construction technology, the walls may be uneven. In order to perform finishing work with high quality, it is necessary to make an alignment, otherwise the interior of the room will look unnatural. It turns out that leveling the walls with your own hands does not require special skills - adhering to the technology, you can make high-quality repairs and save money.
How to align the walls under the wallpaper
- Concrete walls. With slight curvature, it is not necessary to use special mixtures for leveling the walls - ordinary putty is also suitable. The wall is cleaned of debris, primed and several layers of starting putty are applied. After complete drying, the surface is primed again and covered with a finishing layer. With a significant curvature of the walls for alignment, it makes sense to use drywall.
- Wooden walls. The surface must be cleaned of old paint and varnish, tubercles. The recesses are sealed with a special solution. The wood is treated with an antiseptic. Next, the wall is upholstered with shingles (wooden strips up to 5 mm thick). After that, you can apply plaster. At this stage, the irregularities of the wall are eliminated. After the finish layer has dried, proceed to wallpapering.
- Brick walls. Such a surface has more flaws compared to concrete, so much more putty will be required for leveling. For convenience, the solution is prepared in a basin, stirring it with a drill with a special nozzle. If the intended layer is thick, the brickwork is additionally treated with a starting putty. The application is carried out in several layers: each subsequent one is applied only when the previous one dries. The best option is a three-layer structure with the last finishing layer. When the material is completely dry, it is sanded with sandpaper.
How to level the walls in the bathroom under the tiles

- Concrete walls. The most effective method of leveling the walls in the bathroom under the tiles using beacons. Using this technique, the walls are very strong, since the beacons are not removed from the wall, but support the plaster. Special corners will allow you to create perfect angles. The plaster itself is applied using the "throwing" method. According to this principle, a small section of the wall is applied using a trowel. The areas that go beyond the beacons are cut off and can be reused to prepare the solution. After the plaster dries, it is primed and proceed to the application of tiles.
- Wooden walls. The walls are treated with an antiseptic, after which the roofing material is laid and the frame is mounted, taking into account the curvature of the wall. A metal mesh is installed on the frame, on which a layer of cement and plaster is applied. Next, lay the tiles in the classical way. An alternative option is laying tiles on leveled walls using GKL.
- Brick walls. Leveling is carried out according to the same technology as for concrete walls, except that more starting putty will be required to level the masonry.

- Concrete walls. The surface is cleaned of old putty and debris. The first layer of starting mortar 2 mm thick is applied in a strip. For painting, it is better to use a reinforcing mesh with a cell of 2 mm, which is pressed against the solution with a spatula. After complete drying of the material, a layer of finishing mortar with a thickness of 1-2 mm is applied. To achieve the maximum effect, the surface is ground and treated with a primer, after which they proceed to painting.
- How to level the walls in a wooden house? To do this, they are cleaned from old paint or varnish. Irregularities are ground, and small depressions and places of knots are filled with a special grout. The wood is treated with an antiseptic and, if necessary, covered with a stain. Next, proceed to staining or varnishing.
- Brick walls. Depending on the degree of unevenness of the masonry, they are leveled with plasterboard or plaster. In both cases, the surface is carefully primed with a finishing solution - it is ideal for painting, as it has a low absorbency.
Ways to level walls
 |
 |
Alignment of walls with drywall (dry method)
An effective and inexpensive method for walls with a large curvature.
- Alignment of walls with drywall with a profile frame For this purpose, a skeleton is made. It can be made of a bar or a metal profile (guide and rack). First, guides are screwed to the ceiling and floor. They should be parallel to each other. Further, every 40-60 cm, guides are installed, taking into account the width of the drywall sheet. If necessary, at this stage, the walls are insulated with foam or mineral wool. Once the frame is ready, proceed to screwing drywall with self-tapping screws. Their hat should sink a little deeper into the leaf.
- Alignment of walls with drywall without a frame. It involves direct gluing of sheets to the walls using drywall adhesive, while the walls must first be plastered. The disadvantage of this method is that it is impossible to qualitatively align walls with serious defects.
Leveling walls with plaster (wet method)
It is advisable to apply if the curvature of the walls is 30-50 mm. If the walls have a large curvature, it is not economically viable to use plaster to level them. This method saves usable floor space, but is very time consuming.
Leveling walls with Knauf Rotband plaster
Alignment of walls with putty Knauf
Method for leveling walls with plaster
In order for the plaster to be well fixed, the walls are cleaned and primed - this will improve moisture resistance and prevent delamination of the material. A laser level for leveling walls allows you to achieve a perfectly flat surface, but leveling the walls along the lighthouses gives an equally high-quality result. Special aluminum beacons for leveling the walls are mounted in the wall - they are guided in the future. So, if the top of the wall is littered, the beacon is installed at the bottom. It measures the gap at the top of the wall, which will later be filled with a rotband or other filler.
To install beacons, slats are mounted on the ceiling and floor, and the beacons themselves are attached to the slats with building plaster or self-tapping screws. A thread is stretched between the beacons, the verticality of which is controlled using a level. The installation step of the beacons is 50 cm, but it is allowed to vary depending on the size of the tool with which the plaster will be applied. Next, proceed to apply the solution between the beacons.
A separate question is how to align the corners of the walls. This will help corner trowel and level. This is a painstaking process that requires some experience and skill.
Which plaster is best for leveling walls
A faster way is to use the so-called mechanized plaster, in which the mortar is applied to the wall with special equipment. But this technique is not always at hand. Longer, but no less qualitatively, you can level the wall manually with cement or gypsum mortar. The first option is suitable for rooms with high humidity, such as a bathroom or kitchen. The second option is used in a normal microclimate, such as a bedroom. It is important that the prepared solution has a normal consistency - too thick will be poorly applied, and too liquid will slide off. After the material is applied to the wall, it is pressed against the beacons by the rule and leveled to the desired level.
As you can see, the alignment of the walls can be done independently - the main thing is to adhere to the technology. Although this process is laborious and painstaking, the result will be obvious - you will get perfectly smooth walls that can be covered with any finishing material.
Smooth walls are the key to perfect repairs and often the most expensive of all procedures. To reduce the price of work, many people ask themselves the question: how to level the walls with their own hands.
The first thing to do is to understand why you need perfectly smooth walls. The alignment of the walls in the apartment is usually due to pasting wallpaper and the correct geometric shape when arranging furniture.

Walls don't need to be aligned if you're using live wallpapers. They smooth out small irregularities and for them it is not fundamentally a perfectly smooth surface (for example, bamboo wallpaper).

The process itself is presented on the Internet by many videos and photos of wall alignment. Also, before starting work, I would like to advise you to seek help from people who already have experience working with plaster and subsequently read the instructions on the packages with mixtures more carefully.


Types of alignment
If the alignment of the walls cannot be avoided, then this process can be done in several ways. Plasterboard leveling is the least time consuming. To do this, you just need to attach sheets of drywall to the wall, armed with a level.


The list of plaster for interior work is large. It comes with various impurities. If you bought an apartment with already aligned walls, then most likely they were leveled with ordinary sand concrete, but the evenness of such walls must be rechecked.

If you have small differences in the level of the walls, then you can also do this work with sandstone. However, it should be borne in mind that the degree of its drying is longer and therefore the work may be delayed.

How to level the walls with plaster, before this question, you need to be puzzled by others, which plaster to choose. Based on experience, it is better to choose gypsum.

Plaster
If you have chosen leveling with plaster, then in addition you will have to purchase beacons (this is if you have the rest of the materials and tools).

Alignment of the walls along the lighthouses is their correct installation. First, we set up beacons throughout the room. Along the height of the wall, every 30-40 centimeters, we install a dowel with a self-tapping screw into the surface. Usually such “columns” are made at a distance of 80-90 cm from each other throughout the room.

The main thing is that they are all the same. Applying equal to the heads of self-tapping screws, we set the level over the entire height. We do this procedure with the whole room.


We knead a small amount of plaster and fix the beacons on these planes. At the junction with self-tapping screws, we strengthen with plaster. After the procedure is completed, we wait a while and let the plaster dry.

We prepare a mixture of plaster based on the information written on the bag. We throw the finished mixture between two beacons starting from the bottom. Then we take the rule, set it between two beacons and begin to lift the mixture from the bottom up with wiggles. We make such movements until the mass is leveled.


Remove the rest of the mixture from the rule with a spatula and throw it on a non-plastered area. At this rate, we finish all the walls. The walls should be even and smooth. Depending on the type of plaster, the walls turn white, due to the presence of gypsum in the mixture.

putty
After the plaster has dried, we can begin to putty the walls. Putty is needed to remove small porous holes and bring the state of perfect smoothness.

After puttying, we can begin to remove the beacons. In order to remove them, you need to pry from the bottom with a screwdriver and pull them out along the entire height. Do not be alarmed, we close up the resulting failure with plaster and the rule.


It is possible to level the walls simply with putty, but this case helps when the wall distortions are not so great. Permissible deviation is not more than 5 mm.

Drywall
Alignment of walls with drywall is of two types. One has already been described above, but I want to dwell on the other in a little more detail. If you have very strong differences in the walls, then it is cost-effective to level them with drywall.


To do this, a frame is made along all the walls. A guide profile is attached to the level of the floor and ceiling. On them, every 60 cm, a vertical profile is installed. And drywall sheets are attached to this entire installation.

The joints must be glued with a special mesh and all irregularities and holes from self-tapping screws should be covered with putty.

If you want to make the walls some kind of figured, then only drywall will help, because under other conditions, the consumption of materials will be gigantic and cost a pretty penny.


Smooth walls in our life are not a tribute to fashion, but a vital necessity. Improperly aligned walls can make life in your home miserable. The most harmless is constantly peeling wallpaper, but the worst thing is various fungi and bacteria.

Before leveling, determine if it will be easier for you to knock down some sections of the walls to reduce material consumption.

In Soviet times, the walls were lined with plywood sheets, but it has poor moisture resistance. Also, the joints of the sides of plywood sheets had to either be decorated or left as is.

As a result, for better work, it is better to sand what has been done in order to remove microcracks invisible to the eye.

Wall alignment photo


Uneven walls can spoil even the most beautiful interior design. Unfortunately, both in new buildings and in “secondary” housing, wall surfaces rarely allow you to immediately move on to finishing. Of course, you can limit yourself to masking irregularities with wallpaper with a small pattern or arranging large furniture, but it’s better to even out the walls.
Most often, plaster is used to solve this problem. In addition, doing plastering work with your own hands helps to significantly reduce repair costs. To get perfectly smooth walls, you just need to know and follow the simple rules for using this material.

Peculiarities
There are two ways to make a wall even: using plaster and using drywall sheets. Already aligned walls can be additionally puttied to bring the surface to the ideal.
It is easier for beginners to work with drywall, but plaster also has its advantages:
- The material does not require the installation of a frame for sheathing, thereby saving room space. For wiring electricity or plumbing, special recesses are made in the wall itself.
- The wall is monolithic. Seams and joints, which are always present with plasterboard sheathing, do not happen when plastering.
- Even a thick layer of gypsum plaster is protected from cracks.
- Plaster is most often an environmentally friendly building material, does not contain and does not emit substances harmful to humans.


For all its advantages, leveling a wall using gypsum or cement mixtures also has significant disadvantages:
- To work with plaster, much more time is needed than with the “dry method” of leveling.
- It is quite difficult for a non-professional to calculate the amount of ingredients needed to work on a given area.
- The property must have water.
- For a plaster station, according to SNIP, a 3-phase voltage is required. Although when repairing small rooms, you can also use a station that operates from a conventional outlet with a voltage of 220 V.
- Plastering is a “dirty” process that requires accuracy and subsequent major cleaning of the premises.


How to align?
There are several types of plaster mixtures: with cement, with clay and with gypsum. When working with any kind of material, it is necessary to use special tools: spatulas, brushes, levelers, scrapers, containers, a mixer for stirring, a trowel and sandpaper. To facilitate the process, you can also use various guides, beacons and corners.
For outdoor work and decoration of non-residential premises, it is better to use cement plaster. It is cheap and durable, and the proportions can be changed depending on preferences and purpose. However, physically working with such a mixture is quite difficult. It does not adhere well to concrete surfaces. In addition, with a large thickness of the plaster layer, cracks may appear. It is worth noting the fact that any cement mixtures dry for a long time.

Aligning the walls of the apartment with gypsum plaster considered the best option. It is environmentally friendly, has high moisture absorption, provides good thermal insulation. The consumption of such mixtures per 1 sq. m is significantly lower than the consumption of cement products, but the cost of such materials is higher.
Clay plaster is used much less often, since certain experience is required to work with it. This material is also environmentally friendly, elastic and has a high moisture absorption, like gypsum mixtures. But, unlike gypsum and cement, such plaster must be updated annually, because small cracks appear on it around the perimeter.


Preparatory work
Before directly leveling the wall surface, it is necessary to prepare:
- First you need to remove the old coating (wallpaper, paint or the top layer of old plaster).
- You should also thoroughly rinse and clean the surface of dust, dirt and stains.
- All cracks and chips are carefully cleaned with a spatula. To carry out preparatory work at the joints of the walls, you can use a special tool - an angled spatula.
- At this stage, it is necessary to remove all switches and sockets, isolate and hide de-energized wires in the recesses.
- It is better to cover the cleaned wall with a primer so that the plaster adheres better to the surface. The primer is selected taking into account the wall covering material (concrete, wood, brick or old plaster layer). Also, the primer allows you to strengthen the plaster layer and repels excess moisture. For its application, you can use a regular brush, roller or spray gun.


Following the instructions, you must wait until it dries completely. Then you can proceed to the measurement of curvature and the choice of work technique.
Selection and alignment technique
There are two ways to level the surface with plaster with your own hands:
- rule(in non-residential and auxiliary premises). In this case, it is necessary to use a rule with a length of at least 1 m. It is worth considering that the surface of the wall still cannot be leveled to the ideal. It is necessary to fill the recesses and cracks with plaster in advance, knock down the protrusions with a spatula and a hammer. The composition is applied to the wall with throwing movements from the floor to the ceiling and stretched over the entire area using the rule. Then they take a longer tool (from 2 m) and spend it several times in the direction from the bottom up, correcting minor defects and irregularities.

- By lighthouses(most often this is how walls in living rooms are aligned). In order to find out what the curvature of the wall is, you need to apply a level and measure the difference between the start and end points. If the difference is 10 mm or less, there is no need to plaster the surface, you can get by with putty. In the case of a larger difference, it is necessary to correctly apply beacon landmarks. To do this, drill two holes in the upper corners of the wall and insert screws into them. Then, pressing the plumb line to one of the selected points, you need to select the largest ledge and screw the screw at the bottom strictly vertically to this ledge. The same must be done at the other end of the wall. Then you should check the correctness of both guides using a level.


The rest of the wall space is divided into strips equal to the length of the rule, and screws are also screwed in at the top and bottom. After that, the wall must be cleaned again, primed and the guide plumb lines removed from it. After the primer has dried, plaster is applied along the marked lines, and beacon profiles are inserted into it. Excess plaster must be removed.
batch
The leveling itself begins with the mixing of gypsum or sand plaster according to the instructions on the package. The dry mixture is poured into the prepared container, water is added and thoroughly mixed using a construction mixer or any long-handled tool at hand. The mixture should stand for a while, after which it must be mixed again.

Rough layer
In order to make the first (rough) layer, it is necessary to apply the mixture with a spatula on the wall with throwing movements. The application is carried out from the floor to the ceiling in the space between the two lighthouses. If the curvature of the wall is minimal, then a rough application is enough to make the layer equal to the profile.


Repeated layers
If the application of the rough layer is not enough, then after it has dried, it is necessary to repeat the application as many times as necessary to hide the leveling profile under the layers.

Rule Alignment
After the last layer has slightly set, it must be leveled using the rule. The tool is firmly pressed against the surface and moves smoothly upwards. It is necessary to repeat the action until the edges of the beacons appear from under the coating. After this, it is necessary to allow the composition to completely seize.


Beacon extraction and polishing
As soon as the coating becomes strong enough, beacons are removed from it, and the recesses remaining from them are filled with plaster. A completely dried wall is moistened, and then all defects are smoothed out with a trowel, grater and sandpaper.


Smooth walls
You can level any curved wall with plaster using the method described above. However, depending on the type of composition used, the characteristics of the wall surface and subsequent finishing, The workflow may vary slightly.
- Brick walls must first be moistened with water. So the mixture will stick better on the brick.
- To level the clay walls, it is necessary to use only those plasters that weigh less than the clay.
- If the wall has been previously plastered and the strength of the old coating is still high, you can put a new layer on top of the old plaster without knocking it down. In order to determine the strength of the old layer, it is necessary to knock on the wall surface. Where the sound is muffled, the plaster holds perfectly and does not need to be dismantled. If the sound is resonant, the old masonry must be dismantled with an ax or a hammer and a spatula.


The alignment of the walls with plaster in the apartment is carried out the same way in almost all rooms. The exception is work in the bathroom and toilet. Since humidity is high in these rooms, the applied mixture can deform and move away from the wall.
The solution in this case is better to choose cement, as it is more moisture resistant. The mixed mass must be completely homogeneous. The surface of the wall must be covered with a primer. If several layers of cement plaster are applied, then shallow notches must be made on the previously dried bottom layer in order for the top layer to better adhere to it. If it is planned to lay ceramic tiles in the future, deviations in the level of the wall should not exceed one centimeter.


Sometimes it becomes necessary to plaster a wall already lined with drywall:
- To do this, you need to prepare the surface in advance.
- It is necessary to clean and prime it, putty all the seams and places where the plasterboard is attached to the profile, correct the corners with the help of special corners that are laid under the plaster.
- The mixture itself must be selected with the lowest liquid content, or initially moisture-resistant GKL should be installed.
It is not recommended to glue wallpaper on a wall plastered with a cement mixture, as the surface is too grainy. However, if you remove the crumbling layer and treat the wall with special impregnation or glue, the wallpaper, in principle, can be glued. However, it is better to glue them on gypsum plaster, puttied with special mixtures and carefully sanded.


Hard to reach places
Working with plaster on the surface of the wall is not particularly difficult even for those who do it for the first time. However, plastering corners, slopes or ceilings can cause difficulties.
In order to plaster window and door openings, you must follow certain rules:
- It is important to carry out all the preparatory work. It is necessary to cover with a film all window and door elements that can be damaged and stained. It is best to use corners that act as beacons and additionally reinforce the plaster layer. They need to be installed in advance. It is also necessary to attach a bar that defines the plane in which the composition is applied.


- The paste-like solution should be kneaded in such an amount that it is enough for one hour of work. If you make a large volume of plaster at once, the mixture will thicken before the end of the process.
- The plaster is thrown from the bottom of the opening or slope to the top, a small rule is applied for leveling. The excess mortar is removed with a trowel, the surface is inspected, and defects are eliminated. The procedure is repeated as many times as necessary to obtain a neat, even surface.
- After complete drying of the finished slopes and openings, you can cover the surface with paint or lay tiles.

It is recommended to level the corners of the room with plaster using beacons or a reinforcing mesh with a counter-shoulder.
The question of how to align the walls is asked by many apartment owners who have gathered to make repairs on their own. Not so long ago, the range of materials for leveling walls was not great. Today, the situation on the building materials market has changed dramatically, but there are only 2 methods for eliminating irregularities on surfaces:
- their facing GKL;
- plastering with building mixtures.
These wall alignment methods have both positive and negative sides. Those who prefer drywall will not have to deal with the laborious process of preparing walls for plastering. It is enough for them to repair the cracks and fix the crate under the sheets on the walls. In addition, any communications can be hidden under the GKL. However, using sheet materials to level the walls, homeowners significantly reduce its area.
A similar problem does not arise when leveling walls with building mixtures, but the process itself is laborious. Surfaces for plastering need careful preparation. Beacon profiles must be fixed on the walls, relying on which, the rule will distribute the plaster over the surface. In addition, wall leveling compounds are often unable to cope with too large irregularities. However, for those who decide to level the walls with Rotband, it will be easier to cope with the task than for builders who use other compositions in their work.
Characteristics of the mixture "Rotband"
"Rotband" - gypsum plaster, which has a number of advantages over other mixtures. She is:
- excellent contact with most surfaces;
- has high plasticity;
- not prone to cracking and delamination;
- has a relatively small weight;
- dries quickly;
- practically does not shrink;

The disadvantages of the mixture for leveling walls include:
- high price;
- inability to use in rooms with high humidity;
- weak adhesion of the layers of "Rotband" to each other.
True, the last drawback is eliminated if, before applying the next layer, the previous one is treated with a special primer.
When plastering with Rotband, the same tool is used as when working with other mixtures:
- trowels;
- putty knife;
- grater;
- rule.
Surface preparation
Before you start leveling the walls with Rotband, they need to be prepared. They need to be removed:
- wallpaper;
- old paint;
- dust, dirt, greasy stains;
- peeling fragments of plaster.
At this stage, a tool such as;
- brushes;
- spatulas;
- hammer and chisel.

Finally, the remaining dust is removed from the walls with a vacuum cleaner or a damp brush. Significant cracks are best repaired with a cement-sand mortar. After that, the surfaces must be treated with a primer "Betonkontakt" or "Grundirmittel". The latter is produced by Knauf, therefore it is most compatible with Rotband.
First you need to take the rule and check the state of the wall with it. If the walls are fairly even, with differences of no more than 5-7 mm, they can be leveled without installing beacons. Using a tool such as a spatula, "Rotband" is applied to the surface like putty.
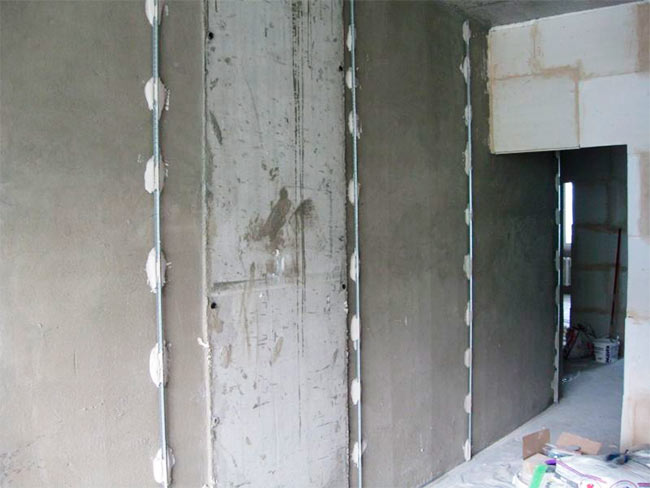
In other cases, you have to install beacons. It must be said right away that it is better to purchase plastic profiles, which, after plastering, can be left in the wall. Metal beacons (even galvanized ones) will begin to corrode over time, and rusty spots will definitely show through the wallpaper. You can safely install steel beacons if the wall is subsequently tiled.
Before installing the beacons, “hills” of gypsum plaster are applied to the wall with a spatula. The distance between them in a vertical row should be about 30 cm. The longer the rule, the greater the distance between the "cakes" horizontally, but in any case it should be slightly less than the length of the fixture, since the tool will rest on adjacent walls when leveling the walls. lighthouses.

First, it is better to install beacons closest to the corner parts of the room. They need to be pressed into the “slides” and checked for verticality with a level or plumb line. Between them, pull 2-3 threads and, guided by the cords, install the remaining profiles. Next, you need to additionally check the plane by applying a building level or rule to the beacons (perpendicular to them).
Plastering with "Rotband"
To obtain a quality mixture, it is necessary to follow the manufacturer's recommendations for its preparation.
It is best to prepare the solution using a tool such as a construction mixer or a hammer drill (powerful drill) with a special nozzle. The finished mixture should be worked out within half an hour.
With a trowel, you need to apply a solution between the beacons. Leading the rule on them, you should distribute the solution along the wall. Leveling the surface must begin from the bottom. Excess solution is removed from the device with a spatula and recovered into a container. The solution is again laid in the remaining recesses, and the rule passes through the uneven areas again. In the corners of the room for plastering, it is more advisable to use a corner trowel.

If it is necessary to plaster in several layers, a new layer is applied after the previous one has hardened. Before re-plastering, the dried layer is primed. In addition, cross-shaped notches are made on it. With multi-layer plastering, the rule is used only for finishing alignment. The main tool for applying "Rotband" during preliminary plastering of the surface is a trowel. The leveling process is completed 2-3 hours after plastering by rubbing the surface with a grater moistened with water.
About the simplicity of working with Rotband
It should be noted that even the most distant person from the profession of a builder will be able to level the walls in the apartment with the Rotband mixture. Having gained minimal experience with gypsum plaster, the master will be able to create a surface ready for finishing with almost any material.
Related posts:

On uneven walls, even high-quality wallpaper will look cheap and not very attractive. That is why, before gluing them, it is necessary to carefully level the surface. In addition, even walls simplify the pasting process itself: it is easier to fit the pattern, dock the edges of the wallpaper, and there will be no waste of materials. In this article, we will analyze how and with what to prepare the walls in the apartment before starting work.

Drywall: for quick leveling
Material Advantages
With a significant curvature of the walls, leveling with plaster under the wallpaper will cost a decent amount. Yes, this process will take a lot of time. Much faster and easier to level them with drywall:
- work at the same time is greatly simplified, because its installation is a less time-consuming process;
- you can level the wall with it with your own hands in a matter of hours;
- drywall is easy to cut and quickly mounted on walls;
- under it, you can easily lay any communications;
- the weight of the sheets is small, so you can level the surface with it yourself, without outside help;
- a minimum of dirt and debris is formed, since the work takes place without plaster;
- the cost of drywall is low.
Stages of work
There are two ways to install this material:
The frame method of mounting GKL is considered classic and is used most often. Let's describe the stages of work:
- the wall must be prepared: cleaned of dirt and dust, as well as knocking down too large influxes of old plaster;
- if the curvature of the walls is small, it is better to use a ceiling profile of small thickness; when hiding communications and large curvature of the walls, a rack profile is used;
- first, the building level outlines its location;
- profiles are screwed to the walls and ceiling with dowels in increments of 500 mm;
- unlike the ceiling, the rack profile is mounted on special suspensions;
- if it is required to stiffen the structure, for example, with further gluing of tiles, horizontal jumpers must be mounted between the profiles;
- drywall is screwed to the racks with self-tapping screws in increments of 250 mm, they should come out at a slight angle;
- in order to correctly align the walls, each subsequent sheet of gypsum board must be shifted so that its angle falls on the center of the previous one, that is, drywall is placed on the surface in a checkerboard pattern;
- before sticking the wallpaper, the joints formed between the sheets are glued with a sickle (a thin strip of reinforcing mesh), and then puttied; it is also required to putty the caps of the self-tapping screws.
The walls, properly aligned with drywall, are perfectly smooth. Wallpapering on this material will not cause difficulty even for a novice master.
You can watch the video on how to fix the GKL on the profiles and glue yourself:
The use of putty
With small wall defects and minor irregularities, the surface can be leveled with putty. For work in small areas, it is much more convenient to use a ready-made mixture, although you can also buy a dry one, which is diluted with plain water.
What to choose: brand examples
We list the most popular putty manufacturers in Russia:
Work order

Unlike ordinary cement mortar, it is comfortable to work with putty. It is very plastic, lays better on the surface, does not dry so quickly, and most compounds can even be diluted with water as it dries.
- before starting work, the surface must be prepared: old wallpaper and loose plaster are removed, then dust is removed; walls and ceiling can be cleaned of dust with a conventional vacuum cleaner or washed with a damp cloth;
- the dry mixture is diluted with water according to the technology indicated on the package;
- the area to be leveled is sprayed with water;
- putty is applied to the required area with a spatula and carefully leveled;
- small cracks can be filled with tile grout or an acrylic-based compound;
- large cracks are pre-strengthened with self-adhesive tape, and then filled with mortar flush with the wall and leveled with a spatula;
- after the layer has completely dried, all large irregularities are scraped off with a spatula and sanded with sandpaper;
- having completed the work in this order, you can begin to wallpaper the room with wallpaper.
Plaster mixtures
How to align: popular brands
Plaster mixtures can be made not only on the basis of cement, but also on gypsum (suitable for rooms with a low level of humidity), acrylic resins (mainly finishing compounds), as well as silicone and potash glass that do not absorb moisture. This rough finish can level a variety of walls: concrete, wood, clay, brick.


Cement-based plaster is suitable for wall decoration in the bathroom and in the kitchen, gypsum - for the bedroom and living room. In the corridor and on the loggia, you can use durable silicone compounds.
All types of plasters are divided into:
- starting: for sealing areas up to 50-70 mm thick; if a thicker layer is required, then it is applied in several stages, carefully drying each layer;
- finishing: it finally aligns the walls to give them perfect smoothness.
When you need to level a large area under the wallpaper, you can choose dry mixes:
- "Knauf": cement "Grunband", "Adhesive" or plaster "Rotband", "Goldband"; compositions of the "Start" type are intended for machine work, but they can also be used for manual application;
- "Volma": quite economical and relatively inexpensive mixtures with a lightweight recipe; they can be used for indoor, outdoor and wet rooms;
- "Bergauf": a wide range and good quality made the products of this company also quite popular;
- "Prospectors": one of the leaders of Russian manufacturers in this area, special fillers significantly reduce the consumption of solutions; all compounds are quite elastic and have good adhesion to the surface;
- "Hercules": this Novosibirsk manufacturer also offers good quality products at affordable prices.
Plastering under wallpaper
Work begins after removing the old crumbling plaster and cleaning the walls from dust:
 To increase the adhesion of smooth concrete surfaces with putty, it is better to pre-coat the surface to be plastered with a primer.

Beacons are placed on the wall or ceiling - a small amount of plaster; their location is checked with a building level, if necessary, the beacon is either slightly pressed in, or, on the contrary, more solution is added to it. This method allows you to align the walls without beacons from profiles.
The distance between the beacons must be kept 5-10 cm less than the width of the rule - a construction tool in the form of a steel strip, with which the solution is leveled.
 As beacons with significant irregularities, you can use wooden slats and metal profiles that are attached to the walls with self-tapping screws. The rest of the putty begins to spread after the beacons have completely dried;


 Constellation Scorpio description")


