Paths made of paving slabs and paving stones are well-deservedly popular with home craftsmen. The use of such a sidewalk is a good opportunity to obtain an original design, reasonable price and reliable coverage. Laying paving slabs with your own hands is not particularly difficult and can be done in the absence of special experience.
To choose a specific way of laying paving stones, you should study the composition of the soil and landscape features of your site, familiarize yourself with the offer of paving elements in your region. You should also evaluate the operating conditions of the coating and correlate the wishes with your budget.
Conditions for the installation of paving stones
Usually the soil on the site has a normal bearing capacity and is sandy loam, loam or gravel. At the same time, paving is carried out without the use of cement mortar and concrete. In the case when we are talking about a recently filled area, as well as clay or dusty soil, an additional concrete base must be made to ensure a uniform load on the ground.

Before starting the construction of sidewalk paths with your own hands on a site with difficult terrain, you first need to equip the terraces with or, and then proceed with the installation of the coating.
The organic layer must not remain under the tile, as it rots and shrinks. For this reason, when preparing the base for the path, the fertile soil is removed and removed from those areas where the pedestrian surface is planned.
In this case, an excessively deep trench can be sprinkled with gravel. The roots of bushes and trees can disturb the path, so they are either uprooted or a path is planned at a distance of 3m from them.
Rules for laying the pavement of tiles and paving stones
 Scheme for choosing paving stones according to operating conditions
 The tile itself is chosen based on the appearance and the required reliability of the coating. It is easy to determine how thick paving stones can be in accordance with the above diagram. can be studied in a separate article.
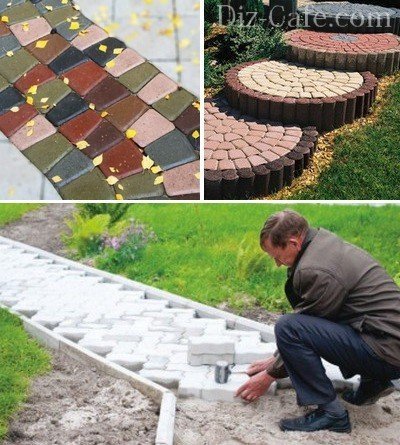
 Various types of paving stones
 It should be noted that, according to the quality of manufacturing, pavement tiles can be vibro-cast, hyper-pressed and vibro-pressed. Vibrocast paving elements have a complex configuration and are inexpensive. Such products are well suited for garden paths.
Hyper-pressed paving stones are more expensive and noticeably stronger. This coating will withstand the wheels of cars.
Testing paving elements is quite simple: durable tiles make a ringing sound when struck, while vibro-cast tiles make a deaf sound.
Decorative elements can be coated with a dye on top, which allows abrasion of the decorative layer. Mass-dyed elements will never lose their color.
In order to make a path, you need a curb stone. You can purchase it or in accordance with our recommendations.
As an underlying material for car parks, it is better to use crushed stone of a fraction of 20-40, while a size of 5-20 is suitable for footpaths. When laying paving slabs, the following list of tools will be required.
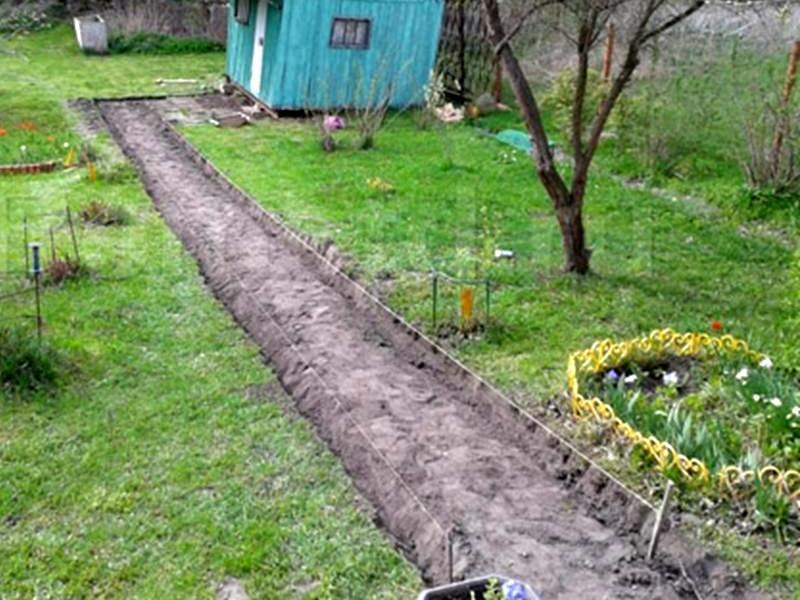
 Marking and planning of the coverage area
Curvilinear and radius shapes of the paths lead to a large amount of tile trimming, increase the cost and duration of the paving. For this reason, they are used only when necessary.
To dig a trench, uneven patches of pavement are drawn on the ground or marked with sand. Smooth paths are marked with a cord and pegs. When planning, do not forget to take into account the curbs and elements of the drainage system.
During the planning and marking of coatings for normal drainage, the following slopes must be provided:
- 1-2 degrees across footpaths;
- 3-4 degrees along the tracks and on the grounds;
- 3-7 degrees when using paving stones on the blind area near buildings.
According to the markings for the footpath, they dig a trench with a depth of at least 20 cm. At the location of the curb, the depth of the groove will be at least 25cm.
We install curb stone
 Installation of a curbstone for a paving stone path
 In the absence of a curb, the pavement path will fall apart. The curb stone can be installed both above the canvas of the track, and flush with it. When placed on the surface of the trays for draining water, it is convenient to equip them next to the fence of the track.
 Various options for organizing the border
 About that, with our own hands, we have prepared step-by-step instructions. There may be a situation where the installation of a curbstone is unacceptable. In this situation, one or two extreme paving elements on the path are placed on a cement mortar prepared in a ratio of 1: 3, in accordance with the above scheme.
We provide drainage and underlayment
It is obvious that part of the moisture during rain penetrates into the gaps between the paving elements. Thus, in order to drain water and protect the coating from destruction, it is necessary to provide a drainage underlying layer.
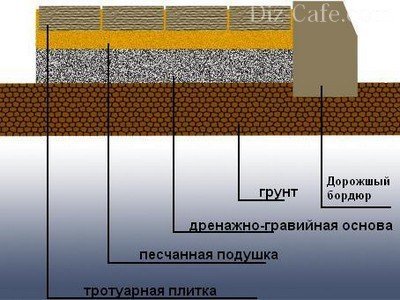
 The scheme of laying paving stones on a mixture of cement and sand
 Ideally, the base for water drainage must be equipped in accordance with the above diagram. With this technology, a leveling layer of sand 20 mm thick is poured onto a flat and compacted soil, which protects the geotextile from damage. Geofabric does not allow mixing of soil and gravel.
This is followed by a layer of crushed stone of at least 70 mm, which is compacted by a rammer to a state where the top stones do not move during movement. Depending on the load, in car parks, professionals require laying a layer of crushed stone up to 30 cm.
On top of the rubble again follows a leveling layer of sand 20mm. Its task is to protect another sheet of geotextile, which will prevent crushed stone and gartsovka from mixing (a mixture of cement and sand in a ratio of 1: 5).

Often, builders neglect the laying of geotextiles, leveling layers of sand and even gravel. A simplified version of the arrangement of the base is allowed for narrow paths in the country. Obviously, the appearance of the paving is of course not affected. At the same time, how long the coating will last, everyone is free to check for himself.
Paving with paving stones
According to the technology, paving stones are supposed to be laid on a gartsovka (a dry mixture of cement and sand in a ratio of 1: 5). There is an opinion that the presence of cement only interferes with the repair of the coating.
It is reasonable to assume: since the cement interferes with the repair, it means that the track is stronger. However, in most cases, tiles are placed on ordinary sand. In severe operating conditions, paving stones are laid on a cement-sand mortar.

During the construction of the path, curbs are beacons for laying gravel and sand. In this case, a rule is prepared from the board, as in the photo, with cut corners, with which the filled material is pulled for leveling.
When laying paving stones over large areas, a cast-off of twine and pegs are first installed to determine the level of coverage. Relative to the twine, beacons are laid out on the ground from a pipe, corner or channel. In this case, sand leveling is done by the lighthouse rule.
Adding rubble is carried out 1-2 cm above the planned level and rammed to a state in which the pebbles from above are not displaced by shoes. The sand is also placed 1-2 cm higher, slightly moistened with a garden watering can and compacted to the point where it leaves no traces when walking.

At the beginning of the process, whole elements of paving stones are placed on a flat surface of sand in accordance with the pattern. Masonry starts from the corner, from the curb. The paving surface is controlled by the rule and corrected with a rubber mallet. Failed elements can be removed, sprinkled with sand and put back in place.
Paving stones are laid out not in rows, but diagonally. In this case, it is easier to control the surface of the coating.
In those places where the whole tile does not fit, it is cut with a grinder. It is better to use a diamond disc and be sure to use the most important tool - goggles.

You can lay rectangular elements on winding sections yourself in accordance with the following order:
- paving stones are placed with the long side along the coating;
- laying starts from the inner radius;
- paving elements in adjacent rows are laid with an offset;
- seams across the track are obtained in the form of a wedge.
When paving radius sections with tiles of complex shape, the seams are placed at an angle of 30-45-60 degrees to the direction of movement. After filling the coating with whole elements, the free areas are closed with trimmed paving stones.

As the laying of all paving elements is completed, the seams between them are filled with sand. It is convenient to use the janitor's tool: a broom or a brush.
Laying paving stones on concrete: concreting and reinforcement
Recall that when arranging paths in the courtyard of a private house with problematic soil (fresh soil, clay, dusty sand), the technology of laying paving stones on a concrete base is used to preserve the geometry of the coating. It is also sometimes necessary to decorate an already existing concrete base with tiles. At the same time, you can put the coating on the carving, cement mortar or tile adhesive.

When constructing a track with a concrete base, it is important to understand that the concrete slab, together with the curbs, form a kind of trough in which moisture can accumulate. This can lead to swelling and cracking of the coating. If the paving elements are laid on tile adhesive, then the penetration and accumulation of moisture will not occur.
Otherwise, drainage must be provided around the perimeter of the coating. However, in practice, trays are installed along the curb to drain water and they do not pay attention to the indicated circumstance, believing that wet sand under the influence of frost will evenly move with the coating without disturbing it.
 The scheme of laying paving stones on concrete using tile adhesive
 Based on the scheme for arranging the footpath, the depth of the pit when laying tiles on the adhesive will be at least 250mm. When choosing the method of paving paving stones for gartsovka or sand, you will need to add at least 50 mm more. For a platform for a car, a layer of sand and rubble will have to be increased, and the trench, accordingly, needs to be dug deeper.
In the indicated scheme, a thin layer of sand and geofabric do not allow cement laitance to leave concrete for crushed stone. Paths in the country can only be reinforced with wire mesh located at the top of the concrete to protect against frost heaving.
For car parks, another layer of reinforcement with a diameter of 6-8 mm will be required, located at the bottom of the concrete. Reinforcement meshes are laid with the intersection of at least one cell. To install the reinforcement at the right level, linings of pebbles will be required.
To protect against destruction, expansion joints are arranged in concrete every 3-5 m of the track. For this purpose, gaskets from boards or 2 layers of rolled waterproofing can be laid in the solution.
Depending on the temperature, paving can be started 1-2 weeks after the concrete has been placed. The installation of paving slabs can be performed on the cutting, as well as on cement mortar or tile adhesive. How to lay paving stones on a mixture of cement and sand, we considered earlier.
Installation of tiles on mortar

Laying paving stones with your own hands can be done on a solution of cement and sand in a ratio of 1: 3. With this method of paving, the recommended layer thickness is 20-30mm. The mixture hardens rather slowly, and even an inexperienced master will be able to lay out a smooth surface of the coating using the rule and level.
First, a whole tile is laid out on concrete in accordance with the pattern. Uncovered areas are cleaned from the solution with a trowel or spatula. After the masonry has hardened, the tiles are cut and laid on the mortar in the remaining areas. At the end of the work, the gaps between the paving elements are filled with carving or sand and moistened with water.
The extremely simple technology of laying paving slabs in the courtyard of a private house allows you to perform work by an individual developer without the involvement of specialists. It is enough to organize the slopes of the coating, mount a storm drain, choose a rational layout and material for paving, depending on the operational loads.
Before you start decorating the courtyard with curly FEM paving elements, you need to learn how to properly plan the terrain of the site and reduce the budget for landscaping. FEM are a budget option for finishing in comparison with asphalt concrete pavement, they allow you to even out irregularities by terracing and making slopes of 4-7 degrees, necessary for gravity removal of rain and melt runoff.
To lay paving slabs evenly and ensure maximum coverage life, the following operating nuances should be taken into account:

Important! Rainwater (point or linear) is necessary in any case, since FEMs are made of concrete, rubber or polymer concrete, and all these materials retain moisture on the surface.
Paving the yard with paving slabs
Laying tiles in the yard should take into account the features of the technology:
Advice! It is better to calculate the number of paving slabs after marking the yard, taking into account the layout scheme, the presence of curved sections and retaining walls for terracing the site.
Yard marking
At this stage, it is necessary to beat off a single horizontal level of the yard, create slopes and outline the paving area with cords. To lay paving slabs on loose mixtures, you need a rigid base, preferably from soils with a minimum clay content. In practice, the developer faces the following problems:

In the latter option, steps are automatically added to transition between terraces. It is better to make them from FEM elements in order to maintain the unity of landscape design style.
Therefore, the marking of the yard is necessary to delineate the paving zone, from the surface of which the fertile layer will be removed and replaced with non-metallic material. For this, pegs or cast-offs are used, the cord is pulled along the outer edge of the curbs or stormwater trays.
Foundation Requirements
If there is clay in the soil, it will swell in winter and destroy the coating. On a fresh embankment, on the contrary, the soil will sag over time. Therefore, in the first case, part of the soil (upper 40 cm) is replaced with an inert material in which there is no clay and swelling is minimized.

In the second option, black soil is also removed, but already to a depth of 0.6 m, a 15-20 cm layer of crushed stone is poured and 10 cm of footing is cast over the entire yard surface. Curly paving elements are laid on a layer of sand with a minimum thickness of 15 cm or a gartsovka (1/6 cement, sand, respectively) with a minimum thickness of 10 cm. All layers are necessarily compacted with a vibrating plate.
Preparing the mixture
You can lay the pavement on the mortar, dry mix-cartridge or clean sand. The first option is expensive, the coating has zero maintainability and is extremely sensitive to base movements. Gartsovka does not provide any special advantages in comparison with pure sand, since for the normal formation of a cement stone, at least a minimum water-cement ratio is necessary, and not moisture accidentally penetrating into the lower level.

Preparation of carving from cement and sand.
Curbs and storm drain
The resource and quality of paving directly depend on the installation technology of storm trays and garden borders. These elements are higher than paving slabs; for them, trenches will have to be deepened along the perimeter of the paving zone. Laying them on the base, you should follow the technology:

The laid curb is covered from the outside with soil, from the inside with non-metallic material (sand or crushed stone) at the same level with the surface of the underlying layer. Stormwater trays and storm water inlets are mounted at the lowest points of the paving area. To reduce the budget for landscaping, storm trays can replace curbs on one side of the yard.
Solid tile installation
On the manufactured base, the paving stones are laid according to the technology:

Rice. 8 Carving alignment by rule
- paving - according to the chosen pattern and the scheme of laying curly paving elements, paving slabs are mounted on leveled bulk material close to each other.
The rule is made of a flat dry edged board, in the lower part on both sides of which rectangular cuts are created with a hacksaw. Unlike tiles laid on glue, you can walk on paving stones immediately, so it is more convenient to hang the work in front of you. This allows you to level the entire paving surface along the beacons and lay the FEM elements in one step, which dramatically increases productivity.

Tool-free laying of paving stones on leveled and compacted sand
Advice! With high-quality alignment along the beacons of carving or sand, paving slabs do not even need to be upset with a rubber mallet. After filling the joints, the entire surface of the FEM is leveled and compacted with a vibrating plate, saving the home master from manual labor.
Trimming and grouting
It is possible to do without cutting curly paving elements only in areas of regular geometric shape, and even then, not for all FEM collections. Trimming of paving slabs is necessary at the junction points:
- at curbs, foundations, plinths;
- near storm water inlets and at intersections;
- in curved, curved sections.
FEM cutting is carried out with a diamond disk or tooling on a stone angle grinder. Unlike some curbs, paving slabs do not have reinforcement, they are cut quite easily.

For some modifications of FEM, manufacturers produce halves, which makes it possible to do without trimming.
At the last stage, the laid facing material must be additionally protected from displacement during operation. To do this, the seams should be filled with quartz or quarry washed sand. Particles of these materials have a torn edge, so they self-wedging inside the seams under their own weight, they are not washed out by rain and are not blown out by the wind.

Backfilling of FEM joints.
Sand is poured in piles over the paving area before compacting the lining with a vibrating plate, brushed over the entire surface of the yard. Bulk material penetrates into the seams on its own, after surface treatment with a vibrating plate, the remains of bulk material are swept away.
Pairing node with a blind area
If it is planned to pave the entire yard area with paving slabs, then the blind area is also decorated with this material by default. Therefore, it is necessary to take into account the nuances:
- the width of the blind area should be 15 - 20 cm more than the projection of the roof on the ground;
- the slope of the blind area should be from the walls outward within 4 - 7 degrees;
- the relief of the courtyard, in turn, may have a slope towards the cottage.
Therefore, along the perimeter of the blind area, a linear storm drain from surface trays should be mounted. Or ensure the drainage of runoff from the waterproof surface of the concrete pavement to point storm water inlets installed at the lower points of the yard, and organize paving stone slopes in their direction.

The junction of the blind area and the paving of the yard with stormwater elements.
Important! At the stage of manufacturing the underlying layer, drainage sewer pipes are laid from storm water inlets towards an underground reservoir for receiving and accumulating wastewater.
Thus, paving the yard with paving slabs on their own is not difficult for an individual developer, even on uneven terrain. It is necessary to take into account the composition of the soil and its bearing capacity, depending on the operational loads on this decorative coating.
Advice! If you need repairmen, there is a very convenient service for their selection. Just send in the form below a detailed description of the work to be done and you will receive offers with prices from construction teams and firms by mail. You can see reviews of each of them and photos with examples of work. It's FREE and there's no obligation.
Ennobling the local area, many owners often wonder how to cover the paths, front and back yards, recreation areas ... Paving slabs are great for these purposes. Functional coverage in landscaping is unparalleled. The price of the material is far from fabulous, and laying paving slabs with your own hands is quite simple to perform. So the design of paths and playgrounds on the site will not cost too much, and at the same time it will be a worthy frame for the garden and decoration of the local area.
Variety of colors, shapes and textures
This allows you to create a harmonious ensemble, combining all the elements of the site into a complete picture, and embody any design and architectural ideas.
Due to their aesthetic appeal and excellent performance, paving slabs are indispensable in landscape design.
Environmental friendliness and comfort
Paving slabs do not emit harmful volatile substances when heated and do not soften under the scorching sun. Sand-filled tile joints allow excess moisture to seep through after rain, preventing the formation of puddles.

The path paved with tiles does not violate the natural need of plants on the site for water and gas exchange
Ease of maintenance and durability
Paving slabs are an ideal coating in frosty winters, they have high strength and low abrasion.

With high-quality laying, tiles can last more than 15 years.
Both the technology of laying paving slabs, and the subsequent care of it, are quite simple. In case of damage to the coating, it is always possible to restore the area by picking up and replacing just a few tiles.
In order for paved paths and platforms on the site to become not only an original addition to landscape design, but also to serve properly for many years, it is important to take into account a number of key points when carrying out work on how to properly lay paving slabs. For example, depending on the location and purpose of the coating, paving slabs can be laid both on mortar and on sand or gravel.
For the arrangement of garden paths and recreation areas, it is enough to use a sand-gravel "pillow"
Tiling work step by step
At the stage of preparation for laying paving slabs, it is extremely important to correctly select products and necessary tools from a wide range of products that will be easy and convenient to work with. When choosing a tile, it is necessary to focus not only on taste preferences, but also take into account the operational characteristics of the material. So, equipping a recreation area or a covered carport, you should ask the manufacturer: is the tile capable of withstanding heavy structures or is it designed only for human weight.
Attention is drawn to the surface roughness, the shape of the product: are there any rebounds, will it need to be cut
To carry out the work you will need tools:
- Master OK;
- wooden or rubber mallet;
- manual tamper;
- metal or wooden pegs;
- ordering cord;
- building level;
- I-beam or pipe of any diameter;
- watering can or watering hose with a sprayer;
- rake and broom;
- cement M500 and sand.
To determine the number of tiles and raw materials for the base, it is necessary to consider the layout of the site, taking into account the location and size of its paths and platforms.
One of the basic rules for laying paving slabs is the need to equip paths with a slight slope based on 5 mm per meter so that water flows freely from them into wells or lawns.
Foundation arrangement
The success of the entire construction directly depends on the reliability of the base surface. When arranging the base, along the edges of the location of the future path, stakes with notches at a height of 5-7 cm are hammered, at the level of which the cord is pulled. A layer of turf, stones and debris is removed from the construction site.

In order to lay any paving slabs with your own hands, you must first carefully prepare the base
To level the surface of the outlined area in elevated places, the excess layer of soil is removed, and on the depressions, pits and hollows, on the contrary, it is poured. The base leveled with a rake is carefully compacted. When working with soft soil, it is advisable to moisten the leveled soil surface with water before tamping. Careful tamping of the base will prevent uneven subsidence of the sidewalk.
The depth of the base is calculated with a margin of a couple of centimeters, taking into account the fact that shrinkage always occurs during compaction. On average, it takes from 20 to 30 cm to lay a layer of sand and the tile itself.

After excavation, the front side of the tile should reach the desired level.
The entire surface of the future track is given a transverse, longitudinal or longitudinal-transverse slope. At this stage of the arrangement of sites and paths, work is also carried out on laying communications. Laying geotextile before backfilling sand will prevent the growth of weeds between the tiles.
Creating a "pillow" of sand or gravel
On the prepared base layer of soil, sand can be laid out, which will not only increase the stability of the sidewalk, but will also act as a drainage system. The poured sand must be leveled with a rake and watered with water until puddles form on its surface. Already after 3-4 hours in sunny weather, the “pillow” can be given a smooth, even shape using a profile, which can also be an ordinary pipe or beam.

To level the surface of the sand layer, you can use inch PVC pipes
Pipes are placed like rails at a distance of 2-3 meters from each other. The gaps between them are filled with sand to the same height, providing a flat surface throughout the site.
To give greater strength to the coating, paving slabs can also be laid both on a crushed stone base and on a mortar. To do this, it is necessary to prepare a dry sand-cement mixture in a ratio of 3: 1. The mixture is laid out in an even layer on the base, the screed is performed with a channel. When working with “difficult” soils, it is advisable to use a combined laying consisting of a layer of cement-sand mixture and concrete.
Paving stone installation
Before laying the paving stones, it is necessary to stretch the cord-order along the chamfer. It is better to start laying paving slabs with your own hands from the curb. The first row is laid out strictly along the cord. The tiles are laid out in the direction "away from you".

It is necessary to place the "bricks" in such a way that they fit snugly against each other.
This will avoid an increase in the width of the seams. The use of crosses will make it possible to set equal intervals of 1-2 mm between the tiles. If the tile lays unevenly, you can use a trowel to remove or report a layer of sand under it and then compact it again.
It is necessary to level the paving slabs using the building level and a mallet. Upon completion of the laying of tiles, the seams are covered with a layer of cement-sand mixture and watered.

To give the path a neater and more attractive appearance, the tile joints can be “wiped” with quartz sand
If the tiles do not fit well with other buildings or landscape design elements, you can trim its edges with a grinder.
Upon completion of the work, debris and sand residues are swept away from the finished track. Installing the curb on the liquid mortar M100 will prevent the loosening of the tiles and the “spreading” of the track.
Video master classes with styling examples
In the future, it is enough just to renew the sand washed out by water in the seams of the paving stones. The path, decorated with paving slabs, will be an excellent decoration of the site.
Landscaping is a very important process. And the maximum attention here should be paid not only to green spaces, but also to footpaths, which will not only improve the external aesthetics of the site, but also make it more comfortable in all respects. Recently, special tiles have been used as a material for footpaths - the material is reliable and practical, and also quite easy to install.
Choosing paving slabs
Paving slabs are distinguished by high quality characteristics - they are much stronger than concrete, and under intensive use and heavy loads, unlike other materials, they do not crumble and do not lose their attractiveness.
Laying tiles is a process, although not fast, but simple enough to do it without the involvement of specialists. It is enough to purchase a sufficient amount of paving slabs in advance, prepare the necessary tools and consumables, and you can begin to arrange the courtyard area. If you do not have construction experience and do not know how to lay paving slabs, a video on the Internet will help you understand the details in more detail.
If you are interested in how to properly lay paving slabs with your own hands, then first you need to learn how to choose tiles so that the end result does not disappoint you. On the modern market there is a huge variety of samples of paving slabs, different in:
- size
- volume
- pattern
- quality characteristics
Before purchasing the material, it is necessary to carefully measure the area of \u200b\u200bthe sidewalk, and calculate the number of tiles based on its size. The most difficult thing is to buy tiles with curly elements or a complex pattern. Here you need not only to calculate its amount, but also to approximately determine its consumption, taking into account undercuts. Since its drawing will need to be combined, a lot of scrap is formed in the process, which can also be used in the future.
When calculating the number of paving slabs, the method of laying must be taken into account. For example, with a diagonal technique, material consumption increases significantly. Therefore, it is much easier and more profitable to install the sidewalk in the traditional way.
When choosing paving slabs, the main criterion is its strength, determined by its thickness. For example, forty millimeters thick tiles are quite suitable for a footpath. And if you plan to pave a path to the garage, along which passenger vehicles will drive, then it is better to choose tiles at least five centimeters thick.
What is required for tile installation?
Before you study the instructions on how to properly lay paving slabs, you need to prepare the tools that you will definitely need in the process. Their list is quite long:
- building level(you can use modern laser models that allow you to make markings as evenly as possible)
- rubber mallet- necessary for fitting the tiles to each other during the laying process
- wooden pegs(spacers) and kapron thread - with their help marking is done
- Master OK- necessary for leveling the sand layer
- rammer- necessary for compaction of layers
- sand and small stone- from them it will be necessary to make a mixture that performs the function of a "pillow"
- angle grinder- tool for adjusting the size of paving slabs
Also, do not forget to prepare the paving slabs and the curb itself - with its help it will be possible to design the path in a better way.
How to lay paving slabs evenly?
When all the necessary tools and supplies are ready, you can proceed with the installation of the sidewalk. But, even if you have an idea about the procedure itself, still look on the Internet for at least one video on how to lay paving slabs - the video will be your best assistant. By the way, about how to properly lay paving slabs, there are a lot of literary sources and visual aids that you can also use.
So, laying paving slabs with your own hands begins with preliminary preparation of the territory. Professional craftsmen usually draw up a plan of the territory, measure out all the dimensions, transfer them to paper, and only after that they start work.
- kapron thread
- pegs
- a hammer
With their help, you will need to mark the boundaries of the territory where you plan to lay paving slabs. Within the designated boundaries, you need to carefully remove the sod to a depth of approximately twenty centimeters, and then remove the soil. Make sure that the prepared area is free of debris and grass residues.
After the soil is evenly removed, it is necessary to make a pillow of small stone, which is filled up, leveled and carefully rammed. Then you need to start laying the next layer of sand or sand-cement mixture. Sand is laid up to a thickness of forty centimeters. If you are laying a sand-cement mixture, then a layer of twenty or thirty centimeters will suffice. Sand is mixed with cement in proportions of 3:1. To make the layer dense, you can slightly moisten the mixture of sand and cement with water. If you want paving slabs to last their maximum life, you need to make sure that plants do not sprout from the ground. This can be done using a layer of geotextile, which is placed between the paving slab itself and a pillow of sand and cement.
We mark the area
If you are interested in how to properly lay paving slabs, you should know that paving slabs must be laid strictly according to the markings. To do this, you need to measure the level of the slope of the territory where the path will be equipped. It is better to do this in the direction from the house to the street.
Drive in two pegs along the line and pull a nylon thread between them. Make sure the thread is lying flat on a horizontal plane. You can do this with a level. Next, tie the free end of the thread to the third peg and stretch it perpendicular to the first. The third peg must be driven in above the first two. Then the fourth peg is driven in, the thread is pulled, as a result of which a rectangle is formed - this is the platform for laying paving slabs with your own hands.
Paving slabs
After the preparatory work is completed, you can proceed to the direct laying of paving slabs. You can lay tiles with your own hands in several ways, for example:
- traditional
- diagonal
- combined
If you are not a professional, then it is better to use the traditional one. First, prepare a solution - mix six parts of sand with one part of cement. It is important that the sand is sufficiently wet. If the sand is dry, moisten it a little and spread the mixture on the prepared area for laying paving slabs.
Tamp down the layer carefully. Lay two pipes on the sides - at this stage they will play the role of limiters. To make sure that the layer is absolutely even, take a fishing line or thread, pull it over the pipes and draw it a little to the side - this way you will see where you need to remove a little, and where, on the contrary, add.
How to lay paving slabs correctly with your own hands: tile inspection and installation
Before laying the tiles with your own hands, you should carefully examine the material itself. Take the tiles and carefully check that they do not have cracks, chips and other defects that may adversely affect the final result and the quality of the pavement.
Laying tiles correctly is not difficult. Just lay them on the prepared base with a minimum gap. Use a rubber mallet to push the tiles closer together. Do not forget that paving slabs, although durable, are prone to defects, so tapping with a rubber mallet should be light.
If tiles need to be cut, use an angle grinder. For this you need:
- make a mark
- saw the tile
- lay the tiles flush with the rest
Periodically check the level of the masonry - the tiles should be even and in line.
After you have laid all the tiles yourself, you need to sprinkle the paths with fine gravel and rub it thoroughly with a stiff broom or brush. Then you can start grouting the seams. To do this, it is better to use special grouts that are sold in stores. On this, the process of installing a paving slab with tiles can be considered completed. The only thing you will need to do next is to install the curb.
Installation of curb plates
It has already become clear how to lay paving slabs correctly. Now you need to figure out how to install the border. Here you should pay attention to the fact that you can lay the curb flush with paving slabs, or raise it a little.
The main task of the curb is not the aesthetic appeal of the path, as many people think, but the prevention of tiles from spreading on soft ground. To install them, you need to dig special trenches, the width of which will be slightly larger than the size of the curb itself. Next, in the trenches, you need to lay a pillow of sand. A layer of five centimeters will be enough. The sand is carefully compacted and a slab is installed on top, which must be leveled and fixed.
Contrary to popular belief, laying paving slabs on your own is a feasible task. This is one of the options for improving the site in the country or next to a country house, the implementation of which is possible without outside help. In the article we will talk about the technology of laying paving slabs with our own hands, we will analyze detailed step-by-step instructions, and also show diagrams, photos and video materials.

The estimated dimensions of the site should be carefully calculated before starting work on marking it. The length and width of the paving area is best made multiple, based on the size of the prepared paving slabs, in order to avoid its cuts. The most durable are the ways of laying paths from solid tiles, so cutting it should be avoided. Having finished with the calculations, you need to measure the area for laying with the help of pegs and a cord stretched between them, as well as a tape measure. Do not forget that you will need to make a small groove around the perimeter for the curb.
After marking the paths, it is advisable to walk along the proposed route, because then you will need to walk along it many times. If everything suits you, then you can proceed to the next stage of work.

The first stage is the selection and preparation of a site for paving slabs. Of course, you need to see if the necessary tools are available. You will need:
- pins or stakes (made of metal or wood, it doesn’t matter);
- rubber mallet;
- building level (for fitting tiles);
- a hose with a divider or a large watering can (if there is no water supply);
- broom;
- rake;
- an even long object (channel, pipe or corner).
After making sure that you have the necessary equipment, you can get to work.
For high-quality work, you need to know how to properly lay paving slabs. The guide below will help you accomplish this task.
With pegs we mark the boundaries of the area where laying is planned. If you plan to fence with sidewalk curbs, then you should leave a small margin.

For a 25x25 cm tile, it is logical to make the length and width of the area a multiple of a quarter meter. If the tile is 30×30 cm, then multiples of 30 centimetres, and so on. This eliminates the need to cut the tiles and makes the structure more durable.
Leveling the site

During the laying process, the main task for high-quality paving slab coverage will be a prepared even base. It should be aligned over the entire area, so that later you do not have to redo anything.
It is necessary to cut the turf from the marked area. This will ensure the removal of the root system, which to some extent will prevent the germination of plants in the joints of the tiles. Such work is also useful in that the base is being prepared for backfilling, thanks to which the surface can be leveled. Now we are trying to achieve a level ground on the site. We do this by cutting hills and pouring soil into lowlands and pits.
During this stage, it is also necessary to take care of the presence of a drain for water, for which it is enough to make a slight slope of the base. The formed surface is carefully processed with a rake and rammed.
If the soil is soft, it should be moistened and well compacted in order to prevent future shrinkage.
Subsequent work on the preparation of the marked site

Having completed work with the relief, it is necessary to fill up 2 layers from above, the first of which consists of gravel, and the next of sand.
If the coating will serve to park a car on it, then laying paving slabs on a concrete base is best suited.
It is necessary to carefully compact each layer, the ideal size of which is in the range of 3 to 5 cm. In some situations, geotextiles are placed between the gravel and sand, which prevents the gravel from mixing with the sand, but does not prevent the outflow of moisture.
We prepare a layer of embankment

Here, the general case of laying tiles in the country can be divided into two options. The first is the laying of paving slabs on a concrete base, the second is the use of materials that allow laying without cement, for example, on sand. The optimal height of the embankment is about 7 cm. On the marking stakes, we stretch the fishing line or rope along the selected level.
At the same stage, you will need to determine the line of water flow. Stagnant water can erode the base of the tile.
Installing the border

The border is installed in front of the embankment. Prepare a small trench for installing the curb and pour a 5 cm layer of sand on the bottom. The depth of the trench is chosen so that 60% of the height of the stone is under paving.
The curb must be installed in such a way that it can withstand not only the steps of the child on it, but also the collision of a car.
As already noted, in order to avoid trimming, paving slabs should be laid according to exact calculations, based on its dimensions. If you can’t do without trimming, use a “grinder” with a cutting wheel for concrete. How are paving slabs with cut edges laid? As well as solid tiles, but in this case, more attention should be paid to laying out the pattern.

After determining the level of the base, we fill the area under the paving slabs with sand, ramming it. Then, along the stretched levels, we level the sand with a rake, adjusting it to the state of a smooth surface with a pipe (channel, corner). You should have a flat area. Now it must be moistened with jets of water (without pressure to avoid washing out).
Laying tiles

When laying paving slabs on the sand, carefully press it to the base and, if necessary, knock it out with a rubber mallet. Do not forget about the drawing that you are posting, as the pattern must go sequentially and in accordance with the intended scheme. When the tile is laid, for additional compaction, it is desirable to pass over it with a vibrating plate. As a result, the surface will be absolutely smooth, each tile will "grow" with the base, and water will not accumulate on the surface.
To lay tiles on bends and turns, it is necessary to increase the gap between them, and their maximum width should not exceed 0.8 cm. In general, special tiles with rounded edges are sold for laying turns and bends (“Classic” model). It is better not to use a rectangular tile for this.
It remains only to fill the finished paving area with sand and rub it with a brush with a hard bristle. At this stage, the work is basically finished and the new pavement can be used.
The sand poured into the joints and onto the surface should not contain organic materials and salts that can cause efflorescence.
In addition to beautiful pavement, you can learn great skills that you can easily apply to the foundation of your new paving laying business.

It is worth mentioning the minimum requirements for basic maintenance of new lanes. First of all, paving slabs, like any other coating, require systematic cleaning from dirt and dust. Given this fact, it is better to opt for dark-colored tiles that do not require thorough cleaning. Tracks with patterns should be washed regularly with a brush and detergent.
Particular attention should be paid to the cleanliness of the paths in the winter season. It is strictly forbidden to use metal and sharp objects in the process of caring for paving slabs, for example, to break ice, etc.
In no case should you sprinkle paving slabs with salt, as it will corrode not only the ice, but with it the top cement layer of the tile.
If you decide to use a special tool, then it is better to test it on an inconspicuous area of \u200b\u200bthe tile, as there are many chemicals that can ruin the appearance of the track. It is undesirable to cover paving slabs with paints or varnish in order to avoid losing the original appearance and aesthetic appearance, especially since they can easily spoil the coating. We sincerely hope that our article will help you in your work.
If the option of self-laying paving slabs does not suit you, then you should responsibly approach the choice of a company!
Scheme
And now you can get acquainted with the schemes for laying paving slabs:


