Hello!
We continue to finish the kitchen, and today's article will be about how how to lay tiles on the walls. Rather, we will tell you how we did it, because each master has his own secrets and his own ways of laying tiles.
Our walls are already plastered. If you don’t have it yet, click on it, it describes in detail how we plastered with cement mortar. I will not make a long introduction, and “pull the cat by the tail”, in the course of the article I will tell you what tool we used and what material we used. By the way, if you are interested in laying tiles in the kitchen, go to tile4you.ru.
First of all, we prime dry plastered walls with a deep penetration primer. There are a lot of manufacturers now, but the composition of such primers, in principle, is no different. We used this one:

One clarification: it is advisable to immediately use up the primer cast from the canister to the end. If it remains, you should try to use it in the coming days and in no case pour it back into the canister. The fact is that after several days of storage, a used primer begins to emit a very unpleasant odor.
After the soil has dried, according to mystroyinfo.ru experts, the grains of sand will no longer peel off the plaster, and the tile adhesive will stick to the wall more reliably.

Now for the glue. There are also quite a few types of it, you won’t be mistaken if you take the most affordable adhesive for interior tile work that will be in the store. There is almost no difference between the notorious Ceresit and, for example, our Artisan in terms of composition and quality, but noticeable in terms of price. So why pay extra for a title?

The choice of the tile itself is a matter of taste, here we are not advisers. You can write a whole book about the varieties, manufacturers and quality of this finishing material.

Usually, articles on how to lay tiles begin with the calculation of the amount of tiles. You can simply calculate the area of the walls and add about 10% for pruning and a possible battle. If the size of the tile itself is known, you can cut out a cardboard template, and, applying it to the wall, find out exactly how many tiles there will be in each row, how many tiles will be cut.
It is advisable to place cut tiles in places that will be covered by furniture, or where less attention will be paid to it (in shaded corners, behind pipes, curtains). Some of our customers wanted all sockets and pipe holes to be located in the center of the tile, or in the middle of the seam, then the tile was purchased with a good margin, and a detailed layout was made.
In our case, we will not lay tiles at the kitchen tables, so we measure the height of the table from the screed - 80 cm, give another 3 cm margin - to cover the edge of the tile with the tabletop. It turns out the distance from the screed - 77 cm.

Draw a horizontal line on the wall.
Along the line, we will attach a metal narrow profile for drywall, on which the tile will rest. We cut off the necessary pieces of the profile and fasten the dowel-nails.


We check the correctness of fastening with the help of a level.


To regulate the thickness of the joints and the position of the tiles, we use plastic crosses and wedges. In our case, the seams will be 2 mm thick, respectively, we take such crosses.

We will lay a tile large enough - 230x350 mm, for applying glue we will take a notched trowel with a tooth width and height of 10 mm. Smaller sizes of tiles can be laid under a spatula of 8 or even 6 mm, for floors a 12 mm comb is usually used.

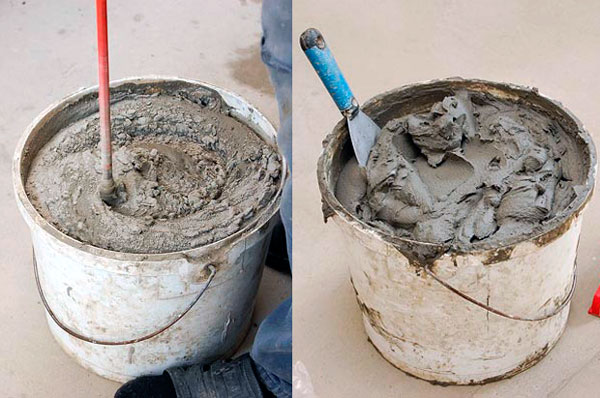
Everything seems to have finished the preparation, the primer has dried, you can knead the glue. If you have no idea what the consistency of the glue should be, read the instructions on the bag and follow it (it’s not just written that way). For kneading, a powerful drill and a screw nozzle are used.


And we have, especially for these purposes, an electric mixer. What he is, you can see.
After kneading, the glue is infused for 5-10 minutes, after which it is mixed again. This procedure makes it softer and more plastic, do not neglect it.

Another detail is that the notched trowel is constantly in the water - so the glue does not accumulate and does not dry out on it.

Well, aluminum rules are used to check the planes.


We stack the tiles in piles so that the arrow looks in the same direction. Next, draw a line with a pencil along the ends of the tile, thus marking its top (or bottom - depending on the pattern). Now, looking at the end, you can immediately find out how to lay the tile, in the sense of which side goes where.

Finally, apply a layer of glue to the tile with a regular flat spatula. And with a notched trowel we remove the excess, leaving even grooves of glue. We try to keep the spatula perpendicular, without tilting - the thickness of the layer depends on it.


Excess glue from a wet spatula almost independently slides into a bucket - the spatula is clean.

We apply the tile to the wall, evenly press. We check horizontality and verticality with a level, although if the wall is well plastered and the profile is horizontally attached, the tile itself will become as it should, it will be problematic to press it with some kind of large skew.


Glue can also be applied to the wall itself, over a large area, but in this case, some skill and experience in quickly laying out tiles on the surface is required. We simply do not like this method, we put it as described above.
Next to the first, glue the second tile.

We insert crosses between them from above and below.

We go through the whole line.

Using the rule, we check the plane - there are no gaps, the tile fits everywhere.

In the corner you need to glue a piece of tile.

Cut off a straight piece with a tile cutter.


If it is not there, you can make an incision with an ordinary glass cutter, and then break the tile on the edge of the stool or table. This should be done carefully - you can easily cut your hand on a broken ceramic edge.
In places where curly cutouts or holes are needed, we use an angle grinder (simply, a grinder) with a diamond disc. Of course, there is a lot of dust from it, but not everyone can fork out for a special machine with water supply.


The most primitive tool for such purposes is pliers, wire cutters or tongs. Round holes are made with tungsten-coated nozzles or special ballerina cutters. We don't need them today.
To support the edge of the tile in the right place, you can simply drive a nail under it.

You can adjust the position of the tiles within 15 minutes after gluing, if more time has passed, it is better to remove the tile completely and, having cleaned it, put it again.
In this way, slowly, we lay the tiles up to the ceiling.


On the right wall, the window slope serves as the border of the tile. To neatly arrange it, we use a plastic corner in which we hide the end of the tile. The corner should be taken a couple of millimeters larger than the thickness of the tile. For example, if the thickness of the ceramic is 7 mm, the corner is needed 9 mm, otherwise the edge of the tile simply will not go inside.


Ceramic tiles are deservedly considered one of the best materials for decorating the kitchen. Such "clothes" are beautiful, durable, resistant to moisture and high temperatures. Manufacturers today offer many tempting options for decorating the kitchen space, however, the cost of laying often exceeds the cost of the material, so the question of how to lay tiles in the kitchen does not lose relevance.
The problem that anyone who decides to tile the kitchen will inevitably face is which tile to choose for the kitchen? The presented assortment is diverse: customers are offered matte and glossy, smooth and embossed tiles of various shades. What should you pay attention to when choosing first of all?
Kitchen tiles must be heat and moisture resistant, not be afraid of the aggression of chemical solutions and mechanical stress. Pay attention to the size and weight - the lighter the tile, the easier it will be to glue it to the wall, a large tile fits twice as fast as a small one.
It is important!
According to standards, when saturated with moisture, the increase in the weight of a tile should not exceed 1%.
As for the size, for small kitchens in small apartments, the best option is 10x10. However, do not forget that small tiles are more difficult to lay and level. Large spaces can be finished with larger specimens - 20x20 or even 30x30 cm.

Think in advance about the color of the tile and texture, consider the overall design of the room. You can calculate the amount of material as follows: determine the area of \u200b\u200bthe wall and add 10% to the resulting number (for pruning and a possible battle).
Video instruction
In order for the result to please for a long time, it is necessary to prepare the tools in advance and strictly adhere to the sequence of work.
Tools
- grinder or tile cutter;
- a hammer;
- crosses;
- glue;
- ruler, level;
- metal profile for drywall;
- bucket with water;
- spatulas (small rubber and wide notched);
- dowel-nails;
- pencil.

Surface preparation
Beautiful and reliable laying begins, first of all, with the preparation of the work surface. The walls must be cleaned and treated with a deep penetration primer, and then with a sand-cement mortar.
It is important!
Clay, lime and gypsum mixtures are not suitable for surface treatment.
You can prepare the walls in 2 ways: we level with plaster or drywall sheets. Consider the sequence of actions of the first and second methods.
Plaster leveling
- clean the walls from dust, remove the old coating;
- roughen the surface (stuff shingles on a wooden wall, apply notches on a concrete wall);
- treat the working area with a deep penetration primer or betokontakt, which will help to avoid peeling of the plaster;
- install beacons, attach corner profiles to external corners;
- prepare a sand-cement mortar and, 20 minutes after mixing, apply it to the walls with throwing or spreading movements;
- prime the surface.

Leveling with drywall
- with differences of more than 5 cm, standard sheets of drywall should be purchased for gluing onto mounting glue;
- make sure there are no crumbling areas;
- apply primer;
- cut drywall for sockets and ventilation;
- take care of hidden wiring (sockets and boxes for switches should protrude 20 mm above the base);
- apply gypsum or mounting glue to the cut sheets and glue the drywall to the wall;
- until the glue has hardened, level the sheets with a level and a rubber mallet;
- prime the walls, putty the seams.

Important Points
Please note that tiles are not laid behind wall cabinets and kitchen tables, because in this case, material overrun cannot be avoided. If you decide not to deviate from tradition and want to tile an apron, then draw a horizontal line in the place where the countertop will end. Attach along this line a metal profile for drywall sheets with a margin of 3 cm, on which the bottom row of tiles will be based.

Plastic crosses are used to adjust the position of the tiles and the thickness of the joints. Thus, if you need seams 3 mm thick, then you should choose the appropriate crosses.
The dimensions of the spatulas also depend on the dimensions of the selected material. For laying large tiles, you will need a spatula with a tooth width of at least 10 mm, for small tiles - 6 mm. In addition, there is one that will harmoniously fit into the interior.
Sequencing
The process of laying tiles is simple, even for a beginner who has encountered this task for the first time, it is possible to lay tiles with high quality. However, it does not hurt to get acquainted with some of the nuances.
We knead the glue

Glue after kneading is not used immediately - it must gain plasticity. This usually takes 15 minutes. The adhesive composition is applied with a conventional spatula, and the excess is removed with a notched one. To prevent glue from accumulating on the spatula, dip it into a bucket of water from time to time. If possible, try to keep the tool perpendicular, without tilting.
We glue the tiles
We fix the tile to the surface - if the preparatory work is done correctly, then the tile lays down as it should. Glue the second tile next to the first one and insert crosses between them from below. Do not forget to check the plane with the rule - there should be no intervals. By the way, after an hour after the completion of the work, the crosses should be removed - otherwise it will be problematic to do this later.

Some prefer to first apply the adhesive to the wall or floor, and then glue the tiles. Undoubtedly, this way the work will go twice as fast, but it will not be easy to achieve perfect masonry.
Check the verticality of the rows with a building level. If there is an obstacle, for example, a socket, draw the contours with a pencil and attach the tile to the socket from above and from the side - so you will accurately determine which of the contours should be cut. Please note that the cut line should be on the wrong side.
It is important!
Do not glue the tiles immediately after trimming - check if you did everything right.
It is easy to increase the adhesion of the material and the surface - just tap on the tile with a rubber mallet or mallet. It is most convenient to cut tiles with a tile cutter; curly cutouts can be obtained using a grinder.
For the neat design of window slopes or corners, plastic corners are used, which should be 2 mm thicker than the tiles.
Grouting
Grouting powder, chosen to match the color of the tile, is diluted with water and applied with a rubber spatula between the tiles. To simplify the work, you can use an extrusion gun or an empty pipe from under the sealant.

Excess grout is removed with a damp sponge. Act carefully so as not to remove the fruits of painstaking work cleanly. After a few hours, wipe the tile with a cloth and admire the result.
The work is completed, the tiles are laid and pleases with even masonry. As you can see, laying tiles in the kitchen with your own hands, if you wish, is quite simple. The main thing is to follow simple rules that will help transform the kitchen space and bring beauty to the house.
If you once spend a couple of days to lay out tiles on the floor in the kitchen, it will last you 10-15 years of use. Due to low cost, practicality and exceptional moisture resistance, this material is considered the best solution for rooms with high humidity and load. In the last article, we talked about, and now we will take a step-by-step look at how to lay tiles in the kitchen correctly.
The choice of floor tiles for the kitchen depends on whether you want to get a solid color or ornament, prefer the quality of foreign materials, or inexpensive Russian tiles are more suitable for you. In this article, the finishing will be carried out on the example of Ukrainian embossed stone-effect tiles from Inter Cerama 35*35 cm in size (BARI collection in light brown color).
Quick article navigation
Necessary tools and materials
For styling you will need:
- Two-meter level or rule for checking the plane;
- Bubble level 40-50 cm;
- Roulette, pencil, paint cord;
- Brush or roller for applying a primer;
- Spatula: regular and comb with 12 mm teeth;
- Rubber mallet;
- Bulgarian with a diamond disc;
- Deep penetration primer;
- tile adhesive;
- Plastic wedges and crosses for seams 3 mm;
- Grout and rubber spatula.
Preparatory work
If you have chosen a monochromatic design, as in our case, this is not difficult to do. Consider the floor area and add 10% for the margin.
Or you make it easier - knowing the size of the tile, consider how many pieces you need to lay out along the length and width of the room, taking into account trimming.
If you choose a floor finish with an ornament, please note that the amount of waste will increase.
Prime the screed liberally with any deep penetration primer and wait until it dries.

The presence of an even screed will not only greatly simplify your work and reduce the consumption of glue, but will also guarantee that after laying the tile will not crack due to the uneven setting of glue of different thicknesses (it shrinks at different speeds when it dries). Therefore, do not spare the money, and before laying the tiles in the kitchen, make at least a rough screed with waterproofing.
markup
From the wall where the entrance to the kitchen is located, measure a distance equal to the width of the tile, taking into account the gap of 5 mm, which will then be hidden under the plinth.
Pull the paint cord along the marks and beat off the line. The first row of tiles will go along it.

For laying tiles in one direction, there are auxiliary arrows on the wrong side. But when you smear it with glue, this arrow will not be visible. To fix this, immediately make marks on the ends with a pencil.

Make a mark in the center of the door and place a tile there without glue as a guide.

This object has an exit to another room through the loggia, so the laying of tiles in the kitchen goes from the door, so that it is easier to make markings and there are whole rows in the center of the entrance. In other cases, you can not lay several tile paths to leave your way back, or start from the opposite wall.
Glue preparation
According to the manufacturer's instructions, pour the required amount of water into a 10-liter bucket and gradually add glue there. In this case, the mixture must be constantly stirred with a mixer or perforator with a whisk nozzle.
Try to achieve the consistency of thick sour cream and leave the glue to mature for 5-10 minutes, and then mix it again before applying.
Laying floor tiles in the kitchen
- Apply the adhesive in an even layer on the tile itself using a regular spatula. Then run a comb along it at a right angle so that the same grooves of glue remain.
- Throw excess glue back into the bucket, and it is better to put the spatula in water so that the glue does not harden on it.
- We put the first tile to the right of the previously laid "beacon". We combine the edges along the line and press down to the floor. Then we check with a short level whether it lies flat.
- If one of the edges is uneven, tap it with a rubber mallet, and then check again with a level.
- We continue laying in the direction to the right. We insert plastic crosses between the tiles. Before inserting the cross, run it along the seam to remove excess glue, otherwise, when it dries, it will be very difficult to do. And in order not to accidentally move the tile towards the wall, put plastic wedges there.
- We finish laying the first row to the right side and check the overall level using a long level. If it is not there, a long rule or even a flat profile of 1.5-2 meters with a small bubble level attached will do.
- If unevenness is found, you have 15 minutes after laying to carefully remove the crooked tiles and add grout, or remove excess. If more time has passed, the adhesive will already begin to set, and it will be necessary to first remove the tile and clean its surface and the place under it with a scraper.
- Near the wall, you may need to trim. High-quality floor tiles are much harder than wall tiles, and it is better to cut them off with a grinder with a smooth diamond blade or an electric tile cutter.
- We lay the trim and finish the row on the left side of the kitchen doorway.
- We also start the second row from our beacon in the center of the door and go to both sides of it. We check each tile for level and combine the corners with neighboring ones. Finishing the floor is greatly simplified if you have high-quality tiles, but cheap domestic tiles can differ by several millimeters even within the same box.
- When we reach the pipes, with the help of a grinder we make cutouts for them. Sometimes you need to make round holes. For this, there are special attachments for the drill - crowns and ballerinas.

Glue application

To simplify the alignment of the tiles among themselves, there is one simple way: before pressing the next tile, put a level on it so that it hangs from the side above the previous element. So you will see how much more to lower it until the level touches the previous one.


Conclusion

At the end of the work, we check the floor surface again with a long level in different directions. If all is well, after a day we clean the seams from the remnants of glue and fill them with grout of a suitable tone. After 30 minutes, the excess grout is removed with a damp sponge, and after another day, the surface of the tile is finally washed from stains and is completely ready for use.
Laying tiles in the kitchen today is considered an almost integral part of the interior. In some cases, when the tiles in the kitchen are missing, it seems that the repair was done incorrectly. But at the same time, although this type of repair seems so familiar and easy, it has a number of inherent subtleties that should be taken into account. That is why, before starting work, you need to clearly know how to lay tiles in the kitchen.
Tiles in the kitchen: general information
First you need to understand the total complexity of what the tile is used for in the kitchen. And it is worth noting that laying can be carried out on various surfaces, at the same time play a different role.
Another factor is the division of the entire room into zones. These zones include the following:
- The first zone is considered to be the working zone. This includes the lining of places where household appliances are located.
- The next zone is marked. Moreover, its design may differ from the general design of the finish.
- Another becomes the floor, it is he who is now interesting to us. Note that it can be used to directly divide the entire room into zones.
Dividing tiles into zones
Taking into account the fact that the kitchen can simultaneously serve as a dining room, which for the most part happens, a good solution would be. In total, you can see an approximate result of such a division in the photo below:
Thus, laying the floor in the kitchen helps to separate individual zones with different colors and types of tiles. At the same time, you can carry out the same division simply by changing the pattern, while using the same tile. Thus, for example, you can lay out a place for cooking in straight rows, and a dining area diagonally.
A little about how to choose a tile.
The question of how to lay tiles in the kitchen on the floor becomes quite important, more specifically, which tile to lay. And the answer will depend on a number of factors, including performance and aesthetic appearance.
As you know, each of the varieties of tiles has its own characteristics. Some samples are more resistant to wear, others have increased strength, and still others have density. And directly for the kitchen, you need to choose a sample that will skillfully combine all three characteristics.
It is important to note that the first priority is precisely the assessment of the quality of the surface of such a tile. In the case when it comes to laying tiles in the kitchen on the floor, preference should be given to matte tiles, rather than polished ones. This option is less slippery, which allows you to protect residents from falling and damage.
Another factor in favor of a matte finish will be its greater water resistance, as well as less susceptibility to detergents. Namely, this becomes important in the kitchen, where constant pollution is inherent in the floor, and additional care is accordingly necessary.

The size of the tile is also an important factor. In particular, large sizes can introduce some dissonance in the design of the room, especially when it comes to a small kitchen..
That is why, laying floor tiles in the kitchen requires careful selection of tiles. Experts recommend choosing material for small kitchens no larger than 20 * 20 centimeters, and it is best to take a mosaic altogether. Of course, laying such a tile is more laborious and requires great skills, but this is offset by the creation of harmony in the design.
Layout options
An important role is played, of course, in the kitchen. Or rather, the choice of one of them. In particular, the following types are worth noting:
- The first is the usual option for everyone, laying tiles in even rows. In this case, the tiles are laid in rows, seam to seam or apart.
- The next option is diagonal styling, more details about which can be found in a separate article.
- Another option is modularization. This method will require more professionalism, additional calculations, perseverance and patience.
In total, these are the main options that can be found most often. Also, you can learn more about the layout in a separate article about, which discusses all the variations.
Mounting technology
Now let's move on to the question of how to properly lay tiles in the kitchen. In total, the installation itself practically does not differ from other premises, therefore, with the slightest skill in working with tiles, it should not be difficult. But at the same time, laying floor tiles in the kitchen has its own characteristics that should be considered.
floor leveling
The first task is to prepare the foundation. The floor surface must meet the following minimum requirements:
- Be absolutely dry (in some cases forced drying of the surface is required).
- The base must be level.
- Traces of the presence of the old coating must be eliminated.
If there are irregularities, fill the floor under the tile. In particular, the so-called self-leveling floor is used. Such a coating is quite expensive, but at the same time the easiest to perform. A cheaper alternative would be
If the answer to the question of how to quickly fill the floor under the tile will be dilute, following the instructions, and then fill the room.

Frequently asked questions about tiling
Now we will answer the most common questions that people have when laying tiles:
How much does it cost to tile in a kitchen?
This question has no exact answer, there are many factors that can affect the cost of the work. Among these factors are the following:
- The type of tile to be used. And there are quite a few of them, it can be ceramic, tiled, porcelain stoneware, marble, etc. The cost of each of these types is significantly different, as is the cost of glue for them.
- The second factor is the area of the room.
- The type of installation is also important, straight, diagonal, modular, etc. This is due to the different number of tiles for each of the varieties, and in addition, the need to cut it.
- Of course, the choice of design will have a significant impact. Patterned tiles cost more than standard plain tiles.
- You can also note the size of the tile, which also matters.
And these are not all the factors that affect the cost.

It is also necessary to take into account the leveling of the floor, which will cost 300-500 rubles per m 2 during the screed.
Ultimately, the cost of laying tiles in the kitchen will be from 600 to 1000 rubles per square meter, with self-laying. The cost of the services of hired workers ranges from 300 to 1000 rubles, depending on the amount of work, type of tile, complexity of installation and many factors.
This is an approximate calculation, subject to the use of inexpensive tiles. Accordingly, depending on the cost of the tile, the price will increase. Note that the cost of the screed will remain the same, but the cost of the adhesive mixture will rise, as well as the tile itself (the price of the services of a tiler will also become higher)
What is the best way to lay tiles in the kitchen?
In this matter, you need to think only on the basis of personal preferences, since how the tiles will be laid determines the design of the room. Therefore, only the appearance depends on the layout option. But there are a few recommendations:
- In large rooms, it is recommended to perform zoning using tiles, laying it in different patterns.
- For small rooms, it is recommended to create a light design and simple drawings.
And the rest, it all depends directly on the taste of the owner.
Tile in the kitchen is one of the most popular solutions. It protects the walls from excess moisture, which is inevitably released during cooking, and gives them an attractive appearance. Tiled masonry will allow you to forget about repairs for a long time: this coating can last for decades. The main thing is to choose the right materials and properly prepare the surfaces.
Ceramic tiles in the kitchen protect the walls from moisture and dirt.
Preparatory stage and tile selection
 Decorative tiles on the floor and walls of the kitchen.
 Start by choosing a tile. It is important to determine its appearance and type. For kitchen premises, it is necessary to select options that are protected from high humidity, temperature extremes and aggressive chemicals. This will extend the life of the coating for a long time. Thanks to the right choice, the walls in the kitchen can be washed with any detergent, without much difficulty washing off grease and splashes.
 Tiles for the kitchen, the choice of type and color.
 You can choose material from:
- tiles;
- ceramic tiles;
- Porcelain stoneware.
The tile has a glossy sheen. It is covered with a glaze that shines brightly, looks attractive, but slips a lot. It is better to lay it on the wall, as it is possible to slip on the flooring made of this material.
 Glossy tile for kitchen walls.
 Ceramic tiles are also glazed, but they are more resistant to temperature extremes and chemicals. It suits the kitchen better.
Porcelain stoneware is famous for its outstanding strength, it is able to withstand the huge loads that the kitchen is subjected to. Its disadvantage is the high cost and the complexity of the selection of shades: the color range of this material is rather limited.
 Ceramic tiles for the kitchen in a classic style.
 When choosing a tile, you should consider:
 Designer decorative tiles in the interior of the kitchen.
 - Size: small tiles - in a small kitchen, large - in a spacious one;
- Design: you need to follow the general style, choose the right shades and patterns;
- Quantity: it is important to correctly calculate the number of tiles, depending on the installation method.
Gluing methods
Tiles in the kitchen can be glued in several ways.
 Variety of tiles for sticking.
 The first is "seam to seam". This is the best method for beginners. Tiles are laid out in rows, each particle is strictly under the other. This method will allow you to avoid unnecessary time and financial costs, since the consumption of tiles will be relatively small. Do-it-yourself styling by this method is quite fast. It will also be easy for you to calculate the number of tiles: just calculate the area of \u200b\u200bthe room and add ten percent to it for the stock. You can go the other way: measure the length and width of the room, then divide the values \u200b\u200bby the length or width of the tile, take into account the distance between them of several millimeters and add the announced ten percent to the expense.
The second way is "on the run". It is also quite simple. The tile is laid so that the seam of the top falls in the middle of the bottom. This method will also allow you to lay tiles in the kitchen with your own hands quickly and without the extra cost of glue, nerves and money.
The third way is diagonal. It is already somewhat more difficult for you, especially if you are a beginner tiler. The tile is laid at an angle of forty-five degrees. Here you will have to take more materials, since its consumption will increase, respectively, you will need to cut the tile with a tile cutter or grinder. This option is recommended to be carried out with the help of professionals. However, if desired, laying on the walls of the kitchen can be done independently with the help of patience, good glue, a spatula and all the necessary tools.
The fourth option for wall processing is combined. Part of the tile is glued in the usual way, part - in any other way: diagonal, center or in a checkerboard pattern. This option allows you to achieve the greatest attractiveness and interesting design.
 Replacing tiles in the kitchen.
  Ceramic tiles in the design of the kitchen.
 Required Tools
 Cutting tiles for laying in the kitchen.
 Self-laying tiles will require the following tools:
- Large and small building level;
- Rule;
- Measuring tools (rulers, tape measures, etc.);
- Marker or pencil;
- Primer brush;
- Plain, rubber and notched spatulas;
- Rubberized hammer;
- Tile cutter or grinder with special nozzles;
- Tiled crosses;
- Primer, glue and grout.
 Necessary tools for laying tiles.
 You may also need a construction mixer to stir the glue, a ballerina or a diamond wheel for a grinder, a paint cord. Nozzles for a grinder are required for cutting tiles, a cord for marking surfaces.
Surface treatment
 Before laying, clean and level the surface.
 Before laying the tiles, it is necessary to carefully process the walls of the kitchen and the floor. They must be even, otherwise the consumption of glue increases and the risk of damage to the tile due to shrinkage of the adhesive mixture and its uneven distribution.
The floor must be filled with a screed if the height differences in it exceed one or two millimeters. Likewise with walls. The walls are leveled with a thick layer of plaster (two or three centimeters) or drywall. Drywall should be taken waterproof, resistant to moisture, since the kitchen belongs to rooms with high humidity. Plasterboard panels are attached to profiles screwed to the wall.
 Laying tiles on the floor in the kitchen.
 If the walls are covered with paint, it should be treated with a special paint remover or scraped off with a chisel or spatula. It is not recommended to stick tiles on paint that has just been cut through, as this will lead to uneven walls and all the ensuing consequences.
 Laying tiles on the walls in the kitchen.
 After leveling, all surfaces must be carefully primed. A deep primer must be used. Such a mixture will reliably fix the plaster, as a result of which the grains of sand will stop crumbling.
Laying tiles on the floor
You can get started in different ways. In some cases, it is more correct to move from the far corner of the room opposite the entrance, in others - from the middle of the kitchen, in others - from the middle of the threshold. The choice depends on what first catches your eye when entering the premises, which corner will be more noticeable. Those places that the eye falls on last can be laid out with tile scraps, the same that will be the most prominent, it is better to overlay with whole ones.
 Laying patterned tiles on the floor.
 An arrow is drawn on the back of the tile, indicating the correct location of the tile. However, after spreading the glue, it is not visible, so it is recommended to stack the entire tile in a stack and mark its ends with a pencil, drawing a noticeable line along the stack. Now there will be no confusion.
 Laying tiles on the floor with markings.
 Before actually laying, you need to dilute the glue. It is important to follow the instructions. It often needs to be stirred thoroughly until it becomes a paste. It is better to do this with a construction mixer or a puncher with a whisk attachment. After initial stirring, leave the mixture for ten to fifteen minutes, only now it can be used.
Sequence of work:
- The floor is marked with beacons or a paint cord;
- A centimeter for the plinth recedes from the wall;
- Using a notched trowel, glue is applied to the tile;
- The tile is applied to the floor and tapped with a rubber mallet;
- The procedure is repeated with another tile;
- To control the distance between them, crosses are inserted;
- The height and position of the tile is carefully checked by the level;
- In case of height differences, glue is placed or removed under the tiles;
- Glue excess is immediately removed;
- A day later, the seams are rubbed with a grout;
- Excess grout is removed with a damp sponge;
- The entire floor is washed after a couple of days.
 Laying tiles on a warm floor.
 It is important to ensure that the tools with which the glue is applied are in water during non-use, otherwise the adhesive mixture will dry out and it will become inconvenient to use the tool. It should also be remembered that floor tiles must be much more durable than wall tiles, as they are subjected to more stress.
Laying tiles on kitchen walls
Before starting work, you also need to make a layout, count the number of tiles and decide on the most visible and most inconspicuous angle. Where cabinets hang and stand, there is no need to glue the tiles, so it is often necessary to glue only an apron and free walls.
 Laying tiles on the wall with beam markings.
 To do this, on the wall, where the tile begins, it is necessary to mark the line from which the cladding will go. Beacons are exposed, whole pieces of the coating are glued, row after row, from bottom to top. Holes for sockets are cut with a grinder or a puncher with special nozzles. At the same time, ceramic tiles are very dusty, so it is better to wear a mask. Corners and trimmings are glued last. After a day, the seams are overwritten.
Similarly, laying on the free walls of the kitchen is carried out:
- Work begins from the most noticeable corner, from the bottom row;
- The glue is spread with a notched trowel on the wall or tile;
- Crosses are inserted into the seam joints;
- Cut out slots for sockets;
- The tile is tapped with a hammer, the level is carefully monitored;
- Seam slots are overwritten;
- After the mixture has completely dried, the surface is washed.
 Washing and grouting tiles after laying.
 Experts recommend starting laying tiles on the walls of the kitchen (and any other room) from the second row. To do this, a distance equal to the height of the tile is measured from the bottom, and then a bar is attached to this level. It can be a flat rail or a metal profile. It is important to monitor the evenness of its location. The line serves as the basis for the second row. When the entire upper part of the wall is covered with tiles, you can glue the remaining lower part.
 The use of crosses in laying tiles.
 The seam spaces can be enlarged or reduced with appropriately sized crosses. It is important to take this distance into account when calculating the number of tiles.
Thus, the instructions given will allow you to stick the tiles on the walls or floor screed of the kitchen on your own. The main thing is to be patient, correctly calculate the amount of material and choose the appropriate coating option. All work can be done in just two or three days.
Video: Laying tiles in the kitchen


