A mill is a mechanism in which various grains, such as wheat, are ground in order to obtain flour or fine animal feed.
Mills come in different shapes and sizes.
There are several types:
Manual
Water
windmills
Electrical
All types of mills have grinding mechanisms called millstones. They are driven by different forces.
hand mills operate on applied force. While a person is turning the handle, the mill is running; as soon as he is tired and decides to rest, the mill does not grind grains.water mills use the power of water. Such mills are usually built near fast-flowing rivers. A water mill has special blades on the wheel, when water flows, it rests against these blades, thereby pushing them and setting the entire wheel in motion, and they, in turn, rotate the millstones.
Works in a similar way

Windmills work with the wind. They have blades with bevelled edges. When the wind blows, it slides on sloping surfaces and pushes them away. They start spinning.

Electric mills millstones are rotated with the help of special motors that run on electricity.
At present, mainly electric mills are used.
When a person wants to get flour, he goes to the mill, pours the wheat into a special container, from which the grains are fed in a small amount into the millstones. There they are ground into small pieces, which are cleaned and sieved. In the end, we get pure white flour, from which our mothers bake delicious buns and pies for us.
mini test
1. What is the mill for?
2. What types of mills are there?
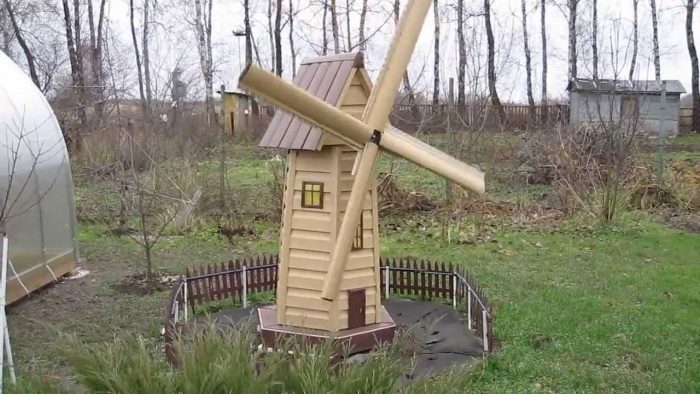
The era of agriculture has sunk into the past many centuries ago, but this does not mean that all the developments of that time now mean nothing. For example, today we will talk about how to make a windmill with your own hands.
It’s worth starting with why this is generally necessary? It is unlikely that someone with her help will grind millet into flour. And the cultivation of millet is carried out by professional farmers, who have modern technology responsible for all production processes. Nevertheless, more and more summer residents are wondering how to make a windmill with their own hands?
Such a hype is explained quite simply - a windmill, which you can easily make with your own hands, is a magnificent element of landscape design that makes the site truly unique. It is much easier to sell a garden that has such a zest than a plot that is like two drops of water similar to the neighboring one.
In the modern world, uniqueness is valued above all else. That is why if you decide to make a windmill with your own hands, this will allow you to transform your garden. In addition, with due diligence and a little digression into physics, you can use this structure as a source of energy.
Attention ! The windmill can be used as an electric generator.
A windmill in your summer cottage can not only be an element of the landscape that you made with your own hands, but also a wind energy converter. This will significantly save the family budget.
Additional qualities of a windmill

Before choosing a place to install a windmill, you should consider that this structure, which you make with your own hands, can have several purposes:
- A windmill can hide a number of unsightly places in your yard, like a manhole.
- Some DIY windmills are made from lightweight materials. As a result, it is possible to minimize their dimensions. Therefore, these structures are often used as protective caps for pipe valves and other engineering facilities.
- The building can be used as a house for children's games. To do this, you need to enlarge the structure a little, but there is nothing unrealistic here. The main thing is to make it stable and not forget about the entrance.
- In a large structure, made under the mill with your own hands, you can store a variety of garden tools. In fact, it will be a utility room.
- The stone mill can also be used as a brazier.
- This structure, with a slight modification, can be used as a scarecrow for moles. It is enough to dig the legs 20 centimeters deep so that the vibrations from the structure that will occur during the rotation of the blades are transmitted to the ground.
As you can see, the windmill that you make with your own hands can find many uses as an element of landscape design.
The role of the windmill in landscape design

The modern world is so diverse that in order for the site to be the best, simple care and even beds are not enough - you need to stand out. At the same time, everything must be done wisely. After all, landscape design is a complex science that takes into account many nuances.
For example, factors such as:
- shadow,
- humidity,
- combination with other cultures
- necessary irrigation systems, etc.
One of the most trending elements of landscape design at the moment is the windmill. The most important advantage of such a structure is that the structure can be made by hand.
We make a windmill with our own hands
Choose a place and prepare it
Building a windmill is a much more responsible undertaking than it might seem at first glance. There are many factors to consider in order to get a truly worthwhile element of landscape design.
Open space is best suited for installation. Firstly, here the blades of the mill will almost always rotate, and secondly, it is much easier to assemble this structure in open space, since nothing will interfere with you.
After you select a suitable place for installation, you will need to remove the site. Remove all bushes and stumps that interfere with the construction. If the grass is too tall, cut it with a lawn mower.
The ground before installing the structure must be carefully leveled. Only after that you will be able to start laying the foundation, more precisely, the platform. To choose the right place, you must have a clear idea of \u200b\u200bwhat your future structure will look like.
Create a plan

As an example, let's take an elementary structure that, with the right amount of effort, every person can build. It all starts with creating a plan:
- Draw a sketch of the layout.
- Using the drawing, calculate what dimensions should be for each part of the windmill that you want to make with your own hands.
- Choose the optimal material from which the main structural elements will be made. Pine is the best choice. It has high performance. At the same time, its cost is at an acceptable level.
After everything is settled with the plan and drawing, you can proceed to the direct assembly process.
Selection of tools and materials necessary for work
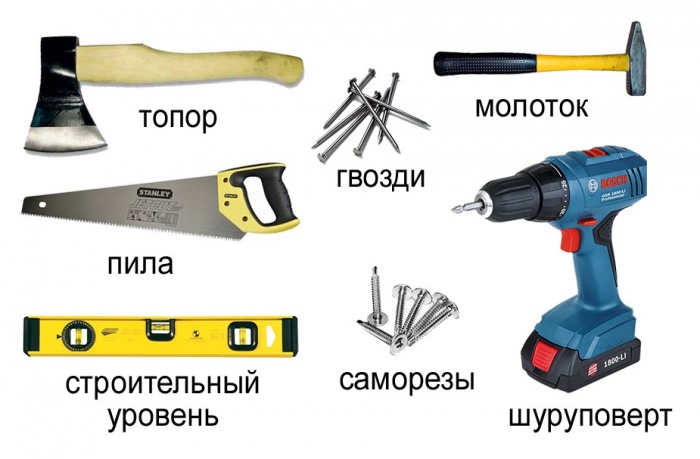
To create a decent structure, you will need the following tools:
- Ruler for creating corners.
- Pens, felt-tip pens, pencils, compasses, markers.
- Construction roll.
- Drill with a set of different-sized nozzles.
- Screwdriver or screwdriver. You can also use a regular drill with a special nozzle for this purpose.
- Hammer, saw, jigsaw.
- Bolts, nails, washers, self-tapping screws, screws. The length of the elements directly depends on how thick the boards you will use.
- Sandpaper for grinding elements. You can also use a grinder.
With these tools, you can make an excellent windmill with your own hands, which will be a great addition to your country landscape concept. Also, to implement the idea, you will need the following materials:
- To make a windmill with your own hands, plywood or lining is most often used. Wide boards are great for the hull.
- To make walls with your own hands, use the bars.
- Any material is suitable for sheathing.
- To make the blades, use metal slats or pipes.
- corners.
- The roof can be made of plywood. Use rails as fasteners.
- In order to fix the paddle propeller with your own hands, you will need a capstan and a bearing.
After all the materials and tools are collected, you can make a windmill with your own hands.
Design layout
After all the drawings are made, and the necessary inventory is collected, you can proceed directly to the layout of the structure with your own hands:

After you make the layout of the windmill with your own hands, carefully cut out all the elements, sand them, treat them with special compounds, and only after that start the final assembly.
Treatment
For the impregnation of wood, it is best to use the following compositions: Pinotext, Aquatex, Belinka.
Important ! Impregnation should be done in 2-3 passes. This guarantees the stability of the protection. In this case, each layer should have time to dry.
Assembly

After you complete the processing of all parts of the windmill, you can begin to assemble it yourself. Just follow this guide and you can do it yourself:
- Fasten the side parts with rails.
- To make the base of the windmill with your own hands, use two squares that have holes in the middle.
- Connect the base and body of the windmill with self-tapping screws.
- Put together two triangles, the bases of which are 38 cm, and the sides are 35 and a half.
- On both sides, screw plywood to the triangles.
- The roof must be made of two parts. For each, five pre-prepared elements will go.
- Make a windmill turntable with your own hands using wooden slats.
- Fasten short rails to the ends of the blades and screw the circles in the center. Then drill a hole in the middle and install the studs. You need to do the same with the butt.
- Fasten the spire. Fasten the entire structure with nuts.
At the end, put the lid on the body that you made with your own hands and secure everything with self-tapping screws.
You can see the detailed assembly process of the windmill device in the video below.
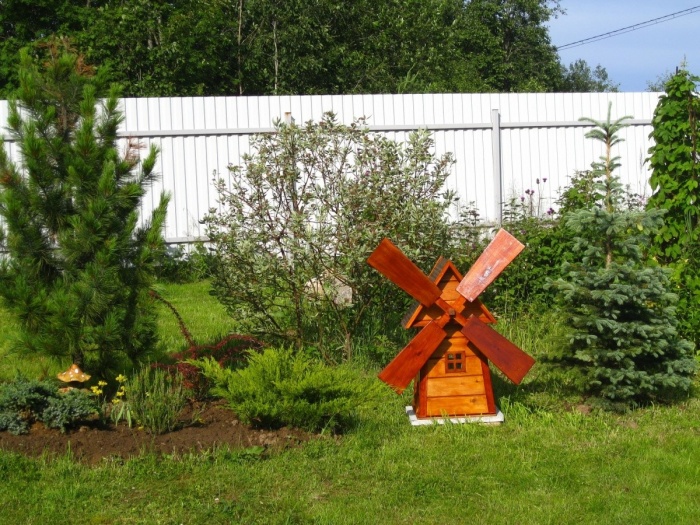
decoration
After you have made a windmill solely thanks to your hands, you need to give it the appropriate look. To do this, you can use varnish. It will give your building completeness.

Attention ! If the wood elements are not processed with sufficient quality, it is better to use paint.
To give the windmill an additional entourage, its elements can be painted in different colors. You can also add drawings like flowers, butterflies or insects. Each of them is easy to do with your own hands, if you use a little imagination.
Results
As you can see, everyone can make a windmill. The main thing is to draw the correct markup at the initial stages and find a good place. It is also necessary to decide in advance what unique qualities the structure will have.
For a long time, windmills, along with watermills, were the only machines used by mankind. Therefore, the use of these mechanisms was different: as a flour mill, for processing materials (sawmill) and as a pumping or water-lifting station.
With the development in the XIX century. steam engines, the use of mills gradually began to decline.
The "classic" windmill with a horizontal rotor and elongated quadrangular wings is a widespread element of the landscape in Europe, in the windy flat northern regions, as well as on the Mediterranean coast. Asia is characterized by other designs with a vertical placement of the rotor.
Encyclopedic YouTube
1 / 1
✪ The principle of operation of wind turbines
Subtitles
Story
Antiquity
Presumably, the oldest mills were distributed in Babylon, as evidenced by the code of King Hammurabi (about 1750 BC). The description of an organ powered by a windmill is the first documented evidence of the use of wind to power the mechanism. It belongs to the Greek inventor Heron of Alexandria, 1st century AD. e. Persian windmills are described in the reports of Muslim geographers in the 9th century, they differ from Western ones in their construction with a vertical axis of rotation and perpendicularly arranged wings, blades or sails. The Persian mill has blades on the rotor, similar to the blades of a paddle wheel on a steamboat, and must be enclosed in a shell that covers part of the blades, otherwise the wind pressure on the blades will be the same on all sides and, since the sails are rigidly connected to the axle, the mill will not rotate.
Another type of mill with a vertical axis of rotation is known as the Chinese windmill or Chinese windmill. The design of the Chinese windmill differs significantly from the Persian one in the use of a free-turning, independent sail.
Middle Ages
Horizontal windmills have been known since 1180 in Flanders, South East England and Normandy. In the 13th century, in the Holy Roman Empire, mill designs appeared in which the entire building turned towards the wind.
This was the state of affairs in Europe until the advent of internal combustion engines and electric motors in the 19th century. Water mills were distributed mainly in mountainous areas with fast rivers, and windmills - in flat windy areas.
The mills belonged to the feudal lords, on whose land they were located. The population was forced to look for the so-called forced mills to grind the grain that was grown on this land. Together with the poor road network, this led to local economic cycles in which the mills were involved. With the lifting of the ban, the population was able to choose the mill of their choice, thus stimulating technological progress and competition.
new time
At the end of the 16th century, mills appeared in the Netherlands, in which only the tower turned towards the wind.
Until the end of the 18th century, windmills were widespread throughout Europe - where the wind was strong enough. Medieval iconography clearly shows their prevalence. They were mainly distributed in the windy northern regions of Europe, in a large part of France, the Low Countries, where there were once 10,000 windmills in coastal areas, Great Britain, Poland, the Baltic states, Northern Russia and Scandinavia. In other European regions, there were only a few windmills. In the countries of Southern Europe (Spain, Portugal, France, Italy, the Balkans, Greece), typical tower mills were built, with a flat conical roof and, as a rule, a fixed orientation.
When the pan-European economic leap took place in the 19th century, there was also a serious growth in the mill industry. With the emergence of many independent craftsmen, there was a one-time increase in the number of mills.
In Russia, windmills were traditionally used for grinding grain or lifting water. Modern wind farms provide electricity to small households and businesses.
The most ancient devices for grinding grain into flour and peeling it into grits were preserved as family mills until the beginning of the 20th century. and were hand millstones made of two round stones made of hard quartz sandstone with a diameter of 40-60 cm. The oldest type of mills are considered to be structures where millstones rotated with the help of domestic animals. The last mill of this type ceased to exist in Russia in the middle of the 19th century.
The Russians learned to use the energy of water falling on a wheel with blades at the beginning of the second millennium. Watermills have always been surrounded by an aura of mystery, covered with poetic legends, tales and superstitions. Wheel mills with a whirlpool and a whirlpool are in themselves unsafe structures, which is reflected in the Russian proverb: “They will take water from any new mill.”
Written and graphic sources testify to the wide distribution of windmills in the middle lane and in the North. Quite often, large villages were surrounded by a ring of 20-30 mills, which stood on high places open to the winds. Windmills grinded on millstones from 100 to 400 pounds of grain per day. They also had stupas (croupers) for obtaining cereals. In order for the mills to work, their wings had to be turned to the changing direction of the wind - this led to the combination of fixed and moving parts in each mill.
Russian carpenters created many different and ingenious versions of mills. Already in our time, more than twenty varieties of their constructive solutions have been recorded. Of these, two fundamental types of mills can be distinguished: “pillars”
Post mills:
a - on poles; b - on the stand; in - on the frame.
And "tents". The first were common in the North, the second - in the middle lane and the Volga region. Both names also reflect the principle of their device.
In the first type, the mill barn rotated on a post dug into the ground. The support was either additional pillars, or a pyramidal log crate, chopped “in cut”, or a frame.
The principle of mills-tentacles was different

Tent Mills:
a - on a truncated octagon; b - on a straight eight; c - octagon on the barn.
- their lower part in the form of a truncated octagonal frame was motionless, and the smaller upper part rotated in the wind. And this type in different areas had many options, including mill-towers - quadruple, six and eight.
All types and variants of mills amaze with precise design calculations and the logic of cuttings, which withstood strong winds. Folk architects also paid attention to the external appearance of these only vertical economic structures, the silhouette of which played a significant role in the ensemble of villages. This was expressed both in the perfection of proportions, and in the elegance of carpentry, and in the carvings on pillars and balconies.
water mills


Windmill diagram 

Donkey-drawn mill

Mill station

The most essential part of the flour mill - the mill set or tackle - consists of two millstones: the upper, or runner, BUT and - lower, or lower, AT . Millstones are stone circles of considerable thickness, having a through hole in the middle, called a point, and on the grinding surface, the so-called. notch (see below). The lower millstone lies motionless; his asshole is tightly closed with a wooden sleeve, a circle g , through the hole in the center of which the spindle passes With ; on top of the latter a runner is planted by means of an iron rod CC , strengthened by the ends in a horizontal position in the runner's point and called the paraplice, or fluff. In the middle of the paraplice (and, consequently, in the center of the millstone), on its lower side, a pyramidal or conical recess was made, into which the correspondingly pointed upper end of the spindle enters. With . With this connection of the runner with the spindle, the first rotates when the latter rotates and, if necessary, can be easily removed from the spindle. The lower end of the spindle is inserted with a spike into a bearing mounted on a beam D . The latter can be raised and lowered and thus increase and decrease the distance between the millstones. Spindle With rotates with the help of the so-called. pinion gear E ; these are two disks put on a spindle at a small distance from each other and fastened together, around the circumference, with vertical sticks. The pinion gear is rotated by the wind wheel F , which has teeth on the right side of its rim that grab the pinion gear by the sticks and thus rotate it together with the spindle. per axle Z a wing is put on, which is set in motion by the wind; or, in a water mill, a water wheel driven by water. Grain is introduced through the bucket a and a runner's point in the gap between the millstones. The bucket consists of a funnel a and trough b, suspended under the runner's point. Grinding of grain occurs in the gap between the upper surface of the bottom and the bottom of the runner. Both millstones are dressed with a casing N , which prevents the scattering of grains. As the grinding proceeds, the grains are moved by the action of centrifugal force and the pressure of newly arriving grains) from the center of the bottom to the circumference, fall from the bottom and go, along an inclined chute, into the pecking sleeve R - for screening. Sleeve E is made of woolen or silk chintz and placed in a closed box. Q The from which its underlying end is exposed. First, fine flour is sifted and falls at the back of the box; coarser is sown at the end of the sleeve; bran lingers on the sieve S , and the coarsest flour is collected in a box T .
Millstone
 The surface of the millstone is divided by deep grooves called furrows, into separate flat areas called grinding surfaces. From the furrows, expanding, smaller grooves depart, called plumage. Furrows and flat surfaces are distributed in a repeating pattern called accordion. A typical millstone has six, eight or ten of these harmonicas. The system of grooves and grooves, firstly, forms a cutting edge, and secondly, provides a gradual pouring of the finished flour from under the millstones. With constant use, millstones require timely undercutting i.e. trimming the edges of all flutes to maintain a sharp cutting edge.
Millstones are used in pairs. The lower millstone is installed permanently. The upper millstone, also known as the runner, is movable, and it is he who produces the direct grinding. The mobile millstone is driven by a cross-shaped metal "pin" mounted on the head of the main rod or drive shaft, which rotates under the influence of the main mechanism of the mill (using wind or water power). The relief pattern is repeated on each of the two millstones, thus providing the effect of "scissors" when grinding the grains.
The millstones must be equally balanced. Proper positioning of the stones is critical to ensure high quality flour grinding.
The best material for millstones is a special rock - viscous, hard and incapable of polishing sandstone, called millstone. Since stones in which all these properties are sufficiently and evenly developed are rare, good millstones are very expensive.
On the rubbing surfaces of the millstones, a notch is made, i.e., a series of deep grooves are pierced, and the gaps between these grooves are brought to a roughly rough state. The grain falls during grinding between the grooves of the upper and lower millstones and is torn and cut by the sharp cutting edges of the notch grooves into more or less large particles, which are finally ground after leaving the grooves.

The grooves of the notch also serve as the paths along which the ground grain moves from the point to the circle and leaves the millstone. Since millstones, even those of the best material, wear out, the cut must be renewed from time to time.
The mills are called pillars because their barn rests on a pillar dug into the ground and lined with a log frame. It contains beams that hold the column from vertical displacement. Of course, the barn rests not only on a pillar, but on a log frame (from the word cut, logs cut not tightly, but with gaps). On top of such a row, an even round ring is made of plates or boards. The lower frame of the mill itself rests on it.
Rows at the posts can be of different shapes and heights, but not higher than 4 meters. They can rise from the ground immediately in the form of a tetrahedral pyramid or at first vertically, and from a certain height pass into a truncated pyramid. There were, though very rarely, mills on a low frame.
The base of smocks can also be different in shape and design. For example, a pyramid may start from ground level, and the structure may not be a log frame, but a frame one. The pyramid can be based on a log quadrangle, and utility rooms, a vestibule, a miller's room, etc. can be attached to it.
The main thing in mills is their mechanisms. In smocks, the interior space is divided by ceilings into several tiers. Communication with them goes along steep attic-type stairs through hatches left in the ceilings. Parts of the mechanism can be located on all tiers. And they can be from four to five. The core of the shatrovka is a mighty vertical shaft penetrating the mill through to the "cap". It rests through a metal thrust bearing fixed in a beam that rests on a paving frame. The beam can be moved in different directions with the help of wedges. This allows you to give the shaft a strictly vertical position. The same can be done with the help of the upper beam, where the shaft pin is embedded in a metal loop.
In the lower tier, a large gear is put on the shaft with cams-teeth fixed along the outer contour of the round base of the gear. During operation, the movement of a large gear, multiplied several times, is transmitted to a small gear or pinion of another vertical, usually metal shaft. This shaft pierces the fixed lower millstone and abuts against a metal bar, on which the upper movable (rotating) millstone is suspended through the shaft. Both millstones are dressed with a wooden casing from the sides and from above. Millstones are installed on the second tier of the mill. The beam in the first tier, on which a small vertical shaft with a small gear rests, is suspended on a metal threaded pin and, with the help of a threaded washer with handles, can be slightly raised or lowered. With it, the upper millstone rises or falls. This regulates the fineness of grinding grain.
From the casing of the millstones, a deaf wooden chute was obliquely passed down with a board with a valve at the end and two metal hooks on which a bag filled with flour was hung.
Next to the block of millstones, a jib crane with metal arches-captures is installed. With it, the millstones can be removed from their places for forging.
Above the casing of the millstones, from the third tier, a grain supply hopper rigidly fixed to the ceiling descends. It has a valve with which you can shut off the grain supply. It has the shape of an inverted truncated pyramid. From below, a swinging tray is suspended from it. For springiness, it has a juniper bar and a pin lowered into the hole of the upper millstone. A metal ring is installed eccentrically in the hole. The ring can be with two or three oblique feathers. Then it is installed symmetrically. A pin with a ring is called a shell. Running along the inner surface of the ring, the pin changes position all the time and swings the obliquely suspended tray. This movement throws the grain into the millstone. From there, it enters the gap between the stones, grinds into flour, which enters the casing, from it into a closed tray and bag.
The grain is poured into a bunker cut into the floor of the third tier. Bags of grain are fed here with the help of a gate and a rope with a hook. The gate can be connected and disconnected from a pulley mounted on a vertical shaft. This is done from below with a rope and a lever. , passing through the hatch, open the shutters, which then arbitrarily slam shut.The miller turns off the gate, and the bag is on the hatch covers.The operation is repeated.
In the last tier, located in the "cap", another small gear with beveled cams-teeth is installed and fixed on a vertical shaft. It makes the vertical shaft rotate and starts the whole mechanism. But it is forced to work by a large gear on a "horizontal" shaft. The word is enclosed in quotation marks because, in fact, the shaft lies with a certain slope of the inner end down. The pin of this end is enclosed in a metal shoe of a wooden frame, the base of the cap. The raised end of the shaft, which goes out, rests calmly on a "bearing" stone, slightly rounded at the top. Metal plates are embedded on the shaft in this place, protecting the shaft from rapid abrasion.
Two mutually perpendicular beams-brackets are cut into the outer head of the shaft, to which other beams are attached with clamps and bolts - the basis of the lattice wings. The wings can receive the wind and rotate the shaft only when the canvas is spread on them, usually folded into bundles at rest, not working hours. The surface of the wings will depend on the strength and speed of the wind.
The gear of the "horizontal" shaft is equipped with teeth cut into the side of the circle. From above it is hugged by a wooden brake block, which can be released or strongly tightened with a lever. Sudden braking in strong and gusty winds will cause high temperatures as wood rubs against wood, and even smoldering. This is best avoided.
Before operation, the wings of the mill should be turned towards the wind. For this there is a lever with struts - "carrier".
Around the mill, small columns of at least 8 pieces were dug in. They were "driven" and fastened with a chain or a thick rope. With the strength of 4-5 people, even if the upper ring of the tent and parts of the frame are well lubricated with grease or something similar (previously lubricated with lard), it is very difficult, almost impossible, to turn the "cap" of the mill. "Horsepower" does not work here either. Therefore, they used a small portable gate, which was alternately put on the posts with its trapezoidal frame, which served as the basis of the entire structure.
A block of millstones with a casing with all the parts and details located above and below it was called in one word - setting. Usually, small and medium-sized windmills were made "about one set." Large windmills could be built with two stands. There were also windmills with "crushes" where linseed or hemp seeds were pressed to obtain the appropriate oil. Waste - cake - was also used in the household. "Saw" windmills did not seem to meet.
Buildings available on a personal plot or summer cottage are usually created in a strict functional style. As a rule, they do not have any specific decorative elements and look appropriate for their purpose. At the same time, the desire to somehow decorate, revitalize the territory of the site is characteristic of most owners. There are many options for solving this issue. Most often, landscape design technologies are used, with the help of which absolutely any piece of land can be decorated.
One of the options for creating an unusual appearance is building a windmill. The decision is somewhat unexpected, but invariably spectacular, requiring detailed consideration.
Device and principle of operation
A windmill is a device that converts into the work of a flour-grinding mechanism. This is the traditional purpose of the mills, which performed almost the only job - grinding grain, making flour. The blades (wings) of the mill received the wind flow on their planes and began to rotate. It was passed on to millstones that grinded grain and produced flour. The windmill device is a prototype of pumps and other mechanisms of today using flows.
At present, it is rare to find a working windmill; basically, they are kept in ethnographic reserves as exhibits. At the same time, they are quite serviceable and can do their job quite efficiently.
Decorative element or practical structure?
It is impossible to use a windmill as a full-fledged flour grinding facility. Firstly, the size of such a structure is not suitable for relatively small areas. In addition, there is currently no need for grain grinding. So windmills erected in garden plots play a decorative role. At the same time, a rotating rotor, if it is able to perform its functions, may well be used for various household needs:
- power generation;
- actuation of the water pump;
- the case of the windmill can be adapted to store various equipment.
The choice of how to use a windmill is the prerogative of the owner of the site, but the most common purpose of such structures is to decorate the site, bringing folklore motifs into the design style. This moment cannot be considered secondary or unimportant, since the appearance also needs a competent and creative approach, as well as practical application.
What might be needed?
In this case, the key point is the independent manufacture of the structure. In addition to certain practical goals that are pursued when creating a windmill, a creative approach is important, the ability to make efforts to independently design the site.
You can use such a structure in different ways, for example, using a windmill, you can decorate a water well. Often, such structures cover the exit to the surface of sewers. The use of a windmill for its intended purpose is not excluded - in order to set in motion mechanisms or generate electric current, for example, to illuminate a site.
Important! Decorating the territory is an important factor in itself, but if there is a possibility of practical use of a windmill for household needs, its value increases many times over.
Another possible use of such an element is a place for children's games. Children enjoy playing in various houses, and if it is stylized as a windmill, it becomes even more interesting.
Site selection for installation
The choice of location is influenced, first of all, by the owner's intention, the purpose of the structure. If a purely decorative use is planned, then the mill is placed on the basis of picturesqueness, external effect, that is, in an open area that provides a good overview of the structure. If the device is functional, then the choice will be affected by the level of the site, the absence of large buildings nearby that can close the blades from wind currents.
In addition, it is necessary to take into account the location of utilities, buildings or structures that may be interfered with by the rotating wings of the mill. If they are opposite the window, the constant flickering in the eyes will create a significant inconvenience for the people in the room.
It should also be borne in mind that the structure will need to have a normal approach, especially if it is planned to make it an element of a children's playground. Taking into account all these considerations, the choice of the optimal place for the construction of the mill is made.
Step-by-step instruction
Creating a windmill occurs according to the usual scheme used in the construction of any structures:
- creating a project (working drawing)
- purchase of materials, selection of tools
- site preparation
- housing and rotor assembly
- installation of mechanical elements (if planned)
- start, debug operating modes
Some of the steps in this checklist may be redundant, sometimes, on the contrary, additional steps may be necessary. The final plan of action can only be drawn up by considering the specific design, its operating conditions, dimensions and other parameters.
Important! In no case should you neglect the creation of the project. Often it is at this stage that significant errors or additional factors are discovered that radically change the approach to the work performed. Random production can lead to a waste of time and materials.
Necessary materials and tools
For creating a decorative windmill It is best to use traditional materials:
- beam,
- boards,
- turned logs,
- nails,
- self-tapping screws.
In addition, depending on the size and purpose of the mill, materials may be needed to create the foundation:
- cement,
- sand,
- reinforcing bar.
It is equally important to have the necessary tools:
- electric saw,
- electric plane,
- hand hacksaw,
- chisel, chisel,
- pliers,
- a hammer,
- electric drill with a set of drills,
- ruler, tape measure.
Depending on the design of the structure, other tools or devices may be involved, if necessary.
Foundation
The first steps that will need to be completed at the initial stage are the preparation of the site for construction. If the structure is planned to be large enough, for example, it is necessary to decorate a storage for tools, inventory, engineering devices under a mill, then a foundation will be required.
The easiest way to fill the foundation is to create a tape type foundation. To do this, a ditch is dug along the perimeter of the future walls, inside which formwork is installed, a reinforcing cage is knitted and concrete is poured. The foundation is maintained for the right time for sufficient crystallization of concrete, after which further work can be carried out.
Note: for small decorative structures, a foundation is not required; it is enough to raise them slightly above ground level to exclude contact with groundwater.
After the foundation is completed, they begin to create the windmill housing.
Choose the type of walls and roof
The construction of the walls and roof of the mill is carried out in strict accordance with the working drawings made in advance at the very beginning. There are different options:
- construction of walls from turned logs. It is performed when creating a large mill designed to perform certain economic functions.
- erection of walls from timber. This method is somewhat simpler, since fitting a beam is much easier than logs. The size of the mill is also quite large.
- creation of a frame with subsequent sheathing with boards. This construction is suitable for a smaller mill.
The options considered involve the construction of a structure directly on site. There may be options when the entire structure is assembled in one place, for example, in a garage or in a workshop, and installed ready-made in a designated place. This approach can be used to create small decorative windmills that can be moved within the site.
The construction of the walls is completed with the beginning of the creation of the roof. Traditionally, a two- or four-slope structure is made. As a roofing material, any of the old, traditional roofing is used - tiles, shingles, etc.
Wood is a material that is unstable to atmospheric moisture and rain. The finished structure must be protected from water by applying a layer of varnish or drying oil. The best option would be pre-impregnation with an antiseptic and fire retardant to protect the walls from insects or fire.
Features of the construction of a functional mill
If the windmill will perform useful work, then it is arranged in a rather complicated way. The design consists of a rotating rotor that transmits movement to the generator, from which the resulting voltage is transmitted to the battery and inverter. This is the most difficult, there may be easier options. But all of them are united by one feature: the rotor shaft is connected to a certain mechanism.
This circumstance forces us to approach the construction from the other side:
- first, the working mechanism is mounted;
- walls or a protective box are built around it with the possibility of access to equipment for repair or maintenance.
In such situations, construction is carried out so that the walls and roof of the mill do not interfere with the rotation of the wings or block access to the mechanics. The rest of the work is carried out in a similar way using the same materials and tools.
Wind turbine installation
The installation of a windmill is necessary in cases where it was made in a workshop. Typically, such structures are small and quite accessible for transportation within the site. This option is good for repairs, upgrades or maintenance. The ability to perform work in a normal workshop, and not in the open, provides many advantages and ensures a high quality of repair or maintenance.
Installation of a mill is made on the dry prepared platform. If necessary, the device is attached to it with anchors. If the structure is horizontal and does not have the ability to be installed into the wind, then care should be taken in advance to choose a location that allows you to use the prevailing direction of flow for a given region.


