Beautiful symmetrical hallway design
Options for decorating a room today are so diverse that they can only delight and surprise. One of the non-standard solutions is a light panel on the wall. This is an original bright accessory for decor that will not leave anyone indifferent.
- Lighting elements
- Variants of products in the interior
- Placement of the light panel
- Conclusion
- The originality of the decor, which is not used so often.
- Reliability, energy efficiency through the use of LED elements.
- Aesthetics of the room.
- Ease of maintenance. 14


- Affordable price.
- Large selection of images.
- Lamps give a diffused glow, which helps to illuminate all the elements of the picture evenly, without bright spots or dark places.
- Ribbons better to use as additional lighting. If in the product it is used as the main one, then its placement should be without gaps. That is, the tape is placed densely over the entire surface. It should be understood that in this case the light may be too bright, so it is better to choose an image of muted tones. Ribbons can be of different colors, which creates an additional decorative effect.
- Lamp with matrix. There are many of these on the market, so there will be no problem of choice. They are also economical and practical, like the previous options.
- They can have a landscape or an abstract image, interweaving of geometric shapes and other very different effects. The choice of one or another option depends on the decor of the room and the design style.
- Images with motifs of ancient heroes, ancient architecture, photo prints, famous paintings are often used. 15


- The image of the steps leading to the garden looks original. With the right placement of lighting elements, you can create a three-dimensional effect.
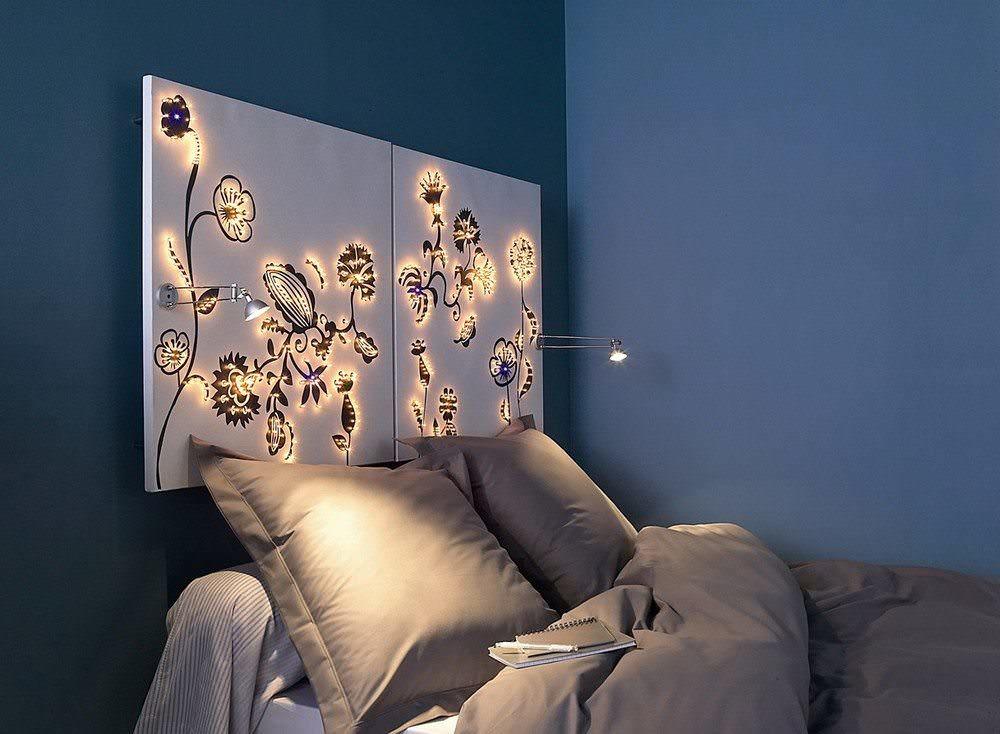
- A light panel in bright colors with an abstract image will be an excellent night lamp and a source of subdued light. This is especially true for the bedroom.
- Such products can be programmed to turn on, flickering gives a calming and relaxing effect.
- The shape can be different - square, rectangle, circle, oval, polygon. There are solid models and arranged from individual elements.
- For the kitchen, it is better to choose thematic images - fruits, vegetables, dishes, ready meals.
- Google+
- gmail

Backlit onyx looks very impressive
What is a light wall panel?
A light panel is an image illuminated over the entire surface or in its individual parts. The picture is applied to glass or other material that can withstand heat without losing its properties.

Fusion style bedroom interior

Wooden terrace with a fountain and a luminous panel
Important! In some cases, there is no image as such, but there is highlighting by light. In this case, an LED strip is used, which is able to make local accents and easily takes on the necessary shape.
Light panels can be of a more complex design, in which case separate panels with LEDs attached to them are installed. Such an option may look like a full-fledged wall lamp - the brightness is quite enough for this.
14


Another variety is stained glass panels. They have an attractive look and create a very bright effect in the literal sense. Strengthening visual perception will be achieved if, in addition to the main light, several lamps are added inside along its perimeter. Multi-colored highlights will be an excellent decor for even the simplest walls.
Applications and benefits
Very often, light panels can be seen in the decoration of public places. This refers to cafes, restaurants, exhibitions. Advertising signs are often designed in this way.
Abstract panel with LED backlight
This element of the interior looks great and attracts attention. At the same time, it visually expands the space.
The main advantages of using in the interior:
Lighting elements
In light panels, different options for lighting elements can be used. The effect depends on which ones are used. Options:

Finishing the fireplace with decorative panels with lighting

A small sofa in the hygienic room

You can make a backlit panel with your own hands or purchase a ready-made one.
Important! When choosing, you should pay attention to ease of use and price. In addition, the lighting option should match the chosen decor.
Variants of products in the interior
Depending on the location, light panels can have a different look and create different visual effects.
Placement of the light panel
The location of such a decorative element is not an easy task, but many can cope with it. You need to select one or another option based on the functional purpose of the room, its size, and the chosen style.
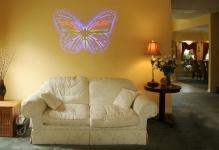
Hallway
Such an element can be placed in any hallway, it is only important to observe the proportions. When it comes to an apartment, then basically this room is small in size, which means that the decor should be like that. If you use a large element, then it is able to expand the space, especially if you can find a three-dimensional image that goes into the distance.

Large round mirror with a shelf in the interior of the hallway

Relaxation area on the terrace
For the kitchen, you should choose a decor that will be convenient to wash, and in this regard, a light panel is what you need. The most correct place is above the dining area. In addition to the decorative function, the panel will also perform the task of lighting.
Advice! If space allows, a kitchen apron is allowed in place. This option is original and practical.

Minimalist kitchen interior
Living room
This room is one of the largest, so there is where to roam in terms of decoration. As for placement, it is best to place the panel on the largest wall, above the sofa, near the window.
Advice!If the finish is neutral base colors, then it is allowed to use bright, colorful backlit panels. If the colors are already active, then it is worth placing neutral in light colors. The decor can be placed in a niche, so it can be hidden and decorated at the same time.

Living room combined with dining room

Case wall with decorative design
Advice! Modular models look beautiful, which are made up of 2-4 elements with separate lighting for each.
Conclusion
Light panels are increasingly used in the interiors of apartments and private houses. The effect of them is unique, because the decor in combination with light transforms the room in the most wonderful way.


If you need a modern design solution in the stylistic design of any room, but are no longer interested in ordinary wall paintings, panels and other ordinary elements for decoration? Or do you want to make an original gift to your loved one and at the same time put a piece of your soul into it? I think you will need the ability to make an interior accessory with your own hands, which we will do in today's homemade, or to be more precise: a three-dimensional LED panel.
Of course, there are similar panels on sale, but it will cost you a tidy sum, although this is far from the main factor: this homemade panel will show a heart-shaped panel, and you can, using your imagination, display absolutely any picture. Despite its visual effect, the accessory is not difficult to manufacture and does not require large material investments.
To bring this "masterpiece" to life, we will need the following materials and tools:
Furniture stapler and staples;

- hot glue gun;

- hot glue sticks;

- LED strip;

- LEDs;

- resistors;
- picture frame (deep);

- mirror;
- heart (papier-mâché);

- foil;

- film (mirror);

- Styrofoam;

- adhesive tape (double-sided);

- window cleaner
- rags;
- wires.
In the beginning, we will disassemble the frame we have and take out the base from the cardboard with a paper sheet.
Here is a purchased picture frame (standard 50 * 50), the frame can also be made by hand (any size), I think with a little skill it will not be difficult.

Glass is installed in the frame, it must be carefully wiped using a detergent, and then stick a mirror film (on the inside). Pasting should be done on a damp surface, trying not to leave air bubbles.

Using a hot glue gun, along the contour of the heart (as shown in the photo), we fix the LEDs. Further: using wires and resistors, we solder them into a common circuit.

Two small pieces of foam must be glued so that they extend beyond the edge of the heart, in which case the heart fixed in the inside of the panel will have a floating effect. After fixing the foam on top, it is necessary to glue double tape on it, for convenient location of the heart in the panel and to avoid unnecessary strokes of hot melt adhesive on the mirror coating.

Using foil, we will wrap the heart, but the installed LEDs should look out and place it in the center of the mirror.

Along the perimeter of the picture frame (from the inside), using a furniture stapler, we attach the LED strip. We work with a stapler carefully, in no case should the tape be damaged. Solder wires for power.
A well-chosen light panel is a relatively inexpensive, but at the same time a creative way to transform a space. They are produced in various modifications, differing in color, size and set of functions. Before buying, it is better to familiarize yourself with the list of those. In this case, the composition will successfully fit into the interior without damaging the family budget.
Wall compositions with the inclusion of lighting elements perform several functions. First, they form a visual accent. If you place the porthole above the bed or on the wall, you can focus on a specific point. Secondly, of course, they light up the room. Due to the fact that the panel has touch control, you can easily adjust the parameters of its operation.

The following recommendations will help you choose decorative compositions with benefits for aesthetics and damage to your wallet:
- The Crystal glass cover must not show signs of damage.
- It is possible to replace an individual element without violating the integrity of the entire composition.
- The power system is equipped with a fuse.
- Luminaires must be connected in parallel, not in series. In this case, the failure of one will not disrupt the operation of the entire system.
Overview of light panels: New Year's decor
The fashion for a variety of New Year's luminous compositions came to the countries of Eastern Europe a decade and a half ago. Yes, it used to be customary to decorate shop windows for one of the biggest holidays of the year, but this could not be fully attributed to the panel.
Today, large buildings and small apartments can be transformed before the new year. Trading networks help to do this, offering options for every taste and wallet size. Going shopping, you need to think in advance what you want to see in the interior.

Depending on the responses received, you must select one of the following options:
- Decorated with LEDs Christmas wreath - you can place it on the wall or hang it on the window;
- Figured Christmas tree with illumination - thanks to a wide range of colors, electric decorative structures fit into any interior;
- Decorated glowing ball - due to its relatively small size, it can be used as a stylish visual accent.
Various types of touch screens
In order to make a light panel at home, you must first choose a creative concept. A universal option is considered to be made of onyx. It can be installed in any room, regardless of its functional purpose. Thanks to the many shades, the luminous elements will form the desired pattern.
Depending on the chosen stylistic direction, you can create dynamic or static compositions at home. In second place in terms of frequency of occurrence is a panel of duralight.

To make it with your own hands, a sketch is required, on the basis of which a pattern is formed. The material must be selected durable, because a base is attached on top of it - duralight.
After that, you need to bend everything within the framework of the prepared sketch. At the final stage, the connection to the electrical network takes place. Do not forget that massive wall compositions require an appropriate frame.
In addition to the above, there are several other options:
- Made on the basis of Himalayan salt - has a limited area of \u200b\u200bapplication. You can meet him in the sauna or bath. A significant disadvantage of the project is its high cost. The slabs alone will make the estimate for many literally astronomical. To make a composition, you need to create a pattern or image using salt plates. Fasten the finished product to the wall using a 2-component adhesive made on the basis of magnesite.
- Multicolor stained glass - designed for spacious rooms, where the play of light and shadow forms unique pictures. Installed on the wall, located on the side of the window. If we are talking about a hall in a store or a building where a large crowd of people is foreseen, then it is better to install panels from the side of the streets. The choice is made in favor of the sunny side.
- A budget option in all respects will be a panel made of LED strip. In addition, you can use the usual Christmas tree garland.
We create a touch panel with our own hands
Experience shows that it is not always possible to find a suitable option in the trading network. That is why many decide to make an LED panel on their own. Beginners are advised to choose a simpler option. First you need to make a small sketch on a piece of paper. What is planned to be installed? Is there a thematic reason? Where will the composition be set?

Accurate answers to these questions will avoid many problems in the future. After that, you need to find the basis. In her role will be a hoop or an option purchased in a specialized store.
The further course of action is as follows:
- Tie the found base with twine or fabric that is resistant to prolonged thermal exposure;
- In the apartment you can always find unnecessary things that will act as decorative parts;
- Apply with a glue gun to the prepared form vertical and horizontal decorative parts;
- As soon as all parts are fixed, it is necessary to hang the composition with lighting;
- This is done carefully so as not to damage the smallest details of the composition.
Original light panel (video)
A creative backlit panel will decorate the interior of a private house and a city apartment. It is easy to choose it in a theme store or make it yourself. If the second option is chosen, then you should start by making a sketch. The more precisely it is made, the easier it is to choose the required amount of materials. In the manufacturing process, do not be afraid of minor experiments. The main thing is not to overload such a finished product with decorative elements.
Examples of light panels (photo in the interior)


If you have ever seen a light panel for the streets, you probably thought that such a thing could decorate your interior. Luminous elements, multi-color image, vertical and horizontal, on windows and on the wall ... There are countless variations, and there are also many materials of execution.
You can make this panel the main accent of the room. It can decorate the center wall of the living room, or frame the area that you consider to be the main one in the room. A decorative panel should be in the style of the interior - a pretentious, inappropriate element, no matter how bright it is in itself, will spoil the overall impression.

Porthole panels are in particular demand, creating the effect of an additional window in a house with various marvelous views of cosmic landscapes or the beauties of the seabed.
Crystal light panels are stylish light panels that decorate the interiors of restaurants, shops, clubs, which can also find a place in a modern sophisticated interior.
Assembling a light panel on the wall (video)
Light panel on the window: a stylish decoration
A light stained glass panel is an exquisite decor that looks great on small windows, on windows, doors and windows, which are rather decorative.

Technologies for creating stained glass light panels:
- sintering;
- Painted stained-glass windows;
- Soldering technology.
Sintering has another name - fusing. This technique of creating stained-glass windows has been actively used for only a couple of decades. Its essence is that glass fragments are sintered in a furnace at a temperature of 800 degrees, while the edges of the fragments melt. Products in this technology are durable, multilayer, moisture-permeable, embossed.
Light panel on the wall in the apartment
A wall light panel is a thin structure made of fabric or plastic, behind which or on the side of which there is a backlight.

At the same time, masters in panel design can use both realistic images and fantastic, bright paintings, which, when the light is turned off in the room, create a very special, magical atmosphere. From a simple starry sky to views of landscapes of distant planets.
Light wall panel in the interior (video)
Do-it-yourself panel with backlight
Unusual panels can be built with your own hands. How to do it?
Take on board a few ideas:
- Himalayan salt panel. Such a panel is often used in a bath or sauna. The slabs themselves are made of salt, their installation is expensive, so usually people are content with decorating the walls of the panel. Your task is to lay out some pattern or pattern with salt plates, and they are usually attached to the wall with a two-component adhesive based on caustic magnesite.
- Onyx panel. Such a panel can be installed in any room. Onyx has many shades, and its natural pattern conveys the movement of waves, drops, various roundness. Onyx can create the appearance of movement, brightness and variety of patterns.
- Duralight panel. First you need to make a sketch, then create a pattern on which the duralight will be attached. Then the figure gently bends, and completes the connection process. For a complex and large figure, a frame is needed.
Many craftswomen take Christmas tree garlands as a light element, which become the basis for creating a light panel.
LED panel: we decorate the interior ourselves
To make such a panel with your own hands, you can use a regular LED garland. Thus, you can make a New Year's ball or a New Year's wreath.
Panel in the form of a New Year's wreath:
- Tie a round hoop or blank made of thick cardboard, similar to a hoop, with Christmas tinsel to match the color of snow-covered fir branches;
- Christmas decorations (both rare glass decoration and modern decor), cones, apples, twigs of berries, nuts, etc. can be used as decor;
- To top it off, such a wreath is wrapped with an LED garland.


As a New Year's decor, such a wreath looks great, and to make it is an hour of work, no more. And such beauty will delight for many years!
New Year's light panels
If we talk about the New Year theme, you can make a panel with the inscription "Happy New Year!" or in the form of some kind of New Year's figure, for example, a Christmas tree, a snowman. There should always be some kind of base that you decorate with a garland.

For example, cut out a snowman figure from thick cardboard. You can decorate it with, for example, cotton balls or sea salt on PVA glue to make it textured. Along the contour, the snowman will be framed by a garland. Any method of fixing to the wall - from a simple rear suspension to elementary buttons.
Light panel “Snowflake” (video)
Christmas electric panels
New Year's electric panels are compositions on a New Year's theme, equipped with an electric glow system.
The most popular types of such panels on the wall:
- Snowflakes. Simple or patterned, light, multi-colored or made in the same color scheme.
- Herringbone. It can also be simple, the backlight goes only along the contour, or a complex panel, with overflows, touch.
- New Year's deer. Recently, it is the figurines of snow-white or red New Year's deer that have become in great demand.

You can compose a whole composition on the New Year theme from several fragments.
Decorative panel lamps
Such lamps usually decorate the interior of a hallway or a room where lighting of a certain area is required. And everything is done simply, you get a diode tape, stick it on and install an adapter. You fix the panel above the door. And the role of the panel itself can be played by a structure with holes - metal or from another dense material. So that light can see through the holes.
At the same time, this design shines very brightly, soft light floods the entire room. On the mezzanines you can find old Soviet-style panels, which will be fixed to the LED strip.
Do-it-yourself panel-lamp for the interior (video)
Light panels are always a bit of magic in the interior. This is a cheap way to transform your home, and not just for the holidays. You can buy a ready-made panel, you can build it yourself, and please yourself, household members, guests with one more hearth light.
Light panel in the interior (photo)


In the age of high technology, more and more people prefer cutting-edge designs using glass, plastic and metal. The matter concerns not only decoration or furniture, decorative elements can also be made of these materials, but they are often very expensive.
In this article, we will tell you how to make an original glass panel on the wall of the kitchen or any other room in your house with your own hands, and you will see that there is nothing complicated or intricate in their manufacture.

It is believed that glass is a very fragile material, from which only windows and dishes are made. In fact, this is far from the case, and glass wall panels turn out to be very durable, and, importantly, safe.
There are a lot of manufacturing options, but we will tell you about the three easiest ways that you will surely succeed, even if you have never done such work before. So, let's look at each method in more detail.
Method one: oracal film

Oracal is a self-adhesive film with high adhesion to any materials. By the way, aprons for the kitchen are made in this way.
First of all, you choose a drawing or photo. There are many options in hobby shops, and if you don’t like anything from their range, then you can print a custom image on the oracal. The price of such a panel, of course, will be higher, but you will get a truly original image.
You can order printing on oracal in any printing house or studio engaged in large-format photo printing. Their designers will independently stretch your image to the required size and transfer it to film.


Sticking an oracal on glass is not difficult, but you need to know a few secrets that will help you do the job as efficiently as possible:
- Do not remove the entire protective film at once. This must be done gradually. First, release one edge, glue it, and gradually remove the film, smooth the pattern with a soft cloth or a special felt squeegee.
- Carefully expel all air bubbles at the gluing stage, since it will be much more difficult to remove them later. If you see that a bubble has appeared, slightly peel off the film and expel it, then return the canvas to its place.
- If it was not possible to get rid of all the bubbles, just pierce them with a needle, and smooth this place with a squeegee. There will be no trace of unevenness.
- Do not use glass thinner than 4 mm. It will be too fragile and easily damaged, especially if you decide to make your own kitchen apron.
Important! In order for the film to lie evenly, apply a little water to the glass before gluing. After gluing, it will dry and leave no traces, but it will greatly simplify the process of applying the film.
That's all, our glass photo panel on the wall is ready. As you can see, there is nothing complicated here, although before getting down to business, it is better to practice a little on small pieces.
Although, if you have glued a protective film on the screen of your smartphone at least once, then you will definitely not have problems with making such a panel.
Method two: triplex panels

Triplex is a three-layer glass that is used for the manufacture of car windows. Its main advantages are strength and safety. When such glass is broken, it does not shatter into fragments, but is only covered with a network of small cracks.
This is achieved due to the fact that a special film is placed between the two glasses, after which the whole structure is baked in a special oven at a high temperature. As a result, all layers are sintered and the same triplex is obtained.
Of course, it is unrealistic to make it at home, but we are not talking about a full-fledged triplex, but about imitation. The only thing we have in common is the number of layers.


The bottom line is to place a drawing or photograph of your choice between two glasses. The manufacturing technology is extremely simple: we clean the glasses from dirt, place the selected picture between them and glue the edges with a special colorless glue. Everything, the photo panel on the glass wall is ready.
Another interesting solution for home creativity is modular triplex paintings. The technology is the same, only the image is applied not to one glass, but to several segments of different sizes.
The result is a solid drawing, consisting of several parts. By the way, later such panels can be illuminated with an LED strip, which is placed under the picture. Such a work looks very stylish and interesting, and besides, it can serve as a night lamp or an additional source of light in the house.
Important! After you cut the glass, be sure to carefully process their edges to avoid cuts. This is done using a special tool, which can be purchased at any hobby store.
Method three: stained glass window imitation

A real stained-glass window is a complex structure, consisting of many multi-colored glasses of different sizes, glued together. In the old days, they were made not on a whim, but because there was no technology that could blow glass in large sizes.
Artists have been collecting one stained-glass window for several years, but we are not ready to spend so much time on it, and modern technologies make it possible to produce such a reliable imitation that it is possible to distinguish it from the original only upon closer examination. Everything you need to make a stained glass window can also be purchased at a hobby store.
For the manufacture we need:
- glass itself. Again, it is better to take a thickness of at least 4 millimeters, so that the product is durable and safe.
- colorless glue to draw boundaries between the multi-colored parts of our stained-glass window. By the way, you can also pick up gold or silver glue, then the stained-glass window will look even more original.
- Stained glass paints in different colors. The choice depends entirely on your wishes and the picture you want to transfer.
- Stencil. You can buy it ready-made or make your own.
- Special pencil for drawing on glass.


First of all, the glass must be thoroughly cleaned, after which the image is transferred to its surface through a stencil. We remove the stencil, and the next step is to draw the borders with special glue for stained glass work. The principle of its action is that it creates almost imperceptible sides that prevent the paint from spreading and filling neighboring areas.
After that, the glue must be allowed to dry completely. The instructions on the package will tell you how long it will take. Now, you can fill the limited areas with stained glass paints. That's all, the stained glass panel on the wall is ready, and if desired, you can also install a backlight under it.
In the process of making a stained glass window, you may encounter some difficulties that we have not mentioned, therefore, before starting work, we strongly recommend that you watch the video in this article, which shows a master class in creating stained glass windows.
Mounting panels on the wall

In fact, making panels on glass walls is much easier than hanging them, so we could not ignore this issue.
First of all, you need to remember that glass paintings are heavy, so you need to hang them very carefully and carefully. The second nuance is that the glass does not tolerate curvature, so the surface of the wall must be perfectly smooth and even.
There are two ways to fix glass to the wall:
- with special glue. It is applied to the surface in thin strips, after which the panel must be pressed against the wall for several minutes. The disadvantage of this method is that under such a picture it is impossible to place a backlight, so the tape will have to be glued around the perimeter, or even refuse to use it.
- On the dowel. This method is not suitable for plasterboard structures, as the dowels simply will not hold in them. But, with the help of dowels, the panel can be hung at some distance from the wall, which will allow you to place an LED strip under the picture.
Whatever method you choose, the main thing is that the panel is held firmly, since, despite the fact that the glass material is quite durable, it will almost certainly break when dropped from a height. Unfortunately, within the framework of one article it is impossible to describe all the glass panels on the wall, but even those options that we have told you about will allow you to maximize your imagination and decorate your home with a truly original and stylish piece of decor.


