Each owner of a summer cottage tries to equip the landscape in such a way that it pleases the eye. When constructing a well, it is necessary to remember the rules for designing garden structures. It must fit into the overall picture of the site. Finishing a well requires creativity. For the external design of the well, brick, wood, stone can be used. You can entrust this work to professionals, or you can do everything yourself. Finishing wells in the country is usually done according to the design of the site. The subtleties of the process should be considered in more detail.
material requirements
When decorating the outer part of the well, any material can be used. The main requirement is to give the design a beautiful look. The lining material must also perform another function of protecting the well from negative influences.
There are several features of using different materials:
- Brick is often used to decorate wells, as well as traditional wood or stone. Often, when decorating such structures, flowers are chosen.
- If wood is used for finishing, it is better to choose harder varieties. The cladding must withstand the effects of bad weather and temperature changes for a long time.
- The selected material must be wear resistant.
- The decorative component is no less important when lining the well. The finishing material is usually painted or plastered.
- One condition can be attributed to the main requirement - the base must have high moisture resistance.

To select the optimal material, you should understand the features of each product. Beautiful photos of decorated wells will help you choose a specific material. A lot of unusual and attractive photos of wells in the country and their finishes are presented in the article.
Finishes
Finishing the well with your own hands can be done using a variety of materials. They differ in properties and installation features. Each of them deserves more detailed consideration. It is worth familiarizing yourself with different materials in more detail.
Brick
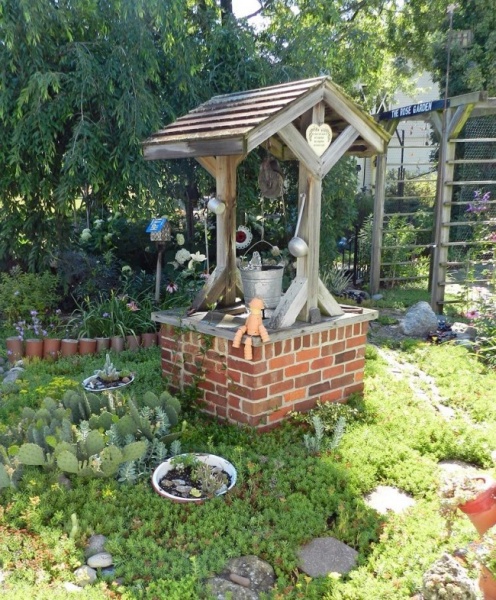
Quite often, a time-tested material - brick - is chosen for the decorative decoration of wells. Any of its varieties can be used for this purpose. The red material looks great. Such a cladding can give the well house a special originality, an unusual and attractive look. With such a cladding, a well becomes a striking design element of the site.

Silicate or ceramic bricks are perfect for decorating a house. The latter has a number of advantages:
- distinctive strength;
- density of the material structure;
- variety of colors;
- durability of operation in various conditions;
- aesthetic appearance;
- resistance to shock and mechanical pressure.
However, this material has a serious drawback - it absorbs moisture. In order for the lining of the ceramic brick well to last longer, the surface should be treated with a special composition. Usually, hydrophobic varnish is used for such purposes. If processing is not performed, the brick will collapse over time. The brick cladding process is quite simple, but for a better understanding, you should read some instructions:
- There are several features of wells that are made of brickwork. Do not take products with voids. A full-bodied brick is better for making a head. It can be laid on edge or flat.
- The masonry of facing bricks is constructed round. This allows you to significantly save on material.
- The masonry walls are 25 cm thick.
- To make the surface more durable and resistant to various influences, it should be plastered.
- The cladding should be ironed out, which will increase the life of the cladding. For this task, cement powder is rubbed into the plaster, which has not yet dried.

When using bricks, it is important to remember these rules.
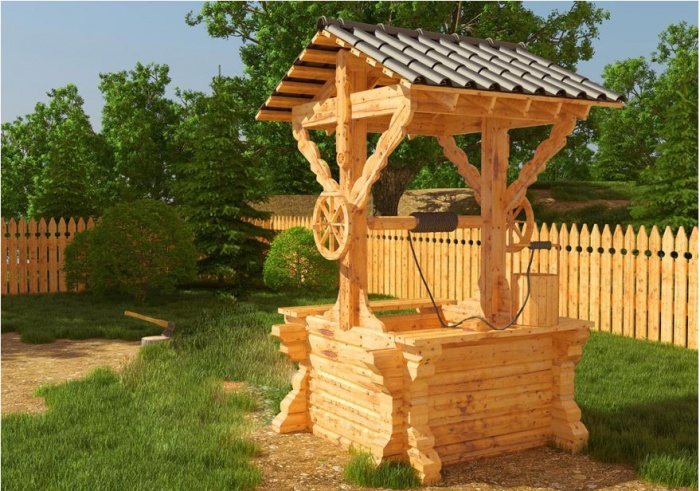
Wood
Wood is a traditional material used for cladding many structures. Shaft finishing is one of its most common uses. With the help of this material, an interesting decorative finish is created. Since ancient times, wood has been chosen as the material for the head. The application of carvings to wooden elements made it possible to give such structures a special appeal.
Finishing, which is made of wood, has several features:
- Wood cladding is very easy to do on your own. This is due to the ease of working with the material.
- If a wooden structure is being built with your own hands, it should be remembered that such material is susceptible to moisture. For this reason, wooden elements should be dried well before finishing. After that, the facing material is treated with a special composition. It usually contains antibacterial components.
- Some wells made of wood are lined with clapboard or siding. However, this work will take a lot of time and will be quite laborious.
Many builders advise building a full-fledged roof over well houses that will protect them. In addition, such an element can give the design a unique look.

Stone
When choosing a natural product, a beautiful and stylish structure is obtained. One of the main positive qualities of such products is their high wear resistance.
There are several subtleties of finishing wells using stone:
- In the process of work, not only small pebbles, but also medium-sized cobblestones can be used.
- If you carefully select the stones by color and shape, you can get a pretty beautiful view of the well. Fastening is best done with a special glue.
- If the stones that are selected for finishing the well shaft have different color shades, an original drawing is made from them.
- A path of stones is often laid out to the well. This will make the landscape of the suburban area more noble.
- A roof should be made over the mine. It is installed on supports installed in the sides.

To determine the intricacies of arranging a well using stone, you should see a photo of finished structures.
Flowers
In addition to finishing with various materials, the well can be decorated with flowers. If the mine is buried in bright plants, the well looks especially attractive. This decoration is easy to create with your own hands.
There are several subtleties that should be considered when planting flowers around the well:
- Flowers decorate the territory close to the well, the foot of the mine and the roof.
- Colorful flowers can be placed in a planter. To create an attractive appearance of the well, various pots with lush flowers should be placed at its base.
- On the sides of the house, it is better to make several ledges in order to install flower pots on them.
- You should use those varieties of flowers that bloom in turn.
- Weaving plants can be planted. Over time, they will braid the well house and create an attractive design.

When facing wells with flowers, wood, cement and stone are used. Quite often, soil and pebbles are used.
Surface painting
After finishing the well, the well is plastered and painted. This stage becomes the final one when creating a beautiful well design. Plaster is very often used when facing brickwork. The space between the middle and lower frames of the shaft is subjected to plastering.

Features of plaster:
- For plaster, a mixture of cement is prepared. It should have a consistency close to sour cream.
- The solution is applied only once. It should be applied from top to bottom. It is necessary to level the plaster with a trowel, and smooth it with a trowel. To get the most even and smooth surface, wooden beacons should be installed on the sides. They are usually created from slats 5-6 cm thick.
- As soon as the first strip is plastered, the beacons should be rearranged, and then the second strip should be filled with mortar again.
- When constructing a shaft from wood, plastering is not performed. If necessary, a metal mesh is installed on the surface. It will help hold the solution.
- After that, the lowering of the structure is performed. In this case, be sure to follow the process.
- At the end of the work, the bottom should be cleaned of dirt. Then the sand and gravel mixture is poured.

In addition to plaster, paint is often used. She is treated with the front of the well. Painting is done for wooden houses. In addition, the tree is often varnished for reliable protection from external influences. Additionally, different colors are used to create a specific pattern. Shafts with several parts painted in different colors look very attractive.
Which method is more suitable for creating a well lining? Everyone answers this question based on their preferences and capabilities. Someone loves antique wells. In this case, wooden elements should be chosen for cladding. To create a more durable structure, you will need brick or stone.
If the decision on finishing the well has not yet been made, you should decide on design preferences. There are several attractive ideas worth looking at. Each of them has certain features that must be considered.

Chalet-style well
When creating a country house in the style of a chalet, it is better to choose this style when designing a well. Such structures are usually erected in Switzerland. The decoration is usually made of stone. It is better to pave the path to the well. Before starting work, you should view several photos of such structures.
Country style
The appearance of a classic Russian well is familiar to everyone. It is made from logs. The main details include the rotator. It is worth familiarizing yourself with several characteristics of rustic-style wells:
- The log house has a log structure. It should have four corners and linking corners.
- To give the structure an original look, sometimes it is cut into five or more corners. To build such a head, you will need to use a rounded log. Such material allows you to build the most accurate structure.
- A log house is often arranged around the ring. Expanded clay is used to fill free space.

To create a real rustic style, the design should be supplemented with various ethnic elements:
- threaded columns;
- rustic water tub;
- openwork cornice;
- straw roofing.
Such elements allow you to build an original well, which will decorate the site.

East style
When choosing an oriental style, they usually rely on the appearance of the house. If the design of various structures on the site is the same, you can use just this method of finishing. Such a structure should be covered with a canopy. The eastern well is decorated with various figurines and amulets.
Do-it-yourself well in the country- an important component of the normal life of the owners. Many, of course, have running water, but still not everyone has it, and the quality of the water often leaves much to be desired. In addition, water pipes connected to summer cottages do not supply water regularly, and sometimes the time without water can drag on for several weeks. But in the summer cottage grow plants and trees that need to be constantly watered, especially in warm weather. Therefore, no matter how it is better to equip an alternative source on your site, thanks to which you will not even think about water at all. Now you will have it always and on a regular basis.
As such an alternative source of water is quite suitable well in the country (photo). Water is everywhere, the main thing is to find out the depth of their occurrence, the choice of a well, the depth of the well and other not unimportant factors will depend on this.
The well will not only provide you with a constant source of water, but will also supply you and your family with clean drinking water all year round. In addition, the well will perfectly complement and. Its design is not always a concrete block, which will not attract with its appearance. Today's technologies make it possible to turn an ordinary well into a real work of art.
As an example, you can arrange a well made of wood, which will perfectly echo with. Wood is a natural and environmentally friendly material; when properly processed, it always looks elegant, expensive and attractive. And the summer cottage, decorated using a variety of wooden structures, will receive even greater elegance and beauty.

To make the well look even more attractive, you can arrange a beautiful one next to it. Just imagine how beautiful it will look in the complex. In general, the design of the site should be given credit. After all, it is here that you will spend all your free time, and you will need such a summer cottage so that you can completely relax from the bustle of the city, retire and enjoy the beauty of nature and clean air.
- it is not an easy task, here you need to think through a lot of nuances so as not to spoil the overall picture. And in order for the site to always be in excellent condition, to please you with its green, and bring long-awaited fruits, it needs to be watered and looked after, respectively, you definitely cannot do without a beautiful and high-quality personal well.

As we said earlier, even if there is access to running water, you should not refuse an additional source of water. So where do you start garden well decoration? First you need to determine the place where it would be best to equip the well. There are two ways to solve this problem: well and dowsing. Both methods are good and effective. Therefore, you need to choose only the one that suits you the most according to any criteria.

So, let's start with dowsing. For this method, we need wire frames, which are made of brass. It is quite possible to make them yourself. We take a wire with a diameter of 2-3 mm, half a meter long and bend it at an angle of 90 degrees. You need to bend it in the place so that the length of the handle is equal to ten centimeters. We need two such curved wires. We take a frame in each hand so that we can spin freely. In this position, we need to bypass our site. In the place where they twist and intersect, it will be seen that the water is located near the surface. It is in this one of these places that you need to spend design of a well in the country photo.
The option with a well will be much more expensive. They are arranged in those places where aquifers may lie. Alternatively, ask your neighbors. There is a high probability that in your country house the level of water occurrence will be the same.

There are several folk statements that can be used to determine the proximity of water to the ground. The first version - after the snow melts, there should be water in the basements of the houses. The second version - sometimes there is an impenetrable fog despite the fact that there are no reservoirs nearby. The third version is a fairly close location of reservoirs. In addition, there may be a large number of midges after the sun sets, thick grass during a drought and moss.
Previously, people resorted to a different method of determining the location of the waters. They took sheep's wool, washed it thoroughly and dried it. They removed the top layer of turf and laid wool on this place, on top of which they laid an egg and covered it with a pot of clay. The whole structure was covered with sod on top. The result should be visible already at dawn. If there are signs of dew, then there is water at a distance of three to seven meters from the surface. Otherwise, the water lies very deep and, accordingly, there are no signs of dew.

When choosing a place where the well will be located, you need to pay attention to the location of the sewer, compost pit and toilet. From these places, the well must be placed as far as possible. If this decorative well in the country, then where it will be located will not play a role.
Decorative wells are decorative, they do not perform the functions that are assigned to a real well. Typically, such designs are installed for beauty, to create something special with your own hands. For such a well, we do not need to dig a hole, and look for the depth of underwater waters. A decorative well, of course, is good, but in our case we are talking about a real design to obtain the required amount of water.

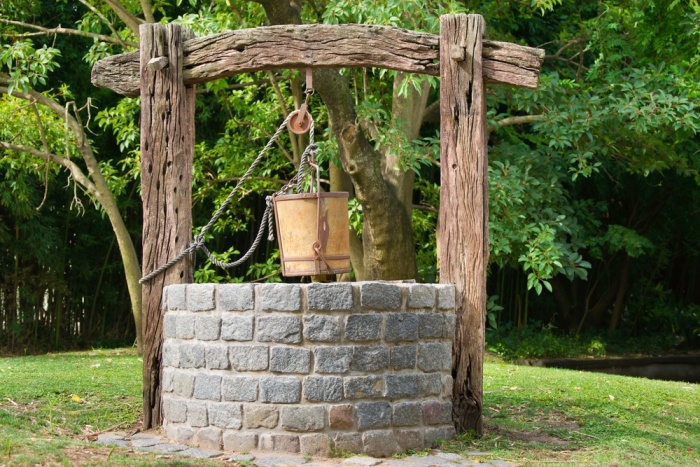
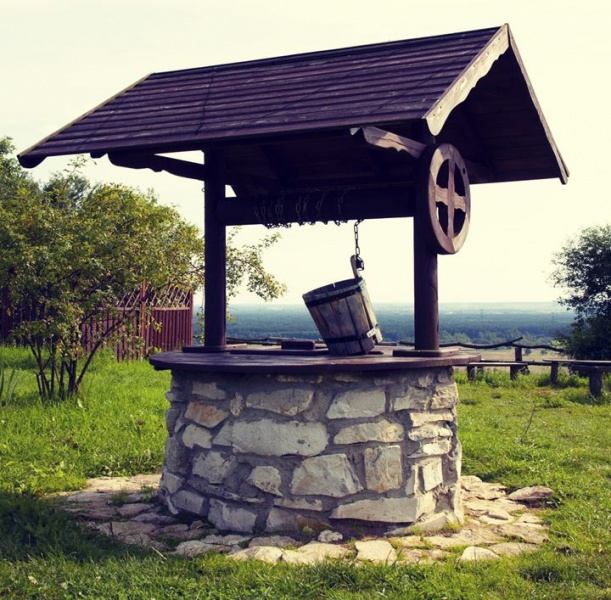
Almost all wells are built on the same principle. Their design consists of three main elements: a water collector, a trunk and a head. The reservoir is sometimes also called a reservoir, judging by the name it is clear what functions are assigned to it (accumulation and storage of water). The trunk is needed in order to protect the well itself from shedding soil. It can be made with both round and rectangular sections. But the upper part, which we see - the head, is necessary to protect the well from snow, dirt and rain, and also prevents freezing at temperatures below zero.
Many believe that if a pipe is laid to the base, then it is quite possible to organize a good water supply from a well. But in fact, the well is not the design to be at the heart of the whole water supply. It is better for him to equip a well.

With the place and device of the well, the issue has been resolved, now you need to figure out where the digging process begins and how it happens. The first thing that many builders recommend is to start arranging the well in the fall. This is due to the fact that groundwater is sinking, so it will be easier to cope with the work, and it will be easier to determine the exact depth. As for the digging itself, unfortunately there is still no such device that will help to cope with this task faster and without much effort. As before, so now, digging is purely manual work. You can dig a hole yourself, or you can seek help from a specialized company. In this case well in the country house price the final one will be more expensive, so if you do not have extra money, try to master this task yourself.

For independent work, we need a shovel (with a short handle) and a tool for hard ground (in case one comes across). In addition, we will need a ladder and a lighting fixture that can be adjusted (a good option for a lamp with an extension cord). At the same time, one cannot do without buckets and a device for pulling them out.
After the hole of the required size is dug, we need to arrange a water tank and, of course, a well shaft. Concrete rings are perfect for the barrel. It is better if they are chamfered for docking, though this option will come out more expensive than usual.

There are two options that you can use to create a well structure. Let's start in order. One of the options involves digging a kind of mine until the moment we come across groundwater. This must be done very carefully, strictly adhering to safety precautions. If the soil is very loose, it is better to immediately proceed to the second method. If everything is going well, we can continue to work. So, we put the rings on top of each other in the pit, after which we dig a couple more rings deeper. If you want to get a rectangular well, you should stop at monolithic walls. This technique is available for non-flowing soils, it is more convenient and faster.
In the second option, the first ring is installed immediately after the pit reaches a depth of one meter. After that, we continue to dig a hole under the ring, under its own weight, it will gradually sink down. When it becomes possible to lay the second ring, we fix it and then we dig and so on until we reach the level of groundwater. As for the rings, it is worth choosing as the first ring a design with a cone-shaped sharpening or a metal knife, along the edge of which the pins will be located.

No matter how you twist it, seams remain between the rings, they must be repaired. To begin with, we lay out tarred cords or hemp between the rings in the process, and cover them with cement mortar on top. Alternatively, you can use clay. This option is much more environmentally friendly, but it will not last long.
From the moment the water begins to appear, we need to dig a couple more meters. The process is complex, so you can’t do without a mud pump. Upon reaching the desired level, pour granite crushed stone to the bottom. On average, the thickness of such a layer should be 10 cm. Do not forget about the waterproofing of the upper rings.

The most difficult stage of work is over. Now we just have to equip the beautiful upper visible part of the well, and it will be completely ready for use. A well, decorated according to old traditions of wood, will look beautiful. But this is not the only option for action, everyone can independently decide on the appearance of their well. The construction of a well, although a laborious task that takes time, is necessary, because without it you can forget about normal life in a summer cottage.
Do-it-yourself well in the country house. A photo


Wood, stone, concrete, plaster or brick are the main materials that allow you to decorate wells in a country house and a country house.
Well types:
- According to the method of raising water: with a collar and a crane (a rope attached to the collar or a long pole that acts as a lever).
- The head is performed in an open (base, racks and roof) or closed form, such as a "house". In open structures, the well pillar is covered with a lid, in "houses" - with a door on one of the roof slopes.
- Lighting of the entire area around the well and the building itself is allowed. Beautiful lanterns are suspended from the roof of the structure, and spotlights are hung on branches and shrubs.
Material selection
The frame of a natural massif is treated with tinted impregnation, giving the desired tone and providing protection from decay and bugs. Carving or carved overlays look good. The preparation of the decor is easy to do with a stenciled jigsaw, and nailed to the boards with small nails. An old frame or concrete rings are hidden under a wooden cladding. It is pre-cut to size, planed and treated with an antiseptic. The boards are nailed to the frame, with further coating with varnish or drying oil.
When choosing weaving, it is required to install wooden stakes or metal pins in the ground, braided with a flexible vine.

For finishing brick or monolithic structures, natural or artificial stone, facade tiles, mosaics, large pebbles, broken ceramic tiles are used.
The decor looks good with the use of facade mineral plaster, covered with silicate paint.
Style selection
Decoration of wooden wells in the old Russian style
Wells made of natural solid wood look harmonious in any landscape. An excellent addition to them are houses with carved elements in the form of birds and animals. Flowers and a bench planted nearby, a barrel, a wicker fence, a stylized cart and a windmill will emphasize the colorful style of the site. The upper house is made in a round, tetrahedral or multifaceted design using a log house. For wall cladding, cobblestone, brick or planed board is used, the structure is crowned with a gable roof. The upper part of the house can take the form of a tent. As a coating, use a natural array, shingles, polycarbonate or straw.

Tip: to design all buildings in one key, the roof of the well is made in a similar design, relative to the design of the house.
To give the scenery functionality, you need to perform a number of steps:
- Close the water with a tight cover that prevents debris from entering the shaft and provides protection from the sun's rays.
- Complete the composition with a circle with a chain and a bucket, used for its intended purpose during a power outage.
- Structures with lace carvings, wicker mesh structures look original.
- When planting climbing plants, such as clematis, roses, ivy or grapes, you can successfully complement the landscape design by turning it into a shaded recreation area.

medieval style
The choice of direction requires the preparation of stone in a gray shade and aged wood of a similar color (planks or logs). At the base of the structure, a platform is built, concreted or lined with natural stone. Beams and roofing are made of gray materials. The resulting installation fits well into the environment of bright colors, like a guest from the past.

Other styles
The Swiss chalet is associated with stonework at the bottom of the well and the predominance of natural solid wood at the top. The decoration of the head is made using a round cobblestone, pouring concrete in a circle. The roof is usually placed directly on the head, making a door for the bucket.

Oriental style is easily recognizable by the peculiar roof with curved edges, as in Japanese or Chinese houses. The basis is wood or stone.

A modern design will give a concrete mixture, plastic or metal. The head is presented in the form of a concrete figure, colored plastic is used for the development of the roof, and supports for the roof are made of forged metal.

The shaduf well is suitable for an ethno-style house, if there is a large open area, the swing of the crane handle is 3-4 m. The construction of the roof requires a lot of labor, so a flat cover is fixed on the head with hinges.

wells-images
The design of structures excludes the presence of a pronounced style, which determines their successful application for the design of any landscape.
Decoration in a marine style
Maritime style lovers are invited to decorate a decorative well:
- the base is wrapped with a rope;
- a steering wheel is used as a handle for the gate;
- hang a decorative anchor on a beam;
- pick up a beer or wine barrel instead of a regular bucket.

well-mill
Wooden structures are shaped like a windmill with 4 blades. The window inside the head, where the bucket is located, is placed on the back side, and the product itself is turned with blades towards the central path of the dacha.

Well-house
A miniature house made of stone and covered with bright tiles will fit well in a barbecue area, where it is recommended to have drinking water near the cooking area.

Making a well from concrete rings
The implementation of the idea begins with the preparation of materials:
- cement-sand mixture - 4 buckets;
- 0.5 l of pastel paint;
- Master OK;
- brush;
- building mix tank;
- putty knife;
- stones of a small fraction.

Manufacturing process with photo
Well design includes a number of stages:
- Having kneaded the solution with your own hands or using a concrete mixer, it is evenly applied over the concrete ring, observing the same layer thickness.
- Using a spatula, level the walls, give time for the solution to dry.
- Let's start with the source. Its bottom is 1/3 trimmed with stone, pressing it with little effort into the cement-sand mixture. The inside is decorated with a flat natural stone.
- The rest (2/3 of a monolithic well) is decorated using a “brick” pattern: bricks or rings are drawn with a sliver on a slightly dried mixture, pressing a glass jar. Leave the composition for a day, allowing the pattern to grab.
They take a brush and paint, paint the bricks. Instead of a brush, an ordinary sponge will serve, convenient for coloring.

Natural stone for well decoration
For a dacha associated with a stone palace, the ideal solution would be to create a baroque well. A well with masonry below will create a harmonious atmosphere, forming a successful combination with other materials. This will serve as a large flat pebbles or "wild" stone with uneven coverage. The borders of garden paths are laid out from the stone used for the bottom of the structure. An alternative option for its arrangement is an “aged” brick, the roof is made of reeds, setting a touch of romance and comfort.

To implement your own ideas, the choice of decorative materials is presented:
- granite;
- shell rock;
- sandstone.

They are mounted on a brick, foam concrete or aerated concrete surface. Before the start of lining the well with natural stone, which has a large weight, the structure is reinforced. Reinforcement or wire mesh is placed on the surface, ensuring a secure fixation of the finish. Installation is carried out using a concrete solution applied to the surface according to the principle of plaster placement. Work is carried out using two spatulas and a building level. The solution dries for several days, then it is primed and natural stone is placed.
For the ground part, large boulders are used, connected by cement mortar. In order to facilitate the work, a wooden blind area is used (it is removed at the end of the work). Usually lay out a three-level base. Large stones are used to create the first level, giving massiveness and the ability to hold further construction.
Attention! When processing the brick base of the well, additional reinforcement is not provided.

Finishing the source with decorative stone is characterized by low labor costs, which is explained by the low weight of the structures:
- plaster;
- acrylic;
- synthetic.

Preparing the surface of the well for stone finishing
The basis is taken concrete or drywall. The last option is installed on the frame or without it. Frame technology will additionally insulate the well with sheet insulation (for example, foam). Prior to installation, the surface is primed, which will ensure a high level of adhesion to the adhesive composition.
For reliable fixation of a decorative stone, a standard set of materials is required:
- Adhesive composition for ceramics and stone, intended for outdoor use.
- Construction level, providing smooth installation of decorative elements.
- Tile cutter for preparing individual pieces of artificial stone.
- Spatula for applying the solution.
tillage
Along the entire perimeter, the soil remains moist; concrete pouring is used to strengthen it. The use of bedding is allowed
(crushed stone or gravel). Backfilling with stones helps to remove excess moisture and preserve the finish of the structure, giving the well an original design.
Do-it-yourself well cover development
For convenience, a fixed panel with two opening doors is considered. The fixed element can be made in the form of a round or square shield, with a hatch in the center. The hatch is equipped with two wings attached with long loops. The flaps open outwards easily for access to water or equipment. The flaps of the lid are closed with a lock.

Procurement of materials:
- boards of 2 cm;
- timber 4x4 cm - 4 pcs.;
- timber 2x2 cm - 4 pcs.;
- metal handles - 2 pcs.;
- loops - 4 pcs.;
- bolts;
- nails;
- wood sealant;
- drying oil, varnish or paint.
Manufacturing principle:
- Boards are stuffed on 2 bars 4x4 cm. Preparation of boards of different lengths is required, allowing you to create a rectangular hatch in the center. The shield bars will fall on the lower and upper parts of the hatch. An additional 2 bars are stuffed on the sides.
- They knock down 2 small shields from a board and a beam 2x2 cm, forming doors for slamming the hatch. They are hung on hinges and fixed on the side walls of the hatch.
- Metal handles are fixed to the doors with bolts.
- The seams between the boards are lubricated with sealant.
- To give moisture resistance, the lid is treated with drying oil. As it dries, it is treated with paint, stain or varnish.
Plastering and painting

Surface preparation
At the first stage, the old coating is removed with a spatula or solvents. The cleaned surface is washed with a rag and detergent. In the presence of obvious defects and large cracks, they are leveled. The base is primed. If there are metal elements on the surface, they are treated with a protective compound, otherwise there is a risk of rust formation. Finishing the new well is done with lime mortar.
Materials and tools

The list of necessary accessories includes:
- putty knife;
- grater;
- metal ironing board;
- tank for plaster mixture;
- rollers or stamps for textured materials;
- dye;
- paint primer.

Step by step instructions
Regardless of the choice of plaster, the finishing of concrete rings is carried out according to the following algorithm:
- Prepare a solution for plastering, according to the instructions (preferably a mineral composition).
- The mixture is applied taking into account the chosen technology (pebble, mosaic, Venetian technique or "bark beetle"). The maximum layer thickness is 40 mm. Subsequent layers are applied after the previous ones have completely dried. The mixture is applied manually or by machine. The first layer should correspond to the name "sprinkling", which is determined by its even and thin application.
- Mashing. Work is carried out on a semi-dry layer, when the material is processed and is already firmly fixed on the coating. A roller of a special configuration, graters, stamps, brushes, plastic bags, leaves and feathers will help to give a special structure. Relief forms are created by applying and running them over the surface, applying patterns. The thickness of the layer is determined by the desired effect.

Advice. Until the plaster has dried, straight or broken grooves are squeezed out on it, imitating brick / masonry.
Paint application
Before applying paint, the plaster is primed, allowing the surface to last longer. For work, waterproof paint is well used, resistant to mechanical damage and ultraviolet radiation. The process is carried out with a roller with a long pile, but monochromatic paint does not always allow you to give the desired effect, which requires shading the protruding relief. To fix the paint, use a water-based varnish. It is diluted with water in proportions 1:1, which ensures deep penetration into the structure of the plaster. The varnish is applied with a brush (it should be squeezed well, excluding smudges) in 2-3 layers.

How to create a decorative well from a log house with your own hands? Step by step instructions

Preparation of the main structure:
- They dig a pit for a large capacity, leave free space on the sides (up to 20 cm).
- A sand mixture (20-30 cm) is poured into the bottom of the pit, when the container is placed, its top will rise above the soil level by a similar interval. The tank is fixed by sprinkling the edges of the pit with soil.
- The base of the well is surrounded by logs. To give density, a foundation is poured around the well at a depth of 30 cm.

Top decoration:
- Upon preparation of the lower part, proceed to the decorative finish. Log cabins are installed on the ground, having previously treated them with an antiseptic.
- The bottom row of logs is fixed to the base with anchors, then well masonry is performed at a height of 1 m. Racks are placed inside the square - the basis for the roof. Nails are used for fixation. On each rack, 2 bars knocked down by a house are mounted, connected using transverse beams.
- A drum and a handle are fixed to the racks, providing water lifting. The decorative cover is made in a round or square design. In place of the cover at the top of the decorative well, a flower bed is arranged. To ensure the duration of operation, the tree is treated with an antiseptic, varnish, paint or stain.
- The roof of the house is made of bamboo, straw or tiles.

- When preparing the finish for the upper rings, additional insulation should be provided in advance. But many craftsmen neglect this condition if the water surface is below the freezing level of the soil.
- Decorative finishing allows you to create an external waterproofing layer. This rule is mandatory when working with brick and concrete rings.
- When an autonomous water supply system powered by a pump is connected to the well, finishing work is carried out upon the placement of pipes in the ground and the completion of installation work.
- The budget type of finishing wells is plastering with the use of liquid glass and dye. This will give additional protection to the finished look.
- Regardless of the thickness of the cladding, the formed coating should not go beyond the edge of the blind area on the ground. Otherwise, it is required to expand it with a concrete mixture or facing material.
Important to remember! The cost of decorative work can cost an order of magnitude more than the price of another system.
Video
Modern landscape design involves the arrangement of gazebos, paths, flower beds, the installation of garden sculptures, etc. A decorative well is among those structures that clearly emphasize the originality of the design of a suburban area, if the general style is maintained. It is not necessary to create it from expensive materials: the remaining ones from a large construction will do.
The owner, who undertook the construction of such an element in his dacha, does not require professional skills - any man who knows how to handle simple tools will cope with the task. A simple drawing will help calculate the required amount of material. Exclusivity is given by design solutions, among which are the most incredible - even old and unnecessary things are used. Despite the primary aesthetic orientation of the design, it also performs some practical tasks.
Options for creating and assigning decorative wells
During the construction of the structure, the goal is not to create a source of water. Mostly it serves to decorate the summer cottage, standing out for its originality. It is possible to give it useful functions that practical owners use:
- hide sewer hatches, other communications that spoil the overall design;
- protect containers for collecting water from dust and debris;
- hide small garden tools, hoses for irrigation;
- ennoble the head of the well that comes to the surface.
The construction market offers a large number of decorative wells from various companies. Their cost is quite significant, and the design does not please with diversity - most of these are houses in the form of a log house or sheathed with clapboard. Therefore, many people prefer to make the design themselves. The dacha and the garden, subject to the correct location and design, are transformed.
Well in country style
The most common form of the object is a house. The originality is given to it by the roof, which is performed in several versions. The usual one with two or four slopes resembles a Slavic hut. If you bend the corners like they do on eastern pagodas, decorate the garden with other similar elements, you get an interesting extraordinary structure.

Oriental style attached to the shape of the roof
The decorative well is made in the same style as the general design solution of the site:
- country - in the form of an ordinary village house, which is decorated with carved details, and a garden grows around;
- eastern - in addition to the roof with corners bent upwards, they select the appropriate color, decor;
- modern (modern, minimalism, etc.) involves the use of materials that are the same as those used to build other objects, a similar technique;
- medieval - it is distinguished by large massive forms, the house is built of stone, has a pointed top and small narrow windows.
Creating a decorative well is an exciting activity that allows you to demonstrate your skills as a builder and designer. There are a huge number of options, and the advantage of self-production is that even the most junk material used for construction, with skillful use, transforms the site.
What to build and how to arrange - a variety of options
When choosing materials, they are guided by the dimensions of the product. It is not necessary to repeat the parameters of a real well - it can be a proportionally reduced copy. In this case, trimming boards, beams, and roofs are used. To achieve a unified style, the same materials are used from which other buildings are built.

Wooden building in the shape of a barrel
Much depends on the desired shape of the product. It is preferable to build round ones from stone, concrete rings, bricks. It is difficult to create them from wood, but classic right angles are made without much difficulty. Wood is not only easy to process - it is affordable, quite durable and environmentally friendly. Used, in addition to boards, bars, logs, even branches, pre-treated with antiseptics.
Concrete ring lined with boulders
In some areas, a stone building or a concrete ring used for real wells is preferable. Even if you do not sheathe it, but simply paint it with bright colors, the structure looks boring. Decorative stone or brick imitates medieval style. If you build a high gabled roof on top, it resembles a tower in a feudal lord's castle.

Rustic roofing
Tiles, plastic products and everything that is used in construction are also used. Sheet metal make out the individual elements of the walls and roof. For it, you can use everything available: boards, slate, tiles, linoleum, straw, reeds. It is important that they survive the hot summer, rainy autumn and severe winter frosts.

Sometimes a decorative structure is created using old unnecessary things. As a base, car or tractor tires are laid one on top of the other. A large barrel of 100-200 liters is also suitable. If it is whole, it will fit for practical use - you can heat water for irrigation in it. Such a base design looks unattractive, requires decoration. After performing any of the available methods, attach the remaining elements to give the appearance of a real well.

A lid, a bucket on a chain, handles or wheels are installed, for which the gate rotates. Registration is limited by the level of imagination and capabilities of the owner. For one, simple painting is enough, the other stuffs patterns through a stencil. Someone turns a decorative well into a flower bed, decorates with carvings. Wealthy owners complement the landscape with garden sculptures.
Classic-shaped houses made of wood - instructions for making
Little carpentry skills are required, as well as tools. A file, a chisel, a planer, a jigsaw, a drill with grinding nozzles are used. With such a set, you can make a decorative well that looks like a log house or simpler. Before searching for the necessary material, draw a drawing.

If it is planned to store some kind of inventory in the structure or arrange a pumping station, the size of a standard mine source for water intake or more will suffice. There are no difficulties with a square shape, and if a polygonal design is required, then a circle is drawn. It is divided into six equal parts and the points are connected by lines.
In some cases, even a light wooden house requires a foundation, for example, if it is chosen as a place to install some equipment. Done quickly:
- dig a trench;
- collect the crate;
- cover the bottom with a film;
- filled with cement mortar.
When there are few stones, bricks or cinder blocks, they lay out a platform from them that rises above ground level. It will not let the structure get lost among the surrounding plants.
Simple construction with inexpensive materials
Repeating the product is available to any master - the scheme is simple. Despite the apparent primitiveness of the structure, it is very popular among summer residents. Beauty depends on the accuracy of the work and the final design. If you build it qualitatively, then products of the same type in shape are strikingly different, acquiring an original appearance.
For manufacturing you will need:
- wood of the lowest quality: block house imitating logs, grade C lining, unplaned timber;
- moisture resistant plywood, edged boards, square slats with sides of 40 mm, dies (thin plates of wood);
- corners, bolts, nuts, self-tapping screws;
- any decorative material for covering.

Step-by-step instructions will help you complete the work in a few hours:
- 1. A cube-shaped base is made from a bar. The crowns are connected in one of the ways: with steel corners or washed down with additional reinforcement with screws.
- 2. The finished frame is sheathed with a block house. They are fixed with self-tapping screws, having previously drilled holes of a slightly smaller diameter than so that the material does not crack.
- 3. Racks made of boards are bolted to the sides of the well. They make rafters, a skate, using a thin wooden beam. The slopes are reinforced with plywood corners. The roof is covered with any material of low weight.
- 4. Finish with sidewall sheathing, for which a cut board or lining is used. All parts are cleaned with sandpaper, impregnated with anti-rotten compounds, varnished. If desired, add other decorative elements made of wood, metal, plastic.
Make a bucket. A simple option is a sawn deck, but it looks more beautiful if it is made by hand from thin dies. They are selected the same size, the ends are treated with glue, laid out side by side face up. In order not to budge, fasten with tape. A cylinder is rolled from the workpiece, left until it seizes.

Decorative bucket of dice
The bottom is cut out of a piece of plywood according to the size of the inner diameter, inserted. To give additional strength, they are pulled together with strips of tin at the bottom and top. Holes are drilled for the handle, instead of which a decorative cord is used, the same as that on the collar. Gather everything together, varnish.
Sheathing of a stationary product
If it is decided that the house will be in a permanent place, a more solid structure is required. A barrel or a well circle is installed as a basis. A concrete foundation is made under them, as containers are used to collect and store water.

First, you have to make a drawing, indicate the dimensions. This will allow you to calculate the amount of material needed. The shape is chosen at your discretion: round, square, polygonal. The configuration of the base, frame and roof depends on this. The well ring can be painted, overlaid with stone, brick or tile.

Many people prefer wood because it is easier to work with. They begin with the installation of racks, for which they prepare pieces of steel or asbestos pipes about 30 cm long, the diameter of which is slightly larger than the cross section of the beam. The quantity depends on the shape of the product, for square structures you will need 4 short ones in the corners and 2 long ones for the roof. To protect the material, the metal is painted, and the wood is impregnated.
They dig holes, fill them with molten resin and wait until it soaks into the ground. Pipes are installed, fixed outside with a solution of cement and sand, using crushed stone or pieces of red brick as a filler. Insert racks, fix with mortar. If the diameter of the hole is much larger than the cross section of the bars, pebbles, expanded clay are added. Expose strictly vertically, checking the level. Take a break for a few days to allow the mixture to set.

The frame is sheathed with boards, positioned in a horizontal or vertical direction. In the latter case, transverse bars are attached on each side from above and below. The rafter system is assembled separately, only then it is installed on the well. There are many designs, but even the simplest gable looks beautiful if the overhangs are made of different lengths. The pediments are made with the same material that was used for sheathing the sidewalls.

A more complex hexagonal umbrella-shaped roof. First, the rafters, the holding plate, and the roofing boards are prepared separately. All parts are sawn at the required angle, grooves are made in the dome. The frame is installed with glue. Planks are nailed to the bottom edge, fixing with self-tapping screws. The subsequent rows are laid so as to overlap the previous one. Finished with a wooden dome.
The final touch is the installation of decorative elements: gates, handles, buckets. They do not experience any load, so there is no need to think about reliability. Further, the building is decorated, for example, they arrange a flower bed, which will immediately make it an original detail of a summer cottage. The lid on the well will hold the structure together and at the same time be able to play a functional role: to serve as a table around which they gather to relax.
Examples of design solutions - original ideas
The popularity of decorative houses-wells is increasing every year. Unlike purchased ones, handmade ones have a unique appearance. They serve as a decoration for a summer cottage, while simultaneously fulfilling functional purposes: hides sewer manholes, grow flowers there, and if there is water, they perform their intended purpose.

Well-flower garden with antique styling
Country or retro style looks original. For the first, materials collected in the garden, forest, on the river are chosen: dry branches, stones. Imitation of antiquity is created by using artificially aged boards for sheathing. At first glance, the design is ancient and obsolete, but if the overall design of the rest of the buildings matches, it organically fits into the landscape of the suburban area.

The well has been turned into a vast flowerbed
Amateur gardeners will appreciate the decorative well, turned into an extensive flower garden. It has several tiers where various plants are planted. The lower wide steps allow you to sit down and relax in the shade. Each level can be lined with different materials. The originality of the flower beds is complemented by hanging pots made in the same style.

A flower garden made of tires in the form of a well looks original
The use of classic shapes with the right angles is optional. Concrete rings lined with tiles with a tile roof look original. Used tires are used, which are decorated with enamel, bituminous or acrylic paints. The stylization looks like a large wooden bucket. Favorably emphasize the originality of two steel strips.

Solid birch logs, from which the well is assembled, perform a decorative role and are able to serve for their intended purpose. From an old cart or spindle they take a wheel, which is installed instead of a handle. The originality is added by a bucket made from a thick log cut, selected from the inside.

Unusual crane - a bright element of decor
To create a building in a medieval style, a concrete ring is used. In addition to the usual facing with brick or stone, river pebbles give an unusual color. They combine small and large ones, lay out patterns, paint - the choice is up to the master. A crane placed next to it will create a unique ensemble.

Even the simplest product, made on its own in a summer cottage, will become its decoration. Rational use gives originality. In most cases, flowers of one variety are planted in a well, another in a bucket. In addition to traditional materials, they use forging, plastic, pipes - everything that can be found on the farm.
Reading time ≈ 10 minutes
A well can be not only a source of water, but also a spectacular decorative element, so you can arrange it for a summer residence with your own hands, using original ideas and photo examples. A do-it-yourself well can become an important element of landscape design. After all, the times when the well looked like a nondescript concrete structure are long gone. Thanks to modern technologies and materials, it can be turned into a real work of art!
The original well, stylized antique.
Style options
On our website you can learn about the technical part. We will consider the decorative component.
There are many styles in the design of the site, and almost any of them can be applied to the decoration of the well, as it is an important element of the landscape design of the site.
When designing a well, it is important to take into account the general exterior of a summer house or a private courtyard, since a harmonious combination of elements will be the key to a holistic, pleasant picture.
Basic style decisions:
- Russian well. Traditionally, it is made of a wooden frame, and the whole structure imitates a tower. However, more original options are also possible, for example, the design of a cap under tree trunks. For decoration, you can use carved wooden figurines of animals.
- East style. Today this style is becoming more and more popular. Oriental-style wells have a characteristic roof - its edges are raised up. The well stands are made in the form of various mythical creatures, in particular - dragons.
- Alpine style. Wells in this style are also called chalet wells, since a chalet is a kind of rural alpine house (hut). The main finishing and decorative material of the Alpine style is stone of various sizes, types, colors and shapes. Stone can also be supplemented with wood. Structures in this style look somewhat brutal, uncouth and rude, but this is what gives them charm. Therefore, the head of the well must be built from this material (natural or decorative). An alpine-style well looks great among perennial flower beds, near ponds and fountains, and alpine slides.
- Medieval style. The simplicity of forms, rough lines, stone and wood, a minimum of decorative, ornate elements - this is all about the medieval style. A well in this design looks very atmospheric and unusual, for sure it will become a highlight of any site. And thanks to the simplicity of finishing, it will not be difficult to arrange it.
- Sea style. A construction in this style suggests the presence of a steering wheel and other attributes of marine life: anchors, ropes, a pirate flag, a bucket in the form of a barrel. The head can also be decorated with sea shells or images of underwater vegetation and animals.
- Other style decisions. Sometimes the design of the well cannot be attributed to a specific style direction, but this makes the well look no less original and appropriate. For example, in the photo below, the well is finished with simple plaster, paint and stone. However, the decoration echoes the design of the entire site in terms of color and materials, which makes the visual perception of the territory very positive.

Wooden well with a gable roof and carved decorative figurines.

Japanese style well.

Alpine well decoration: a combination of stone and wood.

The well in the medieval style looks very concise, but at the same time picturesque.
A variant of another well (decorative) in the medieval style.

Decorative well in the old style.

Nautical style building.

The unified style is supported by the details: stone inserts on the well, white base and red accents.
Finishing a drinking well is limited by your imagination and financial capabilities in the choice of materials. Next, we will consider what materials can be used to design a well and how to guide the choice.
Features of the choice of finishing material
The choice of finish is largely determined by the purpose and method of using the well.
- Water intake with a bucket. In this case, the design should be thought out in such a way that the decorative elements are functional, resistant to moisture, and most importantly, do not bother the daily process of water intake.
- Water intake with a pump. If a pump is used to supply water, then the well shaft itself practically does not function (only in case of repair or other work). Therefore, there are no strict restrictions in the design of the well.
- Decorative purpose of the well. Very often, old (empty) or existing wells are transformed into decorative elements of the site that perform an exclusively aesthetic function. In this case, there are no restrictions on the choice of finishes either.
Let us consider in more detail the possible finishing materials, their advantages, disadvantages and features of use.
Brick
Most often, brick is used to finish the head of the well. Moreover, it can be used not only for cladding, but also for the construction of the head itself. This material has several advantages:
- affordable cost;
- ease of operation;
- high strength, durability and wear resistance, resistance to mechanical stress;
- decorative appearance.

Modern brick well with a roof.
To finish the well, you must use a solid brick. Since it is able to absorb moisture and even collapse under its influence, the brick must be coated with a special protective varnish. For the design of the well, ceramic bricks or silicate bricks (a more budget option) are optimally suited.
Since this facing material is rightfully the most common and in demand, let's consider how to make a brick well with your own hands according to original photos and ideas (using the example of a well for a summer residence, where the head is made by hand from a concrete ring).
Step-by-step instruction:
- Around the head of 50 cm, you need to dig a recess up to 30 cm, carefully compact the earth.
- Build a wooden formwork.
- Pour sand in a layer of 10 cm and also compact.
- A chain-link mesh is laid over the sand.
- Next, the recess is concreted with a solution: cement grade M400, river sand and crushed stone in a ratio of 3:3:4. Using the building level, you need to control how even the masonry is. Then the concrete must be left to dry completely. To prevent the coating from cracking during drying, it must be periodically sprayed with water.
- Along the perimeter of the well, at an equal distance, you need to drive in 6 dowels and pull the rope between them so that you get a hexagon. This geometric figure will indicate the lines along which the brickwork will pass.
During masonry, joints must be carefully processed. Since this is a clean job, it must be done as accurately as possible. For greater structural strength, bricks must be laid with an offset.
In general, the process does not differ in complexity, therefore even a beginner without any experience can brick a well.

A brick well looks original thanks to a suitable wooden decor.
A brick building can look very atmospheric and cozy:

A simple brick well with decorative elements.
Wooden structure
Wood in well decoration is another traditional material. Wooden wells harmoniously fit into the style of almost any site, go well with wooden buildings and green spaces in the garden.
Material advantages:
- environmental friendliness;
- ease of processing;
- practicality;
- wear resistance and durability;
- great opportunities for decoration.

A well lined with wood.
However, untreated wood reacts poorly to moisture, so the wood must be carefully varnished before use. Also, the structure must be protected from sunlight and precipitation.
In order for a wooden well to serve for many years and retain an attractive appearance, it is recommended to build a gable cover over it to protect it from ultraviolet radiation, rain and snow.
You can trim the head in two ways:


Laconic design of the well with the help of a block house
For a more original look in the design of the well, you can combine two finishing materials, for example, as in the photo below:

Layout of finishing materials: brick and wood.
Application of stone
Stone finish looks very stylish, solid, original. Stone for well decoration has been used for many centuries, and for good reason. The material has the following advantages:
- durability, wear resistance, practicality, resistance to deformation and climatic / mechanical influences;
- decorative appearance;
- ease of installation;
- A wide range of sizes and colors to suit any design idea.

Stone well with a tiled roof.

Ancient stone well.
When using natural stone, you need to take into account its huge weight and build a reliable foundation. On the other hand, they can lay out the head of the well from scratch without using a concrete ring. A head made of natural stones of various diameters and shapes will look especially original:

A well of stones of various shapes and sizes.
If you use a decorative stone, its weight will be much less. But they can only finish a perfectly flat surface. Decorative stone outwardly differs little from natural and looks very impressive.

Decoration with decorative stone.
Plastering and painting
The simplest, budgetary and unpretentious way to finish a well is to use plaster and color. It is possible to apply both cement, and decorative plaster to external works. Although this option is inexpensive, the end result can be very spectacular:

Decoration of the well under the Mediterranean style with the help of plaster and paints.
Often, gray concrete rings are used to make a well shaft. They look very unpresentable and gloomy, but if you add a little color, the design can immediately change:

Transformation of a concrete well ring.
If you like to wield with a brush and paints, you can bring to life the most daring and interesting ideas! For example, apply a floral ornament and patterns, abstraction or geometry. And if you are afraid that you will not draw beautifully enough, you can use ready-made stencils.

Decorative composition of a well, a bench and a bucket.
Flower plantings, flower beds and other decor
They can also be an important element in the design of the well. Flower plantings will help create a cozy, sincere atmosphere, hide from the eyes not quite decorative components of the well. Flowers can be placed on the roof of the structure, near the base, in the surrounding area. Ampelous plants look spectacular and harmonious in attached to the arch of the roof of the well.

The well is literally buried in flowers and greenery.
Around the well, you can arrange a flower bed of continuous flowering from perennials, then you can admire the riot of colors from early spring to late autumn. The area around the well can be arranged using the following materials:
- broken ceramic tiles to create a mosaic;
- pebbles and gravel;
- sand and other bulk coverings.
You can complement the composition by installing a bench near the well, in style reminiscent of a water well.
You can make an original well for a summer residence with your own hands, even if you have a small budget. Our selection of original ideas and photos will allow you to choose the most suitable option for finishing the well with your own hands!
Video: original ideas for do-it-yourself well houses.


 Constellation Scorpio description")


