Many are faced with the need to refresh the interior quickly and as cheaply as possible. Such a need may arise for people who have rented an inexpensive apartment for a long time. Or those who have spent all available funds to buy their own housing, postponing repairs and changing furniture until better times. Those who live in the temporary territory are also in no hurry to invest in the situation. In general, the situation is ordinary. Let it be transient, but you want to live in cleanliness and comfort now, and not someday later.
Is it possible to transform the interior literally for a penny, without making a complete renovation and without changing the furniture? Yes, and there are many possibilities for this. Today we will talk about improving the appearance of the kitchen. We bring to your attention 16 ideas for a low-budget easy metamorphosis. Of course, the patched up will not look completely new, and the old kitchen will remain old, but if you approach the issue creatively, with imagination and a twinkle, you can achieve an excellent result.
How to transform the kitchen without spending a lot of money?
1. Paint the facades of kitchen furniture
This will not only refresh the doors, hiding the traces of time, but also change the color to a more current/light/cheerful one.


9. Cover the apron with new material
If the wall in the work area looks more than deplorable, you can hide it behind laminated chipboard, MDF panels, plywood sheets, a mirror, etc. At the same time, it is not necessary to remove the old apron finish.


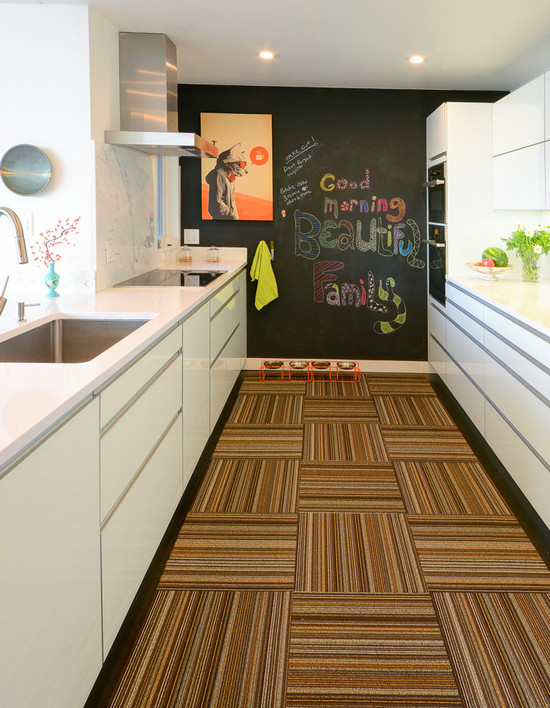
10. Paste the wall in the working area with wallpaper and cover with glass
Tempered glass, if it is not decorated with photo printing, is not too expensive. This method of mounting the apron is easy, clean and fast. However, the old finish, if present, will most likely have to be removed.

11. Paste the floor with PVC tiles
There are vinyl coverings in the form of tiles, the size of which corresponds to the dimensions of the floor tiles. However, there are also variations for parquet. You can glue them directly on the tiles or on the boards. This will allow you to quickly and very inexpensively update and transform the floor. Of course, such a finish will not last too long, but as a temporary option it will definitely justify itself.


12. Lay a large rug
Not so bad carpeting in the kitchen. They are warm and cozy. And it’s easy to maintain order if there is a vacuum cleaner in the house. It is better, of course, to take a dark carpet so that the stains (and they will appear sooner or later) are not so noticeable.
Hygienic wicker carpets-mats - they can be washed with a rag and a mop, like a regular floor.
13. Decorate the wall near the dining table
A stylish and comfortable dining area can become the main decoration of the kitchen interior. It will draw attention to itself, making the flaws of the old kitchen much less noticeable. Fortunately, transforming the dining area is much easier than working.

Particular attention should be paid to the wall near which the table is located. If the finish in the kitchen is very old and there is no way to change it, you definitely need to refresh at least this wall. It is not necessary to remove the old coating and carefully prepare the surface. Even on top of old wallpaper, tiles or paint, you can mount, for example, lining, panels, laminate, mirror or glass panels, etc.
14. Change dining chairs
This will instantly change the look of the kitchen (for the better, of course). Especially if the choice falls not on classic elegant models, but on something modern and / or bright.


15. Introduce bright accents
Colored elements will make even the most gloomy kitchen more lively, modern and cheerful. However, it is important to prevent chaos and excessive diversity. Accents should be one or two colors. The number of bright details also needs to be limited. Everything is good in moderation.

In the photo: the tiles on the walls and on the floor were painted, the facades were painted, the fittings were replaced, accents were added. The kitchen looks completely new.


16. Decorate the interior
Decorative little things turn the kitchen into a cute cozy nest. Minimalism is good in an expensive interpretation, and the old interior needs to be properly decorated - new design elements will draw much of the attention from old surfaces and worn objects.
To the place there will be wall decorations that hide the old finish (paintings, posters, mirrors), baskets and storage boxes, live plants (visually refresh the environment). However, don't overdo it! Don't let decor clutter up your kitchen.
Low-budget kitchen makeover: additional examples


Save money on a kitchen redesign with just paint, new handles, kitchen cabinet door decor, bright colors and your imagination. Here are 30 budget and colorful ideas that will help you decide to update the kitchen.
If your kitchen is already not new, with its own errors, add a few bright accents that will “distract” the eyes of the guests. This tip is only relevant if the color of the kitchen cabinets is neutral.
4
Open shelves give the kitchen a lighter look. In this case, attention is focused on what is on the shelf more than on the shelves themselves. Add bright jars, dishes, flowers - and they will cover the old shelves for a long time.  2
2
fresh colors
The best defense is an attack. If you do not have the opportunity to replace some kitchen cabinet or drawers - make it the accent of your kitchen by painting its surfaces in a bright defiant color! Please note that in the photo the red is found in several details and is in harmony with the dark wooden surface.

Buy "chalkboard" paint and paint over the surface of your kitchen cabinet doors. On such a board, you can write down a menu or a list of necessary purchases.
 1
1
White top, black bottom - it turns out that this combination also applies to kitchen surfaces. Paint the top line of cabinets white and the bottom line black. There must be a third color that will be found in both lines and combine them into a composition in this way.
 2
2
Sometimes the desire to change the kitchen cabinet is due only to the fact that it is eternal chaos. Use our tips for cleaning kitchen cabinets and drawers - and they will immediately seem better to you.
 3
3
Glass doors give a great look to kitchen cabinets. To update such a cabinet, you can paint the back panel in a bright color (for example, blue) and support this color with other decorative elements.
 6
6
Removing doors from several top-level cabinets will visually make the kitchen look bigger. Paint the interior surfaces of the open cabinet a dark color to further deepen this effect.
 11
11
For a little update to your kitchen furniture, swap out traditional wooden handles for trendy tubular ones.
 1
1
If your cabinet does not have doors, but you still want to hide unattractive dishes or pots from your eyes, hang curtains. They will not only close several compartments from prying eyes, but also allow you to easily get to the right things.
 1
1
If the edges of the paint are worn off on the kitchen cabinet - do not be discouraged! Many designers achieve this effect on purpose to give furniture a vintage Provence look. All you need is to exacerbate the worn effect so that it looks organic.
 4
4
White kitchen surfaces are all the rage right now. In addition to cabinets, use white on textiles, curtains. But the walls in such a kitchen can be painted in a darker tone, then the white will be even more radiant.
 1
1
Blue and gray shades have a wonderful smoothing effect, which is most suitable for furniture with scratches and scuffs that need to be hidden.
 2
2
Kitchen cabinets are given a dramatic makeover with trendy orange. Paired with a darker shade, this orange doesn't look provocative or childish.
 2
2
This is one example of how you can successfully combine several tips: the use of bright colors and decorative aging of furniture.
 4
4
The combination of wood of different shades and with applied paint of different colors is successful if the variation in shades is small. In the example, we see a transition from snow-white to mustard color.
 1
1
Vintage is in fashion not only in clothes, but also in the interior. Do not rush to call your furniture old, but on the contrary - present it as a vintage find! To do this, you just need to repaint it in a fresh color and replace the handles.
 4
4
If you like the idea of glass doors on your kitchen cabinet, but you are not sure that you will be able to keep your open shelves clean and tidy all the time? Then a solution using frosted glass is right for you. It also visually makes the interior more spacious and lighter, while hiding the mess on the shelves.

Molding is able to turn an ordinary closet into a small masterpiece. Paint it in a contrasting color and attach it to the cabinet door with special glue.
 3
3
A few coats of stain can give your kitchen furniture a whole new look! After painting, it will be even deeper and more saturated.

A small, curly-edged wood overlay on the top shelf sets the tone for the entire kitchen in this photo. Ethnic motifs and rustic style are visible in it, which make this kitchen very warm and cozy.
 4
4
If you want to update the look of the island, cover it with planks, creating a relief surface.

Yellow and red are among the warm shades, and their combination will transform the interior in an amazing way. Paint the walls red and yellow the surfaces of the kitchen furniture and your kitchen will become many times “warmer”.
 2
2
Sideboards in modern kitchens are increasingly becoming a thing of the past. But if you honor traditions, give the top line of the kitchen for the placement of sideboards. Behind the glass you can store sets, porcelain, glasses.
 2
2
If kitchen cabinet surfaces are great, white countertops are highly impractical. Fortunately, the combination of dark countertops and white surfaces looks very stylish.

heavy meta
Looking for a modern and slightly urban design for your kitchen? Coat the surfaces of your kitchen cabinets with metallic paint to give your kitchen the look you want.

Retro style in the kitchen can be created using a combination of the right colors and decor with retro-style things. In this example, both techniques are used: pale yellow and light green perfectly convey the style of the past era, and the old-style gas stove, teapot and cups only enhance this effect.
 1
1
Overhead horizontal and vertical wood planks give texture to the kitchen cabinet, while the color and handles complete the overall composition.
 2
2
Once upon a time, we tremblingly picked up handbags to match the shoes? and now it is considered mauvais ton. The situation is the same with colors in the interior - a successful combination of different shades is valued much more than a single color painting.

Create a unique look for your drawer kitchen cabinet by painting each drawer a different color. Of course, try to choose well-matched colors and shades.

Although the kitchen is considered a non-residential area, the time spent here every day by all family members is measured in hours. It is natural that in a couple of years the interior of the kitchen will want to change. Buying a new kitchen set, re-gluing the wallpaper or re-laying the floor are labor-intensive ideas that will take a lot of time to implement. How to update the interior of the kitchen with your own hands?
Kitchen interior ideas #1: change the surface of the walls
The surface of the walls is a huge field for fantasy. A plain wall in the kitchen is enlivened with stencils. Working with stencils is intuitive for anyone. If you want to gently deepen the interior, then the wall is covered with a pattern that is in harmony with its main color. A contrasting stencil pattern will make the atmosphere in the room original, but sharp.
There is another solution available: a kitchen wall with decals. The range of stickers will satisfy any demanding customer: mirrored, one-color and multi-color, with or without a plot ... Therefore, finding suitable stickers is not difficult, just like sticking them. Stickers and stencils can be attached not only to a painted wall, but also to wallpaper. But peeling them off without damaging the wallpaper will not work.
Kitchen Ideas #2: Affordable Wall Decor
A fashionable idea for the kitchen is a wall decor that can turn an ordinary renovation into a designer one. For example, a laconic kitchen looks relevant, where the design of one wall becomes an interior accent.
An interesting idea that has become a classic in design is the art wall. It implies that the decor completely fills the wall. In order for the design of the kitchen to look stylish, it is necessary to select items that have a partially similar look or design style. For example, the composition may be as follows: a picture depicting a lavender field, a herbarium: wild flowers under glass, plates in green and lilac tones, a small figurine of a rooster or a horse. The kitchen, where such items are placed, evokes associations with the Provencal style.
Instead of themed compositions, try using photos. To make a collection of different photos look cohesive, you need to choose a unifying element for it. For example, black and white photos of famous masters, your family photos from different years, photos of the kitchen in retro style. If the photos in the kitchen differ in plot or style, then making them look uniform will be possible due to a similar frame.
Such a decorative technique as art wall has an important advantage. This kitchen decor will not get bored. After all, any element of the composition, whether it is a picture for the kitchen or a photo, if desired, are interchanged or replaced by other objects. A suitable art wall can be chosen for any style of kitchen.
Kitchen Design Ideas #3: DIY Furniture Design
The appearance of furniture in the kitchen can be changed at minimal cost. It is realistic not only to change the style of the kitchen, but also to hide defects on furniture that appear over time - chips, cracks, scratches. Among the simple ways - decoupage. A special napkin is glued onto the prepared surface of the furniture. A picture or photo may also be used. To make the design not only original, but also functional, cover the resulting furniture decoration with two layers of acrylic varnish. It will protect the locker or drawer.
A simple idea on how to freshen up a kitchen set is to cover it with self-adhesive film. But this procedure will have to be repeated at intervals of six months or a year, because the film quickly leaves on the end parts of drawers and cabinets.
If the kitchen is designed in country style, then you can refresh the kitchen set by replacing its doors with small textile curtains. In order for the headset to remain functional, the curtains must be removable for ease of maintenance.
The upper cabinets will look new if you remove the doors from them. But on open shelves, decorative items for the kitchen should be placed, and not ordinary plates. Otherwise, such decoration of the kitchen will give the room sloppiness.
A kitchen cabinet that has lost its original appearance can be changed by repainting it. In some styles, for example, loft, grunge, provence, shabby chic, the casual coloring of the surface of the cabinets will also fit in. Therefore, if your kitchen is associated with these stylistic trends, but you are not sure about your decorating abilities, it is still worth a try.
The effect of aging is easy to achieve if you cover the kitchen cabinet or other furniture with two contrasting layers of paint, and clean the top one locally with sandpaper. Be careful - in order for the cabinet or chair to look decent, you should wait for the paint to dry completely.

Kitchen Interior Ideas #4: Changing the Design of Appliances
A kitchen where there are no household appliances, for example, a refrigerator, or a microwave oven is nonsense. But as a potential object for decoration, they are often unfairly forgotten.
For example, the idea of making an old refrigerator an original interior element can be implemented by anyone. Old equipment should be sanded, degreased and primed. Then painting is carried out, stenciling patterns, pasting the refrigerator door photo ... For additional protection, it is better to varnish the technique. After all, the kitchen is where drops of water or fat constantly fall on any surface, whether it is a sink or a refrigerator.
A similar technique is used in relation to other types of technology. But do not forget that a small pattern or drawing on a large technique looks ridiculous, and vice versa. Then these items and the kitchen as a whole take on a disharmonious look.
To make the kitchen look stylish and its design not be overloaded, independent design of appliances should not be combined with updating furniture. Otherwise, the space will look not stylish, but tasteless. Don't forget to take precautions. In order for the kitchen to remain a safe zone during the renovation process, the appliances should be unplugged and make sure that their case is intact.
DIY Kitchen Interior Ideas #5: New Textiles
Kitchen Idea #6: Small DIY Decor
- A useful item in every kitchen is a hot stand, which can be done in less than half an hour. You will need 30-40 pieces of wine corks. Their side parts are glued together in a vertical position. The shape of the stand is determined by your taste - it can be round or square. Additionally, such a small but original craft is decorated with ribbons or twine, which are tied around its perimeter.
- Even your small kitchen will not lose a single square centimeter of space if you place all the decorations in a vertical plane. Among the options that are affordable and pleasant for home owners are do-it-yourself kitchen refrigerator magnets. To make such a decor for a small kitchen, you will need your favorite photo, a small piece of wood, glue, varnish and a magnet. The photo is glued onto a piece of wood, the edges of which are better to be slightly rounded with a file, and this small composition is varnished. A magnet is glued to the back. The photo in a beautiful frame, which will always be in sight, is ready! Such an idea, if you hang a lot of photos, allow you to make a mini-gallery out of your kitchen. It is not necessary to stick a photo to the magnet - any beautiful gizmos will do: from papier-mâché fruits to shells brought from vacation.
- To turn the kitchen into a room where family news is stored and transmitted, it is worth making a wall-mounted note board. The surface of the board of the required size is covered with a special paint for school boards and inserted into a beautiful frame. To make the writing board even more convenient and functional, attach hooks at the bottom of the frame designed to accommodate towels and other kitchen items. Do not forget to provide a place for a piece of chalk, with which messages for your household will be written. For these purposes, make a small shelf a couple of centimeters wide, mounted on the frame. Another option is to fasten the chalk to a string that is attached to a nail driven into the frame.
- A chandelier made of plastic spoons is a simple hand-made option, the implementation of which is cheap. A kitchen with such a chandelier looks non-standard, but guests will not be able to guess what the lampshade is made of right away. Cut off handles from plastic spoons. The round parts of the spoons are glued to the surface of a large plastic bottle with a cut bottom. The placement of the spoons imitates fish scales, so the bottle will not be visible. In the lid, you need to make a hole for the wire, and then also seal it around with spoons. Spoon chandelier is ready! If necessary, paint it in the desired color.
Kitchen storage idea #7: Use space wisely
The kitchen is a room where there is always a lack of space, regardless of its size. Therefore, each storage idea will not be superfluous. To make the space under the sink, which is rarely used due to the placement of communications there, more functional, place several metal pipes in its upper part. Pipes are fixed side by side in a horizontal position. This idea of storage will allow you to use the space under the sink to accommodate household items. Tanks are placed on pipes. One pipe under the sink may be enough. Then household products with an elongated atomizer are suspended from it on a pipe. If attaching a metal pipe to the space under the sink is problematic, then use a plastic cornice for curtains from the bathroom.
A convenient storage solution that is sure to come in handy in the kitchen is a magnetic board. On it in a vertical position it will be possible to place a lot of metal utensils. If you couldn’t find a magnetic board for sale, then your kitchen will benefit from the presence of a perforated canvas. Small S-shaped hooks are inserted into the holes for hanging items. If you paint the perforated canvas in the color of the walls, then the kitchen will take on an original look.
If the kitchen has already been renovated, but was not comfortable enough, then the idea of \u200b\u200bstorage using wooden clothespins will help. To use the space on the inside or side of your kitchen cabinets, carefully glue the clothespins in place. This storage idea will allow you to hang kitchen textiles and many different little things - for example, towels, potholders, notes. Also, clothespins are glued to the wall. This storage idea frees you from the hassle of drilling holes and buying hooks.
It may seem that handles are an insignificant element and are not even worth talking about. But designers have a completely different opinion on this matter. They argue that it is the small details that play a rather large role in the overall image - they give the furniture a finished look and emphasize the style. If the kitchen set as a whole is well preserved, has not cracked, but the handles have faded and peeled off, then the interior of the kitchen will look sloppy.
That is why urgently replace the old handles with new ones! Now you can find a huge variety of different options: these are modern staples of various colors, wooden, or transparent plastic.

Want to brighten up your kitchen? Get colored pens, they will certainly bring a fresh touch to the interior of the room. Experiment not only with the material, but also with the shape. Now there is a huge selection of different handles for furniture fronts, for example, in the form of animals or plants, which your child will simply be delighted with.

The range of door handles is so diverse that it can satisfy the needs of any, even the most demanding customer.

When going to the store for new kitchen cabinet hardware, be sure to take an old handle as a sample, otherwise you can make a mistake with the size, as a result, you will have to make new holes in the doors, and this is just a waste of time.

Decorative inserts
Another interesting idea on how to update a kitchen set with your own hands is a sticker on the facade of cabinets (including doors) of decorative inserts. You can use a variety of materials for this - the remains of ceramic tiles, for example.

This will require the following materials and tools:
- ceramic tiles (you can take leftovers for this purpose and even buy scrap at a bargain price);
- tile adhesive;
- overlay strips.
Special skills are not required. You should not abandon this method for the reason that you have never had to lay out a tile before. Believe me, everything is much easier than it seems. First you need to unscrew the doors of the cabinets, remove the fittings. Wash them thoroughly and let dry. It does not hurt to treat the pollution with some kind of alcohol-containing solution. If you want to radically update the facades, then it is worth pre-painting. Dilute the tile adhesive. Lubricate the surface of the facade. And start gluing the tiles according to a pre-created sketch.

To add aesthetics to the facade, make a frame of decorative or plastic strips around the tiled mosaic. Glue them also on glue, but pick up a universal one, one that fits both surfaces without any problems and leaves no marks.

By the way, inserts can be not only ceramic, but also made of rattan fabric - they are most suitable for kitchens whose interior is designed for eco-style or for some kind of country style.
That's all - the finishing of the facades of the kitchen set is completed. The home master only had to install them in their places and screw the unscrewed fittings.

Let there be color!
Colored boxes will instantly transform the interior of the kitchen space. Colored blotches, disproportionately located on the surface, are very fashionable now. If the kitchen is made of wood, just paint a few of the drawers in different colors. For example, if a white kitchen needs updating, then paint the drawers green or blue. Do not be afraid to create, there are no restrictions, it can be red or yellow, to your taste.

Although white is considered the color of purity and neatness, in general it is rather boring and monotonous. And it is the bright color blotches that can make the furniture colorful and cheerful. If the kitchen is made of plastic, then the boxes can be pasted over with colored self-adhesive film, which is sold both in construction markets and in stores. Remove boredom and despondency from the family hearth!

wooden decor
Wooden stickers on kitchen doors look original. You can buy them ready-made - kits for children's creativity are also suitable for this purpose. Can you cut? Wonderful! Then make wooden blanks with your own hands! Cover them with varnish and glue to the doors.


It is up to you to decide what shape the sticker will be - small flowers or stars, geometric shapes or fences glued across or along the door panels. If you have a child, invite him to participate in this interesting business, he will decorate kitchen furniture with great pleasure under your guidance.
Chintz accent
Chintz facades look non-trivial. In order to decorate the kitchen in this way, you will need a piece of chintz, which you can buy in a store or find in your closet, measure the doors of kitchen furniture, cut the fabric according to the measurements and stick it on the panel (be sure to remove the handles before this!).

After drying, paint over the chintz with a colorless varnish - this should be done five to seven times. Along the perimeter of the glued fabric, you can attach wooden slats that will complement the innovation and make the decoration more accurate. And if you manage to make a lampshade from the same fabric, sew chair covers, then you will get an unusually beautiful kitchen.

Decoupage
Decoupage is one of the most spectacular and cheap ways to update a kitchen set. The works of the masters turn out to be so interesting that even after looking at not very high-quality photos, it is still breathtaking and I want to try to transform the furniture in the kitchen that has become incredibly annoying beyond recognition with my own hands.

To make such beauty, nothing expensive is required. All you need is an artistic flair, an understanding of how the transformed furniture will look after the decoupage work comes to an end.

What will be required:
- dye;
- large drawings of a kitchen theme (for example, fruits, beautiful jars of spices or cereals);
- acrylic lacquer;
- primer;
- craquelure varnish (provided that you want to achieve the effect of aging - as a result, the furniture will be covered with artistic cracks);
- PVA glue (or special decoupage);
- sandpaper;
- a set of brushes.
Again, you can not do without parsing the kitchen. Unscrew the panels, remove the fittings. Thoroughly wash the surface to be decoupage. If necessary, sand, remove bumps.
Carefully inspect the surface, if there are large cracks on it that spoil the appearance, then you will first have to putty them. After that, go over the panel with sandpaper.
To make the surface look even and the applied decor then look natural, it is better not to be too lazy and primed.
If you plan to do decoupage on glass inserts, then you must definitely degrease the glass. Special detergents will help you deal with this.
Prepare the pattern you want to place on the furniture. Consider the surface area, the size of the pattern will depend on it. Do not paste too small images. But, of course, it all depends on the idea being implemented. It is better to use special three-layer napkins for decoupage. Which drawing to choose is up to you, but keep in mind that they must be of good quality and fit the overall interior of the kitchen. If the main decor of the room is made in the Provence style, then pictures depicting lavender, olives, climbing roses will do.
By the way, you can print pictures for decoupage yourself if you have a laser printer available.
You can go the other way - decorate kitchen cabinets with pieces of wallpaper with a suitable pattern. Perhaps this is the easiest decor option.
If you decide to decorate an old set with wallpaper, then in this case standard decoupage glue or PVA will not work. In this case, the adhesive is selected from the type of wallpaper.

The final touch is to completely cover the entire part with acrylic varnish. This must be done 5-6 times.
It is necessary that each previous coat of varnish dry well.

We assemble the kitchen set and admire the transformation. Do not forget to take a photo and post it on social networks - this way you will wait for your friends to visit faster, they will probably want to learn the secrets of updating kitchen furniture with their own hands and see how the set looks live.

Imitation of fabric on old kitchen furniture
There is another way to update a kitchen set - fabric imitation. If you do not want to mess with the real material, use this method. First you need to remove the doors from the hinges. Paint the front with white paint and let dry completely. Next, apply a thin layer of paint in any other color of your choice, but make sure that the white color does not show through the new layer. If desired, you can leave a white border around the edges. Now start creating. Take a spatula with large teeth and draw straight lines from top to bottom. The result is smooth tracks. Move a little distance and look at the door - it seems that it is covered with a striped fabric. If you also draw horizontal lines, there will be a feeling that the fabric is in a cage. There is one important circumstance - be sure to make sure that the hand does not tremble, the lines are even. It is also impossible to tear off your hand when drawing lines, otherwise the tracks will look sloppy.

Self-adhesive film
One of the easiest and most inexpensive ways to update a kitchen set is to glue the facades and internal shelves with self-adhesive film. The assortment of this material in stores is impressive - you can easily pick up a vinyl film with the desired pattern. The image on the film imitates different surfaces: natural stone, leather, wood texture.

Self-adhesive film is ideal for the restoration of old kitchen furniture:
- It tolerates high humidity;
- Resistant to sudden temperature changes;
- Washes well;
- If necessary, it is easy to replace the damaged fragment.
Materials and tools:
- vinyl self-adhesive film with the desired pattern;
- accessories;
- roulette;
- marker knife / scissors;
- rubber roller;
- sponge.
Before starting restoration work to improve the appearance of kitchen furniture, it is necessary to completely free it from the contents, remove shelves, drawers, remove facades from hinges, and remove fittings.

Place the unscrewed fronts on a hard horizontal surface. Now take measurements - the height and width of the boxes, facades that you are going to paste over with self-adhesive film. Record this data.
Unscrew the handles, corners and other fittings, if any, on the facades.
Now arm yourself with sponges, detergents - thoroughly wash the surface on which you plan to stick the self-adhesive. Make sure that there are no greasy stains on the panels and shelves. Be sure to dry the headset with a clean, soft, lint-free cloth.
Self-adhesive film is easy to work with, and even a novice furniture restorer can handle it without any problems. Please note that a paper centimeter grid is applied on the back of the film. It will help you cut out the details of the desired size.
Do not forget to add 4-5 cm to the pattern in those places where the film will be bent. This margin is necessary in order for the film to stretch well. When you start cutting the film, control the location of the pattern, if it is there.
Using a marker knife, cut out the required number of parts according to predetermined sizes (taking into account the margin for hem).
Start decorating the headset. Attach the film to the surface of the facade, carefully peel off the protective paper base, on which the centimeter layout is made. After the film has adhered evenly, pass over it with a rubber roller. Make sure that the self-adhesive film lies evenly, there are no air bubbles under it.

In such a simple way, paste over all the facades, shelves, drawers. Replace hardware if necessary. Screw the fronts into place.
Now enjoy your work! The set has changed, will last a few more years or until you want to radically replace all the furniture in the kitchen. In the meantime, get ready to listen to compliments from friends who have come to the light that they were able to transform their old headset so cheaply beyond recognition.

Facade replacement
There is another cardinal way to update the kitchen set - a complete replacement of doors. But we must say right away that this method cannot be classified as economical. Having made measurements of old doors, you can order new ones, at your discretion, both in color and in material.

You can varnish or paint new doors. And do not be upset that, apart from the doors, everything remains old, no one, believe me, will notice this. And if the base of the kitchen is in good condition, then it will be able to please you for many more years. There is another important detail - you did not overpay for the upgrade, because almost all wooden kitchens are basically made of chipboard, and only front panels are made of wood. Think for yourself why you need new costs when the “skeleton” of furniture is already good. If the shelves over the past years have become so dirty that it is almost impossible to wipe them off, paste over the surface with self-adhesive wood-like film - inexpensive and beautiful!

Glass replacement
If your kitchen cabinets have glass doors and shelves, replace them with new, more modern ones. Now at the peak of popularity frosted and colored glass. The updated facade of kitchen furniture, as well as new shelves - and we can assume that you have fashionable furniture in your kitchen.

It is best to order glass in a store, but if you do not have the means, you can use the method that our grandfathers invented - apply a mixture of powdered chalk with silicate glue with a brush on the glass in two layers.

You can put beautiful bright dishes on the shelves, which will give the kitchen a “cheerful mood”, and under the shelves you can make a backlight. The result is a kitchen set that will not yield to expensive Italian furniture.
Moidodyr
If our advice and examples with photos did not convince you to update the old kitchen set, then try to at least just wash it thoroughly. Over the years, a huge amount of soot and grease eats into the surface of the furniture, and with high-quality cleaning, it can even change color. Furniture that is finished with plastic and enameled is easily cleaned with ordinary washing powder at the rate of one tablespoon per liter of water. Washing the surface of enameled furniture with water above fifty degrees with soda or laundry soap is not worth it. These funds lead to tarnishing of the enamel. It is enough to wipe the wood with a well-wrung out cloth, and then dry the surface of the furniture with a linen napkin.
If there are many small cracks and scratches on the surface of the furniture, purchase a special product from the store that masks them. In case your table top has a stain from a hot pot once placed, you can easily wipe it off with a mixture of alcohol and vegetable oil.
Metal parts of the kitchen that have darkened or faded from time to time can be updated with a self-prepared product - ammonia (30 g), chalk or tooth powder (15 g) and water (50 g). All this mixture must be shaken well, and then applied with a flannel napkin to the darkened surface and rub it to a shine. After such processing, furniture handles will be better than new ones.
In a word, choose the method that you like and go! Everything that you do for the sake of your favorite cuisine, she, believe me, will appreciate it and will delight you with its new look for a long time to come. We will be glad to see in the photo how the furniture has changed, thanks to our advice and your skillful hands.
When the kitchen furniture is dilapidated or simply no longer like it, do not rush to buy a new one, because, most likely, you can update it yourself. All you need for this is a couple of free hours or days, a thoughtful rework idea, some money and one of our instructions.
Method 1. Painting the kitchen with chalk paint
Do you want to update your kitchen set beyond recognition with your own hands? The best way to do this is to repaint the facades with chalk (mineral) paint. Why chalk?
- The fact is that this type of paint has a thicker consistency and increased adhesive properties, due to which it fits perfectly on any surface - even on laminated chipboard / MDF. Moreover, chalk paints allow you to do without tedious sanding, and sometimes even without a primer.
Chalk paints are also good because they give the painted surface a texture similar to that obtained when painting a wooden surface. Therefore, even the most ordinary kitchen with film facades after such an “update” will look much more noble.
- In Russia and the CIS countries, you can buy chalk paints from designer Daria Geiler, foreign manufacturer Annie Sloan, Kazakhstan's Vernenskaya Manufactory, etc. You can also make chalk paints with your own hands according to recipes that are easy to find on the Web.
Here are some photo examples of kitchens before and after restoration.
Photo of a kitchen with film facades before and after painting with paint by Daria Geiler. Here, the author of the alteration restored the peeling film on the facade near the stove, and then painted the furniture without removing or sanding the film.

An old veneered kitchen before and after Annie Sloan paint. By the way, in this kitchen even the tiled floor was painted with chalk paint, and the patterns on it were painted using a homemade stencil


Inspired? Then it's time for the master class.
To paint the kitchen you will need:
- Primer (special for chalk paints or alkyd if the furniture was painted with oil stain);
- Chalk paints (preferably with a 10% margin);
- Matte moisture resistant varnish (acrylic or polyurethane).
Helpful Hints
- The consumption of materials is calculated following the recommendations of the manufacturers. It is especially important to correctly calculate the consumption of paint. If it is not enough, you will have to repaint the remaining areas with paint from another batch, which, due to the nature of production, will differ slightly in tone.
- Which varnish is better - polyurethane or acrylic? In order for the kitchen coating to withstand extreme loads, it is more reliable to use polyurethane varnish. However, if you don't cook often and don't have pets, acrylic varnish is great, especially since it dries faster, doesn't have a strong smell, and is cheaper.
- Brushes: two synthetic brushes for primer and varnish, as well as one natural or synthetic brush about 4 cm wide (a natural brush gives a more pronounced texture);
- Degreaser, for example, white spirit;
- Sandpaper with a grain of 100-180 microns;
- Ladder;
- Film and masking tape (to protect non-painted parts);
- Screwdriver;
- Gloves.
How to paint a kitchen set:
Step 1. Preparation
First you need to remove the handles from the facades. The floor, walls, backsplash, countertop, glass inserts, fittings and other surfaces that you do not want to paint should be covered with film and masking tape. Next, clean all parts from grease (preferably with a degreaser), stains and dust.
- Should the facades be removed? It is not necessary to do this, but it is more convenient to paint this way.

Step 2: Priming and/or sanding
It is not necessary to sand the old paintwork, film or lamination, but it is necessary to prime it in 2 layers. In this case, each layer of the primer must be allowed to dry, and then the primed surfaces should be treated with sandpaper to level the coating and enhance the adhesion of the paint.
- However, if the lamination has a strong gloss, then it is advisable to remove its upper shiny layer with fine-grained sandpaper - this will make the coating even stronger.
- If you are not too demanding on the result (for example, if the kitchen is temporary, very old or got for free), then you can do without a primer. All you need to do is: wash the fronts of grease, then paint them in 2-3 layers and finally cover them with 1 layer of varnish.
- Do you want to achieve the most even and durable coating? Then it is worth sanding the surfaces after each layer of primer, paint and varnish (except for finishing layers).
- Before starting work, test the paint on any object.
- If you want to save money, paint only the facades and visible parts of the frame, and the inner walls and shelves of cabinets can be painted with paint cheaper or left unchanged.

Step 3. Coloring
Once the primer is dry, start applying 2-3 coats of paint, letting each coat dry completely (one coat of chalk paint only takes about 30 minutes to dry).
- It may take 5-6 coats to cover a dark white paint finish.
Step 4. Lacquering
When the final layer of paint is dry, you can start applying varnish in 2-3 thin (!) layers with a synthetic brush (not used). In this case, it is desirable to allow each layer to dry completely for about 24 hours.
Step 5. Finally, we return the fittings and facades to their places.
Voila, the old kitchen is as good as new!

Method 2. Pasting facades with self-adhesive film
The fastest, cheapest and easiest way to restore kitchen furniture is to decorate its surfaces with self-adhesive film (self-adhesive wallpaper). Unlike staining, gluing a film is also good because it allows you to return the look of the kitchen to its original state after a while. For those who live in a rented apartment or just love a change, this way to update the kitchen will help out with a bang.
- The service life of furniture pasted over with a film will be 2-3 years in good condition.
- Most of all, this method of alteration is suitable for kitchens with solid facades without panels and relief details.
Below are photos of the kitchens before and after film restoration.


You can only partially cover the kitchen with foil. For example, one of the tiers, the back of the headset, plinth or panels. Examples of such a remodeling of the kitchen are presented in the following selection of photos.


If the facades of your headset have glass inserts, then you can only wrap the back walls of the cabinets with foil.

Patterns and drawings can be cut out of vinyl "self-adhesive".


By the way, you can update the apron, the tabletop of the headset or table and appliances with the film.


If the refrigerator is not built into the set and does not fit into the interior of the kitchen, just paste over it and the facades of the furniture with a film of the same tone


To remodel your kitchen you will need:
- Vinyl self-adhesive paper (with a margin);
- Sharp scissors and dummy knife;
- Ruler and centimeter;
- Squeegee for smoothing with a hard and soft side;
- Rags without lint.
- Screwdriver.
How to glue the kitchen with self-adhesive film with your own hands:
Step 1. Using a screwdriver, remove the handles from the facades, if you wish, you can remove the facades themselves - it will be more convenient to glue them.
Step 2. Wipe all surfaces, including the ends (!) clean and dry, paying special attention to greasy deposits - it is better to remove it with a degreaser.
Step 3. We begin to glue the film. Remove part of the substrate from the film and attach the canvas to the facade, leaving free 3-5 cm on top and side - we will wrap these excesses later on the edges. Take a squeegee and start smoothing the film, expelling bubbles, gradually going down and peeling off the backing. Movements should be smooth and slow. Having reached the lower edge of the facade, step back from it 3-5 centimeters and cut the canvas.
- If desired, you can pre-cut the canvas to the size of the facade with an allowance of 2.5-3 cm (for facades of standard thickness).
- The film fully sets only after a few hours, so do not be afraid to make a mistake - all flaws are correctable.
- If small bubbles remain on the film, they can be gently pierced with a thin needle and smoothed out again.
- The film is available in 2 colors to create a stylish contrast: light top - dark bottom.
Step 4. Now that the facade is almost completely pasted over with a film, let's take care of the edges and corners:
- First, cut the corner part of the free film at 45 degrees as shown in the photo below. Thus, you will get two "wings" along the two edges of the facade.

- Now carefully wrap the free edge of the film on one of the edges and smooth it. Next, wrap the remaining corner on the adjacent edge of the facade as shown in the next photo, and cut off the excess.

- In the same way, decorate the second edge with a film, but this time cut the corner at a right angle.

- Finally, press the seams tightly and repeat the procedure with the remaining corners.

Step 6. In the described way, glue over all the front parts of the headset, visible parts of the frame and the plinth with a film. If desired, you can decorate the shelves and inner walls of the cabinets with vinyl. However, it is not at all necessary to do so.
Step 7. At the last stage, put back the facades if you removed them, as well as the handles, by making holes in the right places with a knife or an awl.
Also, a visual master class on how to paste over the kitchen with self-adhesive film can be viewed in this video.
Method 3. Kitchen decoupage
Hand painting is very beautiful, but difficult or expensive. But even a beginner can decorate boring facades of a headset or hide local damage (scratches, chips, spots, etc.) with drawings created using the decoupage technique. In this case, the result is guaranteed to be excellent! We offer kitchen decoupage ideas in the next selection of photos.


Decoupage kitchen in shabby chic style

 PVA glue;
- For do-it-yourself kitchen decoupage, decoupage cards are more suitable than napkins - the drawings on them blend perfectly with each other and can be large in size.
- The main thing in remaking furniture using decoupage technique is the right choice of patterns. They should fit into the interior of the kitchen in color and style.

How to transform the kitchen using decoupage technique:
Step 1. First you need to degrease the selected place with alcohol or a degreaser.
Step 2. Carefully separate the layer with the pattern from the napkin, then cut out the desired print from it. At this stage, the drawing can be “tried on” on the facade and at the same time make a note where it should be located.
Step 3. Now we grease the reverse side of the cut out pattern with PVA glue and apply it to the facade in the right place. Next, gently smooth the napkin with a brush, moving it from the center to the edges, and blot the excess glue and remove it with a slightly damp cloth.
Step 4. Glue all the remaining napkins in the same way.
Step 5. If desired, the decoupage of the kitchen can be finalized by hand painting. When the glue and paints are dry, the pattern can be sealed with acrylic or polyurethane varnish in 2-3 layers (let the pattern dry completely between layers).
Some more useful information
- Wanna turn minimalist kitchen with solid fronts classical? This is possible if you glue moldings or carved parts on them, and then paint them following our instructions.

Also, before painting, the headset, wall cabinets can be supplemented with figured brackets (you can buy them ready-made or cut them yourself), and the base with baluster legs.


- For the best result, it is worthwhile to approach the “update” of the kitchen in a complex way and, if necessary, change not only the color of the facades, but also countertop With apron , curtains, dining table and chairs.
- Sometimes the desire for change can only be satisfied by replacing / painting furniture handles.

- Of course, before painting the kitchen or pasting it with vinyl, it needs to be repaired: tighten / change the fittings, glue and iron the peeled film a little, polish the scratches, and fill the chips, cracks and holes from the furniture handles with furniture putty.


