The strength of the screed, which is a prerequisite for arranging a reliable basis for installing flooring, is affected by the type of interfloor overlap, as well as the quantity and quality of materials used in the preparation of the mortar. The most difficult in the arrangement is considered to be a screed on wooden logs.
Rules for preparing the base for the floor
Sand-cement screed allows you to make a flat surface on which it is planned to lay one or another type of floor covering. The advantage of a concrete base is that the leveling layer is prone to deformation only during solidification, and after that no significant changes occur with it.
Before a strong and durable floor screed is created on wooden logs, its parameters should be calculated. It is necessary to deal with the content of cement in the solution, with the thickness of the base layer, with the need for a reinforcement process.
When there is a need to use reinforcement, it is determined with its type and dimensions of diameter and cells. If a significant load is exerted on the finishing floor covering during its operation, reinforcement is carried out in two layers.

A high-quality mortar will be obtained only on the condition that the needs for cement necessary for the screed are correctly determined. It is necessary to decide what strength the base and the brand of concrete need. It is important to know the amount of mortar that will be required in the process of creating a leveling layer. After receiving all the data and performing calculations, proceed to laying the screed.
Work is performed in the following sequence:
- prepare the surface, removing debris and dust;
- then the interfloor overlap is coated twice with a primer with deep penetration. The second layer is applied after the first has completely dried;
- along each of the walls it is desirable to lay a plastic tape or other rolled materials. This measure is necessary to eliminate possible deformation inside the screed and to prevent the formation of cracks and chips;
- after pouring, the solution is leveled according to pre-installed beacons. For their installation, profile trimmings or logs are used. The use of beacons requires additional time costs, but in the future the work will be completed in a shorter time and materials will be saved.
Organization of concrete screed on wooden logs
Most often, the leveling mixture is laid on top of the concrete floor slab. But sometimes in private wooden houses or in old buildings it becomes necessary to equip the screed along the logs, as in the photo. But these wooden elements have a significant drawback, which is their low strength.
In addition, under mechanical influences, they often dampen, especially with unevenly exerted loads. Also, wooden products are subject to putrefactive processes.
Therefore, it is necessary to strengthen the design of the lag. You should also pay attention to the parameters of density and elasticity of the sand-cement mixture. To increase the latter indicator, special additives are used (for example, plant fibers, polystyrene).

In order to strengthen the lag, a metal frame is made of wood and a reinforcing mesh is laid. If it is necessary to perform two-layer reinforcement, the frame structure is made of a channel.
When a screed is made on wooden logs, before creating a frame, insulating materials (expanded clay, perlite or others with a low thermal conductivity) are poured into the gaps between the wood elements. This measure further reduces heat loss and improves sound insulation. Before filling the insulation, a plastic film is placed on the base.
When expanded clay or other material is filled up, they begin to create a frame. Self-tapping screws are used to fasten the channel to the bars. After the installation is completed, a reinforcing mesh is laid in one or two layers, which is placed at some distance from the insulating material. This parameter is determined using clamps. About 5 pieces are used per "square" of the area.
After the installation of the frame is completed and the reinforcement is laid, the prepared solution is poured according to the pre-placed beacons. After this work is completed, the mass is carefully leveled with a vibrating screed. This construction tool moves and removes bubbles from the top layer of the solution, which has a positive effect on strength.
If a concrete screed is made on wooden logs, after the mixture has dried, its surface is subjected to grinding. This process enhances strength and contributes to obtaining an even base.
Construction of the floor along the logs in wooden houses

The technology for installing dry floors in wooden houses looks a certain way:
- logs are installed directly on the base, determining the distance between the bars in accordance with the choice of finishing flooring;
- when plywood finishing is planned, the space between the lags is reduced;
- if you have to lay durable wooden boards, increase the distance.
The peculiarity of the installation of the lag is that the construction of them can be installed on a base made of any materials.
Laying flooring on logs on a primer
Work on arranging the floor using this technology in wooden buildings begins with calculations to determine the size of the step between the supporting elements and the lags. This parameter directly depends on the thickness of the bars. The larger it is, the greater the distance between the lags.

- since columns for the foundation are used to build the foundation of the structure, they need to be dug into the ground;
- then a waterproofing layer is laid between the ground and the concrete base using roofing material and a wooden lining treated with impregnation;
- columns of bricks are placed on top of the columns for the foundation. As a rule, the height of the subfloor is approximately 20 centimeters;
- a layer of insulation is placed in the space between the pillars, for example, expanded clay is chosen;
- after laying the heat-insulating layer, antiseptic impregnation should be performed. It can be used to process the wrong side of the boards, from which a rough version of the floor covering is made.
Laying a wooden floor on a reinforced concrete floor
In this case, the base for the logs are pieces of fiberboard, pre-impregnated with an antiseptic composition. Between the bars maintain a distance equal to at least 60 centimeters. When laying ceramic tiles, a step of up to 30 centimeters should be observed (more details: "").
Wooden logs are attached to the ceiling using screws, dowels and self-tapping screws. The work associated with the installation of bars is checked for deviation from the required result using a level.

The nuances of laying wooden floors on logs
There are features of the installation of wooden coatings on logs:
- To give the finished floor visual appeal and aesthetics, the bars must be placed perpendicular to the flow of light from the window openings.
- It is necessary to fasten the logs to the base and floor boards as reliably as possible, preventing the formation of sagging wooden elements, the appearance of cracks and voids.
- Finishing boards must be from the same lot.
- When laying ceramic tiles, then the distance between the lags should not exceed 30 centimeters.
- In places of the most active movement of people, the boards of the laid finishing floor covering should be located along the route of movement, and the logs should intersect with its trajectory.
- When arranging the floor along the logs in the apartments of urban high-rise buildings, it is desirable to lay soundproofing material under the bars.
- The gap between the walls of the room and the lags cannot exceed 3 centimeters.
- In order to increase the degree of rigidity of the subfloor, the design of the arrangement of wooden bars should have an external resemblance to the grid. When the step of their installation can not exceed one meter. Such designs must be used if it is planned to lay such a floor covering as a laminate.
- When choosing parquet for the floor under it, experts recommend installing adjustable logs, and then an ideal position relative to the horizontal and the required ventilation will be ensured.
Thus, the concrete floor screed on wooden logs and the laying of the finishing floor covering can be done independently, without the involvement of a master. The main condition for obtaining a quality result is compliance with the technology, according to which it is customary to carry out construction work.
Wooden floors are rarely leveled with concrete. Many experienced builders believe that hoisting a heavy monolithic structure onto a wood floor makes no sense. Moreover, the concrete layer is not very “friendly” adjacent to the wooden base, not only during solidification, but also during operation. In this regard, it is more expedient to use dry leveling schemes. But in those cases when it is necessary, for example, to lay tiles in the washing room, you have to look for a way out.
We’ll make a reservation right away that a concrete screed on a wooden floor is a completely feasible task, but here, as in any other business, there are specific moments.

Plank floor - photo
Wood is a special material that has not only a number of technological advantages, but also one significant drawback. It is not static, therefore, even at the end of the installation work, it “behaves” according to its own laws, peculiar only to it. Changes in temperature and humidity cause the lumber to shrink, increase / decrease in volume, stretch or shrink. By the way, it is for this reason that after the construction of the log house, the final finishing is carried out after about 2 years.

But even after a two-year period of shrinkage, wooden structures are still moving, albeit not so intensively. For example, a wooden floor with underfloor heating moves every time the heating system is turned on.

Video - Concrete floors in a wooden house
Unlike wood, a monolithic concrete base only slightly changes its geometric parameters during hydration, and after complete solidification, it almost does not move at all.

And if this base were tightly connected to an unstable wooden surface, then the slightest movement of the latter would lead to the formation of cracks on the concrete surface.

One of the reasons for the appearance of cracks is non-compliance with the technology of pouring concrete on a wooden base.
But the leveling technology described here is intended to ensure that both elements cannot harm each other, and its (technology) distinguishing feature is that during pouring, the base does not contact the walls.

Scheme - an example of arranging a screed on a wooden floor
Design features of plank floors
It is hardly advisable to pour the screed over the floor, equipped with logs and floor slabs. Such floors often have a thickness of about 7-7.8 cm, and the only right decision in this case can only be the dismantling of all wooden elements, followed by pouring over the floor slab. Another thing is if the logs are high and located on brick pillars. Such pillars have a height of over 0.3-0.4 m, so it is impossible to replace them with a concrete screed. Schemes of such floors are presented in the images below.
 1 - base; 2 - waterproofing from two layers of roofing material; 3 - lower harness; 4 - top harness; 5 - outer cladding with grooved boards; b - non-ferrous metal plate with holes; 7- outer wall from boards; 8 - plaster; 9 - plinth; 10 - plank floor; 11 - lag; 12 - a column of bricks; 13 - antiseptic wooden lining; 14 - underground
  1 - compacted sand; 2 - preparation from concrete; 3 - waterproofing from roll materials; 4 - brick column; 5 - wooden antiseptic lining; c - sheathing from antiseptic boards; 7 - board intermediate flooring: 8 - thermal insulation; 9 - air gap; 10 - floor; 11 - bearing beam
It is these structures that are often filled with a screed.
Pouring technology
The essence of pouring a concrete screed over a plank floor is to create a gap between a monolithic surface and unstable wood elements. For this purpose, the leveling layer is cut off from the walls with a damper tape, and from the plank base - with polyethylene.

Thanks to this, a floating floor is created, without connections to any of the surfaces. As a result, all the lumber elements continue to move in one direction or another, and the screed, which simply lies on top, is not covered with cracks from the permanent change in the position of the boardwalk.
The technical parameters of the concrete screed, as well as the basic requirements, are in SNiP 2.03.13-88 and 3.04.01-87.
SNiP 2.03.13-88. Floors. Download file
SNiP 3.04.01-87. Insulating and finishing coatings. Download file

On the advisability of using polyethylene
Direct contact with polyethylene film is known to adversely affect wood, leading to the growth of fungus and mold.


That is why, instead of a film in wooden structures, roofing material, bitumen-based mastic, glassine, or roll waterproofing with bituminous impregnation are often used. But the cement screed does not stick to the plastic film at all, which is why:
- both plates will be able to move freely along the isolating boundary;
- the screed will not draw moisture out of the wood, leading to cracks;
- the screed when moving will not pull the film, stretch and tear it.
Important information! Before starting work, care should be taken to minimize the negative effects of contact between lumber and polyethylene. To do this, all wooden elements must be treated with an antiseptic and an Aquastop primer mixture, which has moisture-repellent properties.

The filling procedure itself consists of several stages, let's get acquainted with them.
Prices for reinforced polyethylene film
reinforced polyethylene film
Stage one. Calculations
There is one standard calculation scheme: for every 15 kg / m² of dry mix, a thickness of 1 cm comes out. Even if the required amount of materials is known, you still need to buy them with a 10 percent margin.
Table. Dry cement mixes - cost
| Name | Manufacturer | Package | Price |
|---|---|---|---|
| "VOS Mixes" | Bag, 50 kg | 95 rub. | |
| UMIX | Bag, 50 kg | 100 rub. | |
| "Stone Flower" | Bag, 25 kg | 75 rub. | |
| "Polymin" | Bag, 25 kg | 118 rub. | |
| Kreisel | Bag, 25 kg | 132 rub | |
| Manufacturer: "Ceresit" | Bag, 25 kg | 160 rub. |
Stage two. Foundation preparation
Having dealt with the technology and calculated the required amount of the mixture, you can proceed directly to work. Traditionally, you should start with the preparation of the base.
Step 1. First, the boardwalk is dismantled and a thorough revision of all elements is carried out. Logs are checked. If among them there are unsuitable for further operation, then they must be replaced.


Step 2 If the logs are installed in increments of more than 40 cm, then auxiliary bars are installed between them.

Step 3 Boards - if they are still usable - are nailed back. If slightly damaged floorboards are found, they should be turned over.

Nail heads are recessed by 2-3 mm, otherwise the plastic film laid on top may tear.
Step 4 Skirting boards are removed, thin boards are installed instead (the latter should cover the cracks near the walls). Do not forget that these boards are installed for a certain time, and after pouring the screeds will be dismantled. This will ensure ventilation of the wooden base, prevent it from rotting.
Important information! You also need to close all the cracks. If they are small, then you can fill them with sealant, but it is better to blow out large gaps with mounting foam.


Instead of sealant, you can use parquet putty made on the basis of wood dust, or a home-made putty mixture. To prepare the latter, you need to mix any sawdust with oil paint in a ratio of 4: 1.


Stage three. Padding
When the sealant or putty is completely dry, vacuum the substrate thoroughly to remove dust and debris. Sanding can be done if desired, although this is not required.

Next, a moisture-resistant primer is applied in two or three layers: it will prevent the appearance of air bubbles and the absorption of liquid from the cement mortar by the surface. Also, the primer will serve as additional protection for the wood from mold and fungus.

Concrete floor primer prices
concrete floor primer
Stage four. markup
Using an ordinary or laser level, a zero level is marked along the perimeter of the walls. The latter can be at an arbitrary height, but on average it is 35-70 cm from the base surface. It is necessary to designate several points of the zero horizontal on each of the walls.

Equal distances are laid down from these points, while the thickness of the screed itself must be taken into account.

Important information! The standard thickness of a concrete floating floor is about 5 cm. At the same time, each centimeter of such a floor will create a load on the wooden base of 100-110 kg per square meter. It is for this reason that it is desirable to strengthen the logs, although, if possible, it is generally better to install metal channels instead of them.

Stage five. Waterproofing
Further actions are related to the insulation of wooden structural elements, and the result should be a kind of pallet that does not allow moisture to pass through.
Step 1. A damper tape with a thickness of 10-20 mm and a width slightly exceeding the thickness of the screed is attached to the walls along the entire perimeter. This tape will provide not only damping of sound vibrations, but also the possibility of lengthening / expanding the floating plate. Tape is used for fastening.


Important information! At the end of the finishing of the floor, the excess tape protruding on the surface will be cut off, and the gap formed will be closed with a plinth.


Important information! There should be no wrinkles or damage on the waterproofing layer. The subsequent steps must be performed with extreme caution so as not to tear or puncture the film. If this could not be avoided, the holes must be immediately closed with polyethylene patches.

Step 3. Ideally, the waterproofing layer should be without joints at all. If there are joints, then they are all firmly glued with adhesive tape. Further work of the leveling layer will largely depend on the tightness of the waterproofing.
edging tape prices
edging tape
Stage six. Reinforcement
If the concrete layer is thick enough, then it must be reinforced. There are several methods of reinforcement, only the most common are considered below.
Method number 1. Reinforcing mesh


A very common option, which, however, is not particularly suitable in this case. The fact is that the previous layer is polyethylene, which can be damaged by the mesh. It will be quite difficult to move through the reinforcement without violating the integrity of the insulation. In addition, the film, as noted above, must be in direct contact with concrete, so the mesh must be located in the body of the screed.
For this reason, concrete is poured in two layers:
- poured - without beacons - the first layer;
- the grid is laid, beacons are installed;
- the second layer is poured.
It would seem that nothing complicated, but the concrete layer will dry for a long time - the interval between layers can reach 1 month. Therefore, it is better to resort to the second method.
Method number 2. fiberglass

The next reinforcement method is to add fiberglass directly to the concrete mix at the stage of preparation. The polymer fibers that make up this material are arranged randomly, resulting in maximum bond strength in all directions.
Moreover, the total weight of the screed will noticeably decrease due to the rejection of the metal mesh. Further actions are focused on the use of this particular method.

fiber prices
fiberglass
Stage seven. Installation of leveling
Lighthouses need to be built especially carefully, there can be no talk of any screws and nails. The foundations for future "beds" are made from the same solution that will be used for the screed. "Beds" are formed along the entire length of each of the lighthouses.

Important information! The distance between the "beds" must necessarily be 10-15 cm shorter than the length of the rule (often it is about 120 cm). The distance between the surfaces of the walls and the extreme "beds" should be 25-30 cm.
The metal profile is laid on the tops of the "beds" and heated in the solution in such a way that the height noted earlier (the level of the leveling layer) is reached. The installation of beacons must be done a maximum of an hour after mixing the solution, otherwise it will seize.
Stage eight. Mixing the solution
A mixture for concrete screed can be purchased ready-made or made independently. Factory dry mixes are sold in bags of 25 kg and 50 kg and diluted with water (6.5 liters per bag or 13 liters, respectively). If necessary, the amount of water can be increased, but not more than 0.5 liters.


All components are mixed with an electric drill with a mixer nozzle, the finished mixture should be used for a maximum of 15 minutes.
For self-preparation of the solution, you need to mix cement (at least “four hundredth”) and sifted sand (preferably river sand) in a ratio of 1: 3. An electric drill is also used for kneading, but the whole procedure is performed in 2 stages. The finished solution must be used no later than 1.5 hours after mixing.
Important information! The strength and water resistance of the solution can be increased by adding special plasticizers (the proportions are indicated on the package). Although there is a cheaper alternative to a plasticizer - ordinary washing powder (a handful for every 100 liters of water).
Prices for cement-sand mixture
cement-sand mixture
Stage nine. fill
The filling procedure is carried out traditionally, i.e. continuously. You should start from the far corner relative to the front door. The surface is leveled using a rule.

24 hours after pouring the screed, the beacons are removed, and the remaining voids are treated with a primer, filled with the same solution and leveled with a trowel.


Video - Screed on a wooden floor
Further care of the screed
Care requirements are the same for a finished dry screed, and for a home-made cement-sand mortar. The next day after pouring, the screed is moistened, the procedure is repeated daily for one week. For the first four days, the concrete must be covered with plastic wrap so that moisture evenly evaporates from the screed.


This completes the procedure for pouring the screed onto the wooden floor.
Wooden floors, if the right materials are used for their installation and if they are properly installed, can maintain their strength and stability for decades. Sometimes the question arises of laying concrete screeds directly on such floors. Why is there such a need? They think about a concrete screed in cases where they strive to perfectly level the floor in order to lay some kind of coating on it (ceramic tiles, a layer of polymeric materials). The same method is used when a complete wooden floor is too expensive.
Wood, which has a lot of technological advantages, is also known for one significant drawback that should be taken into account when working with it. This disadvantage is that it does not have static nature: even after the construction is completed, the wooden elements continue to “live” guided only by their own laws. Changes in humidity and temperature conditions cause:
- increase or decrease in the volume of wooden parts and elements;
- their shrinkage in height;
- increase or decrease in their linear dimensions.
This feature of the tree determined the rule that builders involved in the construction of wooden structures are always guided by: fine finishing of log cabins should be carried out no earlier than two years after their construction. As applied to our topic, this rule should be interpreted as follows:
It is strictly forbidden to pour concrete mortar on a new concrete floor. Concrete screed can be laid only after 3-4 years after the completion of the floor installation.
The mobility of wooden floor structures increases when any heating systems are laid under them. Each start-up and shutdown of such a system will cause them to move slightly.
If we compare the mobility of wooden structures with the mobility of a concrete slab, which is formed when laying the screed, it should be noted that the geometric dimensions of the latter change only during hydration. When the hardening of concrete ends, the dimensions of the monolith practically do not change. Such a difference in the behavior of wood and concrete in the event of their tight contact can cause cracks in the screed. Moreover, in such a case, it may even crumble completely.
The technology of leveling, produced without connection with walls and with a wooden floor, which we will discuss below, allows each of the elements - floor boards and screed concrete - to exist, obeying only its own principles and without harming its neighbor.
Materials required for work
If an assessment of the condition of the wooden floor and other related conditions has led you to the conclusion that a concrete screed is really necessary and that it is quite possible to make it, it is necessary to prepare in advance the materials that will be required during the work.
When preparing, it must be remembered that the mass of the fill must be sufficient to guarantee the tightness of the junction of the screed to the boards. However, the large weight of the concrete used can cause subsidence of the floor, bending, and then the destruction of the laid screed.
If the condition of the floor tells you that this course of events is quite possible, when preparing the concrete mix, you should use a plasticizer that will give the concrete some mobility while maintaining its integrity. An additional advantage of plasticizers is that these substances can have a positive effect on increasing the water resistance of the screed, which will be an additional protection for wooden structures.

And so, the list of materials required for laying the screed includes:
- cement and the required amount of plasticizers;
- the film needed to separate the concrete from the surface of the wooden floor;
- sand;
- any suitable sealant;
- epoxy or other suitable putty;
- primer with a water-repellent effect;
- metal mesh for reinforcement.
During preparation, you need to make sure that there are no breaks on the purchased film. Since the film should be laid overlapping, and its edges should rise slightly to the plane of the walls, when calculating its amount, at least 15% should be added to the area of the room.
You should also remember about the tools that will be needed in the course of work. In particular, you will need:
- spatula with which putty and sealant will be applied to the floor;
- hammer and screwdriver to strengthen the floor with nails or self-tapping screws.
Preparing the surface of wooden floors
A concrete screed can be applied to the floor only if its surface is completely ready for this. When preparing it, you should carefully examine each floorboard to make sure that they are free of rot and cracks. All boards must be securely fastened, there should be no gaps between them. Boards with major damage are removed and replaced with new ones. If it becomes necessary to interrupt the floor, then the nail heads should be recessed. The resulting recesses must be carefully puttied.
When preparing the floor surface, you must:
- fill with putty and, if necessary, mounting foam all the cracks on the floor;
- process wooden elements with sealants;
- after drying all the substances applied to the floor, clean it of debris and treat it with a moisture-resistant primer;

- when the primer dries, roll out the film with an overlap, so that it goes fifteen centimeters onto the plane of the walls. Excess film must be cut off. Fixing the film, if necessary, should be done with adhesive tape. The use of nails to fix it is unacceptable. To achieve a better result, a reinforcing mesh can be laid on top of the film.
In the video below, you can see how the film is properly laid on the surface of a wooden floor:
Having completed all these operations, you should start applying the preparatory markup. One of the original markup methods is presented in the following video:
Directly on the film covering the floor, with the help of concrete, rack beacons are strengthened, the distance between which should not exceed the size of the rules used when leveling the concrete solution.
Concrete screed and the process of pouring it
Pouring is preceded by the manufacture of concrete mix. For its preparation, clean sand and cement grade 400 are taken in a ratio of 3: 1. The solution is prepared on the basis of water with the addition of special plasticizers or similar substances. For mixing, you can use a large plastic container and a drill with a mixing nozzle. After mixing the solution, it is necessary to let it settle, and then mix it again.
If the thickness of the screed does not exceed 1 cm, then the consumption of the concrete mixture will be about 15 kg / m 2. Pouring the solution should be done, focusing on the beacons. Filling the entire floor must be done at the same time. Partitioning is not allowed. During the pouring process, air bubbles present there must be removed from the cement mortar using a spiked roller. Leveling the mixture poured onto the floor so that the concrete screed is even is carried out using a wide spatula or rule.

The techniques for leveling the screed on wood and concrete floors are similar, so the following video can be used to learn more about the techniques used:
The drying time of the laid screed is 28 days. During the first two days after laying, it should be moistened with water three times a day. After that, the beacons are removed, and the surface is primed and rubbed. After a month, the concrete screed is completely ready for full operation.
In the video below, although it is not in Russian, you can perfectly see all the schematically presented steps for laying a concrete screed on a wooden floor.
Choosing a wooden house on stilts, the owner gets a light, inexpensive, environmentally friendly building, the construction of which is carried out as soon as possible. The piles leave an empty space under the floor, providing air circulation, which prevents the wood from rotting, prolonging the overall life of the structure.
But the design also has a negative feature: in the cold season, the heat loss of the house through the floor increases significantly, which reduces the comfort of residents and increases the cost of maintaining a certain temperature inside. The best way to get rid of the problem would be a "warm water floor", equipped in a wooden house on stilts.
Purpose of screed equipment
One requirement is imposed on buildings of this type: a lightweight structure is not able to withstand a massive base, therefore, the arrangement of the screed should be approached with the utmost responsibility. It consists of three layers, each of which performs a specific function:
- The bottom layer is applied to the "rough" floor, allows you to level the base. If the level check revealed a slope between two walls exceeding 5 mm, then it is necessary to fill it. This will facilitate the circulation of water in the heating system, reduce the load on the pump, and extend the life of the mechanism.
- The second layer is needed for thermal insulation so that the house, installed on piles, does not freeze, which will significantly reduce its heat loss and reduce the current costs of maintaining a certain temperature in the rooms. The thickness of the insulating material is selected based on the average annual temperature in the region during the cold season.
- The top layer closes the pipes with the coolant, protecting them from damage, and at the same time plays the role of a stone oven. When heated, the concrete retains the temperature for a long time, transferring it to the room, which reduces the cost of maintaining the temperature in the room.
Properly equipped floor screed in a wooden house under the "warm floor" will extend the life of the building and increase the comfort of residents.

Existing types of screeds
At the moment, three types of screeds are used, which are divided depending on the amount of water in the composition of the solution:
- Liquid or wet. Received the greatest distribution thanks to simplicity of installation and high functional and strength characteristics.
- Semi-dry. The percentage of moisture is kept at an average level. Due to the reduction of moisture, the time for drying and the introduction of the "warm floor" into operation is reduced.
- Dry. Fine-grained expanded clay, quartz sand or fine-grained slag is used as a filler. A fiberboard, drywall or waterproof plywood board is laid on the heating pipes. The surface is leveled with a putty, and after drying, it is filled with a layer of bitumen, which serves as a waterproofing.
"Warm water floors" on wooden logs in a private house are laid using one of these technologies. The choice of a particular method depends on the budget, available time and structural features of the building.
"Floating" screed for private houses
In a house on a pile foundation, two types of screed are used to equip a horizontal heating system: on a “floating” screed and wooden flooring.
The first option is highly reliable and durable, but its weight will be at least 100 kg per square meter, so before installation, you must make sure that the structure of the building is able to withstand it.

A layer of waterproofing is laid on a leveled "rough" base, which is usually polyethylene. It performs a dual function: it protects the wood from moisture and subsequent decay, and is a separator between the screed and the base on which it is laid. To ensure reliable protection against moisture, the film is taken with a small margin, approximately 15 cm on each wall, where it is fixed with mounting tape, which will ensure tightness. If the polyethylene layer consists of several parts and overlaps, then the joints are also glued.
The heater is installed next. In this capacity, rolled, soft materials or expanded polystyrene plates, which provide high protection against freezing, will be the best options.
This method of making a “warm floor” screed in a wooden house on piles involves laying a damper tape around the perimeter of the room where the pouring takes place. Wood is not static, and under the influence of temperature there will be slight movements in the building structure, the tape levels these vibrations and protects the screed from destruction. It is important to remember that in a room whose area exceeds 40 m 2, several heating circuits are equipped, they also need to be separated by a layer of damper tape.
Tip: It is advisable to add a plasticizer to the cement mortar of the screed. To do this, you can take PVA construction glue at the rate of 1 kg of glue per bag of cement.
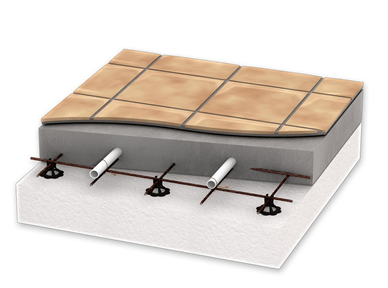
To ensure the solidity of the structure and fix engineering communications, a reinforcing mesh is laid on the thermal insulation layer. On it, with the help of clamps or special fasteners, maintaining the required distance between the turns, the heating pipes are fixed so that they do not change their position during the process of pouring concrete.

The last step will be the pouring of cement mortar. Its thickness should be within 5-7 cm, so that during the heating process the plate does not burst, and “cold bridges” do not appear in the cracks formed.
The floating screed does not have a strong adhesion to the base and is separated from the walls by a damper tape, therefore, with natural movements in the structure of a wooden house, it will retain its integrity.
Heating system mounted on a wooden base
Consider how to lay a water "warm floor" on wooden logs. The work is carried out in several stages:
- The draft floor is leveled until the difference between the edges of the site is eliminated.
- The first layer of polyethylene for waterproofing is laid.
- The second layer is foil-wrapped polystyrene foam. It will give the right level of insulation, and the foil prevents the heat from spreading down, concentrating it at the top of the "pie".
- Next, a wooden frame is assembled for the heating circuit. Gutters are sawn in it, where pipes will be laid.
- Communications are closed with a layer of galvanized metal or aluminum plates, which will evenly distribute heat over the entire surface.
- The last sheets of plywood or OSB are laid, on which the final floor covering is mounted.

Another option is to install a "warm floor" in a private house between the lags:
- On the side surface of the lags, cranial bars are attached with self-tapping screws, which will become the supporting base.
- Sheets of moisture-resistant plywood are laid on the bars, which are covered with a layer of polyethylene with a slight overlap on the logs.
- For thermal insulation, a layer of expanded polystyrene is used. Its thickness should be selected so as to coincide with the upper edge of the lags.
- The structure is covered with a layer of vapor barrier film, the area of \u200b\u200bwhich should exceed the dimensions of the room by 10-15 cm on each side.
- The reinforcing mesh is placed next, which must be poured with a thin layer of cement mortar. A layer of foil-coated insulating material is mounted on it, which acts as a heat reflector to the upper part of the structure.
- Heating pipes are laid in increments of 10 or 15 cm.
- A screed is poured, 3-5 cm thick, which is closed with a finishing coating.
We get a water "warm floor" in a wooden house with a screed on a plate of a multilayer "pie", which is lightweight, but retains its strength characteristics.
Tip: In low rooms, where the thickness of the concrete screed does not exceed 3 cm, it is recommended to use a layer of self-levelling compound. This will increase the strength of the structure.
Tiles as flooring
The physical characteristics of wood do not allow it to adequately retain the heat received from the heating system, so the best flooring option for horizontal water heating is natural or artificial stone tiles.
To get an independent screed for a "warm floor" for laying tiles on wooden beams in a private house, the following work must be done:
- A "floating" screed is mounted, according to the technology described earlier. The only exception is the thickness of the concrete solution. It should be 3-4 cm.
- After the screed has completely hardened, it is treated with a soil solution.
- Next, the floor covering is installed on the tile adhesive.
Despite the possibility of installing a tiled floor on wooden logs, this technique has a significant minus, the service life of wood is lower than porcelain stoneware and other tile materials. To replace worn-out wooden bars, it will be necessary to carry out a serious dismantling of the floor covering.
The advantages include:
- Significant cost savings due to the lower cost of wood.
- The total weight of the floor "pie" and the load on the supporting structure are reduced.
- Increased installation speed.
- The heating system is put into operation faster due to the faster drying of the thin layer of concrete.
Despite some limitations, tiling bathrooms, swimming pools and other areas with high humidity, together with the "warm floor" system, can significantly increase comfort and increase the durability of wooden structural elements.

Screed - an indispensable attribute of heating "warm floor". It protects pipes from stress and mechanical damage, allows you to get a perfectly flat floor surface, which has a beneficial effect on the comfort of residents. Its only disadvantage is that the installation of the screed "raises" the level of the floor, reducing the total volume of the room. If in rooms with high ceilings this does not have a significant effect, then in low ones it can interfere a little.
Many of us know that a dry screed can be laid on a wooden floor. Sometimes even experienced builders do not advise making a wet screed of cement-sand mortar or concrete on a wooden base. But residents of apartments and houses with jogged floors should not give up tiles on the floor or floor heating systems. There are special technologies that allow you to arrange a wet screed on a wooden base.
Wooden base features

Despite the abundance of advantages, wood has one significant drawback - it continues to live its own life even after being used in a certain design. As a result, wooden elements are susceptible to all kinds of changes under the influence of moisture and temperature changes. They can shrink, swell, or warp.
Important: it is precisely because of the non-static nature of wood that the installation of a concrete screed on a freshly laid wooden floor is strictly prohibited.
Even after a few years, the wooden floor elements continue to move, warp and shrink. Underfloor heating systems made of wood cause characteristic structural changes with each temperature difference.
Concrete screed behaves quite differently. It is prone to deformation and shrinkage only during the solidification of the mixture. In the future, no special changes to the leveling layer occur. Rigid adhesion of movable living wood to a stable screed would lead to cracking and damage to the latter. That is why the non-bonded screed technology was invented, allowing each layer to "live by its own laws".
The nuances of the screed device

The essence of the method is that for a screed device on a wooden floor, it is necessary to isolate each layer. To this end, the concrete screed is separated:
- from the walls of the room with a damper tape;
- from a wooden base with insulating material.
As insulation, you can use polyethylene film, glassine, roofing material, bituminous mastic or modern roll materials. However, preference is given to polyethylene film. Despite the fact that it creates a greenhouse effect for a wooden base, the film has a number of beneficial advantages for a concrete screed:
- a smooth surface does not cause adhesion of the insulating layer to concrete;
- concrete unattached to the film will not pull it along and tear during shrinkage or deformation;
- the integrity of the insulating layer will not give the wooden base the ability to draw moisture from the hardening concrete;
- a whole film will prevent the further cured screed from absorbing moisture from the wood, which can lead to cracks in the concrete floor.
Important: in order to negate the negative greenhouse effect of the plastic film on wood, all wooden base elements must be treated with an antiseptic and a water-repellent primer.
Technology
If you decide to make a screed on the floor along the logs with your own hands, then you should thoroughly understand the process of its device, which consists of several stages. A more visual installation guide in the video at the end of the article.
Preparatory stage

At this point, we need to do the following:
- All boards must be removed and inspected. Rotten, damaged or cracked elements should be replaced.
- We also examine the lags. We replace unreliable beams with new ones.
Tip: pay attention to step lag. If it is more than 40 cm, then it is better to install additional beams to increase the bearing capacity of the floor.
- Install the floorboards. Boards with an uneven, damaged surface can be turned upside down.
- All gaps between the boards are carefully sealed with sealant.
- After the expiration of the curing period indicated on the packaging with the sealant, you can begin to treat the floor with a moisture-resistant primer. Give time for the primer to harden.
- Using a laser device, we mark the level of the clean floor on the walls of the room.
Attention: when determining the height of the screed, please note that each centimeter of the thickness of the concrete layer presses on a wooden floor weighing 100-120 kg. Therefore, if it is necessary to perform a high screed, it is worth further strengthening the logs or replacing them with metal beams, for example, from a channel.
Insulation laying

At this stage, you need to make something, like a trough, from waterproof insulating material for pouring concrete. To do this, we do the following:
- First of all, we attach a damper tape along the perimeter of the room to the bottom of the walls. You can use a special strip, a regular board or a strip of expanded polystyrene. The tape can be attached with double-sided tape or with a stapler. The optimal thickness of the strip is 1-2 cm, and its height should be a couple of centimeters higher than the height of the screed. This element is needed not only for deformation movements of the screed, but also as a soundproof barrier. After laying the front layer, the protruding parts of the tape can be cut off.
- Now it's the turn to lay the plastic film. Adjacent strips of the film should overlap each other by 10 cm. The joints of the film are sealed with adhesive tape. Also, the insulating layer must be wrapped on the walls of the room to a height of 15-20 cm. As a result, you will get a waterproof trough made of insulating material, on which you can safely pour the screed.
Attention: Under no circumstances should there be holes, cuts or punctures in the insulating material. If they appear in the course of the work, they should immediately be sealed with polyethylene patches.
Installation of beacons

It is strictly forbidden to fasten guide beacons with self-tapping screws or nails to the floor. It is best to lay them on cakes or mortar beds. From the walls, extreme beacons are installed at a distance of 20 cm (see video). And the step of the guides relative to each other is 1-1.2 m, but not more than the length of the rule.
As beacons, it is better to use guide profiles for drywall. The arrangement of beacons on the beds from the solution will facilitate their alignment with the level of the clean floor. The lighthouse can be drowned deeper into the solution or raised higher by adding more mixtures, thereby achieving the desired mark (see video).
Tip: if you do everything with your own hands, then keep in mind that after preparing the solution, it is better to lay the beacons within an hour.
Screed reinforcement
The device of a floating screed on a wooden floor along the logs requires additional reinforcement, especially if the layer height is more than 5 cm. Usually, the reinforcement of the screed is done using a metal mesh made of wire or reinforcement. But in the case of floors along the logs, it is better to use a lighter material that will not additionally load the screed. In addition, the metal mesh can easily break the insulating layer during pouring. That is why the ideal reinforcement on a wooden base will be fiber.
The fiber is added to the solution during its mixing. This method of reinforcement is suitable for doing it yourself. Fiber fibers randomly located in the screed ensure the strength of the layer in different directions.
Pouring concrete mix

Regardless of how the mixture will be poured, with your own hands or with the help of hired workers, leveling is done in one of two ways:
- If laying will be carried out over a large area, then it should be divided into separate sections (cards) using formwork and pour the mixture according to the cards. At the same time, it is allowed to take breaks in work when pouring individual sections.
- If the room is small, then pouring can be done at a time, starting from the corner of the room farthest from the entrance. In this case, it is not allowed to take breaks in work, so it is better to fill with your own hands with an assistant. While one pours and levels the mixture, the other prepares a new portion.
Laying the solution is carried out as follows:
- We spread a portion of the mixture between the beacons just above their level and level it with the rule. To do this, we lay the tool on the guides and pull it from side to side, leveling the mixture.
- A day after laying the mixture, the beacons can be removed from the solution, and the recesses from them are treated with a primer and filled with fresh mortar. The top is leveled with a trowel.
- The surface of the screed must be sprayed with water for the first seven days and covered with plastic wrap for the first four days to evenly evaporate moisture. Equally important is the constant humidity and temperature in the room.


