Making a computer desk with your own hands is not so difficult, and as a result you will get irreplaceable furniture, because computers are in every home today, and it is much more convenient to use furniture specially designed for this instead of the usual one.
Today on the market you can find a wide variety of computer tables - a transforming table and a corner table are especially popular, because. they are not only comfortable, but also look original.
But, what is most pleasant, you can make almost any model of the table you like by yourself, after selecting it from the photo.
In the article you will learn how to make a computer desk, what tools you will need for this and how to properly mount the parts so that the furniture will last you a long time.
Drawings are the first thing you need when creating a computer desk. You can take ready-made drawings, or create your own, suitable for the size of your room.
Drawings are needed not only to see what the design will look like, but also to calculate the amount of materials and the price that it will cost you to build a computer desk.
First of all, decide on the appearance and functional elements of the computer desk: do you need drawers, pull-out shelves, stands for things, etc.
The more additional elements there are, the more difficult it will be to make the table, but the more functional it will be in the end.
You also need to correlate the size of the structure with the size of the chair or chair that will be used for sitting.
This is necessary so that the table does not turn out to be too low, or, conversely, high or simply uncomfortable.
As a basis, you can take the standard size of any office chair, because. they differ little from each other.
The shape of the computer desk is another important detail.
It can be the usual rectangular, angular, or you can make a transforming table (see photo), which can change shape depending on the need.
The last option is the most difficult to manufacture, but you can assemble it if you wish.
The optimal table height is about 700 mm for an adult, and 600-650 mm if the furniture is planned for a nursery.
If you are making shelves for a printer, scanner and other office equipment, then you need to first measure it and find out what size the final size of the shelves should be.

The size of the computer desk is also affected by its location - try to ensure that the place is properly lit, the chair can move freely, and in general there is enough room for movement.
The final scheme should reflect the size of all parts, as well as the thickness for the side walls and countertops.
A high-quality drawing is a guarantee that you can easily and quickly cut the material and make parts of the correct shape and size, which will greatly simplify their installation and connection to each other.
The drawing should also reflect the amount of detail - look at the photo for an example of a diagram before you start creating your own.
After the drawing is ready, prepare the tools that you will need for further work.
Most often, chipboard is chosen as the material for the table, because. it is the most economical, and at the same time high-quality and durable.
In addition to chipboard, you can use natural wood or MDF, but then making the table will be more expensive.
In addition to wood, you will need the following tools:
- jigsaw;
- hacksaw;
- grinding machine;
- screwdriver;
- drill;
- roulette;
- chisel;
- square.
As you can see, there is nothing specific here, and, most likely, you can find these tools at home or in the garage.
Table manufacturing and installation
Do-it-yourself corner computer desk, a transforming table, as well as a regular rectangular table are made almost the same.
To make the simplest version of the design, you will need a chipboard plate with a thickness of at least 16 mm.
They begin work on assembling a table of any type with the selection of parts that will fix the structure on the sides.
Guides are screwed onto the boards, which are needed if you want to make drawers and shelves for your computer desk. Then the side parts are assembled on the dowels.
To make the fasteners work better and fix the parts as much as possible, add PVA glue to the nests, or insert wooden planks there. The walls themselves are fastened with self-tapping screws.
The following parts must be assembled using parts to create drawers. For them, it is better to choose chipboard with a thickness less than the rest of the table - about 10 mm.
When installing drawers, pay special attention to the corners: they must be straight so that the drawers of the table slide out and slide in easily. Lubricate the PVA sockets, and after that you can install dowels.
Then you need to paste over the side cuts with an edge tape so that it lies tightly, you need to walk along the tape with a preheated iron.
But before that, put a sheet of paper on top, otherwise the surface may become covered with bubbles.
If you see that the tape is wide and extends beyond the edge, then cut off the edge with scissors, but do it carefully so as not to damage the coating.
In order for the shelf to move easily along the guides, wooden planks must be glued to its outer and inner sides, the size of which matches the part.
If the elements do not match, then the shelf will jam, so pay special attention to this moment.
Look at the view of how the shelves for the computer desk are assembled - it will help you do the job better.
The tabletop is the last component of a computer desk. Before starting its installation, you need to make markings on the chipboard, noting the places where the countertop will be attached to the supporting pedestals.
In these places, you need to drill non-through holes, having previously installed a limiter that will allow you to control the depth of the hole.
The cabinets are installed on the countertop so that the holes are directed upwards. They will be connected by stiffeners, which will make the structure as stable as possible.
Wires will also be placed here, which will make the computer desk more convenient to use. As supporting elements, you can also use parts of the corrugated pipe, which will become a support.
The next steps are to fix the plinths on the pedestals, then turn the structure over and install the hinges on which the side door will be held.

You need to fix the structure with screeds so that it can be easily disassembled and mobile - if desired, you can easily move the table to another place.
It is best to make a monitor stand on the tabletop: for this, first make a frame (small wooden round bars are suitable for it) and fix it with glue and dowels.
You can also purchase a ready-made stand by fixing it with self-tapping screws.
The last step is the processing of the chipboard table. It is best to varnish the surface, but you can also paint it in the color you want to match the furniture with the overall style of your room.
If you decide to paint the structure, then first treat it with a primer. After applying the coating (lacquer or paint), it will be possible to use the chipboard table in 2-3 days, when the coating dries.
A transforming computer table is made in the same way as ordinary tables, ordinary chipboard is also suitable for the material, but there is room for creativity: for example, a transforming table can be made with a turntable, or it can increase in size, and then you can use it not just as a place for installing a computer, but also a full-fledged canvas for receiving guests.
To do this, you can make the monitor stand removable, or completely abandon it.
Another unusual and popular option is to hide a transforming computer desk in a false cabinet, which you can also assemble yourself.
This is very convenient for small apartments, because in this way you save a lot of space.
In addition to the transforming table, in such a cabinet you can install shelves for books or documents - then everything will always be at hand at your workplace.
Finally, the classic option is when the transforming table has a retractable panel, which, if necessary, increases the working space.
This is relevant, for example, if there are several children in your family, and they need to do their homework at the same time.
Other options for how a transforming computer table may look, look at the photo.
You can combine several, or come up with your own original version, with the necessary skills and supporting videos, you can make almost any design model.
Drawings of a corner computer desk. Dimensions.
According to the preliminary design project, the MFP is installed on a retractable console, which is attached to the top and side of the cabinet. One of the sidewalls of the cabinet simultaneously acts as a support for the tabletop, transferring the load to the legs. The reason why the role of the support is given to the inner sidewall is visible from the design itself, in this form, access and work with the MFP can be carried out from almost all sides.
- Corner Computer Desk Project .
- Scheme and detailing of a computer desk .
- Accessories for the manufacture of a computer desk .
Cabinet with drawers and a panel under the MFP.
Underframe.
The height of the underframe is equal to the overall height of the cabinet (740 mm), the length and width of the underframe is free and is calculated according to the dimensions of the tabletop (see section above).
To the curbstone, the inner sidewall of which is the support for the tabletop, is adjacent to the main underframe with one more, the farthest support and the rear vertical wall. The back wall performs three functions: it is a connection between the table supports, a vertical spatial structural rigidity element and an additional support for horizontal shelves. The back wall is attached with a gap between the tabletop, i.e. she does not rest against her upper end. Thus, we provided a place for the free passage of computer electrical cables.
Between the table supports in the underframe, two horizontal shelves were placed that can be used for various needs. For example, it is convenient to put your feet on the lower shelf when you want to lean back in your chairs and watch a movie from the monitor screen. In addition to everything, these shelves, together with the back wall, act as an element of spatial rigidity of the entire table.
The tabletop-bearing side of the underframe is mounted on mortise adjustable supports. .
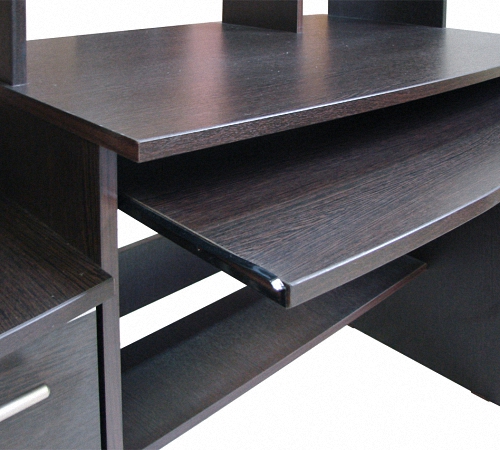
Keyboard shelf.
You can make a keyboard shelf yourself to fit your size or use a special component for computer desks - a ready-made factory keyboard shelf.
The advantages of the finished shelf - you do not need to make it yourself, the disadvantages - it is used only for the keyboard.
Advantages - can be made any individual sizes.

A frame is made of two sidewalls and two connected planks. The shelf itself is installed on full extension ball telescopic guides.
Installation of the keyboard shelf is extremely simple, it is screwed with 4x30 self-tapping screws through the bonded strips under the bottom of the tabletop, directly into its place.
If you plan to use a corner table for a desktop computer, and not for a laptop, it becomes necessary to place the system unit. In order not to fence additional structures under the tabletop and make the system unit not tied to a specific place, we will make a stand for the system unit. You can use a ready-made accessory from the factory, but we like to do everything ourselves and will make it so that it harmonizes in design with the whole table.
Add-on for a computer desk.
Our life is no longer easy to imagine without a computer. Although some prefer laptops and all-in-ones for their compactness and mobility, a familiar desktop computer is by far the most convenient solution. But equipment of this kind should be placed in a place specially equipped for this, but often buyers do not quite understand how to assemble a computer desk, and whether it is worth doing it yourself.
Before Assembly
Before directly placing home-made or purchased furniture, you need to decide exactly where it will be located. This is an extremely important step, because the location of the equipment must comply with all safety rules and proper operation.

The basic rules are:
- The presence of outlets nearby and the ability to easily connect devices.
- It is better to arrange the structure so that it does not take up much space in the room.
- To avoid vision problems, the computer room should be well lit with natural light.
- The wall to which the computer table will be attached should be flat, and pictures and other decorations should not hang on it.
- Do not place the equipment near heaters or radiators, otherwise the devices may overheat.
By following these rules, you can eliminate most of the problems that may arise when working on a personal computer in the future.

Assembling a computer table according to the instructions
Ordering a finished table without assembly and delivery will save a significant amount, and the process itself, although it requires accuracy and painstaking work, is quite simple. Even if there are difficulties with the table assembly scheme or in the process, there is always the opportunity to contact the support center of the store that sold this product.

Before assembly, check the presence of each necessary part and the circuit itself. The cabinet is the fastest and easiest to assemble, and the most difficult stage is the installation of moving parts, so it is recommended to start with the cabinet.
Carefully fasten the supporting components to the countertop so that the finished structure does not stagger.

Sequencing
Unpack each package and distribute the parts. Put the small ones in some tray or box, arrange individual modules: legs, table top, etc. The countertop, as a rule, will be assembled at the very end according to the instructions.
Prepare a screwdriver, 2 screwdrivers (flat and Phillips). According to the diagram, lay the parts you need according to the instructions on the floor with the inside up, put the metal fasteners so that the holes match, and connect them with mounting screws and plugs. Each part is connected exactly according to the assembly instructions for this table.

Under the work surface, mount the guides for the keyboard drawer, horizontally and parallel to the floor in the places indicated for this purpose. Make sure the shelf slides in smoothly and without interference, and secure the rails with a screwdriver. Install the end caps and insert the caster shelf.

Check all connected parts according to the instructions, the structure itself must be tightly fixed and not wobble. You can install and connect a computer.

This algorithm is applicable to almost any type of furniture. Even such a difficult process as assembling a transformer table will not be unnecessarily complicated if you arrange the parts in the order of the diagram and carefully read the instructions.
Making your own computer desk
Design
Sometimes assembling a computer table with your own hands can be a cheaper way than buying or assembling costs. But in this case, you yourself will have to think over the design, material, color, make instructions, drawings, diagrams and details.

The first step in manufacturing is to design and plan your structure. As a rule, this is done using chipboard. It should be remembered that this approach will require much more attention and care than the connection of ready-made parts according to pre-written instructions.

The main parameters by which you can design a computer table:
- Type: corner or straight, rectangular, modular, multi-seat, stand table or transforming table;
- Length: for the extension and countertop (space for the user) they recommend 60-70 cm, for corner options this parameter will be no more than 60 cm, since the turning space, space for the system unit, for the cabinet (30-40 cm) are taken into account
- Depth: 60-70 cm (including the extension) or 45 cm (without it), for the corner model 85 cm;
- Height: depends on the height of the user, the average value is 75 cm. There is a formula for calculating the optimal height: height * 75: 175. For a child, it is recommended to plan a seat height regulation system.
- Cabinet planning
It is also possible to find ready-made options, diagrams, drawings, instructions and photos of assembling any table on the network. This can slightly simplify the design and speed up its manufacture.


Part preparation and assembly
When the final version has already been selected, all the parameters suit the user and are well thought out, it is time to turn the idea into reality. In order to assemble a computer table according to the scheme, you will need:
- Material: furniture sheet of the desired size, it is allowed to use MDF boards, plywood or chipboard;
- Machine tool, hacksaw, chisel;
- Sandpaper;
- Any lacquer to cover;
- Self-tapping screws, fixing screws, drawer handles, pull-out shelf rollers and other parts provided in advance.
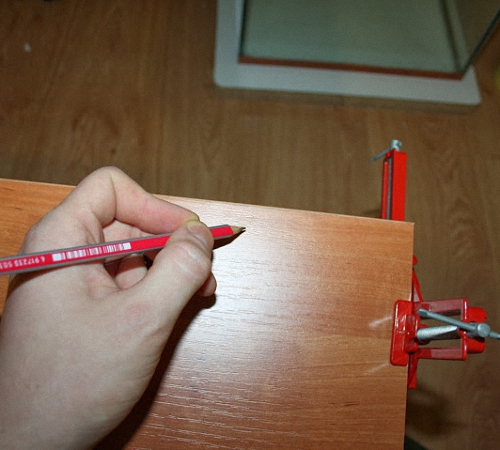
- Pencil, tape measure, square;
- Screwdriver and drill with drills.
Once all the tools are ready to work, you can start cutting:

First of all, you need to cut out the countertop, sides, top and bottom of the cabinet. Take the dimensions exactly as shown on the drawing.

Cut the corners of the vertical panels, the back corners can be left as they are, as they will be directed towards the wall. Using sandpaper, round off any cut irregularities, sand sharp corners.

Cut out a shelf for the keyboard and a stand on which the system unit will be located. If the drawing includes additional shelves, cut them out as well. Round the front corners, near the back bottom corner, cut a small area for the baseboard so that the shelves and stands are flush with the wall.

Using a drill, make holes in the places marked in advance (with a pencil). Check if the holes will match perfectly.


If a cabinet is provided, then cut out all the remaining walls and drawers, mark with a pencil where the drawer guides should be located, and attach them with mounting screws. Connect the bezel to the lower part, and then to the body walls themselves. Assemble the box, not forgetting the back wall, drawers, and check the movement of the drawers along the guides.

Similarly, an extension is made, if it is provided according to the plan. To do this, use a drill to cut holes in the tabletop and on the vertical walls of the structure, where they will be attached to the tabletop to be attached to it. Take a square and set the sides so that they are perpendicular to the plane of the table, and secure them.
Screw the screws into the underside of the countertop, you may need to find someone to help hold the panels. All other walls parallel to the plane of the floor are attached in the same way as the side strips. The main thing is to check with the help of the level their location relative to the floor.

The assembled table must be completely disassembled. Mark the details in advance so that you can immediately understand what is attached to what. Sand every detail of the structure and varnish to ensure the smoothness and long life of your structure.

Connect the modules to each other according to the diagram and check the design for looseness.


If the table stands firmly and does not tilt from side to side during operation, then it is ready for use. You can safely put it in a pre-designated place and connect equipment.

The quality and durability of the structure depend on the accuracy of the installation and cutting of parts, as well as on the quality of the fasteners themselves. By choosing each component of your table model yourself, you can prevent breakage and other inconveniences that may arise in the future.

Thus, in addition to buying a ready-made table, you can save quite a tidy sum by assembling a computer table with your own hands. But such a method will require extreme accuracy, painstaking work and more time than assembling ready-made parts.

A homemade table can look exactly the way the user personally wants it, the main thing is to handle the tools correctly and pay more attention to assembling and polishing the wood panels.

Photo of the table assembly process


It is difficult to imagine the life of a modern person without a computer, which requires a specially designated place in one of the rooms. A laptop or monoblock can be placed on any convenient plane, while stationary “smart” devices require computer tables. Due to the high cost in the retail network and structural simplicity, many are wondering - how to assemble a computer desk? And there is nothing complicated in this, if you build intelligently and in stages.
Types of computer tables
A computer desk is a multifunctional kind of cabinet furniture. People who constantly work at a computer at home cannot do without it. Without a convenient table, there is nowhere to place in one place:
- system unit and monitor;
- mouse and keyboard;
- speakers and router;
- folders and documents;
- printer and copier paper;
- stationery and discs for the accumulation of information.

All this is important to consider when thinking about how to assemble a computer desk with your own hands. An approximate diagram of a classic computer desk:
Designers and technologists have developed many types of cabinet furniture, including multi-seat computer tables. Even if the PC is used occasionally, you need a simple table where everything is at hand - with a place for a "system unit" and a sliding shelf for the keyboard. Or you will have to allocate a niche in the rack with shelves, providing a folding working plane. The choice of the shape of the tabletop depends on how you work for the PC:
- "riveted" look to the monitor;
- a lot of typing or playing games;
- often print documents;
- refer to a laptop or tablet standing on the side.
Look at examples and drawings of computer tables, the shape of the tabletop varies:
- simple rectangular;
- with a rounded cutout centered above the keyboard;
- with an arbitrarily curved line;
- L-shaped;
- U-shaped;
- U-shaped.
- curly.

It is not necessary to use wood, plywood or chipboard. Sometimes it’s enough to limit yourself to a high-tech frame structure - this is a tube frame plus a fixed table top made of any suitable material:
- plastic;
- thick plywood;
- laminated chipboard;
- thick display glass;
- veneered chipboard or thick plywood;
- finished worktop made of solid wood (natural wood).
You can also use parts of old furniture, designed as a table top on a computer desk with your own hands. But these are not all varieties of a table for a PC, since they are conditionally classified into subgroups according to their configuration:
1. A rectangular computer desk with a cabinet for a system unit is a classic version that came in the form of a desk transformation. But an ordinary desk is not very convenient for working at the keyboard, so the roll-out shelf turns it into a convenient functional place for working with a PC. When there is no need to use powerful speakers and various office equipment, this option is enough without an additional cabinet.
2. Corner computer desk, small, compact, takes up minimal space, very functional and ergonomic. One free corner in the room is enough to install a small product with great benefits of a work surface. It’s even convenient to have lunch here if you can’t leave your computer. It can be equipped in height with various hanging shelves along the entire height of the corner. The corner design makes it possible to use both planes of the wall and the corner to accommodate:
- auxiliary devices and office equipment;
- paper and stationery;
- collectible items;
- indoor plants.
For example, computer tables - photo:
3. Modular computer desk is a great invention for those who like to re-arrange the workspace. The set should have a basic set of modular elements:
- tabletop and sliding keyboard;
- pedestal under the "system unit";
- additional blocks;
- hanging shelves;
- corner sectors.
4. If it is not possible to allocate a permanent place for a stationary PC or laptop, it makes sense to opt for a compact mobile version. This is a folding table-transformer, where there is no table in the traditional sense, but there is a portable table top. This option has minimal dimensions and weight, but all planes are easily laid out. This workstation is easy to carry and transport so you can keep working:
- in the country;
- on a picnic;
- on the beach in the shade, etc.
5. Table-rack in the form of a rack with a folding top and multi-tiered shelves. Very handy when the room is very small but there is plenty of vertical space along the wall. In this design, it is recommended to fold everything after work, completing it with a folding chair. At the bottom, it is convenient to install a turntable under the system unit in order to deploy it after work to the place where the feet are usually. A monitor is placed on the main stationary shelf of the rack, and a keyboard and mouse are placed on a folding tabletop. Shelves up to the ceiling - for the rest of the equipment.

6. A multi-seat computer desk is convenient in a family where there are several PC users and office equipment. Behind a common tabletop, 2-4 people can sit behind 1-2 monitors. If there is no suitable table for sale, it is difficult to find, ask how to make a computer table for several people. To do this, it is important to consider where the main units and PC users will be located.
Selecting the color of the table surfaces
The advantage of self-assembly of a computer table is the absence of restrictions when choosing:
- model and countertop configurations;
- dimensions (the dimensions of the computer desk are limited by the space of the room);
- complete with additional shelves and cabinets;
- countertop material and color.
Ideally, a computer desk should be in harmony with other furniture in the interior and match the style. The classic table has a natural wood veneer, regardless of the base, but can be plain, matching one of the leading shades of the room.
1. If the room is decorated in a modern style, there is a lot of equipment around, then a black lacquered computer desk is suitable, in harmony with a large plasma monitor.
2. A small table should match in color with other cabinet furniture.
3. for a dark room on the northern stolon, it is better to choose light surfaces of MDF, laminated chipboard or other wood-like finishes.
4. White or other plain type of surface should be in harmony with other items in the interior.
5. It will also be original if you choose any unusual color of the tabletop, cover the base with fabric, make an original print and varnish the image.

Computer desk made of prefabricated parts
Due to the fact that prices for computer tables are increasing all the time, it is advisable to make them yourself. A table that is bought in a store without assembly and delivery will be much cheaper than a finished one. It is sold in the form of separate packages for each block, but there is an instruction on any computer table that shows the assembly steps. It is not difficult to assemble it, but it is tedious to be careful not to confuse the structural and fasteners. For assembly you will need:
- trays for sorting accessories and small parts;
- a set of screwdrivers (flat, Phillips) or a screwdriver with different nozzles;
- assembly diagram (instruction) and a drawing of the finished table.
Self-assembly according to the scheme is a simple matter, but unhurried and painstaking, and requires attention and perseverance. When buying a table, it is worth clarifying who you can call back if clarification is needed.
Attention: Large furniture companies engaged in wholesale and retail trade have specialized consulting centers that work with consumers. It is beneficial for them to deal with buyers who decide to self-assemble. When buying from the manufacturer, you can also ask the managers whose phone numbers are listed on the official website - how to assemble a computer desk? Help and advice can be obtained at any stage.

Stages of assembling a computer desk for individual modules
Stage number 1. Lay out in a conspicuous place:
- tool;
- assembly details and accessories;
- scheme (instruction);
- the main structural details according to the marking packages.
Stage number 2. Wooden parts (or chipboard) are laid out with the inside towards themselves so that there are visible holes for assembly. Next to each block lay out the corresponding parts for fastening. Check the completeness - if there are enough parts, you can assemble each block separately. The tabletop is fixed last, if there are no reservations in the instructions, diagram or drawing. After the general assembly, all the screws are firmly tightened or the fasteners are screwed deeper and closed with plugs.
Stage number 3. The greatest care is shown when assembling the rotary modules and the sliding shelf for the keyboard. The guides must be strictly parallel and horizontal to the floor, the shelf movement limiters are placed behind. The assembly sequence is carried out strictly according to the instructions so that there are no defects. When the pull-out unit is ready, the side racks are assembled to prepare the base for the countertop.
Stage number 4. Connect all the blocks according to the scheme with a working surface (table top), put a sliding shelf with rollers on the guides. Install decorative caps. Fasten the back plywood on the back wall. Check again if the table is wobbly. If everything is fine - reinstall and arrange all the parts of the desktop computer in their places, connect and work.

Worth considering:
1. Most models of computer desks are shipped unassembled from the warehouse, and you should ask about this when buying. It is important to immediately check the complete set, fittings and assembly scheme.
2. Materials that may delaminate during assembly are assembled carefully, especially when using a multi-purpose power tool, since it is difficult to adjust the pressing force or drilling speed. Be especially careful that the nozzle does not make a through hole if there should not be one.
3. The easiest way is to assemble a cabinet, so it’s worth starting with it in order to master the process. It is more difficult to mount moving parts and guides for their movement.
4. It is obligatory to fix the rear wall of the cabinet - it serves as an additional component of reliable fastening. Handles and other fittings are fixed last, as they can interfere with assembly.
5. Table supports - cabinet, sidewall or metal pipe. The stability of the computer desk depends on the reliability of their fastening to the table top.
6. Some parts of modular structures can be stacked on top of each other or hung on the wall. However, modules cannot be stacked on top of each other without securing with pins - one awkward movement, and parts of the case will fall along with office equipment.

Features of making a table for a computer with your own hands
If there is no desire to buy a ready-made computer desk, but you want to make it yourself, according to some special needs, then you will have to do all the details yourself. If we return to the beginning of the description, drawings of computer tables were outlined there, which are recommended to be used as an example. As a rule, in such drawings you have to make your own adjustments. With a creative approach, it is possible to borrow ideas and the best design details from each variety. For example, combine the advantages of a rack, a transformer and a corner computer desk.
After the final version is selected, sketches and drawings are made, it's time to move on to translating the meta into reality. In a building supermarket, we select material for the manufacture of our table and specify whether they provide services for cutting materials. Please note that you cannot do without precise cutting by a machine, especially when it is not an array, but pressed materials:
- finished worktop with trimming;
- MDF board;
- veneered plywood;
- laminated chipboard, etc.

When the store does not provide such services, cutting can be entrusted to any carpentry shop where there are special machines. Without drawings, no one will undertake to do according to a photo or drawing. Sometimes experienced craftsmen can take over the development of a drawing, but for a fee. But a good sketch with detailed dimensions can also serve as a basis for them to realize your desires. Don't forget to remind them to prepare the holes for mounting, and at the same time check what kind of fasteners to buy in the store. It remains to assemble your universal computer desk at home with your own hands. The quality of the assembly directly depends on a good tool and accuracy, especially when trimming.
I had an ordinary computer in an ordinary case with a water cooling system, but I wanted something new, beautiful! And having seen enough of all sorts of modding projects, I decided to do everything in the table, so that all sorts of schoolchildren would envy, and just do, to please the eye! I myself am without hands and tools with only one idea and decided to turn to a familiar carpenter.
They made me a table made of chipboard with a double bottom, glass on top. In another place they made metal panels, I glued them on liquid nails. It turned out, in principle, not bad, but collectively and, in terms of cooling efficiency, so-so. The water heated up to 50 degrees, due to the fact that the air did not pass well through the holes in the panels. And since there was no design using component sizes, not everything fit as I planned.

 And so I decided to take on a new project with a serious approach (as best I can) and at the same time upgrade the video cards, buy a new monitor and switch to 4K. I mastered the program for designing modular furniture, measured everything and created the project itself in 2-3 months.
 This time everything should turn out clearly, evenly and, most importantly, beautifully! I also bought more radiators for greater cooling efficiency and symmetry of the composition.

I started looking for an office that could do everything for me, and then problems arose. No one wants to work with such non-standard things, and, usually, the modder himself is directly involved in the manufacture of such parts and assembly. But, since I already said that I am without hands, I searched further. The main problem is the one-piece front panel, curved in 4 places. And I didn't know how to make it better. In the end, I still found a person and decided to make everything out of wood.
 I threw in the drawings from the program and the process began.


 Of course, I could not explain everything in words and a lot of stocks with sizes came out and I had to improvise to fit everything! It was also necessary to simultaneously solve many problems related to the non-standard arrangement of cooling components and table sizes:
How to place CBO components
How to organize food for coolers on the right side of the table, there are no such long extension cords
How to fix the controller in the groove
How to place lighting
How to hide all wires or disguise colored wires as plain ones
How to minimize vibrations of the pump, hard drive, etc.
How to make holes for radiators for sufficient air flow
How to clean the board from spilled past liquid (yes, I'm a handyman)


 And finally, after 2 weeks the table is ready


 Further pleasant chores, installation of equipment, launch of the CBO, and the entire system, hoping that I wiped everything well with alcohol! Let's add the rest of the periphery and that's it!
Let's call this project: I can't do anything myself, here's an idea for you, a project in a program in which you don't work, please make me a table!


