A profiled metal sheet can be safely called a universal material, since it is used in private construction for a variety of needs. They block the roofs of residential buildings and utility buildings, it is used to create walls and partitions in adjoining buildings, it is also perfect for fences, gates and gates. Often, by the way, it happens that, starting with a gate or gate, the owner of the site in practice realizes the simplicity and convenience of working with this material, and this stimulates him to completely update the old wooden fence of his territory using corrugated board.
There are separate publications about the fence from corrugated board on the site, and in this article let's look at how a gate is made from a metal profile with our own hands - a diagram + an order of work. On the example of this, the smallest in area, element of the territory fencing, it will be easier to understand the principle of the operations performed, with the tools, materials and components necessary for this, with the main technological methods used during installation.
Preparatory stages
Necessary tools for work
Everyone knows that when working with metal parts, welding is most often used to fasten individual elements into a common structure. Indeed, this is the most reliable method of fixation for metal. However, there are cases when it is not possible to use such technology, and then the masters resort to other installation methods.
So, for the manufacture and installation of a gate with metal profile sheathing, it is necessary to prepare:
- This device will always come in handy for owners of private houses, especially those who are planning to overhaul their homes or are building outbuildings on their backyard. For non-professional craftsmen, it is enough to have an inverter welding machine with a welding current of up to 160 ÷ 200 A in their tool “arsenal”. The price for these devices today can be considered quite affordable, with proper handling, the device will last for many years. And, by the way, it will help to save even larger amounts, since inviting a welder with his equipment for any reason is not cheap.
The ability to independently perform metal welding - solves many problems
In the daily life of a country house, the need to perform various welding work arises very often. The best option, of course, is to purchase your own equipment and have the skills to work with it. How to choose the right welding machine, and how to start - read in a special publication of our portal.
Prices for metal profiles
metal profile
- Angle grinder ("Bulgarian") and a set of circles for working with metal - for cutting and grinding.
- Screwdriver - this tool will help you quickly and effortlessly fix sheets of corrugated board on a metal frame.
- The scriber will help when marking out parts for a metal structure. Unlike a pencil or marker, a scriber gives clear, regular lines that are easy to cut.
- Also, for marking, you will need a metal ruler, tape measure, building square and level.
- Clamps - these devices are necessary when assembling the frame, when installing the hinges and the gate lock.
- A garden drill with a diameter of 200÷250 mm will help not only to quickly and easily drill a hole for the installation of load-bearing wicket posts, but also significantly save on bulk building materials. This is due to the fact that the hole dug with a shovel will always be much wider, which means that it will require a larger volume of mortar, which is used to fix the supporting racks.
- If the farm does not have a concrete mixer, then it is necessary to prepare a container for mixing concrete. And in this case, a construction mixer can help to mix the solution qualitatively. An electric drill with a mixer nozzle is unlikely to cope with such a task.
- Shovels, shovel and bayonet - for earthworks, as well as for mixing concrete. If it is to be done manually.
- Scrap - this tool is also used for digging pits for poles (if dense rock is encountered along the path of the drill), and for tamping rubble around the bearing racks, and for “bayoneting” - removing air bubbles from the solution after it is poured into the pits.
Previously, attention was paid to the fact that if the wicket frame is planned to be made heavy, that is, for example, each of its elements will consist of two profile pipes or the total height will be more than 2000 mm, then it is recommended to tie the support posts in the upper part with a crossbar. This design will be more rigid and will help take some load off the support legs. It is not forbidden to place the same jumper on the bottom.
Calculator for calculating the amount of concrete for installing racks and ingredients for its manufacture
The calculator below will allow you to quickly calculate how much M200 concrete mortar is required to install one wicket post.
- The calculation program provides the ability to change the height of the concrete pouring of the well.
- In addition, you can include in the total amount of concrete the volume that is required to completely fill the pipe cavity. When you select this item, additional data entry fields will appear. Considering that various pipes can be used for racks, the calculation algorithm includes the parameters of the most suitable sizes of square, rectangular and round pipes for this purpose.
- The answer will be given both in the total amount of concrete, and with a breakdown by ingredients - PC400 cement, sand, gravel and water. The quantity of ingredients is estimated in mass and in volume.
Each summer resident tries to make his site well-groomed and comfortable for rest. The easiest way to "revive" and highlight your dacha among other gardens is to equip a beautiful gate. It is the entrance composition that attracts attention in the first place and creates the impression of the site as a whole. Few people will be surprised by the same type of factory designs, and experienced summer residents prefer to design and equip the entrance complex with their own hands.
Consider the features of various gates, as well as provide detailed instructions for planning and assembling fences made of wood and metal.
What should be a country gate
There are no clear requirements and norms for the placement and dimensions of the gate. When designing, it is important to take into account the purpose of the door, the presence of a fence on the site, the size and design of the site itself.

The nuances of arranging a gate for entering a garden plot:
The width of the canvas is about 1 m. As a rule, this is enough to bring large items and pieces of furniture to the estate. A large fence requires reinforcement of the support beams and the use of more durable fittings.
The height of the structure is limited to 2-2.2 m. This value depends on the height of the existing fence and the purpose of the sash.
Experienced summer residents agree that the optimal placement of the main entrance is close to the residential building, so that the gate can be seen from the window.
The main criteria for choosing a gate
Consider the varieties of gates for giving based on their main design characteristics: purpose, device and material of manufacture.
The purpose of the guard door
Conventionally, all country gates can be divided into three groups:

Design features of the gate
Based on the design of the frame and conjugation with the fence, the following types of country gates are distinguished:
- separate fences;
- wickets that are part of the gate;
- fences adjacent to the entrance gate.
According to the degree of openness of the door leaf, they are distinguished: curtained, free and combined.
blind gates protect the country estate from prying eyes and drafts. This option is very popular. To make the fence attractive, the canvas is framed with decorative elements made of wood or metal.
Free wickets partially block the view to the territory of the site. To create an openwork canvas, artistic forging is used - the elements are made in the same style. Simpler products are made from a wooden picket fence or a chain-link metal mesh. Translucent models of gates are made of polycarbonate.

Combined entrance gate created from several different canvases. From below, the gate is made deaf, and the upper part is decorated with forged inserts.
The fabric material
The most popular materials for arranging gates are metal, wood and polycomposite. Consider the features of the application of each of them.
metal gate for giving it is considered the most durable, wear-resistant and mechanically strong. The disadvantage of the model is the complexity of making it yourself. To implement the project, you will need specialized equipment and welder skills.
Types of metal fences: gates made of corrugated board, forged products or the use of sheet metal.
Features of fences from corrugated board:
- the profiled sheet is made of steel, covered with a protective layer of zinc and polymer - this ensures the resistance of the material to corrosion;
- web rigidity due to the presence of rectangular waves;
- ease of fixing sheets to a metal frame - fastening is carried out using special rivets;
- affordability and ease of use.

Decking also has some disadvantages:
- high probability of dents in case of mechanical damage;
- the formation of corrosion due to violation of the integrity of the upper layer;
- "simple" appearance.
Forged Products On the contrary, they are distinguished by sophistication and exclusivity. But for the presentability of the design, you will have to pay a relatively large cost. Forged elements greatly weight the gate. Some summer residents are alarmed by the transparency of such a fence, but this drawback can be easily eliminated by installing a polycarbonate “blind”.
Gates made of sheet metal are practical in operation, but the material is difficult to process independently.
wooden gate for giving it is appropriate if the fence on the site is also made of wood. The fence is organically combined with gabions, natural stone and brick. Advantages of wooden models:
- ease of processing wood;
- the possibility of self-manufacturing of the gate;
- availability and environmental friendliness of the material;
- beautiful appearance.
Disadvantages of wooden products:
- susceptibility to moisture, rotting and burning processes;
- the need for regular treatment with protective equipment and coatings;
- service life - about 5-8 years.
Polycomposite and plastic models appeared on the market recently, but have already gained popularity among summer residents. On sale are gates of various sizes, textures and colors. Assembly and installation of the fence does not cause any difficulties.
Manufacturing technology of a wooden gate
To work, you will need a hacksaw, a screwdriver with bits and drills, a level and a tape measure. From the materials you need to prepare:
- corners;
- loops;
- self-tapping screws;
- boards for door trim;
- wooden thick bars for the frame;
- support beams.
Advice. It is better to buy lumber already in finished form - dry, planed boards of the same thickness on a thicknessing machine
When choosing wood, it is desirable to give preference to:
- larch and cedar - a dense material that is resistant to weather conditions;
- spruce or pine - affordable wood, easy to process;
- oak - durable, hard raw material with a beautiful texture;
- glued laminated timber assembled from hardwood.
Step-by-step instructions for making a gate for a summer residence:

Step-by-step installation of kalik from corrugated board
The requirements for a country gate are fully met by a fence made of profiled sheet. Prepare a drawing and assemble the gate on it with your own hands.
Drawing development and procurement of materials
Having considered the ready-made drawings of the gate for giving, you can easily draw up your own plan, based on the parameters of the site and personal preferences.
The diagram should indicate:
- the total length of the support pillars;
- the depth of the foundation for the racks;
- distance from the ground to the door leaf;
- gate width;
- frame design, number of jumpers;
- the location of the hinges and the deadbolt.
Important! Support poles must be buried below the freezing level of the soil. On heavy soils, a depth of 0.7 m is permissible, and on light, heaving soils - at least 1 m.

Based on the developed drawing, materials are selected:
- metal profile for poles - two cuts of 3.3 m each;
- plug plates for supports - two squares 80 * 80 mm;
- wall profiled sheet - 1 * 2 m;
- metal profile for the frame 40 * 40 mm - 5.5 m;
- two loops, a lock and a latch.
Additional consumables: waterproofing film, sand-cement mortar, metal primer and paint, rivets for fixing the profiled sheet.
To assemble and install the gate with your own hands, you will need the following tools:
- grinder and drill;
- welding machine;
- hacksaw for metal;
- drill for digging a hole.
Installation of support legs
Pre-clean and level the area, mark the place for the support beams - the distance between them should be 4-5 cm more than the width of the gate.
Procedure:
- Drill holes with a diameter of 40-50 cm.
- Cover the bottom of the blocks with a waterproofing film.
- Arrange a "pillow" of rubble.
- The edges of the metal racks that will be immersed in the ground should be cleaned of rust and treated with a primer.
- Place the beams in the pits, align the supports according to the level and fix the position with stones.
- Fill the hole with cement-sand mortar.

After a day, check the parallelism of the beams by measuring the dimensions of the opening from above and below.
Creating a frame and canvas
Sequence of work:
- Prepare the components of the frame - cut the pipe with a section of 40 * 40 mm according to the drawing.
- Lay out the segments on a flat surface and fix the structural elements with clamps.
- Check the alignment of the assembly.
- Seal the elements with a welding seam and once again check the evenness of the diagonals and the perpendicularity of the corners.
- Install the cross bar and strengthen the frame with metal corners.
- If assembly is correct, perform final welding.

"Try on" the frame by placing the frame to the support posts. Mark the places for the hinges - the distance to the edges of the canvas should be about 25-30 cm. After welding the hinges to the frame, grind the welds, cover the frame with a primer and paint.
Frame trim:
- Carry out cutting of profiled sheet.
- Fix the metal sheet with rivets. A weak fastening will lead to loosening of the canvas during the wind, and a strong fastening will lead to its deformation. Therefore, it is necessary to screw in the self-tapping screw carefully.
Final assembly of the structure
Hanging the finished canvas on the support posts is carried out after the foundation has completely solidified.
Assembly order of the wicket:
- Put the fence in the opening, placing a wooden beam 10 cm thick under the canvas.
- On the beam will designate places for reciprocal loops.
- Weld the hinges and hang the gate.
- Check door movement. Spontaneous opening or closing of the kalika is unacceptable.
- On the reverse side of the hinges, place a limiter so that the door works only in one direction.
Gates for giving: photo ideas for decorating the entrance ensemble
Kalika and the fence act as a single decorative element due to the pattern applied across the entire fence sheet.

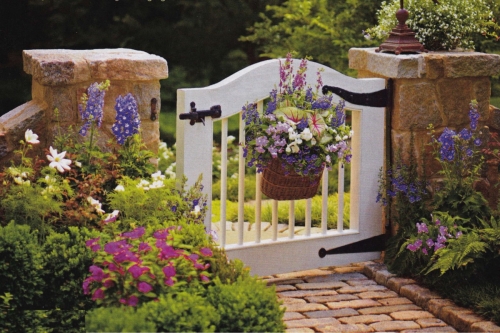
A low fence in the Provence style is suitable for separating the garden from the garden plot. The white gate looks great against the backdrop of lush greenery and natural stone.
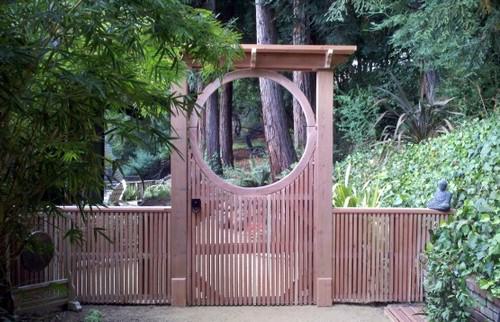
The original and at the same time simple shape of the front door emphasizes the conciseness and sophistication of the Japanese-style garden.
An unusual solution is the combination of forged elements and natural materials. Skillfully executed bunches of grapes are complemented by a natural branch of the vineyard.

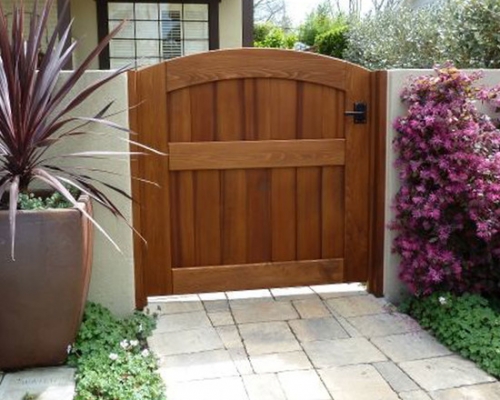
Eco-decor from raw wood is appropriate for a small country estate. The gate doors, like the fence, are designed in a rustic style.
Even at the stage of designing a fence for a summer cottage or a private house, one difficult issue remains to be resolved - to arrange a gate together with a gate, or to leave the gate separately, and the gate - separately. There are a number of cases when there is no way out and then you have to combine the gate with a gate. For example, if there is simply no space. Yes, and the cost of such a design will be cheaper. However, there are many reasons to leave the gate as an independent entrance.
Gate or gate with metal gate
From the point of view of aesthetics, of course, a separate gate looks more attractive than in a company with gates, however, the price of materials, installation and work will differ. Nevertheless, the photos of metal gates on our page indicate that many find this an unconditional benefit. We will not go into debate, and we will simply consider the main stages of work on installing the entrance group.
The metal gate provides an opportunity both to show the imagination of the graphic designer and designer, and to reliably protect the territory from penetration, and, if necessary, from prying eyes. If you have free time and very little free money, then forged elements or a combined gate solution will favorably distinguish the entrance group from the neighboring ones.
Design work
Before you start working directly, it is better to spend an hour or two sitting with a pencil and paper and evaluate your requests. Perhaps it is easier and cheaper to realize your desires by the hands of masters. If there is a technical possibility to build a gate with your own hands, even better. Naturally, the place for installing the gate has already been chosen and the approximate dimensions are put on paper. If this is not so, then first of all, it is necessary to remove the numbers that can be operated on. Only then can we talk about the constructive solution of the gate.
Regardless of what the gate will be sheathed with and whether it will be sheathed at all, it will not be possible to do without a welded metal frame, and before starting work, you should make sure that you will have at hand at the right time:

To install and assemble the gate, you will need an elementary tool and electric welding, and if you are unable to handle it, you will also need a welder.
Making a gate from metal
According to predetermined dimensions, frame elements are cut off in accordance with the drawings and diagrams, after which the frame is tacked by welding in a draft. The dimensions are checked again in place and only then can the frame be scalded with a reliable seam. At the same time, one must not forget that the design may include a lock or an electric drive, in the end, which should also be taken into account when constructing the frame.
The sheathing of the gate is made either with self-tapping screws or rivets, depending on what it will be sheathed with. It makes sense to pay attention to the combined options for solving the gate: metal and wood can be perfectly combined if this is required by the overall design solution. If there is no financial opportunity to use forging in the design, they will be perfectly replaced by metal patterns. When choosing a material for the posts, it must be borne in mind that their height will be about a meter more than the gate. In order for the pillars to be installed securely, the minimum depth of the well for their installation must be at least 0.8-1 m, depending on the type of soil.
Installation of a metal gate
The diameter of the well under the column should exceed the diameter of itself by 25-20 cm. This is necessary to fill the support with a concrete mixture. Before you make supports for the gate, you need to take care of the anti-corrosion treatment of the material, especially its underground part. Anticorrosive treatment, priming or coating with waterproofing materials will extend the life of the pole by several years.
When holes are drilled in the soil of the required depth, a pillow of crushed stone, broken brick, and small stone is laid on the bottom of each of them. The thickness of the pillow should be at least 15 cm. Then the pillow is compacted and a pillar is installed using a level or building level, which is then poured with concrete mixture. It is prepared from cement grade 300, and the consistency should be such that the solution freely penetrates into the space between the post and the soil.
Further work on installing the gate is carried out after the solution has completely solidified. Then hinges are welded to the posts, a finished gate is hung and, if necessary, the entire finished structure is painted with water-repellent enamel. Thus, without special financial costs, you can install a metal gate with your own hands. Successful work to all!
Many people make the gate separate from the gate. You can make a metal gate with your own hands so that it will decorate any building. When performing this process with your own hands, you can bring to life all your most daring ideas and unexpected decisions. Forged elements will help to give solidity to the product and decorate it. And thanks to the electric drive, you no longer need to go outside.
Before you start working on the production of this metal product with your own hands, you need to choose the place where the gate will be installed. You should also take measurements and arrange all this on paper in the form of a diagram.
Materials for the production of gates
- metal blanks are selected with a high carbon content, since it is he who is the least susceptible to corrosion and, accordingly, will last much longer;
- sheet of metal (thickness not less than 1.5 mm);
- pipe or profile for posts (diameter not less than 100 mm);
- profile pipe or corner (section not less than 25 mm);
- special liquid or gasoline, which will be necessary for anti-corrosion treatment;
- dye;
- mixture for priming the surface of the metal profile;
- electric drive or lock.
Wickets production tools

In order to, be sure to prepare all the tools that will be needed when working:
- kapron thread - will be needed for marking;
- welding (power 220 W);
- hand drill or sledgehammer for driving posts;
- a screwdriver with which metal is attached;
- grinder - needed for stripping and cutting metal;
- scissors for metal;
- shovel.
How is the installation of the gate
Making a gate with your own hands at home is a fairly simple matter. Plus, it will save you money. After the materials and tools are purchased and prepared, the direct manufacturing process begins.

Columns on the sides. Do-it-yourself gate from a metal profile is fixed to posts that are mounted in the ground no less than 1 m. First of all, marking is done and the installation site is marked. Then the grinder cuts off the length of the pillar blank with the addition of 1 meter. Next comes the surface treatment. For this purpose, corrosion traces are removed from the metal profile using an anti-corrosion liquid and a grinder. After the post dries, a white coating forms on it, which is removed with a rag.
By means of a hand drill, a hole is drilled in the ground, which can simply be dug, in places where markings are made. The diameter of the hole should be 10 centimeters larger than the diameter of the pipe. After that, a liquid solution is prepared. Grade 300 cement is mixed with sand (1:3). The mass should be homogeneous, it is necessary to bring it to a liquid state, gradually adding water. Installation of pillars is carried out in prepared holes, which are covered with rubble. You can also use other stones from the site. The rubble is eventually compacted.
Brick pillars. The gate can be fixed on brick pillars. To do this, metal products should be faced with bricks. It will be both beautiful and reliable. The building will look better. The solution is prepared in the same way as above, but it should not be liquid. The laying of the first row begins with a whole brick, and the second row is laid with 3/4 bricks, for a more rigid bond. After the solution dries, the rows are lined. On top of the pillars, metal or decorative caps are optionally installed. This will allow water to drain away from the product when it rains.
Frame. Do-it-yourself metal gate consists of a corner or a profile. The choice of frame material depends on the desire of the owner. In general, this is not a fundamental issue, because the installation is carried out the same way for everyone. This work requires special care.
In order not to violate the configuration, you need to carefully measure the dimensions. For competent do-it-yourself work, you need a good place to place the structure. The channel is laid along the perimeter. Its size should be 15-20 centimeters smaller than the product. It should ideally maintain the plane with a level. Adjustment is done by means of gaskets placed under the channel. In accordance with the indicated size, the corner / profile is cut off. Burrs are removed by a grinder. The blanks are laid out at the workplace and fixed. Then the joints are welded by welding. The bottom and top or side racks are also connected by welding - this way the rigidity of the structure is achieved. Only spot welding is used, the seams of which are cleaned by a grinder with a cleaning wheel. The final stage is the treatment with gasoline or anti-corrosion liquid.
Attachment to poles. Do-it-yourself fastening of the gate to the poles should be done only with the help of powerful fasteners. It is best to use a curtain with a built-in bearing.
Sheet metal fastener. This is the final touch of installing the gate with your own hands. It is necessary to carry out the following actions:
- cut a sheet from a metal profile of the desired size;
- remove burrs on cuts;
- fix the sheet on the frame of the product;
- treat the metal surface with an anti-corrosion liquid;
- paint and hang on loops.
After the installation work has been done with your own hands, you need to install a lock or connect an electric drive. This is already done at the request of the owner.
A neat fence with beautiful gates and a gate is a memorable visiting card of the owner.
Their appearance characterizes the owner, shows his wealth and economy, because the fence and gate are the first thing that guests and passers-by see.
A good gate, and if it is with decorative elements, it is not cheap. The price depends on the chosen material and on the price of the work, usually the work comes out as a material.
To save on work, you need to know how to make metal.
Material selection
If the fence is brick, then the material from which the gate will be made is not critical, if the fence is, then it is better to make the gate out of it.
The gate should stand out against the background of the fence, but at the same time harmonize in color and material. In order to immediately know how much material is needed, you can first sketch out the drawings of the future gate.
Gate material:
- Metal blanks, the metal must be high-carbon, this will prevent rapid corrosion.
- For poles, pipes or a profile with a diameter of at least 100 mm are suitable.
- Profile pipe or corner for the gate frame.
- A sheet of metal with a thickness of 1.5 mm or a sheet of metal profile for sheathing.
- Metal curtains preferably with a bearing mechanism.
- Lock.
- Primer.
- Dye.
- Fluid for anti-corrosion treatment.
Tools for work:
- For marking you will need a thread, a plumb line and a tape measure.
- The welding machine is semi-automatic with a power of 220 W.
- Manual drill, if available, or a shovel.
- A sledgehammer for driving posts.
- Screwdriver and drill for fastening the skin to the frame.
- Bulgarian for cutting metal and cleaning seams from welding.

Pillar installation
Pillars are the bearing part that holds the entire structure of the gate or wicket. The length of the pillars should exceed the height of the overall structure by 1 meter so that they can be buried in the ground for reliable stability.
With a drill in the ground, it is necessary to make two wells at a distance of about 1 m, with a depth of about 50-70 cm. Poles are inserted into these wells and an additional 30 cm are driven in with a sledgehammer.
After, the pillars are leveled vertically and poured with concrete at the base. To give additional rigidity to the pillars, they are welded with a transverse profile in the upper part.

Frame collection
The size of the frame of the future gate must be made less than the width of the opening of the pillars by 5-8 cm for a comfortable turn of the sash. The distance from the ground to the gate leaf should be from 15 to 20 cm, this is necessary in case of snowfall.
The metal frame is welded from a profile or a corner with a metal thickness of 3 mm. The profiles are welded together at the corners of the frame. To make the frame rigid, an additional transverse bar is welded in the middle.
In the resulting frame halves, an additional one profile is welded obliquely in such a way that they resemble the Latin letter “Z” to each other. After that, sheathing made of metal profile or iron will be attached to all the racks of the finished frame and additional stiffeners.

Preparatory work is a very important part. Before you start cooking the frame, you need to cut the workpiece with a grinder in size, remove burrs at the cut points, degrease the cuts with gasoline or a special solution. And then on a flat, pre-prepared surface, start cooking.
The surface on which you are going to assemble the frame with your own hands must be necessarily even, if this is not the case, then a kink at one of the corners may result, and the frame will take the form of a propeller.
After the frame is ready, curtains are welded to it. They consist of two parts, one part is welded to the door frame, the second - to the pillars. It is desirable that the curtains be with a bearing mechanism.
Frame sheathing
For sheathing, it is best to take a sheet of galvanized metal or a painted metal profile sheet, it does not corrode and will last a long period.
From a sheet of metal that was prepared in advance, a whole piece is cut to the size of the welded frame of the gate. If there is no such large piece of metal and it is impossible to cut a whole piece, then try to cut it so that the seam of the connection of the pieces of metal falls on the middle transverse bar of the frame.
Further, with your own hands, pressing the sheet of metal tightly against the frame, grab it around the perimeter. If you have chosen a metal profile sheet or galvanized metal, then attach it with rivets or self-tapping screws using a drill and a screwdriver.

Lock and handle insert
After you have finished with the sheathing, you need to embed the lock. For gates, it is best suited for three crossbars that extend into the locking part of the frame. The handle can be chosen complete with a lock or separately, all at the discretion of the owner.
decoration
To decorate the resulting gate, various forged products can be welded to the outside. Such products in various hardware stores and supermarkets are available in a large assortment. You can choose what you like and make any pattern or composition with your own hands.

Final stage
When the new gate is in place, all the parts are screwed on, the decorative forging pattern is welded on, it is necessary to clean all metal surfaces and welds from traces of rust, and open it all with a rust converter. After the converter is taken with a white film, it must be wiped off with a rag, and all metal parts should be primed. When the primer dries, apply two coats of paint on top.
That's all, our gate is ready!
The above method for collecting a gate with your own hands is also suitable for gates. The assembly principle is the same for almost all materials.
Look very attractive, wood and metal. If you decide to make a gate or gate out of wood, then you need to provide tools for processing wood in advance and, at the end, take the necessary measures to protect it from pests and the influence of natural factors.


 in the configuration?")


