The economic benefits of laminate flooring are not just the very affordable price. Significantly reduce costs can also be due to self-laying. The developers of the finishing material diligently "polished" its design, trying to alleviate the fate of builders and inexperienced performers, and succeeded in achieving the goal. The technology is extremely simple, but it requires the knowledge of a number of nuances from the home master. Before proceeding with the flooring, you should find out how to properly lay the laminate, so that your own work will please you with a presentable look and long service life.
Selecting a panel layout
Success at the finish line in the field of finishing will ensure an important component of any work - design. We are not talking about a professionally designed floor project with scrupulous calculations, but about a simple drawing with the dimensions of the room to be equipped. It will help to present the final picture and choose the optimal layout of planks that imitate expensive walnut, birch or oak boards. We will start from the location of daylight sources, that is, from windows, since this factor is considered the main one.
In relation to window openings, laminate can be laid:
- perpendicularly, due to which the direction of the long butt joints between the boards will coincide with the direction of the sun's rays, and the joints will become almost invisible;
- in parallel, emphasizing the presence of seams due to the resulting shadow;
- diagonally or at any priority, according to the owners, angle.
In general, laminated panels can be laid in 50 different ways if they are edged with universal locks that allow you to combine the end sides of the panels with longitudinal counterparts and vice versa. However, there are doubts that a novice finisher will immediately take on a coating with an impressive cost, and for mastering a rather complex laying method. Therefore, we will consider the most common version of laminated planks with Lock-latches at the ends and Click-locks along the equity lines.
Most buyers of the most popular material prefer the first type of arrangement of laminated panels for understandable reasons. After all, it gives the impression of a monolithic floor without seams. The second type of direction is chosen if there is a desire to visually expand a narrow, elongated room. The third method is used if you want to optically expand small dimensions. A prerequisite for diagonal styling may be a non-standard configuration of the room or the idea of dividing into functional sectors.
It is no coincidence that we started with the location. It depends on him the amount of material required for the arrangement. You need to decide at the start how to lay the laminate in order to purchase:
- for parallel and perpendicular installation of panels 5-7% more material;
- for a diagonal and angled version requiring multiple cuts in laminated boards, with a margin of 15%.
On the pack, the manufacturer indicates the quadrature covered by the planks in it. The material must be purchased taking into account the pre-calculated area of \u200b\u200bthe room and with an appropriate margin.

It is necessary to plan in advance the laying of laminate boards for the following reasons:
- Laminated planks will need to be cut, as the length of the panels in extremely rare cases is a multiple of the size of the room. In addition, it is necessary to displace the end joints so that the result is a semblance of brickwork. It is unacceptable that the length of the panel segment used to complement the row be less than 30 cm. True, there are manufacturers that allow 20 cm to be used as an insert.
- The multiplicity of the width of the panels to the size of the room can also be safely attributed to the category of pleasant, but rare accidents. The last row in most cases is made up of planks sawn along. According to technological requirements, its width cannot be equal to or narrower than 5 cm. However, if such a situation arises, it will be necessary to increase the width of the last row by reducing the same size of the first strip. That is, both extreme strips of the laminated floor will have to be sawn along the long edge. It is desirable to evenly distribute the covered distance for symmetry.

The offset of the end seams is a prerequisite for a reliable connection. Independent craftsmen, experienced finishers are advised to retreat from the end line of the previous row by at least 1/3 of the length of the board. We managed to find out that in order to get a “brick” or “chessboard” order in the layout of the panels, the boards of the laminated floor will not only have to be sawn, but also alternate rows, starting with a full length and with a panel divided into parts.
You can alternate symmetrically and without observing these rules of geometry:
- the symmetrical scheme of laying the slabs repeats the “pattern” of the floor most often through one, less often through two lanes;
- an asymmetric scheme does not force the master to adhere to any sequence at all, the offset is formed spontaneously by setting the trimming of the last board in the first row to the beginning of the second and then by analogy.
Laying without symmetry is considered the most economical and simple. However, the master should not forget that there should be no inserts less than 30 cm in the coating he creates. Therefore, it is still necessary to draw and calculate the priority size of the offset. If the drawing reveals a segment that does not meet the technological requirements, it is better to reduce the length of the first plank of the second row.

Note. A gap must be left around the perimeter of the floor to be laid to allow the laminate to change dimensions slightly without creating billowing bumps and without damaging the locks.
When planning, keep in mind that laminate flooring expands and contracts with temperature changes. It is believed that 1 m² of coverage is increased by an average temperature movement of 1.5 mm. Taking into account the average value, depending on the size of the room, the installers leave a compensation indent, which allows the coating to lengthen and shorten, from 0.8 to 1.5 cm.

Preparing for a laminate floor
Both the material itself and the rough basis for its installation are to be prepared. The base needs to be repaired and leveled:
- by grinding;
- pouring cement or polymer screed;
- plywood or GVLV flooring on point supports or logs.
As a result of leveling, the height level differences within a 2 m² floor area should not exceed 2 mm. Before work, the rough base is carefully vacuumed so that due to grains of sand and specks that accidentally fall into the lock joints, the panels do not make straining creaking sounds.
Laminate flooring cannot be laid on the day of its purchase, it must be given the opportunity to "get used" to the surrounding conditions. Two days should be allocated for the adaptation of the coating. Then we will release the panels from packaging, sort them by shade, if there are some “disagreements” in color. During the construction process, slabs that differ in tone will be evenly distributed so that there are no too large sections of different colors.
Note. The laminated coating should acclimatize at max air humidity 60%, min limit 50%. The optimal temperature for addiction is 18º Celsius.
During the adaptation period, the panels must be laid horizontally, stacked in the center of the room intended for decoration, so that the normal course of adaptation is not affected by the humidity of the walls.


The sequence of actions of the laminate stacker
It remains to figure out how to properly put a laminate on the prepared floor with your own hands, and proceed to implement the idea.
General order of the flooring process
Laminate flooring will be as follows:
- We completely cover the concrete base with strips of polyethylene film 200 microns thick. It will protect planks made from moisture-sensitive components from water released by the base. Wooden subfloors do not need waterproofing. We lay the strips with an overlap of about 20 cm, fasten them pointwise with adhesive tape for the convenience of further work.
- We lay the substrate of XPS, polyethylene foam or cork. Since the thickness of the substrate is from 2 mm or more, it must be laid end-to-end so that there are no thickenings. Mats or strips of the substrate are also attached with adhesive tape. It is desirable that the components of the multilayer floor system are laid "in a cross" with the previous and subsequent layers. It is recommended to place the underlay strips across the laying direction of the covering panels. This means that the insulating polyethylene for the concrete subfloor is laid perpendicular to the substrate, but in the direction of laying the laminate.
- We assemble the starting row of laminated boards, combining the end grooves with the end tongues in the manner indicated by the manufacturer. For a perfect fit, we tap the attached panels on the opposite side with a rubber mallet or an ordinary hammer, but through a damper bar or a piece of laminate, so as not to break the locking system.
- Without deviating from the technological course and from the selected layout scheme, we form the second row.
- We connect both assembled rows. Together with an assistant, we insert the tongue of the second row at the angle indicated by the manufacturer into the groove of the first strip. Gradually lowering it down, pressing it until it clicks with a characteristic clicking sound.
- We expose the assembled part of the floor to the wall, placing expansion wedges with a thickness equal to the expansion gap between it and the wall. You can buy these spacers or make your own from laminate scraps. We also put wedges from the ends.
- We form and rally the third row with the assembled part of the floor. We act in the same way until the last row, not forgetting about the spacers.
- To form the extreme strip, we measure each panel separately, applying the part turned upside down to the installation site. Piecemeal measurements will help to avoid deviations associated with the unevenness of the walls, traditional for domestic construction. Not forgetting about the deformation indent, we draw a line on the wrong side with a pencil. We'll cut off on it.
- To attach and adjust the panels of the extreme row, we use a bracket. Craftsmen, who are looking for their own ways, how it is more convenient and cheaper to lay a laminate on the floor with their own hands, use a hammer or a nail puller instead of a clamp-clamp.


Laying near pipes, radiators, doors
In the process of laying a laminate floor, there are specific moments, such as laying panels around pipes crossing the ceiling, designing a doorway and inserting slats under low-mounted radiators:
- If the heating battery prevents the board placed under it from snapping into place, cut off part of the ridge and fasten the panel with glue.
- To install the coating around the pipes on the panel, we draw their location with maximum accuracy, then we drill holes, the diameter of which should be greater than the diameter of the pipes. Next, we cut off a drilled bar along the diagonal line parallel to the end and lay its main part in the usual way, and put the insert that goes behind the pipe on glue. The remaining gaps are masked with sealant or plastic lining.
- We begin the arrangement of the doorway with sawing the jambs to the thickness of the laid coating - a laminate with a substrate. In general, with a door frame in the opening, it is advised to trim the jambs before starting work so as not to pollute the floor and locks of the planks with dust and sawdust. Then you need to accurately measure and draw the actual configuration on the panels laid next to the jambs. We take into account that there should be a gap between the wall and the plates, but this indent must be closed with a box, that is, bring the board almost tightly under the jamb beam.
In a doorway with a threshold, we associate the boundary line with it, without a threshold, with the line located under the closed leaf. By the way, the canvas must also be “shortened”, but the height of the plastic or aluminum transitional profile that masks the seam must also be added to the height of the coating. Similar end profiles close the expansion joints dividing the laminate floor into segments if the covered area exceeds 10.0 m in length and 8.0 m in width.
Note. The plinth installed at the end of the flooring is attached to the walls, not to the floor.

Despite the presence of some features, the process of laying a laminate floor cannot be called complicated. All the moments that arise with independent stackers are thoroughly thought out by the manufacturers of the material. It remains only to make an effort and show patience.
Laminate is one of those materials that are often used as flooring. Beautiful appearance, additional insulation, pleasant to the touch texture and these are not all the qualities that cause love for this coating. However, the coating can please the owner of the house for a long time, only if it is laid correctly. To do this, you need to properly prepare the base.
Preparatory actions
A lot of hard work needs to be done before laying the laminate flooring. It all starts with checking the evenness of the floor, it must meet certain standards. For 2 m² of floor, the height should not change by more than 2 mm. Otherwise, the panels on four sides equipped with special locks will loosen over time, which will lead to their breakage. There will be ever-growing gaps clogged with debris and dust. The floor will start to creak.
If the base has a slope, it must be uniform and not exceed 4 mm per 2 m². It is better not to place furniture resting on 4 legs on these areas, it will lose stability, and the doors, if any, will stop closing. The temperature and humidity of the substrate should also be checked. Wood must have a moisture content of less than 12%, concrete 4%, floor temperature over 15°.
What could be the basis
Having dealt with the size of the permissible distortions of the "relief" of the floor, we proceed to the types of bases and their preparation.
- Concrete floor. It must be repaired, small cracks need to be slightly enlarged and filled with cement-sand mortar. Large detached pieces should be removed, and the resulting recesses should be filled with a self-leveling mixture. The hardened floor is sanded. Dust after this procedure must be completely removed, only then begin to lay the laminate.
- Wooden covering. All irregularities are removed with a planer, lagging floorboards are reattached with self-tapping screws, rotten areas are replaced with new ones. If the ceiling height in the room is more than 2 m, the floor is leveled with plywood sheets 5 mm thick.
- Linoleum. This material can not be removed, provided that the floor itself is even. The only thing that needs to be done is to bend the edges and check for mold. If present, treat with antifungal agents.
- Tile. With a sufficiently even surface with ceramics, you just need to remove dust and dirt.
- Insulating layer. It is used only when the material needs to be laid on concrete. The peculiarity of this floor is that it absorbs moisture. The material is made of paper and pressed woodworking waste, which means that if it lies on a damp surface, it will begin to change shape over time - it will swell.
- Substrate. According to all technological standards, it is recommended for use.
- Carpet covering. Under no circumstances should it be used as a basis. The pile does not hold its shape well, which will lead to loosening of the locking system and a creaking floor. The result is repair or replacement of the coating.
No less interesting: — stages of work, advice and choice of materials
A few words about the substrate and vapor barrier
A concrete floor, old or new, absorbs moisture and transfers it to the floor covering. To avoid such problems, an insulating layer of 200 micron thick diffusion membrane or polyethylene is used. It should be laid on the entire floor area and not fixed to the base in any way. To do this, pieces of polyethylene must be glued with an overlap using adhesive tape. Excess insulation, stepping on the walls, is hidden with the help of a plinth.
 Rules for laying insulation
 Laminate flooring requires an underlayment that acts as a sound insulator and additionally protects against moisture. It is also designed to protect the bottom surface, the laminate will avoid abrasion when in contact with fine abrasive crumbs and ensure the immobility of the floating floor covering. So, what can be used as a substrate.
- Linoleum. However, this possibility will appear only in the case of its impeccable styling. It will not allow moisture to get on the laminate and will work as a heater.
- Penofol. This material is usually used in conjunction with foil, creating an excellent sound deadening layer. This underlay can be used for rooms with underfloor heating.
- Polyethylene foam. It is cheap, well repels moisture and retains heat, resistant to bacteria. True, it is short-lived and quickly loses its shape.
- Cork. It perfectly hides the flaws of the base, serves as a heat and moisture insulator, and is durable. But quite costly.
The thickness of the underlay must be calculated depending on the laminate. Usually, when buying this flooring, a brochure is included with it, which contains the manufacturer's recommendations regarding the underlay. As a rule, a 3 mm insulator should be placed under a 9 mm laminate.
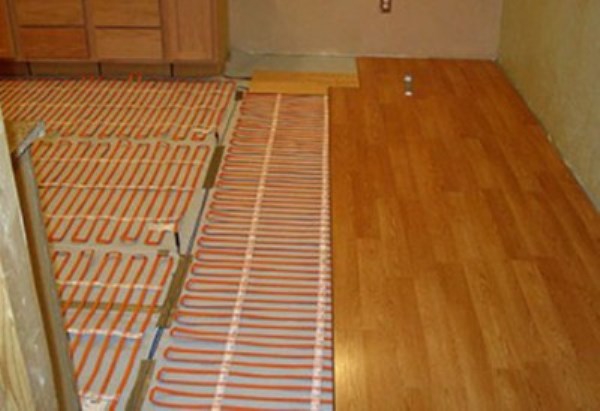
Warm floor
In some way, they are also related to what is placed under the laminate. Their use promises the use of only certain types of substrate. Foil and other insulators based on it, for example, penofol, are suitable. What are the underfloor heating, their pros and cons.
Heating with wires
In rooms that require additional heating, electric underfloor heating shows good results when laying under a laminate. Depending on the size of the room and the required temperature, you can choose a floor of different power. 150 W is enough to create comfort in the kitchen and in the living room. 220 W is able to completely heat a balcony or a room where there is a large heat leakage.
 Underfloor heating, electrical system
 - Easy installation, which is able to produce a person who does not have special skills.
- The main or additional heating of any room.
- No additional substrate required. All laying is carried out on the insulation already existing under the laminate.
The disadvantages include only the high cost of electricity with its constant use. Also, in the event of a wire break or burnout, the entire system will cease to be operational.
Infrared film
Among the residents of houses with laminate flooring, film infrared heating is the most used. This happens because such floors provide an optimal temperature regime that does not allow the floor covering to overheat.

- Damage to one or more sections does not entail the failure of the entire heating system.
- Its service life is at least 50 years.
- All installation work is carried out within two hours.
- Very thin, will not reduce the height of the room.
- The use of various heating modes significantly reduces the cost of heating.
- The film is not affected by corrosive and biological factors.
- There is no need to purchase any other equipment.
- Completely safe.
There is only one downside to this system. Significant costs will have to be spent compared to water and wired systems.
water system
This type of heating is less popular. However, it has positive properties that are not inherent in other types of warm floors. Also, preparatory work should be carried out before laying. First, turn on the system, drying the base. Secondly, before laying the laminate, it is recommended to cover the warm floor with a sound insulator about 3 mm thick. This will allow the laminated coating to deteriorate less when in contact with the screed.
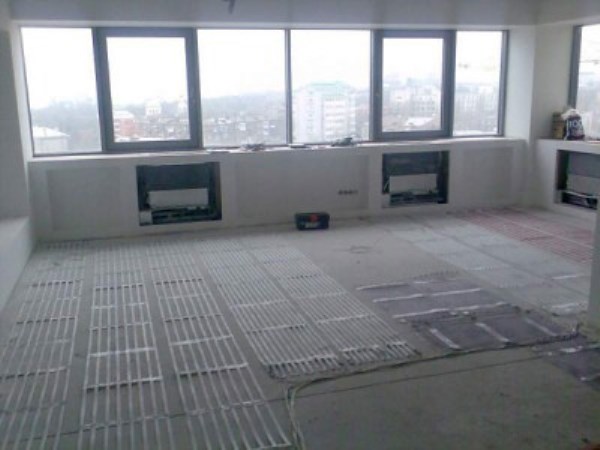
- Constant and uniform heating of the concrete base, increasing the life of the laminate.
- Durability. The system without mechanical damage will last for many years.
- Availability. Of all types of underfloor heating, this option is the most economical in use. No need to pay for anything other than central heating.
- Difficulty of installation. For wiring this system of underfloor heating, debugging and launch, you will have to hire specialists.
- Additional labor costs. She can hit the pocket quite noticeably.
- In addition to acquiring the system itself, you will have to fork out for fittings and other accessories.
- In the event of a breakthrough in the heating system, the floor covering will be damaged. You will also have to compensate for the damage to the neighbors below, if any.
Conclusion
After studying the content of the article, each home master is able to independently choose the optimal type of substrate and base. Also, qualitatively carry out preparatory work and calculate the approximate cost of future repairs. Or at least not allow yourself to be deceived by negligent hired workers with the choice of material and, if necessary, make changes to their work.
The great advantage of laminate flooring is its ease of installation. Due to the high quality of the panel joints, an almost seamless connection between them is achieved.
Everyone has probably heard about the laminate, but not many people know what the laminate is laid on. In addition, it is necessary to understand that the final price of a laminated floor will depend on several factors: the area of the room, the cost of work and materials.
If properly laid, the finished laminate floor will look like a monolithic surface.
To properly install laminate flooring, you need to have the following on hand:
- a hammer;
- tensioner 30 cm long;
- wedges;
- belt;
- lining (foam rubber);
- saw;
- adhesive tape 80 mm wide;
- waterproof putty;
- any material that protects against moisture, such as plastic wrap.
A video of laying laminate flooring can be viewed at the end of this article.
And indeed, talking about what it is not at all difficult to make with your own hands is not at all accidental. If the laminate will act as a new floor covering, then in this case there is no need to dismantle the old floor covering.
To the question of what to lay the laminate on, any specialist will answer that laminate panels can be laid on almost any surface: fiberboard, chipboard, wooden boards, linoleum, ceramic tiles, concrete floor.

The main thing here is the absence of large differences. It doesn’t take much time to produce, and absolutely any person (if desired) who can hold a saw and a hammer can handle such work.
Of course, when performing this type of work, it is necessary to observe the basic rules for laying laminate, including taking into account what the laminate is placed on.
First of all, the purchased laminate should be unpacked, its quality checked and left for two days in the room where it will be installed. Such actions are necessary in order for the laminate to acclimatize, while the temperature in the room must be at room temperature, that is, at least 18 degrees with a relative humidity of not more than 75%.
Only by observing these requirements, the laminate can take the dimensions corresponding to the temperature and humidity of the room. But what the laminate is laid on, we have already told.
Surface for laminate flooring
- should be on a dry, clean, flat and hard surface. But on what it is better to lay a laminate, there is no definite answer. So, if the old floor covering is made of linoleum or polyvinyl chloride, then it can be left in place.
- But if there is carpeting, then you will have to remove it. Floor short hair and soft linoleum can be used as an underlay under a laminate floor.
- If the laminate will be laid on tiles, hard linoleum or wooden floors, then it is necessary to lay an intermediate layer of soft material, at least 2 mm thick. As such an intermediate layer, a gasket made of foam rubber or foamed polyethylene has proven itself well.
- The intermediate layer should be laid carefully and then glued.
- You can glue this layer with any film on a self-adhesive basis, 5 cm wide. To prevent moisture from getting under the floor, you should glue the wall and corners at a height of 20-30 mm with such a film. In the future, this film will be hidden by the plinth. As you can see, there is nothing complicated, so it’s not at all worth panicking about the question of what the laminate is laid on.

If the laminate is to be laid on a ceramic tile or cement floor, a polyethylene film should be laid as an insulating vapor barrier so that its edges extend onto the wall.
Advice!
A seamless uneven floor must be leveled with a putty mass, which is designed specifically for floors.
Of course, on what to lay the laminate, everyone decides for himself, the main thing is to observe the correctness of the work.
In what direction is the laminate laid?
When laying laminate is carried out on large areas, expansion joints should also be provided. The room should also have a place at the entrance to it, which will trap moisture and dirt at the entrance.
Another important point when laying laminate flooring is the need to clearly measure the closing and opening of doors in the room where it is planned to equip the laminate floor.
Advice!
The laminate should be laid in the direction of the light beam. Laying laminate flooring in long rooms is done regardless of the direction of the light beam.
In addition, it is forbidden to ventilate the room during work. Laminate panels should always be laid in a "floating way", i.e. without bonding and gluing to the floor subfloor.
There is no need to fix the panels with nails or otherwise to the base. The only exceptions are spikes and grooves, which will need to be glued to the floor. Panels can only be glued together.
When laying laminate, it is necessary to leave gaps of 0.8-1 cm around the heating system and around the entire perimeter of the floor.

After the laying of the laminate is completed, the existing gaps are closed with a plinth or planks, and they are not attached to the floor.
How to install laminate flooring
The following instructions for laying laminate flooring are general and suitable for any surface.
- First of all, it is necessary to spread a vapor barrier film and a substrate over the entire surface..
Lay the vapor barrier strips with an overlap of 20 cm. The underlayment is laid end-to-end. Here is the answer to the question of what to lay the laminate on. - The first row of laminate panels begins to be laid from the left corner of the room. To connect the short sides of the laminate panels to each other, it is necessary to insert a comb into the groove of the laid panel and hammer it.
It is forbidden to hit the panel itself with a hammer when fitting it; it is recommended to use a block for this. It is also recommended to use wedges to maintain a distance of 1 cm from the walls.
- Laying subsequent rows is done by attaching the long edge of the laid first panel.
To do this, at an angle of 25%, insert the comb into the groove of the laid row, and then carefully lay the panels on the substrate.

The laminate has high quality butt joints. Thanks to this, ease of installation and almost seamless connection of the panels is achieved. Such panels do not require fastening to the subfloor. They are laid in a single monolithic layer, resembling a carpet.
Laminate flooring is probably known to everyone - a perfectly even and smooth coating. But the laying rules are not familiar to many.
When deciding to use this building material, you need to understand that the final price of the floor will consist of several factors:
- material cost,
- works,
- delivery,
- The size of the area of the room.
Therefore, before making a decision on laying a laminate, you need to carefully calculate the area of \u200b\u200bthe room and the weight of the laminate packages.
How to install laminate
If the laminate is laid correctly, then as a result we will get a single, even surface.
For the correct laying of the laminate, we need:
- A hammer;
- Tension device 30 cm long;
- Belt;
- Foam rubber;
- Saw or jigsaw;
- Adhesive tape 80 mm wide or double-sided tape;
- Waterproof putty;
- plastic film
Ease of installation also lies in the fact that you can not dismantle the old floor covering.
Laminate flooring can be laid on almost any surface: linoleum, plank flooring, fiberboard, chipboard, plywood, concrete flooring, and tile.

If you follow the basic rules for laying laminate flooring, absolutely anyone can handle this job.
Here are the basic rules:
- Purchased material must be unpacked.
- Check the completeness, quality and color.
- Leave in the room where the laying will be carried out for two days, for acclimatization.
- The temperature in the room should not be lower than 18 degrees, and the humidity should not exceed 75%.
Surface for laminate flooring.
In order to avoid problems with the laminated surface in the future, it must be taken into account that the laying base must be clean, dry, firm and as even as possible.
Linoleum and plank flooring does not require dismantling. Even a short-pile carpet can serve as an excellent underlay.
If you are planning to install laminate flooring over a hard surface such as wood or tile, it is advisable to install an underlay that is at least 2mm thick. Such a substrate can be soft linoleum or foam rubber. It is desirable to put the substrate on glue or mounting double-sided tape. It is also necessary to carry out waterproofing of the joints of the walls to a height of 20-30 mm and the floor.
If the coating is laid on a cement floor, then it is recommended to cover the floor with a plastic film as insulation with a launch on the wall.

Advice! Uneven floors must be leveled with floor putty.
As long as the coating is properly laid, it does not matter what it will be laid on.
In what direction is the laminate laid?
When the laminate is planned to be laid in a large room, expansion joints must be provided. When entering a room with a laminated floor, there must be a place that will not allow moisture to enter it. Don't forget the opening doors. It is necessary to measure their unhindered opening.
Advice! Laminate should be laid in the direction of the light beam, and in long rooms - regardless of the direction of the light beam.
An important fact: it is forbidden to ventilate the room during the laying of the laminate!
The laying of the laminate is carried out in a "floating way". Panels must not be fixed to the floor subfloor. But you can glue the panels together.
Gaps of 1-1.5 cm must be left at the walls. After installing the laminate, they are covered with a plinth without fastening to the floor.

The following are general instructions for laying laminate flooring. But we must not forget that for each reason there are nuances. Therefore, you need to carefully read the instructions enclosed by the manufacturer of the laminate.
- The entire surface of the base must be covered with vapor barrier material. It overlaps and is given a launch on the walls of 20 cm.
- Put a pad on it. The substrate is laid end-to-end.
- Start laying the laminate from the left corner of the room. To connect the short sides, a comb is inserted into the groove and hammered through the block. Do not hit the panel with a hammer!
- Subsequent panels are attached to the long edge of the first panel by inserting the tongue into the groove of the previous row at an angle of 25%.

So, the choice in favor of a laminated floor is made, the material is purchased in the right amount and delivered to the installation site.
It remains to invite a team of craftsmen and wait for the work to be done. And is it necessary to pay extra money for the installation of the coating?
A good owner is quite capable of coping with such a task, of course, with certain basic skills, the proper level of accuracy and care.
Laminate laying technology is not in a hurry. So that the laying of the coating itself does not cause difficulties, and so that the resulting floor lasts a long time without losing its operational and decorative qualities, it is necessary to carefully prepare for work.
Assessing the condition of the floor
 Usually, even before making a decision to purchase a laminate, the condition of the “subfloor” is assessed, and appropriate repair and restoration work is carried out.
By and large, a laminated floor can be laid on any surface subject to the main condition - it must be smooth, durable, without areas of dynamic deformation.
Otherwise, "weak" places will inevitably appear on the new coating, where violations of the integrity of the surface, divergence of joints, and the appearance of squeaks are possible.
Ideally, the floor should be strictly horizontal, with allowable differences of no more than 1-2 mm per linear meter.
- should not have significant cracks, gouges, delaminations or crumbling areas. If it is impossible to correct the existing defects, it is impossible to lay on an uneven floor. You will have to update the screed - or. It is possible to start laying the laminate only after the coating has completely hardened, in accordance with the terms established by the concrete work technology.
- If it is supposed, its entire surface must be carefully checked. In the case when areas of “playing” or creaking boards are identified, they are subject to repair or replacement. Possible irregularities can be processed with a planer, grinder, fill existing cavities with wood putty.
- It is possible to lay laminate, provided that there are no holes or bumps on it, delamination of joints, through abrasions, areas of destruction of the concrete base. Such a coating cannot be repaired; it will be easier to remove the linoleum and carefully prepare the base for the laminate.
If funds allow, the ideal option would be to cover the entire floor surface of 10-12 mm, after laying them from below with a plastic film for waterproofing. The process of laying laminate flooring will be greatly simplified, and the sound and thermal insulation qualities of the floor will increase significantly.
We prepare the necessary materials and tools
Good advice to all novice masters - before laying the laminate, after it is delivered from the store, it is worth unpacking the panels and letting them rest for 2-3 days in the room where the flooring will be carried out.
Aligning the temperature and humidity indicators of the material and the room will facilitate the installation process and eliminate the risk of warping of the laid coating.
This time can be devoted to preparing the necessary tools and materials.
First of all, you need to have the required amount available, regardless of the type of base.
The substrate not only has a good insulating effect - it has a shock-absorbing effect, does not allow friction of the laminate board with a rigid base, which ensures the durability of the floor covering.
 The substrate can be polystyrene or polyurethane foam, with or without a heat-reflecting foil coating, produced in rolls or in the form of rectangular panels.
A more expensive, but very high-quality option -.
- The lining material is laid end-to-end, without overlaps, so double-sided tape is required to securely fix it on the floor. You can get by with ordinary adhesive tape, fixing the rows of the substrate at the seams.
- It is worth immediately preparing a set of wooden wedges, 10-12 mm thick, for laying the laminate at the required distance from the walls of the room.
- You can cut laminated panels to the required size with a regular hacksaw or electric jigsaw.
- For high-quality joining of the seams, you will need a hammer, preferably a rubber or wooden one (mallet). You can also use metal, but only necessarily through wooden spacers (bars).
- To mount the coating sections located near the walls, you need to have a small mount, or you can make a lever from a steel strip with a hook and a shoulder protruding upward, through which the hammer force can be transmitted.
In principle, the materials and tools for laying are ready. However, before starting work, there are a few more points to consider.
How to Avoid Unwanted Mistakes
It is best to precede the laying by drawing up a plan carefully drawn on a scale - the required visibility and clarity in further actions will appear.
What is important to consider:

- When answering the question: how to lay the laminate along or across, the following is important: the direction of the longitudinal joints should be parallel to the direction of the rays from the main source of natural light (windows) - in this case, the seams will practically not be noticeable.
- The laying direction, as a rule, from the far left corner, is orderly. For the panels of the first row adjacent to the wall, the groove should be outward, and the spike should be cut so that a flat end is obtained. Longitudinal sawing of panels is best done with a circular or vertical hand-held electric saw.
- On the plan, be sure to take into account that the last, final laying strip must have a width of at least 100 mm. If not, you will have to reduce the width of the first row. The same should be taken into account if there are any internal corners in the room.
- The thickness of the laid coating should not interfere with the free opening of the doors. Sometimes you have to remove and cut the door leaf from below in advance.
- When planning, do not forget about the pipes passing through the thickness of the floor. To cut curly grooves, they will definitely need a jigsaw.
After thinking through all the theoretical issues, you can proceed directly to the installation.
Laminate installation process
Laminated floor panels are available in a lock or adhesive version. In turn, locks can be one of several systems - "Click", "Lock", "5G".
How to properly install laminate?
Each type of laminate has its own installation features.
Features of laying laminate with the "Click" system
 Currently, this is the most common locking system among laminate manufacturers and a popular locking system among craftsmen.
Its main difference from others is that you can insert a figured spike into a complex groove only at a certain angle - for different manufacturers - from 25 to 45 degrees.
When the two panels are rotated into the same plane, the lock locks securely.
Convenience also lies in the fact that disassembling the coating will also not be difficult when the panel is turned, the lock will “open”.
- Work begins with the assembly of the first row of panels. It is laid along the wall and wedged on both sides with 10-12 mm dies. This gap is necessary to compensate for the thermal expansion of the laminated coating. The assembly process is simple - insert the spike at the right angle, aligning the edges exactly, lower the panel down until it clicks into place.
- The assembly of the second row takes place with the provision of displacement of the transverse seams by half the length of the panels (it is allowed - by 30-40 cm). The strip along the entire length is assembled completely, and only then does the connection with the first row follow. This will most likely require an assistant. After fixing the second row, it is also wedged from the walls with blocks from both ends.
- Further work continues in the same order until the room is completely covered.
Be sure to control the cleanliness of the grooves so that there are no sawdust or other debris left.
In the case of a good material fit, a hammer is most likely not even needed.
Features of laying laminate with the "Lock" system
 Such a lock system is gradually falling into disuse, although inexpensive laminate models can be produced with it.
The connection of the thorn and the groove occurs strictly in one plane, and the engagement occurs due to special protrusions and grooves.
The joint turns out to be much less durable, although disassembly, if necessary, is not easy to carry out - the spike may be damaged.
- When assembling the first row, after connecting the end sides of the panels, for the full entry of the spike into the groove, tapping with a hammer through a wooden gasket is carried out. The wedging of the row from the wall is carried out in the same way as in the case of the "Click" system.
- The second row is assembled gradually, one panel at a time (also taking into account the displacement of the transverse seam by half the length of the board). The first panel is inserted into the groove of the first row, tapped with a hammer until it is fully connected, and then wedged from the wall.
- The second panel is tapped on both the long and short sides for reliable fastening of the longitudinal and transverse locks. Further work continues in the same order.
- The most difficult thing is the installation of the last, adjacent to the wall, panel of the row. Here you will need either a mount or a curved lever.
Work is carried out in order or "ladder", to the end of the room. The last row is also carefully mounted with the transfer of force through the lever.
It is very important to correctly measure the force of the hammer blow or the force on the lever so as not to damage the surface of the laminate and not to break the spikes of the lock.
Features of laying adhesive laminate
Such laminated panels, although equipped with a tongue and groove system, do not have a locking connection. Thus, the strength of the joint is provided only by gluing.
Such floors are distinguished by good solidity, moisture resistance, but it will not be possible to dismantle or repair a separate section of the coating.
The installation process is more laborious, in addition, you will need to purchase special glue. It is not recommended to use PVA familiar to everyone.
- Laminate laying technology is generally similar to the "Lock" system - the sequence is the same. The difference is that each groove is abundantly smeared with glue (in accordance with the instructions attached to it). Excess adhesive that has come out after joining the panels is immediately removed with a clean, damp cloth.
- After laying the first three rows, a break of at least 2 hours must be taken so that the glue has time to grab. The same rule applies in the future, until the entire laying of the laminate.
Master class on laying laminate in video format
Video on how to properly lay laminate flooring, shows the laying technology, and preparatory work.
Finishing work
After the entire surface of the floor is covered with laminate, the expansion wedges are removed from the walls. The final step will be the installation of skirting boards that will hide the expansion slots.
It is important to remember that in no case are the skirting boards screwed to the laminate flooring - only to the wall.
The transition to another coating at the junction of adjacent rooms can be closed with a decorative overlay or use.
In fact, the installation work is completed - you can proceed to cleaning the premises and decorating the interior of the room. As you can see, there is nothing prohibitively complicated. The main thing is maximum attention, thoughtfulness of each of your actions and the highest accuracy. Everything should work!


 in the configuration?")


