Not everyone in their house, and especially not in their apartment, has a fireplace. And sometimes you want to create a festive mood (to have somewhere to put gifts) or you just want to make the room more cozy and intimate. In this case, you can create an imitation. The simplest option is a fireplace made of cardboard. Typically used are packaging boxes from large equipment.
False fireplace made of cardboard: models
A false fireplace made of cardboard, like a real one, can be wall-mounted or corner-mounted. In both options, the portal can be straight or arched. Whatever you prefer. If we talk about the practical side of the matter, straight is easier to make and easier to finish. Even a beginner can handle it.
A wall-mounted fireplace is great if you have a decent amount of free space on the wall. It looks great in the wall between the windows. If the walls are all occupied, but there are corners, you can build a corner model.
What materials are needed
The best material is cardboard boxes. The easiest way to make a fireplace out of cardboard is if you have a box for a large monitor or TV. All you need to do is cut out the portal and glue the side walls.

It will be a little more work if you only have small boxes like shoe boxes. But from them you can assemble a more interesting model in shape.
You will also need:

These are all the materials and tools that will be required. Of the entire list, questions may arise only regarding adhesive tape. Why paper? It is good in any finish. Including when painting. So the option is universal. If you are not going to paint the fireplace, you can use regular adhesive tape.
You will also need finishing material, but we’ll talk about this later, since a lot depends on the finishing method.
Assembly options
If there is a big box
A large cardboard box will make a fireplace with a rectangular portal. Determine the size yourself, but the optimal height is about 80-90 cm, the width is about the same, and the depth is 6-15 cm. But there are models that are wider, narrower, taller, and lower. Everything is to your taste. For example, here is a drawing of a cardboard false fireplace with dimensions.

We begin assembling the imitation fireplace from cardboard from the central part. We form the columns first. Cutting rectangles to size is no problem. The problem is to make even folds in the right places. Take a large ruler or a straight bar and a hard object with a rounded end. For example, a ballpoint pen will do, or you can take a spoon or fork and use the pen. The idea is as follows - along the line where the fold should be, apply a ruler/bar, draw the back of a ballpoint pen or the handle of a cutlery along the bar, pushing through the cardboard. But be careful not to tear it. The sheet bends easily along the drawn line.

We glue the central part or paint it right away. Then it will be too inconvenient. You can paint it black, as in the photo. Another option is to imitate brickwork. Looks good too.
It is convenient to glue the parts together with tape (the type of tape has already been discussed). We glue each connection on both sides. We don't regret scotch. This cardboard fireplace was painted, so the columns were covered with white thick paper. You can use a primer and apply paint over it.

We make a shelf above the fireplace from several pieces of cardboard using the same technology. If you plan to install something, it is advisable to make stiffening ribs - several partitions. If the entire structure turns out to be strong and stable, you can make a shelf from a piece of plywood, for example.
If the cardboard is thin, you can use polystyrene/foam. It is sold in construction stores. You can take the slabs that are used to finish the ceiling. They have processed edges and a pattern is applied to the front surface. In general, it might turn out interesting.
Next comes the finishing touches. In this version, “bricks” were cut from paper of suitable colors. They decorated the portal opening. This is where you will need PVA glue. Don't forget to leave seams between the “bricks”. In the presented model they are painted with a base color, but you can make them, for example, black or white.

The rest of the surface of the false fireplace is painted, and foam plastic (polystyrene) is glued on top.

Moldings can be glued before painting. You need to cut them with a sharp stationery knife. Then the cut will be smooth. Glued with PVA or special glue. Wipe off any remaining residue immediately, otherwise the paint will lie unevenly.
The same structure can be covered with brick or wild stone wallpaper. Self-adhesive film is also suitable. But you have to work with it carefully - you won’t be able to peel it off.
If the boxes are small
Small cardboard boxes are no more difficult to work with. They can be the same or different sizes, thickness and width. Based on the existing set, the structure is assembled.

There are two ways:

The second option takes less time, but the design is unreliable. If the dimensions are large, it may sag and sag.

To give a fireplace made of cardboard boxes a presentable look, we paint it “like a brick.” To do this, cover the surface with thick grayish-brown paper. This color will be the background.
To paint, you need reddish-brown paint and a large foam sponge. It can be cut to the size of the brick - 250*65 mm. Pour the paint into a flat bowl, dip a sponge into it, apply it to the paper and lightly press it, draw the bricks.

When working, you need to make sure that the “seams” between the “bricks” are the same width. This is not an easy task - you get distracted a little, and the size is not the right one. You can do it simpler - cut the masking tape into narrow strips, stick it on, draw “bricks”. After the paint has dried, remove the tape.

The top part had to be reduced because our fireplace was too wobbly. It is better to use whole boxes.
Fireplace with round portal
Its assembly is more labor-intensive: you will have to glue the vault well. This fireplace required 4 large boxes (like TV boxes).

The base was glued separately. Stiffening ribs were glued to the inside of polystyrene. The weight turned out to be solid and the base sagged without reinforcement. The strips were installed approximately 5 cm apart. They were glued with masking tape, then the base was taped on all sides.
Then we cut out the front part and decorated the back wall. It’s better to decorate it right away, before it’s glued together. We transfer the arched cutout onto a sheet of cardboard. We cut out “bricks” from cardboard and glue them so that the edges do not extend beyond the “arch.” When the glue dries, we assemble the main part of the portal. We also install several stiffening ribs in the portal - at a high height, the cardboard can “play”, and this way everything turns out strong and rigid.

The next stage is making the lid. It is multi-layered - cardboard, polystyrene foam, cardboard. Everything is coated with glue, the weight is installed. When the glue had dried (after 14 hours), the lid was secured to the structure with tape. NEXT - finishing work.
To smooth out any unevenness caused by the tape, we cover all surfaces with thick white paper. You can take A4 sheets, or larger ones.
Next you will need a roll of paper towels and PVA glue. We dilute it 1:1 with water and pour it into a spray bottle. We wet the napkin and lay it down, squeezing it a little. Wet thin paper itself gives a relief; we just correct it a little, achieving a better effect. We process all surfaces in a similar way, excluding “bricks”. We wait until it dries.

We take red-brown and ivory paint (in this case). We paint the “bricks” brown, and the rest of the surface light. The cardboard fireplace is almost ready. The finishing touches remain.

After drying, we go over everything with a brush slightly dipped in gold paint. We dip the brush, squeeze it out, and once again remove the remaining paint on the sheet of paper. Using a semi-dry brush, we go through the “seams” between the bricks, lightly touching the “bricks” themselves. Next, using the same technique, we emphasize the texture of the surface. It is important not to apply too much paint. Now that's it. The cardboard fireplace is ready.
Ideas for decorating a fireplace made of cardboard in photo format
You can make an imitation of a fireplace from cardboard of any shape. Several ideas are collected in this section. You already know the principles of assembly, you can come up with the decor yourself or use ideas from photos.


If you use good brick-like wallpaper, it will look very natural


In progress…


Decent option...

In a city apartment, where, due to the lack of chimneys and reliable heat-insulating ceilings, it is impossible to install a fully functional wood-burning fireplace, it is possible to design a decorative model of it. When using inexpensive materials at hand, the work will not require extensive construction skills and expensive tools. You can build a fireplace made of cardboard with your own hands in a few hours, and it looks no worse than the real thing.

You can also involve children in the work; for them this activity will be not only interesting, but also educational.
There are several models depending on their location in the room:
- wall-mounted – located near the wall and protrudes its façade for some distance;
- built-in – mounted directly into the wall;
- corner - occupies a corner of the room;
- island - does not adhere to the wall and is most often installed in the center of the room.
False fireplaces made of cardboard are most often made into wall or corner fireplaces, because they are not intended for heating a house, but have a decorative function. This dummy can also be used as furniture: shelves can be installed in a niche, and the upper tabletop will act as a shelf for small items.

photos
According to their external design, there can be a huge number of types of false fireplaces: in English, classic, rustic style, with an arched or rectangular firebox, with a dummy wood burner or oven. When designing, it is important to consider that this detail is combined with the surrounding interior.

photos
The simplest option that children can make is a small dummy without a chimney with a rectangular portal and firebox. Outwardly, it will resemble a large letter P. In the future, this decorative device can be supplemented with other elements and make more complex decor.
It is possible to assemble a model of a classic English fireplace from cardboard. It is distinguished by an open firebox in the shape of a trapezoid and a straight chimney that goes into the ceiling. Inside the combustion chamber, the walls are located at a slight angle of about 20°. The English version is decorated with decor that imitates the finishing of limestone, rubble or brick.


A model imitating a stove for a bathhouse or a rural style should have an arch-shaped firebox. Making a shaped hole out of cardboard is not difficult. And it is best to decorate the outside with cardboard or foam stucco in the form of bricks or cobblestones
Material and tool
Getting thick corrugated cardboard is not a problem; you can use containers from large household appliances: TVs, refrigerators, washing machines or other goods. The entire manufacturing process can be carried out at home right at the future location of the decorative hearth.


Corrugated cardboard is good because, thanks to internal stiffening ribs, it retains sufficient strength, weighs very little, and is cut with a simple stationery knife. But a cardboard fireplace, even with external decoration, will not support much weight, so you should not place heavy objects on it. It is not protected from moisture and high temperature, so the false fireplace should not be placed near heat sources, and only safe methods should be used to simulate fire.
To build the frame you will need the following tools:
- stationery knife;
- polymer glue;
- transparent tape;
- pencil;
- roulette;
- ruler.
Depending on the methods of decorative finishing of a cardboard false fireplace, the following materials and tools may be needed:
- paint or decorative putty;
- paint brush or spatula;
- paint baths or a container for mixing putty;
- corners, moldings, stucco, frames or profiles.

You can decorate such a fireplace using putty and subsequent painting, or glue ready-made stucco molding, polyurethane sheets, self-adhesive laminated paper with the texture of wood or natural stone onto the surface. Based on the chosen method, the appropriate set of items for finishing is selected.
Plan and calculations
Even the simplest version of a cardboard fireplace requires a step-by-step work plan. It includes the following items:
- determining the shape, type and location of the fireplace;
- selection of materials for the frame and decorative finishing;
- creating a design drawing with dimensions;
- preparation of tools and materials;
- marking frame parts on cardboard;
- cutting elements, gluing them and installing them;
- external finishing.

The good thing about developing such a plan is that by performing all the steps step by step according to the existing scheme, you can gain some experience and next time start creating a more complex structure, for example, from polyurethane or plywood. Despite the frivolous work of gluing ordinary cardboard, you can make a detailed calculation of the dimensions of the firebox, portal and chimney, as for a real wood-burning fireplace. This is useful for gaining some experience in construction.
Frame
It is worth considering step-by-step instructions for creating the most common frame layouts: wall-mounted U-shaped and corner false fireplaces.
For a wall-mounted fireplace, you will need a wide cardboard box with a height and width of 1 - 1.4 m and a thickness of 0.2 - 0.25 m, for example from a large LCD TV. First of all, fold and cut lines are marked on the cardboard with a pencil. A rectangular symmetrical cutout is made in the center on the front side - this will be the oven portal. The back of the box remains untouched. For greater rigidity, the inner walls of the firebox are glued inside. All sides of the frame can be secured with plastic corners or moldings. The frame is placed on a foam or polyurethane base.

To finish the U-shaped version, it is best to use light white ceiling panels or self-adhesive laminated paper. Foam panels are attached with waterproof polymer glue, which dries in a matter of minutes. Another finishing method is to use water-based paint. In order for it to adhere firmly to the cardboard frame, you can first coat it with a primer or a very thin layer of liquid putty. After this, wait 1 - 1.5 hours for the primer mixture to dry completely and begin painting.

A corner decorative fireplace made from a cardboard box is made in the shape of a prism with a triangular base. The corners of the frame are tightly glued with tape or polymer glue, a hole in the shape of an arch is cut out in the front part, the top can be decorated with a decorative tabletop made of lightweight material, such as PVC or laminated plywood. Inside the firebox, for beauty, you should make false walls from the same cardboard.

The decor of a corner cardboard fireplace can be done in the same ways as the previous option: painting or appliqué. In a niche you can place beautiful souvenirs or a toy fire, the creation of which will be described in the next section.
Portal
Fireplace portal– the part where wood burning occurs. In the case of imitation using cardboard, there are several ideas on how to make its appearance as realistic as possible and similar to a real fireplace. First, you should install a fake firewood grill inside. Since in this version it is metal, you need to look for lightweight materials that are visually similar to metals. These can be plastic or wooden parts covered with shiny mastic or foil. You can use black paint.
Next, we simulate a flame in the firebox of such an imaginary hearth. There are several ways to create the illusion of a bright, flickering fire. The simplest and safest technique is based on the use of a New Year's garland. First, artificial firewood is made from dry branches. They are covered with cotton wool and foil. Next, a bunch of such firewood is placed in a circle of stones in the niche of the fireplace, and a garland folded into a ball must be inserted into its center. When connected to the network, a mesmerizing flicker is created inside the fireplace, similar to the smoldering of real firewood.

A garland or individual bulbs can be placed in raw salt crystals. They create a beautiful shimmering effect and also have a beneficial effect on the body. Just take into account that the design of the cardboard fireplace can withstand the weight of the salt lamps.
Some people place a flat display on the floor at the base of the firebox, onto which a picture of a live fire is transmitted. This method is beautiful but not practical - use an expensive monitor for only one image. But it is quite suitable for one-time use, for example, on New Year or another holiday.
A simpler and cheaper method of simulating a flame is using a hand-drawn picture, embossing, appliqué or a three-dimensional hologram. This technique can be constantly changed, creating new original images.
Nowadays, almost every person dreams of a cozy and warm home. When we say “home,” we often mean family. Thus, the idea of creating a home with your own hands arose. Most associate comfort with a fireplace, but many do not have the opportunity to install one. However, not everyone knows that you can make it yourself and not using brickwork, but from simple cardboard boxes. Don't listen to those who will claim that he is not real. This can be done in one day, and in appearance it can be even better than the original.
Our country can boast of great ability to produce masterpieces from improvised materials. In this case, we will look at fireplaces, the production of which will take a little time. The most important thing without which you won’t be able to create a false fireplace, even with the most detailed instructions, is a large cardboard box. It can be taken from the TV, refrigerator and even from a vacuum cleaner.

But the most important thing is that it must meet 3 requirements:
- The cardboard must be packable and very strong. It must be rigid enough to support the weight of the top shelf and future finishing.
- The box must be large in size so that there is plenty of room for the fulfillment of fantasies. If the box with the required parameters is not found, you can use smaller dimensions and create a corner fireplace.
- The material must be unnecessary. For example, if you bought a refrigerator and its repair warranty has expired, you can use the box for your own purposes. Otherwise, if the equipment breaks down, it may not be accepted for service.
In addition, for the work you will need: masking tape, hot glue, primer, a stationery knife, a spatula of the required size, acrylic paint. If you want to organize additional finishing, you can purchase polystyrene foam, drywall, mosaic borders, varnishes and grout. To make the work more comfortable, you can use a grinder and a jigsaw.
Preparation before creating a fireplace with your own hands from boxes
Before you create an artificial fireplace from cardboard, you need to create a design for the upcoming product. It is necessary to create it because in the process even the most skillful hands will not be able to work only on imagination; you will need to rely on at least something.
If you don't have a box of the right size, you can use several small boxes and glue them together in the process, giving the assembly an arched shape.
The first step in preparing a plan should be to mark out the parameters of the future fireplace. Everything must be taken into account according to the capabilities of the room.
When calculating parameters, the following conditions must be taken into account:
- The fireplace should be placed under the wall on which there is no furniture. This way it can become a key attribute.
- If you don't have much space, but have an empty corner, then a small corner fireplace would be a great option. It can effectively decorate your living space.
Having calculated all the dimensions and determined the free space, you can begin organizing the layout of the future fireplace. On a large sheet of paper in a selected scale, you need to display the plan in height and width. Don't forget to indicate the depth of the firebox, as well as its shape. Once all the details have been specified, you can proceed directly to working with the box.
DIY New Year's fireplace: making a frame
Creating a fireplace frame is the most crucial moment in organizing a cardboard fireplace. To do this, you need to make markings on the box and, using a stationery knife, cut out all the components for the future design. The future appearance of the product will depend on how carefully the work is done. Therefore, the work must be done as carefully and clearly as possible.
In order for everything to go perfectly, lay the material on the floor and use a pencil to mark the location of the future firebox and all the necessary bends.
It is best to mark in different colors. This nuance will help when assembling structures.

In order for the cardboard to bend better during assembly, it is recommended to cut it, but only slightly and the top layer, which covers the corrugated interior.
After this, the firebox is cut out. Regardless of what shape the future firebox will have, its formation is always identical. First, a window is cut out, then its lower part is bent, and thus we get the bottom of the firebox. The next thing to do is the side and back walls. They are measured and cut out from another piece of cardboard to be identical in shape to the frame. Each of the cut out figures should be 5 centimeters larger. This is done so that the material can be glued comfortably. The entire structure is assembled and glued with assembly adhesive or secured with a stapler. If you want to install additional shelves, then assembly of the structure should be postponed until they are manufactured. The shelves are made in the same way as the fireplace insert.
When everything is ready, you can think about strengthening the structure.
To strengthen you will need:
- You need to put foam or cardboard under the firebox and shelves;
- The material must be dense, light and able to withstand everything that will be placed in the niche;
- If there is a possibility that the structure may bend in certain places, you need to place the rolled tube in cardboard.
To make the structure more durable, experts recommend using cardboard or plywood. But such materials require installation only on a metal frame.
Correcting errors or how to make a fireplace out of boxes correctly
If you have finally created your masterpiece and the false fireplace is ready exactly according to the design that you created, but as a result, several shortcomings were found, they must be eliminated. This is where regular putty can come to the rescue.
Work with putty carefully, in parts and in small areas. Do not forget that cardboard strongly absorbs moisture and a second layer should be applied only after the previous one has dried.

There is a little trick that can help with minimal damage. You can use a standard rough type patch. It adheres perfectly to cardboard and the putty fits perfectly on it. You can find a master class on the Internet that contains step-by-step instructions with photos and videos for correcting all errors.
False fireplace made of cardboard: decor and finishing
A fireplace without a lid has not yet been invented. And this fireplace is no exception. It must be made of dense material. It can be polystyrene foam or drywall, or it can be made from plywood. First, you need to make cuts in it so that the panel falls into place without flaws. Check that the notches match and attach the cover with glue to our fireplace. The joints can be masked with putty.

And the last stage is finishing. Initially, the finishing putty is applied using a spatula, and then your imagination comes into play. To begin with, our new homemade fake fireplace is covered with paper. The decor of our fireplace can be organized with foam borders, which are very often used to decorate the ceiling. You can also create a decorative stone that is painted to look like a decorative stone. The lid will look great if it is tiled or decorated with wooden clapboard. You can complete all the splendor with varnish in order to fix and preserve the entire design.
DIY cardboard fireplace (video)
It turns out that it is very easy to make a fireplace with your own hands simply using cardboard boxes. And so that you do not have any difficulties, the most key points have been revealed in this article. Use step-by-step instructions, use your imagination, and you can create a real family hearth in any room, around which all household members can gather.
Many people want to make the interior of their house or apartment original and impressive. Today on the Internet you can find a great variety of truly original and interesting ideas and ideas. Among them, not the least popular decoration is the fireplace. However, not everyone has the opportunity to install a wood-burning stove with a chimney indoors. That is why, as an alternative, you can make a decorative fireplace from boxes. A fireplace made from boxes is one of the most budget-friendly and attractive solutions.

Yes, you can make a fireplace out of boxes with your own hands. To do this, you will need packaging from various household appliances and electronics, which you can always find on hand at home. So how do you do this? Read further in the article!
Selection of materials
Before making a fireplace, we will need to select suitable materials for the manufacture of such a decorative design. In order to assemble a false fireplace with your own hands, we will need to acquire:
- In boxes. There can be many different shapes and sizes, or just one or several large ones. Boxes can be not only different sizes, but also shapes;
- Wallpaper or plain paper. If you are going to use wallpaper to decorate the portal, one tube will be enough for you;
- To glue boxes, wallpaper, paper together, you will need to buy an adhesive base - it can be silicate or PVA glue;
- Scotch tape (regular, masking and double-sided);
- Paint brushes, sponges and rags;
- For basic work we will need a stationery knife and a simple pencil. Additionally, you can get a ruler and scissors, a tape measure and a building level;
- If you are going to equip the fireplace portal with a shelf or tabletop, you will need a sheet of plasterboard or plywood.

It is also worth purchasing the necessary materials for decorating the fireplace portal in advance. This can be wallpaper with a print imitating the classic brick surface of a fireplace. A fireplace made of cardboard can be decorated with self-adhesive film, the surface of which imitates natural minerals, such as marble, sandstone or granite. Classic volumetric patterns represented by various columns, plaster elements, baseboards, and foam decor look beautiful and stylish. The surface can also be painted with simple paint from a can or bucket.

If you want the final result to be a rougher and more uneven surface, it is recommended to use liquid wallpaper, which has a corrugated structure and a rather uneven surface. All kinds of acrylic compositions are very popular. This paint is practically odorless, dries quickly and has interesting shades and tones (gold, silver, bronze, sparkles, mother-of-pearl).
Getting to know the varieties
A fireplace, the portal of which has a purely decorative function, may have more advanced functionality and a number of additional features. Such a false fireplace will be an excellent addition and decoration to the electric fireplace firebox. Electric fireplace will be an excellent alternative to a wood stove and can even be installed in an apartment.

Since cardboard and boxes are classified as flammable, it is unsafe to install a bio-fireplace or gas fireplace in it. For the same reasons, it is strictly forbidden to install a fireplace with a water circuit.

Installation of such fireplaces is impossible not only because of the strong heating of the housing, but also because of the rather large mass. It is also not recommended to install open fireboxes and an electric fireplace with a heating function.
The best option is a modern electric fireplace with 3D with the effect of a burning flame and high-quality sound visualization and lighting.
You can make a false fireplace with your own hands in one of the following styles:
- The category of modern fireplaces includes fireboxes in the Art Nouveau style. The direction is distinguished by its originality of shapes and sizes. It is possible to have and use contrasting shades, bright, catchy and cold tones;
- A false fireplace in a high-tech style will look stylish and original. To create the necessary image, you can decorate the portal in one fairly calm and muted shade (black, gray, white, silver, metallic). Complete the look with a mirror or glass decor;
- The classic style is always appropriate and will be relevant even in ten years. A classic fireplace is a wealth of patterns, ornaments, voluminous decor, and expensive decoration. It is fashionable to complement the frame with columns, candlesticks, and shelves;
- Rustic style or country motifs will make the fireplace and atmosphere in the room as cozy and homely as possible. Natural and environmentally friendly materials are always used for finishing in this direction. However, for a false fireplace you can use photo wallpaper with a pattern and texture of stone. You can decorate the combustion chamber with firewood.


DIY step-by-step assembly
As it turns out, you can make a fireplace with your own hands quite quickly and on a budget. To do this, you will need to use the following step-by-step guide:
- First of all, decide on the room and the specific location in which the structure will be installed. A false fireplace can be island, corner or wall-mounted. The smallest are the corner portals. Also, with the help of a fireplace you can hide some wall defects;
- Using a building level, first apply all the necessary marks to the floor and walls and carry out a control check;
- The quality of the pre-drawn drawing and sketch of the fireplace plays an important role. Make it as detailed as possible, indicate the dimensions and features of the firebox, portal and each decorative element;
- The base can be either several separate boxes glued together, or one large box from under an LCD TV. Double-sided tape is used to glue several boxes together;
- We remove unnecessary decor and things that interfere with work from the room. Apply the marks indicated in the drawing to the box using a pencil;
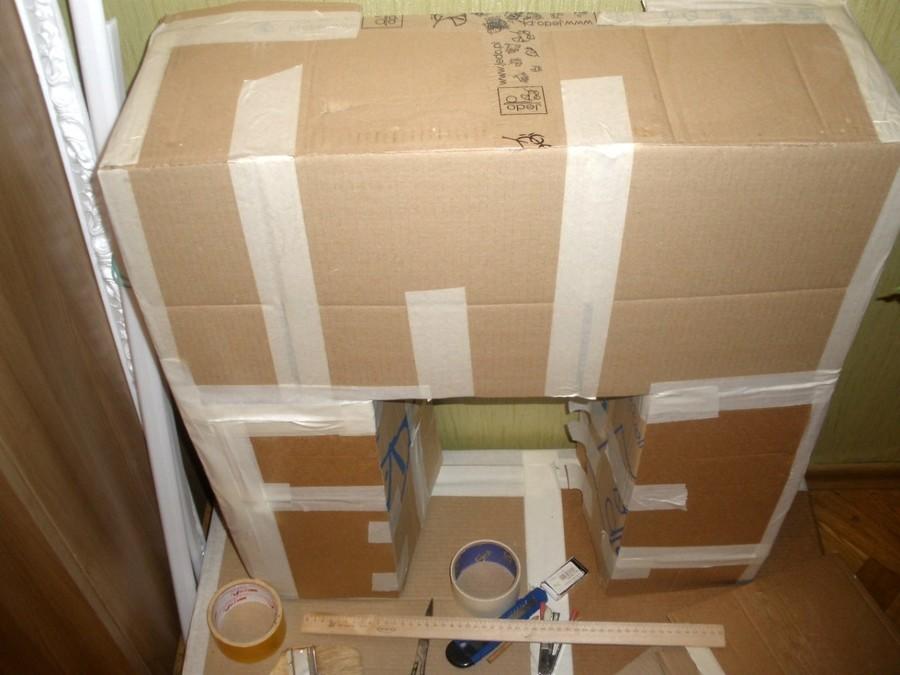
- The basis of any false fireplace is a podium, which is responsible for the stability of the structure. The podium must first be strengthened. For this purpose, its sides are supplemented with special cardboard inserts. The ribs must be installed in a perpendicular position to the podium and secured with tape. Each rib has a height equal to the side edge of the pedestal. Also, the sides of the pedestal can be strengthened using several layers of cardboard, which are secured with tape. To ensure that the structure is as stable as possible. The podium is made wider and larger than the portal itself by 80-100 millimeters.


Do-it-yourself portal for a false fireplace
A fireplace in an apartment made of cardboard or boxes can be made of either a frame type or have a back wall. Fireplace instructions or step-by-step assembly guide:
- If you want to assemble a frame frame, you need to prepare cardboard, which will become the front of your fireplace. We make marks in the area where the hearth will be located and make an incision in the upper part. For this we need a stationery knife. It is also necessary to cut the central part of the portal. We bend the cut sections, they will become the sides of the combustion compartment. A rectangular strip is cut out, the width of which will be equal to the sides of the frame, and the length will be equal to the width of the combustion compartment. After this, we fix the ceiling part with tape and strengthen the inside with frame panels consisting of 2-3 layers of glued cardboard. The frame is installed and secured to the podium using glue;
- A portal with a back wall is easier to implement. It can be formed from just one large box. Incisions are made in it, the upper and combustion parts are formed and folded. Next, the portal is installed and secured to the pedestal.

You can complement a false fireplace and make it more functional with the help of a mantelpiece. It can be assembled from one sheet of drywall or plywood. Also, a fairly high-quality shelf is obtained by gluing 2-3 layers of cardboard together. To secure the shelf to the frame, use double-sided tape.

Before you begin cladding the portal, you need to prepare the surface. To do this, the cardboard is pre-painted with water-based paint, acrylic from a spray can, or puttied. This is necessary to obtain a uniform shade and get rid of contrasting spots. As an alternative, you can cover the surface of the portal with several layers of white paper, the so-called papier mache.

For surface cladding, you can use photo wallpaper simulating brickwork, marble, or granite. The rough surface formed by applying liquid wallpaper looks advantageous. You can simply paint the frame or apply self-adhesive film.


The firebox can also be decorated at your discretion: with firewood, garlands. Above the fireplace you can place a mirror, a clock, a picture. On the shelf there are various candlesticks, candles, figurines, photo frames.
Corner false fireplace
You can also make a corner false fireplace with your own hands. To do this, you will need the following step-by-step guide:
- We find the most advantageous angle for placing the fireplace in a room with good visibility;
- We make a podium from one large box. We cut the sides and shape them in such a way that they perfectly match the shape of the selected corner in the room. For fastening we use masking tape;
- To strengthen the structure, we equip the sidewalls with stiffening ribs. To do this, we make small dimensions on the sides using a stationery knife. The optimal distance between cuts is 10-15 centimeters. The marks will connect on the inside and bend the cardboard. Next, all excess and remnants of cardboard are removed and gluing is performed;
- A size for the firebox is made in the center of the portal. Recommended shape: square or rectangle. The top may have a slight rounding of the pores, similar to the arch principle. The lower part is not cut off, but folded inward to form a firebox. Secure with masking tape and trim off all excess;
- At the next stage it is necessary to form the side walls of the portal. To do this, take two cardboard sheets, the height and length of which are equal to the dimensions of the combustion compartment. We cut them to shape and secure them with masking tape. The top of the fireplace is also formed from one cardboard sheet;
- We equip the mantelpiece portal from two sheets of cardboard connected to each other with PVA glue;
- After the glue has dried well, we line the frame with the selected materials.


As an addition, you can make decorative firewood for the fireplace with your own hands. To do this, take cardboard and remove the first smooth layer. We determine the length and thickness of the logs so that they look harmonious with the fireplace insert. To form firewood, you need to cut a strip, which rolls up and can be supplemented with small knots. To form logs, after rolling, it is necessary to glue the edges of the workpiece well with PVA glue and additionally secure it with thread. For small branches, it is enough to cut out a small and very thin strip of cardboard, glue it, dry it and stick it to the main log. Next, the surface is painted with white paint and, after drying, repainted with a suitable color. To make birch logs, the original color can be left white and after the paint has dried, apply a few strokes or stripes with black paint.


For painting you can use acrylic, oil or gouache.
Anyone can make such a decorative fireplace from cardboard boxes. At the same time, the design and design of a false portal can be very diverse. The advantages of a false fireplace made from boxes include mobility, light weight and environmental friendliness.


In this video you will learn in more detail how to assemble a fireplace from boxes or cardboard with your own hands for an apartment or house. The video shows a Christmas fireplace for the New Year:
The dream of having a fireplace at home accompanies many throughout their lives. Even the thought itself is pleasant that someday it will be great to sit near the fire in your own home, enjoying the play of the flames. But these dreams are not always destined to come true.
Cardboard fireplace
Living in an apartment, it is impossible to build a real fireplace in it, and an electrical appliance is not cheap. Therefore, many come up with their own models, made from drywall or even from an ordinary box. We will tell you how to make a natural fireplace from cardboard with your own hands, which really cannot be distinguished from the real thing, the emphasis is only on one hundred percent similarity with the original, read carefully and you will succeed!
There are many different options, more complex and very simple, but it is very important to take the work seriously, do everything carefully and take your time, carefully consider every detail. Only then can you get the desired result.
- When planning this craft, determine the area where it will be located. It is best to place the fireplace in a place that seems empty and there is nothing to force it. For example, a wall where you cannot place a wide piece of furniture, but a narrow fireplace portal would be just right. Another option is . It will help close an unsightly corner and become a convenient additional shelf.
- Next you need to determine the size of the future work. This is done taking into account the area of the area where it is planned to be placed.
- The next stage is the creation of drawings-sketches of the fireplace in two versions, the first will be a drawing with the indicated dimensions, and the second will be with the final decor. Remember that decorating the building can be called the main process in this work. It is not so important what the frame is made of - the main thing is to decorate it in such a way that no one can even imagine that the fireplace is made of ordinary corrugated cardboard.
Materials and tools
Now you can start searching for materials for this product. To “build” such a structure you will need:
- The first thing you need to find is a large cardboard box, such as a refrigerator or other large household appliance. This material will cost you nothing.
The only difficulty will be finding a large piece of material. If you are not going to purchase a large item packed in such a box in the near future, then you can turn to friends or acquaintances.
Another option, more troublesome but affordable, could be an agreement with the happy purchaser of a refrigerator (washing machine, etc.) right in the store that you will take the packaging from him as soon as it is no longer needed. In general, if you really want to, you can always find a way out.
- You will need to buy PVA glue, since you can’t do without it.
- Polymer glue will be needed for gluing decorative elements.
- Water-based paint for coating a finished, already glued structure.
- Transparent varnish, preferably water-based.
- Color additives of the desired color for water-based paint.
- Gold paint for painting elements (optional).
- Expanded polystyrene ceiling moldings - their length must be calculated according to the height and length of the intended fireplace. Moldings and corners, which will also be needed, can be decorated with carved stripes or have a relief pattern. You can choose these decorative decorations to suit your taste. In addition to them, you can purchase elements imitating stucco and small columns with capitals.
- Set of brushes + sponge.
- Masking tape.
- A simple pencil, a tape measure, a long ruler, a paper knife.
All of the materials listed can be purchased at a hardware store or office supply store. Naturally, you will spend some amount on them, but it will not be so large as to affect the family budget.
Making a fireplace
Based on the sketch and selected dimensions, it is necessary to draw out the details of the fireplace on a piece of cardboard. It consists of three parts: base, portal, top shelf.
Warp
The base should have a width of 5-7 cm wider than the total thickness of the fireplace, and a length of approximately 10-12 cm more than the width of the future building.
A rectangular box with ribs arranged inside it from several pieces of cardboard glued together is cut out and glued together using masking tape. The photo clearly shows the inside of the base.
You immediately need to decide how it will be attached to the base.
- It can be installed inside it, fixed to the walls and bottom, and then the open space around the portal will be sealed.
- Or the box is completely sealed, and the portal is secured with tape on its surface.
Depending on which option is more convenient for you, the gluing of the base will be done: the box is sealed tightly, or left in the form as shown in the photo.
Fireplace portal
The fireplace portal can also be made in different ways: with a solid back wall or a frame one, but in this case the first option will be considered.
Future fireplace portal - rear view
The front of the fireplace can be made from individual strips or from a single piece of cardboard from which the middle part is cut out. It will imitate a firebox. If the firebox is cut from a single piece of fabric, it must be accurately marked and drawn, then a cut is made along its top, and then the middle of the cut is marked and cut evenly to the very bottom. You will get a kind of window, the edges of which will form the inner side walls of the firebox. They must be secured to the back wall with construction tape.
The firebox ceiling is cut out separately, according to pre-determined dimensions. It is also secured to the back and side walls with tape.
Fastening the base and portal
The middle is marked on the bottom base of the fireplace, and equal distances are measured from it in both directions according to the size of the portal. Next, the prepared portal is installed along these marks and secured to the base with construction tape.
Upper mantel
You can leave the mantel as the top of a box, but putting a heavy vase on top of it won't work, so it's better to make it more rigid. To do this, three or four identical parts are cut out - they can be slightly larger than the thickness of the fireplace portal or exactly the same width.
These parts are glued together thickly using PVA glue and sent under a heavy press. When the panel dries, it will have sufficient rigidity, and it is placed on top of the portal using polymer glue.
All seams of the portal and the base should be taped with masking tape, it is thin, paint adheres well to it, and it will perfectly hold all the parts together.
Decoration
The next stage is decoration. This is the most enjoyable job, as the fireplace begins to transform and acquire a “marketable” appearance.
- The mantelpiece is framed by a wide molding. Narrow, neat polystyrene strips can be distributed in different ways. Stucco elements are also used if you provide them. After gluing them, the fireplace will be transformed. Moldings and decorative elements are fixed with polymer glue.
- An even more interesting process follows - the entire structure is coated with white emulsion paint using a soft brush. In places where the stucco molding is fixed, you can paint it with a sponge or a thin brush. The result is an amazing snow-white design.
Further decoration of the fireplace will depend on your imagination - you can leave it snow-white, or you can tint it with your chosen color water emulsion and apply tone to the stucco elements. If desired, they can also be gilded.
- Then a colorless water-based varnish is applied. Surfaces coated with it can be easily tidied up - just wipe off the dust.
- After completion of the work, the fireplace is installed in its designated place and decorated with a pot of flowers or a certain number of candles. You can come up with something of your own, original and exclusive. Feel free to get down to business and create.
Fireplace accessories
An interesting solution would be to place several fake logs in the firebox, which can easily be made from the same corrugated cardboard.
- They are made quite simply - the cardboard is rolled into a tube of the required thickness and glued together with masking tape, or its edge is coated with polymer glue and pressed well. Several of these “logs” need to be made, and they should have different thicknesses.
A simple process for making firewood
- Then several more thinner tubes are rolled up and cut into pieces that will act as knots.
- The next manipulation is to fit the “knots” to the cardboard “log”. They are also glued with polymer glue.
- When all the “logs” are ready and the glue has completely dried, you can start decorating them using emulsion paint and gouache.
- “Logs” can be tinted to match any type of wood and painted the way you like best. In this version it is “birch logs”.
“Birch woodpile” is ready
- It should be noted that “firewood” can be of other shapes, for example triangular or square. In this case, you won’t have to make “knots,” but you also need to paint them to look like “chopped wood.”
This accessory will perfectly decorate your fireplace and give it a natural look.
How to make a fireplace with your own hands from cardboard - video tutorial
When starting this creative process, don’t be afraid to mess something up. You need to turn on your imagination and act boldly, but carefully. Perhaps, in the process of creativity, completely unexpected ideas will come to you, and then your fireplace will not be like any other. You can be proud of your ingenuity and exclusivity. After all, if you made a fireplace with your own hands, and did not buy it in a store, you will look at it completely differently and your attitude towards it will be completely different. In any case, don’t be afraid to experiment, cardboard is not the heaviest material and you can make anything out of it!


