Autumn is an interesting time of the year. First, the crowns of the trees acquire yellow and red color, and then the leaves fall off, leading to discouragement. It is during this period that you need to diversify your life with something interesting and original. It will be about crafts from snags. It turns out that branches that are unnecessary at first glance can be very useful to you in the interior or on. Consider 5 workshops related to making beauty with your own hands.
How to prepare branches for crafts?
From ordinary unremarkable driftwood, you can make original wood, which will later be used for homemade gizmos.
Many craftswomen wonder about the intricacies of preparing this material. The process is simple if you follow a certain procedure. For preparatory activities, you will need the following items (they are in almost every home):
- Plastic container.
- Soda ash.
- Sandpaper.
- Linen bleach.
Branch preparation
Using branches for furniture
Large snags are ideal for and. Medium-sized raw materials will be the best option for the manufacture of shelves,. And small snags will come in handy for individual details. In the manufacture of furniture designs, it is important to take into account some points.
- Driftwood must be strong, because they have to take on a colossal load, especially when it comes to pieces of furniture of impressive size.
- Raw materials are prepared for work in accordance with the information specified above. They need to be bleached and sanded.
- Next, prepare the tools. You will need a drill, nails for knocking down snags, if the furniture design provides for this. Other equipment necessary for is being prepared.
- After the production process, driftwood should be treated again with compounds that prevent rotting and pests. Leave for a couple of days, and then put the piece of furniture into operation.


Since there are a lot of furniture designs from snags, it is worth using tips for making specific types of furniture.
Lighting
From driftwood, it turns out, you can make chic! Of course, there are many design options, but we will consider the process and algorithm using the example of a classic product. Whatever we say about its standardity, it will look unusual, but its appearance will allow it to fit into absolutely any interior.


Now - about the order of manufacture. Arm yourself with certain materials and get to work.
- Take one large snag (up to 1 m long). It is desirable that it has an interesting shape (curly branches arranged in the original order). Choose the breed at your discretion, but it is best to give preference oak or needles: the production process will give you a lot of pleasant emotions, and the result will amaze you with its unusualness.
- Process the wood according to the first master class, and then make holes in it along the entire length of the base and individual branches at a distance of 10 cm from each other in order to insert decorations into them. It can be metal fittings, decorative stones, ribbon bows.
- Prepare the base for. It can be a purchased item in the form of a regular stand. Then you need to connect the stand and the snag in a convenient way. To do this, you will have to acquire carpentry skills, it will be difficult for a beginner. The thickest part of the driftwood should be located closer to, and the thin one will act as the top.
- A decorative braid or rope 20-30 cm long is suspended from the upper part of the structure. On the other side of this thick thread, an electric mechanism will be located, that is, a system for turning the lamp on and off.
- So that the light bulb is not “naked”, provide a lampshade for it. This step is up to your imagination. Can make it with your own hands or buy a ready-made version.
- Prepare a rectangular snag (this can be a log cabin) 30 cm long and 10 cm wide. Process it in accordance with the first master class. This will be the basis of the panel.
- Another element is attached across the base. It should have the shape of a parallelepiped and match in length with the width of the base. Fastening can be done with nails or good wood glue.
- Then you just have to process the tree and put a candle on the protruding element - your home will be transformed in the blink of an eye!


Original panels from snags
If you want to get involved in the process of such needlework, to help you -. They are hung on the wall and used as paintings or stands for candles, souvenirs.
In our case, a master class on making panels will be considered.


This is what the original panel looks like. If you follow the given instructions, the result will pleasantly surprise you.
The bizarre outlines of the branches involuntarily attract attention, and I want to capture this sophisticated beauty not only in memory or in a photograph, but also in real life. If desired, you can add an unusual decorative touch to the interior, making interesting compositions or creative products with utilitarian features. Crafts from tree branches is a great hobby that allows you to create beautiful decor elements with your own hands without investing any financial costs. The interior of the house, decorated with this natural material, acquires a special sophistication, where everything is aimed at emphasizing its individuality. Before starting work, the blank for future crafts should be carefully prepared, taking into account the individual characteristics of the wood.
Crafts from branches - procurement of material
For creative activities to decorate the selected room (this may be, as well as and even), well-dried branches will be required. They are easy to pick up during forest walks, as well as pick up in a square or park. You can independently dry the branches that remain after sanitary pruning.
Before work, dry the material thoroughly for further use:
Inspected for cracks;
Cleaned from dust and dirt;
Exfoliating places on the bark are polished.
To exclude the appearance of unwanted larvae in the house, it is necessary to carry out disinfection using a weak concentration of potassium permanganate solution known to many. Depending on the idea, the branches can be painted in the desired tone, covered with stain or varnish.


Decoration of various items
Having brought home a bouquet, you can quickly make a creative vase using branches. For this, any suitable jar is taken - tin, glass, and pieces of branches are cut into pieces with a length slightly exceeding the height of the container.
They are placed close to each other in a vertical direction on the outer surface of the jar and secured by tying it with a beautiful braid or ribbon. You can plant branches with glue. Flower pots are decorated in the same way.


To make this wonderful vase, in addition to the glass base, you will need: a glue gun, dry willow or birch sticks, wire cutters.
- Harvested branches must be cleaned of bark. It is better to do this when the wood has not yet dried up, so it will be much easier to remove the bark;
- Next, using wire cutters, cut the bare branches into small pieces. Their size should be calculated based on the height of your workpiece;
- After the material dries, we glue each stick to the base in such a way that a kind of crate is obtained;
- It remains to give time for the glue to dry for 10-15 minutes. Congratulations, the branch vase is ready!
Crafts from branches will always find their worthy application in interior design of a house or apartment. Their shape and size can be completely different, because different materials can be used for their manufacture. Products made from bark, chips, snags, cut logs or large branches, etc. will look good. It all depends on your imagination and personal preferences.

The branches installed inside the glass jar in a continuous layer along the entire side plane will look no less original. So that they do not crumble in an impromptu vase, the bouquet should be quite voluminous.
For the products described above, you will need fairly even trimmings from the lower ends of the branches. The upper thin stems will help create a delightful evening with flickering candles. To do this, they are simply placed in a glass container so that they rise above it, pour no more than half the volume of water and lower the floating candles.


Charming compositions from branches
Trunks crowned with a web of thin twigs, placed at the head of the bed in a niche cut through one side of the coffee table top, will help to bring an unusual accent to a room, for example, a bedroom. In the dining area or office, a high floor vase will look elegant, in which, along with the branches, there will be dried cereals.
Bizarrely curved branched thin tree trunks are placed in a vase and decorated with decorative elements matching the color of the interior. It can be sparkling stars or snowflakes on the eve of the New Year, bright valentines on the eve of the corresponding holiday of lovers, or just butterflies with fancy ornaments on the wings, birds, flowers, fruits, leaves from any material at hand.


Having strengthened graceful branches on a velvet fabric, in color harmonizing with the general situation, and placing, after pasting on cardboard, the resulting composition in a wooden frame, you can get an elegant decoration of the interior.
A beautiful branch can be supplemented with golden bows, Christmas balls or forest cones. Such decoration will contribute to a good mood and cause only positive emotions. In addition, New Year's decorations will create a festive atmosphere on the eve of the main winter celebration.


Branches in the interior: a step-by-step master class
Tall shrub trunks (willow is most often taken) will allow in an unusual way. For example, to separate the sofa corner from the rest of the space in the living room. Such a partition is made very simply:
- To do this, a wooden beam of the desired length is taken as a stand. You can use absolutely any type of wood.
- In the beam, two rows of non-through holes are drilled in a checkerboard pattern, in which prepared branches are fixed vertically to the glue. In length, they should be about a meter less than the height of the room. The step depends on how openwork the resulting screen should be.
- To make the product look stylish, it is varnished.


The current bedroom design ideas are endless - birch trunks in the interior are proof of this.

Trimmings of trunks with a diameter of 8-10 cm with strong branches extending upwards from the side at an acute angle easily turn into hangers dear to the heart. They can be mounted on the wall in the hallway, creating a natural corner with a specific purpose. Among the designer finds, you can find birch trunks that play the role of cornices and even racks near the bed for attaching a canopy.
The picture will be complemented by a coffee table, the base of which is a bundle of branches fastened vertically into a stable cylinder, and the tabletop is durable glass of round or oval shape.
You can make an option that is unexpected in effect by fastening the branches in the shape of a cube and laying it on the floor on the side face. A plastic or glass square tabletop is placed on top.


Wall mirrors are often decorated with branches. They can be glued around the entire perimeter perpendicular to the frame or along it. There may be many options. Craftsmen easily make frames for photographs, children's drawings, reproductions of their favorite paintings from scraps of thin trunks.
A gracefully curved thick branch can become the basis of a table lamp. A branch with many branches, mounted on the wall near the mirror on the dressing table, will allow you to easily place all the jewelry.


Such work requires delicate female hands and special attention.

Creative inspiration is the main stimulus for a person who wants to create beautiful crafts from branches with your own hands.
In spacious hallways, one wall can be turned into a fairytale forest by installing trunks reaching the ceiling behind a high plinth with LED lighting installed near the floor. This is one of the best ways to give your interior a scenic look. Both thin and thick branches of trees can be used as material.
Small products made from dried snags will look original. For a change, you can use tree bark and wood chips, combining everything later into a single composition.
We make decor from branches with our own hands
Crafts from branches are always distinguished by their originality and unique design. With the help of these uncomplicated sticks and twigs, you can create a beautiful author's decor on absolutely any subject. , paintings, wreaths, flower pots, bizarre animal figurines - this is just a small part of what can be created from this wonderful natural material.
- Making a wreath from branches is probably one of the easiest tasks that even a child can handle. Take thin willow rods and twist them together into a tight ring, then carefully tie them with copper wire. As an additional decoration for a wreath, you can use tree leaves, flowers, forest cones.
- You can revive an inconspicuous tree branch using ordinary snowflakes. Cut them out of paper, foil, or colored felt and hang them on each branch. Such compositions will look great in the house against the backdrop of a wall with beautiful wallpaper.
- If you still have broken light bulbs, they can also be used as decoration. From a soft wire, make a special mount with which you can hang them on a branch so that the light bulb base is at the top. Further, through a hole specially made in the base, the light bulb is half filled with water. It remains only to give our miniature an elegant look. To do this, the branch can be decorated with decorative braid, ribbons and bows.
Despite the fact that the process of creating some crafts is quite long and laborious, the result of the work done will be amazing.


Even the most ordinary painted twigs can be a great material for making fun crafts. For example, in interior design, unique products made of branches in the shape of a star will look very beautiful and fun. You can make them with your own hands on a regular table.
- Material preparation. For each craft, we need 5 sticks. It can be branches of any tree, as long as they are even and have the same length. The material should be dried and varnished in advance, so your products will last longer. We also need a thread, rope or thin ribbon. With their help, we will tie the ends of our sticks.
- Making a star Lay the sticks on the table so that they form a closed figure of a pentagonal star. Tie each formed corner with a thread or rope and decorate with satin ribbons. The resulting star can be hung on a Christmas tree or given to friends.

To create something unique for your interior, do not copy someone else's ideas, but try to do everything yourself. Feel the mood of your home, think about what exactly it lacks, what things and objects could highlight its own style. Write down everything that comes to your mind in a notebook - when creating an interior design, these thoughts may come in handy for you.
Pay attention to the little things. It is they who, in a creative union with non-standard design solutions, create an unsurpassed atmosphere and focus on a specific element of the interior.


The original floor lamp is a creative interior decoration


Crafts from branches are not only beautiful, but also profitable. The main advantage is that no funds are required for their manufacture, because the material itself is literally lying around under our feet. Moreover, all compositions can be created with your own hands, involving your children in this entertaining process.
Crafts from branches can be easily and quickly sold, because this is a unique decor, which is always in high demand. You can also earn extra money by teaching paid workshops on creating designer jewelry for beginners.


We really hope that this article was useful to you. Create, create, experiment and perhaps this interesting hobby will grow into your professional field of activity.
Root furniture is interesting in that it will definitely not work to create 2 identical copies. It will look good in a country house, where at least a piece of nature should be present, or on the street. Leaving the city for fresh air, you want everything to be beautiful, fabulous ... All the materials from which the furniture is made should be natural. Furniture? made from ordinary tree roots? would be the perfect choice!
The advantages of the presented type of furniture
Products for the site must be durable, moisture resistant. The tree does an excellent job. You can buy furniture or make your own. The tree has been used from time immemorial, and now it has not lost its relevance. Previously, they tried to decorate and improve products in various ways, roots were often used. Now this option also has the right to life.
The use of roots began at the end of the 18th century. People were fascinated by bizarre forms. Each item became individual. Furniture of this kind was in the collections of kings.

Then the original method of furniture production was forgotten, but after some time it was revived again, and it became popular again.
Main distinguishing features:
- Since each tree is unique, products from it will also be unique. You won't find another one like it in the world.
- The furniture is eco-friendly, absolutely safe.
- The roots are strong, which means that the products are as reliable as possible.
- Any kind of furniture can be made.
Who will suit the original solution
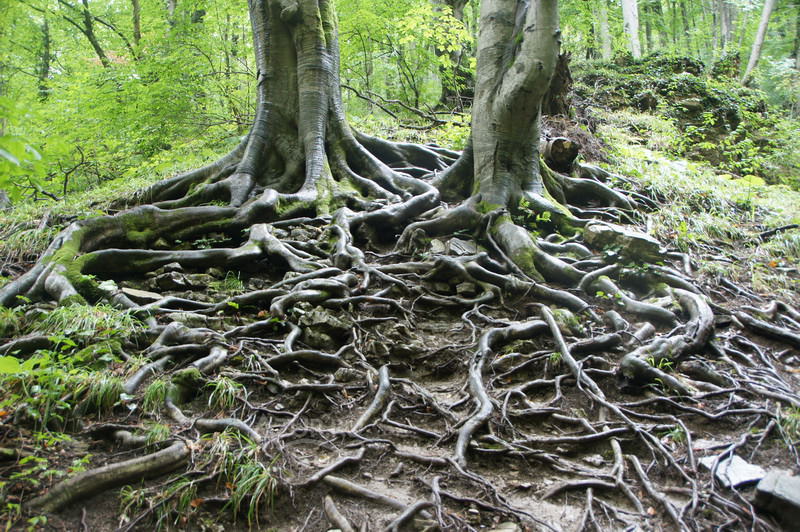
The roots have an expressive shape, suitable for fans of non-standard solutions. Much depends on the conditions in which the tree grew. The more difficult the conditions were, the more bizarre the roots will turn out. If the master is experienced, it will not be difficult for him to find interesting solutions.
Products from trees are very durable, furniture is obtained "for centuries." This applies to those tables, chairs, which are made from a single piece of wood. Often a whole stump with roots is used.

What can be done
Tree roots are traditionally used for the production of tables, chairs, decoration. Products are fabulously beautiful, quite homemade.
Among the modern interior, original things will look conceptual. Excellent wooden furniture for a summer residence, a country house. Coniferous products are good for use in the sauna.
There is one interesting idea - using the roots to create a bar in folklore style. So each visitor will have a favorite hanger, table, chair. Stylistics can be sustained in any subject. Wood allows you to make any kind of furniture - from flower stands to shelves.

With the help of roots, you can decorate the following things:
- dressers;
- cabinets;
- tables and chairs;
- bed.
On the walls, you can make panels that imitate living trees.
How to properly prepare the roots
Finding the roots of trees in our country is not difficult. It is enough to go to the forest and choose the most interesting snags. The question is different - how to properly prepare them?

First you need to decide on the material for the frame, backs, legs. The following types of trees would be a good option:
- coniferous;
- Apple tree;
- nut;
- Birch.
Roots should be thick enough. It is important to make a layout in advance in order to clearly understand what should happen.
What roots to take, dry or fresh? Any option can be used. If you see cracks in the wood, this is good, the marks will give more personality, the main thing is that the strength does not decrease. You need to dry so that the tree does not lead. It is better if the process takes place in stages, under a canopy. Drying takes place in an unheated room.
Next comes the roots. A brush is used for rough peeling, previously clamped in a drill. It is necessary to follow safety rules, wear goggles, a respirator. After getting rid of the main dirt, a small brush is taken, processing continues.
Assembly rules
Finishing the ends involves observing the nuances. Processing is done with a coarse brush. Cleaning is done using a drill. You need to act clockwise. You shouldn't push! Then the treatment is carried out with a fine brush. Next, the roots are dried, assembly is in progress.
Ways of connecting pieces of furniture can be different - gluing, wedge, fit on screws. When choosing a mount for a capercaillie screw, you can put a decorative cap on top. Joints are treated with special glue.
Sitting can be made from several roots. You can fasten them with hemp rope. The method will make the furniture durable and individual.
Finishing
If there are cracks that are not credible, you can repair them with dark-colored epoxy. Then the product is polished.

After grinding and assembly, excess glue is removed, decoration begins. A stain is taken, the product is covered in several layers until the desired color is obtained. Emphasis is placed in a number of places. Then oil is applied. Then you can enjoy your creativity!
Each person can make tables, chairs or shelves from tree roots. Material in large quantities is in the nearby forest. First of all, you need to correctly choose the type of tree. Roots are allowed to take both fresh and dried. Original furniture from the roots will be an ideal option for a personal plot, a bar, a sauna, a modern apartment. You will get an exclusive piece of furniture. Do not be afraid to take roots with cracks, they give a special charm.
Root furniture (video)


https://dachadecor.ru/images/kdjkldsjflkdsDD_201.jpg" alt="(!LANG:Furniture from the roots: fabulous beauty" width="345" height="227" border="0">!} 


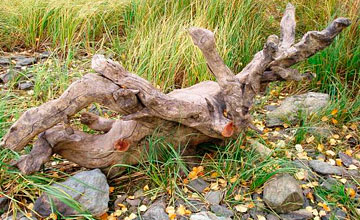
Snags are called partially rotted fragments of trees that have been lying on the ground for a long time.
Despite the peculiar and sometimes unpresentable appearance, driftwood is a good material for making various crafts and products.
The material combines a fairly high mechanical strength and an unusual shape, and also has a wood texture.
In this article we will talk about what can be made from snags, and also teach how to process this peculiar material.
 The basis for the appearance of driftwood is a living and dead tree, as well as its parts.
When a plant weakens or ages, its immune system can no longer effectively resist various pathogens and pests.
Therefore, in some areas, damage appears that changes the properties of the wood.
Over time, damage leads first to death, and then to decay, resulting in part of the plant loses its strength and collapses by wind, rain or other factors. Since there is no clear boundary between normal and damaged wood, the destroyed areas take on the most bizarre forms.
If destructive processes occur on a tree, then over time the damaged fragment breaks off from the trunk or roots and turns into a snag, that is, a severely damaged piece of any part of the tree.
If a branch or trunk broke off from a tree even before the damage, then they are a snag become only after various microorganisms have sufficiently damaged them, and these defects will be noticeable even with a cursory examination.
If the damage has affected the roots, then they turn into a snag after the trunk breaks off from them, and the root system comes out of the ground under the influence of various factors.
Where can I find it and can it be collected?
Since driftwood comes from unmaintained trees, easier to find them:
- forests;
- forest parks;
- windbreaks;
- groves.
 Despite the fact that allows you to collect driftwood and other tree fragments naturally separated from the plant, local authorities often impose various restrictions.
Therefore, before going for a snag into the forest, ask your local government whether there are any restrictions at the local level.
The brush removes dirt well and cleans even cracks and depressions, but it damages the surface of the wood, so it will have to be sanded. Most effective, however, almost completely removing the bark, is the processing of driftwood pressure washer. This machine removes any dirt, but does not damage the wood.
Bark cleaning
Bark removal can be either a separate operation or one of the actions carried out when removing loose wood or grinding.
In the first case use blunt chisels with which from wood. It is undesirable to use sharp chisels, because they can damage the wood and deprive it of its natural texture.
In the second and third cases, standard tools are used for removing or grinding, that is, nozzles for a drill / grinder or sandblaster.
Drying
forest snags have very high humidity(25-55%), which makes it difficult to stop the destruction processes in them, because high humidity is the main condition for the active life of microorganisms that feed on wood.
In addition, washing the material with a sponge or pressure washer further increases this parameter, making the material even more vulnerable. So driftwood after cleaning it is desirable to dry. This can be done in two ways - forced and natural.
 For forced drying, the wood is placed in a dryer or oven and the heat is turned on.
The liquid inside begins to evaporate and look for a way out, which leads to cracking of the material. Depending on humidity and temperature, such drying takes 10-50 hours.
For drying naturally the snag is laid in a well-ventilated shaded room without drafts, it is desirable that the temperature in it be within 15–25 degrees above zero. Drying time is 10–30 months, due to the slow release of moisture on the surface of the wood, no new cracks appear.
Loose part removal
Before removing loose or rotten wood, it is necessary to mark its boundaries with a simple pencil.
It is undesirable to use a marker for this purpose., because its paint is absorbed into the wood and it will be possible to remove it only together with the top layer of the driftwood surface.
Then the middle of the rotten area removed in various ways., For example:
- break out by hand;
- knocked out with a hammer or an ax;
- cut with a jigsaw;
- grind with a brush-nozzle with hard steel hairs.
During this stage, it is advisable not to approach the edges of hardwood, because you can accidentally damage them, after which you will have to grind this area hard. Rude on the border with hardwood removed with a large rasp or nozzle brushes with soft metal hairs.
Shape change
Despite the fact that the unusual shape of driftwood is its main advantage, sometimes you have to change the shape.
For this:
- it is cut with a hacksaw, jigsaw or chainsaw, depending on the size and thickness of the driftwood;
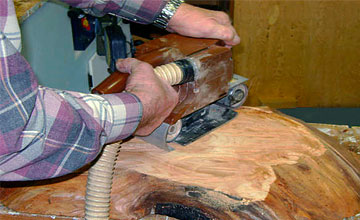
- the surface of the material is leveled using manual / electric planers and jointers;
- cutouts are made in the walls using manual and electric jigsaws.
All these operations are performed in the same way as when processing any other wood, for example, boards. Therefore, those who know at least a little how to work with wood will be able to independently change the shape of the driftwood, giving it the desired shape.
Putty
For sealing cracks use both ready-made putties for wood, and a mixture of wood dust with PVA glue. You can get the dust of the desired color using a grinder. In addition, wood dust of any color and suitable water-soluble colors can be used.
Before puttying it is necessary clean the surface wood and, if possible, sandblast it.
After filling the defect with putty, it is necessary to remove all excess, so that the putty area does not protrude relative to the surface wood. If the size of the defective area of the driftwood exceeds the values recommended for putty, then it is advisable to fill the defect several times, this will keep the putty from cracking.
Grinding
 Sanding eliminates minor imperfections, and also make the texture of wood more clear.
Coarse sanding can be done with a grinder and coarse sandpaper or with a brush attachment with soft metal hairs inserted into the drill.
Medium grinding of hard, as well as medium and final grinding of soft rocks, is performed only by hand using sandpaper with numbers from 20 to 6, gradually reducing the grit. For final grinding of hard rocks, use 5-n or 4-n sandpaper.
If during coarse or medium sanding it is not possible to remove the pile, which constantly rises after the passage of sandpaper, then the surface of the wood must be wetted. For any grinding method, periodically change the direction of movement of the sandpaper to avoid deep marks.
Burning
This operation is used for surface color changes polished driftwood, because during heat treatment the wood darkens, and the stronger the heating, the darker it becomes. You can burn both the entire surface of the driftwood, and only certain sections.
For firing use a blowtorch or gas burner. All flammable substances must be removed before firing.
If, by firing, the surface is made a little darker than necessary, and then sanded again, you will get a very unusual pattern of wood texture, which will retain its shape, but greatly change the color.
Impregnation with various reagents
Such impregnation is carried out if the finished product is located in places with high humidity or high temperature.
For this processing,:
- antiseptics (protect against pathogenic bacteria);
- insecticides (protect against pests);
- hydrophobic or water-repellent (to protect against high humidity);
- flame retardants (to protect against high temperatures and open flames).
For such processing, it is advisable to use only high-quality ready-made formulations, and also act in accordance with the instructions that are pasted on the reagent containers.
In addition, snags often boiled in soda or table salt, however, both methods are applicable only for those products that will then be constantly in water, because soda and salt are very hygroscopic, therefore they draw in moisture even from the air.
Painting and varnishing
For painting, both paint from aerosol cans and any water-soluble, for example, acrylic dyes, are used.
Before painting with water-based materials, it is necessary to carry out a “wet” sanding of the surface to completely remove the pile, otherwise, after contact with water, it will rise and the surface will have to be sanded first to remove the dye, then repainted.
Also you can use paints and enamels on any polymer bases However, before this, the driftwood product must be thoroughly dried, otherwise excess moisture will not be able to escape through the vapor-tight polymer layer, and the wood will begin to break down.
You can also change the color of the wood surface with the help of stains. Their main advantage is that they penetrate deep into the wood by 0.1-1 mm, so by carefully grinding individual sections, you can change the color saturation.
In addition, the color saturation in individual areas can be adjusted by the amount of stain or by applying it in several layers.

For varnishing, you can use any varnishes compatible with dyes. Varnishes based on acrylic and wood resin allow water vapor to pass through, so the workpiece can not be dried too much. Varnishes based on other polymeric materials form a vapor-tight film, so only well-dried snags can be covered with them.
Polishing and joining with other parts
Lacquered surfaces can to polish using the same mastics that are used to polish parquet or wooden floors. In addition, you can use any polishes for lacquered furniture.
There is two conditions for high-quality polishing:
- use a mastic or polish that is compatible with varnish;
- strictly follow the procedure described in the instructions for the polishing material.
Often a snag is, albeit the main one, but only an element of the whole composition, so it has to be combined with other details.
For this use:
- glue;
- pins;
- nails;
- locks;
- threaded elements;
- furniture corners.
Any of the connection methods does not differ from the same action applied to any wooden parts, so you will find more detailed information on this issue.
What products can be made?
Due to their unique appearance and rather high strength, driftwood is a good basis for making a wide variety of crafts.
 Here short list what can be done with them:
- decorations for an aquarium or terrarium;
- lamps and chandeliers;
- candlesticks;
- decorative figures from snags for the garden and interior;
- furniture;
- wall and table decorations;
- watches and watch stands;
- gazebos.
Decorations for aquarium and terrarium
Snags in aquariums and terrariums not only play the role of decorations, but also create a more familiar habitat for fish and other living creatures.
For a terrarium, you can choose wood of any species, however, when making driftwood for an aquarium it is better to use the hardest hardwoods of all that are available.
Although you can use driftwood from branches, material from the roots is better suited for terrariums and aquariums. And it is advisable to take a firewood for this purpose, that is, wood that has lain in the sea or running water for a long time.
The selected material must be cleaned of and dirt, then carefully sandblasted or soft wire brush. This will help you find any rotten or moldy areas that need to be removed, including some of the healthy wood.
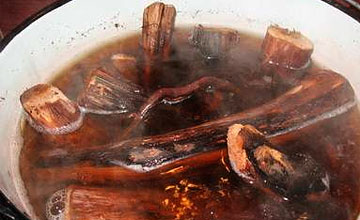 Since the use of purchased antiseptics is unacceptable, because they can be harmful to the inhabitants of terrariums and aquariums, during the preparation of wood boiled in a solution of common salt for 3-10 hours.
After that, it is boiled for another 5–15 hours in clean water, changing the liquid every half hour.
Such preparation completely cleans the wood from harmful substances and dangerous microorganisms, and also saturates it with water, so that it will not float.
If the snag still pops up, then you can attach rubber suction cup and with its help to fix on the bottom. If the snag is prepared for the terrarium, then after boiling it is dried in a ventilated room for 3–5 months.
Lamps and chandeliers
Due to their unusual shape, driftwood is well suited for the manufacture of lamps and chandeliers. It is best to use snags from the butt (lower part of the trunk) or roots that contain indentation with jagged edges.
You can install a lamp in the recess, and uneven edges, especially with roots coming out of them, will give fancy shadows.
Making a lamp from driftwood is usually includes several steps:
- cleaning from dirt and bark;
- removal of loose areas;
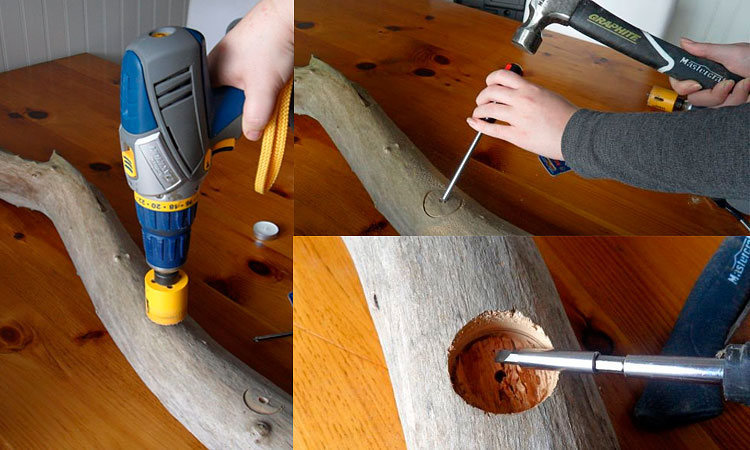
- drilling holes for hanging on a wall, ceiling or other surface;
- drilling holes for installing the lamp and cartridge;
- coarse and medium grinding with lint removal;
- impregnation with stains or firing;
- fine grinding;
- varnishing;
- polishing;
- installation of a lamp and cartridge;
- laying wires;
- wall mounting.
Candlesticks
 For the manufacture of a candlestick, a snag of any shape is suitable, while the type of wood does not matter.
If the candlestick will stand on the table, then it is necessary provide maximum stability, which may require changing its shape.
If the candlestick is installed on a wall or ceiling, then it is necessary to install the mount on the most durable part of the material.
The most important steps processing are:
- cleaning from dirt;
- removal of loose areas;
- grinding;
- flame retardant impregnation.
In addition, very it is important to choose the right place and method of installing candles. Candles can be placed either directly into the wood, for which you need to drill a hole 1 cm deep in the snag, the diameter of which is slightly less than or equal to the diameter of the candle, and into metal glasses of any shape that are attached to the wood with self-tapping screws.
decorative items
In the vast majority of cases, in the manufacture of decorative figures, you have to perform all the processing operations, and some need to be done several times.
Some snags similar in shape to humans, animals, or mythical creatures, so you can make beautiful decorative figures from them and use them in garden design.
Often you have to make a composition either from several snags, or from driftwood and various additional elements, which can be anything.
For example, a figurine of a mythical gnome can be decorated with a wide-brimmed hat and old boots. And the figurine of a horse - with bundles of natural or artificial hair imitating a mane and tail. In addition, other crafts for the garden can be made from driftwood, for example, flower stands.

Beds, tables, cabinets and other furniture
For the manufacture of furniture, you need to use the strongest and largest snags from roots and branches, because the finished product will experience significant loads.
From this material you can make:
- tables and coffee tables;
- chairs or stools;
- beds;
- bedside tables and cabinets.
In the manufacture of tables from snags, only the legs or the body are made, but they have to be made from another material.
The choice of finishing method depends on the shape and color of the driftwood, so in each case it is selected individually.
However, in any case, mandatory steps are:
- cleaning from dirt;
- bark removal;
- grinding with lint removal;
- drying.
 In the manufacture chairs or stools both individual legs and the entire structure are made from driftwood.
In order for such a chair or stool to be more comfortable, for him make soft bedding, which can either be attached to the surface of the seat, making it part of the structure, or made in the form of a removable pillow.
The minimum set of operations is the same as for tables. In the manufacture of beds, driftwood is used as a decorative element or a supporting structure.
In the first case, these can be relatively small parts of any thickness, in the second case, it is necessary to use only material from roots or thick trunks, and most of it should retain its mechanical properties.
The frame and lattice for the mattress are made of planed boards or metal, connected with snags in various ways, providing the necessary strength and beautiful appearance.
In addition to the minimal processing used in the manufacture of other furniture, interior details from knots, branches, roots and snags must be soak thoroughly with antiseptics and insecticides so that various diseases do not appear in them and bugs do not settle.
All parts made of natural material must be varnished in order to prevent raising the pile and the appearance of splinters.
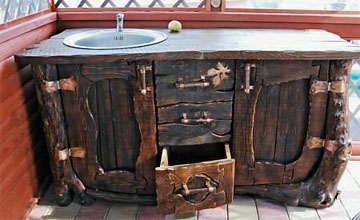 For nightstands and cabinets made from snags body only, as seen in the photo, and drawers and the top cover or countertop of a piece of furniture (if provided for by the design) are made of other materials.
This approach allows you to make a bedside table that can not only be used to store things inside, but used as a stand.
In addition to the minimum set of operations have to change shape snags, because without this it will not be possible to insert a box into it or fix a beautiful lid / table top on top.
Wall and table decor
Due to the unusual shape of the snags are obtained stylish wall and table decorations. It can be flat, partially or completely three-dimensional figures. For the manufacture of a flat decoration, you can use both a snag bent in two changes, and a cut from a large snag of any shape.
The cut can be made with a chainsaw, circular or band saw, then level the surface with an electric planer or electric jointer. The same trimming can be carried out for a partially voluminous product, this will preserve the voluminous appearance, but greatly reduce the overall thickness of the product.
On such decorations, the remains of the bark can harmoniously fit into the overall pattern, so it is very important to remove all damaged fragments as much as possible and thoroughly soak the workpiece with antiseptics and insecticides.
If this treatment is not done or done carelessly, then it is likely that after a few years, due to the destruction of the cellulose, the bark will peel off the wood, and it will have to be glued into place. In addition, various bugs can settle in poorly processed bark, which will spoil its appearance.
Watches and stands for them
 From snags, beautiful and stylish cases and watch stands are obtained.
To make the case, pick up a piece of driftwood that is noticeably larger than the size of the watch, then either insert them into a natural recess wood, or first cut or gouge a hole under the clock with a chisel, then insert them there.
The first method is preferable for those who are not very good at working with a chisel, but the second method allows you to make a complete imitation of the fact that the watch is part of a driftwood.
In addition, from driftwood you can make not only the case, but also the dial, into which the clock mechanism will then be embedded. To do this, it will be necessary not only to create a flat plane, but to partially disassemble the clock, after which attach the mechanism from the inside of the structure, and install arrows and numbers from the outside.
If a stand is made of driftwood, then it is necessary select material with a flat area at the top, the size is not inferior to the clock.
In cases where there is no such platform, it can be made either by sawing off the upper part of the material, or by hollowing out a recess of the required shape in it with a chisel.
gazebos
Due to the unusual shape, driftwood can be used to create decorative arbors, including antique ones. The thickest and strongest snags fit well for the role of load-bearing pillars, medium and small parts can be used for wall cladding.
 Such a gazebo will look most stylish if its roof is made of straw or various plants, while the roof frame is best made from boards small thickness.
Chairs or benches, as well as tables in such a gazebo, should also be made of snags, in which case the whole structure will be made in the same style.
In order for the wood not to lose its color over time, its it is desirable not only to clean, sanded and impregnated with stain, but also varnished.
Links to thematic forums
Homemade products from snags are in great demand, so the authors often discuss their works on thematic forums and share their experience there, what and how can be done.
- Aquaforum;
Any snag, regardless of its shape and condition, can be used. However, in order for a product made of it to serve for many years, the material must be properly processed.
Now you know:
- what can be made from snags;
- how to prepare and process them;
- what kind of driftwood can be put in an aquarium, and where to look for other ideas and tips on the use of this material.
In contact with


 in the configuration?")


