It is impossible to express in words the feeling of delight and renewal that a person experiences after a good bath. If bathing procedures were carried out after hard physical work, a long expedition, hunting, fishing, or simply staying in the forest, mountains, near a river, the effect is indescribable. A do-it-yourself camping bath is what a tired person needs to restore his strength, communicate with nature.
A bit of history
There is an opinion that our geologists, gold diggers, taiga hunters and just travelers borrowed the idea of a camp bath from the peoples living in the chum, covered with deer skins with a hole at the top. In the middle of the plague, a fire was burning, lined with stones. When the stones warmed up well, they were poured with water. That's the whole bath! A similar do-it-yourself camping bath is available for our travelers. Rate our photos, maybe they will give you useful ideas for making them a reality.


Various options for a camping bath
The idea of the taiga people was picked up by industrialists. They developed a project for a modern-style bath-tent complete with a stove, a collapsible frame, and a fire-resistant cover. This option is used by some travelers who travel in a roomy car that can carry all the components.


For the installation of such a bathhouse does not require much experience. All components ideally fall into place. The wood-burning stove has a chimney outlet and provides good heating and soft steam. Such a portable bath has two drawbacks: the need for transport and the high price of the finished kit.
A more modest option is a homemade blank, in which metal tubes for the frame, tarpaulin, stones, and a metal blank for the furnace are stocked. Made from modern materials, such camping baths also require transportation and investment of money. There may be a stove-heater made of cobblestones, or a finished stove with a chimney.


The most optimal, inexpensive option is a do-it-yourself camping bathhouse made from dead trees, poles, spruce branches. Stones lying on the banks of reservoirs are suitable for the heater. Firewood for the hearth is also collected locally. All materials are natural. In extreme cases, you need to save a plastic film or a piece of tarpaulin and a rope for attaching the film or tape. Although in this case, travelers can take advantage of the young bast of deciduous trees.
Attention: When arranging a sauna, you cannot use modern tourist tents made of synthetic material, they are poorly resistant to fire.
Stages of work carried out during the construction of a camping bath with your own hands
Do-it-yourself camping bath is not a very simple matter without preliminary home preparation. But our people are "cunning to invent", they will be able to make a small sauna for 2 people and one where several people can sit.

To build a mobile sauna, you need to choose a place near a river or other body of water. After all, water will be needed for washing, watering stones.
1st stage: heater installation
The most important point in the construction of an impromptu sauna is the hearth device.

The whole effect of soaring will depend on how the pebbles heat up. For the furnace you need to prepare large stones. They heat up longer, but also "exude" more heat. They are folded in such a way that there is a place inside for laying firewood 50-60 cm deep for long logs. An inlet with a width of 40-45 cm and a height of 40-45 cm will be convenient for laying firewood and maintaining a fire. Specialists, who are not the first to install a sauna fireplace, choose stones of a certain shape for this, which fold together securely, but not too tightly. In order for firewood to burn well, they need access to oxygen. Properly laid cobblestones provide access to the air that supports combustion. Do not use granite and stones with a heterogeneous or layered structure for a sauna. Cobblestones of a rounded or oblong shape are most suitable for a sauna.
Handmade blank
Some travelers bring with them a blank made of steel bars of rectangular shape, which will serve as a stove when arranging a sauna, and in other cases it will become an impromptu table or chair.

Attention: It is necessary to heat the heater for at least 5 hours. The result of all the work will be a hot sauna, where you can warm up for 2 hours. The number of bathers depends on the size of the camp bath.
Tip: In order for the stones to heat up well, you need to prepare firewood that gives a high heat transfer. It is desirable that the company should have one person responsible for the heating of the stove. The stove must not be allowed to go out and then rekindled.
2nd stage: frame manufacturing
While the stove is heating, you can mount the frame. It is made in any convenient way. In some cases, even the trunks of growing trees are used. The easiest and safest way to build a camping bath is not a thick round timber.


The frame can be mounted square, rectangular or in the form of a hut. Round timber is dug into the ground and fixed in various ways.
Tip for building a bath from improvised materials: In order to ensure better stability of the structure, the diagonals of the roof can be connected with poles. In some cases, you need to connect the sides obliquely.
Some "experienced" travelers use tubes from a tent, a board, metal pipes prepared in advance and brought by car for the frame. This option will significantly reduce your work, but again - requires the use of vehicles.
3rd stage: interior arrangement and preparation of benches for sitting
The floor inside the steam room can be covered with branches, moss, and benches can be installed for sitting. For a low bench, a round timber (for several people) or hemp is suitable - for one sitting place.
Final stage
The taiga dwellers first “heat” the bathhouse, and then remove the coals and ash. This is done when the stones are well warmed up. Ashes and coals are raked out with a shovel or a wide stick. The remaining coals must be extinguished with sand or moss. This is done in order not to “burn out” (not to be poisoned by carbon monoxide). Then the frame is wrapped with a film, fixed with ropes or a bast. In order for the film not to swell and hold tight, you can dig a strip foundation around the heater. The covered film is pressed down with stones, sand, cobblestones. When arranging a camping bath, you need to provide an exit. Each builder has his own version of the entrance window. It is carried out, depending on the design and dimensions of the bathhouse, construction methods and the material available. The ideal option for covering the bathhouse is an old tent without a bottom. During the day, it will serve as a cover for the sauna, and at night it will perform its direct function. But this option also has its drawback - poor illumination.
The process of soaring in a camping bath
They take a steam bath in a field sauna, pouring water over hot stones. At the same time, a high temperature is reached in the plague, causing sweating and a pleasant sensation from natural aromas. In such a sauna, you can warm up well, relax, relieve yourself of the burden of everyday worries. A broom brought with you or made from fresh birch or oak twigs will not be superfluous in a camping sauna. A fresh broom in a field setting is steamed with cold water. Fragrant herbs, leaves, needles, balms can be added to water for watering stones.
Conclusion
Armed with the proposed ideas and knowledge, you can not be afraid that you will not be able to wash yourself during the campaign. If desired, you can find stones of appropriate sizes, firewood for the hearth, trunks for the frame. If there is no film, in this case pine or spruce green branches can help.

True, the increased comfortable temperature in such a camping bathhouse will be stored much shorter. To each his own choice!
A do-it-yourself camping bath is one of the easiest options to perform. Having built a small sauna-tent, you can take a steam bath while hunting or fishing, as well as on a hike. If desired, such a structure can be built even on a suburban area, if the traditional version is still at the design or construction stage.
 Do-it-yourself camping bath - photo
There are many manufacturing options. You can purchase a ready-made portable tent - in whole or in parts (oven, awning, frame).
 Mobile bath
  Mobile portable bath Mobiba
  Mobile bath Mobiba
There is also an alternative option - to make a bath from a tourist tent, but exclusively of the Soviet type, that is, made of tarpaulin. This is explained by the fact that modern tents are made from fabrics that are not only not designed for high temperatures, but are also capable of releasing harmful substances when heated. As for the old canvas models, they are quite suitable for this: there are no harmful fumes and the thermal insulation is good.

If we talk about creating a camping bath from scratch, then this will require a frame, heat-insulating material and a stove.
| Design features of a camping bath | Description |
|---|---|
| It is better to make it from aluminum racks (for example, from a stall), since this material is safer than wood. In the absence of such, supports can be made from young trees, in which case you will have to carefully monitor that the wood does not ignite. To fix the frame elements, you can use both a rope and a soft wire. |
| The simplest option is a dense polyethylene film, but due to its disadvantages - low thermal insulation qualities and density - it is preferable to use a tarpaulin. It is important that it be a large and solid piece of material. The dimensions of the covering material depend on how many people will steam at the same time, but if it is no more than four or five people, then a piece of 6x6 m will be enough. |
| Here the choice is also quite wide: you can put a factory stove-heater, you can make it yourself in the form of a mesh metal box made of metal rods or thick wire, or you can simply fold a well of rounded stones and overlay it with firewood. |


Note! A camping bath can be made “in white” (that is, the heater is built separately, and hot stones are transferred to the tent) or “in black” (the stove is set up directly in the steam room). Let's take a look at each option today.
Important conditions
A camping bath can only be crafted under certain conditions. The resting place must meet the requirements below.
| A photo | Conditions | Description |
|---|---|---|
| First of all, there must be water. | The ideal option is to choose a place on the banks of a river or other body of water. |
| Still there must be stones. | Do not use layered cobblestones, because when heated, they can shatter into pieces, causing serious injury to soaring. The stones should not be too small or too large, the optimal size is 100-120 mm, the shape is somewhat elongated. If the stones are smaller, they will not be able to accumulate the required amount of heat and will cool down very quickly; large specimens will heat up for a very long time. Although, if you have time, you can build a kind of foundation for a future fire from large stones. If there are no boulders, then it is quite possible to use pebbles. As for quantity, for each person who will bathe, 1 bucket of stones will be required. Therefore, each participant is obliged to collect a bucket of boulders for himself. |
| Near the resting place there should be thin young trees (or even better, dead wood) that will be used to build the frame (if the aluminum posts were not prepared in advance). | From these trees, you need to make poles with a diameter of about 30-40 mm, you should also think in advance how to attach them. |
| Firewood will be required for a fire, and in large quantities, because it will burn for at least 3-4 hours. | Logs that are too thick are not suitable for this, as they do not burn well. The maximum diameter of firewood should be 100-150 mm - so they quickly burn out and transfer all the heat to the stones. |


Making a camping bath "in white"
First, the simplest option will be considered, for which only adhesive tape and film (possibly clothespins) are required from special materials. We are talking about a white-bath-tent here, that is, the stove will be located separately from the steam room.
We start with the manufacture of a camping bathhouse.
Stage one. Frame manufacturing
There are several ways to make a frame, consider them.
Method number 1 (suitable only for a "white" bath)
For work you will need:
- axe;
- film, 10-15 m; you can use the thinnest film - it will cost less, and it weighs less, experience shows that the film is almost never used more than once anyway;
- wide tape (1 skein);
- stationery clothespins (20 pieces, they can be replaced with the same adhesive tape).
After preparing everything you need, we proceed to create the frame.
Step 1. First, we prepare 8 poles with a length of at least 100 cm (more is possible, but warming up the steam room will take longer). From the poles we build a parallelepiped or a cube, depending on the number of people who will bathe. If there are a lot of people, then it is preferable to bathe in four people - this is the best option.

We connect the poles with tape. A lot of adhesive tape will be required - it is intended not only for fastening, but also for protecting the film from the sharp ends of the frame.

Step 2 Having finished with the frame, we build a place for stones on the side, using 3 more poles 300 mm or 500 mm long each.
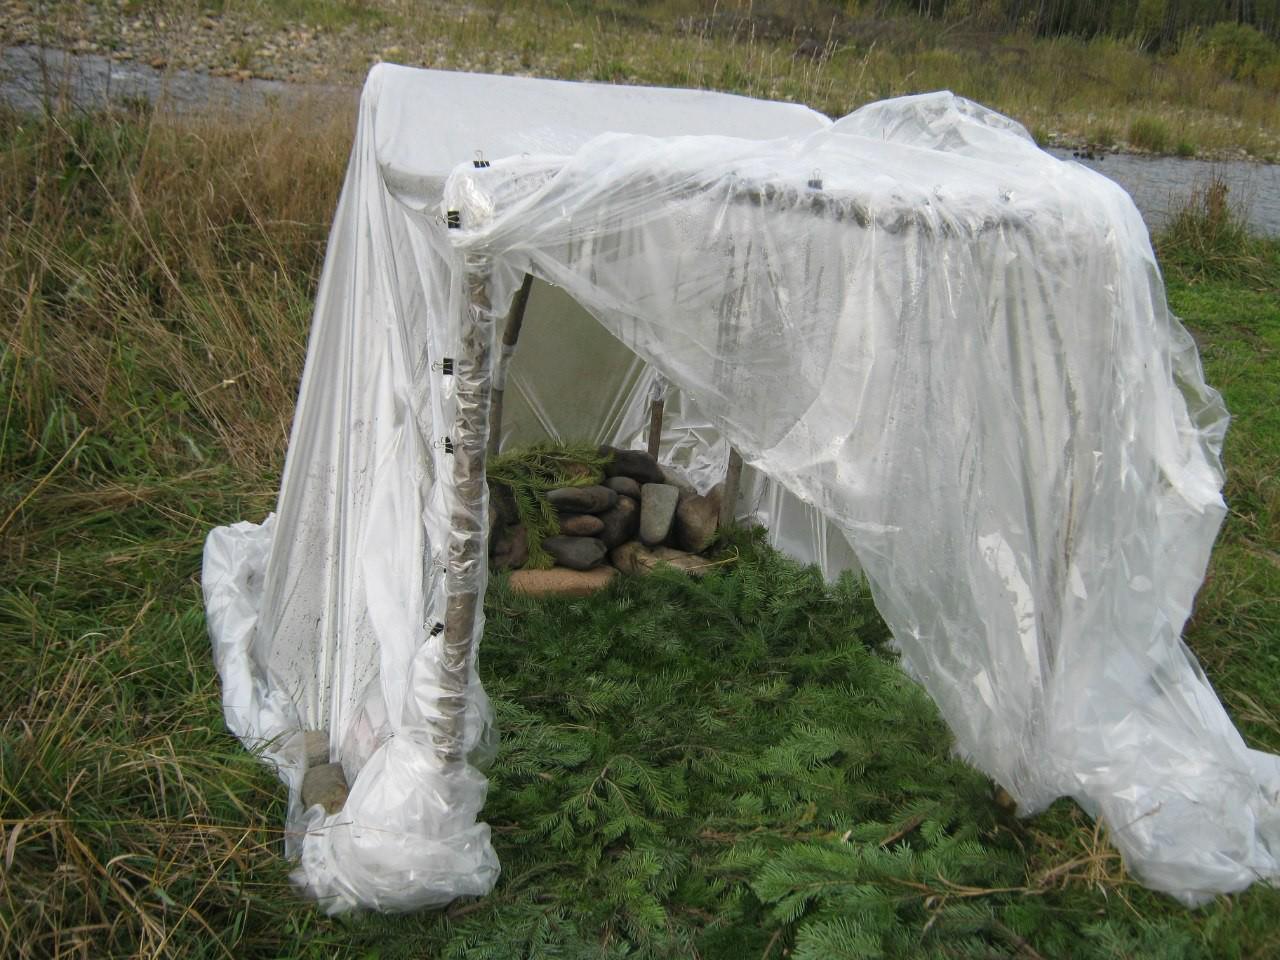
The result should be something similar to the design shown in the image below. The base of the stove is lined with stones.
It is worth noting that much here is optional. So, the design of the frame can be significantly simplified and made in the form of a wigwam. The frame in this case will consist of 3 poles connected at an angle.
Step 3 Next, the frame must be covered with a film. The width of a standard film sleeve is 1.5 m. We cut it and get 10 m or 15 m of a film 3 m wide. We wrap the finished frame with a film, we do this very carefully so that sharp ends or knots do not pierce it.
Note! The dimensions of the frame can be made such that the width of the covering material (3 m) is enough not only for the walls, but also for the roof. In this case, the tightening procedure will be noticeably simplified, there will be no need to cut the film and make additional seams.
There will be no problems at all with fitting a wigwam.

 Tree trunks were used as racks. The film is fixed between them
  Variant of a camping bath in the form of a hut
  Bath from the inside
Step 4 We fasten the film to the frame using clothespins or ordinary tape.

Step 5 On the entrance side, we leave enough film for the “door”. The entrance must be securely closed so that the steam from the tent does not come out. This can be done in one of two ways:
- fasten the film with clothespins from the inside;
- leave a person at the entrance who will hold the “door”.

Almost finished bath
Step 6 Using heavy stones, we press the film to the ground around the perimeter.

Step 7 To cover the floor, you can use spruce branches, which not only smells good, but is also good for health. You can sit directly on the spruce branches, although there are other options: lay a small tourist rug, bring folding chairs or hemp.
Film prices
film roll
Method number 2 (can be used for a black bath)
We use improvised materials - for example, four willow branches 1.4-1.5 m long. Using adhesive tape, we tie two branches in length and set them crosswise. Of course, you can try to find a couple of long branches to cross them, but it will be quite difficult to find ones that would be the right size. You can also build a square structure, as described above, but this will require more time and effort.
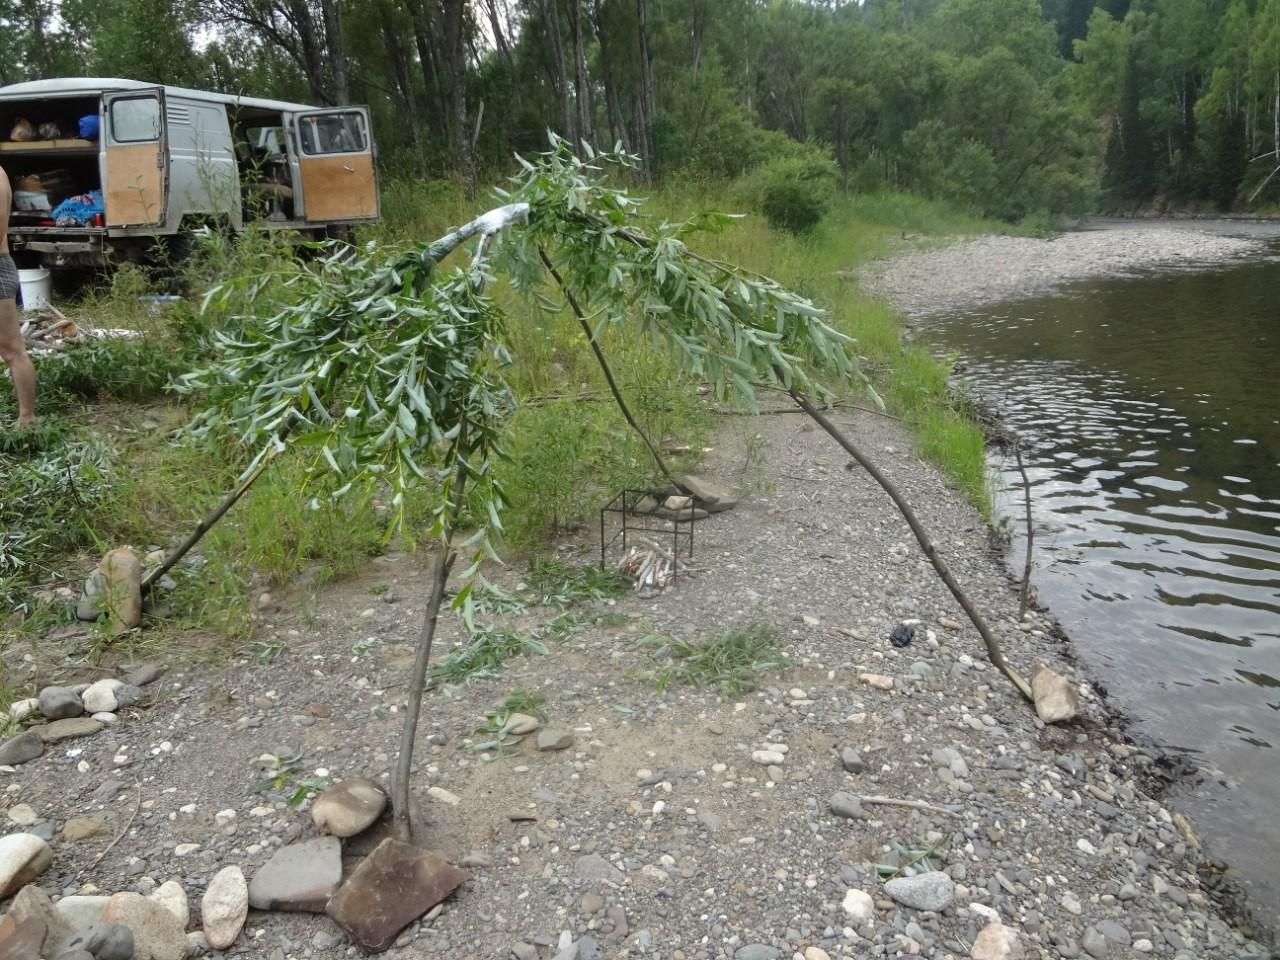

If the bath is large, and the standard 3 m width is not enough for this, you can connect two pieces together using stationery clothespins.


Method number 3 (can be used for a black bath)
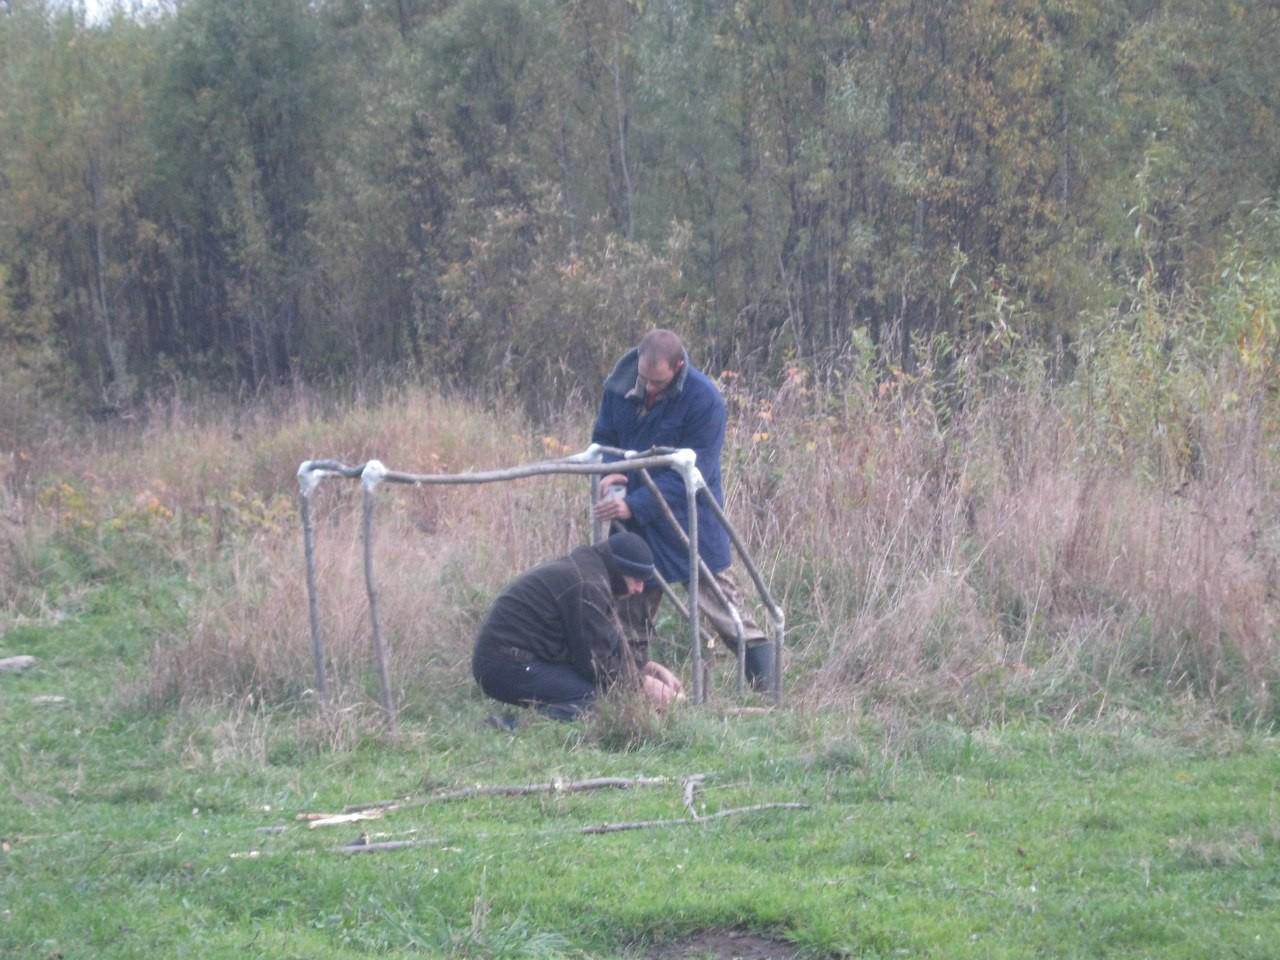
A prefabricated frame can be welded from profile pipes. It only takes a few minutes to assemble it at the resting place. The image below shows that for the manufacture of such a frame, metal tubes 60-70 cm long were used (a total of 16 pieces will be required).
Table. Elements for connecting the frame
For this, pipes of a larger diameter were used.
The heat-insulating material in this case is an awning, pre-sewn in accordance with the dimensions of the structure.

 Awning, sewn to the size of the frame
Method number 4 (can be used for a black bath)
An easier way is as follows: you need to purchase an ordinary double tent, cut off the tarpaulin, and use the tent arches as a frame.
Often, tents are set up entirely, but for the reasons described at the beginning of the article (unpleasant smell, possible release of toxic substances), it is still better to use a film.


Having finished with the frame, we proceed to the manufacture of the stove.
Stage two. Stove
To create a stove you will need:
- river stones of the above sizes, about 25 pieces (you can not from the river, but from the shore);
- sapper shovel or slingshot from branches (for transferring cobblestones to the steam room);
- firewood.
Note! Once again, we remind you that fragile stones (such as sandstone) should not be used, because at high temperatures they can crack.
Step 1. From the collected stones we build a well about 10 m from the bath. It is important that the well is stable, so it is better to take flat stones for it. It may not work the first time, so be patient.


Step 2 After that, we cover the stones with firewood so as to completely hide them. We burn wood.

By the way, the film on the frame can be additionally covered with the same spruce branches or branches (as shown in the images below) so that the steam room retains heat longer.

Step 3 While the stones are warming up, we prepare a sapper shovel or slingshot. In order for the stones to heat up to the required temperature, it will take about 1 hour. Throughout this time, the firewood should burn intensively. After heating, the stones are transferred to the bath.


Note! It is advisable to carry the stones together, so as not to let them cool down. Also, inside the tent, you should put a few plastic bottles with warm water in advance, which will be poured over hot cobblestones.


Camp stove prices
camp stove
Video - Portable bath
The main difference of this option is that the heated stones will not need to be transferred from the fire to the steam room. A large frame in this case will be placed directly on top of the red-hot cobblestones after cleaning the coals. The manufacturing procedure begins with the construction of the furnace.

Stage one. Bake
There are two options here, let's get acquainted with each of them.
Option number 1
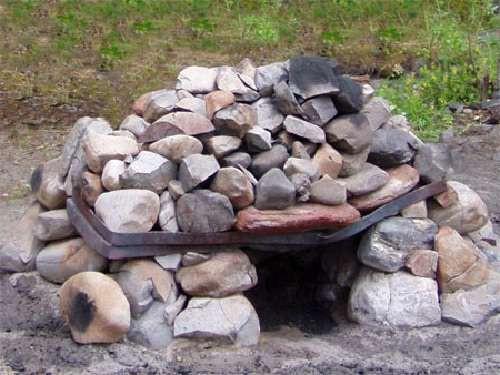
We add a bunch of stones and make a hole in it for loading firewood (in the image, the hole is on the reverse side - where the smoke comes from). Stones will be required much more than for a white bath, but neither the shape nor the size play a special role.
It is worth noting that this option is rather complicated in execution, so you should be prepared for the fact that the heap will constantly collapse.

Option number 2
Using a welding machine, we pre-make a small frame (40-50 cm high, similar width) from reinforcement bars with a diameter of 5 mm or more. Already in place, the finished frame is covered with stones. The main advantage of this design is that the stones will rest on the frame, so they will not fall apart. At the same time, they will take more time to heat up than in the variant described above.


Note! In addition to its direct purpose, such a frame can serve as a kitchen stove, and if you put a sheet of plywood on top, then also as a table.


Option number 3
Here, on a pre-selected site, it is necessary to lay out the foundation of the heater with sides of 100 cm, after digging a small hole under it with a depth of 50-60 cm. -30 cm.


We install stone slabs on top of the boulders in such a way that there is a small through hole in the center of the structure, through which the fire will reach the top of the heater. At the end, we lay another plate (it can even be a mesh or a sheet of thick metal), which will close the central hole.
Having finished the construction of the furnace, we load firewood and set it on fire. Stones, as noted above, will warm up for a long time. We maintain an intense fire all this time, periodically we put firewood. While the cobblestones are heating up, we proceed to the construction of the frame.
Stage two. frame
We make the frame in one of the possible ways (in the images below - a design of 4 poles). When the stones are heated to the required temperature, remove the coals and cover the frame with a film. Along the perimeter we press down the film with large cobblestones, if possible we cover the floor with spruce branches. Everything, you can proceed directly to the bath procedures!
For comparison: how much does a factory bath-tent cost?
Today, camping baths are produced by both Russian and foreign companies. The price of the finished model ranges from 25,000-30,000 rubles. (the set consists of a heater, a hood and a thermal tent). The amount is considerable, but you can save money: build a frame with your own hands and buy only a small metal heater. In this case, the costs will be about 9000-10000 rubles.

Tips for using a camping bath
- Despite the fact that the manufacture of such a bath requires a lot of time, it will still not work for a long time to bathe in it, because the stones will cool down quickly, especially if they are poured with water.
- Stones with visible defects at high temperatures can shoot off small pieces, so you need to stay as far away from the furnace as possible. It is worth knowing that after watering the stones with water, the risk of cracking is minimized.
- The stove must be installed in the opposite part of the tent from the entrance - it will be safer to leave / enter.
- The main disadvantage of the bath-tent is the low temperature near the ground. Therefore, you need to put something under your feet, otherwise you can catch a cold.
Video - Instructions for making a camping bath
A camping bath is a mobile analogue of stationary structures. The structure is assembled on site from improvised materials or a specialized tent and stove, which can be purchased at stores with goods for outdoor activities. If you are going to make a camping bath with your own hands, you will need to prepare before the event. To do this, you need to familiarize yourself with the installation process and the choice of materials necessary for its implementation.
What are camping baths
There are several options for the execution of a tourist camping bath:
- based on the purchased stove and tent;
- completely made up of improvised means;
- combined from specialized and improvised materials.
The first way to build a camping bath is the simplest, however, it has several significant disadvantages:
- acquisition costs;
- transportation of the overall stove and frame;
The option is suitable for tourists who often go to nature in their own car. If the installation of a camping bath-tent is planned very rarely, then it makes little sense to purchase specialized products.

Attention! It is not recommended to use synthetic tents for the construction of a bath. They are not designed for high temperatures (even if they are refractory impregnated) and can quickly deteriorate, as well as release toxic substances during the heating process. The implementation of a tourist bath is possible from tarpaulin tents.
Choosing a place to install a camping bath
To install a camping bath, you need to choose a place where there will be enough stones to build a stove. The most suitable option would be a forest river, since in such an area you can find stones, materials for kindling and building a structure. The presence of water nearby also plays an important role, thanks to which it will be possible to get steam without any extra effort.

Before you make a camping bath with your own hands, you need to arm yourself with a tarpaulin or plastic wrap, as well as a frame, or make it on the spot from sticks. To build the frame in place, you need to take adhesive tape or twine. An indispensable attribute in every trip is a tourist knife, which does not take up much space, but has a wide range of applications in nature.

How to install a camping bath
To install a camping bath you will need:
- dig a small depression in the sand or earth (it is recommended to lay the bottom with stones);
- install the frame of the future stove and lay stones on it;
- kindle a fire inside the oven (the fire must be large, since the stones heat up very slowly);
- when the stones heat up and the fire burns out, you need to install the frame of the bath (purchased or home-made) and pull a tarpaulin (film) over it.
Instead of the first two points, you can use a purchased stove for a camping bath.
The frame can be assembled in advance so as not to waste the heat of the stove, and after that you can fix the tarpaulin and start using the bath. It is advisable to pour hot water on the stones, which can be boiled in parallel with the construction.

Attention! Try not to install the stove for a camping bath directly on the ground. Heated stones can begin to burn the ground underneath them, which will lead to the release of carbon monoxide. If the sandy base cannot be found, it is recommended to make a thick cushion of stones under the stove.
In order to make a small bath frame with your own hands, you need to pick up a few elastic branches, fix the bases in the ground or sand and connect them with tape or rope in the middle. It is very convenient to use adhesive tape, as it can be used to fasten small sticks into the desired design.
Wet and especially wet stones, as well as fresh sticks and logs, can burst under the influence of heat, so it is recommended to choose dry building materials for the stove. If this is not possible, you need to be as careful and attentive as possible until the stones are completely warmed up. Under the influence of high temperature, the water contained in the stones turns into steam and tries to escape. If there is not enough space for moisture in the gaseous state to escape, the stone will explode due to the high pressure inside. Compliance with such a simple safety rule will allow you to enjoy outdoor recreation without any problems.
Today, in stores, the industrial sector can offer its customers any camping baths, with or without a stove, of different sizes and from various materials.
But it's much nicer ifnature , your ownhands erected mobile bath - simple and not as difficult as it might seem at first.
To in nature, in forest or near the river hike you could enjoy a good rest - marching bath, which can be easily do from improvised material, this is what you need.
For the usual version of the camping bath, you will need not so much:
- - stove , which can be collected in nature from improvised stones, small pebbles, or, alternatively, purchased ready-made in the store;
- - special frame , which can be made in nature from branches;
- - tight material - this can be simple, dense polyethylene or tourist tent, which is very convenient and practical;
Withexpert tip: with regard to tight material, it is worth noting that preference should be given in favor of a tent - the thing is that if you use a film, it will take a lot and it will take up more space in a hiking backpack than a regular, Soviet tarpaulin tent . With all this, the tent will serve as an excellent sleeping place in the future.
The device of the bath in nature
 The field bath consists of three sections - this is the dressing room and the steam room itself, as well as the heater, when an improvised stone bath is built in nature. bake .
To know how to build a portable bath, we will consider the materials themselves, from which an impromptu steam room is built in nature, as well as how they are mounted on site.
1. frame- many experienced tourists note that it is optimal to have an aluminum stand with you, rather than looking for branches and trunks in the forest to support under the film. If this is a tent, they simply pull it up at the chosen place. their hands and all. But when only branches are at hand, you will have to make sure that during the rest, in the steam room, they do not ignite, but they are fixed with a strong rope or soft, metal wire.
2. Covering material- such when arranging a bath in the bosom of nature can be any dense material. For example, simple, dense polyethylene - sew it is simple, but the downside here is the low rates of thermal insulation and low strength, when polyethylene begins to warp and melt from high temperatures. The best option is a tarpaulin - as noted above, it can be a simple tent, which is not difficult to pull in nature.

 3. Bake, assembled from stones or its portable version purchased at the store. But for the most part, experienced tourists advise assembling a stove in nature from stones - this will bring a special charm to the atmosphere itself and make the rest more enjoyable. The main thing is to choose the right natural material - experts in this regard unequivocally say that you should not use different types of this material, since each stone reacts differently to temperatures, retains heat from the fire. It is optimal to choose them and the same size - it will be enough to collect 1 bucket for an impromptu stove for one wash.
But for those who are too lazy to bother with the search for stones and masonry, you can buy a ready-made stove.
When arranging a steam room in nature, it is worth remembering that it is assembled and heated in different ways - in this case, we are talking about its firebox both in black and white.
The main difference between the furnace of an impromptu bath is that in the draft steam room the frame will be located directly above the fire itself, but in the process of heating the bath on white - the frame is mounted separately, when the center of heat, the source of high temperatures, are heated stones that are brought into the center homemade sauna.
With a black firebox, the bath will be hotter, but you can get out of there all in the smoke and ashes from the fire, and with a white firebox, the heat will be less, but you will also get out of there cleaner. The easiest option is to lay firewood, stones on them and light a fire. The stones will heat up and even then you can begin to build a bath.
Installation steps
 After a place has been chosen and a stove and a fire have been laid, it is worth starting to assemble the frame. If the frame is metal, they assemble it according to the scheme, if a tent is used, then they pull it over the hearth. But in the case of erecting a frame made of wood, they form a 4-coal rack by driving thick sticks into the ground. Further, they build a roof of poles around the perimeter - an impromptu frame is obtained.
It is important to know: the main conditions for safety is the reliability of the design. If everything is more or less clear with factory supports, then with supports made from improvised material, the tree should be chosen thick, not rotten, not too dry and not damp.
After the frame is assembled, we heat the heater itself and while it is warming up, in parallel we equip the floor of the bathhouse.
Experienced travelers advise: lay coniferous branches, or birch or oak branches on the floor of the bath, which will add their own unique aroma.
After the stones have warmed up, we put water on an impromptu fireplace to warm up. In this case, it is worth remembering an important condition - until all the firewood burns out, you should not close the stretched awning to increase the temperature, since it is possible to burn out from the smoke. Bath in nature is ready.
Watch a video in which an experienced tourist talks about the method of making a camping bath:
Many believe that in order to take a steam bath in field conditions, you need special equipment and the possession of special skills and knowledge. In fact, a camping sauna with a stove is built very simply, and does not require practically any tools, except for those that are already taken on a hike: an ax, a shovel and, in some cases, a hammer.
The main stages of the construction of a bath from improvised means
This chapter is a kind of instruction on how to make a bath in field conditions, and by completing each of the stages, you can easily take a steam bath even far from the benefits of civilization. The requirements are quite simple, but the reliability and convenience of the structure depend on their implementation.
Place selection
At this stage, the following factors should be considered:
- The soil at the construction site must be sufficiently dense, especially if a frame of stakes driven into the ground will be erected. In soft ground, it is impossible to arrange a reliable structure.
- It is best to choose a place next to a pond - after the steam room it is nice to plunge into cool water, in addition, in the wild this is the only way to wash.
- The stove for a camping bath is built of stones, so it is worth examining the area for their presence. Carrying boulders for a kilometer is not very reasonable, and it's hard.

The construction of the stove
Perhaps the most crucial stage, which determines how good the steam room will be.
To achieve a good result, you should follow a few simple rules:
- In the place where the heater will be located, it is necessary to remove a layer of soil and lay out an impromptu foundation from stones.
- The stones should be oblong in shape, the surface should be smooth and uniform without foreign inclusions. The size of the stones is from 20 cm or more, as you know, the larger they are, the longer the heat lasts.
- The construction of the hearth can be carried out in two ways: by alternating layers of stone and firewood and subsequently supporting the flame, or by laying out a kind of hearth with a diameter of about 70 cm and the same height. Inside, space is left for laying firewood, and a flat stone is laid on top. So that you can put a bucket of water on it for heating.
- After the laying is completed, you can make a fire, as the impromptu stove for a camping bath heats up for a long time - about 4 hours, until the stones are red-hot or white-hot - depending on their type.
Tip: do not use layered stones, as when heated they lose their strength and when poured with water they can simply explode, which is fraught with quite serious injuries.

Frame device
A bath in field conditions is constructed from any improvised means that provide the necessary reliability of the structure. Not bad if you have a ready-made metal frame of the right size - this greatly simplifies and speeds up the process.
If there is no finished frame, you can build it from improvised means:
- Sufficiently strong wooden poles that can be prepared on the spot.
- Rope, wire in insulation (heated metal can melt the curtain), twine and other materials to strengthen the connections. If you have a hammer and nails, even better.
First, the size of the building is determined, after which 4 racks are hammered in the corners, if the building is long, then additional poles can be placed between the corners. Two more crossbars are laid crosswise on top, they are designed to prevent sagging of the ceiling.
Some people prefer a safe design where the heater is located in a separate area, this minimizes the danger of touching hot stones. You can see the features of its device in the figure.

After that, the frame can be further strengthened with spacers or crossbars and all connections can be checked for reliability and stability. If everything is fine, you can proceed to the next step.
Canopy for a camping steam room
Most often, one or two pieces of plastic film are used for these purposes. It is quite light, in addition, it can be used as a means of protection from the weather. You can also use an awning for a camping bath made of tarpaulin or other fairly reliable material that retains heat well.
The size of the material should allow you to strengthen the canopy near the ground with stones or sand (a reasonable solution is to dig a groove around the perimeter, with its help you can significantly increase the tightness of the structure).
The floor in the steam room also needs to be insulated. First, coniferous spruce branches are laid, and branches of deciduous trees can be laid on top.
With this simple method, you can significantly improve. It is easiest to use logs as seats.

Tip: never use synthetic materials used in the manufacture of modern tents as a curtain - they release harmful substances under the influence of high temperature, in addition, this option is very short-lived, and after several uses the fabric will become unusable.
Features of visiting hiking steam rooms
We looked at how to make a bath on a hike, but the main rules that should be followed to ensure safety and achieve the best effect should be noted:
- Until the firewood burns out, one of the walls or the ceiling should be left open to prevent the accumulation of smoke and carbon monoxide.
- When the stones are warm enough, a container of water is placed on them, which will be used to water the heater.
- After the wood burns out, all the heat is carefully raked out, after which the tent is completely closed.
- It is reasonable to additionally protect the walls near the heater with a thick cloth or a screen made of wooden poles.
- It should be ensured that the canopy is securely fixed, the less heat loss, the longer the good temperature in the bath will last.
- The stones are poured with water, as a result of which steam is released. Cooling takes one and a half to two hours, this time is enough to take a steam bath for an average tourist group.
- You should not build too large a structure for several people, the larger the frame, the greater the heat loss.

Ready-made camping baths

Nowadays there is no shortage in the choice of options.
In this case, it is worth considering the main points:
- The size of the building and its features- the design may contain a dressing room, windows and much more. The price depends on the availability of these details.
- The material from which the awning for a camping bath is made. It should be light, strong and resistant to high temperatures. To use the steam room in cold conditions, models with double walls are produced, this allows you to use the steam room at temperatures up to -40 degrees.
- The presence of a frame. Some tents are a canopy that is worn on any structure that is suitable in size, and some have a frame, thanks to which the installation of a mobile steam room is greatly accelerated and simplified.
- Lightweight design. Some assembled models weigh 2.5-3.5 kilograms, which allows them to be worn even on hiking trips.

Special stoves for camping baths
If you travel by car most of the time, a smart decision would be to purchase a ready-made mobile sauna stove. It is quite compact and light weight. It requires much fewer stones to work (many carry them with them so as not to waste time searching).
Such stoves are equipped with a spark arrester, which is very important when used in tents made of flammable material. They have a rather attractive appearance.
Chimney pipes are included, most often tents have special holes for their installation.

Conclusion
How to make a camping bath and what to use for this depends on your desire and possibilities. Naturally, if you are traveling on foot, it is quite expensive to carry a ready-made stove and a tent with a frame. In this case, the easiest way is to wear only a ready-made awning, and build the frame and stove on the spot ().
If you are a fan of road trips, then you can carry a complete set and build a mobile steam room in a matter of minutes. Moreover, its size can be very impressive, which is important when relaxing with a large company.
In order to better understand all the intricacies, we advise you to watch the video in this article, which clearly shows all the charm of using a bathhouse on a hike.


 in the configuration?")


