DIY polycarbonate greenhouse
To grow high-quality crops, both professional farmers and amateur gardeners use closed greenhouses. A do-it-yourself greenhouse made of polycarbonate allows you to grow various crops at any time of the year and get decent results.
Kinds

Types of greenhouses
Based on the shape of the structure, polycarbonate greenhouses can be divided into 4 main types:
- Wall-mounted
- Gable
- Polygonal
- Arched

Wall greenhouses- a good option for building a greenhouse. The main advantage is lower consumption of materials. One of the walls will serve as part of a house or other solid building.
In turn, wall structures can have different locations relative to the walls of the house.
Thus, three types can be distinguished:
- Possible bay window option: in this case, the greenhouse will protrude from the general perimeter of the building. As a rule, it occupies a small part of the wall;
- Also, a greenhouse can fill empty space between buildings. With this option, the yard area is conveniently and functionally used;
- A greenhouse that continues the main structure of the house, occupies the entire wall of the building and is the largest in area among wall structures. Often, when drawing up a project before building a house, the location of a closed greenhouse or greenhouse is included in the drawing.

Gable greenhouses have vertical walls and a roof with two slopes. The advantage of the design is ease of assembly and installation. The angular shape of the roof allows for functional use of the ceiling space, for example for installing shelves for pots with seedlings.

Polygonal greenhouse
Polygonal greenhouses are quite durable and can withstand heavy snowfalls and gusts of wind.. They have excellent light transmission. The unusual design of the greenhouse allows you to decorate it beautifully.
The arched type of greenhouses has gained significant popularity due to its ability to better retain heat inside the greenhouse.
The structural feature and smooth slope of the roof allows it to withstand heavy loads from snow and does not prevent snow precipitation from rolling onto the ground.
Advantages

Polycarbonate greenhouse
Modern building material polycarbonate has replaced heavy glass and has radically simplified the work when constructing greenhouses.
Polycarbonate has a number of positive characteristics:
- The low weight of the material simplifies installation work and does not require a solid foundation
- The mobile option allows you to quickly disassemble and assemble the structure and move the greenhouse
- The price category of polycarbonate is lower than its analogues (glass, fiberglass), which reduces the cost of the greenhouse
- The material is strong enough to withstand mechanical damage, strong winds, and hail.
- A polycarbonate greenhouse has excellent thermal insulation, exceeding that of triple glazing
- The light transmittance of polycarbonate reaches 80%, which ensures good dispersion of sunlight. Ideal for plant growth and flowering
- With proper care, a polycarbonate greenhouse has a fairly long service life of 10 to 15 years, without losing its functionality
- The resistance of polycarbonate to ultraviolet rays allows you to preserve the original appearance of the material and the structure as a whole for a long time
- Fire resistance and minimal toxicity make the greenhouse fireproof
Required tools and materials

Set of tools
To install the structure on the site, you will need to purchase the necessary material and prepare the tools.
In case of assembling a metal structure from tools, you will need:
Metal profile pipes 20 by 20 are used as the material for the frame, with a wall thickness of 1.5 - 2 mm. The length of this material reaches 6 meters. Profiles are used with rectangular or square cross-section.
For reliable protection against corrosion, the material is galvanized or treated with powder paint.
If the frame is planned to be made of polypropylene pipes, then you will need:
To create a frame of the required strength, PVC pipes with a diameter of 25 to 32 mm are purchased. The length is usually from 1 to 6 meters. Polypropylene pipes are durable and not subject to corrosion. You can install the frame yourself.
Foundation (base)
Greenhouse structures vary in terms of transportation capabilities. Thus, two types can be distinguished:
Stationary
This type involves a thorough laying of the foundation as the basis for the greenhouse;
Mobile
A greenhouse of this type is not tied to the ground and involves moving the structure if necessary for transportation.
For a stationary greenhouse there are 4 foundation options:
- Tape
- Slab
- Columnar
- Pile
1 Strip foundations are divided into three types: non-buried (only the top fertile layer of soil is removed), shallow-buried (assuming from 70 to 80 cm of foundation depth) and deepened (depth reaches 1.5 meters). The optimal ratio of foundation depth and surface masonry is 70% to 30%. If the foundation goes 70 cm deep, then the surface masonry reaches 30 cm.

Strip foundation device
Various materials can be used as a material for the strip base, such as concrete blocks connected to each other by reinforcement. Ordinary brick or cinder block, or a cement composition including reinforcement.
2 Slab foundation involves the construction of a solidly poured area on top of the primer layer. It is used in areas where there is underground water or a large percentage of sand.

To organize this type of foundation, it is necessary to dig a pit with a depth of at least 10 cm, maximum 70 cm. The first layer is a cushion of crushed stone and sand. The next layer is laid geotextiles, for example roofing felt, which serves as protection from the aggressive external environment. Next, concrete is poured.
3, thanks to its technology, allows you to quickly organize the basis for a greenhouse. Small columns are placed at a depth of up to 80 cm, at a distance of up to 1.5 meters from each other. The material used for the columns is ordinary brick or cinder block. Rubble or natural stone, wooden stump or pipes filled with concrete with asbestos, or special T-shaped pillars made of concrete.

Pile foundations are widely used in swampy areas or on uneven ground. The deepening of the base exceeds the lower freezing mark of the ground by 30 cm.
There are two types of piles: screw (equipped with special blades that allow you to screw piles into the ground), driven (using special equipment, piles are driven into the ground). The distance between the piles reaches 2 meters. For screw-type installations, in some cases drilling equipment is required.

If you do not plan to allocate a special place for the foundation for the greenhouse, you can use a lightweight type - a wooden base. Using a wooden beam makes the work of constructing the base easier and is also a less expensive option. An additional advantage is the ability to move the finished greenhouse around the site.
Step-by-step installation of a metal frame of an arched structure on a wooden base
Installation of a wooden base 3 by 6 meters
1 First, the dimensions of the future greenhouse are determined. For a convenient arrangement of beds (two on the sides and one along the center line), the width of the greenhouse should be 3 meters. Length from 4 to 8 meters. An average size greenhouse is 3 by 6 meters, height 2.1 meters.
2 The base must be stable. In the classic version, you will need to purchase a wooden beam 150 by 150 mm. If it is not possible to deliver a long beam to the installation site, it should be cut into several parts. It is recommended that the timber laid on the width side of the greenhouse (3 meters) be installed in one piece, without cutting. The remaining length is selected in accordance with the dimensions of the greenhouse.

3 If you plan to install a metal frame of a greenhouse 3 by 6 meters, then the length of the timber for the entire perimeter must be at least 18 meters.
Additionally, you should take care of purchasing liquid antiseptics for wood processing. Impregnation of the timber will preserve the base for a long time.
4 Antiseptic groups of drugs contain special chemicals that inhibit the development of harmful bacteria. To maintain the protective effect after treatment, it is recommended to cover the surface with a waterproof material.

5 The frame of the wooden beam is installed in the correct geometric figure, observing a right angle and, as a result, should be a rectangle with angles of 90 degrees.
6 For the corner connection of the timber, galvanized metal fastening corners and wood screws are used. Before laying the timber on the base, the surface must be properly planned.
7 The ground plane should be level and, if possible, not allow differences in height of more than 25 - 30 mm. If it is impossible to prepare the surface according to the specified dimensions, it is permissible to plan the surface for laying the timber using raw sand.
8 For additional stability of the future greenhouse, holes with a diameter of 10 to 15 mm are drilled in the wooden beams. Metal fragments of reinforcement or thick-walled pipes will subsequently be driven into them. Cuttings of a profile pipe attached to the inside of the beam using self-tapping screws can be used.
9 Tethering to the base will significantly strengthen the greenhouse and prevent its geometric displacement during strong winds. The axial distance from the mounting holes is 70 cm. The diameter of the hole must be selected according to the diameter of the metal rod.
10 If bulk soil is used for growing seedlings, then geotextiles are laid at the base of the greenhouse before the delivery of black soil. Such fabric will prevent the growth of unwanted weeds and the penetration of insects into the greenhouse that can harm the root system of plants.
Preparation and installation of a metal frame
1 The highest quality and strongest design includes a metal frame. As a rule, aluminum or galvanized profile pipe is used for its manufacture. Working with these types of metals requires professional equipment (argon welding, special electrodes, etc.) and the involvement of specialists. This type of frame installation becomes quite expensive.
2 To make the frame of the greenhouse, a profile pipe made of ferrous metal will be used measuring 20 by 20 mm or 25 by 25 mm with a wall thickness of 1.8 to 2 mm. When using such a profile, the greenhouse frame is able to withstand quite serious loads.

Profile pipe samples
3 To manufacture the frame arc and all the necessary accompanying reinforcing profiles, it is necessary to make a proper high-quality calculation of the required material. Given the known width and length of the greenhouse, it is worth taking into account the presence in the design of a doorway and window compartments, areas with additional reinforcement of the frame.
4 For a more accurate calculation of the purchased material, you will need to make a drawing of the frame. When making a drawing, special attention must be paid to the front and back sides of the greenhouse. These are areas for installing doors with window elements.

5 As a rule, when making a drawing, special attention is paid to the back sides of the greenhouse, where the doors with window elements will be mounted. In these areas it is necessary to install additional profiles to create increased strength.

Greenhouse with full windows and an entrance door made of metal-plastic
6 To hang the door, you will need to purchase metal hinges and locking elements to close the door itself and the vent section. The distance between the arcs of the structure should not exceed 100 cm. This length between the elements takes into account the width of the standard 5 mm cellular polycarbonate - 210 cm.
7 In the future, the remainder of the 10 cm width will be used for a 4 - 5 cm overlap in the door area, in the form of a small canopy. The remaining 5 cm are intended for overlap when installing subsequent polycarbonate sheets.
8 For the geometric calculation of the greenhouse arc, a simple arithmetic formula for the circumference P=πd is used. The arc itself will consist of half the length of the circle and two straight lines along the edges.
9 Based on the fact that the straight line will turn into a circle, the segment from the beginning of the straight line to the starting point of the circle will be equal to 70 cm. There will be two such lines, that is, this distance is equal to 140 cm.
10 Next, the circumferential length of the profile is calculated. To do this, from the total height of the greenhouse of 2.1 m, subtract the height of the straight segment of 70 cm. We obtain a point for calculating the radius of the arc of 1.4 m. Knowing the radius of the circle (1.4 meters), we multiply it by 2 and get a diameter of 2.8 meters.
Now we apply the formula for circumference:
P = 3.14 * 2.8 = 8.8 meters the length of the entire circle, only half is needed, therefore 8.8 / 2 = 4.4 meters
4.4 + 1.4 = 5.8 meters - the resulting length is the required size for making one arc.
You can adjust the size of straight segments and the arc itself at your own discretion. The standard profile length is 6 meters 5 centimeters.
Taking into account the greenhouse length of 6 meters, you will need:
- to make the arc of the front, subsequent and rear arches, 7 pieces of a six-meter profile are needed;
- 5 six-meter profiles will be used as longitudinal connecting elements reinforcing the entire structure;
- for the manufacture of two doorways, doors and window compartments with an opening width of 95 cm and a height of 2 m, 26 meters must be used. This number may vary depending on the increase or decrease in additional stiffeners;
- 3 six-meter profiles will be used as the basis of the frame;
- 2 six-meter profiles will serve as frame-reinforcing strips in the door fastening areas.
Ultimately, to create a metal frame you will need 126 meters of profile pipe 20 by 20 mm or 25 by 25 mm.
Wall thickness from 1.8 to 2 mm.
11 To give the arched posts a curved line, special equipment is needed - a pipe bender. As a rule, places where profile pipes are sold have profile bending machines with powerful rollers.
It is recommended to bend profiles using professional equipment. In this case, the high quality of the geometry of the entire structure is guaranteed, since when bending the profile into the machine, all profiles are inserted simultaneously.
12 For the best method, profiles assembled to each other before laying are secured by electric welding at the ends. This eliminates uncontrolled movement of the profile pipe during bending.
13 It is not possible to achieve the ideal geometry of the structure by trying to give the profile a uniform bend on your own without professional equipment.

14 By purchasing such a quantity of profile, the cost of bending work, taking into account discounts, is insignificant, which saves time and effort.
15 After making the arc, you should start making the front and back parts of the greenhouse. When assembling these arches, after welding into the base of the profile, the width on the outer sides must clearly correspond to the width of the wooden beam used as the base (300 cm). This will allow you to overlap the wooden base when covering with polycarbonate. This prevents drafts and the penetration of various types of insects into the inside of the greenhouse.
16 Next, two parallel profiles are welded into the contour of the arc, which will serve as a doorway. In the upper part, a transverse cross is installed accordingly. Width between profiles 95 cm (or set according to personal requirements).
17 The door is manufactured in such a way that its external length and width along the external contours should be 6 - 8 mm less than the internal dimensions of the doorway. After manufacturing the door contour, it is reinforced with transverse and diagonal profiles.
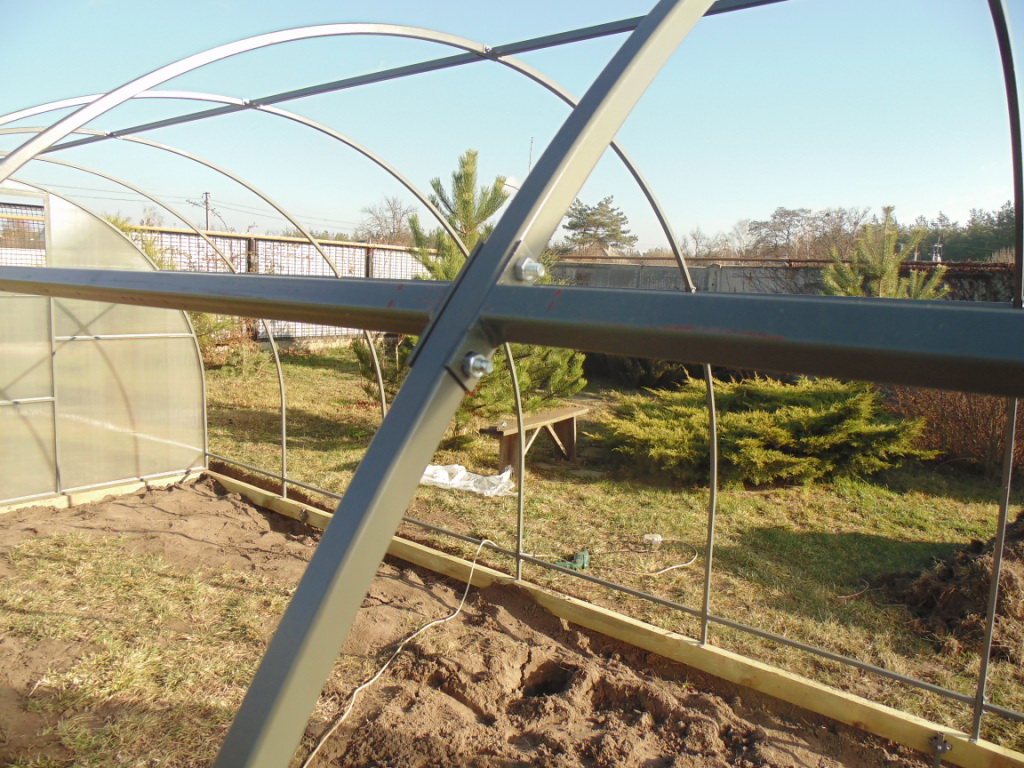
18 To complete the assembly work, you will need the help of one, and preferably two, workers. The first stage is to install the front and rear arches. Using wood screws through the lower profile into the prepared holes, they are screwed to a wooden beam. Additionally, side temporary holders are installed. The installation of arches is carried out in a clear vertical under the control of the building level.

Metal frame already attached to a wooden base
20 Fastening this profile to the front and rear arches can be done using welding or using a metal corner with metal screws with a drill at the end. The use of corners as fasteners will help in the future to quickly dismantle the structure.
21 The upper longitudinal bar is being installed, which will secure the front and rear arches at the highest points. To prevent sagging of this pipe, temporary supports are used.
22 The next step is to install the remaining arcs of the structure one by one, while it is necessary to control the distance, which should be no more than a meter. For high-quality installation of the arc on the profile used as the base, a five-centimeter section of a smaller profile pipe is welded in the area of its installation.
23 Thus, when installing the arc, we get the opportunity to put the profile on the holding ledge. At the same time, each subsequent arc is tied to the already installed upper crossbar.
24 During the entire installation, all dimensions and distances are controlled. The remaining arches are installed in a similar manner.
25 The arch profile pipe and guide profile are fastened using a galvanized bolt, nut and washer. The diameter of the galvanized bolt is recommended to be 4 mm. To install the fastening bolt, a hole of the required diameter is drilled in the arc profile and the guide profile, respectively.
27 Before covering the structure with polycarbonate, anti-corrosion protection is carried out on all metal parts of the greenhouse. The entire surface of the metal profile, if necessary, is cleaned using a wire brush or sandpaper. Degreased using solvent, acetone or white spirit.
Polycarbonate samples
The advantage of this material is high-impact strength, lightness, and high degree of light transmission.
Polycarbonate of transparent light shades should be used. You should not use dark material, this can disrupt the photosynthesis process of plants and cause negative consequences.
The most optimal thickness of polycarbonate for a greenhouse is 6 mm.
As a rule, such polycarbonate is produced in the following sizes:
- width 210 cm
- length 612 cm
For a greenhouse with dimensions of 3 by 6 meters, you will need 4 standard sheets of polycarbonate. Bolts with a drill equipped with thermal washers for screwing into a metal profile are also purchased (as a rule, this kind of fastener is used for installing corrugated sheets) and 43 meters of galvanized metal strip for external fastening, which acts as a holding mechanism.
Installation of such a strip will ensure proper fastening of the polycarbonate sheets to the metal arc, while simultaneously serving as a pressure washer.
If you fasten polycarbonate without using galvanized tape, then during the thermal expansion of the materials and during changes in temperature conditions, a breakthrough of the polycarbonate at the fastening point may occur.
1 Installation of cellular polycarbonate sheets must be carried out in such a way that the stiffening ribs are located along the length and the condensate formed inside the cell can freely flow inside the channel to the ground.

Correct placement of the polycarbonate sheet during installation, the honeycombs are located parallel to the structure supports
2 Before starting work on the installation of honeycomb sheets, the protective UV film is removed. The first step, when installing polycarbonate, is to fasten the sheets to the front and rear arches.
3 The size of the polycarbonate sheet without cutting to length allows for its installation. To do this, you need to, with the help of an assistant, evenly place the material along the arched structure. The first sheet is placed with an overlap in the form of a visor of 4 - 5 cm. A similar overlap should be formed on the side of the second internal arc.
4 Using galvanized tape, polycarbonate is secured with galvanized bolts to the front and subsequent arcs, except for the last one, where overlap is expected when installing the next sheet.
5 When attaching galvanized tape, it is necessary to control the uniform pressing of the polycarbonate to the profile along the entire length of the arc. The mounting bolts are installed at a distance of 50 - 60 cm from each other. Polycarbonate overlap areas are pressed last with galvanized tape.
6 In a similar way, honeycomb sheets are installed on the entire arched structure.
7 You should not use great force when tightening the self-tapping screw at the polycarbonate attachment points, this can lead to surface deformation.

Schematic illustration of the correct fastener
8 The sheet is cut along the contour using a reinforced stationery knife. The surface of the metal arc will serve as a guide for the blade.
Installation of polycarbonate on the front and rear arches can be done either on a ready-made assembled structure frame before covering the total area, or separately on arches not tied to the frame.
Today, a greenhouse can be found on almost every personal plot. This simple structure allows you not only to extend the warm season by a couple of months, but also to significantly increase the yield of cultivated plants. Almost any crop can be grown in greenhouses. Most often, cucumbers, tomatoes, eggplants and bell peppers grow in these warm and cozy buildings.
To clarify, it is worth considering the differences between a greenhouse and a greenhouse, because many do not know how they differ from each other.

All types of greenhouses have as their main task the preservation of internal thermal energy, therefore, when choosing the material and design of the building, the closest attention should be paid to minimizing heat loss.
What is the best way to make a greenhouse?
Just a couple of decades ago, such a question might have seemed simply inappropriate. At that time, the frame for the greenhouse was made from any suitable materials at hand, and the covering material was non-alternative polyethylene film (which you still had to try to find in stores). The film was fixed on the arcs, and by raising and lowering it the temperature level inside the greenhouse was regulated. Among the disadvantages of such a greenhouse, one can note the short service life of the polyethylene film - it was rarely enough for more than two summer seasons; One of the advantages is the comparative cheapness of polyethylene.

On a note! A glazed greenhouse was considered a more advanced and convenient design. Glass transmitted sunlight better and had a much longer service life. The main disadvantages were fragility and the danger of introducing sharp fragments into the soil.
Today, the first two types of greenhouses can still be found in summer cottages, but the palm, without a doubt, was taken by greenhouses from. This material has amazing properties - it is light, durable, flexible, transparent, conducts heat well inside the greenhouse, but very reluctantly releases it into the atmosphere. The only thing that still keeps some summer residents from buying it is the fairly high cost.

Which type of polycarbonate do you prefer?
Today there are two types of polycarbonate on the market:
- monolithic;
- cell phone
It resembles a flexible sheet of glass and can be of different thicknesses and colors. The service life can reach several decades. With equal thickness, it costs slightly more than a cell phone. Most often used in the construction of fences, canopies, canopies, etc.

Structurally, it consists of two thin polymer sheets connected to each other by stiffening ribs located at equal intervals. Air-filled cavities provide this type of material with amazing thermal insulation qualities, which makes it an ideal option for the construction of greenhouses and greenhouses. It differs from monolithic in slightly lower cost and shorter service life.

What is more profitable - buying a ready-made greenhouse or building it yourself?
To understand the difference, it is enough to compare the total costs of purchasing materials for self-construction with the cost of a factory kit.
Table. What is needed to build a standard medium-sized greenhouse.
| Name | Quantity, pcs. | Cost per piece, rub. | Total cost, rub. |
|---|---|---|---|
| Standard 4mm thick polycarbonate sheet | 1 | 2000 | 2000 |
| Galvanized square pipe 20x20x1.5 mm | 22 | 50 | 1100 |
| Self-tapping screws, electrodes, hinges, other consumables | - | - | 500 |
Total: the total cost of building a lean-to greenhouse with dimensions of 3x1.2x1.8 m will cost approximately 3,600 rubles.

In stores, a kit for installing a similar greenhouse will cost significantly more. However, if funds allow, and you really want to save time and effort, you can prefer this option. Another advantage of a factory-made greenhouse is that all its parts fit perfectly together, and the owner of the dacha will be spared from possible errors during design/assembly.
Basic designs of polycarbonate greenhouses
Let's look at the most popular polycarbonate greenhouse designs.

Do you need to build a foundation?
To ensure that the greenhouse is not blown away by a strong gust of wind, and that the entire structure is sufficiently rigid and stable, it is necessary to make a foundation. This will take very little time and will allow you to easily move the greenhouse to a new location if necessary.

Here is a simple set of materials that will be required to build a foundation:
- wooden beam 12x12 mm;
- roofing felt;
- wood screws;
- hacksaw;
- roulette;
- antiseptic;
- shovel.
A trench is dug along the perimeter of the structure being erected, its width and depth exceeding the timber by 5-7 mm. Roofing felt is laid in the trench. Next, pieces of timber of the required length are prepared and treated with an antiseptic composition. After this, the timber is laid in the trench, and the edges of the roofing material are wrapped towards the foundation (if necessary, the roofing material can be secured to the timber with a construction stapler). All that remains is to securely fasten the beams with self-tapping screws - the foundation is ready.

What material to choose for building the frame?
The frame serves as a kind of skeleton on which the entire greenhouse structure rests. Therefore, it is necessary to approach the choice of material here with special care. The most inexpensive and common option is a wooden frame. Wood is easy to process, inexpensive, but also lasts much less. An ordinary greenhouse made of untreated wood rarely lasts more than 3-4 years. However, if wooden parts are pre-treated with an antiseptic, the service life of the structure can be increased to 10 years.
A more expensive, but also more durable option would be to use a metal profile. The disadvantages of this option are more complex installation (especially when building a greenhouse on your own), as well as the metal’s susceptibility to corrosion.

On a note! The most practical option may be to use a galvanized profile. However, there are quite a few such greenhouses due to their high cost.
Let's consider the simplest option - a wooden frame for a greenhouse. To work, you will need a wooden block 50x50 or 40x40 mm, a board whose thickness is 25-30 mm and width - 100-150 mm, a 30x20 cm rail, an antiseptic, metal-plastic water pipes with a diameter of 20-25 mm, mounting angles.
Table. Step-by-step instructions for making a wooden frame for a greenhouse.
| Steps, illustrations | Description of actions |
|---|---|
| A box is built on a foundation or simply leveled area. It is made from edged boards 25-30 mm thick. The boards are tightly fitted to each other and assembled into panels of the required size using 20x30 mm pieces of slats. The height of the greenhouse depends on the number of boards and can range from 20 to 50 cm. A high box is made when constructing a warm bed inside the greenhouse. |
| The shields are aligned according to the markings and their ends are attached to the corner posts made of 50x50 mm bars using self-tapping screws or corners. The top of the racks is cut at an angle of 45 degrees. The inside of the box is carefully treated with an antiseptic, dried and the walls are covered with waterproofing material - roofing felt or analogues. In the northern regions, the walls can be additionally insulated with foam plastic or polystyrene boards. |
| Beams and posts form the end walls. The middle post is made from a 50x50 mm block, placed strictly in the center of the end walls and attached to the boards with corners and screws. Beams from 50x50 mm bars are marked in place, applied to the corner and middle posts, and cut to size. When using film as a coating, it is recommended to process the block - chamfer and sand it. |
| The beams are secured using corners. For connection to corner posts, 135-degree corners are used, and for attachment to the middle post, 45-degree corners. If you do not have the necessary corners, you can use a perforated metal strip. It is cut into pieces of 8-10 cm and secured with 6-8 screws in each node. Steel corners without a protective coating need to be painted; galvanized ones do not need to be treated. |
| Intermediate posts are also made from 50x50 mm bars. They are applied to the wall and marked in place, secured from the inside using a perforated steel strip. The distance between the posts should be 40-50 cm, their number depends on the width of the greenhouse. From the inside, to strengthen the structure, you can attach a gusset made from scraps of plywood. |
| A ridge beam made from a 50x50 mm block is laid on the middle posts and secured to the corners. The extension of the ridge beam on both sides must be at least 15 cm - a rolled film is attached to it when operating the greenhouse. The upper chamfers are removed from the timber and sanded to avoid damage to the film. |
| Rafter frames are made of metal-plastic pipes - they are more convenient to bend in the right places, and they also retain their shape. The pipe installation pitch is 0.5-0.8 m. One of the end walls can be used as a template. The pipe is applied to the corner posts and beams and the bend points are marked. Bend pipes using a spring bender. |
| The rafter frames are secured using a perforated metal strip and self-tapping screws. At the bottom of the pipe, they are secured with 2-3 clamps. At the top, at the point of attachment to the ridge, a horizontal section of pipe 5 cm long is required for a better fit to the block. One attachment point is enough. |


Features of polycarbonate installation
After completing the construction of the foundation and frame of the greenhouse, you should begin installing polycarbonate sheets.
The following tools may come in handy:
- and sealing tapes;
- marker;
- polycarbonate sheets;
- special screws with;
- drill;
- hand circular saw.
To make the greenhouse look beautiful and aesthetically pleasing, it is necessary to cut the polycarbonate sheets as evenly as possible. A hand-held circular saw is best suited for such purposes. The cut is smooth and straight.

After preparing all structural elements, it is worth additionally processing the ends of the polycarbonate. To prevent the penetration of dust and moisture, one of the ends should be carefully sealed with sealing tape. If this is not done, the polymer may darken prematurely, which will negatively affect the amount of sunlight the plants receive. It is better to glue the opposite end with perforated tape. This will help avoid the formation of condensation and will also effectively protect against dust and debris.

To secure the cut pieces of polycarbonate to the greenhouse frame, it is worth purchasing special self-tapping screws with thermal washers.

The thermal washer, on the one hand, will help not to overtighten the self-tapping screw, which is a very important point for cellular polycarbonate. An overtightened self-tapping screw will lead to creasing of the honeycomb structure of the sheet, which can cause cracks and reduce the service life of the material. On the other hand, if the self-tapping screw is loosely tightened, the contact of the polymer sheet with the frame will be loose, the sheet will vibrate and may prematurely collapse at the point of contact.

In addition, the thermal washer will help provide the necessary clearance at the mounting location. This is necessary for thermal compression or expansion of the material when the seasons change. If you neglect the use of thermal washers, in cold or hot weather the polycarbonate sheets may be subject to deformation, which will significantly worsen the appearance of the greenhouse and reduce its service life.

- If the greenhouse being built assumes an arched structure, you should remember that the polycarbonate sheet should be bent only across the direction of the stiffeners.
- You should not save on building a frame. If the frame is wooden, the wood should be chosen even and dry. If it is metal, it is better to take a galvanized profile.
- It is necessary to try to avoid the formation of cracks in the greenhouse structure. Through these cracks the structure will inevitably lose such valuable heat.
- The optimal time to build a greenhouse is early spring or late autumn. During these periods, the average air temperature is as close as possible to the ideal for working with polycarbonate (from +10 to +12 degrees Celsius).
Video - Polycarbonate greenhouse “Zucchini”, assembly
A polycarbonate greenhouse can be an excellent help for summer residents. With the help of such a greenhouse, you can get a good harvest of early vegetables, protect seedlings in the spring, and even organize a flower greenhouse in it.
Moreover, self-installation and assembly of a polycarbonate greenhouse will not take much time and does not require special knowledge and skills during assembly.

In order to assemble a greenhouse with your own hands, you will need a set of prefabricated elements consisting of an aluminum profile and the polycarbonate sheets themselves.

Preparatory work
Assembling a polycarbonate greenhouse with your own hands is not particularly difficult, but in order for it to last for a long period, it is necessary to pour a foundation for the greenhouse on which the structure will stand.

It is very important to install the base correctly. Since such a greenhouse belongs to the lightweight category, the task can be accomplished by pouring a strip cement base under the greenhouse.

When pouring the foundation, it is important that it is level, otherwise the greenhouse will not stand level and there is a risk of mechanical damage.

As for the thickness of the foundation, the base of the greenhouse must exceed the thickness of the bottom profile.
How to install a polycarbonate greenhouse
Before you begin assembling the greenhouse, you need to lay out all the parts of this structure separately, and also carefully study the drawing of the polycarbonate greenhouse.

This is necessary in order to correctly connect the structural parts. Work on the installation of the greenhouse begins with the installation of the base, which includes the lower profiles.

If we consider in more detail, first, such elements of the greenhouse structure as supports for wall surfaces and corners are laid out on a cement base.

After this, all parts are connected and firmly fixed using jumpers. Next, the support profiles are mounted vertically on the rounded corners and screwed to the horizontal bases using bolts.

When installing support profiles, it is necessary to take into account that there should be 2-3 of them on each wall surface. They should not be fixed to the lower supports very tightly, because polycarbonate sheets will later be inserted into these grooves.

Next, the upper support profiles are mounted, thereby allowing the frame to be further secured so that it becomes a reliable base for installing the roof. In addition, they are equipped with an additional function of water drainage.

Now we need to install the edges of the rafters for the roof. They do not need to be screwed very tightly to the supporting profiles. Then you need to install the ridge support.

Moreover, only after they have been carefully inserted, and the end result is a firmly fixed joint with the ridge, can the rafters be screwed to the upper horizontal supports.

Note!

After this, additional rafter supports are installed. To do this, they are twisted to a fixed ridge.

Polycarbonate sheets are additionally reinforced with thin posts. Fixation, which should occur diagonally. The posts are inserted into the empty grooves of the support. Then the special protective film must be removed from the sheets of fixed polycarbonate.

It is necessary to install a separate lifting window on the roof. To do this, the assembled window is installed in the free space between the supports.

The roof of the greenhouse is additionally fixed using staples. The brackets are installed in the gap between the rafters and the wall supports of the profile.

Then all joints located between the polycarbonate and the grooves of the supports are covered with a special sealant. And the joint areas between the two supports need to be covered with another thin support.

Note!

At this stage of work, polycarbonate is installed in the free grooves of the supports. Next, both door elements are mounted, and the door is installed in a special opening. The door is hung on hinges.
After this, the base assembled from the profile is fixed to the finished cement foundation using brackets.

With the help of a detailed description of how to make a polycarbonate greenhouse with your own hands, you can easily cope with this task. In this case, you need to pay attention to the strength of the connection of all structural parts. In addition, each joint must be smooth, because in the future this will ensure the strength and long service life of all greenhouse structures.

The final stage of the greenhouse installation is the installation of adapters on the profile gutters, fixing the tubes that will drain precipitation.

Separately installed fasteners allowing you to open the windows.
Photo of a polycarbonate greenhouse with your own hands


Note!


Polycarbonate, which has a cellular structure, has a longer service life than glass or polyethylene film. It is not afraid of impacts, can withstand strong hail and squally winds, practically does not fade in the sun and remains transparent for a long time, so it does not require annual replacement.
However, installing a polycarbonate greenhouse of standard sizes is not always justified. This is especially true for small areas where every meter of land is important. In addition, a DIY greenhouse will cost much less.
What is polycarbonate?
Polycarbonate is a lightweight and hard plastic that consists of two or more layers and has a cellular structure. Sheets up to 6 mm thick have fairly high light transmittance (up to 90%) and can easily withstand even significant temperature fluctuations. The presence of internal ribs makes them quite rigid and durable: if desired, they can be easily bent and shaped into a hemisphere.Polycarbonate sheets
Due to the cellular structure in polycarbonate sheets, an air gap is created, which is ideal heat insulator. For the construction of greenhouses, it is recommended to purchase sheets with a thickness of 6-8 mm. With an increase in their thickness, the strength characteristics naturally increase, but the light transmittance decreases. Polycarbonate that is too thin (up to 4 mm) is not worth buying: it is used mainly for mounting advertising structures and display windows. You should also pay attention to the density and weight of the material: inexpensive lightweight polycarbonate is less durable and will not last long.

Heavier sheets with a thickness of 8 mm are used for the construction of industrial and winter greenhouses. The light transmission of panels with a thickness of 10-25 mm is significantly lower, so they are not used for greenhouses, but their high strength characteristics allow them to be used for glazing buildings and even industrial structures.
Frame materials
Thin galvanized, aluminum profile or pipes from metal-plastic are easy to install and can be easily given any curved shape. However, a greenhouse with a frame made of such materials may collapse in the event of heavy wet snow or heavy winds. If you plan to build a frame from such materials, it is advisable to increase the number of ribs in it or provide a collapsible structure that will be removed for the winter.To fasten the pillars at the base of the frame, a lower frame must be provided. It is attached to the foundation using a corner or fairly strong reinforcement.

Greenhouse with aluminum profile frame
A frame made from timber thickness of at least 10-15 mm. However, this environmentally friendly material can easily rot in conditions of high humidity. In order for such a frame to last for at least 8-10 years, before installation it should be treated with an antiseptic, drying oil or copper sulfate.

Greenhouse with a frame made of wooden beams
The most durable structure will be made from metal pipes, angle or channel. The strongest are steel pipes with a square cross-section. However, they are very difficult to bend, so if they are used, it is better to use a roof with one or two slopes rather than a sloping one. In addition, a heavy frame will require the construction of a more durable strip concrete foundation or mounting on piles.

Frame with gable roof
Greenhouse shape
To prevent snow from lingering on the roof of the greenhouse, its slope must be large enough. A greenhouse is the most convenient in the form of a hemisphere or with a slightly elongated sharp apex.However, in order for the sun's rays to warm up the plants as much as possible, it is necessary to provide for the presence of flat areas on it. If the angle of the roof is too great, the likelihood of glare (that is, reflected sunlight) on it increases significantly.

Wooden frame with a hemispherical roof

Small greenhouse with galvanized metal frame

Greenhouse with sharp top
Bend metal pipes or channel You can use a grinder. Using a marker, marks are placed on them, the frequency of which depends on the bending radius. At the designated points, the grinder makes cuts measuring 1/2 the height. After bending the profile, the cuts are welded again.
Determining the location and size of the future greenhouse
To avoid mistakes, before purchasing material, you need to choose a location for the future greenhouse and determine its dimensions. For clarity can you draw a diagram, in which you must mark all the frame posts.The roof drawing is made on a separate sheet. In order for the plants to receive maximum sunlight throughout the day, the greenhouse should be located from east to west.
Important! To remove the accumulation of excess moisture in the greenhouse, be sure to provide several windows for ventilation.

Greenhouse location
To keep the amount of waste to a minimum, the size of the greenhouse should be a multiple of the length and height of the polycarbonate sheet. The most convenient for work are standard panels size 2.1x6 m. When bending a 6-meter panel, the height of the greenhouse will be 1.9 m, the width will be 3.8 m. The length of a greenhouse made up of 3 sheets will be about 6 m, while the number of their joints will be minimal. Its height can be increased using a wooden base.
With a width of 2.5 m, the greenhouse will fit two standard 0.8 m wide beds and leave enough space for passage. In a greenhouse with a height of more than 2 m, shelf beds can also be placed.
Does a greenhouse need a foundation?
To ensure maximum stability and rigidity, such a structure must be attached to a fixed base. For light structures it is possible to use point foundation in the form of piles from any sufficiently durable material: timber, brick, blocks of foam or aerated concrete, etc.Inexpensive timber foundation able to support a structure weighing 70-120 kg. To protect the soil from erosion, as well as to protect plants from fluctuations in night temperatures, it is better to bury it slightly into the ground. To lay it, a small trench is prepared on the bayonet of a shovel, onto which roofing material or film is spread. It is not worthwhile to completely wrap it in film or roofing felt: condensation will very quickly collect in such a “packaging”, and the timber will very quickly become unusable. To prevent the supporting pillars from being washed away by water, a “cushion” of sand and crushed stone is placed under them.

Timber foundation
The best option for a greenhouse foundation is old sleepers, from which the creosote has already completely evaporated. Such material can last 30-40 years even in conditions of high humidity. The sleepers are laid in a small trench so that their upper edges are flush with the ground and are fastened with construction brackets, and vertically connected with reinforcement or crutches. Piles for such a foundation can be made of concrete, blocks or bricks.

Sleeper foundation
When constructing heavy metal structures, pile supports will be required. Concrete, although it conducts heat poorly, takes a very long time to warm up after the winter cold, so it is better to build such a foundation only for heated winter greenhouses.
Advice. To prevent the soil from spilling out, the lower inner side of the greenhouse is lined with wood.
Sheet cutting
Cutting polycarbonate with a thickness of 4-6 mm is done with a regular construction knife. To prevent dust and debris from entering the polycarbonate cells, the upper part of the cut is completely covered with tape or profile, and small holes are left in the lower part of the part to drain condensate.Basic rules for working with polycarbonate:
to ensure the stability of the structure, the stiffeners are located only vertically; to determine their direction, you should bend the sheet;
so that the material does not sag between the racks, they are placed in increments of at least 1-1.2 m; the edges of the polycarbonate are fixed to the frame posts;
high-quality polycarbonate has two protective films: blue on the side that will face the sun, and gray on the back;
It is difficult to visually identify a layer with ultraviolet protection, so you should pay attention to the markings;
such a film makes the sheets more durable and less brittle, so it can only be removed after installation; if it is not removed in time, it can “cook” under the influence of sunlight, the sheets will become cloudy, and their light transmittance will decrease.
Important! The sheets are positioned only with the ultraviolet protection facing up. Otherwise, it will have no effect.
Polycarbonate fastening
After cutting, the workpieces are attached to the frame using self-tapping screws. To prevent polycarbonate from collapsing and blocking cold “bridges” Thermal washers are mounted together with self-tapping screws, equipped with a rubber seal and a heat-insulating ring.The sheets are joined with an overlap of 6-10 cm or connected using a special profile. To prevent them from deforming under the influence of thermal expansion, small gaps are left between the polycarbonate panels and in the corners of the joints.

H-shaped connection profile for polycarbonate

Fastening with connecting profile
The holes are located at a distance of 40 mm from the edge of the sheet. Taking into account the thermal expansion of polycarbonate, their diameter should be slightly larger (by 2-3 mm) than the leg of the sealing thermal washer.

Polycarbonate fastening
To strengthen the structure, the joints should be located on the supporting beams of the frame. In places where polycarbonate sheets sag after rain, moisture will accumulate, and under its weight the structure may be damaged, so their tension should be maximum.
Important! If the screws are over-tightened, deformation and premature collapse of the roof may occur.

Cutting polycarbonate
End and connecting profiles are able to reliably protect the cellular polymer from the penetration of dirt and dust. They are attached using thermal washers with a pitch of about 30 cm. When laying overlapping, the sheets are additionally secured with aluminum self-adhesive tape. Inside the greenhouse, such connections are additionally reinforced with perforated tape with holes that will ensure the drainage of condensate.

Perforated tape
Important! During installation, moisture should not be allowed to penetrate into the polycarbonate cells. When it appears, blow them out with compressed air.
An increasing number of people are installing greenhouses on their garden plots. The benefits of using these structures are obvious.
You can grow seedlings and then transfer them to the ground, which allows you to get early vegetables from your plot, or you can generally grow vegetables and herbs all year round, regardless of weather conditions.
Commercially available greenhouses do not always meet the requirements of amateur gardeners. Therefore, one of the best options for installing a greenhouse on your own site is to build this structure on your own.
Material for greenhouse construction
Before starting to build a greenhouse, it is necessary to resolve the issue of the material from which it will be constructed. Considering modern materials for constructing greenhouses, I would especially like to highlight sheets of cellular polycarbonate.
What is remarkable about this material?
- Durability. Polycarbonate sheets can withstand loads well and resist mechanical stress quite effectively.
- The light transmission of this material is 90%. This is more than enough for a greenhouse.
- The arrangement of cellular polycarbonate sheets forms a kind of air layer, which is a good heat insulator.
- Internal ribs provide sufficient rigidity of the structure and the sheet can be bent quite easily.
- The lightness of this material allows you to do without constructing a powerful foundation and a heavy stiffening frame.
As you can see, there are plenty of advantages.
Size and shape - the solution to the problem
Let's move on to the main question - how to build a polycarbonate greenhouse with your own hands?
You can’t do this without a clear plan and drawings. But first it is necessary to resolve the issue of the size and shape of the future greenhouse.
As for the size, this question is directly related to your wishes, capabilities and size of the site. Therefore, we will not focus our attention on it; it is up to you to decide.
But as for the shape of the future structure, this issue needs to be considered in more detail.
- Looking through information about the construction of a polycarbonate greenhouse with your own hands, videos and photographs of various structures, you can see that they mainly show greenhouses in the form of arches.
- As many have noticed, the greenhouses offered for sale have an arched shape.
- More interested readers have noticed that in the recommendations on how to build a polycarbonate greenhouse with your own hands, two specific forms stand out: an arched structure and one with straight walls.

Build speed is not the main thing

When describing the first and second designs, as a rule, the first option is praised much more than the second.
The merit of the first, arched one, is mainly given to:
- Ease of construction. I folded the sheet and secured it.
- Lack of a large number of strength frame elements.
- Good resistance of the structure to snow loads.
Everything said is right and true. But if you pay attention to the described advantages of this structure, you will not find a word about the functional capabilities of this structure.
So stop. We have a question. Are we taking part in a competition to see how fast we can assemble greenhouses?
Or are we building a polycarbonate greenhouse that should perform its functions 100%?
You will not get an answer to this question, for one simple reason: although the arched form of a greenhouse is assembled much faster and with a minimal frame of rigidity it can withstand external loads well, but in terms of its functional qualities, namely providing plants with sufficient heat and light, it is much inferior to a similar greenhouse with straight walls.
Irregular shape
Given the same size, you will spend much more money heating an arched greenhouse than heating a greenhouse with smooth walls.
It's all about the light transmittance of bent and straight polycarbonate sheets. In this article we will not consider this issue in depth, especially since on the pages of our resource in one of the articles we described in detail the effect of reflection of light photons by a bent surface.
In other words, today we will build a greenhouse not for speed of construction, but to obtain a functional greenhouse in which we will grow vegetables and herbs at minimal cost.
When choosing a shape, you need to take into account one feature of polycarbonate, namely, that in a curved form it reflects more sunlight than in a straight one. Therefore, a greenhouse with straight walls will be warmer, which will contribute to better plant development, especially if additional heating is not provided.
DIY greenhouse construction
Where to begin?
Material size matters
First, we will need, to construct a polycarbonate greenhouse with our own hands, drawings and all the necessary materials and tools.
- To make a drawing of a greenhouse, you first need to decide on its size.
- When determining the size, keep in mind that a standard polycarbonate sheet has a size of 2100x6000 mm.
- When drawing up a drawing, it is important to take this fact into account; this way you will avoid unnecessary trimming.
Given this size, what can you do?
- You can get 4 sheets with a size of 2100X1500 mm.
- As a result, you can build a greenhouse with a straight wall size of 4200x1500 mm.
- Or 2100X1500, there are many options.
- The width of the structure will directly depend on the slope of the roof slope, provided that one cut sheet is used to cover it.
As for the height.
- In this case it is 1500mm.
- If you raise the foundation by 200 mm, the height of the straight wall will already be 1700 mm, this does not take into account the height to the ridge.
Interior layout is a top priority
We did not try to offer you a specific size for arranging a greenhouse.
We simply examined the general principle of the device with the production, during installation, of a minimum amount of polycarbonate sheet waste.
We think the principle is clear.
- When designing a polycarbonate greenhouse, the layout of the internal plant layout is also important.
- Therefore, first distribute your crops inside, and only after that can you complete the drawing of the entire structure.
- When setting up a greenhouse, take care of its orientation relative to the position of the sun in your region.
- The more light, and therefore heat, you receive from the sun, the lower the cost of maintaining the desired temperature inside the greenhouse, and this also has a positive effect on plant growth and maturation.
Important - when working with polycarbonate sheets, pay attention to the position of the stiffeners. A polycarbonate sheet is relatively easy to bend in one direction and completely impossible in the other. Knowing this will allow you to properly arrange the supporting frame of the greenhouse.
Choice of frame material
All the main issues have been resolved, it’s time for the material.
- It is best to use a metal profile for the frame.
- Using wooden beams is also possible, but it will require additional treatment against dampness and will not last as long as a metal profile.
- Sometimes a metal corner and pipes are used for the frame.
- Working with this material requires the use of welding.
- Not everyone can do welding work, and not every household has a welding machine, but assembling a greenhouse frame from this material using fasteners is quite a long and tedious task.
The choice is made
Therefore, we suggest that you use a metal profile, which is usually used for installing gypsum board sheets.
- The advantage of this profile is lightness and durability.
- Working with him is easy and simple.
Many may wonder whether a greenhouse made from this profile can withstand a large snow load?
We are not saying that this greenhouse can withstand a layer of snow over 500 mm thick, but if you are going to grow plants all year round, this assumes that you will clear the roof of snow. Otherwise, your plants will not see the sun.
Our drawings - your dimensions
Understanding the complexity of developing this design without the necessary experience, we resolved this issue as follows.
- Below is a do-it-yourself polycarbonate greenhouse, drawings without dimensions.
- All you have to do is set the dimensions you require and get to work.


Profile for frame - size and shape
- To assemble this structure, a section profile of 50X40 mm is used.
- Therefore, it is necessary to purchase two profiles of a rack-mount PS and a guide PN.
- The guide profile is slightly wider than the rack profile.
- The connection of these two profiles will be tight.
- All horizontal frame elements must be made using the PN profile.
Durability at its best
There is no need to doubt the strength of this design.
As can be seen from the drawing, special attention is paid to the stiffeners.
- Please note that this design contains a large number of triangular elements.
- This tells specialists that after assembly this structure will have sufficient strength and rigidity.
Fasteners - the choice is yours
We figured out the design and material for the frame, now it’s time to attach these elements.
There are two ways:
- Self-tapping screws
- Riveting
Both methods are good, but the use of self-tapping screws is preferable when you plan to further remodel your structure or dismantle it to move it to another location.
This question is up to you to decide for yourself. As for the sizes of screws, self-tapping screws of size 4.2X16 with a flat head are available for sale. They are best suited for this type of work.
Tool for the job
To work you will need the following tool:
- Electric screwdriver
- Straight cutting scissors for metal
- Roulette
- Level
Foundation - we solve the problem
We will not dwell in detail on the foundation for this greenhouse. Articles on foundation construction are available on the pages of our resource (see Foundation for a polycarbonate greenhouse).
Also, we will not consider in detail the question of how to install a polycarbonate greenhouse on a foundation with your own hands.
Our task today is to assemble the greenhouse.
Assembling the greenhouse frame
This structure must be assembled as follows:
- Cut the profile to the required length for one frame
- Using self-tapping screws or rivets, assemble the first frame
- For those who have encountered gypsum plasterboard, this will not be difficult for them. In any case, if your hands are in the right place, assembling such a frame will not be a big problem.

- Carefully measure the resulting frame.
- After making sure that everything is correct, cut the entire purchased profile to the required size for all other parts.
- Assemble all the frame parts.

- Now you can connect the individual assembled frame elements into a single frame.

The do-it-yourself polycarbonate frame for a greenhouse is ready.
GCR profile service life
A small digression. Some people believe that the metal gypsum board profile will not last long.
This is motivated by the fact that when cutting and drilling, the outer protective coating is damaged, into which moisture gets in, and corrosion can occur in these places, contributing to the destruction of the profile.
Our certificate is a complete misconception. The metal profile is specially designed to be cut and drilled. This does not affect its durability in any way. If polycarbonate sheets are designed to last for 15 years, a greenhouse frame made from a gypsum plasterboard profile will last no less.
We fasten polycarbonate sheets
Installing a polycarbonate greenhouse with your own hands involves installing polycarbonate sheets on a frame. Let's get to it.
There are many ways to attach polycarbonate sheets.
Correct fastening - excellent results
Regarding the fastening of polycarbonate sheets, opinions are also divided.
All fears and assumptions are completely in vain; the whole point is not in the polycarbonate panels themselves, but in the method of fastening it and sealing the joints.
The first method of fastening is lining
In the first case, polycarbonate sheets are attached to the greenhouse frame using overlays.
- Strips of rubber are laid on the frame of the greenhouse in the areas where the polycarbonate sheets adhere.
- Next, polycarbonate sheets are installed on the rubber pads.
- Metal plates are installed on top of the joint and secured with self-tapping screws.
- The self-tapping screw passes between two adjacent polycarbonate panels through a rubber lining.
- For additional tightness of the connection, the seams can be treated with sealant.
Second fastening method – H-profile
The second method involves the use of an H-shaped profile.
The H-shaped profile can be detachable or non-detachable.

How to secure a polycarbonate sheet using this profile is clearly visible in the figure. The only thing I would like to add is, do not be lazy for better tightness and in this case use rubber linings.

Subtleties of fastening and installation devices
Our advice is that if you need to attach a polycarbonate sheet with a screw passing through it, use thermal washers in this case. The thermal washer will eliminate the cold bridge between the self-tapping screw and the polycarbonate sheet and additionally seals the connection. The hole in the polycarbonate sheet should be 2 - 3 mm larger than the diameter of the self-tapping screw, this achieves compensation for the expansion of the polycarbonate sheet due to climatic influences.
Our information - thermal washers are made of polycarbonate, their service life is 15 years.
Decide the step of fastening the screws yourself; of course, you shouldn’t overdo it and screw on a bunch of screws, but you shouldn’t be greedy either, everything should be in moderation. Also on our resource you can learn in detail about the assembly of such greenhouses as Orange, 2dum and Perchina.
Installing a polycarbonate greenhouse with your own hands on a foundation is best done while assembling the frame, but sometimes the frame is assembled in one place and then transferred to a prepared place. Both methods do not contradict the assembly, with the only exception: by immediately mounting the frame on the foundation, you can cope with this task alone.
In the second case, you will definitely need helpers.
Advantages of a homemade greenhouse over a finished structure
Many materials are used to create a greenhouse, but some of them are too expensive, while others require skills and special tools to work with them:
- A universal material that can be worked without difficulty is cellular polycarbonate.
- Thus, anyone can make a polycarbonate greenhouse with their own hands.
Note. An important advantage in favor of self-production is the opportunity to save money, since purchasing all materials will be cheaper than a ready-made greenhouse from a store.
- Often the area for its installation has a non-standard size, and it is impossible to find a finished product that meets such parameters.
Therefore, making a greenhouse with your own hands from polycarbonate is more preferable, because you can take into account all the requirements and bring them to life.
Good luck to you and a rich harvest!


")


