Paving slabs are an integral element of landscape design. It is equally well suited for urban and suburban areas, and serves as an excellent solution for decorating a site, giving it a well-groomed, neat look. The only drawback is the price, which only grows every year. Want to save money? Then find out how to make a vibrating table for paving slabs with your own hands.
Vibrating table - what is it and what are its advantages?
Homemade vibration table
Vibrating tables are devices used to make tiles. One of the important advantages is the ability to carry out production yourself, which reduces the cost of the final product several times. Let's also not ignore other positive features:
- You can make a vibration table from scrap materials in just a day;
- no professional skills of a carpenter, welder, etc. are required;
- the table can last for years without breakdowns or additional maintenance.
A vibrating table is used in conjunction with a concrete mixer and is intended to compact the concrete mixture, from which the tiles are subsequently cast.
Please note: without compaction, the material turns out to be very loose and airy. Such tiles will be neither strong nor durable. It is exposed to temperature, humidity, and mechanical damage.
Using a vibrating table, you get a quality product without making any effort, without wasting a lot of time and, most importantly, without overpaying.
Device
The design is quite simple to operate and create. Of course, it differs depending on the tasks set and the desired result, but in general there is nothing complicated here.
The basis of the vibrating table is the motor and the eccentric. During operation, these elements form a vibrating unit. Under the influence of a vibration mechanism, a movable plate is activated, where the mold with the solution is located. Constant vibration compacts the solution to the desired level, after which new forms can be installed. It's convenient and fast. And most importantly, the quality of the finished tiles will be no worse (and even better) than in hardware stores.
What is needed for production. Drawings, dimensions
Main design elements
In order to make a vibration table with your own hands, you need to:
- 4 stands (legs). You can choose any rolled metal: pipes, angles, etc. Select the length to suit you so that you can work without bending over. Preferably at least 1 m. There is no big difference in performance properties between pipes and angles. We recommend choosing stainless steel.
- steel sheet (from 3 mm in thickness). It must be perfectly smooth and free from defects, damage, holes, etc.
- electric motor from 250 W and above, depending on the volume of work to be done.
- springs (hardened steel).
You will also need tools. You can limit yourself to a drill, grinder and welding machine.
The key characteristic of the table is its dimensions. If you plan to produce a large number of tiles, it is better to initially make a larger table. Accordingly, the engine power must be sufficient to create the necessary vibration. We recommend choosing motors with a power of 250 W and higher. As for sizes, in most cases 180x80 cm is recommended.
Tip: a washing machine motor can be a good solution. It will work for several years under average loads. The weak points of the engine are the bearings and bushings. If you first replace them with better ones, the table will last longer.
If you want to make a higher quality vibration table, it is better to buy a special vibrator. For example, IV99. Yes, it costs 6–7 thousand rubles, but it is practically eternal. A great addition would be a speed controller.
How to make a device with your own hands
We suggest using the following scheme:
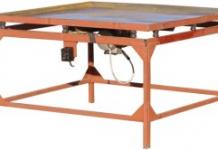
Typical diagram of a vibrating table for paving slabs
- The base to which the tabletop will be connected is made from a corner or channel. These elements must be strong and firmly connected to each other. Especially if you plan to create a large table. Concrete is a heavy material, and the structure must be able to withstand it well. Take measurements, cut the required length of material, weld a rectangle.
- The legs are attached to the inner corners of the base using a welding machine, and plates are welded to their lower part, after which they are concreted. If you plan to move the table during use, skip this step. But then the stability will be low.
- It is better to take the legs higher and then “shorten” them with a grinder. Select the height to suit you so that it is convenient to work. The optimal height is at waist level.
- Place the tabletop on the base. It must be perfectly smooth. Otherwise, the mixture will overflow over the edges. Use a level. If it is not available, you can download the application for your mobile phone. But remember that readings may not be accurate.
- At the corners and in the middle, install and weld springs - at least 6. You don't have to look for special ones. Take moped springs and cut them in half.
- Place a steel sheet on the springs and bolt the engine to it. Check the drawing.
- Place the tile mold on the sheet. You can also make it yourself or buy it in a specialized store in your city.
That's all. During operation, the motor will act on the sheet, and the springs will provide smooth vibration. In this case, the base of the structure (if the legs are concreted) will remain motionless.
The main thing is to first make sure that the surface is completely horizontal. Otherwise, the solution may splash out. Therefore, we recommend making a stationary table rather than a portable one.
As you can see, there are no difficulties in creating a vibrating table for paving slabs. A minimum amount of materials, tools, skills - and you can make such a table yourself in just a day. Calculate how much money you will save, and be sure that the investment and time spent on the construction of the structure are definitely worth it. Even if you buy a relatively expensive vibrator.
Paving slabs or paving stones, which recently appeared on the building materials market, are rapidly gaining more and more popularity. After all, it is ideal for finishing artificial ponds, floors in garages and parking spaces. Areas lined with paving slabs give the site a well-groomed appearance and remain dry after any rainfall.
The concrete base for laying paving slabs is strong, reliable and durable.
Perhaps the only drawback of this coating is its high price. On average, the cost of selling 1 square meter is about 400 rubles. But there is still a way to significantly reduce the cost of this beautiful and modern product - make it at home with your own hands. This article provides detailed instructions for those who decide to make a vibrating table for the production of paving slabs.
What is a vibrating table?

The vibrating table for the production of paving slabs can be of various sizes and configurations.
In order to do it yourself, in addition to various forms and mixtures, you will need a simple design called a vibrating table. It can be used to make concrete (mostly) mortar into any shape.
The vibrating table diagram is simple and understandable, but when making it you need to strictly follow the instructions and carefully look at the drawings.
Necessary materials for work:
- 4 metal pipes and a corner (channel);
- metal sheet (tabletop);
- vibration motor (any 220 V motor with acceptable power);
- steel springs.
Necessary tools for work:
- welding machine;
- bolts (4 pieces, to secure the engine);
- drill;
- grinder or electric scissors for adjusting the size of metal materials.
Return to contents
Design and principle of operation
A homemade vibrating table consists of a top plate movably mounted on a metal frame and a motor that drives the top work plate. When the slab vibrates, all air is removed from the molds filled with the mixture and placed on the slab, making the paving slabs durable and of high quality. When selecting materials to make a vibrating table yourself, it is very important to find a perfectly smooth tabletop and a motor with uniform vibration. Otherwise, there is a risk of getting uneven products that will be difficult to lay.
Return to contents
Vibrating table manufacturing process

In almost all large cities of Russia you can find places where vibropressed paving slabs, made back in the 70s, have an excellent appearance.
As you can see, the vibrating table drawing does not seem very complicated. you can make it yourself by simply following our instructions. First of all, pay attention to the base of the table. It is made from a metal corner (a “fiftieth” is enough) or a channel. The ideal dimensions for the base are 700 x 700 mm, but they can be changed depending on the needs of the master. In addition, it must be taken into account that the larger the homemade table for making paving slabs, the more powerful the engine should be.
Metal pipes welded to the base are used as table legs. In order for the table to be as stable as possible, it is necessary to weld plates onto the legs or dig them into the ground, securing them with concrete mortar. In the first case, your vibrating table will be portable, in the second – “stationary”. When choosing the height of the table, only two requirements should be taken into account: the engine should not touch the floor and the master should be comfortable working behind it. Take careful measurements so that the tabletop is level, as shown in the drawing, otherwise the mixture will spill out of the molds during production!

The next step is making a movable tabletop. At the corners of the structure and in the center of the base (if you are making a large vibrating table, as the drawing shows), you need to weld 6 steel springs. You can buy springs at the automobile market or a dismantling shop; springs from mopeds, cut into two parts, are best suited for these purposes.
Then a metal sheet with a width of at least 8 mm is placed on the table springs, and the motor is bolted to the sheet from below. The drawing shows in detail where it is best to place it.
A form is placed on top of the sheet into which the solution is poured. You can either buy the form or make it yourself. If you need small tiles, then you can place several products on one table at once.
Making a vibration table with your own hands is not as difficult as it might seem at first glance. You just need to stock up on everything you need for this and follow certain instructions. I will introduce you to them further.
Some general information
What exactly is a forming vibrating table and why is it needed on the farm? If you were looking for a similar article, then you already know the answers to these questions.
But for those who stumbled upon it by chance, I will explain:
- The equipment in question is a table whose top is secured using a system of springs or hangers. A vibration motor is installed at the bottom of the platform, which causes it to vibrate when turned on;

- Concrete is poured into special forms, which in turn are installed on the countertop. Transmitted vibrations remove air bubbles from the solution, thereby increasing its strength qualities.
Using this method at home you can make:
- Paving slabs;

- Eurofence sections;

- Window sills;
- Monuments;
- Foam blocks.

Such equipment can be purchased in a store. But its price is quite high, and for one-time use it is unprofitable to make such an expensive purchase.

But making a vibrating table for paving slabs with your own hands will not be very expensive. So, if you set out to economically, but at the same time beautifully and practically, improve your suburban area, then further information will come in very handy.
Process description
Any business should always begin with the preparation of the necessary materials and tools. Assembling a vibrating table with your own hands is no exception in this matter, so let’s get started:
Stage No. 1: prepare everything you need
You will need a certain set of materials:

And you can’t do without tools either:

In addition to the above, of course, you also need drawings of the vibrating table, which can be found in abundance on the Internet. It is according to the scheme you like best that further assembly work will be carried out.

Stage No. 2: assembling the base frame
Now let's move on to making the vibrating table.
Let's start by assembling the base frame:
- Cutting a corner using a grinder into four parts in accordance with the data on the drawing diagram. Most often these are 700 mm sections, but depending on the volume of your planned work, you can choose any other sizes. That is, the more you need to produce, for example, the larger the machine should be;

Be sure to wear safety glasses before cutting, otherwise you risk getting scale in your eyes.

- The resulting we assemble the fragments into a square or rectangle and weld them to each other welding machine.

If you do not have a welding machine or do not know how to use it, then as an alternative, you can connect the sections with bolts, having previously drilled them in the right places. This design will be collapsible, but less rigid.
Stage No. 3: installation of legs
How to make legs?
To do this we proceed as follows:
- We take profile pipes or a pipe, depending on how long it is, and cut it again using a grinder into four absolutely equal parts. It is very important that all supports have the same height, since the slightest slope to one side will lead to the mixture pouring out of the mold during operation of the vibrating table.
In addition, you also need to pay attention to:
- The vibration motor, which will be attached to the tabletop, did not touch the ground;
- The machine operator did not bend over during its operation, but could perform all operations in the most comfortable position for him;
- The resulting We weld the sections to the corners of the previously made frame;
- Now it is necessary to solve the issue of stabilizing the structure.
Here you can go two ways:
- Dig small holes under the legs, install them there and concrete them. In this case, ideal stability is guaranteed, but the machine will also be stationary. If you plan to carry out work exclusively on your suburban area, then this is the best option;

- Weld round or rectangular pieces of metal to the edges of the supports, increasing their area of contact with the ground. In this case, it would be a good idea to additionally connect the legs below with crossbars from the remnants of the corner. The design will not be as fixed as in the previous version, but it will have mobility;

Stage No. 4: assembling the tabletop
This is the most critical stage at which you must adhere to the following algorithm of actions:
- Preparing the springs. I deliberately did not include them in the materials, since I wanted to separately give additional recommendations on them. After all, most owners will be puzzled by the question of where to get them. So, the best option is to go to the car market and buy moped springs or springs from car shock absorbers;

- Cut them in half and attach them to each corner of the base frame. If it looks like an elongated rectangle, then one spring must also be fixed in the middle of the large sides.
The plan is carried out in one of three ways:
- Welded at both ends to the base and to the tabletop;
- They are welded at one end to the base, and special glasses are installed on the tabletop, into which they are inserted a third of their length;
- They are welded at one end to the tabletop, and special glasses are installed on the base, into which they are inserted a third of their length;

Instead of glasses, you can weld pins. In this case, the springs will not be inserted, but put on them, which is also suitable for the normal operation of the vibrating table.

- We apply the vibration motor to the tabletop in the place corresponding to the drawing, and make marks through the mounting grooves. At the obtained points we drill holes for the bolts, with the help of which we fasten the engine. To prevent the bolts from protruding from the outside, you can first weld a small metal box at the place where the vibrator is fixed;

For the countertop, it is better to choose a steel sheet with sides. This will prevent the molds from slipping off the surface in the future.

- We weld or place the tabletop on top of the base with springs and we get a homemade universal vibrating table, ready for use.

Conclusion
In the article you learned what a vibrating table is for and how to make it yourself at home. The video in this article contains some additional material related to this topic. Please ask any questions you may have as you read in the comments.

Let's understand the design of a vibrating table and consider in detail the procedure for manufacturing this unit at home, which is necessary for forming concrete products.
How does a vibrating table work?
The device consists of three main parts:
- Rigid metal frame.
- Fixed on tabletop shock absorbers.
- Electromechanical vibrator.
Forms with solution are placed on the table cover, which begins to vibrate after the engine starts. After a short period of time, the mixture is compacted and freed from air, and the concrete components are evenly distributed throughout the entire volume.
Tools and materials
To make the device you will need:
- Welding inverter;
- Drill;
- Bulgarian;
- Locksmith's tool.
Materials used:
- Steel corner 50x50x4 - about 6 m;
- Rectangular pipe 20x40 – 6 m;
- Sheet metal 120x75, thickness 4–6 mm;
- Springs or rubber cushions – 4 pcs.;
- Small pieces of pipes with a diameter smaller than the internal size of the springs;
- Bolts and nuts.
Construction of the frame
The main requirement for the supporting part of the machine is strength, and there can be any way of implementation. A simple process for making a reliable base looks like this:
- Cut four table legs 75–80 cm long from a corner.
- Two blanks of 60 cm and two of 1 m are prepared from the profile pipe.
- the upper frame is made from pieces of the profile and the legs are welded.
- The lower crossbars are cut to size and connected to the table posts by welding.
- At the corners of the base, “cups” are secured for springs made from pipe scraps.


Making your own lid
The tabletop of the machine will lie on spring cushions and be supported by the sides.
Work order:
- The frame is constructed similarly to the stationary surface of the table, strengthening the structure with additional stiffening ribs.
- Arrange a platform for placing the engine based on its dimensions.
- Retaining stops - steel pipe rings - are welded at the corners.
- Sheet metal is welded onto the ribs.
Making a vibrator
The power unit is selected depending on the size of the movable tabletop - approximately 1500 W of electric motor power is needed per 1 m² of surface. Eccentrics are welded onto the motor shaft - bolts with a diameter of 12–14 mm with screw-on nuts, which subsequently regulate the vibration amplitude by moving it along the thread. An easier way is to purchase a factory-made platform-type vibration motor. Its design already provides for the possibility of changing the force of oscillatory movements.
Vibrating table assembly
The engine is screwed into place, secured with locknuts and the cover is installed on the springs. It is advisable to weld plates for anchors to the table legs. Next, assemble an electrical circuit, connecting the power cable through circuit breakers and arranging the grounding of the unit. The finished vibrating table is tested for performance, the vibration amplitude is adjusted and the stability of the structure as a whole is checked.
The described device is suitable for private households, and its engine can be used on a homemade machine in the process of concrete work.
Having a country house, cottage or dacha with a garden plot, it may be necessary to equip paths, gazebos, and a courtyard with paving slabs. If you have minimal construction skills, desire and interest, you can make tiles yourself. As a result, you can get products that have an original design, and also save significant money.
General characteristics of the vibrating table
To make paving slabs at home, you will need raw materials - cement, sand, water, dyes. As well as a device for forming tiles - a vibrating table. In construction stores you can purchase a ready-made mechanism; it will cost between 20 and 70 thousand rubles. Prices vary depending on engine power, configuration and manufacturer.
 Homemade vibration table with springs
 But if the goal of making paving slabs yourself is to save money and small production volumes are planned, then there is no point in purchasing a vibration mechanism; you can easily make it yourself.
A homemade vibrating table is a metal structure visually similar to a simple table. Its upper part is attached to the frame with springs or cups, creating a gap. Thanks to the motor fixed in the lower part, the table is subjected to wave vibrations - vibrations, due to this the cement mass placed in the molds is evenly distributed and air is removed from it.
In principle, when making paving slabs you can do without a table, but in this case the quality of the finished products will be low and the slabs will not last long. Due to the air inside the mass, the finished slab will be fragile and short-lived.
Necessary materials
To make your own vibrating table you will need simple materials:

- metal corner or pipes;
- Metal sheet;
- springs;
- bolts;
- electric motor;
Metal pipes or angles are necessary to form a frame - a strong frame, support. The metal sheet will serve as a tabletop, so you should choose a fairly durable material with a thickness of at least 8 mm. Springs are necessary to ensure greater vibration amplitude; they can be purchased on the aftermarket.
Springs from mopeds are best suited; you will need two of them; they are large enough and you can cut each one in half.

During the installation of the vibrating table, the following tools will be needed:
- Bulgarian;
- drill;
- welding machine
Using a grinder, pipes or angles are cut in accordance with previously prepared drawings.
A drill will be needed to drill holes when installing the electric motor. And with the help of a welding machine, the process of assembling all the table parts into a monolithic structure is carried out.
Homemade vibrating table for paving slabs
How to choose an engine

In order to make a vibrating table for paving slabs with your own hands, you will need a motor. It can be the simplest, taken, for example, from a washing machine.
Power in this case is not the main indicator; it will be better if it is small. The main characteristic should be an eccentric - a device that provides vibration. If you don’t have a household motor and the question arises about purchasing it, it is better to buy a motor with an eccentric, for example, model IV-98 or IV-99. They are specially designed for installation on vibrating tables. You can buy such engines either new or used; they will cost 5–7 thousand rubles.
If you modify a household motor yourself, you will need a bushing with a screw and a bolt that is attached to the threaded end. When fastening the bolt, it is necessary to ensure its mobility in the transverse direction.
Vibrating table assembly

Before starting installation of the vibrating table, it is necessary to prepare drawings. Consider the height and length of the future table. In order for it to be convenient to use, the height should not exceed 90 cm, length 1800 cm, width 700 - 1800 cm.
It is clear that the larger the area of the tabletop, the more forms can be placed on it, but the larger the table, the more powerful the motor will be required. Another important point is that you need to decide what type of table it will be - portable or stationary.
It is better to make a portable one of small dimensions, since it will still be necessary to ensure its stability. If you are planning a stationary mechanism, you can safely expand the area, and for stability, dig it into the ground or concrete it.
Once the dimensions are determined, you can begin preparing the parts. It is necessary to cut out four legs from the metal corners using a grinder; their length will be in accordance with the drawings, 70 mm. You will also need two segments equal to the length of the table and two segments equal to the width of the table. The bed will be formed from them. The four legs and frame elements are welded together using a welding machine.

The next step in the manufacturing process of the vibrating table is the installation of the table top. The top of the cover should be made of a sheet of durable steel, and the bottom should have mounts for the motor. The lid must be movable, so it is attached to the frame using springs or cups.
 Engine position at an angle of 45 degrees
 It is enough to place four springs in the corners of the table; if the surface is large, you will need two more springs placed in the center. If there is no spring, you can use glasses; they can be made from pipe scraps. Glasses or springs are welded on one side to the tabletop, and on the other to the frame.
Next, you need to install an electric motor. There are a few things to keep in mind when performing this step. If you place the motor horizontally, the vibration will go in the vertical direction; if you place it straight, you get horizontal waves.
Therefore, the most optimal location of the engine is considered to be at an angle of 45°. in this case, the vibration will propagate in both planes. It is necessary to mount the engine securely, since there is a high probability of its displacement during operation under the influence of vibration.
When preparing drawings and assembling a vibrating table, it is necessary to compare all the details of the future load.
The working surface must support the weight of the molds with the finished cement mass. And the engine power must correspond to the total weight of the table. All elements must be securely welded, the frame must be rigid and durable.
To start a successful activity in the production of paving slabs, you will need more forms. They can be made from various materials - metal, plastic, wood. The forms can be purchased ready-made, or you can make them yourself, using your imagination to obtain an original design.
Video: Homemade vibrating table paving slabs

