Reading time ≈ 4 minutes
Making the facade of the house is an important step. Since ancient times, people have tried to make the face of the house unique, covering the space near the door and windows with intricate carvings. Our ancestors attached sacred significance to each turn they made and hoped that these golden laces would protect the dwelling from the penetration of dark forces. The fashion for antiquity leads to the fact that today ancient traditions have become again in demand. In this article, we will talk about how do-it-yourself window trims are made.
Project
Any business should start with a project. First, the front part of the building is drawn, taking into account all the details that are actually available. Then you need to make a drawing of carved platbands on the windows. You can also use the drawings and diagrams presented on the site.


Using a visualization program, if any, you can make a 3D project at home. He will show everything in a complex, will allow you to evaluate how appropriate your favorite wooden platbands are for windows.

When the design documentation is ready, they prepare a set of tools that will be useful for the upcoming work.
- screwdriver;
- feather drill for wood (12 mm);
- a jigsaw, preferably with a soft start, without it it will be difficult to cut complex elements;
- Sander.
You should take care of the material for future platbands. Traditionally, high quality pine boards are taken, on which there are a minimum number of knots. If the knots are on the surface of the boards, then it is necessary to carry out cuts in such a way as to prevent the knot from falling into place.
Sawing platbands

The manufacture of platbands for windows begins with cuts that need to be made from the inside. First, holes are drilled along the contour of the pattern, where it is supposed to make openwork patterns in the future. The video shows that when working, the drill must be held perpendicular to the surface of the board.


When the through patterns are ready, cut out the outer contour.

The tool must be led from one end to the other, the direction does not matter. Pre-cuts are made in the middle part.

The result is a finished piece for window decoration. Next, they make a similar one in mirror image to use it on the opposite side.
Surface grinding

To give the wood an optimal appearance, it is processed with a grinder, the emery wheel of which should have a grit of 80. The result is a smooth surface, ready for painting.
Priming and painting

Before painting, the wood is treated with an antiseptic that will protect it from decay and bark beetles. This composition must be applied to the entire surface, without missing even hard-to-reach places. Scrupulousness in work will allow platbands to last for many years.

When the composition is applied, it is necessary to dry the blanks thoroughly, and only then begin painting the parts. The best option is a water-based paint designed for woodworking. The platbands on the windows in a wooden house are painted in the color that is declared in the project. For this project we use paints of two colors: white and cherry.


Work is carried out using 2 brushes: wide (50 mm) and narrow (20 mm). The first is for painting external surfaces, the second is for internal ones.


It is necessary to carefully paint over the details, leaving no uncovered places. After the first layer dries, apply the second.


One layer is enough. At work, they are careful. Smudges can completely spoil the overall picture. Products should dry under normal conditions - in the open air.
Assembly
It is better to assemble blanks into a single composition on a horizontal surface. This is much more convenient than directly on the window.


Wooden window casings are an element of decorative finishing of the facade of private houses, which is more common in rural areas. They embody the traditions of native Russian architecture and are real works of art.
It is difficult to find beautiful carved platbands for sale, since this type of facade decoration is gradually losing its popularity, and there are fewer and fewer craftsmen who know the intricacies of their creation, and their services are not cheap. But connoisseurs of the traditional design of houses can decorate their homes on their own by making architraves with their own hands. Of course, this work will require patience, training and prior knowledge of the technology. You will find useful tips on the manufacture and installation of wooden platbands in this article.
What are window trims for?
Platbands will decorate the facade and keep the heat in the housePreviously, people believed that certain patterns on the architraves were endowed with magical properties and were able to protect the inhabitants of the house from the evil eye. Now they are valued mainly for their decorative qualities: the ability to emphasize the style of the house, give it a complete look and enliven the facade. In the case of log houses, this type of window decoration is the only possible one, since plastic combined with wood will look out of place, and the building will lose its color.
However, platbands also have a functional purpose. This window element protects the room from heat leakage, drafts, dust and noise, closing the gaps between the opening and the frame. The only drawback of wooden architraves is the need for their proper processing and careful selection of wood.
Types of platbands made of wood
The manufacture of platbands depends on their design features and installation method. By design, they are shaped, flat, figured and openwork. Flat ones do not have a thread and are easy to manufacture, shaped and figured ones have a convex surface with a non-through pattern applied to it and are produced on a milling machine. But handicrafts are valued higher, because the equipment cannot create a through openwork pattern.
Install wooden platbands in two ways:
- Overhead - the structure is attached with metal or liquid (adhesive) nails and screws.
- Telescopic - the platband rests on ledges that join with the grooves of the window frame. This method is more difficult than the previous one, but the appearance of the product does not deteriorate from traces of fasteners.
 Design options
 There are also many types of visual design. We will consider specific patterns and the technology for their creation below.
Wood for making platbands
 The material must work well.
 To make wooden platbands for windows that will last you a long time, you need to choose the right kind of wood for them. Suitable for this purpose: larch, linden, oak, pine, beech, walnut and fruit trees (apple, cherry). You can decide on the option that suits you by evaluating the qualities of these breeds:
- Hardwoods such as beech and oak will last longer but are more difficult to process. Cutting patterns from these materials will take a long time.
- Soft varieties (alder, linden) lend themselves better to processing, but require mandatory impregnation with moisture-repellent compounds.
- Larch is resistant to decay, but very fragile.
- Coniferous species (pine, spruce) are considered the "golden mean". They are durable yet flexible.
- Fruit varieties are suitable for the manufacture of small parts - overlays.
Advice! In areas with significant temperature fluctuations, high humidity or, conversely, excessive dryness of the air, it is recommended to use platbands only from hardwood.
Tools needed for the job
The manufacture of carved platbands will require the use of tools designed for woodworking, namely:
- chisels (semicircular, flat, angled);
- knives with a sharpened and wedge-shaped blade;
- jigsaw;
- drills;
- milling machine.
You can not do without a ruler, pencil or marker and patterns with a pattern. You will also need a spike saw. To make it yourself, you need to take 3 slats, place 2 hacksaw blades between them and fix the structure. This tool allows you to simultaneously saw through the lugs and spikes of the architraves.
 Chisel set
 Meaning and pattern making
The appearance and semantic load that this element of decor carries depends on which pattern you choose. When the art of creating architraves was born, patterns were created not only for the sake of beauty, but also endowed with meaning. Here are interpretations of some of them:
- the sun is associated with energy and life, it is placed on the kokoshnik - the upper part of the casing;
- the snake is the embodiment of wisdom;
- the cross is designed to create harmony between spiritual and material values;
- the bird is a symbol uniting different times;
- wings denote strength;
- plants represent unity with nature;
- earrings placed at the bottom of the design speak of the hospitality of the owners.
Having decided on the desired images, find the appropriate patterns on the Internet and print. Make cuts in the diagram and transfer it from paper to plywood or thick cardboard, so you get patterns for carved platbands. More information about the manufacture of templates (stencils) can be found in.
 Trim templates
 The main ways to create window decorations are slotted and overhead carving. In the first case, using platband templates, the pattern is transferred to wood, and then individual structural details are cut out of it. In the second case, the platband is first made from a solid board, then overhead patterns are cut out according to the patterns and fastened with nails, creating a three-dimensional pattern. Ornaments of all parts should be harmoniously combined.
The upper part of the structure is made in the form of a kokoshnik, the lower part is in the form of a towel, and two sidewalls are placed between them. Details are interconnected with spikes. The upper part must be made 1 cm larger than the lower one and give it a slope to prevent moisture from stagnating.
 Kokoshnik made with slotted carving
 Sawing patterns, movements are made along the wood fibers, otherwise the material will quickly crack. Round elements are more convenient to perform with an electric drill. The ornament is made up of repeating patterns, it is desirable that among them there are more rounded details - they are easier to make.
Fundamental rules
- The design should not interfere with the opening of the window. To achieve this, the dimensions of the inner frame of the casing are made a couple of centimeters larger than the window frame.
- It is necessary to eliminate the unevenness of the walls before installing the platbands. To do this, along the perimeter of the window, wooden slats are nailed, fitted to each other.
- For work, only well-dried wood is used.
- All windows are decorated in the same style.
Preparation for work
To make wooden platbands for windows with your own hands, the first step is to measure all sides of the window and select durable boards of the right size, at least 3-4 cm thick. This thickness ensures the strength of the structure, while not preventing the window sashes from opening. The width is chosen depending on the pattern, as a standard it ranges from 15 to 30 cm in different parts of the casing.
It is better to make a pattern from large elements, since too small details, when viewed from afar, lose, merging into a single whole. In addition, it takes more time to create a small pattern. Before cutting out the “finishing” version, it is worth trying out the trim patterns on the windows on unnecessary pieces of wood. This will allow you to "fill your hand" and check whether the ornaments you have chosen look good on the material.
 Practice cutting out the pattern on a small sample.
 Installing trim on windows
The cut parts of the structure are sanded with sandpaper and connected. Fastening is carried out by the "thorn-groove" method, both parts are coated with synthetic glue before joining.
The installation of platbands on windows differs depending on whether the structure is attached to a wooden or stone facade. To work with stone walls you will need:
- mounting syringe;
- liquid silicone to eliminate cracks;
- drill and drill bits with a pobedite coating;
- self-tapping screws;
- wooden chopsticks for screws;
- a brush and paint to match the color of the trim to cover the caps of the fasteners.
 Finished construction before installation
 Platbands on the windows of a wooden house require a different set of tools and materials, consisting of:
- nails 5 cm long;
- liquid silicone and a syringe for its application;
- hammer;
- suitable paint and brush.
In addition to the above, in both cases you will need a stepladder.
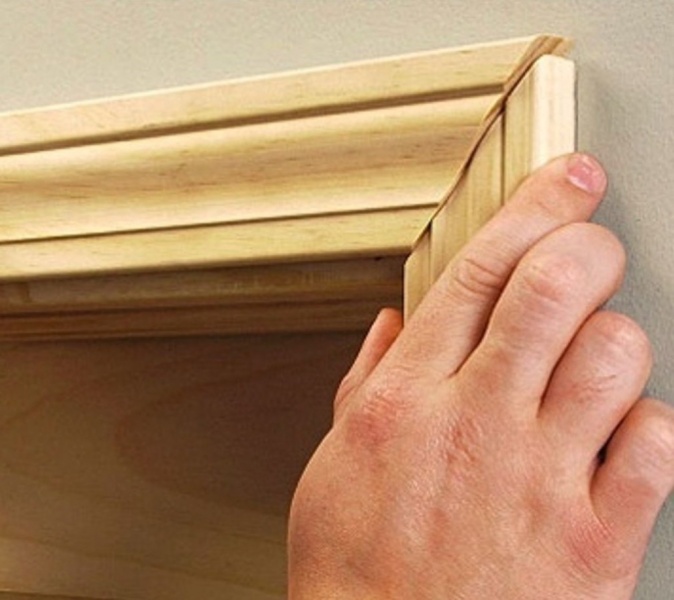
The finished structure is mounted on the wall using self-tapping screws or nails, while making sure that it fits snugly against the edges of the window slopes. All the cracks and loose joints formed are smeared with silicone, then the caps of the fasteners are hidden, painting them with a thin brush. Do-it-yourself wooden platbands are ready.
Finishing
Although the carved platbands themselves look original, the right decor will make them more attractive. In addition, wood processing is needed to increase its service life. The finished product is recommended to be impregnated with a moisture-repellent composition, coated with paint or varnish.
 Painted architraves
 Among the ways to diversify the design are: painting, firing and staining in contrasting colors. The painting can repeat patterns and focus on individual details, and contrasting coloring looks good when several types of carving are combined in a product. No less beautiful platbands for windows are obtained during firing. Processing wood with a blowtorch or gas burner forms spectacular tan marks on its surface.
 Contrasting coloring of elements
 Whatever processing method you choose, remember that the structure needs careful maintenance and periodic minor repairs, then the platbands will decorate the facade of the building and delight you for many years.
Platbands are called overhead strips framing the window. They have an important function - they hide the gap between the window frame and the wall of the house, thereby protecting the home from drafts, heat loss and moisture ingress. They often serve as an unusual decoration of the house, and in ancient times they were even a talisman against unclean forces.
Carved platbands for windows were popular in our country before the arrival of the Bolsheviks, who considered home decorations to be superfluous. Now the popularity of decorated platbands on the windows has begun to increase again.

Types of platbands
There are many types of platbands that differ in design, material and installation method. By type of installation, they are divided into overhead and telescopic platbands.


Overheads are fastened directly to the window frame with synthetic glue, special spikes, using nails, and telescopic ones are fixed in the space between the window frame and the wall.

materials
For the manufacture of platbands, materials such as wood, plastic and MDF are used.

Wooden platbands on the windows are very practical and will easily fit into any interior. Natural wood lends itself well to processing and a carved pattern will look great on it.

Plastic architraves are practical, convenient and can repeat the texture of wood. They are very budgetary, do not require such careful maintenance as wooden trim, but they also do not look as impressive. Their advantage is resistance to changes in temperature and humidity, which saves them from deformation and increases their service life. The downside will be the scarcity of the choice of color, shape and texture of the platbands.

MDF (medium density fibreboard) trims combine the environmental friendliness of wood and the strength of plastic thanks to a special water-repellent impregnation. Unfortunately, the disadvantage of MDF is the low strength of the material compared to plastic and wood.

There are also metal platbands for sale, but they have a purely functional value and have no artistic value.

Wooden platbands will look harmoniously on the windows of wooden houses, metal ones go well with plastic and metal-plastic facade panels, plastic ones will fit under plastic siding, and MDF products are more often used inside the house.


The advantage of using platbands on the windows in the house is the ability to visually expand the window openings and increase the height of the building. When choosing the same ornament of platbands, you can create a complete architectural ensemble on your site.

Making platbands with your own hands
To get a high-quality result of work, it is necessary to choose the right wood from which the platband will be made. For this purpose, a bar made of pine, oak, birch, linden, walnut or alder is used. The wood of fruit trees is also used.

For the first experience in making a trim with a carved pattern, linden, aspen and alder are best suited - they belong to soft-leaved tree species, so even inexperienced people can easily carve a pattern on them. Proper processing of the casing is important - this wood is very hygroscopic and is subject to rapid decay.

A more suitable choice would be hardwood or softwood. Birch and pine have a sufficient margin of safety, while they lend themselves well to processing.

Architraves made of oak and ash (hardwoods) are very difficult for beginners to process due to their increased hardness. They are very reliable and durable, but it is better to entrust the manufacture of platbands from these types of wood to professionals.

Fruit species are well suited for making small details of the casing.


bar
To choose the right timber, you will be helped by a few tips:
- Do not buy a bar with a blue or black tint - this indicates the presence of a fungus in the wood
- Do not buy a third grade tree, the savings will be insignificant, but the quality will be noticeably lower, which will affect the durability of the final product
- Do not take a curved beam - it is very difficult to straighten it.


Usually the thickness of the casing is 20-35 mm. Try to pick up the timber immediately you need the thickness, so as not to waste a lot of time on cutting and processing

The standard timber length is 220 cm, so buy a tree with a margin - you will have a lot of trimmings that are better not to use - the components of the casing will only spoil its appearance and functionality.

Dimensions
The width of the platbands on the windows ranges from 100 to 250 mm. To cut a workpiece of the desired width, nail a bar of different thickness around the perimeter of the window and see from afar which thickness will look more harmonious.

Please note that the trim should go on the frame by 5-10 mm and its upper part can significantly exceed the width of the side and lower parts.

So that your product does not interfere with opening windows, during installation, an indent from the hinges of about 10-20 cm is required, take this into account when measuring.


Thread
To make a pattern on the workpiece yourself, you will need a set of chisels for woodcarving, saws and many other tools. Their set depends on the complexity and type of pattern you choose. At the moment, the appearance of modern power tools greatly facilitates the work.

The most commonly used threading techniques are:
- Through type of processing. In this case, the pattern is sawn through or cut through the tree. These patterns are made using a file and a jigsaw. This technique helps to create an openwork, lace-like product.
- The flat-bladed type is characterized by the creation of a pattern that will be lower than the main background in its level. When choosing such a technique, you will need a knife, semicircular chisels and cutters.
- Relief type. The elements in it are somewhat raised above the rest of the background. To create it, you need the presence of chisels of various shapes.


patterns
To create an interesting design of platbands, you should look for photos of platbands on windows on the Internet. This will allow you to decide on the color, texture and pattern of the intended product.

Now it is easy to find window trim stencils in the public domain. You should not choose complex patterns for the first woodcarving experience. It is important that the same pattern should be depicted on all products.

After you find the wood and stencil that suits you, print the desired pattern in full size and place it on the workpiece, attaching it with buttons.


When placing the stencil, make sure that the thread will go along the grain of the wood, not across. Transfer the pattern to the workpiece and you can start carving. Do not rush, this can ruin the workpiece.

Be sure to carefully sand the resulting pattern, and then remove wood chips and dust from hard-to-reach places with a vacuum cleaner.


Installation
You can attach decorative trim to a wooden frame with self-tapping screws, nails without hats and special spikes. For plastic frames, only liquid nails are used.

Care

As for plastic, metal and MDF platbands, they are unpretentious in their care. Just occasionally repaint them and protect them from corrosion.

Photo of platbands on windows


Platbands are an important component for any window. Often they are associated with beautiful carvings that serve purely decorative purposes. But far from always they have a catchy appearance, and they have much more functions. This is a universal element that is necessary to protect windows and improve their insulating qualities. Therefore, their installation is recommended in almost any wooden house.
What are platbands for?
The platband decorates the window and makes it much more colorful. But initially its purpose was defensive. Platbands are used as an external element of the window frame, which not only protects it from damage, but also closes the mounting gap between the frame and the wall of the house.
This approach provides:
- Reduced heat loss;
- Elimination of through holes;
- Protection from dust and noise;
- Moisture protection.
Interesting ! Previously, platbands were also used as amulets. Because of this, they were given a colorful and non-standard look.
Although these advantages are not so significant in concrete and brick structures, they are extremely important for wooden houses. Over time, the wood can dry out and deform, which leads to gaps between the frame and the rest of the structure. Platbands allow you to slow down this process, as well as reduce the harm from existing holes.
Types of platbands
For houses, a lot of varieties of platbands are used. Often they differ in the material used, since they have a similar design. The main classification of platbands is according to the method of installation and marks two types of platbands:
- overhead;
- Telescopic.
The overhead version is considered the most common, being the old type. It is installed in a simple way over the window frame, thereby blocking access to the sun and precipitation to the joint. Installation of this type is very simple and does not require much effort.
The telescopic casing is more modern. Its fastening does not require additional elements such as screws or nails, because it is placed in the gap between the wall and the frame. Through this, it is securely fixed around the entire perimeter.
Priority is to use the telescopic mounting method. It is more convenient, because it more reliably covers the gap and prevents its deformation. However, its installation is complicated by the fact that for it it is necessary to completely remove the window, which is not always possible in wooden houses. In such cases, it is easier and more efficient to use an invoice platband.
Trim materials

Materials for platbands may be different. Often, wood is used for these tasks, which is recommended for wooden structures. But here several options are allowed, among which:
- Wood;
- Plastic;
Wood is a practical and natural option that is suitable for any structure. Due to its versatility, it can be given any ornament and style, and the use of the same type of material will allow it to perfectly complement.
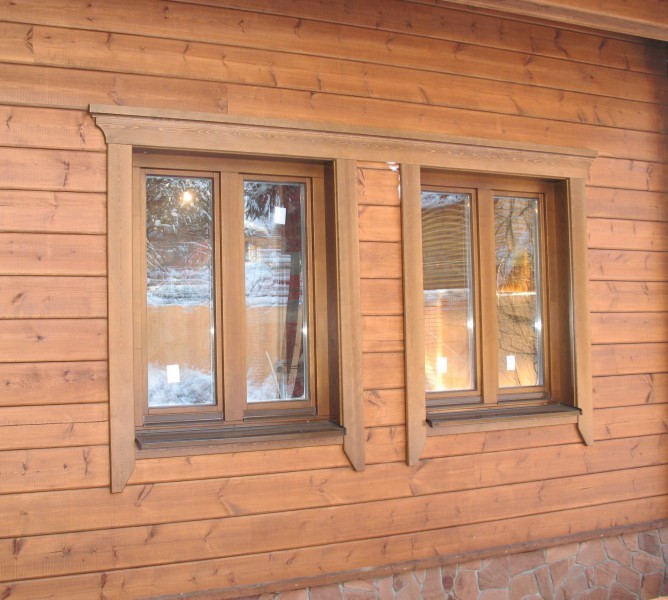
Advice ! For better alignment, it is recommended to make platbands from the same wood as the structure. But if the texture is the same, then the color can be changed through special formulations.

Often it is chosen precisely because of the variety in the decor, because other materials require special processing on machine tools and rarely have similar decorating elements.
Although wood is reliable and durable, it does have its drawbacks. Among them, vulnerability to moisture and high temperatures. In addition, frost also has a negative effect on it, destroying and deforming the structure.
Plastic in this regard is much more convenient. It is practical and reliable, and the wide possibilities in production allow you to give it any texture, including wood. But at the same time, it does not deform from moisture and temperature changes, and its lifespan is much longer. Another advantage of plastic is that it has fastener elements in advance, which allows you not to spoil the appearance of the platbands with nails or screws.
Perhaps the only drawback of plastic is its artificiality. Many owners do not want to supplement their home with artificial materials and reduce its environmental friendliness. A third option may help here.
MDF is boards made from wood waste. They are natural, but impregnated with special compounds, which significantly increases the life of the material and protects it from external factors. Often such platbands are laminated, which increases their lifespan and reliability. The only drawback of such elements is their relatively low strength compared to plastic and wood.
What material to take - the choice is purely individual. Each of them has its own advantages, but there are also disadvantages.
What wood is better
If the choice fell on wooden platbands, then it is important to note the choice of wood species. In fact, almost all options are suitable for this task, because they do not need to carry any load. But even here there are nuances.

The best option for platbands is oak or beech. This is a durable breed that can serve for a long time and not deform from moisture or heat. But the problem is that it is extremely difficult to work with. It is extremely difficult to cut patterns on such material on your own, and not every master will undertake this.
Advice ! The way out of this situation are special milling machines, the pattern on which is loaded into the program in advance.
If you need a softer and more inexpensive breed, then you can choose linden. It is easy to work with, but without careful processing, it will quickly collapse. You need to use high-quality antiseptics and some kind of coating, which can worsen its appearance.
An intermediate option for such a task is birch or pine. This is a fairly durable variety that requires only basic care. But it will be easy to work with her.
Preparing for installation
First you need to take all measurements from the window. It is important to choose the appropriate dimensions so that the frame outline does not peek out from behind the casing and is securely hidden. Next, the preparatory stages with the material are carried out.
If wood is used in the process of work, then you must first cut out the blanks of the platbands, decorate them at your discretion and process them. Plastic and MDF do not require processing, but wood needs impregnation with protective compounds against moisture, as well as to protect against insects.
Important ! All work is carried out with dry lumber. If it is poorly dried, then deformation after installation is possible, which will ruin all the work.
After measurements and processing, it is important to pre-mark the joints and fasteners on the platbands. All holes are pre-drilled. The platbands are carefully polished.

It is also important to prepare the place of work itself. Window joints are carefully isolated, because in the future access to them will be limited. If any insulation or repair work is planned, then they need to be done before installation.
You must first select the method of attachment. It is not required for telescopic architraves, but for invoices there are several options. Among them, the most popular are:
- Nails;
- Deaf spike;
- Through spike.
The first option is the simplest, but spoils the overall picture and creates an extra load on the material during installation. Therefore, spikes are more comfortable. A blind spike involves the installation of small spikes on the window frame, and small holes are made in the casing for them. A through spike implies the same technology, but the hole in the casing is through.
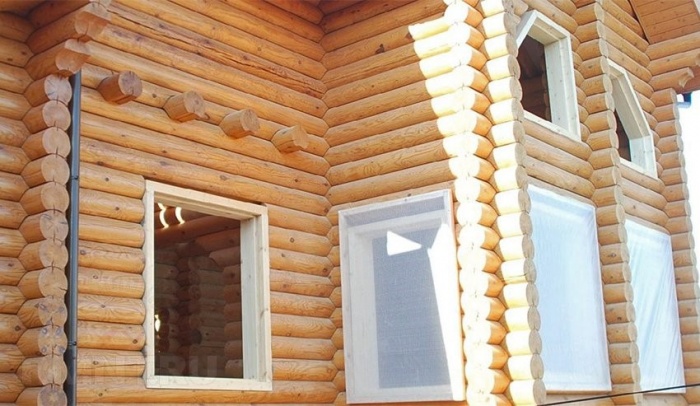
If the house is built from a log house, then you need to make room for platbands. To do this, cut off the protruding edges, which can be done at an angle.
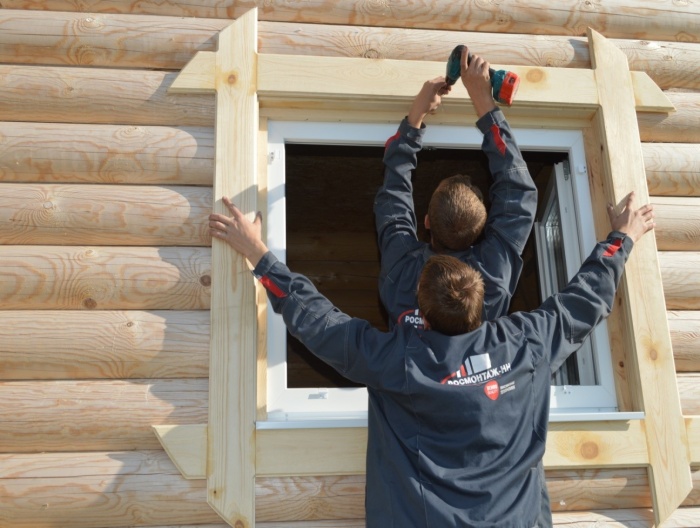
Installation of platbands in a wooden house
After carrying out all the preliminary procedures, the installation phase begins. To begin with, all the components of the casing are interconnected. To do this, you can use the same technologies of spikes, nails or glue. But the latter is often used as an auxiliary component.
During installation, when using spikes, you need to do the following:
- Mark the future location of the spikes on the frame and casing;
- Make or purchase spikes for this task;
- Drill appropriate holes in pre-marked places;
- Put the casing on the spike and fix it.
The first stage includes preliminary marking of the perimeter where the fasteners will be placed. It is important to evenly distribute the load, so it is worth placing them around the perimeter of the structure.
After acquiring or making spikes, future holes are drilled for them. This is a simple step, after which the actual installation process begins. The platband is carefully positioned so that all the spikes fall into the holes.
The task is quite simple, it is only important to accurately mark the future location of the fasteners. It is recommended to use glue during work to securely fix the structure after installation. This will reduce the risk of it falling and improve the insulation of the holes.
You can simplify the process with ordinary self-tapping screws. Although they will worsen the appearance, their use greatly simplifies installation.
Upon completion of the work, it is worth treating the working holes with a composition so that they do not absorb moisture. Further, it is only necessary to monitor the condition of the structure and take care of it if necessary.
The whole process is quite simple, it is only important to qualitatively connect all the elements and not to neglect the preparatory stages of installation. Thanks to this, this design will last a long time, decorating the house and protecting residents from drafts and moisture.
Do-it-yourself window trims are a wonderful decoration for the facade of the house (ready-made stencils and templates will be given in the article below). They make the house look like no other, visually change its proportions.
Today, having certain skills, you can independently create elegant platbands for windows in a wooden structure. Moreover, they can be made not only from wood, but also from other materials.
 When the owner decides to mount the platbands, he seeks to arrange traditional decor in his possessions.
Platbands have the following advantages:
- Excellent decorative function. So the building visually increases.
- Complementing the overall style of architectural design.
- The space between the window opening and the wall plane is protected from moisture and dust.
- Reduced heat loss and noise levels.
- The individual features of the house and the style of the chosen era are highlighted.
There are platbands and shortcomings:
- Wood needs a certain treatment from high humidity and deformation.
- Products need regular care and processing.
- They do not harmonize with metal-plastic windows. In this case, the platbands are made in the same color scheme.
Self-creation of templates
 Today there are many platbands. Their types are determined by the way they are mounted to the window. There are two types of this criterion:
- Telescopic. Their specifics: L-shaped protrusions, coinciding with the grooves of the window frame.
- Overhead. Installation takes place on the window frame. Fasteners - construction glue or nails with screws.
An elegant solution is the installation of carved products. Such plans can be realized independently only with special equipment.
Popular materials

- The most common material for platbands is wood. Products from it have an elegant and harmonious appearance.
- Plastic versions are often used as well. They are characterized by powerful resistance to temperature changes and ultraviolet radiation. Plastic options are sold already finished.
- Another popular material is MDF. It is made from wood waste. It is more environmentally friendly than plastic. In addition, products made from it are characterized by a look reminiscent of natural wood.
- Polyurethane. Variations from it are highly practical. Facade stucco molding is often made from this material.
The nuances of choosing the right wood
 As already noted, wood is the most popular material for platbands. And the performance of wooden platbands depends on the type of wood used.
Here, attention is usually paid to such options.
- Hard deciduous. These varieties include ash, oak and beech. They are very durable. But it is quite problematic to create patterns on them.
- Soft leafy. These are: linden, aspen and alder. They are easier to process. On their surface patterns are created even by hand. And such surfaces are thoroughly processed by special means.
- Cherry and apple tree. They are optimal for creating small components that can be attached to the base.
- Pine and birch. They are also easy to handle. And they have excellent working qualities.
- Various combinations of wood types. The use of special protective compounds for powerful impregnation is mandatory here.
With the help of high quality wood, a beautiful original design of the window opening is obtained.
The nuances of creating templates with your own efforts
The basis of the work is to create stencils and design.
Self-printing stencils is quite feasible for everyone. It is important to achieve a combination of the selected ornament with the whole style. Mixing geometric and floral patterns is not allowed.

When working on platbands, the following subtleties are taken into account:
- There should be harmony in the color palette of the walls and decorative elements.
- Be sure to select the correct parameter. The platbands should not be very wide or small.
- A high-quality version of the coating is selected. Special paints are used.
- A template is needed for the manufacture of external carved components.
- The drawing is correctly positioned on the workpiece. Details follow along the wood fibers.
When it is possible to achieve a color combination of platbands and the plane of the walls, a holistic and harmonious facade is obtained.
Manufacturing stages
Before creating window decor, carved platbands are selected from photographs. You need to make a template first. It should turn out the same for the design work of all openings.

Typically, the following methods of creating patterns are used:
- Applied thread. It has isolated elements of the pattern. They join the same base.

Installation of overhead components should be on the base in compliance with the template pattern.
- slotted thread. Here they make a through ornament. It looks like wood lace.

With all methods of work, the presence of stencils is mandatory. This is how they look:
 You also need to have the following tools:
- Jigsaw.
- Hacksaw (oriented for wood).
- Knives and chisels.
- Drill.
- Milling technology
Platbands must be created from prepared materials. The working stages are:
- Rigorous measurements are taken.
- The selected tree must be dry. If it is wet or damp, it must be brought to dry conditions. The width of the boards is determined by the parameters of the window opening. The thickness of the material reaches a minimum of 3 cm if a slotted thread is made, and at least 1 cm when an overhead thread is made.
 All blanks are pre-treated with a protective compound. Their cutting is done using templates. And the cutting of ornaments takes place using a jigsaw. This tool is better to use different types of files.
To work with an electric jigsaw, certain skills and special care are needed. The created holes must be overwritten. An excellent tool for this is sandpaper. After powerful grinding, the part is treated with a special impregnation.
Next comes the installation of all prepared parts to the base. Here you need to use glue or special nails. In such work, it is better to refuse the use of self-tapping screws. They will cause cracking of products.
Installation specifics
 The created platband can be attached to the desired position using the following methods:
- On a dull thorn. Installation of such parts is on the inside. Especially for them, holes should be made in the frame. Glue is applied to the spike and distributed evenly. The spike is inserted into the groove. This fastening protects the platbands from dust and moisture.
- With the use of a through spike. The butt section here is thoroughly treated with varnish.
These techniques are justified when working with a wooden window. To attach to the metal-plastic, a special powerful liquid glue is used.
Care Required
 Installed platbands need constant attention and care. For processing, special preparations are used - powerful impregnations. They create high-quality protection against:
- tree pests;
- the appearance of cracks;
- sudden fire.
Carved options are necessarily covered with a primer, then varnish or paint. The intensity of such treatments is 1 time in 3-5 years. So the operational life of the products will be seriously developed, and at the same time their attractive appearance will be preserved.
When installing plastic or metal products, some kind of thorough maintenance is not needed. For products, it is necessary to arrange high-quality protection against corrosion. Periodic updating of the paint is also required.
Thus, it is very possible to make platbands of extraordinary beauty with elegant patterns on your own. Certain carpentry, carpentry and tool skills are required. So you decorate window openings in a very original way and bring an elegant zest to the chosen architectural style.
Platbands on windows do-it-yourself templates stencils: drawings, sketches and drawings for cutting, photo gallery, manufacturing instructions
Do-it-yourself window trims are a wonderful decoration for the facade of the house (ready-made stencils and templates will be given in the article). They make the house look like no other, visually change its proportions.
Carved platbands on windows: templates, photos
Old Russian architecture is invariably associated with carved platbands on the windows. This form of design of houses is distinguished by species diversity. A few decades ago, craftsmen with their own style of creating decorative elements lived in each region. Today's return to the roots is accompanied by a revival of interest in window decoration using carved platbands.

Framing purpose
The word "platband" itself speaks of its location - "on the face", that is, one of its functions is to decorate the facade of the building. Therefore, people tried to express their individuality through it and decorate the windows with carved frames. In addition to the decorative role, window trims primarily perform a constructive function, closing the gap between the frame and the opening. This prevents dust from entering the house, protects against precipitation, drafts and extraneous sounds.
In the old days, carved platbands were also attributed magical properties. It was believed that framing a window with a certain shape of a bar protects from the evil eye and serves as a kind of amulet. Therefore, various figures and plants bearing a specific semantic load were seen in bizarre patterns.
In modern architecture, the functional purpose of platbands for windows is as follows:
- A well-chosen carved design allows you to visually stretch a low building or expand a narrow wall.
- The opportunity to show individuality and decorate the building in accordance with the trend of a particular era.
- Allows you to achieve a single architectural ensemble between all the buildings on the site.
- Protection of cracks from the penetration of external negative factors (precipitation, noise, dust).
- It is one of the elements of thermal protection of the house.

Carved finishes, especially those made of wood, have a number of features that should be taken into account during the period of operation:
- Dependence on the influence of atmospheric factors. Moisture and temperature changes invariably damage the decorative design.
- When choosing a frame, you should take into account the properties of the rock from which the platbands are made, and take care of high-quality processing. Timely preventive measures extend the life of the product for the window.
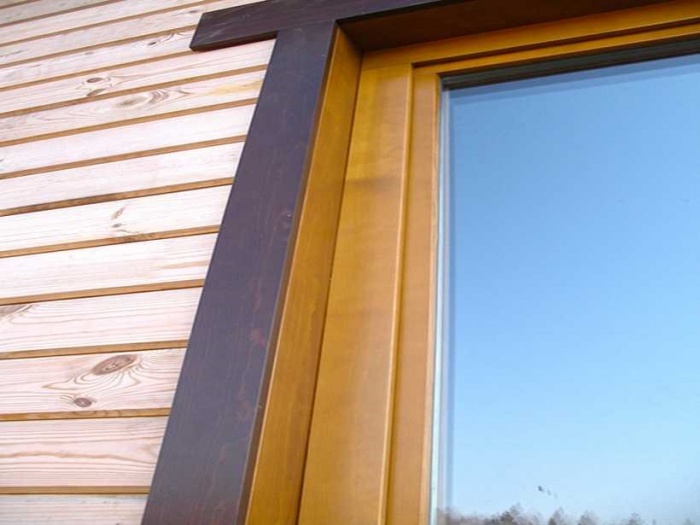
- Difficulties often arise when combining wooden carved elements with modern plastic frames. With this combination, it is preferable to install windows that imitate a wooden texture.

The value of carved elements
The desire to comply with ancient traditions requires knowledge of the meaning of various elements of carved architraves:
- The sun, as a rule, is placed on the kokoshnik. It symbolizes life and energy.
- The personification of wisdom and fertility lies in the image of a snake.
- The symbol of harmony between spiritual and material aspirations is a cross in a carved platband.
- The feeling of unity with nature is emphasized through vegetation.
- Earrings testify to the hospitality of the owners of the house.
- The connecting element of all times is the silhouette of a bird on the window.


Characteristics of materials and forms
For the production of platbands on the windows, natural and artificial materials are used. Traditionally carved elements were made of weather-resistant wood. Characteristics of the properties of individual breeds will help determine the most suitable type:
- Larch is minimally susceptible to decay processes, but is not suitable for the production of carved frames due to its fragility.
- Aspen, alder and linden are the most convenient species for creating openwork decor on windows. However, the malleable and soft wood of carved architraves needs special treatment due to its ability to absorb moisture well.
- Oak, ash or beech window trims are resistant to negative weather conditions, but the processing of carved elements is burdened with difficulties, overcoming which you will get a durable decor.
- A good choice would be birch or pine wood, which allows you to perform a neat carved decor. At the same time, the platbands have sufficient strength for external use.
- Small carved window decorations, which are fixed on the main elements, can be made from cherry or apple.

What other materials are used in the production of linings for windows and what are their features, we will consider below:
- Laminated MDF allows you to accurately simulate the color of any type of wood, but is intended exclusively for indoor use.
- Plastic windows are harmoniously combined with platbands made of similar material (PVC), which is not subject to decay, has a wide color palette, resistant to solar radiation. The color of the platbands is selected taking into account the finishing of the house to match or contrast with the facade.
- For round windows, polyurethane products are ideal, characterized by lightness and unpretentious care.
- Metal strips are fixed in order to protect the mounting seam, connecting them into a single whole with a profile box.
There are two main ways to install platbands:
- Invoice - the most common method in the design of windows. For fixing, special glue or nails are used.
- The telescopic method involves the L-shaped form of manufacturing the casing, which allows you to fix the product by entering the grooves of the box. It is most often used for finishing doorways. Its characteristic difference is the absence of traces of fasteners.


Patterns and types of thread
The carved forms of the architraves give the window individuality, but in order to make them, you will definitely need templates. The presence of woodcarving skills allows you to choose a complex ornament. If the ability to work with wood is not enough, it is better to find a light pattern for window trim. We suggest exploring:
- variants of templates of single elements and their general appearance;
- top, bottom and side decoration details.


You can copy them completely or add your own details to the pattern. The picture of the carved platband you like or its fragment must be scaled up taking into account the size of your window. For the manufacture of carved templates, fiberboard, thick cardboard or paper is used. It is desirable to decorate windows with platbands with the same thread. Please note that it is much more difficult to make small carved elements, and they become unusable faster than others. In this case, a partial replacement of the frame will be required.
The upper part of the casing for the window is called the kokoshnik, the lower part is called the towel. The contours of plants, images of animals and geometric figures were most widely used in the ornamentation of carved architraves.

The key details of the drawing for any window trim are:
- lower bar or window sill;
- vertical rail;
- top bar.
The scheme can also contain all kinds of hangers, flowerpots or a diadem. A detailed description of the names of carved decor elements is presented in the diagram below:

If your windows are of different sizes, experts advise making a drawing with an intermediate repeat repeating the required number of times. For rapport, you can choose one or two elements that repeat alternately. An example of such a scheme is shown in the photo below:

There are several ways to make a wooden carved frame on the windows:
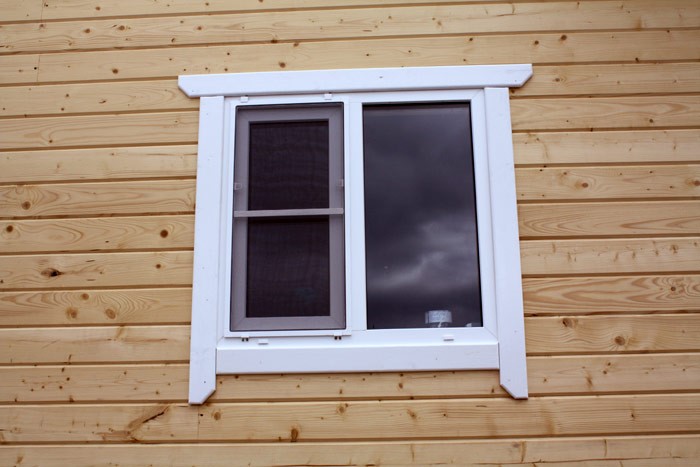
- Slotted platbands are characterized by the greatest decorativeness and delicacy. The product is made of light-colored wood or is subsequently coated with white paint. This window design on a darker wall looks sophisticated and elegant, vaguely reminiscent of Vologda lace.
- With overhead threading, separately cut parts are fixed to a solid board by gluing or nailing. This technique allows you to arrange a window with a simple casing. Protruding elements are often covered with contrasting paint.
Sometimes both types of thread are combined.


Manufacturing process
Having decided on the pattern, material, type of thread and method of fastening the platbands, you can directly proceed to the manufacture of carved framing for windows.
Places of the pattern where it is necessary to make cuts, it is better to mark with color. The work on the manufacture of platbands consists of the following stages:
- Taking measurements from the window.
- For slotted carving, boards with a minimum thickness of 30 mm are selected, the overhead method allows the use of wood with a thickness of 10 mm. All work is done with dry lumber.
- Blanks are cut out.
- For a snug fit of the carved casing from the inside, the wood is selected to an insignificant depth (1-2 mm).
- The pattern applied using the template is cut out. To form holes, drills of various diameters are used, a jigsaw is needed to make cuts. To make a beautiful cut, the entry point of the jigsaw is marked with a drilled hole.
- All carved elements of the platband for the window are cleaned with sanding paper. Wood dust is removed from blind holes with a vacuum cleaner.


Laid on thread provides for fastening finished elements to a wide casing on nails with removed caps. Strengthen the strength of the connection will allow glue applied from the wrong side of the casing. The use of self-tapping screws is not recommended due to the risk of damage to the carved section of the connection.
Carved platbands are installed on wooden windows using deaf or through spikes. The first option is distinguished by a reliable connection and a complex installation process. The second method is simpler, but less reliable. The installation of carved elements on a plastic window is carried out using liquid nails.
Preliminary protective treatment of carved architraves and regular preventive care will ensure long-term preservation of the attractive appearance of the window.


Carved window frames
Carved platbands on the windows: templates, photo Old Russian architecture is invariably associated with carved platbands on the windows. This form of design of houses is distinguished by species diversity. More
Stencils for platbands on windows. How to make carved platbands?
Architraves on windows, despite their simplicity, are of great importance in the decorative design of the facade of the house. They not only create a neat look and add an element of personality to the structure, but also perform the more prosaic task of eliminating the gap between the wall and the window frame. In addition, platbands must withstand the influence of weather factors without losing their qualities.
Window frame function and a bit of history
The platband was first mentioned as an element of the house as early as the 15th century. Now the architraves have somewhat lost their relevance, but their function is still the same, regardless of the material of the building and its decoration. Due to the design features of the windows of high-rise buildings and in cases where glazing is used, their presence is inappropriate.
 Platbands appeared many years ago
Simplified, the platband is a wooden frame with a width of 30-40 mm, which frames the window.
The aesthetic function of this detail is important, but the main task is to bridge the gap formed by the window frame and the wall, which increases thermal insulation and prevents the penetration of dust and moisture from the outside atmosphere, as well as reduces the noise level. In some cases, in the presence of shutters, it performs the function of a frame.
Types and types of platbands for windows
Their form may be:
Flat platbands are characterized by ease of production and low cost. Convex platbands are made using special machines and, in connection with this, the price of products increases significantly. Carved platbands are of great aesthetic value and significant cost.
According to the method of installation, platbands are classified:
- telescopic. They have special protrusions that go into the corresponding cavities of the box;
- overhead.
An important factor in choosing the profile of this window element is the slope that is performed at the top of the casing. Its purpose is to remove sediment.
Modern materials and requirements for the elements of houses have determined the trends in the requests of homeowners. The leaders in popularity are carved platbands made of plastic.
Requirements for the material of platbands
In addition to high aesthetic qualities, the casing must meet practical requirements. Its important qualities are the ability to withstand temperature fluctuations and high humidity. In addition, the material must withstand wind loads.
It is important that the material has sufficient strength and is not subject to chipping and cracking. The use of MDF or plywood is out of the question. The properties of these materials are such that they are able to absorb moisture, are prone to cracking, and the paint on them peels off over time. All this is a sign of the fragility of products made from these materials.
In this regard, MDF as a material for platbands can only be used inside the dwelling. The manufacturability of the material determines the simplicity and relatively low cost. In addition, it does not take much time to get ready-made platbands. Such platbands on the facade will require constant care and additional processing.
Our ancestors have been making platbands from wood for many centuries. Oak and beech are the most common types of wood used for this. Pine and birch have found less use for the production of architraves. Wood tends to absorb moisture, therefore, to increase the service life of the product and its appearance, it is necessary to use protective coatings. In addition, over time, the tree tends to darken, so the restoration of the original shade of the material is required.
When using gypsum as a decorative facade element, the problem of interaction of the material with moisture is also encountered. When the water that has penetrated into the gypsum freezes and thaws in the process of temperature fluctuations, such architectural details are destroyed.
 Materials are subject to certain requirements.
The use of glass fiber reinforced concrete and polymer concrete makes it possible to avoid the negative effects of temperature and moisture. Their use is limited by a significant mass of products. In some cases, when installing such platbands, the increased loads on the wall are taken into account and make it more powerful.
Polyurethane compares favorably with other trim materials. This is due to the fact that its use does not allow the problems described above, and also its characteristics make it possible to create additional thermal insulation. In addition, its mass is comparable to the weight of wood, which facilitates the installation of these facade parts.
How to make stencils for platbands on windows?
Choice of wood
Wood for the production of platbands can be used in various ways. It can be certain types of it, a combination of rocks by gluing or otherwise connecting.
Simple and shaped stencils for window frames are best made from pine.
The production of carved architraves requires that the material be soft. Linden has this quality. Material requirements are due to the manual processing of wood.
 The choice of wood must be made carefully
Climatic conditions associated with high humidity or significant dryness, as well as significant temperature fluctuations during the day, determine the use of wood with a dense and solid structure. These include oak and birch. Their manual processing is difficult, so the use of milling machines is necessary. Such products have a long service life.
Required Tools
Before solving the problem of how to make carved platbands, it is necessary to decide on the tool used for these works. The main tools for this are knives and chisels, various in shape and size.
 Tools for the job
For independent production of platbands, devices for manual milling, an electric jigsaw, and a drill are used. A jigsaw is almost indispensable when performing such work, since with its help you can create almost any pattern. In some cases, a home-made device can be used, which includes a step-down transformer and nichrome wire.
In addition, it may be necessary to make a tool for filing corners. To make such a device, it is necessary to fix two hacksaw blades with a fine tooth between three wooden rails. When working with this device, spikes are sawn with one canvas, and the eyelets of the product are filed with the other.
How to choose patterns for platband?
Using the slotted carving technique suggests that aspen, alder, linden or softwood are best suited. The thickness of the board should be in the range from 5 to 50 mm. It is necessary that the chosen design of the pattern for the casing should be well distinguished at a distance, and act as a single whole of the architectural ensemble. Therefore, it is not desirable to create an image with a large number of small elements.
 Trim options
For a long time at the top of the casing there is a kokoshnik with the image of the Sun. If desired, the top of the casing can be built up using spikes as a connection. Towels - this is the name given to the bottom of the casing. The design must necessarily include the presence of a water-cutting bevel. The bottom plank should be 10mm thicker than the plank at the top of the plank. It is important to observe the unity of the style of both parts.
To avoid the occurrence of cracks in the thread, the parts should be placed along the grain of the wood. As a rule, the endings and openwork bends, which have a small thickness, have significant fragility.
 Structural diagrams
The simplest cut can be obtained by drilling a round hole with a drill. That is why it is desirable to make a choice on a pattern with a predominance of round holes. In most cases, the ornament is made up of repeating elements, each of which is made up of holes and cutouts that have a more complex configuration.
Drawings of platbands on windows contain the following elements:
- bottom bar or profiled belt;
- vertical slats or frame;
- top bar.
 Part Names
To get a stencil, you need to stretch the pattern along the length. For this purpose, a life-size image is applied to paper. Places suggesting the presence of slots should be highlighted in color. Then, the resulting pattern is glued to the workpiece. Using a drill, drill holes of the appropriate diameter. If it is necessary to work with a jigsaw, small holes are made where necessary.
Production of platbands for windows
The opening direction of the window must be taken into account. In the case when it opens outward, the casing should be installed at a distance of 30 mm from the window sashes. In addition, platbands should not become an obstacle to opening the window frame. Other parameters depend on the geometric dimensions of the windows.
At the initial stage of the production of platbands, it is necessary to plan a dry board, the dimensions of which are within: thickness up to 30 mm and width 75-150 mm. In this case, the width of the platbands should exceed the corresponding size of the window frame by 25-50 mm. For a better fit of the platbands to the wall surface, a groove is selected or a gap of no more than 2 mm is made so that it is at a distance of 10-15 mm from the edge.
When working with a power tool, you should not make excessive efforts, as if helping him. This may lead to its failure. If there are difficulties with cutting wood, you should pay attention to sharpening the blade. Long cuts are recommended to be made with a wide blade.
How to mount carved platbands
The fastening of the details of the platbands is carried out by means of deaf or through spikes. Moreover, it is believed that the use of the first of them is preferable, since there is no need to decorate the places where the connection takes place.
The grooves for the spikes are made by drilling several holes, the depth of which is slightly greater than the spike. The removal of partitions between the holes is done with a drill designed for metal. The entry of the spike should be tight, however, without the use of force.
The spikes are fixed with pins made of solid wood. The use of glue is not recommended. This is due to the fact that adhesives are not able to work for a long time under the influence of an aggressive atmosphere.
Platband installation: features
Installation of platbands is carried out without the use of glue using nails. They are driven in in increments of 400-500 mm so that the hat is recessed into the wood. Most often, platbands are attached tightly to the box. In some cases, an indent of 5-20 mm is made to the side, which depends on the direction of opening of the valves.
Architraves drawing
The window sill at the window opening and the platband are installed closely. This design allows you to install bedside tables that protect the lower part of the platbands.
Upon completion of the installation work, it is imperative to carry out a protective treatment of the platbands. You should also apply paint or varnish, which needs to be updated from time to time.
Stencils for platbands on windows
Stencils for platbands on windows. How to make carved platbands? Architraves on windows, despite their simplicity, are of great importance in the decorative design of the facade of the house. They not only create
Do-it-yourself wooden carved window frames
For buildings made of log cabins, carved architraves simply suggest themselves for decorating window openings. Making them yourself is not at all a whim or an attempt to save money, because there are very few really good woodcarvers now.

Required minimum tool
The manufacture of platbands, unlike artistic wood carving, involves the repeated execution of the same type of operations, resulting in a rather primitive repeating pattern. Therefore, most of the work is done with an electric tool: this not only increases the processing speed, but also achieves uniform quality in different areas.
 1 - jigsaw; 2 - drill; 3 - belt grinder; 4 - vibration grinder; 5 - manual router
The main work is done with a jigsaw and a drill. The tool must be reliable and of high quality, capable of being in continuous use for a long time. For cleaning and grinding products, it is better to use an electric grinder, at least the simplest belt grinder. Fast finishing of the relief is possible using vibration-type machines.
If you intend to add additional fine details to the edges of your product, you can not do without a router. Descents, chamfers and a figured border can also be done manually, but only with a variety of chisels, cutters and specific skills in working with wood.
 Wood cutter set
How to choose wood
For platbands, hardwoods are best suited: oak, birch, ash, maple, alder. Since the thickness of the finished product is relatively small (30-45 mm), hard rocks will be less susceptible to decay and drying out, and therefore, they will retain their appearance longer.

If you plan to decorate carved platbands with flat-relief elements with many small details, you should give preference to softer rocks with a fine texture pattern. Suitable linden, poplar, aspen, walnut and spruce.
Wood for platbands should be selected and, preferably, chamber dried, with a moisture content not higher than 12%. It is not allowed to have traces of warping or other pronounced defects, large branches. Ideally, you should immediately order calibrated boards with a width of 100–150 mm and a thickness of 30–40 mm.

The length of the blanks should be sufficient to completely cover the window opening horizontally and vertically with an overlap in each direction by 1.5 board widths. It is important that you initially calculate the number of blanks needed and, in addition to them, purchase a few more boards of the cheapest breed for training and carving skills.
Making templates and stencils
Almost any wood carving begins with drawing a pattern on a workpiece according to a pre-made template or stencil. There are plenty of threading schemes in the network, the main difficulty comes down to transferring lines to the part accurately and without distortion. We will warn you right away: do not chase the high complexity of the drawing. A set of even the most primitive elements in the correct sequence and with well-chosen indents takes its modesty and quality of processing.
 Templates for the upper and lower trim for the window
 Trim ornament pattern example
The first option for marking is the manufacture of a small piece of plastic or solid sheet material, on which a single element of a repeating pattern is applied. Such a template is successively applied to the workpiece and outlined in pencil.
It is also possible to produce a single template. You need to take a strip of paper of the appropriate width, fold it with an accordion several times, and then cut out the pattern according to the principle of a Christmas tree garland. The resulting tape must be glued onto cardboard or LMDF, and then cut out the desired shapes. This method is welcomed with a significant amount of work.

The resulting stencil is subsequently simply superimposed on the board and outlined with a soft pencil. Ideally, saturated, but precise cut lines and boundaries for further processing should remain. When marking out the details, it is also necessary to take into account the layout of the pattern so that the platbands form a solid and complete contour, and the repeating pattern is not interrupted at random.

Through hole selection
The first step is to trim the edges of the workpiece and select holes in the center. Everything is simple with the edges: we cut out the excess with a jigsaw, stepping back from the marking line 1–1.5 mm outward for further processing. To cut out figures in the center of the plane, we drill a part at the very line of each cutout, then select the inner contour with a jigsaw.

For making large holes, it is reasonable to use core drills. In this case, it is necessary to mark on the template not the contours, but the centers of the circles in which the centering drill bit will be installed. A similar technique can also be used in the manufacture of oval holes or elements with small rounding radii: a complex bend is drilled with the appropriate radius, and everything else is cut out with a jigsaw.

When the excess parts of the workpiece are sawn out, the cut edges must be carefully processed with a rasp, and then with sandpaper. It is recommended to use bars of square, round and rounded profiles, on which sandpaper is stuffed. This way you are less likely to "collapse" the edges and you can get right angles on each edge.

Rectangular edges look rather rough, so they are smoothed out with chamfers and slopes of different profiles. The easiest way to diversify the product is to walk along the outer and inner contours of the casing with a curly cutter. But manual processing options are also possible:
- to chamfer, walk along straight edges with a chip, keeping the angle of inclination of the handle to the part constant;
- a semicircular convex descent can also be made with chips, changing the slope of the blade, or use a concave cutter for this;
- concave semicircular pairing is performed with a chisel or a cutter with a rounded edge. Such elements must be cut out in stages, removing small chips layer by layer and carefully controlling the depth of the tool and the tilt of the handle;
- if the descent has a complex profile with several convex, concave and straight elements, this profile is divided into several stages and cut in strict sequence, starting from the widest outer part and ending with the deepest and shallowest tier.


Blind carving: we apply a relief
When you're done with shaping, it's a good idea to diversify the remaining flat pieces with simple ornaments or floral designs. Here are the simplest ways to work:
- A groove (branch, furrow) is made with a narrow chisel or cutter with a square, triangular or concave blade shape. The carving is carried out strictly along the line, the relief is selected with small chips and then polished.
- Sheet - several small grooves that imitate veins cut with a circular knife. From the center between the veins to each of them, small notches are made with a semicircular chisel, imitating the body of a leaf, then an external contour is drawn with a thin cutter.
- The flat areas adjacent to the descent can be diversified with a blind carving of a small ornament. For example, cut two grooves from the edge, forming a triangle with it, and punch an asterisk in the center with a notch.


Wood processing and installation of architraves
Due to the carved elements, the wooden product has a large surface shape, due to which it is more susceptible to aging. Therefore, wood should be treated in a special way.
First of all, carved items for placement on the facade should be soaked in an antiseptic composition for 5-8 hours, for which you can dig a small trench in the ground and put a plastic film there to temporarily equip the bath. After soaking, the parts are dried for several days stacked in a stack with linings after 30–40 cm.

When the wood has dried, it must be carefully sanded, achieving smoothness and finally eliminating all traces of sawing and carving. The protective composition is selected in accordance with the type of facade finish, it can be either alkyd enamel or polyurethane varnish, tinted or transparent.
Finally, for the correct installation of the platbands, the window opening should be framed with a flat rail 10–15 mm thick and so wide that its outer edge is not visible through the carved pattern along the platband contour. The purpose of this plank is to eliminate the remaining irregularities in the wall and provide a solid base for the carved element to be attached to. Often this rail is painted in a color that contrasts with the coating of the casing itself for greater expressiveness of the pattern.

Platbands can be attached with straight and oblique trimming, depending on the type and density of the pattern. Oblique trimming is performed with a 45° cut on each side, while the cutting line must pass through identical sections of the pattern and not cross the figures cut inside.

With a straight cut, a horizontal element is placed between two vertical ones. Their upper edge should be 1-2 cm above the crossbar if the cut end is straight. It is also possible to manufacture on the edge of the thread according to the general scheme, if, during the manufacturing process, fitting and precise fitting of the platbands are carried out. The fastening of the platbands itself is elementary - ordinary ruffed nails without a hat are used for it. It is only important that the nail pierces the casing and the lath, protruding at least 5 mm from the inside.
Do-it-yourself wooden carved window frames
For buildings made of log cabins, carved architraves simply suggest themselves for decorating window openings. Making them yourself is not at all a whim or an attempt to save money, because really good


 in the configuration?")


