There is an opinion that even a person far from computers can install Ubuntu. Yes, this is true - the whole process is actually reduced to repeatedly pressing the "Continue" button. However, in order to immediately touch on a few very important features of Ubuntu, this article will describe not the easiest way to install. Don't worry, it really won't be difficult! On the contrary, it will explain how to easily and correctly configure a place for Ubuntu on your computer and make the installation as efficient as possible. By the way, before you start doing something, it is recommended to read this article to the end so that some questions do not arise along the way.
Just in case, remember that during the installation of Ubuntu it is desirable to have a working Internet connection. How to set it up and why it is needed is described in the previous article.
So, on the desktop in Ubuntu launched from the LiveCD, there is a very unambiguous icon called "Install Ubuntu 14.04 LTS" (look closely - there is one on the launcher). Double-click the icon on the desktop with the left mouse button to launch the Ubuntu installer (or click the button on the launcher):
First you will be asked to select the main language of the future system, in addition, if you wish, you can read the release notes:

Have you chosen? Click Continue.
The system will remind you that you need to have at least 5.9 GB of free space, the computer must be connected to a power source (as you understand, this applies to laptops) and an Internet connection is desirable. At the very bottom of the window, there are two more options: download updates and install third-party software. If you select the first option, the system will download all the necessary updates during the installation process. If the Internet is slow, this can significantly slow down the installation process. The second option will install proprietary software required to play some media formats and some drivers. The fact is that due to the imperfection of the legislation of some countries, the installation of this software requires confirmation of the license by the end user. In any case, the choice is yours. Even if you skip such an installation at this stage, the following will tell you how to install it all on an already installed system:

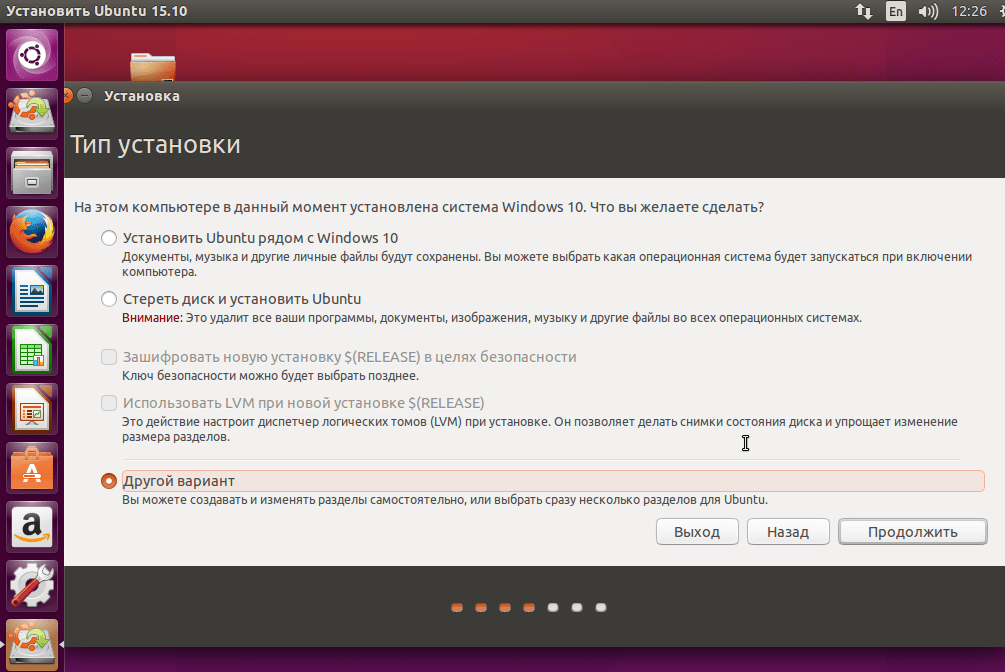
And now the most interesting. Now is the time to tell Ubuntu where to install it. The installer will show a graphical representation of your hard drive and offer three options for further action:
Installation next to Windows;
Complete removal of data from the disk and installing Ubuntu with a single system;
Another variant.
So, the first two points allow Ubuntu to automatically partition the disk for installation. In this case, if you select the first one, the installer will cut off the required space from the last partition on the hard disk and install the system on it, and if you select the second one, it will simply destroy all the contents of the hard disk and re-partition it under Ubuntu. If you haven't already partitioned the disk for your Ubuntu, then you can choose one of the first two options, and if you did manual partitioning, now you need the third option.
Keep in mind: the second option is really deletes all data on disk. Unlike Windows, for Ubuntu, a disk is a physical disk with all partitions. That is, the data will be deleted from all partitions of your hard drive.

Do not be alarmed if instead of this window you see a message that one of the disks is mounted and the system prompts you to unmount it. This message only means that you, using the LiveCD, went to one of the computer's hard drives. Just agree with the suggestions by clicking on the "Yes" button, and the installation will continue. However, during the installation of the system, you will no longer be able to work with data on the computer.
Click Continue. A window will appear with a list of hard drive partitions:

Immediately look in the list for the partitions you created earlier for Ubuntu and remember what sda and other disk names are. In principle, the installer supports some of the partitioning operations available in GParted, but not all. That is why you already have everything marked up in advance and now it remains only to specify which disk to use for what.
And now the information from the article about the file system is useful to you, so if you haven’t read it or don’t remember what it is about, then please go back a little and refresh your knowledge. As already mentioned, partition mount points are assigned during installation. So, since you have already prepared the hard disk, all that is left for you is to specify these very mount points.
Let's start with the system drive. Probably, you have not forgotten that in the example about the layout of the hard drive, you assigned it sda5 . Double-click the left mouse button on the line with the desired section to open the window for editing its properties (or select the section with the mouse and click on the “Change…” button). In the example (for sda5) it looks like this:

Let's say you want to make sda5 a system partition, so you need to specify "/" in the "Mount Point" field. Remember that "/" is the root of the Linux file system? Also, in the "Use As" field, set "Journaled Ext4 File System" as this is the best suited for the root . And finally, just in case, check the "Format partition" box to make sure that the system will be put on a completely clean place. The size of the partition, of course, should not be touched.

In the future, if you decide to reinstall the system, you can mount this partition again as /home , thereby preserving all settings and your data. Formatting it, of course, is not required.
And here's where the tricks begin. First, you don’t need to do anything with the swap, it will be automatically detected and connected. And secondly, the remaining partitions need to specify mount points somewhere in subdirectories/media directories. For example:

Most importantly, for Windows partitions, do not forget to specify the ntfs file system (or fat32 if you still use it) and that you not you must check the formatting box, unless, of course, you want to destroy all data on the selected disk. And don't get confused - the mount point should not be /media , but any of its subdirectories, for example, /media/data .
As a result, you need to specify mount points for all drives except swap. For the very first drive on which Windows is installed, it is not necessary to specify a mount point at all, since only the system is there, and most likely there will be no need to access it from Ubuntu. In any case, if such a need arises, then this can be done in the course of work. Here's what happens:

In the same window, you can configure where to install the bootloader. The bootloader parameters, in the vast majority of cases, should not be touched. Just keep in mind for the future that the Ubuntu installer allows you to customize the bootloader of the system, this can come in handy in complex configurations, for example, when there are several Linux systems on the computer.
Click "Continue" again. Now the system will ask you to select a time zone. You can do this either by entering the name of the city, or by selecting a place on the map:

The installer will then prompt you to select a keyboard layout. Everything seems to be clear here:

In the next window, you need to enter the first username for your Ubuntu. The user you specify will be an administrator with full control over the system. After installation, it can be used to add ordinary non-privileged users. However, immediately pay attention to the fact that using the administrator account does not pose almost any security risks, so you need to create additional users only when someone else is using your computer.

In addition, it should be noted that many users moving to Linux have heard at least once about the so-called root superuser. So, in Ubuntu, this user, in the usual sense for some, does not exist, but this will be discussed in more detail after installation.
In the meantime, you must first specify your name in the system, then your username and password. It is desirable to enter the login in small Latin letters, and the name can be anything. You can leave the computer name unchanged, but the switch at the bottom will surely interest you. Here you can specify whether your system will ask for a password when logging in or not, as well as whether to encrypt your user data, thus making them inaccessible from outside the system. Naturally, in this case, you will always need to enter a password when logging in. For security reasons, it is recommended to choose the second option, and decide whether or not to encrypt your home folder.
Is everything set as you like? Click Continue. If other operating systems are installed on your computer, the user import window will appear, but it is not recommended to import anything through it, so calmly click "Continue" again. Everything! The installation has started.
It is impossible to cancel the installation process after it has started, keep this in mind, just in case.
A slideshow will appear showing interesting and useful information about the system's capabilities, as well as the installation progress:

While the system is being installed, you can drink tea or play Minesweeper (try to find it yourself). After successful installation, you will see a window prompting you to reboot:

Congratulations, you've completed the installation! It remains only to restart the computer, remembering to reconfigure the BIOS back to boot from the hard drive, and you will be in your own freshly installed Ubuntu.
If you want to surf the Internet securely without a firewall or spyware antivirus, "loading" the system; any free editing of video, photo and audio files, reading books on PC from the sofa if video effects Windows heavy and unwieldy for your computer, as well as the cheapest rates anywhere in the world or free PC-to-PC calls, Ubuntu is your best bet.
But you need to be aware that some peripherals may not be supported in Ubuntu, since manufacturers often do not make drivers for their devices under Linux, considering such production to be unprofitable, and those drivers that are created by the free community are not always fully compatible with this equipment. In addition, some highly specialized programs developed under Windows, in linux may not earn. Also, modern resource graphic games are released mainly for Windows. And although wine can save the day, it’s still worth looking for an alternative solution in the form of similar application programs. linux.
Anyway, in Linux nobody restricts the user; and you can always install Windows, and ubuntu on one computer (dualbut-“
Installing Ubuntu as a second system after Windows.
First, connect to the Internet and download the latest ISO disk from the official download page.. Next, we write the installation disk using programs for burning DVD images or flash drives. Then in the BIOS ( UEFI) set boot from CD or USB, and install Ubuntu second after Windows system. There shouldn't be much difficulty. We set the HDD partitions "manually" using the arrows on the keyboard.
Line with Windows to work in two systems necessarily must be brought to the form so that the result is as follows, otherwise Windows will not be recognized:
First line with Windows
:
Change partition size: ~40-1000 GB (depending on how many games you install)
Use file system: ntfs
Mount point: /windows, (we prescribe, because there is no word windows in the drop-down menu-list)
Second line: root section /
. Since the root /- root will contain all mount points except /home, we must allocate space up to 20 GB or more. . Unlike Windows, Ubuntu system files can also be installed on a logical partition. File system - well developed in Ubuntu ext4
Resize partition: 20 GB or more
Format: yes
Mount point: /
Under swap on the PC an amount equal to the computer's RAM, but not more than 2 GB, is allocated. (With RAM of 4 GB or more, swap on a PC is not needed, as on a laptop.). Swap partition is desirable to create at the beginning of the disk.
Use: swap partition
Mount point: not specified.
The last partition for Linux which is for your home directory is /home.
In general, for the convenience of reinstalling in the event of a "crash" of both systems, Windows or ubuntu, all your documents: movies, music, photos, etc., should be stored in a separate section - /home. Then you can reinstall systems, and /home do not change size and do not format, and then all documents and settings of programs and browsers will be safe and sound!
Resize partition: 5 GB or more
Use: ext4
Format: yes
Mount point: /home
If you have multiple hard drives - make sure the bootloader is installed on the drive that will boot first -( hd 0) already points to the first hard drive to boot.
Everything, confirm your actions<Yes> . Then, you need to answer simple questions, think over a username and password, and that's it. The system is installed automatically. At the end of the process, you need to reboot and transfer the boot to the BIOS by factory default - from the HDD.
After starting, two operating systems will run on the computer!
10 Seconds
waiting and, if you do not select the axis with the keyboard arrows, it will load by default ubuntu. By the way, the interleaving, timeout and other bootloader settings of the two systems, Linux and Windows, GRUB can later be changed in the utility " Grub Customizer". Installation available from repository-PPA via terminal (Ubuntu 16.04):
sudo add-apt-repository ppa:danielrichter2007/grub-customizer && sudo apt update && sudo apt install grub-customizer.
Verified disk partitioning (differs in speed and stability in operation):
Approximately, installation with flash-cards a little over 7 minutes. Installation, of necessity
, video driver - 5 minutes. If it works without a video driver, then it's better without it. Updates about 15 minutes. That is, the entire system is installed in about 30 minutes! Windows not much faster, but you still need to install drivers, antivirus, Windows updates, archivers, programs and much more (exactly, in that order). And Ubuntu is ready to go!
Thus, the installation order of the two systems is as follows: first install, if you need to reinstall, Windows. After all operations c Windows, (installation, drivers, antivirus, etc.), install Ubuntu. The system will have two axes. If with two systems you need to reinstall Windows, then after reinstalling the bootloader GRUB will disappear and will only be recognized Windows. Will have to restore GRUB, as
.
And further, in order to read any format, you need to put down all the codecs in the terminal with the command:
sudo aptitude install ubuntu-restricted-extras
Also separately for packages of archivers rar, unrar and p7zip-full command:
sudo aptitude install rar unrar p7zip-full
After installation, the system is immediately ready for use. Program set basic configuration quite suitable for most tasks. Subsequently, it will be possible to select programs from Application Manager or Synaptic and add the missing ones for you.
Some useful information about Linux:
Redshift is a very useful program ubuntu, which helps those who spend a long time in front of a computer monitor. During twilight and early morning, the color temperature smoothly transitions from night to daytime settings, allowing the eyes to gradually adapt. To install it, just open Ubuntu Application Manager, in the Search window type Redshift and install.
AT Applications that start automatically command to run Redshift, effective after reboot (in Ubuntu 14.04-16.04 LTS):
redshift-gtk -l 55.54:37.45 -t 6500:4500 & exit
[Coordinates of Moscow–55° 45" N 37° 37" E ||| Mytishchi–55° 54" N 37° 45" E]
(In Ubuntu 18.04 LTS, by default, there is a "Night Light" program in "Settings - Screen Settings")
It is not advised to remove default programs from the installed system, because. the necessary dependencies may be pulled, and the system may become inoperative, and it is also undesirable to use third-party utilities to configure and “clean” the system, such as Ubuntu Tweak, BleachBit, GTKOrphan, etc. It is recommended that you use only your own terminal commands to clean up the system.
Remove unused packages from the cache ( in Ubuntu 12.04–16.04 LTS
):
sudo aptitude autoclean
Clearing the cache in Ubuntu:
sudo aptitude clean
Removing unnecessary dependencies ( at 14.04-16.04 LTS
):
sudo apt autoremove
This is quite enough. Ubuntu, like Windows, doesn't get clogged if you don't experiment with defaults.
What are the individual directories of the file system responsible for and what is stored there:
File system:
/bin-basic binary user modules (programs) in single user mode.
/boot- contains the files needed to boot the system - for example, the GRUB bootloader files and your Linux kernels are stored here. There are no configuration files used by the boot loader - they are located in the /etc directory along with other configuration files.
/dev-Basic device files (printers, disks, etc.)
/etc-(name comes from et cetera) contains configuration files that can usually be edited by hand in a text editor. Note that the /etc/ directory contains system-wide configuration files; user configuration files are located in each user's home directory.
/home-Contains the user's home directories, which in turn contain the user's personal settings and data, with the exception of the root user.
/lib- contains the libraries required for the main binaries located in the /bin and /sbin directories. The libraries required by the binaries found in the /usr/bin directory are located in the /usr/lib directory.
/lost+found- recovered files. Every Linux filesystem has a lost+found directory. If a file system failure occurs, a file system check will be performed at the next boot. Any corrupted files found will be placed in the lost+found directory, so you can try to recover as much as you can.
/media-The directory contains subdirectories in which removable media inserted into the computer are mounted. For example, when you insert a CD on a Linux system, a corresponding subdirectory will be automatically created under the /media directory. In this subdirectory you can access the contents of the CD.
/mnt- temporary mount points. Historically, the /mnt directory is where system administrators mount temporary filesystems when they use them. For example, if you are mounting a Windows partition in order to perform some file recovery operations, you can mount it in /mnt/windows. But you can mount other filesystems anywhere.
/opt support packages. The /opt directory contains subdirectories for optional software packages. This directory is widely used by proprietary software that does not follow the standard file system hierarchy - for example, a proprietary program may dump its files to /opt/application during installation.
/proc- kernel and process files. The /proc directory is similar to the /dev directory in that it does not contain standard files. It contains special files that provide information about the system and processes.
/root-The home directory of the root user. The /root directory is the home directory of the root user. Instead of being in /home/root, it is placed in /root. This directory is different from the / directory, which is the root directory of the system.
/run application state files. The /run directory is a fairly new directory that allows applications to store the auxiliary files they need, such as sockets and process IDs, in a standard way. These files cannot be stored in the /tmp directory because the files in the /tmp directory may be deleted.
/sbin- system administration binaries. The /sbin directory is similar to the /bin directory. It contains important binaries, which are usually intended to be run by the user during system administration and configuration, for example, init, iptables, ifconfig.
/selinux- SELinux virtual file system. If your distribution uses SELinux for security (such as Fedora and Red Hat), the /selinux directory will contain special files used by SELinux. This directory is similar to the /proc directory. Ubuntu does not use SELinux, so having this folder in Ubuntu is probably a mistake.
/srv service data. The /srv directory contains "data for services provided by the system". If you're using an Apache HTTP server to serve a website, you'll most likely be storing your website's files in a directory located inside the /srv directory.
/sys-This directory has been used since the v_2.6 kernel and "sysfs" is mounted into it, with information about the kernel, devices and drivers. /sys/block - Here are the directories of block devices that are in the system in real time. /sys/bus - List of kernel buses: eisa, pci, etc. etc. /sys/class - List of devices grouped by classification: printer, scsi-devices, etc. etc.
/tmp-temporary files. Applications store temporary files in the /tmp directory. Such files are usually deleted whenever your system is rebooted and can be deleted at any time using utilities such as the tmpwatch utility.
/usr- custom binaries and read-only data. The /usr directory contains applications and files used by users, as opposed to applications and files used by the system. For example, non-critical applications are in /usr/bin instead of /bin, and non-critical system administration binaries are in /usr/sbin instead of /sbin. The libraries for them are located inside the /usr/lib directory. The directory also has other subdirectories - for example, the /usr/share directory contains files that are independent of the system architecture, for example, used for working with graphics. The /usr/local directory is where locally compiled applications are installed by default.
Let's say you read a few articles on the Internet and became interested in the free Linux operating system. Perhaps you even installed it on a virtual machine or booted into Live mode and tried how everything looks and works. You liked it, and now you want to install it on your computer and start using it. But at the same time, you don’t want to lose your already installed Windows, so that in case of an unforeseen situation you can return to a fully working system, and your favorite games and necessary programs will always be at hand. It is possible to install Linux and Windows 10 on the same computer. At one time, for me, as for many other users, this was the ideal option.
In this guide, we will look at how to install Linux alongside Windows 10. I say Windows 10 because it is the newest operating system from Microsoft, but these instructions will also work for earlier versions such as Windwos 7, 8, and 8.1.
I assume that you already have Windows installed, you have found and decided on which disk to separate some space for Linux from, but you do not know how to do it correctly. Here you will get a detailed answer to this question. Let's touch on another important topic - UEFI. This technology is used on all new Windows laptops, and many users are wondering how to install Linux on UEFI and what problems it may encounter.
To install the Linux operating system alongside Windows 10, you will need to create some additional disk partitions. The minimum number is three sections. It is not customary to install Linux on one partition like Windows, although this option is possible. Linux is so flexible that it allows you to place the system, user files, and settings on different partitions. This is very beneficial during reinstallation. You reinstall the system in the system partition, and all your files on the desktop and settings of the working environment will remain in place.
These are the three sections:
- System;
- Home;
- swap partition.
The minimum volume requirements for a system partition in various distributions vary from seven to twenty gigabytes. But this is enough to install the system itself and several additional programs. If you are going to use a lot of programs and games, especially if they take up a lot of space, you need to take another couple of tens of gigabytes in reserve. I recommend using under the Linux system partition in the same way as for the Windows C drive, 30-40 Gigabytes.
The swap partition is used when the system runs out of RAM. At a certain percentage of filling, Linux gradually starts dumping unused data into this file. Therefore, for this section, the volume is half as small as the size of your RAM. But if you plan to use hibernation or hibernation, then you need to allocate an amount of disk space equal to the size of RAM for the swap partition, because in these modes, the entire contents of the computer's RAM is transferred to disk. The home section is the section with your files, movies, music, downloads. Estimate how much you need.
Preparing a disk in Windows
To install Linux next to Windows 10 already in use, you will need to "cut off" space from the system drive. Therefore, before taking decisive action, it is important to back up the system or at least important files. If everything goes well, nothing bad will happen to the files or the system, but due to some kind of failure, such as a power outage, the file system may be damaged. You yourself, inadvertently, can do something wrong and delete the wrong thing.
Therefore, if you work with the system disk, copy important files to external media, and, if possible, create a backup copy of the operating system using the appropriate item in the control panel:

When working with a non-system partition, for example, D, E, F and so on, just copy the files from there.
Now we proceed directly to preparing the disk for installing Windows 10 and Linux. The easiest way to do this is with the standard disk management utility in Windows. Right click on the icon " This computer" on the desktop and open the item " Control":


Here, at the bottom of the window, we see two drives: C (system) and D (normal). I will give an example of how to resize drive D. For drive C, all steps are the same.
Right-click on the desired disk and select the option Shrink Volume:

This window will open, in which you need to enter the size of the volume to be created in the field compressible space size:

Note that you cannot specify a size greater than the amount of free disk space. So first free up some space if you haven't already. We click on the button squeeze. After that, unallocated space will appear, from which you can create the necessary partitions:

That's all. Now you have a place to install Linux next to Windows 10. I see no point in performing further disk partitioning in the Windows utility, since we have already done all the dangerous operations that could damage the system, and Linux partitions are best configured using Linux tools.
Disk preparation in Linux
This is not the next step in installing Linux along with Windows 10. This is an alternative disk partitioning option without using Windows. If for some reason you do not want to use the standard Windows utility to allocate the required space, this can also be done using any Linux distribution LiveCD with the Gparted disk management program preinstalled. For example, the same Ubuntu.

Boot from the Ubuntu disc, search for Dash and type Gparted:

The following window of the disk management program in Linux will open:

It is important to note here that disk partitions in Linux are named differently than in Windows. Here drives are just file addresses in the dev virtual file system. Later you will understand what this is, but for now it is only important that the name of each partition starts with /dev/sd. Next comes the letter representing the physical disk (sda, sdb, sdc, sdd, and so on). Behind it is a number that indicates the partition number on the disk, for example: sda1, sda2.
In the utility window, in addition to the name of the disk partition, we can see the file system, size and free space on the disk. Now, by size and file system, we can understand on which disk our system is located.
In my example, /dev/sdb1 is drive C on Windows and /dev/sdb2 is drive D. We will do the same as in the previous example. Let's reduce the size of the /dev/sdb2 (D) partition to 10 GB in order to install Linux on Windows 10 on the freed space. To do this, right-click on the partition and select Resize/Move:

In the window that opens, you can enter the desired size manually in the field new size or use the slider:

Then press the button Resize/Move.

As you can see, free space has appeared, but there are no real changes on the disk yet. In order to burn everything to disk, press the green checkmark, or in the menu Edit select item Apply All Operations:

The file system resizing process may take a little time:
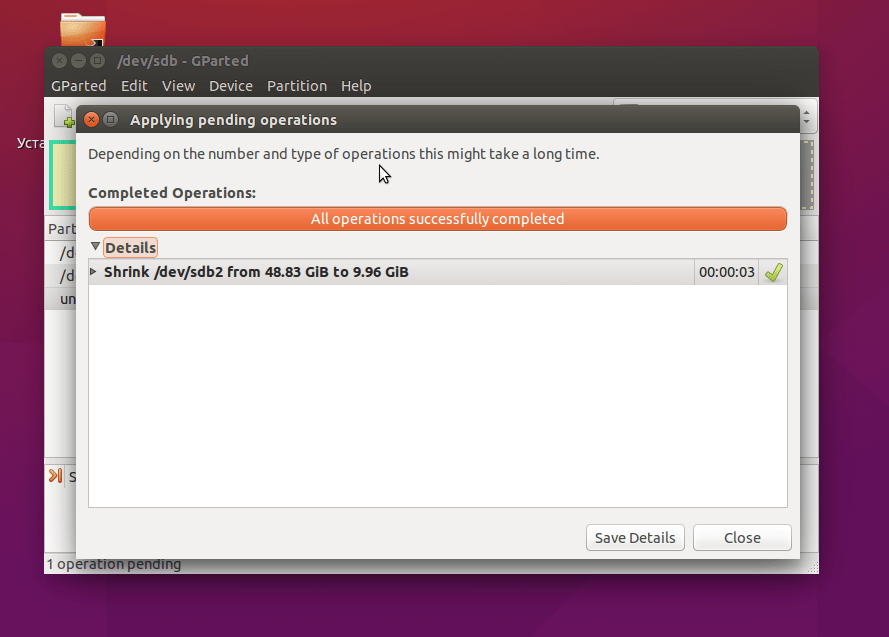
Now you can see that the /dev/sdb2 partition has shrunk and there is free space:
For the system partition, the operations are the same, only there is one remark: do not touch the beginning of the partition. You can safely reduce the size of a partition by adding free space after it, but don't try to do it before it, like this:

You don’t need to do this, otherwise the Windows bootloader will be damaged, it is very easy to restore it, but I don’t think you need to solve these problems at the very beginning of your acquaintance with Linux.
We will not create partitions for Linux here either, it is better to do all this during installation with a utility specially designed for this.
Installing Linux alongside Windows 10
I will not go into detail here on how to install Linux, all this has already been discussed in detail in my articles separately for different distributions. Let's look at just a few aspects of disk partitioning. Let's take Ubuntu as the most popular OS for beginners, but other distributions are pretty much the same.
At the stage of choosing a markup method, I advise you to take the manual option. Since this way you will better understand how to install the system:
Here you create the sections that we talked about at the very beginning of the article from the previously freed space. For the root partition, the mount point must be /, for the home partition, /home, and for the swap partition, no mount point is specified.
Installing Linux alongside Windows 10 UEFI
All modern laptops released with Windows 8, 8.1, 10 use UEFI technology. This is a new progressive technology that has replaced the outdated BIOS. The first important and most noticeable change is the use of the GPT partition table instead of the obsolete MBR, as well as the creation of a separate disk partition for operating system loaders. Many users fear that UEFI will make it harder to install Linux with Windows 10 on their laptop. And in vain - in most cases there is nothing complicated. If you already have Windows installed, then most likely the efi partition has already been created, and during disk partitioning, you just need to select it to install the bootloader. The efi partition is usually created with the fat32 file system and takes up about 30 MB of memory:

If you have a clean hard drive, you need to create a GPT partition table. This can be done using the same Gparted by opening the menu devices ->Create Partition Table:


Then we specify this partition during the installation of Linux along with windows 10, for it you need to specify the /boot/EFI mount point. That's all the difficulties with installing in UEFI. In general, installation in UEFI is supported by all distributions running in Grub2.
Completing the installation
Many new users are interested in: "How do I boot my Windows then?" Don't worry, the Grub bootloader will automatically find the Windows bootloader and, before starting the computer, it will offer you a menu where you can select the operating system:

This way, Windows 10 and Linux dual boot will be configured automatically.
If something doesn't go according to plan, although it is unlikely to happen, everything is very easy to set up. So, if done right, you will definitely get access to your Windows after installing Linux.
findings
Today we looked at how to install Linux on Windows 10. We figured out how to perform partitioning, how to select partitions, and what to do if your laptop uses UEFI. It is pointless to talk about installing any particular Linux distribution along with Windows 10, because, firstly, all the steps are similar, and secondly, you can find detailed instructions in the relevant articles. I would also like to note: for the comfortable operation of Windows 10 with Linux on one computer, you need to disable Windows FastBoot, otherwise you will not be able to. If you have any questions, ask in the comments!
Before you decide to install Ubuntu as a second system, test the recovery of the Windows OS so that if something goes wrong, you won't find the backups unusable.
The reason for such a big effort is that when installing Ubuntu side by side with Windows, problems can arise that are not only related to the Linux system. For example, the difficulties associated with the interaction of modern UEFI implementations.
Each motherboard manufacturer behaves in its own way and only tests for compatibility with Windows. Additional barriers to consider include signed bootloaders, fast startup, and power-saving mechanisms.
BIOS or UEFI?
Your computer's modern hardware is probably running UEFI firmware and Windows is installed in UEFI mode. If you have a PC or laptop for a long time, there may be a classic BIOS. To install Ubuntu, it is important to know exactly the layout, since you must select the UEFI or BIOS mode.
To check this, enter the query "System Information" in the Windows search bar and find the line "BIOS Mode". If it says "Legacy" (outdated), Ubuntu should be installed in BIOS mode. In this case, both Secure Boot and the Fast Boot option must be disabled in the BIOS, and the mode cannot be changed to "UEFI".
If the system information says "UEFI", Ubuntu should be installed in "UEFI" mode and use the 64-bit version. To run Ubuntu parallel to Windows in UEFI mode, Windows 8 and 10 users must disable fast startup. This is done in the power settings through the "Action of the power button" item.
In the Shutdown Options section, make sure that the Turn on Fast Startup option is unchecked. Windows 7 users must disable hibernation from the Start menu with the "powercfg /h off" command. And finally, disable the Fast Boot option from the UEFI firmware.
Space preparation for Ubuntu
To install Ubuntu side by side with Windows, you need enough space. The Ubuntu installer is capable of shrinking the space of an existing Windows. You can do this in advance, manually and directly from Windows. To do this, go to "Disk Management", which is called through the Start menu with the command "diskmgmt.msc".
 Typically, Windows takes up the entire disk, but can free up space for Ubuntu
 Even if you're a Windows-only user, there are often various partitions on your hard drive, including Recovery, UEFI Boot, and, of course, Windows System. The more complex the initial conditions, the more likely it is that the Ubuntu Boot Manager will crack its teeth on your system later on.
To shrink an existing Windows partition C, right-click on it on the utility's main screen and select Shrink Volume. Now you need to specify the size of the compressible space of the required space in MB. If you enter "20000", Windows will free up 20 GB for Ubuntu. This is enough to get started with Linux. To reserve a seat, click on the "Squeeze" button.
Installing Ubuntu
Start your computer again from the DVD or USB stick as described on page 85. In Live CD mode, click on the desktop icon "Install Ubuntu 16.04 LTS". Follow the wizard's instructions, choosing the language first. Connect via LAN or Wi-Fi to the Internet to get updates immediately.

The key point during installation will be the "Installation Type". In this case, you should select "Install Ubuntu next to Windows Boot Manager". Next, set the default settings, such as location and account.

At the end of the installation, you are presented with two options: stay in Live CD mode or restart your computer. Select "Continue exploring" and open the command line with the key combination "Ctrl + Alt + T".

The "sudo apt-get install efibootmgr" command launches a small tool for setting the boot order. The "efibootmgr" command will display information about boot entries. In addition to the line "Windows Boot Manager", the entry "Ubuntu" should appear. Use "sudo efibootmgr -o x,y" to change the boot order, where "x" is for the numbers before the Ubuntu entry and "y" is for the numbers before the Windows Boot Manager.
First steps in Linux
This operating system offers only a base for working with programs and web services. In order for everything to go smoothly, you should get acquainted with the system.
1. Introduction to the Desktop
 Ubuntu uses the so-called Unity desktop. It looks simple, on the left side is displayed the software panel - the launcher. In addition, a menu bar is located on top, similar to the implementation in Mac OS X from Apple. When you open a program, Ubuntu minimizes the menu to this bar at the top of the screen instead of a window. To feel like in Windows, move the launcher to the bottom of the screen. At the moment, this requires typing a command in the terminal. "gsettings set com.canonical.Unity.Launcher launcher-position Bottom" brings the panel to the bottom. An analogue of the well-known Control Panel from Windows in Ubuntu is the system settings.
2. Check for updates
 Like Windows, there are regular security updates for Linux. They need to be installed
 Once Ubuntu is installed, the system is considered up to date if the Wizard is allowed to complete the upgrade. For those who like to speed up the process, there is a command "sudo apt-get update && sudo apt-get upgrade". The first part of the command requests the latest package from the Linux servers, the second one starts the updates. To upgrade to a new version of Ubuntu, such as from Beta 2 from the premium DVD to the final version, type "sudo apt-get dist-upgrade" as well. If the command line scares you, look for the appropriate graphical interface in the update manager.
3. Installing programs
 There are many programs for Linux that you know from Windows. With the command "sudo apt-get install vlc" you can, for example, install the VLC media player. Gnome offers a graphical utility similar to the App Store for Ubuntu. In it, find "vlc" and click on the "Install" button.
Troubleshooting Ubuntu
Installing Ubuntu 16.04 side-by-side with Windows doesn't create any problems per se, as our tests confirmed when installing in BIOS mode. However, the devil is in the details, as our experiments with various PCs and laptops with UEFI found out. At the same time, everything seems to go like clockwork, but then Windows boots up again, and there is no word about Ubuntu.
If you're also facing the same issue, search Google for the exact model of PC or laptop paired with Ubuntu. The quickest way is to find tips on a specific BIOS / UEFI setting or a special bootloader adaptation. So, we failed with a Sony Vaio Pro laptop and an NCQ-enabled SSD drive. Only after disabling this feature did Ubuntu start up. In general, it is recommended to use the latest version of UEFI.
Instead of relying on Ubuntu to automatically set up your hard drive or SSD, you can resort to manual partitioning when an error occurs. The corresponding menu item in "Installation Type" is simply called "Other Option". Here you need to create three partitions: “/boot” for 250 MB (ext2 file system), a swap partition for 4092 MB, and you can give the remaining space to the root partition “/”. Let the bootloader write to the /boot partition.
Linux security under control
Even Linux is not invulnerable. In February 2016, hackers broke into the Linux Mint project server and changed the ISO files hosted on it. In the installation files, they hid a backdoor to steal passwords. But you can protect yourself.

Checksum verification. Manipulations with Linux distributions pop up immediately if the checksums do not match. Windows utilities such as md5sums display values for ISO files. They must match the data from the developers.
A photo: manufacturing companies
Of all the operating systems designed for personal computers, two clear leaders can be distinguished: Linux and Windows. Why are these two shells the most popular among users?
- linux is a free and open source system. An integral advantage of this shell is the ability to customize it - the user configures the OS as he needs it. Ubuntu is a Linux distribution that is simple and popular and runs smoothly even on older systems. Ubuntu is not the only option, it is also possible to use Linux Mint, Kali and others.
- Windows- the second most popular OS in the world, which gives great opportunities, since it is for it that the largest share of programs and games is developed. A large selection of application software and applications for entertainment is the main advantage of the OS from Microsoft over Ubuntu.
Preparing to Install Ubuntu
It is likely that the user reading this article already has the latest OS version from Microsoft installed. To start installing Ubuntu next to Windows, you need to do the following:
Local disk preparation
If the user already has experience in partitioning disk memory into local disks using the volume manager, he can do it the way he likes.
Consider the general case where a standard Windows application will be used. If the disk space consists of one logical disk, you will have to compress it in order to allocate space for the subsequent installation of Ubuntu next to Windows. If available several sections- it will be necessary to determine which of them will be completely cleared, and then allocated to the new OS.
Regardless of the situation, you must do the following:

Preparing Disk Space in Windows 7
Although most users of the operating system from Microsoft have already switched to its latest version, there are people who are faithful to 7-ke. It can also be installed with Ubuntu as a second system on the same computer. The process of preparing the memory on the hard drive is slightly different due to the differences between the old and the new system, so we will analyze the case of Windows 7 separately.

Further actions depend on the number of initial logical disks. So, if there are two of them, then it is desirable to bite off the place (or completely allocate a logical disk) from the one on which the games are installed, the files are stored. The system drive should only be touched if there is only one on the computer.
- If, for example, the memory is divided into D and C, there is an alternative: select drive D by right-clicking on it and selecting " Shrink Volume" or " Delete volume". The first option will allocate space, and the second will completely clear D for further installation of Ubuntu.
- If there is only one C, you need to right-click on it, then " Shrink Volume”, and then specify the required amount of space in GB (from 10 GB).
Preparing disk space via Linux
In order to allocate disk space from Linux, you will need GParted, a standard utility for some Ubuntu builds.
With its help, the user will be able to allocate disk space for the new OS in much the same way as it was done in the standard Windows utility. 
From the largest partition, the required amount of memory is taken, an empty partition is created, on which the OS will be installed in the future.
Initially, all partitions in the system are connected to work. This is indicated by either a key sign or a lock sign. In both cases, you need disable partitions. To do this simply by right-clicking on the desired one, selecting the item " Unmount». 
By clicking RMB on the disk of interest and selecting " resize/move”, you can resize the largest partition, thus creating a new one that will be necessary for further work. 
After, a new local disk will appear, empty. 
You must save the changes in the top bar by clicking on the green checkmark. Now the user has a place to install the second OS. It remains to break this memory into three cells so that everything fits the requirements of the Ubuntu system.
Memory breaks are also very easy. to an empty cell ( anallocated) right-click, then select "New", then make sure that the "New size" field is set to all memory, and the "Create as" item is set to "Extended Partition". 
On the extended section, you should again click RMB, again "New" in the context menu. Now we create a system partition, the volume of which will be 7 GB (7168 MB). In step " Filesystem» should specify ext4. 
Another partition is for the swap disk. Under it, it is worth allocating an amount of memory equal to your RAM. 
The latter is a memory location for user files and programs. After all three sections are created, the user should observe the following: 
It is worth clicking again on the green check mark on the top panel, after which progress will continue and you can proceed to the installation. 
Preparing bootable media
In order to successfully install one of the systems next to the second, you need to write the distribution kit of one of them to a flash drive in a certain way. For this purpose, we will consider an application for Windows OS − UniversalUSBinstaller.

According to this principle, bootable flash drives for Windows and Ubuntu are created.
Download and install Windows and Ubuntu
Due to the fact that all users have different BIOSes, the OS installation process will be described only in general terms.
First of all, in the boot priorities (BIOS subsection), the user sets the USB. After that, restart your PC. The Ubuntu installation menu will open. In the first menu, the user will have several sub-items to choose from: 

Features of installation with UEFI
UEFI is a big problem for inexperienced users who want to install Ubuntu on their device. The updated BIOS is not so simple and needs a certain approach:

System start
After installing Ubuntu Linux, the classic system startup window will change. Further, each time the computer is started, the user will need to choose which operating system he wants to use this time. 
- ubuntu– start Linux OS accordingly.
- Windows 7/10- run the operating system from Microsoft.


 in the configuration?")


