Interior items made from coffee beans are very, very popular. Indeed, they look very stylish and add zest to your interior. In addition, such decorative elements have an incredible aroma. In today's "Cross" master class, we will talk about creating a coffee frame for a photo with your own hands.
First, let's prepare the necessary materials and tools:
- corrugated cardboard (from any box)
- corrugated paper brown
- plain colored paper brown
- scrap paper with any suitable design
- tin
- hard wire (in this case, a copper tube)
- cement-sand mixture (or any replacement of your choice)
- jute rope
- coffee beans
- cinnamon
- dried lemon slices
- hot glue
- moment gel
- scissors
- ruler
- pencil

Is everything ready? Then get to work!
Cardboard and paper frame
Everyone can make a frame out of cardboard with their own hands. To do this, cut out 2 rectangles of cardboard measuring 20 cm by 25 cm, in one of which we cut a rectangle measuring 10 cm by 15 cm. It turns out a frame 5 cm wide.

The resulting blanks can be used to create any photo frame.
We glue both parts on corrugated paper, leaving sufficient allowances at the edges and between the rectangles.

Glue the allowances on the outer and inner side of the frame. It turned out to be a kind of book.

We cut out a rectangle measuring 11 cm by 16 cm from scrap paper and glue it on the whole side of the “book”.
All of the above manipulations are best done using Moment Gel glue, and not hot, because Moment is more liquid and, accordingly, will form a thinner layer.

Twisted trunk
One end of the wire (or tube), from which the barrel for the frame is made, should be made flat. Using glue, we wrap a hard wire with a jute rope. Now we form a certain spring.
If you first form the spring and then wind it with jute, as I did, then the winding process will be much more difficult.

The flat end of the wire must be glued into the frame. To do this, glue it to the side of the frame on which we have scrap paper. We spill the entire inner surface of the frame with glue and close our “book”. We squeeze well.
The surface around the trunk must be abundantly filled with glue. Here it is better to use hot glue, because it gives a more reliable fixation. But work
with hot glue it is necessary quickly, because it quickly hardens.

frame base
We fill the tin can with cement mortar, insert the frame into it and leave it to dry overnight.

The solution should be moderately liquid so that it does not crumble when it dries. Otherwise, the solution will dry out, but the wire will not hold.
Since the tin can is low, the solution is liquid, and the frame is high and voluminous, you need to make sure that the frame is level and does not fall anywhere!
From colored paper we cut out two circles with a diameter equal to the diameter of the can, and a strip of paper with a width equal to the height of the can with an allowance.

Glue the base with the resulting details.

decoration
It's time for coffee beans. We paste over the base with them, starting from the trunk and further in a circle.

Now we fill the surface of the frame with coffee beans. We start from the inside so that the first row is “along the line”.

After the frame is completely filled with coffee beans, glue a couple of anise flowers in the upper corner of the frame, and a dried lemon slice and a cinnamon stick in the lower diagonally opposite corner.
A huge number of crafts can be made using coffee beans. This is a wonderful decoration element with a pleasant invigorating aroma. In this article, we will consider: what crafts can be made from coffee beans with your own hands.
You will need: coffee beans, polystyrene foam, PVA glue, gypsum, barrel stick, brown threads, flower pot, ribbon.
Master Class


You will need: coffee beans, thick cardboard, glue gun, simple pencil, scissors, cotton or linen fabric.
Master Class
- Cut out a square of cardboard of the desired size.
- Cut a piece of fabric of the same size + 2 cm, take a margin for allowances.
- Glue the fabric to the cardboard and pin the edges of the fabric to the back.
- Wait for complete drying.
- Sketch the drawing with a simple pencil. (It can be a heart, a map of the world, an inscription, a number, a declaration of love, a cup of coffee, owls, trees, cats, bears, flowers, and much more ...)
- Glue coffee beans along the edges of the pattern with the convex side down.
- Glue the coffee beans, filling the middle of the pattern with the convex part down.
- Wait for it to dry completely and decorate to your liking.

You will need: coffee beans, glue gun, cardboard, scissors, clock hands and numbers.
Master Class
- Cut out the clock shape of the desired size from cardboard. It can be a circle, square, rectangle, triangle, heart, and more…
- Glue the coffee beans with the raised part down around the edges, then filling in the middle.
- Attach the clock hands and numbers.
- Decorate to your liking.

You will need: coffee beans, cardboard, PVA glue, scissors, water-based varnish.
Master Class
- Make 2 templates for the frame in this way: cut 2 identical rectangles from cardboard, cut a hole the size of a photo on one of them.
- Set the whole rectangle aside.
- Glue the coffee beans with the convex side down to the frame.
- Wait for complete drying.
- Glue the templates together, leaving room for a photo.
- Decorate to your liking.
We bring to your attention, the second simpler version of making a frame for a photo from coffee beans. It is enough just to buy or take a ready-made photo frame and paste over it with coffee beans.
coffee mug

You will need: mug, coffee beans, thread, sponges (cotton pads), super glue and brown acrylic paint.
Master Class
- Glue cotton pads to the mug. (Tight, no gaps).
- Wrap the thread around the mug.
- Paint the mug with acrylic paint.
- Glue the coffee beans to the mug.
The coffee mug is ready!
coffee candles
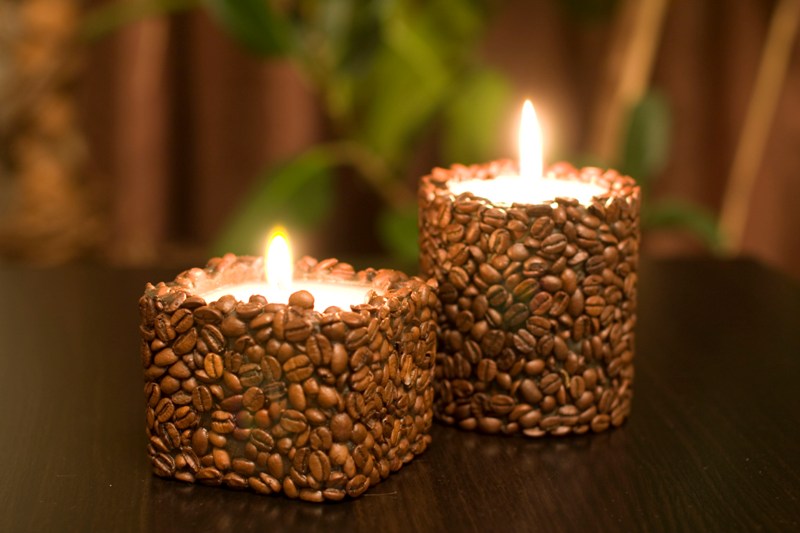
First option
You will need a ready-made candle, it remains only to decorate it with grains. You can stick them with glue or hot wax.
Second option

Take a candle and place it in a transparent wide container. Fill the space between the candle and the glass with coffee beans.
Master class - how to make a photo frame with coffee with your own hands. After all, such a frame will decorate any interior or serve as a wonderful gift for any holiday.
Of course, you can buy a blank and simply decorate it as you wish. But we are not looking for simple ways here, especially since I did not find a suitable blank for sale. As usual in such cases, cardboard and thin plywood come to the rescue.
So where to start?
1. First you need to decide on the size. Of course, we focus on the size of the photo. In my case, the frame for a standard photo is 10 x 15 cm. Therefore, the size of the inner window of the frame will be 9 x 14 cm (5 mm on each side). I made the margins of the frame 3 cm each. This will be our basis.
2. We make a drawing on a thin sheet of plywood. And of course here we have to work with a hacksaw and a jigsaw. Here you can involve a man in the creative process, because it's so nice to do something together;) although it's not at all difficult to do everything yourself.

3. It turned out such a basis / blank for the future frame.
Do not forget to process the edges with sandpaper both outside and inside. The inner rectangle can be used in other work, it will not be useful for making this frame, so we put it aside.

4. Next, we work with corrugated cardboard (three-layer), because it is light, does not weigh down the frame and is easy to work with. Where to get it? Everything is simple here - boxes are made of such cardboard, so it is very easy to find it.

5. We make similar parts out of cardboard, with slightly different sizes, namely: the size of the inner window must exactly match the size of the photograph so that it freely "lies" into this window, does not bend from tightness, but at the same time does not dangle too freely. Working with such cardboard is easy, having a clerical knife at hand.
We never forget about safety precautions when working with stabbing and cutting tools!!!
The size of the fields can be any, but not more than the size of the plywood frame.
And by the way, the inner rectangle of the cardboard is still useful to us! So we don't throw it away. It will serve us as a back wall (well, more on that later).
Now you need to take into account this moment. If we want to make a frame with glass (usually for photo frames no more than 2 mm thick), then we need 2 cardboard pieces to create the necessary depth for the glass.
5. We make an insert (back) - the back wall. Just for her, we will need that cardboard rectangle left over from the cardboard frame, it will fit perfectly. And of course, you will need a support "leg" so that the frame can stand. The leg is made of very thick cardboard. Approximately as shown in the photo. This shape of the leg will allow the frame to stand both vertically and horizontally.

We fasten the leg with glue or a powerful stapler, you can use rivets, who has such an opportunity. The main thing is that the leg should hold firmly and be rigid enough, because it will have to bear the weight of the structure on itself.
6. Using glue, we assemble the structure.
Glue the cardboard frame to the back of the plywood frame.
In order for the parts to adhere securely to each other, it is necessary to glue both surfaces well with glue, and hold it under pressure for some time (but not too heavy so as not to crush the cardboard), the main thing is that the parts are tightly pressed against each other and at the same time do not wrinkle or warp.
The back side of the frame will look something like this.

After the glue has completely dried, you can start decorating. In principle, such a blank can be decorated as you like, there are countless options. I chose a coffee theme, so I needed coffee beans and a coffee-themed napkin.
We prime the frame: on the back with white primer (for decoupage), on the front side with brown (for coffee beans). For this I used regular acrylic paint. (Unfortunately, I didn’t take a photo ... I got carried away :))
The end result turned out like this:

8. back view

9. front view
I fixed the coffee beans with a thermal gun, tried to glue them as close to each other as possible so as not to glue the second layer of coffee (otherwise the frame would be too heavy).
8. There is one more important point left - this is the fastening of the back wall to the frame. The mount should be such that it is easy to remove and put the backdrop back in place to change photos in the frame. Found a very simple and reliable way.

10. We take an ordinary paper clip and simply “unfold” it so that the ends of the paper clip are as parallel as possible to each other.
Master class “Panel of coffee beans. Coffee cup"
This master class is intended for middle-aged and older children, teachers of additional education, educators, for lovers of natural coffee and just for connoisseurs of beauty.
Purpose: interior design, making gifts for relatives and friends for the holidays with their own hands.
Performed: Stol Oksana Vladimirovna, teacher of MADOU No. 203 "Kindergarten of a combined type", Kemerovo.
Target: making panels from coffee beans.
Tasks:
- introduce the technology of making a hollow mug from a plastic bottle and coffee beans;
- improve practical skills in working with coffee beans and natural material;
- to form in children and adults an artistic taste, the desire to do something unusual with their own hands.
Interesting facts about coffee...
Coffee is the world's most popular drink. Among all products, coffee ranks second in popularity (after vegetable oil).
Approximately 10% of people are not at all susceptible to the effects of coffee. Cheerfulness, tone and increased pressure from a cup of hot drink are not about them.
The longer coffee is roasted, the less caffeine it retains.
The taste of coffee is combined with almost any product.
The aroma of coffee is in the top ten most recognizable smells.
The smell of coffee relieves stress
It is believed that the smell of coffee perfectly invigorates. However, scientists from three countries have found that the smell of coffee beans has another property.
Experts from South Korea, Germany and Japan have proven that the smell of coffee reduces the symptoms and effects of stress. Such conclusions were made in the course of experiments on laboratory animals.
Tests show that the aroma of coffee leads to changes in the work of 17 genes and the production of proteins in the brain, writes Web MD. So, the smell of coffee beans stimulates the production of substances with antioxidant properties.
These substances protect nerve cells from damage and help to recover faster from stress.
Coffee beans are by far the most popular material for creating various DIY crafts. Coffee beans - have a pleasant smell, do not deteriorate, have a rich color and an interesting texture. Coffee beans - bring happiness to the house, they have a unique aroma of coffee, which creates an atmosphere of warmth and comfort.
Here is a panel of coffee beans we will do with you.
We stock up on good mood and go!
For work we need:

- coffee beans
- ground coffee
- masking tape
- finished frame
- dense burlap
- PVA glue (preferably building, thick)
- glue "Titan"
- hot glue
- decorative flowers and decorations
- cinnamon
- dried lemon, orange, zest roses
- leg-split
- packaging cardboard
- brown gouache
- brush, ruler, scissors
Step by step manufacturing
1. Cut off the upper part from the plastic bottle, the length from the neck is 13 cm (two parts are obtained from one bottle), cut it in half lengthwise, then cut off the neck


2. Cut out the back wall and the bottom for the mug from the packaging cardboard. For a saucer, it is better to cut out two parts and glue them together, since my cardboard is thin

3. We glue the details to the mug on the Titan glue

4. We glue the workpiece with masking tape, we need this for the strength of the mug, for better gluing of coffee beans and so that the hot glue does not melt the workpiece

5. Paint the mug and saucer with brown ink.

And you can do it differently. First, smear the workpiece with PVA glue, and then sprinkle it with ground coffee (I didn’t really like the second option, this option is suitable for those who stick coffee beans only on hot glue; I mainly use Titanium, and I use hot glue in cases where I need the coffee to immediately stick; and I painted over the workpiece again with gouache)

6. Making a mug
It is necessary to choose the same size coffee beans. Glue the coffee around the edges of the mug with hot glue. Please note that we glue the grains exactly along the blank so that they do not protrude beyond the borders of the mug, otherwise it will not stick to the base of the panel


7. Then we glue the coffee beans on the Titan glue (I drop a little glue on the workpiece and smear a small area with a wooden skewer) You can glue all the grains on one side

And I like to alternate the grains on different sides


8. Making a saucer
We glue the coffee beans first along the edge, and then over the entire workpiece.


Please note that the saucer on top is made of a single layer of cardboard, it was impossible to bend it into the desired shape. But the bottom saucer is already glued from two parts and it was easy to give it the desired shape.

9. Trying on cups with different saucers


10. We glue the frames with burlap


11. We glue a mug, a saucer on hot glue and make a handle from grains

12. Decorate the panel
We tie the cinnamon with twine and glue it on hot glue, on the other hand, a dried slice of lemon
One of the options for decorating the panel is dried orange, lemon and zest roses.

13. This is how I make orange peel roses and dry them


I buy cinnamon like this

15. We decorate the “coffee aroma” coming from the mug
We draw, apply PVA glue and sprinkle with ground coffee. Shake off the rest.


16. Decorate the panel with artificial flowers and decorations


The second version of the panel "Summer morning"

For this option, we do everything the same as in the first case. Only the frame we make out of cinnamon and ground coffee
1. We measure the required distance (6 cm) from the edge of the panel and glue the cinnamon on hot glue

2. Making a frame
To do this, you need to outline the frame and coat with PVA glue, and then sprinkle with ground coffee, shake off the rest on the table
Master class - how to make a photo frame with coffee with your own hands. After all, such a frame will decorate any interior or serve as a wonderful gift for any holiday.
Of course, you can buy a blank and simply decorate it as you wish. But we are not looking for simple ways here, especially since I did not find a suitable blank for sale. As usual in such cases, cardboard and thin plywood come to the rescue.
So where to start?
1. First you need to decide on the size. Of course, we focus on the size of the photo. In my case, the frame for a standard photo is 10 x 15 cm. Therefore, the size of the inner window of the frame will be 9 x 14 cm (5 mm on each side). I made the margins of the frame 3 cm each. This will be our basis.
2. We make a drawing on a thin sheet of plywood. And of course here we have to work with a hacksaw and a jigsaw. Here you can involve a man in the creative process, because it's so nice to do something together;) although it's not at all difficult to do everything yourself.

3. It turned out such a basis / blank for the future frame.
Do not forget to process the edges with sandpaper both outside and inside. The inner rectangle can be used in other work, it will not be useful for making this frame, so we put it aside.

4. Next, we work with corrugated cardboard (three-layer), because it is light, does not weigh down the frame and is easy to work with. Where to get it? Everything is simple here - boxes are made of such cardboard, so it is very easy to find it.
5. We make similar parts out of cardboard, with slightly different sizes, namely: the size of the inner window must exactly match the size of the photograph so that it freely "lies" into this window, does not bend from tightness, but at the same time does not dangle too freely. Working with such cardboard is easy, having a clerical knife at hand.
We never forget about safety precautions when working with stabbing and cutting tools!!!
The size of the fields can be any, but not more than the size of the plywood frame.
And by the way, the inner rectangle of the cardboard is still useful to us! So we don't throw it away. It will serve us as a back wall (well, more on that later).
Now you need to take into account this moment. If we want to make a frame with glass (usually for photo frames no more than 2 mm thick), then we need 2 cardboard pieces to create the necessary depth for the glass.
5. We make an insert (back) - the back wall. Just for her, we will need that cardboard rectangle left over from the cardboard frame, it will fit perfectly. And of course, you will need a support "leg" so that the frame can stand. The leg is made of very thick cardboard. Approximately as shown in the photo. This shape of the leg will allow the frame to stand both vertically and horizontally.

We fasten the leg with glue or a powerful stapler, you can use rivets, who has such an opportunity. The main thing is that the leg should hold firmly and be rigid enough, because it will have to bear the weight of the structure on itself.
6. Using glue, we assemble the structure.
Glue the cardboard frame to the back of the plywood frame.
In order for the parts to adhere securely to each other, it is necessary to glue both surfaces well with glue, and hold it under pressure for some time (but not too heavy so as not to crush the cardboard), the main thing is that the parts are tightly pressed against each other and at the same time do not wrinkle or warp.
The back side of the frame will look something like this.
After the glue has completely dried, you can start decorating. In principle, such a blank can be decorated as you like, there are countless options. I chose a coffee theme, so I needed coffee beans and a coffee-themed napkin.
We prime the frame: on the back with white primer (for decoupage), on the front side with brown (for coffee beans). For this I used regular acrylic paint. (Unfortunately, I didn’t take a photo ... I got carried away :))
The end result turned out like this:

8. back view

9. front view
I fixed the coffee beans with a thermal gun, tried to glue them as close to each other as possible so as not to glue the second layer of coffee (otherwise the frame would be too heavy).
8. There is one more important point left - this is the fastening of the back wall to the frame. The mount should be such that it is easy to remove and put the backdrop back in place to change photos in the frame. Found a very simple and reliable way.

10. We take an ordinary paper clip and simply “unfold” it so that the ends of the paper clip are as parallel as possible to each other.


