The water zone is what any garden needs. After all, real rest is the sun, water, a river or a pond. And if you are not a happy owner of a house on the shore of the water surface, make a pond or a hint of it yourself. In some cases, a very small area will suffice, which will fill the site with a special lake mood. But if possible, make a few separate islands of freshness in the garden.
Homemade pond in a metal bath
Pick up a really large container for water. It can be an old galvanized bath, or a technical tank. Pour in water and move some plants from a nearby lake or quarry. If the pond turned out to be large enough, you can even put small fish into it.

Zinc Bucket Fountain
Any dishes of previous years will look very colorful in the garden. Find something interesting at the flea market or in your own barn. Fill the bucket with large stones and install a special garden fountain pump.

Construction of ceramic pots
Several pots of the same color but different sizes can form the basis of a beautiful composition with a small fountain in the center. Leave one of the pots classic - let flowers grow in it.

Buy a water garden
The easiest way to organize a water garden is to buy special plants from the store. They are ready to transplant and won't cause you too much trouble. Use a large pot without a drainage hole.

Small pond from a plastic container
Place a plastic container for storing small things in a hole that repeats its shape. Lay paving slabs and large pebbles on all sides. Cover the bottom of the container with pebbles or sand.

By the same principle, you can organize a pond from a plastic bucket.

Small pool of old furniture
You can use the entire shelves or put together a rectangular box by disassembling the cabinet into planks. Cover the inside with a film, fixing it with a layer of earth. You can insert a small plastic bath into the box.

Enameled basin
Even such a simple solution will look good in the garden. In one garden, you can plant aquatic plants, and in the other - ordinary ones.

Use large flowerpots
Huge pots made of ceramic or plastic do not have to be filled with soil to the brim. Aquatic plants will be able to take root in them perfectly.

Fountain from an old stump
Instead of uprooting the stump, equip it with a small fountain pump. Another option is to make a recess in which you can build a small pond with water lilies.
One of the brightest tools in landscape design is a decorative pond. Of course, most of the suburban areas are limited to the traditional six acres, and the owners simply cannot build a large pond, but because of this, you should not give up the dream of acquiring an artificial pond. As for the technical part, it will not become an obstacle, but subject to good instructions and desire. So, today we will find out how to make a pond in the country with our own hands step by step.
First, you should find out what purpose the construction of the pond on the site will pursue. From this point of view, water bodies can be divided into four large groups.
Table number 1. Classification of artificial reservoirs by functionality
| Group name | Short description |
|---|---|
| They are an element of landscape composition and are intended, first of all, to decorate a particular area of the garden. Near such reservoirs, active recreation is not provided. |
| They are deeper and often decorated with fountains, bridges, sometimes equipped with lighting. Similar ponds are built near the house or gazebos, benches with awnings are placed nearby. Therefore, it is quite obvious that such reservoirs are the heart of the recreation area for residents of the house. |
| This option is suitable not only for avid fishermen, but also for families with children - the latter will enjoy watching bright fish while relaxing in nature. |
| They also belong to artificial summer cottages and not only perform an aesthetic function, but also provide an opportunity to freshen up or even swim (it all depends on the size). |


Then, based on the goal and our capabilities, we proceed to the choice of style, location, size and shape.
Second phase. Deciding on style
An artificial pond can be made in one of two possible options, each of which also has a great many modifications.
Table number 2. Styles of artificial reservoirs
| Name | Short description |
|---|---|
| This name accurately reflects the essence - these are structures that differ in clearly defined outlines. The shape of the pond, correct in terms of geometry, is suitable for those areas that are decorated in the style of minimalism, high-tech, modern or classic. But, characteristically, the shape can be not only rectangular, but also square, round, oval, broken. |
| They are more popular, because they are characterized by naturalness and irregular outlines of the coast, which means that they bring a person closer to nature. The shape of the reservoir here depends only on personal preferences, but the more complex it is, the more difficult it will be to lay the film (more on this later). |


The relief of the site also plays a big role in choosing the style. So, if the surface is sufficiently even, then the shape of the pond can be any. If there are irregularities and drops on the site, then they need to be given special attention, but they make it possible to additionally equip a cascade or waterfall. In addition, against the background of all this, say, an artificial slide will look great.
Also, the reservoir can be slightly raised above the ground. In this case, the construction technology will differ only in the arrangement of the foundation, which will prevent possible distortions of the bowl.

When creating such a reservoir, earthwork is minimized, and it will be much easier to take care of it.

Note! If the reservoir will be built with a fountain, then preference should be given to a high design.
Third stage. Choose a place
Let's start with the fact that we place the reservoir in the most suitable place, so that it is possible to admire our creation from anywhere in the site. That is why when choosing we take into account several important factors.
- Land area. Not only the size of the pond, but also its shape directly depend on it.
- illumination. It is preferable to place an artificial reservoir in a shady place where exposure to direct sunlight does not exceed five to six hours a day, otherwise some of the water may simply evaporate. Moreover, in sunlight, biological activity can develop, which is unlikely to beautify the pond. Therefore, having chosen a specific place on the site, we observe the solar regime for several days.
- Relief. The shape of the pond depends on it, and it also simplifies the installation of additional elements (for example, fountains).
- Groundwater level, soil composition. These indicators affect not only the depth of the reservoir, but also the complexity of the work and the need for additional consumables.
Note! The greater the depth of the pond, the more illuminated the place it should be placed. If the reservoir is intended for fish, then we take the location even more responsibly, since the oxygen content in strongly heated water decreases.
- Expandability. Do not forget about the perspective, so on the one hand we leave free space.
- Visibility. It is desirable to arrange the reservoir so that it can be seen from the house and places of rest.
- Power supply. If a fountain or lighting is additionally equipped, then we think over electrification in advance. It is better to lay wires even during development, and underground and in a reliable protective corrugation. There should be small access hatches at the junctions.
- Reflection. The pond will look more attractive if the surface reflects the sky or beautiful buildings, and not some kind of outbuilding.
- Landscaping. The vegetation near the pond is, of course, beautiful, but the leaves will pollute it and form silt. Moreover, the root systems of trees can lead to damage to the waterproofing layer.
- Compatibility with general decoration and other objects.
We begin work in the spring - so we will have enough time for the reservoir to "take root" on the site.

Fourth stage. Deciding on sizes
It is difficult to say that a large pond will cost more than a small one, since there are a lot of nuances here. So let's look at the key points.
1. Dimensions. They depend on the location of the reservoir. Many say that the pond should be an average of 3-10% of the total area of the site, although there can be no clear recommendations in this case. As for the specific length and width, they depend not only on the area of the land, but also on our capabilities. After all, we will dig a hole under the reservoir by hand.

2. Depth. It depends on the purpose of creating a reservoir, as well as its size.
3. The difficulty of the content. The larger the pond, the easier (no matter how paradoxical it may sound) to take care of it.

4. Zoning. The reservoir is divided into the following zones:
- coastal (from 10 cm to 40 cm), which will serve as an entrance and for planting a plant;
- shallow (from 40 cm to 100 cm), where crops that grow deeper will be planted (for example, winter-hardy water lily);
- deep-water (more than 100 cm) - it is required only in those reservoirs where fish breeding is planned; the area of this zone depends primarily on the number of fish, but on average it should be more than 20% of the total area of the reservoir.

5. Biological balance. In any case, living creatures will settle in the pond, which means that it is necessary to provide such conditions so that it can clean itself. No oxygenation or chlorination of water is provided here. It is worth remembering: no more than ½ of the entire area can be allocated for plants.
Note! The lowest point should be lowered below the freezing line of the soil, especially if you plan to breed fish - so they can survive the winter in non-freezing water.
Fifth stage. Choosing materials
The next issue to be dealt with is the choice of consumables. There are many options on the market today that can be used to create an artificial reservoir. Let's consider them.
concrete pond

The most expensive option, which, nevertheless, allows you to operate the reservoir for quite a long time. Although concrete pouring is more suitable for arranging a pool.
Finished plastic container

This option is more suitable. A form made of fiberglass or PVC allows you to build a pond in record time and use it for up to 30 years (the specific period depends on the quality of the container).
The procedure itself will consist of only four steps:
- dig a pit;
- set the form;
- fill the remaining voids with sand;
- we plant plants, fill the pond with water.

The disadvantage of this method is the difficulty of transportation (if the volume is large) and the need for basic installation knowledge (otherwise the bowl may be damaged). Moreover, plastic containers degrade over time under the influence of UV radiation.
Note! It is preferable to use a fiberglass bowl, which is reinforced with rubber - this design is more reliable and suitable for repair.

Polymer film
In terms of the shape of the pond, this option provides simply unlimited possibilities. The most affordable material is plastic film, although it will not last long.

PVC film has a longer service life, with proper installation it can last up to ten years.

Perhaps the most reliable option. For ponds with rocky bottoms and great depths, it is recommended to use a butyl rubber (EPDM) membrane, which has a service life of up to 50 years. In addition, this material is able to withstand repeated frosts.

There are several folk ways to make a reservoir that use improvised materials. Let's get acquainted with the most popular of these methods.
Pond from an old bath

A great option, because the bath is a container that was originally intended to hold liquid. The bath can be painted in bright colors and placed in a picturesque corner of the site or, alternatively, deepened into the ground.
Tire Pond
An easy way to create a mini-pond on the site. The manufacturing process is shown in the photo below.

Pond from a basin
An even easier way. The basin is able to retain water well, so it can be installed in the same way as a bath. With proper decoration, such a mini-pond will be an excellent decoration of the yard.

Note! Not only the aesthetic characteristics of the pond, but also its service life depend on the choice of material. It is desirable that the selected material is environmentally friendly.
Sixth stage. We prepare the equipment
To create a simple artificial reservoir, we need a level, a cart with a shovel, a cord, a hose that is used for watering, and pegs.
If the pond is more technologically advanced, then you will need the following equipment:
- cleaning filter;
- sterilizer (it will remove algae so that the water is clear);
- pump for pumping / pumping water;
- aerator for oxygen saturation (especially important when breeding fish).

Seventh stage. We create an artificial reservoir
There are plenty of materials that can be used to create a reservoir, but we will focus on PVC film. The fact is that it is cheaper, takes the desired shape better, it can be repaired, and specific knowledge or skills are not required for work.
Step 1. First, choose the color of the film. There are several possible options here.
- Black film - it will turn the bottom into a mirror (plants, clouds, etc. will be reflected).
- Cream, blue- so the reservoir will look more like a pool, and the fish on a light background will be more clearly visible.
- brown- will imitate the soil of natural reservoirs. Great option for a landscape pond.

Also, when choosing a film, we pay attention to the composition (PVC is more durable than PE) and thickness (for a pond, material thicker than 0.5 mm is required). Moreover, the greater the depth of the reservoir, the greater should be the thickness of the film. No less important is resistance to UV radiation and mechanical damage.
Note! If the depth of the pond exceeds 1.5 m, then we use butyl rubber. Such a film is resistant to stretching, deformation and UV, moreover, it can withstand temperatures of 40-80°C.
- pond width + (depth x 2) + margin (55-60 cm) = material width;
- pond length + (depth x 2) + stock (55-60 cm) = material length.
For gluing, we will use a special glue (for example, "Tagnit") or adhesive tape (Quick Seam 3).

Step 3 The next step is to create a schema.

First, draw it on paper, and then transfer it to the ground. We indicate the dimensions of the steps or "shelves" for plants - this will avoid possible problems. For marking, use sand or a flexible garden hose (preferably a bright color).

After that, we cover the marked area with a piece of light film and examine it from different angles. We make adjustments if necessary.
Step 4. Roem a pit. To do this, perform the following steps.
- First we remove the sod.
- Then we dig the pit itself. At the same time, we move from the edges to the center, delving into the required places - it’s more convenient. For laying stone and decorating, we equip a ledge with a depth of 60-70 cm.
- We remove the soil, and with it the roots, stones, debris and everything that can damage the film. By the way, you can make an alpine hill out of the excavated earth.

When carrying out earthworks, we pay attention to ensuring that the banks of the future pond are located on the same line. If a waterfall is created, then we maintain the required height difference.
Note! If a large level is required, we can make it ourselves. To do this, lay the usual level on a long, flat board.
Step 5 We lay the underlay. We carefully tamp the bottom of the finished pit, after which we proceed to the waterproofing layer, which will prevent the penetration of water into the soil.
The substrate can be made in several ways:
- we cover the bottom with stones and fill it with sand (this kind of waterproofing will lose its properties in a few years);
- we lay a layer of geotextile, which we fill up with sand (it will cost a large amount);
- we lay PVC film (the most reliable way, so we will focus on it).
Step 6 Next, we lay the film, preferably on a sandy "cushion" (the latter will prevent damage by stones and other dangerous objects). It is advisable to lay on a hot day - heating up, the film becomes more pliable.

This may cause problems with the formation of folds. We try to make one large fold, and not a large number of small ones, and then glue it or press it down with stones. The film must be loose, loose.
For its fastening, a swarm along the perimeter of an additional trench. We lay the film there, after which we fall asleep crushed stone. Next, we fill the trench with large stones with a flat bottom (so that the film does not tear). We lay the walls with round stones (flat ones will slide). At the end, we fill the pond with water - we serve it without pressure, directing it to the center of the pit. After two days, cut off the excess film.
Step 7. We strengthen the coast. Their slope depends on the type of soil: if it is sandy, then the walls should be sloping, if we are talking about clay or black soil, then vertical. The optimum slope angle should be approximately 45°.
The fortification itself depends on the type of coast.
If they are gentle, then you can use:
- geomat;
- geogrid;
- polymer geogrid.

You can also use a regular chain-link mesh, filling its cells with soil with seeds of perennial grass (for example, clover). There is another option - to strengthen the coast with shrubs or plants.
If the coast is steep, then we can use:
- piles;
- gabions;
- retaining walls.

It can also be effectively strengthened with the help of biological methods (planting). Ideally, biological amplification methods should be combined with engineering ones.
Eighth stage. Making an artificial pond

There are several ways to decorate a pond. To make it a full-fledged design element, use one or more of the following methods.

As a conclusion. Features of care
As a result, a few words about the further care of the artificial reservoir.

Video - Creating a pond from a film
Contemplation is the way to restore your inner strength and step back from the hustle and bustle. Admiring nature in any of its manifestations - be it a leaf, a blade of grass or even a small pebble, we fall into a kind of trance, delving into our "I" without being tied to current events. Perhaps that is why there is a massive “flight” of citizens away from noisy habitats, closer to mother nature, where on their own, even a very tiny piece of land, you can relax and rest your soul. How to create a relaxing atmosphere in your garden? There is nothing easier! Instead of a couple of beds with potatoes and tomatoes, break a small pond at your dacha - now you will have more time to relax and contemplate the water surface - and this, as you know, is the best cure for stress and loss of strength. Do you think that such a complex hydraulic structure is beyond your power? With our recommendations, you will become “knee-deep sea”, not to mention a small pond, the laying of which you can quite master on your own.
So, you realized that your life is no longer conceivable without a nice little lake, designed to please your eyes and calm your nerves. How to create a pond in the country with your own hands, so that it harmoniously complements the landscape of the garden and lasts long enough, and does not become a problem area that requires tireless care?

An original feature of a small pond decorated with boulders can be an unusual path made of flat stones.
Let's start by choosing the style of the pond and choosing a place to lay it. Then, we will tell you how to technologically correctly make a pond and equip it. Selected in the right style and laid out with all the subtleties, an artificial pond will become a real gem of your garden and a great place to relax.
A small digression into history
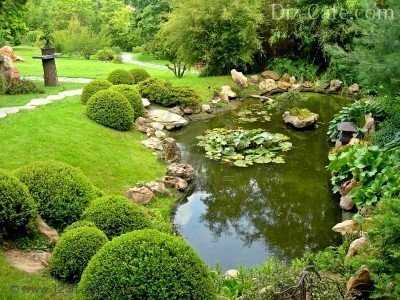
A special charm to the landscape pond is given by its smooth outlines and decorative vegetation that adorns the water surface.
A landscape pond with natural outlines will always be appropriate in the depths of the garden next to the gazebo or not far from the terrace of the house - after all, you should be able to sit comfortably to watch the water surface.
The design of the reservoir can be more restrained according to the Japanese principle - boulders of various sizes, conifers, the absence of multi-colored herbs. Or in the Chinese style - more lush and bright, with an obligatory accent in the form of a tree with variegated foliage and a curved bridge. A landscape pond can also be created in the “nature garden” style, which involves planting only local plants characteristic of the region, and the absence of any plant exotics.

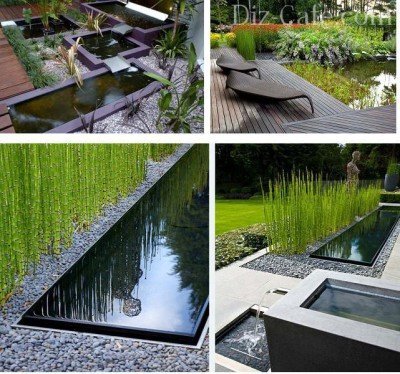
The most concise in form is a formal pond with rectangular outlines.
A formal pond with a geometric shape - square or rectangular - looks great next to the house, emphasizing its vertical and horizontal lines. Not bad such a pond is combined with a patio or patio, especially if rectilinear flower beds are laid out nearby or linear paths are laid.

An unusual flavor to the pond can be given by a path passing above its surface - either in the form of a bridge, or with individual stones or slabs.
An interesting technique that is widely used in modern landscape design is the laying of paths lined with terraced boards and thrown in the form of a bridge over a pond of a broken geometric shape. A similar path through the pond may also take the form of a concrete path or individual square slabs, as if hovering above the water. Cascades of small ponds of different sizes look original, where water flows from one bowl to another through small waterfalls.
The system of cascading ponds in the country house will not only make its landscape unusual, but also fill the garden with a pleasant murmur

Formal round ponds will decorate the patio or front group of your summer cottage
Round ponds, along with rectangular shapes, also belong to formal ponds and can decorate a lawn or open lawn, stylistically complement a garden area with a pergola, or be located near a picturesque group of trees. Round-shaped mini ponds in the garden can be made with your own hands much easier than any other configuration, using ready-made concrete rings, wooden tubs, plastic containers and even car tires.
Choose a location, size, material
The right place for the reservoir will be the key to its long-term functioning without seasonal “blooming” in spring and summer, when green algae are activated under the influence of ultraviolet radiation. For a certain period of daylight hours, the pond must be in the shade so that the algae do not multiply so intensively. On the other hand, placing a reservoir in a completely shady zone will delay the development of ornamental plants. It is important to observe the golden mean here.

By placing a recreation area with a barbecue in close proximity to the pond, you can always admire the beauty of the water surface.
It is important to know that the pond should be exposed to the sun for about 5 hours a day and be open from the southwest. It is undesirable to place a reservoir under shady trees - falling autumn leaves will pollute it.
As for the size of the pond, ideally the pond should occupy 3% of the area of the site. When the garden is small - with a standard area of 6 acres, not every summer resident is ready to allocate 18 m2 for a pond. Of course, the smaller the dimensions, the easier it is to make a pond with your own hands - and not so many materials will be required, and labor costs will be minimal. Therefore, when determining the width and length of an artificial reservoir, take into account your physical capabilities and the harmony of the perception of the pond as a compositional spot on your site - that is, how its dimensions are combined with other elements of the country landscape.

The ascetic solution in the design of the reservoir using only stones is a specific feature of the Celtic-style pond.
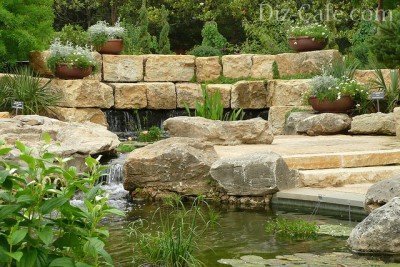
The design of a pond with a waterfall flowing down from a small beige sandstone wall will fit perfectly into the landscape style of the garden
In terms of depth, the pond is recommended to be divided into three stages: a zone for coastal plants, a shallow zone for the queen of the pond Nymphaeum - winter-hardy water lilies and a deepening for wintering fish - if you intend to breed them.
It is not necessary to make the pond too deep, just dig a winter hole for fish about 150-180 cm deep (below the freezing mark), so that it occupies about 1/5 of the pond area.

A cute rectangular-shaped pond can be arranged in a small summer cottage, and the edging of a terraced board will give an unusual look to the pond

The highlight of an avant-garde pond can be an extravagant wooden installation resembling an exotic animal or plant.

A continuous supply of water to the pond can be equipped with an old column or a group of brightly colored glass bottles.
When you have decided on the location and approximate dimensions of the reservoir, it's time to think about what materials to use in order to make the pond as easy and fast as possible. The most capital and expensive option for arranging a pond is a concrete base, which requires the construction of formwork and reinforcement. A less expensive way to lay a reservoir is to use a ready-made plastic container.

The pit under the pond is formed by characteristic ledges - curtains for planting plants

To ensure the circulation of water in the pond, a pump is installed at its bottom, from which water enters the cleaning filter and returns to the pond
And, finally, the most convenient and budgetary way to make an artificial pond with your own hands is to use a special moisture-resistant film with which the pond bowl is laid out. We took this method of laying the pond as the basis for a detailed description.
Step-by-step technology for creating a pond using film
1. Initially, it is necessary to sketch out a plan of the future artificial pond on a scale indicating the depths and width of curtains (shelves for planting plants), and it is also desirable to draw an approximate sketch of the decoration of the reservoir. This approach will help to avoid various alterations during the construction of the pond and at the planting stage. At this stage, consider what will serve as an accent in the composition of your lake - it can be an original stone, tree or sculpture.

Before starting the laying of a pond in your summer cottage, draw a plan of the reservoir indicating the depths and the placement of the main elements of the arrangement
2. Using a regular water hose or spreading sand along the perimeter of the reservoir in the form of a line, outline the intended contour of the pond. Be sure to check that the shores of your future lake are at the same level.

Having marked the outlines of the pond with a hose, dig a pit according to the drawn plan.
Periodically measure the level of the banks of the pond during the formation of the pit. If you do not have a water level of the required length, you can adapt an ordinary long board and set a small 50 cm level on it.
3. We start earthworks - we dig a pit to the depth of the coastal tier and mark the line from which the pond deepens to the next mark. Having received the second tier, we lay a line for digging the deepest part of the pond and take out the last portion of the earth.
The process of digging a pond is quite difficult, so it is better to resort to the services of earthmoving professionals, accompanied by a mini excavator. However, if you still decide to do this time-consuming part yourself, be prepared for the fact that water may accumulate at the bottom of the pit and you will have to mess around in dirty slurry. A pump specially adapted for pumping water with impurities and solids will help you remove water from the bottom of the pit. Nearby, you can dig an auxiliary hole and dump water into it.
4. After the pit is completely dug, we measure its dimensions with a cord, taking into account the depth, adding allowances of about 50 cm on the sides of the bowl - this is necessary to purchase a film of the desired size.
The problem that you will inevitably encounter in the process of earthworks is where to put the earth taken out of the pit under the pond? A good solution to this problem is to raise the level of the site, evenly distributing the soil over the garden. You can also use the earth of the pit as an embankment for a stream or as a base for an alpine slide.
5. The bowl of the pond is lined with a durable moisture-resistant film. As a rule, in order to protect the main film from damage by stones and plant roots, an additional layer of geotextile is laid under it. For this purpose, old linoleum or roofing material is also suitable, or you can simply fill the hole with sand and tamp it down.

When the pit is formed, lay a layer of geotextile, and then a film, tucking the edges of the panels into a specially dug trench along the perimeter of the reservoir
To make the film for the pond more elastic, it is better to choose a sunny day for its installation - then it will heat up a little and will stretch better, easily bending around all the ledges of the pit.
6. To equip the edge of the pond, an auxiliary trench breaks out along its perimeter - to tuck and fix the film. Laying the edges of the film in the trench, sprinkle it with rubble - so it will be securely fixed.
7. Strengthen the edge of the pond with stone blocks or plastic pipes nailed to pegs - this way you will prevent the earth from falling from the coastal zone into the pond bowl. Line the edge with natural stone and decorate with a beautiful single block or group of boulders.
8. Place the prepared plants in special plastic containers and place them on curtains, line the bottom of the pond with stones and rubble.
9. Now you can pour water into the pond. To make it more convenient to choose pumping equipment and volumes of hydrochemistry for caring for the pond in the future, do not be too lazy to take readings from the water meter before and after filling the pond.
10. So that the water in the pond does not stagnate, it is better to equip the pond with a stream - it will ensure a constant circulation of water. To do this, the source of the stream rises above the level of the pond, and water will be supplied to it from the pond bowl using a submersible pump. Be sure to think about how to decorate the mouth of the stream - use stones, planting, clay or glass containers.

Fill the pond with water, equip the stream, install and connect a pump with a filter, plant aquatic plants
11. Install a submersible pump at the bottom of the pond, extend the pipes to the source of the stream and connect them to the water filter. It is better to take a cleaning filter with a pressure filter (with a reverse cleaning system) - it is more efficient than a flow filter.
Material about the device of an artificial stream in the country will also be useful:
Your pond is ready, now you just need to diligently take care of it - clean it of pollution, sometimes use preventive measures to revitalize the water and prevent the spread of algae, and take the plants to the basement for the winter.
The main mistakes in the arrangement of ponds
Creating something with your own hands is not easy to avoid some mistakes, especially compositional ones, so in order to make your pond right, consider some of the standard mistakes inherent in our gardeners:
- Making the banks of the pond with pellets of the same diameter, which makes the pond look somewhat boring. It is better to combine large stones with smaller ones, but do not fill up the entire coastal zone of the reservoir with them.
- Ponds are dug very deep, have sheer walls and resemble a kind of stone bag. A little investigation showed that it is profitable for earthmoving companies to dig deep ponds, as they are paid for the number of cubes of excavated earth. Pay attention to the depth of your pond - do not make it too deep, especially if you do not intend to breed fish.
- Craving for container gardening, which interferes with the normal development of plants, and fear of filling the pond with earth for planting. On the one hand, container planting allows you to quickly change the plant design of the pond by rearranging and rearranging plants. Probably gardeners are also afraid of the prospect of a dirty look of the pond after backfilling the earth, but there is nothing to be afraid of - the soil for aquatic plants is a heavy mixture with a high clay content, which is not washed out by water, and will eventually harden by the root system of plants.
Having thought about creating a pond with your own hands, do not forget that it is not easy - practice first by forming a miniature pond at home.

If the dimensions of your site do not allow you to equip a pond in the country, create a miniature pond in the most ordinary cup
If possible, feel free to proceed with a large-scale project to lay a full-fledged pond in a summer cottage. We are sure you can do it!


We tell you how to make a pond in the country with your own hands, what materials can be used for this. We consider the basic rules for decorating and arranging that will help make an artificial pond an excellent addition to existing landscape design.

Varieties of artificial reservoirs
Before you make a pond in the country, you should decide on the type of future reservoir. Depending on the functional purpose, 4 types can be distinguished:
- small pond- serves as a decoration of the garden, a small part of the overall landscape composition. Active recreation near such a reservoir is not expected.
- Fish pond. Own reservoirs with bright fish are actively replacing small aquariums from the market. It can be reservoirs of absolutely any shape, the main thing is that the size is comfortable for the inhabitants. In such a pond, you can put ornamental fish species or fish suitable for fishing and subsequent consumption. Regardless of who will be bred in the pond, it is important to take care of the water filtration system and enrich it with oxygen.
- decorative pond- a deep reservoir, additional equipment with curbs, a bridge, special lighting.
- Swimming pond. Pools can also be attributed to varieties of artificial reservoirs. In addition to aesthetic functions, they allow you to cool off or swim, depending on the size.

The functions of the pond in the future will determine the choice of location, shape, parameters. An important nuance for everyone who is interested in how to make a pond on the site is the choice of the style of such a reservoir. There are two main styles that have many modifications:
- Formal or regular. It provides for the construction of a rigidly defined shape (round, rectangular, square, oval, broken). Suitable for landscape design, made in classical style, hi-tech, modern, minimalism.
- Landscape. It features an irregular coastline, a more natural appearance, does not limit the flight of design imagination.
Choosing a place for a reservoir and a form
If you have already wondered how to make a pond in the country with your own hands, then pay more attention to its future location. You should not make a reservoir for the sake of a reservoir, when you can create a real highlight in the overall landscape design.

When choosing a place for the location of the pond, it is worth considering several nuances:
- Plan the pond in an open area, away from large trees. Fallen leaves will constantly clog the water.
- Avoid the sunny side. The sun will constantly heat the water, dry up the pond, promote the development of bacteria. It is not recommended that the time of exposure to direct sunlight exceed 5-6 hours.
- Provide for the possibility of expanding the reservoir if necessary in the future. If the size of the plot allows, then the owner will eventually want a bridge, a fountain and other decorative elements.
When determining the location, consider:
- plot size;
- relief;
- soil composition;
- groundwater level;
- power supply;
- visibility from the house or gazebo.

The pond should be combined with other elements of the landscape composition, buildings and the general style of arranging the dacha. Having studied all the above parameters, you can determine how to dig a pond, what shape and size to give preference to.
Base selection
The market offers many ways to make a pond in the country with your own hands. For this, manufacturers offer various materials, although many suggest using improvised devices as a basis.
Each of the methods has its own advantages. Everyone decides for himself what to choose, based on the idea of design, financial capabilities, and the area of \u200b\u200bthe summer cottage.

Tools you will need, regardless of the type of foundation:
- shovel;
- irrigation hose;
- cord (for marking);
- stakes;
- a wheelbarrow for the export of land;
- cleaning filter and compressor (for fish pond);
- pump (for pouring water or during the construction of fountains, the operation of cleaning filters);
- sterilizer (needed to purify water).
concrete base
A concrete bowl is one of the most expensive options, but guarantees a long service life of the reservoir. Most often, such a base is used for the construction of swimming pools in a summer cottage, or for the creation of artificial reservoirs in the northern regions due to its resistance to temperature extremes.

Concrete allows you to create compositions of any shape and size. The main features of using such a framework:
- it is better to choose a sunny area remote from communications and trees;
- before you make a pond with your own hands, you need to dig a pit and make waterproofing;
- the concrete structure is reinforced with reinforcement;
- cement mortar can be used to level the bottom surface.
Concrete bowls are decorated with tiles, artificial stone, figurines of birds, animals.
Arrangement of a pond using a ready-made form
To simplify the work, ready-made forms made of PVC or fiberglass are used. They are easy to install, durable (up to 30 years of operation). Among the disadvantages is the difficulty of transporting large-sized molds. The best choice is a fiberglass mold with a rubber base.

How to make a pond in the country with your own hands step by step:
- After choosing a place and the finished form, you need to dig a foundation pit. To do this, the form is placed on the ground, the contour of its borders is marked. The pit should be 8-10 cm larger than the shape parameters.
- Installing the container in the prepared pit. Use the measuring rod to determine if it is level.
- Filling the mold with water.
- Fill the voids formed around with sand and tamp.
Before digging a pit with your own hands, you need to think over a sketch on paper, and then transfer it to the ground. Marking is more convenient to do with sand or a garden hose.
For decoration along the edges of the form, you can lay out stones or plant plants. This should be done after the container has completely shrunk. Often such a pond is additionally decorated with a fountain.
Arrangement of a reservoir using a film
Another modern material that is often used to create an artificial reservoir of any shape and size is film. You can use different types of it - PVC, polymer, butyl rubber. The choice depends on the operating conditions: the service life of a polymer film - up to 10 years, butyl rubber - more than 50 years, even in conditions of constant frost or rocky surface of the site.

How to make such a small pond in the country with your own hands step by step:
- Digging a pit of the required shape. Depending on the size, this can be done with an excavator or with your own hands. It is important that the bank slope level is 45 ° C, and the minimum depth is 60-80 cm. If the parameters are less, this threatens the freezing of the reservoir in winter, excessive heating in summer, and the death of the flora and fauna of the mini-pond.
- To further secure the film along the perimeter of the pit, a ditch 15 cm deep is torn off.
- Leveling the bottom of the pit, cleaning it from branches, stones, roots that can damage the film. Additionally, it is recommended to sprinkle the surface with washed sand and cover with a geotextile.
- Covering the prepared pit with a film. The sheet must be laid freely, fixed along the edges with a brick.
- Fill with water and leave for a day so that the material takes the desired shape. Water must be supplied to the center of the pit without pressure.
- Cut off the excess film, leaving 20-25 cm under the blind area.
The calculation of the required film web is done as follows: add 2 depths and 1 meter of margin to the length and width of the pond. The edges of the film should extend 20-25 cm beyond the edge of the pond. When choosing a film, consider its thickness, composition, resistance to UV radiation, mechanical damage.

When choosing a PVC film, you need to understand the features of using different colors:
- a black film covers the bottom, which makes it possible to observe the reflection of the sky on the surface of the reservoir;
- brown film makes the reservoir more realistic;
- blue or cream - ideal for a pond with fish and other inhabitants.
To make the bottom suitable for planting plants or for the purpose of additional protection against mechanical damage, the film is covered with pebbles or stones. This approach requires further cleaning of the pond due to rotting organic particles, which is why many people prefer to leave the film open.
You can decorate the coastline with tiles, stones, bricks. The main thing is that the material is laid on the cement mortar, and the width of the blind area is at least 60 cm.
Video description
How to make a pond with film in the video:
Pond from improvised materials
It is not always necessary to buy a ready-made form, a film or make a concrete base. There are several options for those who do not want to purchase special building and finishing materials, dig a huge pit.

As a base for an artificial pond, you can use:
- Old bathroom. The main feature in the preparation of the pit is to provide a recess at the location of the drain, fill it with pebbles. This will allow, if necessary, to drain water into the ground. You might as well not dig a hole at all. It is recommended to cover the bottom of the bathroom with varnish or waterproof paint.
- Taz. Does not require a large pit. It can be used as a base for a temporary artificial reservoir, or as a permanent decoration of the site.
- Tire- allows you to equip a small decorative element of landscape design. The tire is cut in half, placed in a prepared hole, covered with a polymer film.
- Pots, boxes, buckets, tin barrels and to create mini-ponds on the site. Insulation is also made with a polymer film. The option is suitable for growing aquatic plants.

Even with a complete lack of budget, you can create a pond that will become a real decoration of your summer cottage.
Water Filtration and Care
To turn a pond into a complete compositional element, you need to take care of its decoration. If this is a pond with fish, you can not do without a filtration system.
For an artificial reservoir, made by hand in the country, you can use the simplest filtration system. To do this, you need a small pumping station with a sand filter. The system needs two pipes: one will discharge dirty water, the other will again supply purified water to the reservoir. If additional purification is needed, a small stream of sand can be made through which the filtered water will pass.

Proper water purification in artificial reservoirs Source static.tildacdn.com
Ready-made filtration kits can be purchased at stores. Detailed instructions allow you to install without the involvement of specialists.
As for care, for a small pond, a complete cleaning once a year is enough. Features of seasonal care:
- in the spring, with the help of a submersible pump, all the water is pumped out of the reservoir, the bottom is cleaned of dirt manually or using a special vacuum cleaner with a dirt filter. In April, fountains and waterfalls are launched;
- in summer, it is enough to remove weeds around the pond, purify the water from filamentous algae, add it in case of drying;
- in autumn, fallen leaves are collected with a net or ordinary rake (you can cover the pond with a special net that will protect water from pollution during a period of strong leaf fall);
- so that the water does not bloom, a vessel with charcoal located at the bottom of the pond will help.

How to clean the pond from duckweed and get rid of silt, mud, algae Source storage.kun.uz
The listed actions do not require a lot of effort, time and money, since the care is gradual.
Video description
How to make a pond filter with your own hands, see the video:
After finishing all the work on the arrangement, you can proceed to the stage of decoration. The decor can be stones, interesting figurines, figurines, small trees.
Depending on the size of the pond and the entire summer cottage, the reservoir can be supplemented:
- run fish;
- plant aquatic plants;
- make a bridge, a small island in the middle of a pond, a fountain, a waterfall;
- equip night lighting;
- put a bench, gazebo, deck chairs, barbecue;
- lay out the paths with gravel, stone;
- install a beautiful fence.

Additional elements will allow you to turn an ordinary artificial pond into a full-fledged recreation area in your own garden. When choosing them, you should be guided by several rules:
- It is better to choose stones of different sizes to make the composition more interesting. For safety reasons, do not use sharp stones.
- You should not dig a deep pit with sheer walls, since it is very difficult to decorate it.
- Container gardening is much more convenient.

The fantasy in decorating is limitless, it all depends on the personal preferences of the owner of the summer cottage, the available budget, and the general style of landscape design.
planting
Particular attention should be paid to planting aquatic plants. First you need to choose them correctly, since the further biological balance, self-regulating processes depend on this:
- for the first deep level, a tail, arrowhead is suitable;
- among floating plants, you can choose lilies, water hyacinths, water lilies. They will not only decorate the pond, but will also protect the water from the scorching sun;
- ferns, sedges, reeds, reeds are suitable for decorating the space around the pond;
- among flowering plants, plakun-grass, bergenia, lungwort, water iris, kupena and others are most suitable.

You can start planting plants immediately after starting the filtration system. It is much easier to take care of them in the future if you use special containers for planting, which are placed at the bottom of the pit.
Winter care for an artificial reservoir should be started long before the onset of frost. A special protective mesh will help protect water from excessive amounts of fallen leaves, dirt, and swamp gas accumulation. Remove nets after the first frost.
Key points of preparing an artificial pond for winter:
- The reservoir should winter without equipment, filters, pumps, nozzles, lamps, they must be thoroughly cleaned and put into the room.
- Small ponds freeze completely to the bottom, so you need to remove all plants and fish.
- In order for reservoirs with a plastic bowl to endure frosts without deformation of the base, it is recommended to lower several bottles filled with sand to the bottom at the rate of 1 bottle per 1 square meter of reservoir.
- You can start the reservoir if the night temperatures are above zero.

Video description
For more on preparing the reservoir for winter, see this video:
Conclusion
Thus, if you understand the basic nuances of arranging a pond for a summer residence, then everyone can do it with their own hands. It does not take a lot of time, effort and money to create an excellent water recreation area near the house.
Please answer one simple question: what object can transform a summer cottage beyond recognition? Hint: this is not a garden or gazebo.
The answer is simple - this is an artificial decorative pond in the country, made by yourself. The construction of a pool can be problematic: a large area and volumes of water, the construction process is costly and painstaking. Another thing, if you build a small pond in the country. Absolutely anyone can afford such a reservoir. Moreover, the pond in the garden does not require the help of specialists - all work is done alone. Your desire and diligence will help to achieve a good result!
You can build a structure of any shape, decorate it with beautiful swamp plants, run bright Japanese plants inside.
What you should definitely know about ornamental ponds?
Haven't decided on a place for the future pond yet? We recommend doing this first. A little secret: choose it in such a way that the pond in the garden with your own hands is not exposed to direct sunlight for more than 6 hours. Prolonged exposure to the sun promotes the growth of bacteria, the growth of algae - an unpleasant odor appears.
On the other hand, building ponds in the garden next to the trees is also not recommended. Dry branches and leaves will float in the water all the time, nearby trees can destroy the structure with their roots.
From the point of view of the oriental art of Feng Shui, decorative ponds are always placed on the south or east side of the site. So water can bring energy benefits. But the area densely planted with fruit trees is better not to use at all. It is desirable that the area of the structure does not occupy more than 3% of the territory.
The next fact that you didn’t know for sure concerns the size of the pond. It turns out that the larger the reservoir, the easier it is to care for it. This is due to the fact that solid volumes of water and area contribute to the creation of a sustainable ecosystem between the animal and plant worlds.
The basis for the reservoir is a ready-made container: a huge cast-iron bath, a reinforced concrete bowl, a film of butyl rubber, polyvinyl chloride. Some craftsmen make a homemade tire pond with their own hands. When there is a ready-made container, construction is simplified. You simply dig a hole, put this container in it. Although it will be problematic to build a large reservoir.
The most convenient and at the same time economical option is a film. In addition, it allows you to adjust the shape and depth. It is better to refrain from using ordinary polyethylene. Due to the short period of operation, it will leak after 2-3 years.
What does the construction process look like?
Now you will see that building with your own hands step by step is an almost elementary task. As evidence, we attach a photo and a detailed description of the construction:
- Bottom preparation. Dig a recess in the ground at least a meter, with an area of 3-4 square meters. m. The pit should be perfectly flat, without any roots and stones, as well as protrusions. You don't want to damage the film that will become the base, right?
- Drainage. Putting the film on is only half the battle. To immediately prevent shrinkage, a layer of sand is placed on the bottom. Of course, you can make a great pond bottom if you fill it with concrete, line it with granite. This is a solid financial investment, so it is better to get by with simpler methods. The geotextile layer perfectly protects against rodents.
To achieve maximum elasticity of the film, laying is best done on a bright, sunny day. Under the influence of high temperature, it stretches much better and easily bends around the ledges of the pit.
- Laying the film and pouring water. The edges of the film are fixed along the coast line. To strengthen the decorative pond, as in the photo, use heavier stones, fill the edges with gravel or ordinary river pebbles. Ready-made plastic containers with landing sites have proven themselves well.

After filling the artificial container with water, do not rush to cut the film. Wait a day for the PVC material to take its final volume.
After that, you can cut the film, and lay the edges in the previously made trench. They are carefully tucked up and covered with rubble. If the width is not enough, you can connect several pieces together using soldering.
- Registration. Much will depend on your imagination. It can be all kinds of figurines on the shore of the pond, beautiful plants, jugs, from which water supposedly flows, and so on. The bottom of the pond is lined with pebbles or gravel, the plants are placed in containers.
- Pond care. Without proper care, artificial reservoirs quickly turn into a swamp. To prevent this from happening, care should be taken to prevent stagnant water. Buy a filtration system or plant plants that can regularly absorb carbon dioxide, saturating the water with oxygen that is useful for life.
Do not be afraid to experiment, actively combining several options at once.
In winter, the water drains, the plants go for wintering in a home aquarium or a natural reservoir located nearby. Plants are best planted immediately in baskets that are placed at the bottom of the pond. As a decor, you can use lilies, capsules, as well as water lilies. You can carry out artificial lighting, additionally install a pump for high-quality water circulation. In the evening, the pond will delight you with beautiful illumination and a pleasant murmur.
Do-it-yourself pond made from a bath
Let's look at the use of a cast iron bath as a base for a pond in more detail. Do not rush to hand it over for scrap or throw it in a landfill. In a private house, it can be used for various purposes, including the creation of a decorative pond.
Make a recess and, filling it with sand, make a cement screed. Thanks to this simple method, groundwater will never be able to erode the structure. The ratio of sand to cement should be approximately 10 cm to 3-4 cm.
After 5-7 days, pour twenty centimeters of gravel and lower the cast-iron bath. The side openings are also filled with gravel. Make sure that the edges of the vessel do not rise above the level of the shore. It will look very, very unnatural. Lay out the pebbles around the perimeter - it is desirable that it be flat.
The bathroom installed on the slope is strengthened with a large stone on one side and made similar to. That's all - you can fill in water and plant plants!
How to take care of an artificially created pond?
Building a reservoir is half the battle. Like any other object on the site, it requires careful and attentive care. Without it, even the most beautiful pond will quickly turn into a dirty, swampy place, it will begin to dry out, emitting an unpleasant smell. To avoid this, experts are ready to give some advice.
In the spring, an artificial reservoir is inspected with their own hands as soon as the ice melts. Usually this is the middle or end of March. You can’t imagine a better time - work in the garden and in the garden has not yet begun, you can inspect the pond slowly and very thoroughly. Everything is taken into account, from the appearance to the shores. Have they remained intact, what state is the form in?
Owners of deep waters often leave fish for the winter in the pond. Be sure to check their condition, pay special attention to electric pumps, filters. It will not be superfluous to check the bottom of the reservoir for integrity. If cracks or leaks appear, they need to be repaired as soon as possible, and the fish in the water should be temporarily resettled.
The end of March, the beginning of April is a great time to take care of the plants. Are you 100% satisfied with last year's flora? Then put her back in her original place. Do you want something new? Buy new plants. Do not forget about the nearby flower beds that create a special atmosphere.
Most likely, a lot of leaves will float in the water, which the wind brought back in autumn. In the spring, they are cleaned clean to prevent rotting processes and not to spoil the water. The walls of a small reservoir are cleaned with an ordinary brush, dirty water is pumped out, and a new one is poured in its place.
During the summer period, the main concerns are related to maintaining the water at the proper level. On too hot days, when moisture evaporates before our eyes, water is pumped in additionally. To saturate the liquid with oxygen, it is recommended to create an artificial shadow and turn on compressors from time to time.
The plants that grow around the pond are trimmed in time, as shown in the photo. Emerging weeds are removed in a timely manner. This also applies to the remnants of food that remains after the meal of the fish. If you do not get it, the quality of the water may deteriorate.
With the onset of the first cold weather, the initial task of the summer resident is to minimize the ingress of debris and leaves into the pond. Plants on the shore are trimmed, the leaves are removed. You can hang a fine net over the pond to keep leaves from falling into the water. Some representatives of the flora can be removed in a warm room until spring. Feeding fish can be increased - it must stock up on nutrients for the winter.
If the pond is shallow and freezes to the very bottom in winter, completely pump out the water, and take the fish to the home aquarium until spring. You can not take fish from a deep reservoir. Make sure that the pond has a polynya to provide living creatures with oxygen.


 in the configuration?")


