Stretch ceilings have gained large-scale popularity, so more attention is paid to their arrangement. The question of how to attach a chandelier to a stretch ceiling becomes very acute, since in most cases “points” and LED strips are used for lighting.
Which chandelier is right for you?
It is believed that the usual chandelier and stretch fabrics combination is not the best. But, nevertheless, you can choose the option that you can use. This must be done before the start of fastening the canvas. Most often, PVC sheets are used, for which heating, after fastening, is fatal. With regular heating to +45–+50 ⁰C, the canvas hardens, becomes brittle and cracks over time. That is why the installation of incandescent lamps in such chandeliers is unacceptable.
Expert opinion
Alexey Bartosh
Specialist in the repair, maintenance of electrical equipment and industrial electronics.
Ask an expertImportant! To achieve high-quality lighting, you do not always need a large chandelier with high-power lamps. It can be a central element, it should be supplemented with spotlights or lighting around the perimeter of the room in the form of a ribbon with LEDs.
 Original chandelier for stretch glossy ceiling
 When choosing one or another version of the chandelier, you should pay attention to:
- For a standard-sized room, which is decorated in a classic style, a matte or satin stretch ceiling is selected. As for the chandelier, the optimal solution is a compact model with 2-3 small shades.
- If the ceiling is planned to be glossy, then chandeliers with many small lamps that reflect from the surface look great. This technique helps to visually raise the ceiling, make the room larger.
- For mirrored black and dark ceilings, chandeliers with small elements are also perfect. But here you should also consider the color and shape of the lamps. Best of all, medium-sized, simple shapes - spectacularity is achieved through the play of light on the canvas.
- The original can be called a chandelier with matte shades-balls of different sizes in white.
- Chandeliers with colored lampshades should be selected based on the color scheme of the ceiling and the entire room.
Choosing a chandelier according to technical parameters
There are a number of criteria by which a chandelier should be selected specifically for stretch fabrics, among them:
- The distance from the shades / light sources / lamps to the canvas is at least 10 cm. This is necessary to prevent overheating of the canvas during the operation of the lighting device.
- It is optimal when each lamp is placed in a separate ceiling - it will become an additional barrier to thermal energy.
- The more lamps the better. Each individual element will have a low power rating, and the quality of lighting will not suffer.
 Chandelier with many LED bulbs
 - The cap that covers the mounting elements should be large enough - this will make the installation process easier. This element should not have sharp edges that pose a danger to the integrity of the web.
The choice of a chandelier is important, but even more important is the correct and reliable fastening of it to the ceiling.
Wiring preparation
These works should be carried out before the installation of the tension web, cutting the already stretched one will be impossible. Most often, the chandelier is hung in the center of the room, where the cables from the old appliance are already out. The procedure in this case:
- Turn off the machine on the shield and measure the length of the cables. This takes into account the space that the web fasteners will take. The length of the wires is such that the chandelier can be mounted freely, without cable tension.
- If the length is not enough, increase the wires, it is better to have a margin. In this case, clamping terminals are used. It is better not to use twisting, since in this case the contact becomes worse over time, but it will not be very easy to get to twisting.
- Turn on the machine on the shield and check the phase and zero on the wires. To do this, you need an indicator. After that, turn off the machine again.
- The ends of the wires are insulated so that during the installation of the web they do not break through it and suffer from electric shock.
If the installation is carried out in another place, it is required to lay a new wiring. The cable cross section is sufficient for a chandelier of 1.5 mm², the number of cores is selected based on the characteristics of the lighting device.
 Stretch ceiling wiring
 Important! The wiring is attached so that it does not sag and lie on the canvas - this will ruin its appearance.
Mounting methods
There are two main options for fastening: on a hook or a mortgage platform, through a bracket. The choice of one method or another depends on the design of the selected chandelier. All preparatory work is carried out while the canvas is not yet stretched, after which it will be more difficult to do.
Fastening with a hook is suitable for models that have a long rod in the design and a small base in diameter.
A simple mounting plate is the best option if the luminaire is small in size and weight. As for the cruciform bar, it is necessary for massive chandeliers that have a wide base. To hang on these types of slats, you will need a support platform.
Fixing a chandelier with a hook
Hanging a chandelier on a hook is considered one of the most reliable and versatile options. In addition, in an average apartment, the ceilings are equipped with these fasteners. If it is not there, then fixing it on the ceiling is easy. Its independent installation is even better, because the owners will know exactly how much weight it can withstand. If the ceiling is concrete, then you will need an anchor hook with a dowel. The fastening process is simple - drill a hole of the desired diameter and hammer in a plastic dowel, then screw in the hook. For wooden ceilings, even dowels are not needed, the hook is simply screwed into the ceiling or beam.
 Chandelier fixed with a hook
 When the fastener is ready, you need to actually hang the chandelier according to the following algorithm:
- Check the tightness of the hook.
- If the space between the finished ceiling and the rough ceiling is larger than the hook can block, additional suspension elements are needed. They can be: chains with the required number of links, one more hook. Another option is to use a wooden bar that is screwed to the draft ceiling, a hook is already screwed into it.
- The necessary stages of installation of the ceiling canvas are carried out.
- After cooling the surface and its tension, you should carefully find the location of the hook by touch.
- Glue a plastic mounting ring of the required diameter onto the film; without it, the film will be easily torn. This is best done using special glue. Moreover, its circumference should be a couple of centimeters less than that of a decorative glass.
- A film is cut out inside the ring - access to the mounting element is open.
- Now the wiring cables are brought out. The chandelier is suspended in its place, connected to the wiring cables. These actions are carried out with the machine turned off on the shield.
- The last step is to fix the decorative cap.
It remains only to check the performance of the chandelier. As you can see with your own hands, installation is easy.
Mounting on the mounting platform
A similar option is used for chandeliers that have a longitudinal or cross bracket for mounting. The size of the platform is determined based on the dimensions of the bracket, and the thickness, with an eye to the distance between the draft and finishing ceiling and the weight of the chandelier. The actual installation of the platform is carried out at the stage of fixing the baguettes for the stretch ceiling, it should go 2-3 mm above the level of the mounted canvas.
 Platform Mounting Procedure
 The basis of this method is the mounting platform, its fixation on the ceiling should be taken care of in advance. Its main task is to compensate for the distance between the draft ceiling and the stretch fabric. Embedded platform options:
- From a wooden beam. These are needed for massive heavy chandeliers. A hole is drilled in the bar for the output of cables. He himself is screwed to the ceiling base. When choosing a thermal ring for this design, it is important that it be slightly smaller than the platform. In some cases, 5 small rings are used instead of one large one. In this case, screwing the chandelier through the stretch fabric can be done easily.
- Prefabricated structure. It is assembled from moisture-resistant plywood and metal elements. Plywood is attached to the ceiling with suspensions (those used for stretch ceilings). They should be screwed to the concrete base with metal screws.
Fasteners on the longitudinal bar
The installation steps after stretching the web with a longitudinal bar are as follows:
- Find the location of the platform, glue the plastic thermal ring.
- After the glue has dried, cut the film inside the ring.
- Screw the screw on the bar, then fix it on the bar.
- Remove the wiring cables and connect them to the chandelier.
- Hang the luminaire on the removed studs and fix with decorative fixing nuts.
 Longitudinal plank on a stretch ceiling
 Fasteners on a cruciform bar
The algorithm of actions with a cruciform bar is similar to the previous version. The difference is that it is difficult to find a thermal ring of the required diameter, so 5 small ones are used. Central for removing cables, 4 more around the circumference for removing mounting studs and fixing the chandelier.
 cruciform plank
 What tools will be required?
Regardless of the installation method, you will need:
- Thermal rings and glue for them.
- A sharp knife, preferably a clerical one.
- Screwdriver indicator.
- Connecting terminals.
- Crosshead screwdriver.
- Insulating tape.
For mounting on a hook, additionally: the hook itself, if not present. For platform mounting - platform elements based on the weight of the lighting fixture, plates for on site.
Conclusion
In general, hanging a chandelier from a stretch ceiling is not difficult, but strict adherence to the work technology is required. If everything is done correctly, then the result will only please.
At the final stage of repair work, it is always necessary to install lighting fixtures. If this is an ordinary ceiling, then there will be no difficulties with their installation. Problems appear when you have to hang a chandelier on a stretch ceiling. The fact is that it will not work to attach it directly to the ceiling plane.
Beautiful lighting devices are not only one of the elements of the interior of the room, it is impossible to do without them in the dark. When a stretch ceiling is used to finish the rough floor, the process of their fastening becomes more complicated.
Since the ceiling structure consists of a tightly stretched web, it is impossible to use long-used installation technologies. But there are methods on how to hang a chandelier on a false ceiling, while not spoiling it or damaging the panel.
Features of the chandelier installation process
Before proceeding with the installation of lighting fixtures, it is necessary to ensure that this work is carried out by people who know its details thoroughly so that all risks are minimized.
The fastening process must meet a number of requirements:
- Reliability. The chandelier must be installed so high-quality that the possibility of its fall, and hence the possibility of injury, is excluded.
- Aesthetic component. Installation work should be done as carefully as possible so as not to damage the ceiling surface.
- Simplicity. Thinking about how best to attach a chandelier, you should not invent your own ways. It is advisable to use the recommendations of specialists who are constantly engaged in this type of installation work.

Mounting a chandelier on an already installed tension structure has some features:
- The lighting device must be mounted after the web is tensioned and cooled. It is advisable to carry out this process two to three days after the completion of the construction of the ceiling.
- The simpler the ceiling structure, the easier and faster the luminaire can be installed.
You also need to remember about other important nuances that affect the reliability of fastening and good appearance. Care must be taken that after the installation of the stretch fabric is completed, there is a place for installing a chandelier. It is distinguished by a thermal ring, which is intended to prevent tearing of the panel.
Light fixture requirements
Not all homeowners who have installed a stretch ceiling know that not every chandelier can be attached to it.
This type of lighting fixtures has a whole list of requirements regarding:
- Plafonds locations. Suitable chandeliers in which they are directed to the sides and down. It is impossible to install devices if their shades “look” up, as stains appear on the canvas as a result of heat exposure to the canvas. The reason for this phenomenon lies in the property of polyvinyl chloride to change when heated.
- base material. Preference should be given to products in which it is not made of metal. The reason is that during prolonged use of the chandelier, the metal elements begin to heat up and as a result of contact, the ceiling surface is deformed, which manifests itself in the form of spots and streaks.
- The presence of a universal cover. Today, the choice of chandeliers is huge, but the most practical choice is still a universal shade. Energy-saving lamps are suitable for it, since they do not heat up and do not have a negative effect on the stretch fabric.
- Shade depth. It is better to purchase chandeliers in which the lamps are completely covered by them, as this will protect the ceiling surface from the influence of artificial lighting. In the absence of a ceiling lamp, when it is made in the form of a decorative base, only energy-saving lamps with low power can be used.
- Distances from the ceiling to the canvas. It should be at least 20 centimeters, otherwise the cloth will not last for a long time and shortcomings will appear on its surface as a result of heating the material.
- Polyvinyl chloride films. The fabric from it turns out to be elastic, but too thin. Therefore, it can be easily damaged by sharp objects, which means that the chandelier should have a streamlined shape.
- Incandescent lamp. It is permissible to use lamps with a power of no more than 40 W in the chandelier, otherwise too high a temperature will cause rapid damage to the panel.
Fastening process requirements
When choosing a chandelier, you need to pay attention not only to its decorative part, but also to fasteners. There are two methods of mounting this lighting fixture. The first of these is the use of a hook for a stretch ceiling chandelier.
The use of a hook-shaped element is considered the most reliable and time-tested option. With the help of an anchor, the hook is inserted into the ceiling slab and, as a result, even the heaviest of the chandeliers is fixed.

By using a bar, which is a metal part. It is intended for mounting to the ceiling and happens:
- cruciform, consisting of two slats, which are arranged crosswise;
- I-beam - it is used for mounting massive fixtures, if they additionally require a safety mount;
- a conventional bar having the shape of a metal product in the form of a rectangle.
When it is necessary to install a chandelier in a stretch ceiling structure, the best solution would be to use the hook mounting method, which is simple and reliable, and also allows you to keep the ceiling finish intact.
The hook looks neat, it helps to reduce the diameter of the thermal ring used to cut a hole for the output of electrical wires. This allows you to install a chandelier with a small glass and a decorative cover. It is important that the lighting device is not attached to the stretch fabric, but to the floor slab under the structure.
Tools and Consumables
For installation, you will need the following tools and materials:
- self-tapping screws and dowels;
- drill with drills for woodworking and concrete;
- pliers;
- screwdrivers - indicator, cross and slotted;
- wooden block;
- insulation;
- mounting gun plus brackets.
Important: work related to the installation of the chandelier should be carried out with the power supply turned off. These precautions help reduce the risk of injury.
Fixing the luminaire with a hook on a stretch ceiling
There are several ways to attach a chandelier to a stretch ceiling, which differ from each other. As a rule, when selling such a lighting device, a set of fasteners is attached to it. The first method assumes that the installation of the chandelier will be done with a hook.
For installation work, you will need the following tools:
- drill or perforator;
- drills for concrete;
- hammer;
- anchor hook.

Fasteners are produced in a certain sequence:
- A hole is created in the ceiling plate with a perforator, the diameter of which should be equal to the diameter of the anchor.
- Using a hammer, the anchor is driven into the hole. Next, the hook makes revolutions until the sleeve is straightened and takes the working position. A similar result can be achieved in another way, namely by tightening the nut included in the hook kit. The diameter of the anchor is selected in accordance with the type of chandelier. The most popular diameters are from 6 to 14 millimeters.
- A plastic ring is glued to the tension web, through which the hook is to be pulled. Then a hole is cut inside the resulting circle and suspended. Glue the sealing ring, and then cut the film should be in the place where the hook is located. If you make even a slight mistake in determining the location of the hole, this will lead to the fact that you have to move the lighting fixture. For this reason, it is necessary to find it very accurately.
Even for inexperienced home craftsmen, installation will not take more than 30 minutes. There is no better way to install fixtures on a stretch ceiling than this one. But not always the chandelier can be hung on a hook. In some cases, manufacturers of such devices provide for the use of other types of fasteners.
Installing chandeliers on a mounting plate
This method is used when it is necessary to hang a chandelier on a stretch ceiling without a hook. In such a case, fastening is carried out on a mounting plate of a longitudinal or cruciform shape. At the same time, the size of the platform depends on the parameters of the bar, and its thickness on the weight of the lamp.
The mounting plate is installed during the fastening of the baguettes, and at the same level with the guide elements. To make a platform, take a bar, a piece of plywood or boards. In addition, mounting plastic rings are used to fasten the chandelier.

For the longitudinal bar, a ring is used, the diameter of which allows wires to be passed through it and fixed with self-tapping screws. For cruciform planks, 5 rings are required, with different diameters.
Installation of chandeliers on a longitudinal bar is carried out as follows:
- When the level of the ceiling structure should drop by an insignificant amount, in order to install the chandelier on a small longitudinal bar, it will be enough to fix the embedded bar in a certain place on the ceiling. For this purpose, 2 holes with a diameter of 2 - 3 millimeters are drilled in it. To lay the wire in the center of the bar, a shallow groove is sawn through. The overlap is marked and holes are created with a puncher, then the wooden element is fixed and wires are placed in it.
- In case of a significant difference in the level of the ceiling, for example, when installing two-level structures, a prefabricated version of the mounting platform is used. To make it, take a piece of plywood with a thickness of 6 - 12 millimeters and cut out a rectangular element of the required size from it. The length of the platform should exceed this parameter at the luminaire bar by a couple of centimeters, and the width should be slightly larger than the diameter of the mounting ring. For cruciform planks, a square platform is made.
- A hole for wires with a diameter of 10-15 millimeters is drilled in the center of the platform and its outer side is carefully ground to prevent damage to the canvas, and brackets are attached to the corners with wood screws.
- The platform is applied to the floor and its level is checked. This is necessary to make sure that it matches the location of the finished ceiling surface. The height of the platform is adjusted by brackets, for which they are bent. It is fixed on the floor with screws and dowels.
- Guides are placed along the perimeter of the room, controlling the correspondence between the levels of baguettes and the mounting platform. The canvas is stretched according to standard technology.
- After it cools down, when it acquires the required elasticity, proceed to install the chandelier. To the touch, they find a hole for the wires and glue a mounting ring around this place. Then material is cut out inside it and wires are brought out through the hole.
- Mounting studs are placed on the bar and pulled onto the locknut. They are well tightened, because then it will not be possible to fix the device. The bar is mounted to the platform with self-tapping screws.
- Next, you need to remove the bulbs and sharp parts from the chandelier and prepare the terminal block for connection. It is desirable to hang the lamp with a partner - he will hold the device, and the second person at this time will begin to connect the wires and tighten the union decorative nuts on the body.
- At the end, they screw in the lamps, attach the shades and various decorative elements, and then check the performance of the chandelier.
Installation of lighting fixtures on a cross-shaped bar
This method is used when it becomes necessary to fix a heavy chandelier on a stretch ceiling, which requires the creation of additional support. It has much in common with the previous version of the installation of fixtures.
As a fastener for massive lighting devices with a wide base, a cruciform bar is used. It is impossible to mount it in a stretch ceiling structure within the mounting holes, since they are at a great distance from each other.
For this reason, a supporting platform or base made of wood is attached to the ceiling. Such an element can be made from a plywood sheet with a thickness of 10 -12 millimeters, it must correspond to the parameters of the cross.

In the stretch ceiling, 5 holes are equipped, reinforced with thermal rings. One of them, designed to output electrical wiring, is made large. The remaining four are made small and used for connecting the power supply - they must correspond to the mounting holes on the cross bar.
If there are no thermal rings of small diameter, it is possible to use pieces of plastic that are glued to the tension fabric to reinforce the places where the screws are screwed in. Otherwise, the film at the puncture site may tear. When the wires are connected, it remains only to place the chandelier on the cross and attach with decorative nuts.
By the way, it is forbidden to join wires from different metals. For example, copper can only be twisted with copper, otherwise a short circuit cannot be avoided.
Fixing the chandelier dowel - butterfly
The installation method using dowels - butterflies is very convenient, but it is used provided that the lamp weighs no more than 3 kilograms. This fastener has a plastic clip and a screw hook.
Holes are created in the ceiling, taking into account the holes of the clip. Then the hook is screwed into the holder for several turns. It is inserted all the way into the desired hole and the hook is twisted. From the inside, the plastic clip opens into petals and they fix the hook.
Advantages and disadvantages of various fastening methods
To decide on the choice of option, how to put a chandelier on a stretch ceiling in a particular situation, you need to have an idea about the pros and cons of each of them:
- Installation with an anchor hook is simple, fast and reliable, but not every chandelier is adapted for this type of fastening.
- The crosspiece allows you to install massive lighting fixtures, but since this is not easy, an assistant is required.
- Most chandeliers are mounted using a plank, which is a simple method. In this case, you will need to use a wooden block.
- With the help of dowels - butterflies, fastening the lamp is quick and easy, but the degree of reliability of this method is less than that of other options.

There are other methods of fastening chandeliers, but they are not used for stretch ceiling structures, since they provide free access to the base base during installation, which is impossible with a stretched film or fabric.
Connecting the luminaire to the mains
When the fasteners are prepared, the chandelier must be connected to the network. Through a pre-made hole, the wires are pulled out through the thermal ring. The lamp is hung on a bar or hook to free your hands, and the wiring is connected.
The wires are connected according to the manufacturer's instructions for the chandelier, the lamps are screwed into the shades and the device is checked for operation. If it functions properly, proceed to insulate the wiring and fix the lamp. This work is done with the power off.

Having twisted the wires, they are placed in the corrugation and the glass of the device is fixed. Using decorative bolts, they begin to adjust the clamp of the chandelier and the density of its contact with the ceiling surface.
Completion of the installation of the chandelier
After all the work on installing and checking the operability of the devices has been completed, you need to make sure that the canvas is intact and that there are no various damages, such as scratches, tears, and others.

In order to eliminate traces of unprofessional installation, you can use a few tricks:
- The remains of the canvas in the thermal ring are carefully cut off, leaving at least 2-3 centimeters from the edge to prevent slipping or deformation of the material.
- If the ceiling surface is damaged by a tool or sparks, thermal stickers will help to make the damage spots invisible, which will also decorate the interior.
- The corrugation will help prevent direct contact of the wiring with the inside of the tension web - all electrical wires are placed in it.
Elimination of non-standard situations that arise during installation
When a chandelier is suspended on a stretch ceiling, situations often arise from which it is not easy to find a way out.
Among them, the following problems most often occur:
- The length of the hook installed in the ceiling turned out to be insufficient. This happens when there is a large distance between the ceiling and the stretch ceiling. This situation can be corrected by supplementing the hook with a strong chain - a kind of extension cord.
- There was a need to extend the wiring. In this case, all wires are placed in a plastic corrugation. So they will not sag, and therefore touch the inside of the stretch panel. The corrugation is attached with brackets to the concrete ceiling.
- There was an idea to change the location of the chandelier. This should be done in advance, since the transfer is impossible without damaging the canvas.
- There is a difference between the wires of a home electrical wiring and a lighting fixture. In such a situation, it is necessary to use special terminal blocks that prevent the closure of non-contact metals from which the wires are made.

In order to properly perform the rather difficult work of connecting the chandelier to the electrical wiring, you must strictly follow the instructions that came with the lighting fixtures. It always describes the whole process in detail and has a connection diagram. If there is no special knowledge and skills of such work, then it is better to entrust the installation to professionals.
How to hang a chandelier on a stretch ceiling? This can be done by every man, without much difficulty, if he knows some of the subtleties and rules of this process. At the same time, chandeliers for a stretch ceiling must be suitable in size and type of attachment. Any installation of the luminaire must be carried out prior to the installation of the top surface.
Installation of the device must be carried out before the installation of a new surface is started. Initially, any lamp, lamp or other lighting device is attached. Installing it after painting or wallpapering is completely easy. Chandeliers for a stretch ceiling will need special ones, despite the fact that the installation process itself is relatively laborious.
Which chandelier to choose for a stretch ceiling? It must be built-in or overhead type. It is known that the selection of a product is to some extent determined by the design of the room and the method of fastening. Not all options can be mounted in a stretch film.
It is very important that the edges and perimeter of the entire lighting fixture plate are not sharp, otherwise the surface of the product may be damaged. In this case, it will be necessary to make a complete replacement of the material.
In addition, chandeliers are not installed in a stretch ceiling if the latter is made on the basis of PVC. This is due to the fact that there is a possibility of changing their color and size due to constant temperature pressure. Halogen lamps are used in the formation of lighting, the direction of the light beam is organized down or to the side, but not on the surface of the tension product. For a chandelier with a halogen lamp, a ceiling lamp is required, otherwise the surface of the film will be damaged.
Which chandelier to choose for a stretch ceiling? When choosing, pay attention to the main characteristics of the fixtures. You can hang an option that has a plate shape, while its base should not be metal. The metal is able to heat the canvas very strongly, which is by no means allowed.

When choosing the appropriate option, one more rule must be taken into account: the ceiling lamps on the lamp can be directed downwards or on different sides. This will prevent negative impact on the materials from which the film is made. Tension products become darker due to the influence of the rays of the lighting device, which are directed specifically at them.
How to choose a chandelier? In stores, you need to consider those types of chandeliers for stretch ceilings that operate on energy-saving lamps. This will not only save the family budget, but also protect the surface material from excessive overheating. In addition, ceiling chandeliers for stretch ceilings should not be too complex, otherwise it will complicate the installation process.
Fastening technology
How to fix a chandelier on a stretch ceiling? You can carry out this procedure in 2 ways: use a hook or a special bar. If the chandelier is fastened to the stretch ceiling using a strap, then in this case it is necessary to provide for some nuances: use a simple bar in your work, since it can be used to fix the structures of lightweight lamps. You can buy such a bar already with additional equipment (we are talking about studs and screw clamps).
It will be possible to fix the chandelier with the help of a cruciform plank. With this strap you can mount large-sized lamps. You can also attach the device using an I-bar. Be sure to turn off the power supply for any type of fastening. This step is done for the safety of the master, and also in order not to damage the stretch film with sparks that may appear during drilling or fastening.
What method is most often used to make a chandelier on a stretch ceiling (fasteners of any type) look perfect? It's better to use a hook. It is usually nailed to the surface with dowels. In addition, you can hang the chandelier in a through direction. To do this, use hollow slabs, which are often used to create floors.

Hook fixing methods
Before you change the chandelier, you need to consider how the fixation will be made. How to install a chandelier on a stretch ceiling if you plan to use a hook for fastening? There are several ways that make it possible to achieve the goal.
In some cases, the chandelier is fastened to a stretch ceiling using an anchor bolt.
The following steps are expected:
- drilling a hole in the surface;
- inserting a hook into the previously obtained space;
- tightening the suspension nut.
Hanging the hook must be as correct as possible. In this case, special attention is paid to the diameter of the anchor. This value must be selected taking into account the weight of the whole structure.
If such a hook was not at hand, it can be replaced with an ordinary nail. To do this, this element is hammered into the upper surface for a large part of the length, and the protruding part is bent in the form of a hook. But such a simple design will withstand a small simple lamp weighing several kg.
More massive appliances will need to be hung with other fixtures, not a nail.
Lamps and chandeliers for stretch ceilings are often chosen for large houses. In this case, it is more expedient to resort to another method of fastening. It is recommended to fix the chandelier to the stretch ceiling by drilling a hole in the ceiling directly between the floors. Next, you need to start preparing two metal plates. They should be rectangular with a hole in the middle.

Installing a chandelier on a stretch ceiling with your own hands will be implemented effectively only if all requirements are met. First of all, this concerns the size of the plates. Their parameters should be as follows: 20 by 20 for the first and 30 by 30 for the second.
Mounting a chandelier on a stretch ceiling suggests that one of the plates must be installed on the second floor (on the floor), and the second on the first. It is necessary to select elements so that all parts fit correctly. A hook must be attached to the resulting hole. The hook must be carefully connected directly to the threads used for the retaining nut.
Is it possible to use another method of mounting the device? Attention is also offered to another option (when using a six-void). You can change the chandelier on a stretch ceiling using a hole with a diameter of 50 mm. It is formed in a hollow type channel. The installed hook will give a positive result after the implementation of the following successive measures:
- insert of a metal rod (diameter - 10 mm);
- use of wire rod (diameter - 8 mm) for direct creation of a hook;
- use of fittings.
There are cases when, when drilling a concrete coating, the drill falls into the void, and sand and debris pour on the master. This is normal, because the plates are usually not made monolithic. Builders for better sound insulation and to reduce pressure on the walls in the slabs make small holes that are placed along the slabs. They are see-through. If this situation occurred, it means that the master fell into this hole when drilling.
For this option, you should purchase a metal hook of the Molly system. It is used for hanging a lighting device in the hollow surface of the slab. Such a hook will withstand larger structures weighing up to 30 kg. It is enough to insert the dowel into the hole and turn it clockwise until it stops. At a certain point, the master’s own hand strength will not be enough, so he will need some kind of leverage.

Mounting strips
At the present stage of technology development, stretch ceilings are very popular and the installation of a chandelier on them is carried out by a special method. How to hang the lamp correctly? Mounting strips are often used. It is very important to hang the chandelier correctly, while the installation is not carried out on a concrete base. It will be more appropriate to hang the chandelier with slats only if the beams are wooden.
We hang the chandelier on the stretch ceiling with slats, if plywood is used as a special insert. It is attached to concrete. It will not work to replace plywood with drywall, since the planks are not adapted for this material. When the mortgage under the chandelier in the stretch ceiling is selected, you can proceed to the main stage - installation.
It is not difficult to choose a chandelier for a stretch ceiling if the fastening mechanism is clear. The stretched material at the initial stage is fixed with a special thermal ring. Before you arrange stretch ceilings with a chandelier, you need to clearly define the place where the lamp will hang. It is there that a wire should be launched, through which the supply of electricity will be realized. How to choose the right diameter? It should not be larger than the glass of the lamp itself.
A chandelier for a bedroom with a stretch ceiling can be hung in any convenient way. After the work is done, it is necessary to bring the wires. It is very convenient to hang a lighting device on a stretch ceiling by means of a mounting plate. In this case, it must be borne in mind that the hole in the thermal ring must comply with the standards. The device will be fixed as successfully as possible if all parameters are selected accurately.
The ceiling chandelier will function only after the last stage is implemented: you need to connect the wire to the terminals (they are located in the wiring). Hanging material with an already working device will look very impressive.
Additional Information
A chandelier for a stretch ceiling should always be chosen carefully enough. Its main purpose is to give the interior some exquisite notes. At the same time, it is very important to think over the lighting of this type of material correctly. For example, you can use LED lamps or use spotlights. This choice makes it possible to scatter light reflections in different ways.
What other chandelier can you choose? Attention can be stopped on lighting fixtures that are equipped with shades. They are best placed in the hall, since it is there that this proposal will look most interesting.
LED lamps are often recommended. A chandelier for a hall with a stretch ceiling of this type has a fairly large number of advantages. The first thing you should pay attention to: LED lamps do not get very hot. They can be placed in the living room, as these options are also energy efficient.
LED lamps should be purchased even before installation, so that it is possible to carefully consider the mechanism for installing them to ceilings. In addition, LED lamps can be decorated in the place where the mount will take place.
For plafonds, it is desirable to choose energy-efficient lamps. Plafonds are directed down or to the sides. A square chandelier is installed on an already fixed film material in a standard way.
What to do if the owner chose a heavy and massive light fixture? A special structure should be built. This is done only before the process of installing the stretch film, but not after it. You need to attach the frame in almost the same way as with the option of using a mortgage, but it is made more powerful by using a metal plate. Attach such an assembly at several points.
If the house has stretch ceilings, fixing the chandelier to it will not be difficult. All actions for mounting the device must be clear and as consistent as possible, otherwise a good result cannot be obtained.
Stretch ceilings are in fashion, they look beautiful, rich, have a long service life, they are easy to care for. They are rightfully the decoration of the interior of any room. Stretch panels can be of different quality: matte, glossy, printed, etc. A chandelier on such a ceiling should be fixed perfectly, reliably, correctly, without damaging the canvas itself and in harmony with it.
Chandelier in the stretch ceiling in the interior of the room
Installation of a chandelier on a stretch ceiling should be carried out by specialists who know the features of its fastening. If you wish, you can do it yourself, having understood the features, methods and installation steps. If this is not done, then you can ruin the cloth and even make it unusable.
Choice
Before fixing a PVC or other material on the ceiling, 3 conditions must be met:
- buy your favorite ceiling lamp;
- determine its place of installation in the premises of an apartment, a private house, a public facility;
- bring electrical wires to the installation site.
Particular attention should be paid to the choice of the design of the chandelier. There are features that must be observed at the selection stage. The ceiling lamp must be such that the heat transfer to the stretch fabric does not exceed the permissible limit, i.e. was less than 60 0 C, because exceeding this value will adversely affect the material of the ceiling. The chandelier must meet the following criteria:
- do not have a metal base (it heats up during the operation of the chandelier, which will eventually lead to cracking of the stretch fabric);
- ceiling lamps should be directed down or to the side, but not on the canvas (dark spots may form) or be at a considerable distance from it;
- it is necessary to screw LED or energy-saving lamps into the ceiling lamps (they consume little power, which saves electricity consumption, and does not heat the canvas during operation);
- lamp power should not exceed 40 W;
- fit the area and height of the room;
- the design of the luminaire should be simple so that it can be securely fastened.
Usually they choose a classic lamp with several horns, in the form of a ceiling, its choice depends on the preferences of the residents.
Tools
Before you start installing the chandelier, you need to prepare the following tools and fixtures:
- sharp knife;
- roulette;
- ruler;
- pencil or marker;
- screwdrivers: flat and Phillips;
- soldering iron;
- flux and solder;
- electrical tape;
- self-tapping screws;
- step ladder.
When installing a chandelier in a false ceiling, the most reliable fastening of wires is their connection by soldering.
Installation methods
Before attaching the stretch ceiling, preparatory work is carried out to connect, after which it will be easy to hang and connect the chandelier.
Fixing the chandelier to the stretch ceiling is carried out on the following mounting elements:
- hook;
- bar;
- plate.
Installing a chandelier on a hook is considered the most reliable way. This method is the most common. For these purposes, the following types of hooks are used: anchor, with through-type fastening, specially welded to the plate, independently made from wire rod of various diameters (depending on the weight of the lamp).

Fixing the chandelier with a mounting hook
mounting hook
There are several ways to secure the lamp with a hook. The first of these is to drill a hole in the base of the ceiling equal to the diameter of the anchor hook (usually from 6 to 14 mm), hammer it into this hole and secure it with a nut.
You can do it in another way: make a through-type hole and, using nuts superimposed on 2 metal plates with holes equal to the anchor shank, fix the hook on both sides and press it tightly against the ceiling base.
When making a hook with their own hands, they prepare a channel in the ceiling, where they lay a mortgage rod, into which they first thread a hook made by themselves.

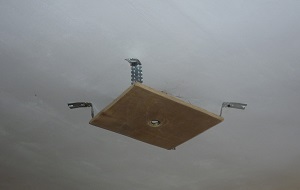
Fixing a suspended chandelier to a stretch ceiling using a moisture-resistant plywood platform
Mounting plate
Chandeliers of small and medium size are mounted on special mounting strips, which can be straight or cruciform. The plank, as a rule, is included in the chandelier kit along with fasteners. Heavy and bulky chandeliers are mounted on I-beams.

Installing a straight mounting plate
Sometimes they also use a special platform, which is made of moisture-resistant plywood. Its size is usually 300 * 300 mm, in the center there is a hole for the hook. Attach such a platform to the base of the ceiling as shown in the figure below.

Fixing the platform to the ceiling base
The lower plane of the product should be at the level of the stretch ceiling. For fastening, you need corners made of steel with a thickness of at least 1 mm and a width of 20 mm or more. The length of the strip for making a corner with your own hands depends on their design and the height of the platform. The diameter and number of holes for fasteners depends on the size of the self-tapping screws and screws.
Installation
You can start installing the chandelier only after the panel has cooled down and the electrical network has been de-energized. If the luminaire will be hung on a hook, then it is necessary to install a thermal ring in the place where it is fixed. It must be properly selected under the glass of the lamp.

Making a hole in the tension web
The size of the outer diameter of this product must necessarily be less than the attached glass, which should subsequently close this ring and lie tightly against the stretched ceiling. Usually, the thermal ring is glued with a special compound. Then, along the inner hole of this ring, a ceiling sheet is cut out with a sharp knife. The electrical network cable is pulled out into this hole, directed to the switch, then it is connected using the terminal block.
Checking the chandelier for performance is carried out by turning on the automatic power supply on the switchboard.
With my own hands. Video
You can learn about the features of installing a chandelier on a stretch ceiling from this video.
A beautiful chandelier is not only an element of room decor, but also a lighting device, without which it is difficult to do in the evening. In the case when there is a stretch ceiling, the process of installing a chandelier is somewhat more complicated. The thing is that the design of the ceiling, which assumes a tightly stretched surface of the canvas, does not make it possible to use the usual installation methods. How to hang a chandelier on a stretch ceiling, without damaging it and without spoiling the beauty of the ceiling itself, we will analyze further.
Features of fastening chandeliers
It is important to ensure that the work being done is done by a person who knows all the nuances of the process, as there are some risks that should be minimized. The fastener must meet the following requirements.
- Reliability - the chandelier must be well fastened, which will prevent it from falling and possible injuries.
- Aesthetics - installation work must be carried out as carefully as possible to prevent damage to the ceiling in the process.
- Simplicity - do not reinvent the wheel, thinking about how best to fix the chandelier. You should take the advice of professionals who perform such installation work daily.

So, installing a chandelier on an existing stretch ceiling has several features.
- The chandelier is attached only after the ceiling has been stretched and cooled down. It is best to perform installation on the second or third day after installing the ceiling.
- The simpler the design, the faster and easier it is to install.

Do not forget about other important factors that determine the reliability of fastening and a beautiful appearance. Care should be taken that after installing the stretch ceiling there is a place under the chandelier, which is separated by a thermal ring that prevents the fabric from tearing.

Requirements for a chandelier
Not all owners of stretch ceilings are aware that not every chandelier is suitable for mounting on just such a ceiling. There are certain requirements for chandeliers.
- Plafonds location- it is recommended to use only those chandeliers, the shades of which are directed down and to the sides. You can not use chandeliers with shades upwards, because stains will appear on the ceiling from the heat of the lamps (the feature of polyvinyl chloride changes when heated).
- Base length- preference should be given to those options whose base is not metal. The fact is that with prolonged use of the chandelier, the metal is able to heat up and lead to deformation of the ceiling upon contact, which manifests itself in the form of stains and blurry spots.
- Universal cover- the choice of modern chandeliers is diverse, but the most practical option is still universal shades. For such plafonds, energy-saving lamps are suitable, which do not heat up and are unable to have a negative effect on the stretch ceiling.
- Shade depth- it is best to buy chandeliers, the shades of which completely hide the lamp, which will protect the ceiling from exposure to artificial light. If the ceiling is missing (made in the form of a decorative base), only low-power energy-saving lamps should be used.
- The distance from the ceiling canvas to the ceiling must be at least 20 cm, otherwise the ceiling will not last long, and defects caused by heating of the material will quickly appear on its surface.
- PVC film is very thin but elastic. It is easy to damage it with sharp objects, so the chandelier should be as streamlined as possible.
Chandelier prices
In addition to the chandelier, attention is also paid to the incandescent lamps themselves. You can use lamps no more than 40 W, otherwise the elevated temperature will lead to early damage to the ceiling.


fastener requirements
In addition to the decorative part of the chandelier, you should pay attention to the fasteners. Most often, chandeliers have two types of fastening.
Hook- the base of the chandelier is attached with a hook-shaped element. This option is the most reliable and proven for decades. With the help of an anchor, the hook is inserted into the ceiling plate, securely fixing even the heaviest chandelier.

plank- is a metal part that is attached to the ceiling, and there are several types:
- cruciform - consists of two planks arranged in a cross;
- I-beam - designed for massive chandeliers that require additional safety fastening;
- ordinary bar - presented in the form of a rectangular metal cut.

When installing a chandelier in a false ceiling, it is best to use a hook mount, which is more reliable and simple, and also allows you to keep the ceiling in relative integrity. The hook looks more neat, and also allows you to reduce the diameter of the thermal ring, through which a hole is cut for the output of wires. This will allow you to use a chandelier with a small glass and a decorative cover.
Attention! The chandelier is not attached to the stretch ceiling, but to the ceiling plate located under it.

"Special" chandeliers
Stretch ceiling prices
stretch ceiling

What tools will be needed?
Installation is not possible without the following tools:
- drill with drills for wood and concrete;
- self-tapping screws with dowels;
- a wooden block from which you can make a plank substrate;
- screwdrivers (cross, indicator and slotted);
- pliers;
- insulation;
- mounting gun with brackets - is necessary in the case when an independent transfer of the location of the chandelier is carried out and a large amount of wire is required to be fixed.
Attention! All work on the installation of the chandelier must be carried out with the electricity turned off. Taking precautions will reduce the risk of injury or even save your life.

Mounting methods
Consider step by step how to hang a chandelier on a stretch ceiling, using one or another method of fastening. Usually, fixtures are already included with the chandelier, so they can be selected together with the lighting fixture.
Prices for popular models of screwdrivers
screwdriver
Method number 1. Hook
For installation, you will need tools such as:
- drill (can be replaced with a puncher) and concrete drills;
- anchor hook;
- hammer.
Fasteners are performed according to this sequence.

Using a perforator, a hole is made in the concrete ceiling slab, the diameter of which must match the diameter of the selected anchor.
The anchor is driven into the hole with a hammer, after which turns are made with the hook until the sleeve is straightened to working condition. The same result can be achieved by tightening the nut that is included with the hook. The diameter of the anchor is selected based on the type of chandelier. The most popular sizes are from 0.6 to 1.4 cm.

A plastic ring is glued to the canvas, through which the hook will pass. After gluing it, a hole is cut inside the formed circle and suspended. Naturally, you need to stick the sealing ring and cut through the film where the hook is located. If you make a mistake even by a few centimeters with the location of the hole, everything can end up with the transfer of the illuminator, therefore, it is necessary to accurately determine its location.

Installation even for the most inexperienced takes no more than half an hour. For stretch ceilings, the best way to fix chandeliers has not yet been invented. However, not every chandelier can be hung on a hook. It happens that the manufacturer provides for fastening in the form of a bar, for which the following method is suitable.
Method number 2. Mounting plate
This method is used when mounting on a longitudinal or cruciform mounting plate is provided. The size of the platform is determined based on the size of the bar, and its thickness depends on the weight of the lamp. Mount the bar when installing baguettes, keeping it on the same level with the guides. The platform is made from a bar, board or piece of plywood.

You will also need plastic mounting rings to mount the lamp. The diameter of the ring for the longitudinal bar should allow wires to be threaded inside it and the bar to be fixed with self-tapping screws. For a cruciform bar, five rings of different diameters are needed.
Table. Mounting the chandelier on a longitudinal mounting plate.
| Steps, illustrations | Description of actions |
|---|---|
| If the ceiling level drops slightly, to mount the luminaire on a small longitudinal bar, it is enough to fix a mortgage bar in the right place on the ceiling. They do it this way: drill two holes with a diameter of 2-3 mm in a bar. In order to lay the wires, a shallow groove is cut in the center of the bar. They mark the ceiling and drill holes with a puncher, after which they fix the bar and lay the wires in it. |
| With a significant change in the level of the ceiling, for example, when installing two-tier structures, the prefabricated structure of the mounting platform is used. To make a platform, a rectangular platform of the required size is cut out of a piece of plywood 6-12 mm thick. Its length should be several centimeters longer than the length of the luminaire strip, and its width should be slightly larger than the diameter of the mounting ring. For a cruciform plank, the platform is made square. |
| A hole for wires with a diameter of 10-15 mm is drilled in the center, after which the front side of the platform is carefully polished so as not to damage the ceiling canvas. At the corners of the platform, brackets are attached to wood screws. |
| They apply the platform to the ceiling and check its level - it must match the calculated level of the final ceiling. Adjust the height of the platform with the help of brackets, bending them. Fix the platform to the ceiling with screws and dowels |
| Guides are installed around the perimeter of the room, checking the compliance of the levels of the mounting platform and baguettes. Stretch the ceiling fabric according to the usual technology. After it cools down and acquires the necessary elasticity, proceed to the installation of the lamp. By touch, a hole for the wires is determined and a mounting ring is attached around it with glue. Carefully cut out the canvas inside the ring and lead the wires through it. |
| |
| Mounting studs are installed on the mounting plate and pulled onto the locknut. They need to be tightened well, otherwise it will be impossible to fix the lamp later. Fasten the bar with screws to the platform. |
| They remove sharp parts, light bulbs from the lamp, prepare the terminal block for wiring. It is better to hang the chandelier together - one holds the lamp, and the second connects the wires and tightens the union decorative nuts on the lamp body. |
| They screw in the lamps, install shades and decorative elements on the lamp, check the operation of the lamp. |


Method number 3. cruciform plank
This method is similar to the previous one and is used to fasten massive lighting structures that require additional support.
A cruciform bar serves as a fastener for heavy chandeliers with a wide base. It will not work to install it within the mounting hole in the stretch ceiling, since the mounting holes are at a sufficient distance from each other. Therefore, as in the previous case, a wooden base or a supporting platform is attached to the base ceiling (it can be made of plywood 10-12 mm thick), corresponding to the dimensions of the cross. In the stretch ceiling, 5 holes reinforced with thermal rings are made: 1 large for the output of wires and power supply and 4 small ones.
Prices for ceiling lights
ceiling lamps

Needless to say, the small holes are made to match the mounting holes on the cross bar. In the absence of small-diameter thermal rings, the places for screwing in self-tapping screws can be reinforced with pieces of plastic glued to the stretch ceiling. If this is not done, the film at the puncture site may tear.
After connecting the wires, it remains only to put the chandelier on the cross and secure with decorative nuts.
Note! It is forbidden to connect wires made of different metals. Aluminum wires are twisted only with aluminum, and copper with copper. Otherwise, there is a high chance of a short circuit.
Below is another example of using a cruciform bar - mounting a recessed chandelier into an already stretched ceiling.


A new hole is cut along the inner contour of this ring (indentation - at least 1 cm)


Method number 4. Butterfly dowel
This mounting method is convenient and suitable for any type of ceiling, provided that the chandelier weighs no more than 3 kg. This fastener has a plastic clip and, in addition, a screw hook. In accordance with the holes of the cage, holes are made in the ceiling. Then the hook is screwed into the holder for several turns. The clip is inserted all the way into the corresponding hole, the hook is carefully twisted. The plastic clip opens from the inside into petals that fix the hook.

Advantages and disadvantages of each method
To determine which mounting option is suitable in a particular situation, you can use the help of a table that clearly displays all the advantages and disadvantages of the methods.
Table. Pros and cons of ways to mount a chandelier on a stretch ceiling.
| Attachment Method | Advantages | Flaws |
|---|---|---|
| anchor hook | Ease and speed of installation, reliable fastening | Not every chandelier is suitable for hook mounting. |
| cross | Possibility of mounting massive chandeliers | Difficult to install, need outside help |
| plank | Most chandeliers have such a fastening, simplicity, uncomplicated design | The need for additional installation of a wooden bar |
| Butterfly dowel | Fastening any chandeliers, quick and easy installation | The degree of reliability is lower than that of previous methods |
There are several more methods for attaching chandeliers, but they are not used for stretch ceilings. The fact is that these methods provide for a free approach to the concrete ceiling, which is not the case with a stretch fabric made of PVC or fabric.
Network connection
When all the fasteners are ready, it's time to do the most difficult thing - connect the chandelier to the electrical network. Through the thermal ring, in which a neat hole is first made, the wires are pulled out. The chandelier itself is hung on a hook or bar so as not to be held in hands when connecting wires. Connect the wires in accordance with the instructions, screw the bulbs into the shades, turn on the power supply. If the chandelier is working properly, then you can do the insulation of the wires and further fix the chandelier.
Prices for ceiling chandeliers
ceiling chandelier

It is important to use good insulation and do all work with the power off. Twisted wires are placed in the corrugation, securing the glass of the chandelier. With the help of decorative bolts, the clamp of the chandelier and its density of contact with the ceiling surface are adjusted. It is important not to overdo it here, because the glass can pull the canvas, causing damage to it.
Final stage
When all installation work has been completed, and the chandelier has been checked for operability, you should pay attention to the integrity of the ceiling canvas and the presence of scratches, chips and breaks. To eliminate the consequences of unprofessional installation, you can resort to a few simple tips.
- The remains of the canvas, which are in the thermal ring, can be carefully cut, but not more than 2-3 cm from the edge, which will prevent it from slipping and deformation.
- In the event that the surface of the ceiling was damaged by sparks or tools, thermal stickers will come to the rescue, which will hide defects and diversify the interior a little.
- To extend the wiring and prevent its direct contact with the inside of the stretch ceiling will allow the corrugation, which conveniently fits all the necessary wiring wires.

Video - How to hang and install a chandelier on a stretch ceiling
Non-standard situations accompanying installation
When mounting a chandelier to the ceiling, situations sometimes arise that are not easy to find a way out of. The problems described below are considered the most common.
- The length of the hook in the ceiling is insufficient for fixing the chandelier- occurs when there is a large distance between the concrete ceiling and the stretch fabric. You can correct the situation as follows: the hook is supplemented with a strong chain, which acts as an extension cord.
- Wiring needs to be extended- for this, all the wires are laid in a plastic corrugation so that the wires do not sag and do not lie on the inner surface of the stretch ceiling. The corrugation itself is fastened with brackets to the concrete ceiling.
- Change the location of the chandelier- for this, it is recommended to determine in advance where the future lighting device will be located. Otherwise, the transfer will not be possible without damaging the web.
- The difference in the wires of home wiring and chandeliers- in this case, special terminal blocks should be used, which prevent the closure of two non-contact metals from which the wires are made.
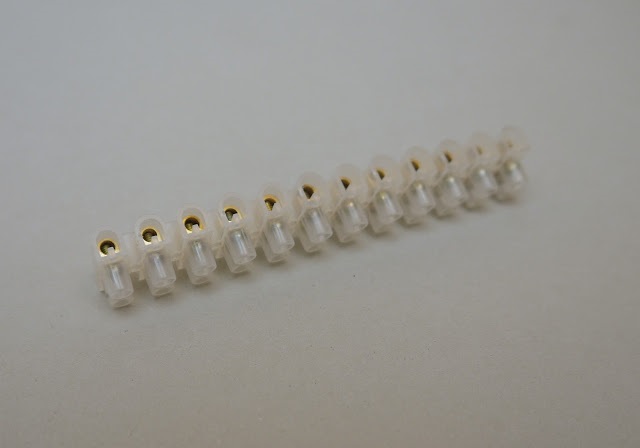
 They have a brass sleeve with screws.

Note! Connecting a chandelier to the mains is not an easy task. To perform all the manipulations correctly, you should follow the instructions for the lighting device, which describes in detail the connection diagram.
Thus, installing a chandelier on a stretch ceiling is a simple but responsible process. If there is no special knowledge and training, as well as experience in carrying out such work, then it is better to entrust the installation to professionals. Carelessness in work can lead to damage to the stretch ceiling, which is fraught with high material costs.
Video - Connecting a chandelier to three wires


")


