In situations where a pet begins to damage furniture and wallpaper by scratching them, a scratching post made according to a master class will be the best assistant. If you figure this out well, the task will turn out to be completely uncomplicated, especially considering how much benefit you will get from it.
Since this habit is inherent in the nature of the animal, you cannot scold your pet for its tricks. With a homemade scratching post, the cat will be able to calmly sharpen its claws, and the owner will forget about the problems with the scratched sofa.
You can choose the right scratching post for any apartment, based on its size and design concept. Our master class suggests making one of the following scratching post options for cats:
- scratching post in the shape of a cone, wrapped with ordinary rope, which is glued to the base

- a rectangular product covered with natural fabric to make it convenient for the cat to sharpen its claws on it

- compact scratching posts with fleecy fabric placed on the wall

- houses that combine both a place for a cat to sleep and vertical columns for sharpening claws

- scratching post resembling an ordinary board, which is tightly wrapped with rope

- corner design, which is placed at an angle for the convenience of the pet

Any option can be adapted to suit your apartment and make it convenient for the cat, and if necessary, the structure can be installed exactly in those places where the pet likes to sharpen its claws.
Our master class on creating a scratching post is very simple. If you do not have the opportunity to purchase any materials for its manufacture, there will be suitable things in the house to construct a scratching post according to the diagram. It can be:
- any remnants of coverings (fabric, carpet, etc.) that will be comfortable for the cat;
- small but stable plastic pipes;
- remnants of furniture that has already outlived its usefulness.
It is important to take into account the fact that for manufacturing you need to select materials that will not leave debris as a result of sharpening the claws. You can take a ready-made form as a basis or use cardboard, but it is better to wrap it with fabric or rope on top.
Step-by-step making of a cardboard scratching post
One of the simplest and most affordable materials for a scratching post is cardboard, because it can be found in almost every home. This product will serve your pet for quite a long time, so its production will be not only easy, but also practical. To work you will need to take:
- pencil;
- ruler;
- ordinary cardboard;
- stationery sharp knife;
- fabric or rope for decoration.
You don’t need to have any specific skills to make such a scratching post according to our scheme. Follow the steps below and construct it yourself, without much difficulty or expense:
- Drill a hole in the center of the board.
- Attach the cardboard to a wooden dowel that also has a hole drilled in it, right in the middle.
- Screw the screw into the base, holding it with a screwdriver, and screw the dowel onto it.
- Then, for several levels of the scratching post, you need to prepare templates and cut them out.
- Use these templates to get the pieces you need from cardboard and cut them out with a sharp knife.
- Assemble all the cut pieces onto the dowel.

All you need to do is spend a little time, and a scratching post for a cat from improvised means is ready for use.
Scratching post with a bed for your beloved pet
This design will require some sewing skills, and more complex materials are needed to make the scratching post, namely:
- timber is dry;
- plywood (thickness about 1 cm);
- rope;
- textile;
- self-tapping screws;
- plastic;
- foam;
- sharp knife or scissors;
- necessary construction tools.

Having selected the necessary materials and decided on the size of the future scratching post, you can begin to perform the step-by-step master class presented below:
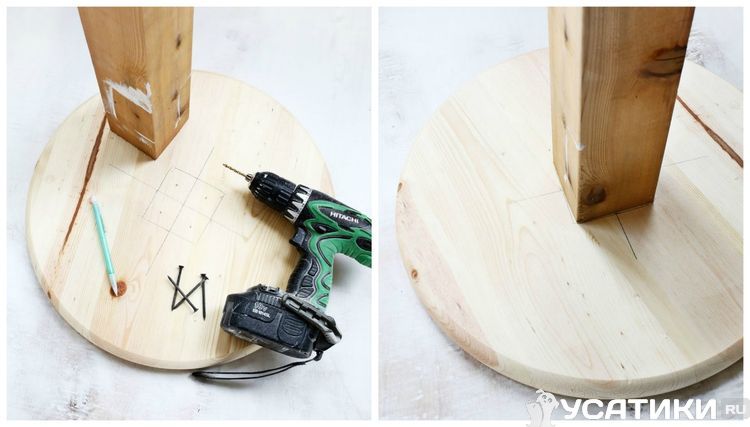
- Based on the results of measuring the required characteristics, a stable board is selected, which will be the base of the product.
- Cut 2 rectangles to the specified dimensions.
- Determine their center by drawing diagonal lines.
- Make an oval template out of paper before cutting it out of a wooden board or chipboard, attach it to the base and trace the shape.
- Once you have the base of the desired shape, sand the edges.
- Cut another such oval out of plywood, only its thickness should be smaller.
- Make a side for the future bed using metal, and cut out another oval from foam rubber for the bed itself.
- For a scratching post, take a plastic pipe or wooden beam of the required length and diameter and attach it with self-tapping screws.
- Assemble all the received parts as follows: fix the pipe on the base of the scratching post with self-tapping screws, decorate the pipe with fabric or rope using special glue so that it is convenient for the cat to sharpen its claws on it and there is no debris left on the floor, and install the bed itself on top, in the same way , with which the pipe was secured to the base.


This version of the scratching post will be more versatile, since the cat will also have a place to rest. The structure can be placed anywhere, because it is quite compact.
Twine scratching post: step-by-step description
In order for a scratching post made according to our master class to be of high quality, the design and dimensions of the product must be correctly selected. Natural twine is perfect for a standard scratching post in the form of a vertically mounted tube wrapped in fabric or rope. You can do it as follows:
- Take a stable and strong base.
- Make a post of the required size, which can be a regular pipe or a wooden beam.
- Next, you should connect and fix the post on the base of the scratching post.
- Wrap the finished form tightly with rope, the skeins of which should fit tightly together, and secure them with permanent glue.

To make such a scratching post look more interesting, you can install a bed on top or attach some toys to interest the cat.
Making a flat or corner scratching post for a cat
The flat scratching post for cats, the photo of which can be seen above, is made from the same materials as the previous ones, except that it does not need to be mounted on a column.
- You can take any board or timber, the main thing is that it is flat.
- Then you should wrap the base with material that you find around the house.
- Using a stapler, you need to fix the material on the base of the scratching post.

This structure is attached to the wall or floor. Its main convenience is that it can be installed specifically in the place where the cat sharpened its claws before the scratching post appeared in the house.
As for corner structures, the process of its creation involves the use of the above steps, with the exception that it must be made in two planes. Attach it to two surfaces, the floor and the wall, and firmly fix it with self-tapping screws, and this scratching post will serve your pet for a long time.
Tips for making scratching posts at home
If you have never encountered master classes before, then perhaps the process of making a scratching post will seem complicated and time-consuming to you, but it is much easier and faster than you think. Follow the step-by-step recommendations and everything will work out, and small tips will help you avoid mistakes:
- in structures with a house, place it on a pole, since the cat can use this room as a toilet and relieve itself in the wrong place;
- if you have several cats in the house, and you decide to design a scratching post with several beds, then think through everything so that the resting places are at the same level from the floor, otherwise disagreements may arise between the cats;

- the height of the scratching post or the entire structure should not be higher than 1 meter;
- If you want to arouse your pet's interest in the scratching post using toys attached to the structure, make sure that your cat will be interested in it so as not to waste time.
If you take into account all the parameters of the room and the factors that influence the convenience of the cat in using the scratching post, you can create an excellent design according to our scheme and spend your time profitably, saving your own money on the purchase of the product.
In many houses where there are cats, the furniture looks sad - the animal constantly sharpens its claws on the sofa or chair. But it is quite possible to wean your cat off this habit if you buy a scratching post. Or do it yourself, because it’s cheaper and even faster. Instructions for making scratching posts at home are further in the article!
A little about scratching posts
Cat owners often say that the most comfortable scratching post for a cat is a vertical post. Although you can also find a rug, a hanging panel, or a ring on sale. Such structures are made from fabric, cardboard, twine, and wood.

If a cat has just arrived at home, you can buy a scratching post that also combines play functions. There are models combined with a house for the animal, bridges, tiers and shelves.

The structure can be attached to the ceiling and walls. The height can also be different - up to 1 meter. But these are options for those who have 2 or more cats. For one animal, you can simply look at how to make a scratching post yourself and choose a smaller size.


What errors are common?
It is important to calculate the sizes of scratching posts and other nuances in advance so that you don’t have to redo anything later. It is worth considering the following:
- It is better that the height of the pillar is at least 1 meter, and the beds and houses can be placed even higher.
- The pillar-shaped scratching post should be about 8-10 centimeters in width.
- If the scratching post comes with a house, it should be placed on top of the structure. Otherwise, the cat may think it's a toilet. In addition, animals like to climb higher if they want to rest.
- For several cats, beds should be placed on the same level so that there are no wars between animals for supremacy in the pack.
- You can hang toys from the scratching post if you work a lot and your cat spends the whole day alone.

Scratching post on the rug
The scratching post bed for cats is very convenient. It will be easier for the animal to get used to it, because it will be possible to rest on such a rug in the absence of its owners.

By the way, you can choose a material that will make the scratching post fit perfectly into the interior.

To work you will need colored rope, any rug, a knife, a stapler and sisal rope. We determine the center on the rug - this is the place where the scratching post will be located.

Using glue, attach the sisal rope to the rug. It is better to also treat its edges with glue so that the cat does not pull the threads out of it.

You can leave the mat as is, or stretch it over a wooden stand, using a stapler to secure the edges. Then the scratching post can be attached to the wall.

Wall-mounted plywood scratching post
Looking at photos of hand-made scratching posts, we can see this option. This design is very easy to make.


You will need to prepare two plywood sheets with a width of 25 centimeters (for large cats, these parameters naturally increase). For a soft layer, a piece of old carpet will do - you will need to secure it to the plywood with the wrong side up. The piece is fixed using a stapler.

You can also wrap the sheet with a rope and secure it with slats along the edges. Next, the structure is nailed to the wall. All that remains is to train the cat to use the device.

Quick option
It happens that a cat appears in the house unexpectedly, or you are given an animal for a while (for example, the owners go on vacation).

In this situation, a DIY scratching post house is an additional waste of time. You can make the construction faster:
- A softwood log is an excellent alternative to the store-bought version. Its length can be about 70-100 meters. We chop the log lengthwise and attach a piece to the wall.
- You can take packaging cardboard and roll it up. We secure it with rope in several places and attach it to one of the walls.
- An old carpet or bedding can be rolled up with the inside out - it will be convenient for your cat to sharpen its claws on this surface.


How to train a cat to use a scratching post?
You can play with the animal using a scratching post so that the cat shows interest in the object. You can also moisten the tip of the scratching post with valerian tincture - this technique works great!


The cat will quickly get used to the fact that its claws can be sharpened in a new place, and you will no longer have to worry about the safety of the furniture!

Photo of DIY scratching posts


A kitten in the house is always a source of joy and positivity, but it is important not to forget that the pet has its own needs. For example, a timely purchased scratching post will not only save furniture and wall coverings from sharp cat claws, but will also certainly please the kitten. In addition, do not forget that you can easily make a device from wood and strong rope yourself.
Making a scratching post
In animals you can find a wide variety of designs for sharpening claws - overhead, angular, in the form of labyrinths or simple columns. But a self-made scratching post has a number of advantages:
- Save money, since a hand-made design will cost several times less than one purchased in a store.
- For manufacturing and decoration, you can take any materials, taking into account what will fit into your interior.
- If you try, you can construct an entire play complex with a variety of columns, shelves and transitions. Such labyrinths are quite difficult to find in the store.
- The design details can be adjusted to the size of the pet. What is presented in specialized stores is produced according to standard sizes and does not always fit the size and age of the animal.
In order to make a regular scratching post, you only need two things - a post and a rope. We'll talk about what rope to use for the scratching post a little later.
Types of scratching posts
What kind of scratching post you get as a result depends only on your desire, skills and the amount of time spent on its manufacture. To make the simplest standard structure in the form of a column covered with rope, it will take a maximum of an hour. If you decide to put together an interesting gaming complex for one or several pets, then you will have to work hard and allocate much more time for this.

The simplest version of the play complex consists of several posts and a shelf fixed on top where the pet can rest. The remaining details depend only on your imagination.
How much rope will be needed?
Any modern rope for a scratching post has a high degree of strength and is resistant to tearing, which makes it an ideal material in this case. Before proceeding with the manufacture or replacement of this element, it is necessary to calculate the length that will be required.
There are two ways to measure footage:
- Using old rope for a scratching post. In this case, you need to remove the rope from the old post, measure its length, or take the rope with you to the store so that the consultant can help you choose the material and footage.
- Calculation using a special formula:
Rope length = (post height/rope diameter) * 3.14 * post diameter.
For example, there is the following data:
- The height of the column is 100 cm, its diameter is 10 cm;
- Rope diameter - 0.8 cm.
From here we get: rope length = (100/0.8) * 3.14 * 10 = 3925 cm, that is, 39.25 m.
The optimal rope diameter is considered to be 8 mm, but 6 mm is quite suitable for making a scratching post.

Which rope is better to choose?
The choice of ropes is very large, but the main thing you need to pay attention to when choosing is natural fibers. Environmentally friendly materials of natural origin are the best ropes for scratching posts; they are completely safe for both animals and people, do not become electrified and will not harm the pet. A cat is sure to like a scratching post coated with it, which cannot be said about a store-bought one made from artificial rope. Some pets may be put off by the synthetic smell, as well as the presence of paint and impregnation.
Polypropylene and nylon ropes are several times stronger than natural ones, but they tend to stretch, and cat's claws can get tangled and stuck in the fibers of the material.
A hemp rope wrap for a scratching post will not last long; the material will quickly fluff due to fragments of fibers.
Types of ropes
The question of what cat scratching posts are made of worries many owners who have decided to please their pet. There are several of the most common ones for scratching posts that can be used to wrap a post:
- Cotton rope. This material looks great and fits perfectly into any interior, but is much more expensive than other types.

- Its cost is much lower, the structure is fleecy, the material is quite strong, durable with a grayish or pale yellow tint.
- Jute rope. This material is most often used in scratching posts that are sold in stores. Jute rope for scratching posts is the cheapest, but has less strength compared to previous materials.
All these materials differ radically from each other in a number of basic parameters, which primarily determine how long the scratching post will last. Therefore, next we will look at what ropes for scratching posts are called and compare their types to make it easier to systematize the information for the right choice.
What to choose - jute or sisal fiber?
So, both types are popular due to their affordable cost. This factor is quite significant, because winding a post requires several tens of meters of rope. But you should immediately pay special attention to the fact that no matter what material you choose, the scratching post will not last forever! Any thing wears out over time, and this product is no exception. The lifespan of the scratching post depends on the following parameters:
- How often does the pet use it?
- Breed of the animal (large representatives have a much larger nail plate).
- The quality of the scratching post.

Jute is made from the plant of the same name in the mallow family. Its fibers are mainly used in the textile industry, as well as for making ropes and burlap. Features of jute:
- Gray-brown fiber color.
- Softness.
- Smoothness (fibers do not stick out).
- Low cost compared to similar materials.
Sisal rope is much coarser than jute because it is made from raw fibers obtained from the leaves of the agave tree. This plant has unique qualities, which allows it to be used in a wide variety of industries, from food to construction. What features does sisal have?
- Quite a rigid structure.
- Light sandy shade.
- High wear resistance.

Hemp for scratching post
If you just can’t choose or for some reason don’t want to purchase sisal and jute rope, then you can consider another option for winding the scratching post - hemp threads. This material is made from hemp plants, which do not contain narcotic substances. The fibers are used in the production of fabrics and ropes. Although jute and sisal ropes are favored by pet product manufacturers, hemp is just as good, proving that hemp remains an important resource in the industry. New fibers are also mistakenly called hemp - sisal, jute and others. So, let's look at the advantages of hemp threads:
- A variety of colors (the shade can be absolutely any, depending on the processing method).
- Has an average price.
- Its properties are superior to jute rope.
- High strength.
- Resistance to environmental influences.
- High hygroscopic and anti-electrostatic properties.

Conclusion
From the above, the following conclusions can be drawn:
- If you decide to purchase or make your own scratching post for a young cat, then you should choose a jute rope for a cat scratching post, since it has soft fibers (this will avoid damage to the claws) and low cost.
- If you have an adult cat of a large breed or several pets live in the house, then the best choice would be a sisal rope, which will last much longer and at the same time be safe for your pet’s claws.
It's no secret that when we take a cat into our home, in addition to the pleasure of communicating with our beloved pet, we acquire a lot of responsibilities and even problems. One of these problems is known to many cat owners - torn wallpaper, ties in curtains and upholstered furniture. This beloved pet is sharpening its claws.
You can’t argue with nature: it is impossible to wean an animal from sharpening its claws, since this need is inherent at the level of instincts. To help your beloved pet and save the furniture, provide your cat with a convenient place to “manicure” its claws, or better yet, a special design that combines both a house and a simulator. And we will tell you in a step-by-step master class how to make such a scratching post for a cat with your own hands.
Of course, you can purchase a finished product in a store. There are many such products that combine everything at once in pet stores. However, their sustainability is questionable.
Why is it better to make your own claw sharpener?
The stability of most purchased structures is achieved through a retractable stop, that is, the house will stand between the ceiling and. Young, healthy, active animals will not miss the opportunity to climb on this support, which, most likely, sooner or later will lead to the fall of the structure. The supports themselves are of the same type, which also does not add strength to the structure.
In addition, such houses are designed for installation in rooms with a standard ceiling height, since the stop extends to a certain length. In apartments with high ceilings, for example, in “Stalin” buildings, you cannot install such a structure; you will have to order a stop of the required height from the manufacturer, wait for the order for several weeks, and it will cost much more.
Based on the above, a reasonable question arises: why buy a design in a store, and even pay a lot of money for it? It’s better to make something yourself from building materials, and save a lot of money.
Cost of a homemade house
Having calculated the cost of the manufactured house, we can say that such a house will cost about three times less than a similar ready-made structure purchased at a pet store. In addition, a homemade house is significantly superior to similar factory products in functionality, stability and reliability.
Project planning: diagram, dimensions
To make a scratching post, you need to first develop a design project, prepare the necessary tools and purchase the necessary building materials. 
A practical and safe design option would be to place five platforms for crawling and jumping on three support posts, a rectangular house, a hammock and a small platform on top of a long post. If there are several pets in the house, then it is advisable not to distribute the platforms evenly, since one cat, jumping on the platforms as if on a ladder, will not allow the other cat to sleep if he decides to do so on one of the shelves. 
Thus, on one base there will be three thick pillars connected to each other by the first platform. The second platform will connect the longest and shortest pillars, and the third will be placed under the rectangular box (house) and connect the main pillar with the middle one. Next will be the house itself, above which on the main (longest) pillar there will be two platforms of different sizes.
Preparation of tools and building materials
To create a house with a scratching post, you should prepare the following tools: a screwdriver, a jigsaw, an electric stapler, and an electric hacksaw.
You should also purchase the following materials:

Any material can be used as a covering for the house and platforms. Carpet is soft, durable and wear-resistant, so we will give preference to it. As for the rope for wrapping the post, you can use hemp rope, but jute rope looks better and is more durable.
Attention! It is better not to use cardboard for such a design, since the resulting scratching post will not meet the safety and stability requirements. After all, cats are active creatures, and they need strong support.
How to make a scratching post with a house: step-by-step instructions with photos
Before you begin the construction process, there are a few things to consider. First, decide on the height of the future product. The maximum height of a stable structure is 2.2 m, so we make the tallest support column of this length. To do this, we cut off a 2.2 m long piece from the block. This will be the support pillar. 
Secondly, the basis for the structure must be stable. We cut a sheet of plywood into 6 equal pieces (approximate size - 750x500 mm) and take one of them as a base. The remaining pieces of plywood will be needed to make platforms. The preparatory stage is completed, we proceed directly to the manufacturing process.
Making the basic frame
- First of all, in the platforms that will be attached below the house, we cut holes for the support pillars. We will leave the platforms that will be attached to one pole and placed above the house for last.

- On each platform that will be located below the house, using a pencil we make marks where the pillars will presumably be located.
- To simplify your task, you can make a stencil from a sheet of whatman paper with the locations of the pillars relative to each other marked on it.
- By marking the platforms using a stencil, you can be sure that the platforms will fit regardless of their geometric shape.
- The first connecting shelf will be the largest. It can be made rectangular (a cat can easily jump to such a height from the ground), or you can cut a semicircular groove in it. The more various holes and cracks there are in the structure, the more interesting it will be for cats to climb on it, so we make the first platform with a large corner round hole. From the cut piece we will later make a wall with an entrance for the house. We make the remaining three platforms according to the same principle: we either leave them rectangular, or use a power tool to give them a shaped shape.

- We make holes for supports in the prepared platforms. In the opposite corners of the rectangles drawn using a stencil, we drill holes using a drill with a diameter of about 12 mm, then using a jigsaw we cut out grooves for the supports. It is better to make the grooves a little larger than required. Otherwise, even a small millimeter deviation may interfere with the assembly of the structure.

- We assemble the finished platforms into one structure to make sure that the supports fit into the grooves.
Before proceeding with further assembly, the platforms should be upholstered with carpet, since upholstering platforms already attached to the posts is problematic. We do this using an electric stapler, it is much easier and faster than doing it manually.

Next, we attach the platforms to the pillars. To do this, we make marks on the pillars that will help place the platforms parallel to each other. To be sure, we make marks on all sides, so it will be more convenient to screw the corners in the future. We attach the corners that will hold the first shelf directly to the pillars, and we attach the corners that will hold the remaining shelves directly to these shelves. After this, we assemble the structure, that is, we screw the platforms to the pillars. You don’t even have to screw the supports to a single base just yet; the platforms already reliably hold the structure together.
Making a cat house: master class
We take pre-cut pieces of plywood as the building blocks of the house. From one piece of 75x50 we make the floor and ceiling, from another - the side walls and end. The wall with the entrance to the house is already ready - it was left over when cutting out the first lower platform.
We screw the corners to the side walls and bottom and assemble all the elements together. Even if the box doesn’t turn out very smooth, don’t be upset, the carpet will hide everything.
Let's start upholstering the house with carpet. We do the upholstery both outside and inside the house, and secure the carpet using an electric stapler.
We attach the house to a structure consisting of pillars and lower platforms. To do this we use a screwdriver. You can simply screw the house to a pole, but in this case the stability of the structure is unreliable. To ensure better stability, it is better to pass the support inside the house along the corner.
After this, we proceed to wrapping the pillars with rope. To do this, carefully wind the rope in a circle around the pole, pressing it to the base after each turn. We fasten the rope to the post using an electric stapler.
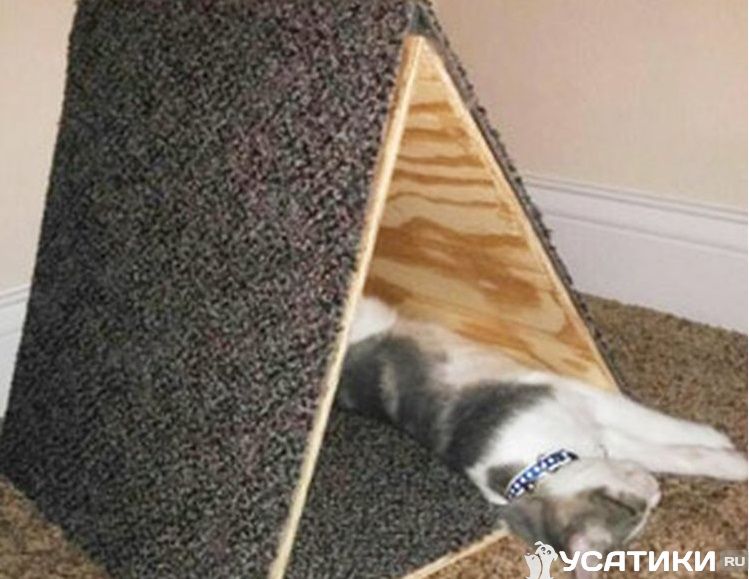
Making a hammock where it will be comfortable for both the cat and the kitten to lie
We cut out a frame from a piece of plywood using a jigsaw, tighten it with material and carefully attach it to the post. You can use carpet to make a hammock, but it is better for this purpose to purchase a special material that is just as durable, but not so dense. To attach the hammock to the pole, we use large corners with a stiffener. The fact is that this structural element is attached to only one support, and it must withstand the weight of one cat lying in the center. 
It is quite possible that the cat will not sleep in the hammock, but will use it as a kind of springboard or will simply play with the threads sticking out of the scratched fabric. In any case, the hammock will be used.
At the final stage, we mount the roof of the house and attach the entire structure to the base. The structure is quite heavy and relatively stable, so you can attach the pillars to the base using self-tapping screws. To ensure greater stability, you can additionally attach the main support of the structure to the wall using a large bracket.
Despite the many positive emotions that cats give us, a positive attitude can deteriorate if you find traces of their natural instincts in your apartment: scratched furniture, torn wallpaper, curtains and other “charms.”
To avoid such surprises, from the first day your cat is in the house, you should provide her with the opportunity to sharpen her claws in a convenient place.
But this does not mean that you should urgently go for expensive nail clippers: such a device is very easy to make with your own hands.
Let's learn about the best techniques and see photos of how to make a step-by-step scratching post - corner, wall, floor, with a cat house - with your own hands.
Corner scratching post for cats, photo
What to consider before making a scratching post?
A homemade scratcher for cats has many advantages. At a minimum, this is an opportunity to create a convenient device for the point of the claws that is suitable in size and shape, fit it harmoniously into the interior, use available materials and avoid high waste.
A durable, functional and beautiful scratching post will delight not only your pet, but also the owners themselves.
The first thing you need to do is decide on the general design and size of the scratching post for cats with your own hands. If it will be a house, it is important to take into account the age of the cat and anticipate that over time he will need even more space.
If it takes the form of a separate device with a specific function, the main task will be to provide enough space for the simultaneous point of the claws on both legs, so you should not make it too narrow.
Attention! The height of such a product should be twice the length of the body of an adult pet.
When starting a master class on a DIY cat scratching post, think about some other points in advance:
- material for a scratching post. It must be durable and wear-resistant, but at the same time, comfortable enough for the animal;
- fastening method claw clippers. Most often they have a wide, stable base or are mounted on a wall;
- decide Will the claw sharpener be intended for other purposes?. They are often supplemented with a sleeping place or devices for games (mice, birds, feathers and other objects).
 House with a scratching post for a cat, photo
 It is important to consider that any scratching post can be subject to “attacks” from cats, so it is better to securely fasten the product. Next, we will talk about the most common options for nail clippers with and without a house, which can be made from scrap materials.
Making a rope post
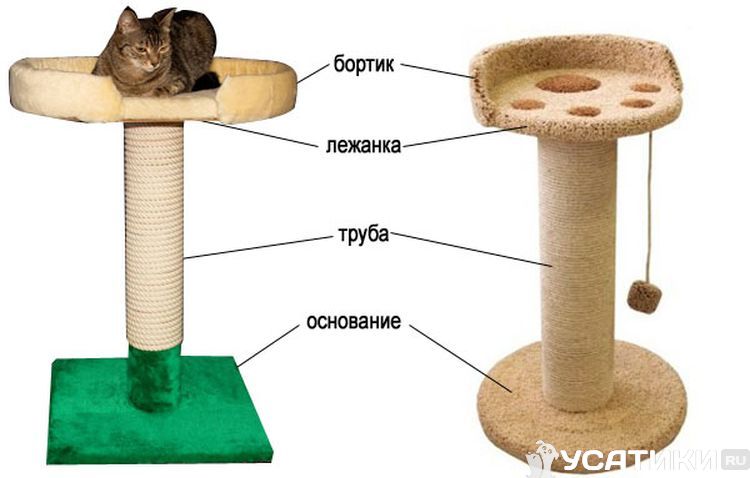
This type of scratching post remains the most popular due to its convenient shape and relatively small size. The product consists of a stable base and an internal part, mainly cylindrical in shape.
What to make a rope scratching post for a cat from? The entire device is wrapped in a special rope (many people don’t know what the rope for a scratching post is called - ask for hemp rope in stores).
 Scratching post for a kitten, photo
 Advice: Make sure that the rope is not slippery and does not tear into small pieces at the first touch of the claws.
How to make a scratching post for a cat with your own hands? In addition to a coil of rope, you will need a plastic pipe or wooden beam, as well as dense material for the bottom base.
 DIY scratching post: step-by-step instructions, photo
 The pipe is tightly wrapped with rope: for a lasting effect, use glue every 10 cm. The base of the claw can also be wrapped with rope or decorated with thick fabric.
If desired, the claw scratcher can be supplemented with a convenient shelf for the cat to rest. But in order for such a shelf to support the weight of the animal and hold firmly on top of the scratching post, it is necessary to calculate all the proportions in advance. A “shelf” that is too wide will warp the product, so the base should prevail in size.
Another option is a sleeping place, as in the photo:
 DIY cat scratching post, photo
 Scratching posts of this type are often supplemented with special toys and other accessories. Before you start creating a functional device for cats, look at the photo with variations of rope posts.
rug on the wall
Now let’s discuss step-by-step instructions for a DIY scratching post that is attached to the wall. It is believed that this is the most optimal option for owners, since the product is made very quickly and takes up minimal space in the apartment.
You will need thick fabric (preferably carpet or tapestry), strips for fastening and screws.
Start by cutting out a piece that fits the parameters: remember that the cat should be able to easily extend its front legs for the claw point, so the fabric should be long enough. The flap can be fixed directly to the wall or to a wood base of a similar shape.
For fastening on each side, use self-tapping screws and slats.
 DIY wall scratching post, photo
 Advice: Show your imagination and create a scratching post of an unusual shape. For example, in the form of your pet's paw print.
That's all. Now it’s a small matter: treat the textile fragment with your cat’s favorite scents - and soon your pet will be using the new device every day.
Flat nail clipper
This scratching post looks like a rope post. The diagram on how to make a scratch for a cat of this type with your own hands differs only in the shape of the central element: instead of a cylinder or pipe, a flat board or other material is used. Securely fix the flat part to the base and cover the entire surface of the sharpener with carpet or other type of fabric.
If desired, you can use jute or hemp rope, as in the first description. And with the help of special furniture hinges, such a product can be mounted on the wall.
 Floor scratching post for cats
 Corner type scratching post
The corner cat scratcher has similar features to the vertical and wall ones, since it is often held in place by both the floor base and wall fasteners. This option is especially loved by pets, since the specific shape of the claw scraper allows the cat to climb on top.
To create this product at home, you need to take three boards with a width corresponding to the door jamb, a screwdriver and self-tapping screws, fabric or rope for external decoration.
To begin, wrap all the boards or cover them with carpet, which is secured to the base with the wrong side. If you use rope, do not forget to glue the material and also secure the edges of the rope with a construction stapler for greater reliability.

Now all that remains is to secure all the boards to the door frame or wall. To do this you will need a screwdriver. As a rule, such scratching posts are made to cover the entire height of the opening, but you can choose other parameters.
Wooden claw point jig
When creating a cat scratcher, it is not necessary to use rope or fabric. Wood is an excellent material for such purposes, so you can take a wide branch without leaves and turn it into a cat claw sharpener with simple manipulations.
Attention! For such a scratching post, you can take branches with twigs and branches so that your pet can play.
 DIY cat scratching post
 On a wooden base, you can make either a separate scratch or a whole cat house with a scratching post with your own hands. To make it easier to secure the product, it is better to align the inner side. Then it will be easier to place the sharpener on a wall or floor, and also to install it at an angle.
By the way, a wooden claw board fits perfectly into your home interior, regardless of the chosen style of decorating the space.
Other options
To ensure maximum safety of furniture, textiles, accessories and other interior items, you can implement other ideas for homemade nail clippers:

Getting your pet used to a new scratching post
After making a cat claw, all that remains is to help the pet get used to the allowed place. To do this, place the cat's paw on the surface and press on the pad. As soon as the kitten releases its claws, run your paw over the scratching post: this way he will understand that this can be done here.
If over time you notice that the cat has forgotten about where it is possible and where it is not possible to sharpen its claws, let him understand that it is wrong to do this.
Don't offend your pet: just scold him and take him to the nail clipper.
 DIY claw sharpener for cats
 In some cases, you can lure the animal to the permitted place using aromatic treatment. For example, you can spray the scratching post with valerian or another product that cats like for its smell.
A scratching pad should be in the house in any case, since scratching is a natural necessity of every cat. Therefore, you will not be able to wean your animal from sharpening its claws, but by taking timely care to create the device, you will protect your home from damage.
If you don’t have time to create a homemade scratch, buy a finished product, but don’t forget to accustom your cat to it as quickly as possible. If he develops the habit of sharpening his claws elsewhere, it may be difficult to wean your pet off.
Video
Watch a video with a master class on a DIY cat scratching post:


