The modern design of apartments and private houses involves the use of combinations of different materials to design one plane. So, on the floor in the hallway or kitchen, a practical solution would be to choose durable, moisture-resistant and all kinds of aggressive floor tiles in the work area (kitchen) or at the front door (hallway), and the rest of the coating is made of laminate. This technique also allows you to make a visual zoning of the room. But the question arises - how to arrange a joint between two materials? Leaving it as it is - at least not aesthetically pleasing, but on the practical side - the joint will not be resistant to moisture and dirt. In this regard, a wide range of special thresholds has appeared on the construction market. These products differ in many criteria and on how to choose the threshold between tiles and laminate today's material.
At first glance, it may seem that the nut is needed only to make the junction between the two materials look aesthetically pleasing. However, along with this, it also copes with other important functions.
During the operation of the floor covering, which consists of two types of materials with a joint inevitably formed between them, the latter is exposed to intense pollution and dust. At the same time, it will take a lot of effort to remove them, and such a joint will look untidy. After installing the connecting element, the labor intensity associated with the operation of such a floor covering is significantly reduced.

Of the positive qualities of the docking thresholds, the following can be noted:
- The service life of the floor covering increases, since the edges of the material are reliably protected with the help of the docking element - the most vulnerable place where chips and cracks can form.
- The threshold increases the safety of the operation of the coating when walking on it.
- Laminate and floor tiles have not only different external design, but also thickness, as a result of which a height difference can form. Separate types of sills allow you to hide small defects.
- A wide range of products that differ in the material of manufacture, appearance, method of attachment, design allows you to choose a model for a particular case. Products equipped with a hidden mount look neat.
Important! When choosing, it is necessary to calculate the width of the product, which will allow you to qualitatively hide the junction between the tile and the laminate.

Nut varieties
There are several criteria by which the sills differ from each other.
By destination
Depending on the purpose, the sills are divided into several varieties.
Table 1
| Illustration | Description |
|---|---|
| The corner profile is also called the staircase. Outwardly, it resembles a “corner” detail. They are made of dense rubber or aluminum with notches that provide an anti-slip effect. |
| It is possible to equalize a small difference in the height of the two materials to be joined using a metal threshold equipped with a rubber compensator. The result is an almost flat surface. With a greater height difference, choose solid plastic sills with a suitable cross section. |
| The width of the multi-level thresholds, designed to level the height difference between materials of different thicknesses, is 1.5 - 10 cm. In this case, the height difference can reach up to 2 cm. The method of fixation is open and closed. |
| To design a transitional joint between rooms, provided that the materials are located in the same plane, decorative overlays made of various materials are used. |
| To design joints of a smooth shape - rounded or wavy, flexible or curvilinear sills are used. More often they are made of soft plastic and easily take the form of a given trajectory. |
| One of the types of nut used when joining laminate and tiles is called the final one. It can often be seen when decorating the entrance to a balcony, loggia, as a border for the edges of the podium or hallway material. |
| For joining two materials located in the same plane and a height difference of not more than 1 mm, use straight thresholds. |


Connection method
There are several varieties depending on the type of product profile:
- A metal bar with a through type of fastening, made in the form of a strip, is fixed on self-tapping screws after it is laid on the joint. The advantage is simple installation and reliable fixation, regardless of the type of surface. With the help of such a bar, you can level the difference in heights between materials.
- When installing a non-separable H-shaped nut, it is laid sideways and a laminate is placed in one groove, and a tile in the other. On the tile side, the seam is grouted, and on the laminate side, the seam is treated with silicone sealant.
- The collapsible H-shaped nut consists of two T-shaped bars connected with special legs. During installation, the lower part is fixed along the joint boundary, and then the decorative part is fixed on it using the existing clamp.
According to the material of manufacture
Like flooring, the threshold is subjected to intense abrasion, so its service life largely depends on the performance of the material from which it is made.
Table 2. The most common types of docking strips
| Illustration | Production material | Description |
|---|---|---|
 | Aluminium, brass, steel | High mechanical strength, corrosion resistance, durability, the possibility of coloring any shade make such products the most popular. Attractive and spectacular look have chrome parts with a mirror finish, which retains its performance properties for many years. |
 | Plastic | This variety belongs to the category of budget options not designed for heavy loads. Flexible profiles for the design of curved joints are popular. They come in a wide variety of colors and textures. |
 | fiberboard | The main advantage of a fiberboard nut is its perfect combination with a laminate imitating various types of wood, but due to its low mechanical strength, it is recommended to use it only in rooms with low traffic. Such sills have a laminated surface, where under a protective transparent layer there is a special paper with a pattern printed on it that imitates a particular type of wood or natural stone. |
 | Rubber | L-shaped sills based on rubber, polymers and other inorganic additives have sufficient elasticity and are attached to the edge of the step. Straight sills are often made in the form of overlays on an aluminum profile. |
 | Wood | The most expensive variety are sills made of high-quality natural wood. The downside is the high cost of products and its demanding care - periodically the threshold must be treated with a polish. The plus side is the luxurious look. |
 | Cork | Cork strip with a decorative outer end. It is fixed on the adhesive composition and sealant at the junction between the laminate and the tile. |
The process of installing the threshold
There are two ways of fastening the connecting elements between the tile and the laminate - open and closed. When open, the nut is fixed on self-tapping screws through a through hole in the product to the base. The closed method involves the use of a prefabricated structure consisting of a mounting profile, which is attached at the joint to the base and a decorative strip, tightly fixed into the groove of the mounting element.

Straight Thresholds
Straight thresholds are the easiest to install - with their help, you can tightly close the joint, prevent dirt and moisture from entering it. However, this option has some disadvantages:
- The transition will not work smoothly, as the element protrudes above the floor surface.
- More often on sale you can find aluminum straight sills, which outwardly are not suitable for every interior.
- When fastening is open, the presence of fasteners on the surface spoils the appearance, but on the other hand, the availability of fastening allows you to quickly dismantle the product.
Some manufacturers offer straight sills with concealed fasteners. In any case, this type of threshold is quite popular and is a practical way to join two materials.

Hidden fastening involves the use of special glue or liquid nails.
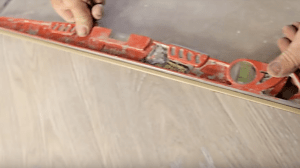
Table 3. Installation process of a direct docking element
| Illustration | Description |
|---|---|
 | First, measure and cut off the element of the required length. |
 | The threshold is applied to the place of future operation and markings are made on the floor opposite the holes for the fasteners that exist on the surface of the part. |
 | Focusing on the markings, and on the floor along the joint line mark the places for drilling holes for the dowels. |
 | Make a hole using a perforator. |
 | Install the threshold and fix with screws. |
How to install flexible sills
Curved and curvilinear seams are made using a flexible docking threshold. In terms of popularity, prevalence and availability, this material, which easily takes any form, is not inferior to its direct counterparts.

The flexible threshold is a prefabricated structure - the lower part (mounting profile), which has a groove-clip, is fixed inside the joint to the floor base, and a decorative insert is snapped on top.
Advice. To make the PVC molding softer, before installing it, it is immersed in hot water with a temperature of at least 70 degrees for 15 minutes.
A flexible metal connector between laminate and tile is somewhat more difficult to install. To do this, first measure and calculate the thickness of the finish, taking into account the adhesive and the substrate. It will be necessary to give the required radius to the product manually. Using a hacksaw or grinder, the length of the connecting element is adjusted, and its installation is carried out simultaneously with the finishing work.

Along the entire length, the metal flexible threshold is equipped with special paws that are inserted under the tile and fixed to the adhesive composition. On the other hand, laminate lamellas are inserted into the groove.
Table 4. The process of installing a flexible PVC threshold
| Illustration | Description |
|---|---|
 | At the first stage, the mounting profile is fixed. At the same time, it should be fixed smoothly along the radius. Since the mounting profile must be at the same height as the tile and laminate, it may be necessary to remove some of the underlay. |
 | The mounting profile is fastened to a self-tapping screw with a small cap. |
 | Repeating the connection radius, mount the laminate and install the threshold. |
 | The threshold, despite its flexibility, is rigid, so when installing it, you have to create some effort so that it falls into place in the mounting profile. |
 | It is recommended to use a rubber mallet. To make the work easier, the threshold is immersed for 15 minutes in hot water - so it will become softer. |
When it comes to flooring, combining materials has become a fashionable trend. Curvilinear bends acquire the most bizarre outlines.
Video - Installing a universal nut
Ways to design a joint without a nut
The presence of a threshold is not a prerequisite for joining tiles and laminate, if the cladding is located in a single plane. There are two most common ways to design such a joint without installing a threshold.
Compensating cork strip
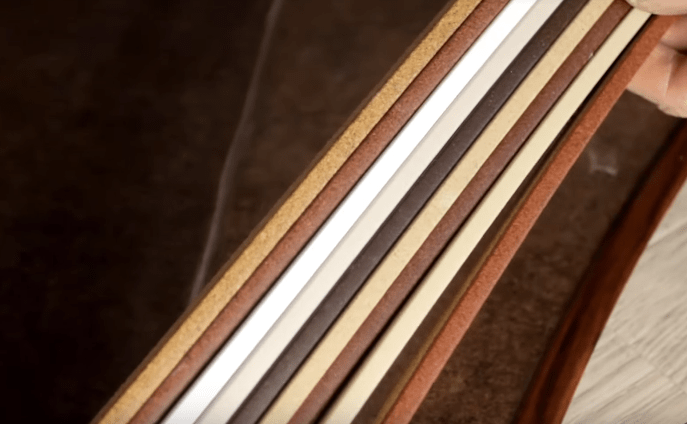
Cork compensator is a strip of cork 7 mm thick, 15 mm high and 900 mm long. A wide range of colors of cork compensators allows you to easily select the desired shade for the joined materials.
The edges of the two materials at the junction must be carefully prepared and aligned. In the laminate, the edge is not only sanded, but also treated with a moisture protection agent. The edge of the tile is also ground if trimming was done manually. In preparation for installation, the height of the cork compensator is adjusted by trimming it. For gluing the nut using a special glue. And for the final finishing of the gap, an acrylic-based plastic sealant is used. It allows you to additionally protect the edge of the laminate moisture.

Table 5. Cork Nut Installation
| Illustration | Description |
|---|---|
 | Liquid glue is applied along the entire length of the joint. |
 | The cork compensator is applied, slightly pressing against the cut of the laminate along the entire length, but not glued completely. |
 | The nut is slightly bent and a sealant is put inside to protect the cut edge of the laminate from moisture. |
 | The excess that has come out is removed with a sponge dipped in water. |
 | After the compensator is fixed on the laminate, proceed to. To do this, first apply glue. |
 | The tile is laid so that it is located in the same plane with the laminate and the compensator. |
 | A seam is formed between the tiles by inserting supports with holes for the wedge. With the help of these devices, the tile will subsequently be brought to the level |
 | First of all, it is necessary to lay out the tiles at the threshold, and then on the rest of the area of \u200b\u200bthe room. |
This material appeared not so long ago, but has already gained popularity due to its easy installation, affordable cost and neat joint, which is obtained in the end. The nuance of using cork is its fragility when sawing - this must be done carefully to prevent chipping and damage to the material, since the compensator must have the correct geometric parameters from all sides.
Creating a joint with a sealant
The joint between the tile and the laminate is in some cases performed using a sealant. This is a universal way to hide a seam of any shape. In this case, it is important to choose the right compensating material, which must have excellent adhesion (adhesion) with both materials, strength and elasticity.
Important! Such a joint turns out to be non-separable; if necessary, its dismantling will require the removal of the floor covering.
Table 6. The process of creating a sealed seam
| Illustration | Description |
|---|---|
 | At the first stage, you will need to fit the laminate with the substrate and the tile to the same level. |
 | You can adjust the height of the tile by using the thickness of the adhesive under it. |
 | Laying the laminate is carried out according to the technology with the condition that a compensation gap is formed between them with tiles, which is to be filled with a sealant. |
 | The next step is to fix the edge of the laminate, which will be adjacent to the tile. To do this, it is necessary to remove a row of laminate, substrate and film, so that a 10 cm wide area of \u200b\u200bclean base remains. |
 | To fix the laminate, an elastic adhesive with good adhesion to both materials is used, such as MakroflexFT101, parquet adhesive or liquid nails. Glue is applied to the base with zigzag movements. |
 | The lamella is inserted into the groove and gently lowered into place. |
 | The lamella is lightly pressed down and the adhesive composition is waiting for it to dry, having previously fixed the laminate plate with a plastic wedge. |
 | A day later, the fixing plastic element is removed. Laminate and tile are located in the same plane. |
 | The next step is to seal the joint between the tile and the laminate. The color of the sealant is selected according to the shade of the laminate, tile or fugue. Sealant is applied to the seam. |
 | With the help of a soap solution and a special rubber plate, excess silicone is removed and the required seam profile is formed. |

Which is better to choose
It is necessary to choose the material, the method of fastening and the appearance of the nut, depending on the operating conditions. You should also take into account the design features of different types of thresholds - in each individual case, a certain type of product can be used. The material of manufacture is primarily influenced by the degree of load on the seam. So, products made of natural wood and plastic are not resistant to intense abrasion loads. And with the help of a metal profile, it is not always possible to draw a curved seam - in this case, a flexible PVC profile will help, which is easy to give any shape.
With a choice of shade and texture, docking strips, as a rule, do not arise - the modern construction market offers them in a wide range, so you can easily choose a product for a specific design solution. The not very attractive appearance of metal profiles can be diversified with the help of a special wear-resistant film of the required color and texture.

In order for the room in which the combined flooring is made to look harmonious, the docking element is selected so that it blends seamlessly with other interior materials. There are some rules for this:
- For a classic interior, a threshold is selected so that it matches the shade and texture of the floor plinth - this will give the design solution a complete look.
- A threshold matching the color of the doorway - the box and the canvas, will emphasize its contours and allow you to visually mark the boundaries of the two rooms.
- The most popular is the choice of thresholds to match the color of the flooring, which allows you to make an inconspicuous joint between the two materials.

Making the floor in the corridor with laminate and tiles: photos of successful combinations
Often, when installing flooring in the hallway, there is a combined option, in which part of the space near the door is made of tile or porcelain tiles, and the rest is made of laminate. It is not only beautiful, but also practical. Since the laminate is a wood-based material, and therefore it is not very resistant to moisture and abrasion, unlike tiles, which are absolutely not afraid of moisture, mechanical stress and are easy to clean.

The combination of tiles and laminate in the hallway No. 1

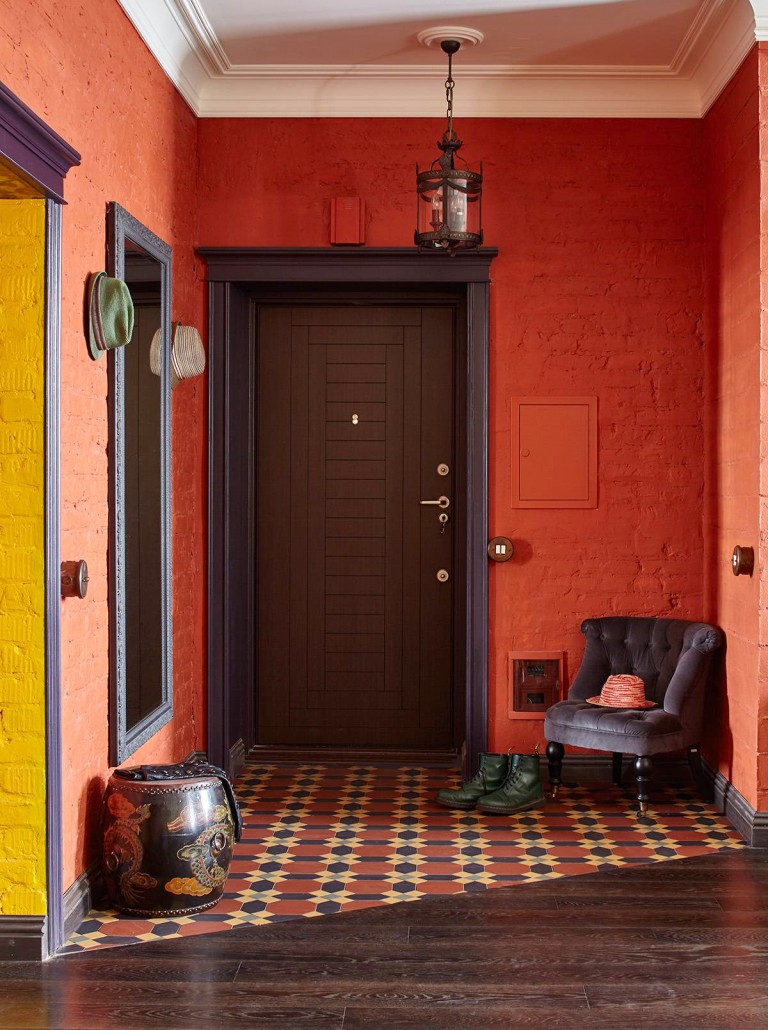

Using laminate in the corridor, you can get an aesthetically attractive, durable, reliable and durable floor covering. How to choose this material, we will tell in
Prices for laminate "Tarkett"
tarkett laminate
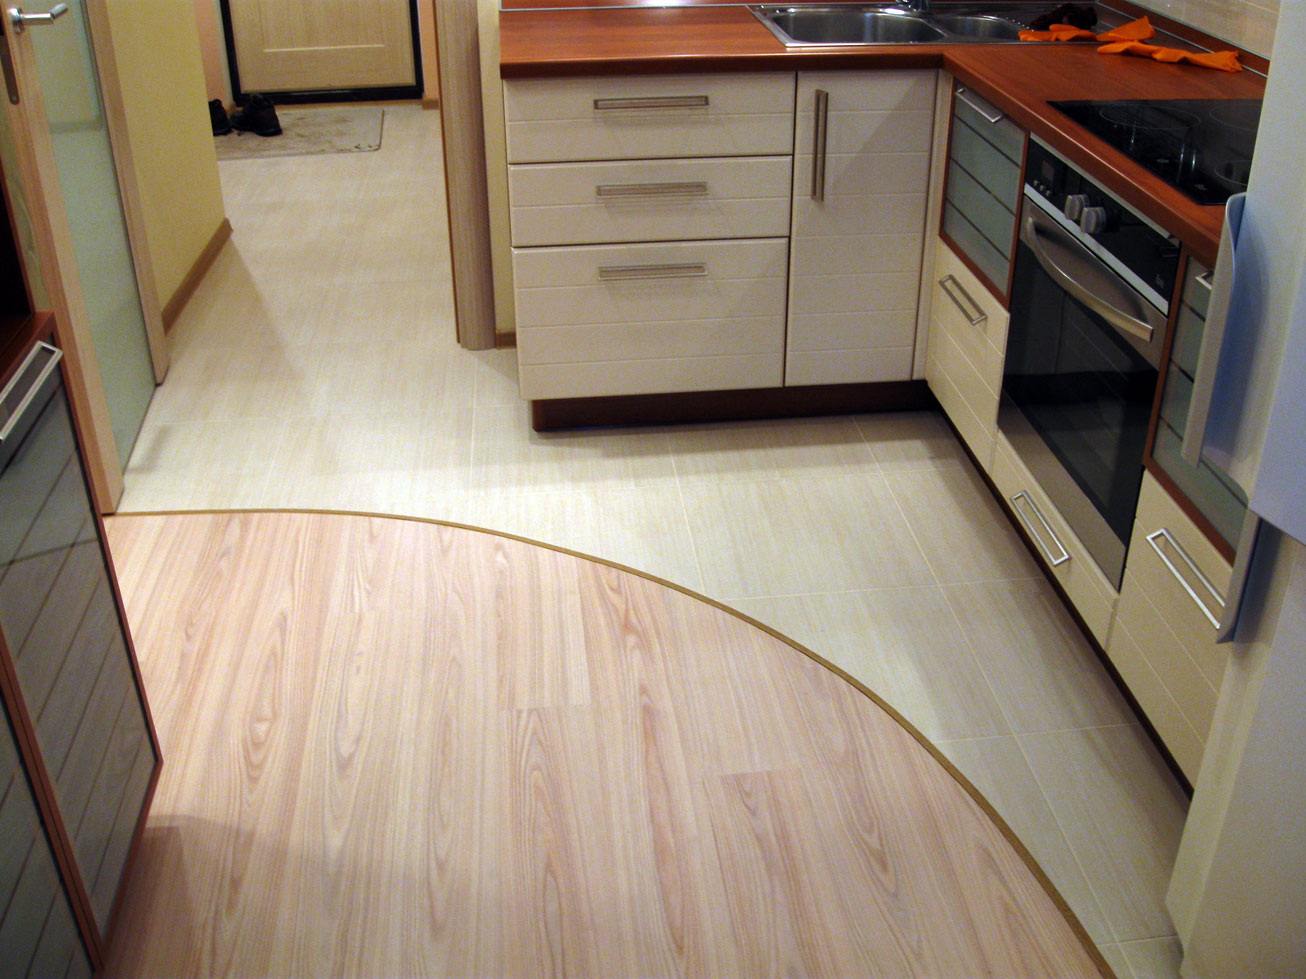
Tiles and laminate in the kitchen: photos of combined floors
Combined floors in the kitchen are no less popular. The reason is the same - the resistance of the tile to moisture, mechanical stress, wear, easy maintenance. It is laid in the working area of the kitchen, where flooring pollution most often occurs. Laminate is laid in the dining area or dining room adjacent to the kitchen.
In one of our articles we will try to understand


When connecting two materials that are different in texture and texture, it is necessary to somehow arrange the place of their connection. In this article, we will discuss how to beautifully join laminate and tile. The methods are different, as are the results.
Where can there be a joint and how best to arrange it
In a modern house or apartment, different floor coverings are used. In places of their connection, height differences are often formed - due to the different thickness of the coating. You can make such a transition beautifully and reliably only by knowing what and how to do it. Most often you have to join tiles and laminate. These are the two most popular types of floor coverings for rooms for various purposes. The junction of tiles and laminate in place occurs in two places:
As you already understood, there are two ways to make a joint between a laminate and a tile - with and without a threshold. The first requires high quality tile trimming, the same gap between the two materials throughout the seam. Only in this case a decent result is obtained. The second one is simpler in execution, does not require special accuracy when cutting material and special skills when performing. But it looks a little "rough".
Docking methods without a nut
When joining tiles and laminate without a threshold, you first need to solve the problem of height difference: due to the adhesive layer, the tile can be higher. Only after that you can start working. Also, the junction will look good if it is carefully processed, the gap will be even.

If two different materials are joined - ceramics and laminate - it is impossible to place them close to each other without a gap. With a change in temperature or humidity, they can increase in size (the laminate “suffers” more from this). The presence of a gap prevents the problem - it allows it to change in size without compromising the integrity of the coating. When joining laminate and tiles without a threshold, this gap is filled with a suitable elastic material.
Whatever material is used for sealing, the edge of the laminate adjacent to it must be treated with a protective compound that prevents moisture absorption. Most often, a sealant is used for this. Better - silicone, which after drying does not lose elasticity and does not turn yellow over time.
Cork compensator
A cork expansion joint can be placed between tiles and laminate. This is a thin strip of cork, which is painted on one side and covered with a layer of protective varnish or finished with a layer of veneer. The second option is more wood surface, you can choose a color that is very similar to your flooring. But they use it more often for joining parquet - it costs a lot.

Dimensions
In addition to the fact that the "face" of the cork compensator is finished with different materials, it can be of different shapes: with or without a chamfer of different types. In addition, the sizes can be different:

Cork compensator of standard length is only good if the joint is under the door. Then its length is sufficient. In other situations, you either have to splice or order.
Mounting
A cork compensator is installed at the junction of tiles and laminate when laying the flooring. When one type is already laid, and the second will only fit. First of all, if necessary, cut the height of the cork - it is not always possible to find the ideal option. Therefore, carefully, with a sharp knife, cut off the excess.
Another preparatory work is finishing the laid edge. Once again, we remind you that it must be even and well processed. Most often, the edge is sanded with sandpaper, aligning the traces of cutting.
A cork compensator is mounted on glue, preferably for wood. Pre-installation site is well cleaned and degreased. Next, the process is:

If everything is done correctly, it turns out a neat, not conspicuous seam. What is good, so you can make out both straight and curved joints.
Grout for joints
If the materials have already been laid, the junction of the laminate and tiles can either be decorated with a threshold or filled with tile grout. We'll talk about the thresholds later, but now we'll discuss how to use the grout.

The edges of the laminate should be smeared with silicone. They can also fill the joint by about 2/3. When the silicone dries, fill the remaining space with diluted grout, level it and wait until it dries.
Simple and effective way. But only if the edges are processed with high quality. For greater color stability and easier maintenance, it is better to cover the seam with a colorless varnish.
cork sealant
Another joint between laminate and tile can be sealed with cork sealant. It is itself a sealant, so this is the only option where the laminate cut does not need to be protected from moisture. Another plus - the dried composition has the color of a cork tree - light brown. If it suits you, you won't have to worry about painting it.
Cork sealant is a mixture of cork wood chips and a water-based binder. Without dyes, after drying, it has the color of a cork - light brown. There are palettes painted in primary colors. Available in polyethylene tubes, can be applied with a closed-type gun (with a container) or a spatula. Can be used to fill joints in floor coverings.

When using this composition, you will most likely have to use a spatula. Therefore, on both sides of the mot seam, we paste masking tape. We clean the seam itself, remove dust. You can work at temperatures above +5°C.
Sealing the junction of tiles and laminate with cork sealant is simple:

After drying, we have a joint of tiles and laminate ready for use. The only drawback is that the base color is not suitable for everyone. And yet - it is necessary to carefully and evenly distribute it immediately after application. Then it will not be possible to align or correct.
With the use of thresholds
It makes sense in three cases to make a joint between a laminate and a tile using thresholds. The first, when the joint is obtained under the door. In this case, the presence of a nut is logical and "does not hurt the eyes." The second option is in the presence of a height difference between the two joined materials. There is simply no other way out.

And the third case. When tiles are laid in the hallway near, and then there is a laminate. Even if their level is the same, it is better to put a threshold here. It rises a little above the finish and will retain sand and litter, which is inevitably brought in by shoes. This is the option when you can close your eyes to some aesthetic imperfection.
Types of thresholds for joining materials
There are the following thresholds that can be used to close the junction of laminate and tiles:

It just seems like there aren't many options. There are all these sills in different sizes and colors, with different fixation systems. There are a lot of them in big stores.
Installation of a flexible PVC profile
As already mentioned, a flexible PVC joint profile consists of a base and a decorative lining, which is held on it due to the force of elasticity. It must be installed after the tile is laid, but before the installation of the laminate.

First, a base is mounted along the cut of the laid tile. It is attached to dowels or screws. Choose fasteners with flat caps - so that in a twisted state it almost does not protrude and does not interfere with installing the overlay.
The installation process is as follows:

With the help of a flexible PVC profile, it is not difficult to seal the joint of the laminate and tiles. Outwardly, of course, not everyone likes it, but installation is simple.
Video on the installation of thresholds at the junction of laminate and tiles / porcelain stoneware
Modern living spaces are distinguished by original design, which involves a rather unusual combination of floor materials with different structures and textures. One of the designers' favorite tricks is to combine laminate and tile. This is perhaps the best option for zoning living space.
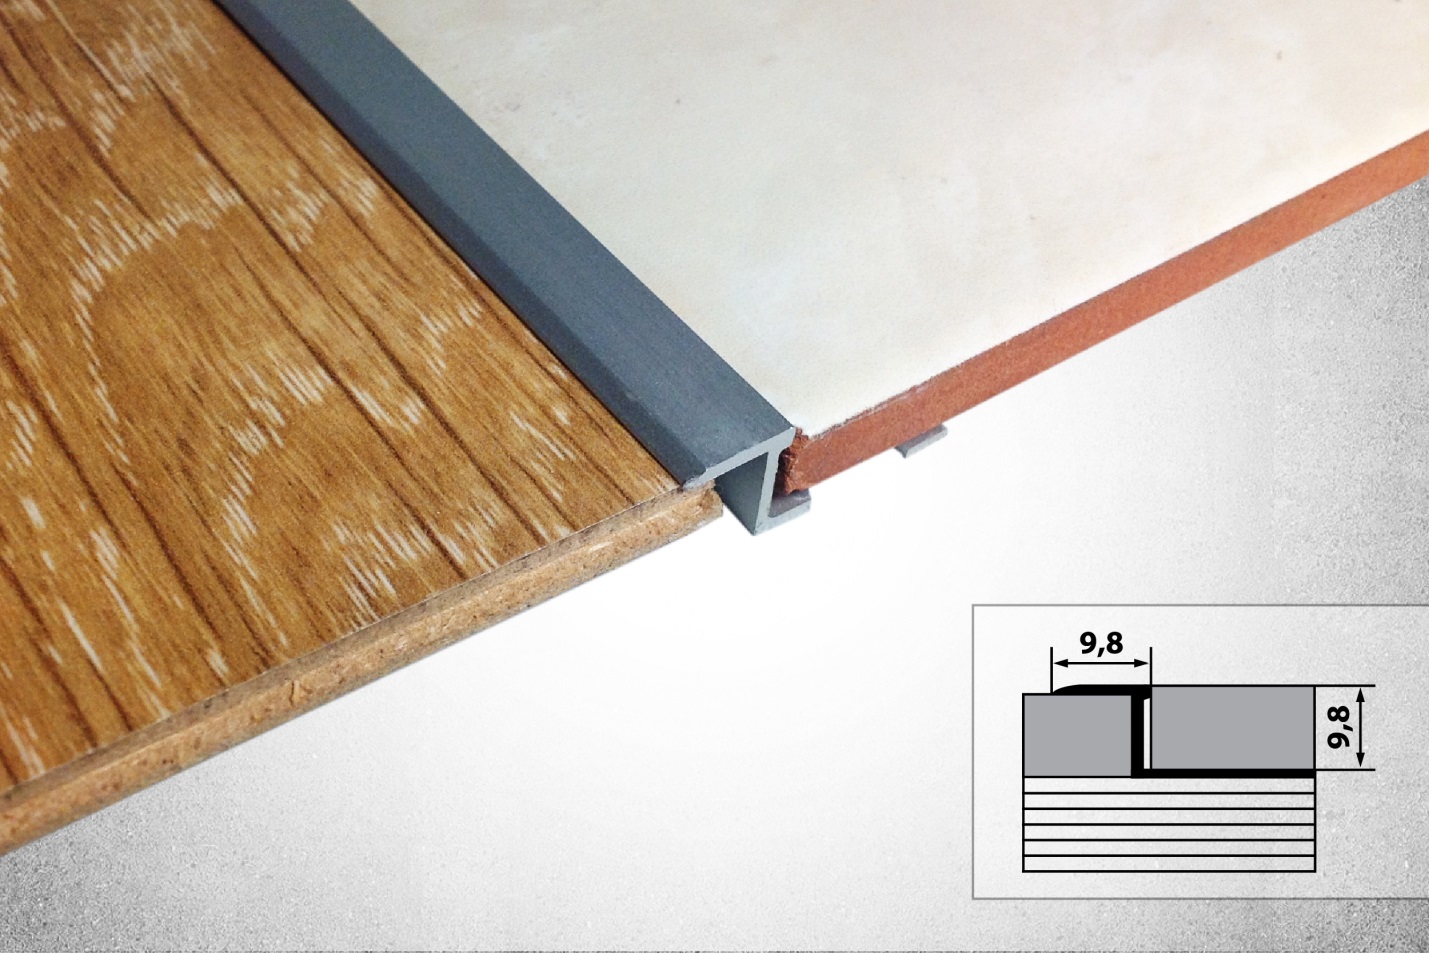
When installing a floor finish, it often becomes necessary to join the laminate and tile. But the joint, no matter how hard you try, in an open state is a gap with sharply defined boundaries, which does not paint the new floor at all. To effectively hide it, special docking elements were invented - the so-called thresholds for laminate and tiles. Most often they are used when both floor materials are laid in the same plane or the height difference is minimal - no more than 1 cm.
Appointment of thresholds
At first glance, this element is necessary only to improve the aesthetic component of the coating. But in practice, it performs a number of other equally important functions. Timely installation of thresholds is not a laborious process. Therefore, it is recommended to include them in the installation scheme and package in advance.
In practice, during the operation of the coating, a large amount of dust and dirt accumulates in the cracks formed by the two materials. It takes a lot of effort to remove it. By installing a connecting element, you can reduce the complexity of floor operation. In addition to this factor, we note the improvement in the appearance of the coating.
Positive qualities of connecting elements:
- Coating durability. The most vulnerable places of the decorative floor are the edges. With a constant mechanical load, chips and cracks form on their edges. Thresholds for laminate between rooms will perform a protective function;
- Safety for residents while walking;
- The ability to hide small defects. Most often, these are level differences between different floor coverings;
- The choice of various models that differ not only in appearance, but also in the material of manufacture, design and method of installation.
It is important to choose the right floor sills with a hidden fastening or a similar model with a different mounting scheme. To do this, you should familiarize yourself with their varieties.
The choice will be influenced not only by the operational, but also by the technical characteristics of this mounting component. In particular, it is necessary to correctly calculate the width in order to completely close the transition from tiles to wood flooring.
Installing thresholds on laminate and other materials is carried out in various ways:
- the use of decorative thresholds;
- butt to butt;
- podium arrangement.
Types: multi-level, angular, final, straight

- Leveling sills are designed to reduce the height amplitude between different coatings. With the help of such structural elements, it is possible to hide height differences in the range of 3–18 mm.
- Straight thresholds between rooms are used to arrange floor joints of the same height. The maximum possible height difference is no more than one millimeter.
- Corner or stair - have a local application. With their help, fix the floor covering near the steps. As a rule, they are made of rubber, since there is always a risk of slipping off the steps.
- The final ones - make out the approaches to the balcony, the threshold of the hallway or frame the edges on the podium floors. They are often used as a multi-level threshold between tiles and laminate.
According to the method of connection, they distinguish:
- A metal bar with a through fixation. It is a special strip that covers the joint, pressing its edges to the floor. For fastening, as one of the possible options, use self-tapping screws equipped with a countersunk head. The plank is also effective when there is a difference in the heights of the surfaces or an inaccurate trimming is performed. Silicone sealant can be used to seal the edges of the plank.

- H-shaped profile. It looks like the letter H, which is laid on its side. The lower shelf is brought under the installed panels, then the tile is inserted into the opposite groove and laid on the glue. At the same time, a gap remains, which is rubbed with a special compound for tiles, and from the side of the lamellas it is filled with sealant. Acrylic or silicone compounds are suitable for this.
- H-shaped collapsible. It has two T-bars that are connected by legs. The bar is set in accordance with the boundaries of the joint and fixed. Having completed the installation, the upper part, decorative, is inserted into the clamp located on the lower part and snapped into place.
In addition, an important point is the choice of material of manufacture. For a long service life without repairs, the quality of products must be carefully checked even before they are purchased. Aluminum models remain the most popular, as they have all the necessary properties - mechanical strength, do not corrode, can be painted in any color.

But in addition to them, it is possible to select the following types of final delimiters:
- Plastic. A budget option that can only be used if the surface is not subjected to heavy loads. Also, a flexible threshold between and laminate is used to create non-rectilinear patterns.
- From fiberboard. The advantage of this material is the appearance and harmonious combination with the lamellas. The disadvantages include the influence of low mechanical strength. To create a pattern, a special film is applied to the surface of fiberboard, which is protected by a layer of a special transparent material.
- Rubber. In fact, during the manufacture of flexible thresholds, rubber is used. Sometimes, to create sufficient elasticity, polymers and other inorganic additives are introduced into the composition.
- Cork. They are very rare, as they are characterized by high cost and insufficient mechanical strength. Scope - decorative closing of cracks of small sizes.

In addition to these types, manufacturers offer corner thresholds. They are mounted on the edges of steps to prevent slipping while walking.
In some cases, glass products may be used. But at the same time, all safety requirements are necessarily met, since a unique appearance is not the main priority when choosing.
How to install a threshold between tiles and laminate
For the manufacture of decorative thresholds, wood, plastic or aluminum are used. By texture, they can imitate wood, stone or even precious stone. All this is the best suited for the design of joints between lamellas and tiles. Aluminum accessories are more resistant to abrasion, that is, they last much longer.
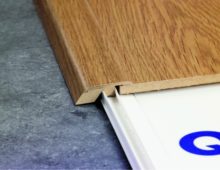
Straight Thresholds

The easiest way to install straight sills. They tightly close the gaps, prevent the ingress of dirt or moisture into the joint. This method is not without its drawbacks:
- You cannot call such a transition completely smooth, since it protrudes a little;
- it is not always possible to choose an accessory to match the floor materials;
- the screws used for fastening are sometimes visible on the surface, although there are also hidden fasteners for laminate flooring on the market today.
However, they are very popular. This is the most practical way to join materials.
- dowels are driven into the floor along the joining line of the laminate and ceramic tiles. It is very easy to do this, since all products that are presented on the construction market today have special markings and symmetrical holes for fasteners. Through them it is very easy to mark the base;
- according to the markup, holes are drilled on the base and the threshold is screwed with screws that are included in the kit.
- this does not apply to wooden bases - the profile is attached to them immediately using self-tapping screws.
For hidden fastening, special glue or liquid nails are used. This method is quite laborious, however, more aesthetically pleasing, since it allows you to hide the fasteners.
Make sure that the floor material does not rest against the groove in the nut. It is necessary to leave a compensation gap of at least 5 mm, which will prevent their linear deformation during temperature changes.
How to install flexible sills

For the design of joints of complex shape - curved or curvilinear, a flexible threshold is used between the tile and the laminate. Today you can buy these strips, which are able to take the necessary shape, in almost any building materials store.
Thresholds flexible consist of two parts. The lower one, on which there is a groove-clip, is installed during the installation of the floor covering. The decorative insert snaps onto it later, already on the finished floor finish.
These moldings in the normal state are characterized by a small bending radius. Therefore, before work, they must be softened. The plastic is either immersed in warm water for about 15 minutes or a blow dryer is used. The insert, ready for installation, is driven into the lower part of the profile with light blows. A mallet is most suitable, its rubber head will not cause any damage to the surface of the decorative strip.
See how beautiful these sills look - photo:


How to dock without a nut: connection methods
Today it is possible to finish the joint between tiles and laminate without a threshold. With the right degree of skill and experience, perceptible level differences between two layers of material can be prevented. There are several options for how to join tiles and laminate without a threshold. For each of them, you will need to change the standard installation scheme for the coating.

- The first step is to prepare the subfloor. The ideal option is the same level of the first and second coverage. Therefore, it is necessary to calculate in advance the thickness of the substrate for the lamellas and the tile adhesive. After that, the process of laying the latter begins.
- As soon as the border has formed, you can proceed with the installation of a wooden coating. In this case, a junction of tiles and laminate will be formed without a clear boundary. Once again, it is necessary to focus on the same level. During installation, it is allowed to use different types of primer to form a single pattern. The only condition is the safety of operation for wooden lamellas.
- A more difficult task is to connect laminate and tile without a wave-shaped threshold. In this case, prepare the layout of the form. For this, any suitable material is used, for example, a strip of thin-walled metal. The template is installed at the junction of the coatings. Then pieces of tiles are cut according to the contours obtained and installed on the subfloor. The same procedure is performed with lamellae. It is important that the blanks fit snugly against the template. After the final installation, it is removed, and the junction is filled with a primer. Thus, the laying of a decorative surface is carried out using available improvised means.
We present to your attention the most effective laying technologies.

- Cork compensators. Although this is a new material, it is already popular, as the transition is neat and very beautiful. Installation is carried out quickly, however, long preparation is necessary. In addition, the materials are cut very carefully to prevent any damage, even the slightest chipping. This is due to the fact that the compensator is inserted into the joint between the coatings, and it must be even not only in width, but also in depth. To do this, when fitting these materials to each other, a small gap is left, approximately 2 mm. They vary greatly in strength, and if the tile remains completely intact during their direct contact, then with the laminate everything is completely different - the lamellas can be deformed or damaged. The compensator is placed in the butt joint. It is pushed inward using a conventional screwdriver. Cork compensator does not require any special care or additional processing.

- Sealants (foam, mastic, paste). In this way, it is possible to hide butt joints having any shape, width and depth. The most important point is the choice of compensating material. It must have good adhesion to both surfaces, be strong and resilient. It should be noted that after processing, the seam turns out to be one-piece, that is, if repair is necessary, the entire floor is dismantled. Joints are processed in the following sequence:
- first lay out the tile, and when the glue is completely set, the lamellas are adjusted under it;
- lamellas should cover the tiles with some margin;
- mark the exact cut line;
- the unnecessary part of the tile is very carefully cut off with a grinder;
- a part of the substrate is cut off from the lamellas so that the height of the joined surfaces at the seam is the same. Then the material is carefully rubbed with emery;
- the laminate with the part from which the substrate was cut is fixed to the screed with glue;
- after the materials are tightly joined, proceed to sealing the seams.
Bends at the point of contact between two floor coverings look beautiful in design projects and in the photo, but it is very difficult to make them in real life. In this tutorial, we will look at how to make a technological junction of tiles and laminate on straight and winding sections.
Most often, the joining of laminate and tiles has to be done in the following cases:
- In the hallway and in the kitchen - in order not to spoil the laminate from moisture and increase the wear resistance of the coating;
- For zoning a room;
- Under the doorway.
Quick article navigation
Junction options
There are several ways to make a technological joining of laminate and tiles:
- Flexible PVC Profile- suitable for any curved bends. Consists of a base and a decorative nozzle.
- Flexible metal profile- most often used on curved sections, but it can also be used on straight seams. They are powder coated for durability.
- Aluminum nut- best suited for mounting on a joint under the door leaf. It allows you to hide not only the expansion joint, but also to level the height differences. Some models are powder coated. There are several types of sills:
- Thresholds with holes for self-tapping screws - standard;
- With a hidden mount - look more beautiful;
- Self-adhesive - the easiest installation.

- box threshold- it is installed to increase sound insulation, get rid of drafts and to protect against water leakage from the bathroom in the event of a flood. But doing this option is categorically not recommended: you will hardly notice much difference, but you will constantly stumble about the threshold 3 cm high.
- Solid T-Profile- a beautiful, but expensive pleasure for decorating straight seams. The cost can start from 600 rubles per linear meter. It is usually used to decorate the junction of parquet with tiles. Installed with glue.
- - a good option if you want to get a smooth join between laminate and tiles without a threshold. Laminate and tiles should be cut as evenly as possible, and a special cork sealant is inserted into the expansion joint. It costs about 200 rubles for 90 cm. This option has an obvious disadvantage - over time, dirt will get inside the cracks, which will need to be cleaned.
- PVC transition profile- allows you to accurately draw a large height difference between the two coatings. First, a mounting profile is installed, and a plug is attached to it.


According to the "Manual for the design of autonomous engineering systems of single-family and block-built residential buildings" (section Ventilation, paragraph 4.84), there must be a gap of at least 2 cm under the interior doors for air to flow.


Mounting methods
Let's take a closer look at the installation features of each option.
Cutting tiles and laminate
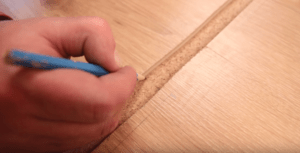
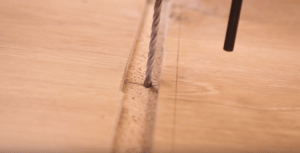
When the seams between the two materials are straight, there are no problems with their adjustment, but it is difficult to trim the sinuous sections. To do this, you will need to make a template from improvised material (cardboard, polystyrene foam, etc.), according to which to mark the future joint.
- A curved cut on a laminate is done using a manual or electric jigsaw.
- Tiles can be cut to bends of any shape with a grinder with a diamond disc on a tile, or manually with a jigsaw / hacksaw with a diamond string. You can also drill as many holes as possible along the cut line, and break off the excess with wire cutters.
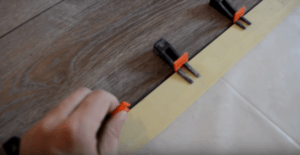
Installation of a flexible PVC profile

Installation instructions for flexible PVC profile
- After laying tiles and laminate, there should be a gap, the thickness of which will allow you to install the fixing profile and leave a temperature gap of 5 mm next to the laminate.
- Using a perforator, we drill holes for dowels in the expansion joint. If you have a warm floor passing through the seam, then you can use liquid nails for installation, but it is better to exclude such cases at the design stage.
- We cut off the required length of the profile with a knife / hacksaw / jigsaw.
- We fasten the fixing profile to the base with self-tapping screws.
- Before laying the decorative flexible profile, you need to soften it. To do this, it is placed in warm water (50-70 degrees) for 15-20 minutes.
- The decorative cap is inserted into the mounting profile and snapped into place.
Installation of a flexible metal profile

Installation of aluminum sill
A regular nut with holes is installed as follows:
- Cut the sill to the width of the doorway.
- Mark the drilling points at the junction.
- Drill holes, insert dowels and fasten the threshold to the screws on top.
- To screw in the screws, use a screwdriver or a screwdriver with minimal torque, otherwise the nut will bend.
An important nuance: the measurement is done taking into account the casing, and not just between the two extreme points of the box. Then the nut is trimmed under the trim to avoid gaps.

Proper pruning
If the nut has a hidden mount:
- Holes are marked on the base.
- A self-tapping screw with a dowel is inserted into the groove on the wrong side of the nut.
- Holes are made in the floor.
- The threshold with dowels on is inserted into the holes and hammered to the end. In order not to damage it, strike it through the block spacer.

The standard fastening has a significant drawback: the BM 6x40 dowel has a large gap between the cap and the threshold arch, so it will not be installed securely. To avoid this, it is better to take dowels 8x60 and grind off the hat on both sides for a snug fit.

To remove the backlash - take a larger dowel and file the hat
The easiest way is to put a threshold with a self-adhesive base:
- Mark the contour of the sill on the floor covering to glue it evenly in the center of the joint.
- Remove the protective film from the self-adhesive base and stick it on.
Conclusion
From a practical point of view, the appearance of additional thresholds at the junction is not very convenient - the floor becomes more difficult to wash and you can stumble on it.
Also keep in mind that the laminate must be laid in a floating way, so do not use sealants, grout or foam to fill the joints.
comments powered by HyperCommentsRelated posts:
No related posts found.
Tiles and laminate are combined for greater practicality of the room and its zoning. For example, in kitchens, kitchen-living rooms, in hallways, as well as under doors. Here are 5 main ways to design a joint (list by degree of popularity):
- With the help of a nut or a docking profile;
- Using a sealant (silicone, acrylic, polyurethane);
- With the help of a cork compensator;
- With the help of interstitial tile grout;
- With a liquid stopper.
In this article, we examined each of these solutions in detail and presented 40 photo examples.
A joint WITHOUT a threshold - how to do it and why sometimes it's better not to take risks
Let's start with a more preferred, but also more complex solution - the junction of tiles and laminate without a threshold.
How to make a junction of tiles and laminate WITHOUT a threshold?
It is possible to join tiles and laminate without a threshold only if ALL of these 5 conditions are met:
- Lay both coverings not in a floating way, but on an adhesive. If the laminate is laid in a floating way (when the lamellas are laid on the substrate and are not glued to the base), then a threshold is indispensable.
- Achieve the same height of tiles and laminate by adjusting the thickness of the adhesive and screed. The maximum error is 1-2 mm. This is the second reason why you need to plan the junction of tiles and laminate without a threshold in advance.
- Make a expansion joint of sufficient width. In order for the laminate to expand and contract naturally, there must be a gap of at least 5 mm between the tile and the laminate (an average of 1 mm of expansion gap is required for each meter of laminate length). Otherwise, the laminate will swell, begin to creak, and the cork may even fly out of the joint.
- The joint should have a length of no more than 3 m, and the room should be no more than 25 square meters. m. After all, the larger the area of \u200b\u200bthe laminate, the greater the compensation gap it needs.
- Trim the laminate very carefully. This requires special equipment and a qualified craftsman, especially if the shape of the joint is complex.
If at least one of these requirements is not met, then the threshold will still have to be set. Do you doubt whether it is worth bothering with a joint without a threshold, or is it better to go the easy way? The advantages of the first solution are obvious: a neat look, no gaps that complicate cleaning, nothing interferes with walking.

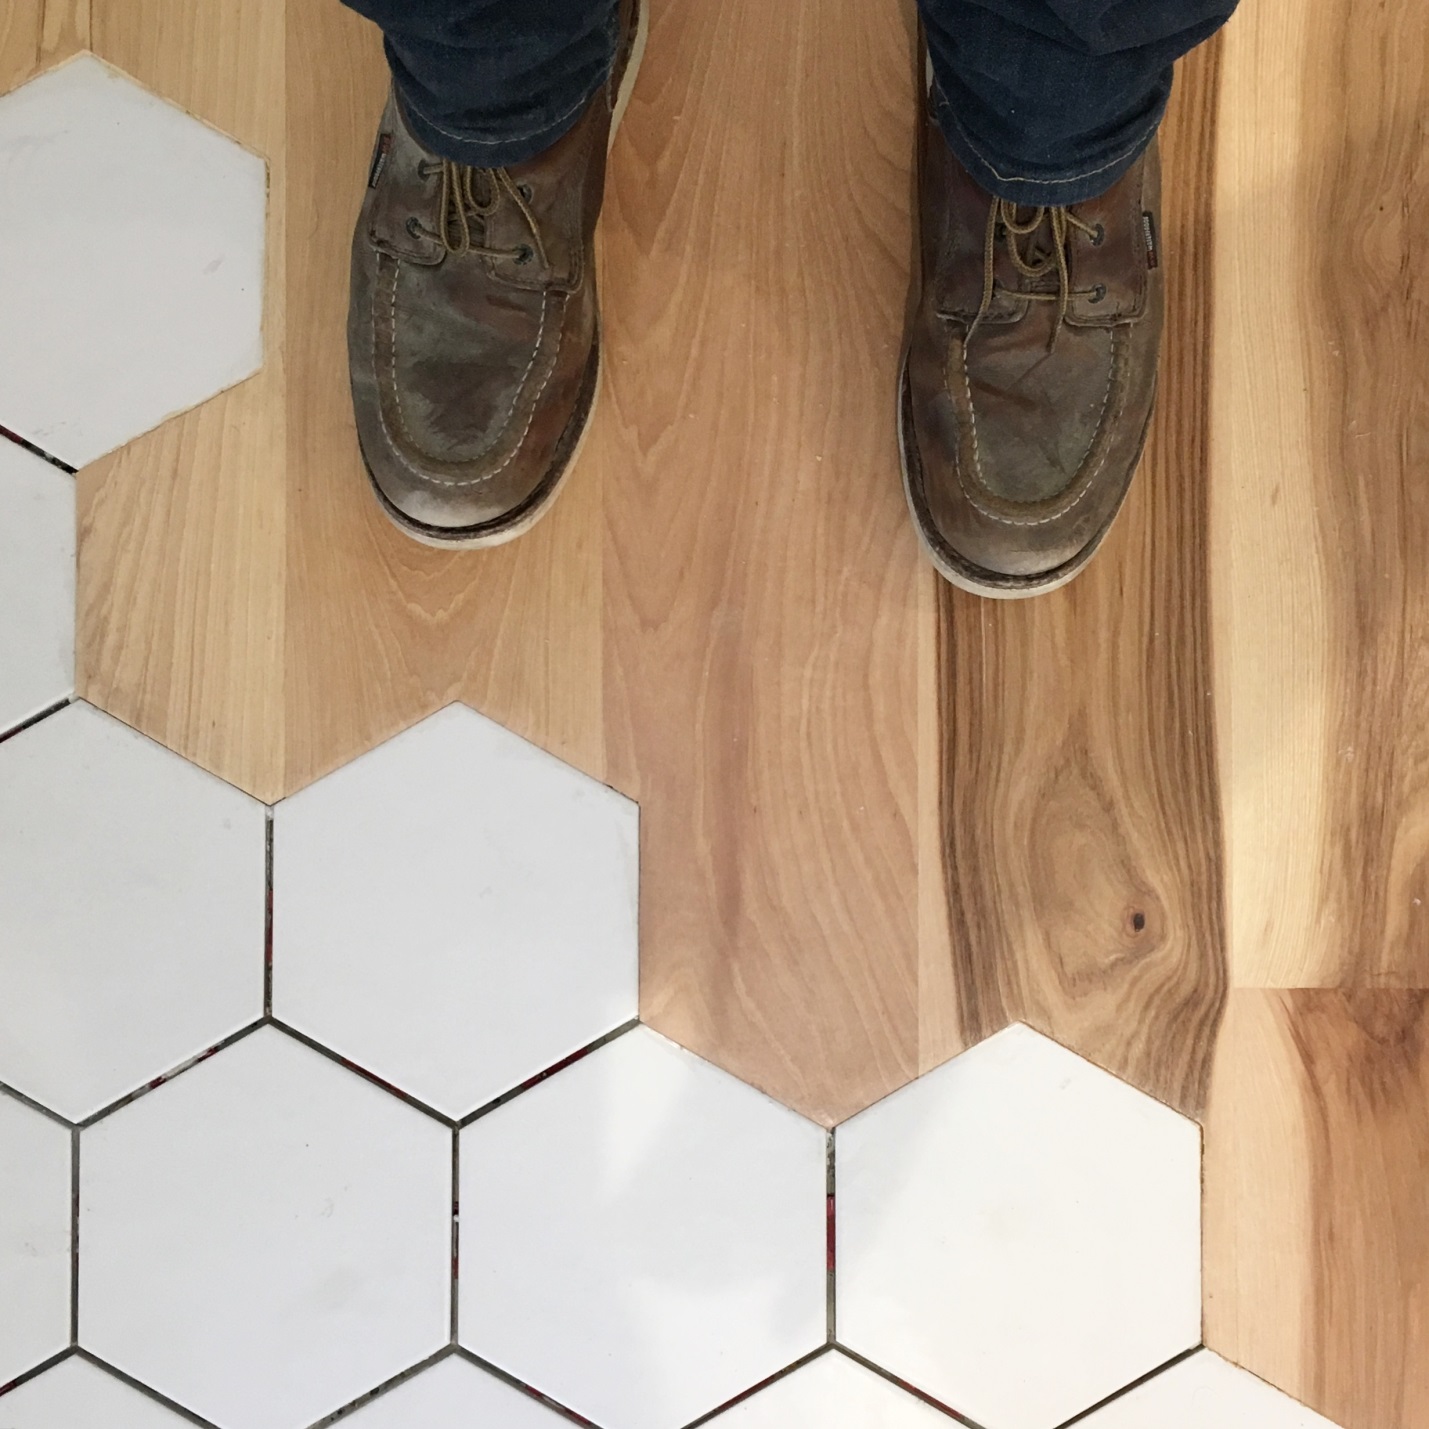
The joint of tiles and laminate without a threshold in the interior of the kitchen in Khrushchev
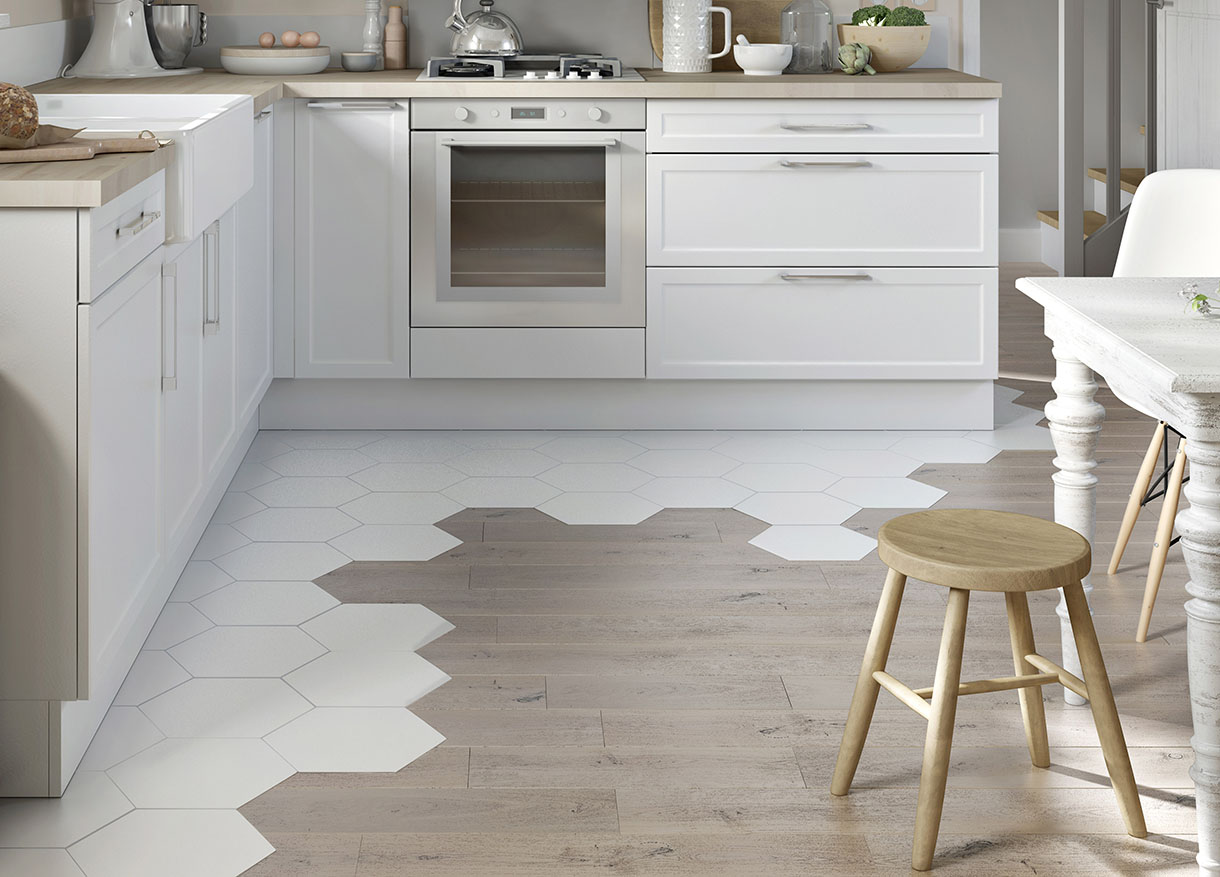
And the absence of a nut is shown if the joint has a complex configuration. For example, if it is too long, radial, wavy or curly (zigzag, with six- or eight-sided tiles). Here are a couple of photo examples of complex joints.


On the other hand, when making a decision, keep in mind that no matter how perfectly the joint is made and no matter how high-quality the laminate is, there is still a risk of swelling. In this sense, the threshold is a more reliable solution.
So, where to start planning the joint:
- If you want to connect tiles and laminate without a threshold, then you need to choose specific materials and a method for designing a joint in advance - before the screed stage. Then some math: add up the thickness of the tile and tile adhesive, and then the thickness of the laminate and its substrate / adhesive. Finally, we calculate the difference between the heights of the two coverings. The task of builders is to level this difference due to the thickness of the substrate, screed and / or glue.
- However, if you have already laid the tiles, but have not yet laid the laminate, then there is still an opportunity to make a single-level floor. Since the tile has a standard thickness, it is laid first, then the laminate can be adjusted under it.
Finally, we talk about 4 ways to design a junction of laminate and tiles without a threshold.
Attention! Whichever of the following methods you choose, when laying the laminate for its thermal expansion, you should leave 5-10 mm indent from the opposite wall (later it will be closed with a plinth).
Method 1. Sealing the joint with tile grout
Pros: Simple, inexpensive and working way. Suitable for difficult joints.

Cons: The grout can crack as the building shrinks. Since the joint between the tile and the laminate is rigid, the expansion gap for the laminate must be left under the baseboard.
Installation: It is possible to fill the seam with grout both during the laying of the floor and after its completion. The algorithm of actions is as follows:
- On the screed we draw the markings of the line of the future joint;
- We lay the tiles to the line, cut the unnecessary part and trim it with a grinder;
- We cut the laminate, lay it taking into account the compensation gap, and process the edge with silicone;
- We fill the resulting seam halfway or a little more with sealant and let it dry;
- On top of the sealant, lay the grout in the seam and level it;
- For greater durability of the seam, cover it with a transparent varnish.
- Epoxy grout or polymer grout for porcelain stoneware is especially well suited;
- You can use the same grout that was used to grout the tile joints.
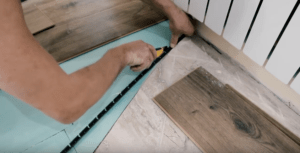
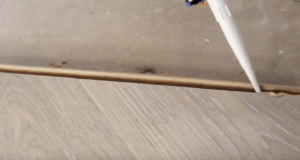
Method 2. Sealing the junction of tiles and laminate with sealant (silicone, acrylic, polyurethane)
Pros: Due to its plasticity, sealants allow you to “walk” a little. For the same reason, the joint between dissimilar coatings does not deteriorate when the building shrinks.

Seam 1.5 mm filled with silicone sealant
Cons: Sometimes silicone sealants harden over time. Only narrow joints with a width of about 5 mm can be sealed with sealant.
- Acrylic sealant can be painted and varnished after drying (unlike silicone).
Installation: In this video you can see the process of bringing tiles and laminate into one plane and the process of making a joint with silicone sealant.
Method 3. Joint with cork compensator
Cork compensator is the most popular alternative to the nut. They can arrange a straight joint, and sometimes a radius one.

- Many designers prefer the cork compensator. And there are those who consider it the same relic of the past, like aluminum profiles.

Pros: Looks good, the joints are very neat. Pressed cork is soft and elastic, so it can allow natural expansion of the laminate/parquet. Due to its naturalness and plasticity, cork expansion joints are particularly suitable for joints between tiles and parquet/parquet board/engineered board.
Cons: higher price, not suitable for curly joints, limited choice of shades, theoretically it can start to crumble due to shrinkage of the house or even fly out of the seam (but, as practice shows, this is unlikely). Another significant drawback is that the elasticity of the cork is not enough to compensate for the expansion of the laminate in spacious rooms (more than 25 sq. M).
- When laying laminate, you can buy a cork compensator to match it and already with varnish. If you are laying parquet / parquet board, then you can buy a cork compensator without any processing (pictured) and sand and varnish it at the same time as the parquet.


