The popularity of artificial ponds has never faded. Now such reservoirs have reached a new level, they can be found in many private estates. Sizes can be very diverse, depending on the purpose of their creation. For the normal functioning of reservoirs, it is necessary to take care of creating an aerator for the pond with your own hands, which is quite possible so as not to spend money on ready-made models.
What are aerators for?
First of all, they provide purification and simultaneous saturation of water with oxygen, and this, in turn, prevents water from stagnating. In addition, without purification, the water will bloom, and the smell from it will become unbearable.
Factors indicating the need to install an aerator

Pond and reservoir aerators are compression-type installations, the main task of which is to mix water with oxygen. Such units are also called air compressors.
In natural reservoirs, this process occurs by itself, since air constantly penetrates into the water as a result of the mixing of water flows: rivers flow into the seas, waters are filled with precipitation, strong winds blow, filling occurs through underground springs with natural microelements. Accordingly, in artificially created ponds, such interchanges do not occur, so they must be created with your own hands.
Home ponds have their own ecosystem, which operates on a different principle. This is due to the fact that when creating a pond or lake, the bottom is lined with waterproofing material, which becomes an obstacle to the penetration of oxygen from the soil. The surface area of artificial reservoirs is often small, and they are located mainly surrounded by trees, in this regard, neither the air currents carried by winds nor precipitation can fully saturate the water with everything necessary.
The lack of oxygen in the water leads to the death of plankton, fish, snails, frogs and other living creatures. As a result, silt, rot, bottom sediments appear in the water, and only a swamp remains from a beautiful reservoir.
Note.
The lack of oxygen in the reservoir is indicated by the formation of a film on the water, fish are often shown on the surface of the water, snails rise from the bottom, silt appears.
Types of pond aerators
The aerators are divided into two groups:
- Stationary- units of a capital type of installation, which are intended for installation in a specific pond and carry out their work on an ongoing basis in a given mode.
- Mobile devices are designed for seasonal use, their power is enough to fully serve several ponds. Aerators of this type are best suited for small ponds or for those that do not need constant oxygen filling.
Pond aerator classification
According to the type and place of installation, as well as the features of work, it is carried out into several types.
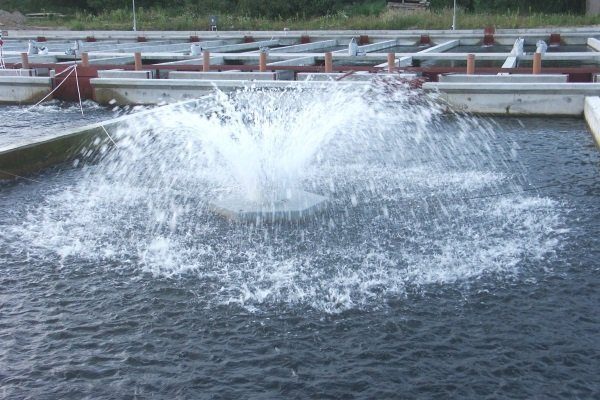
outdoor aerators compressors for ponds . These installations look like small fountains or waterfalls. Often used for installation in domestic ponds, in order to add an attractive appearance. An important point of such units is that not all the inhabitants of the pond will appreciate the noise of falling water. Features of the operation of outdoor aerators are that the pump draws water from the pond, and then releases it in the opposite direction. When a stream of water is in the air, oxygen saturation occurs.
 Ejectors.
The principle of operation of these units resembles the features of outdoor compressors, with the difference that water is not sucked from the pond. The process of saturating water with oxygen is carried out by blades, which are driven by a motor. The blades hit the water with a certain force, mixing it and saturating it with air. It should be noted that these installations also emit a lot of noise.
Ejectors.
The principle of operation of these units resembles the features of outdoor compressors, with the difference that water is not sucked from the pond. The process of saturating water with oxygen is carried out by blades, which are driven by a motor. The blades hit the water with a certain force, mixing it and saturating it with air. It should be noted that these installations also emit a lot of noise.
Bottom aerator for pond . This is a new device for ponds, which has gained a reputation as the most efficient to date. A compressor that makes noise is installed on the shore of a reservoir, and a tube with a diffuser is lowered into the water. Oxygen enters through small holes, passing through layers of water. The result of this operation of the installation is the saturation of the pond with oxygen and the mixing of all layers of water. This aerator is quiet.
Combined aerator. The principle of operation of the installation is based on the operation of a pump or compressor. The compression unit is installed on the shore of the reservoir, and the diffuser is mounted in the water. The head of the diffuser remains above the surface of the water, and air saturation is carried out due to the flow of water, which beats like a fountain.
Wind aerator for pond . This installation differs from all other types of aerators by autonomous operation. The unit is driven by the force of the wind. The design is mobile and stationary, it is created from large blades located on the water surface, as well as a propeller immersed in water. The principle of operation is as follows: the wind drives the blades, they activate the course of the propellers, which mix the water and form a seething.
Note.
Wind-type aerators are most often used in the country, as well as in those areas that remain without the participation of people for a long time. The installation is able to function year-round without process adjustment by the owner of the reservoir.
We create an aerator for the pond with our own hands
Making an aerator for a pond on your own is not difficult. The main thing is to study the assembly instructions, as well as stock up on the necessary materials. The cost of ready-made installations is not small, but with self-production you can save a lot of money.
For small ponds, it is enough to use an aerator of a simple design, which can be assembled from materials that the summer resident always has at hand.
Assembling the ejector aerator
Materials:
- drainage pump with low power;
- a piece of pipe with a cross section of 32 mm and a length of 2 m;
- branch pipe 40 cm long and 32 mm in cross section;
- tee angle 45º;
- double braided cable.
Note.
The importance of choosing a tee with an angle of 45º is explained by the fact that when the pipe is connected at an angle of 90º, there will be a constant flow of water into the unit.
Assembly process:
- The sewer tee is attached to the drainage pump using a fitting for connecting the aerator hoses for the pond. To ensure the reliability of the connection, a silicone-based sealant is used.
- On the reverse side, a branch pipe is inserted into the tee, the length of which should be less.
- An angle of 45º is inserted into the upper outlet, then a two-meter pipe is fixed.
- An electrical cable is connected to the aerator. The wire must be sealed with electrical tape, which is wound in several layers, after which it is placed in a corrugation.
- The pump is placed at a depth of 70 - 100 cm of the water surface, and the water intake pipe should be on the surface of the water. In order for you to succeed, make a kind of mast from a steel pipe and fix it at the bottom of the reservoir.
- At the last stage, an aerator is attached to the mast and electric current is supplied.
Assembling the bottom aerator
The cost of assembling an aerator of this type with your own hands is small. To do this, you will need to find a compressor from a car with a receiver.
materials:
- High pressure hose;
- collar;
- Tees;
- Nozzles, sprayer.
Note.
The nozzle can be made from a plastic bottle, after making a hole in it. To reduce the size of air bubbles, the bottle is wrapped with foam rubber of small thickness.
Assembly process:
- The compressor is placed near a reservoir or hidden in a nearby outbuilding.
- The central hose is connected to the compressor and stretched to the pond.
- With the help of tees, bends are made depending on the number of nozzles. Staples are used for secure fixation.
- Diffusers are attached to tees and placed at the bottom of the reservoir. To prevent them from rising to the surface, you can put heavy stones on them or fix them at the bottom with pins with curved ends.
Note.
The work of bottom aerators for the pond cannot be continuous, in addition, the unit makes an annoying loud sound. Devices of this type are used to periodically saturate the water in ponds with oxygen.
Assembling a wind aerator for a pond in winter with your own hands
Installations of this type are best suited for operation in the winter season. It is not difficult to assemble it, you will need the most common parts that can be found on the farm.
materials:

Assembly process:
- Cut out eight pieces of squares from metal and connect them into cubes. A cross member is installed inside each of them, in which a hole is cut out and a bearing is inserted. The central parts of the bearings must be in line.
- A steel bar is placed in bearings.
- A plastic barrel is cut into two parts and blades for a windmill are obtained.
- With the help of metal loops, the blades are fixed at the top of the rod.
- At the bottom of the steel bar, blades are attached, which as a result will be located above the surface of the water.
- The assembly of the mast for the wind-type aerator is carried out at the last stage and after that it is installed in the reservoir.
A floating wind aerator for a pond is created using plastic barrels, bottles or polystyrene attached to the mast.
There is practically not a single natural source left on earth that would contain water suitable for long-term use. This fact has been repeatedly confirmed by the relevant departments. Therefore, the organization of water treatment is one of the main tasks facing the owners of suburban areas. Of course, you should create a water treatment plant only based on a comprehensive laboratory analysis of water from your source. But, given that the iron content exceeds the permissible norms almost everywhere, without an aerator, not a single water treatment system can be called a full-fledged one.
Today we will talk about assembling a water treatment plant based on an aerator (non-pressure aeration column) on our own.
Briefly about aeration
Aeration is usually called the process of saturating water with oxygen (basically, the process is forced) in order to purify it from iron, manganese and other oxidizable compounds. Simply put, we are talking about substances that, after reacting with oxygen, take insoluble forms and precipitate as a precipitate. Subsequent filtration or settling allows you to rid the water of the resulting sediment, which contains harmful impurities.
In the process of aeration, the main catalyst for removing harmful impurities from the water is the oxygen contained in the air. In other words, aeration means non-reagent deironing of water - the most economical of the known methods of deferrization.
Another cleaning method, the effectiveness of which is not in doubt, is the following: iron removal using chemical catalysts (passing water through activated carbon, porous aluminosilicate with a special coating or other special filler).
Together, both of these methods help to achieve excellent results.

MTT FORUMHOUSE User
In serious water treatment systems, aeration is only one of the stages in the process of iron removal and demanganization. At this stage, the water is saturated with oxygen (for further and complete oxidation of iron with the help of catalysts), and the removal of dissolved gases occurs.
Distinguish between non-pressure and pressure aeration systems. The design of pressure aeration systems provides for the presence of a closed aerator (contact chamber), in which water is saturated with oxygen using a compressor. In such a system, there is no loss of water pressure, therefore, water enters the distributing line under pressure, which creates a pump (pumping station) of the first lift. For a pressurized system, a second lift pump is not needed.

The main elements of the pressure aeration system:
- The supply line with a mud filter.
- Compressor that pumps air into the aeration column.
- Aeration column with air valve (with air vent).
- Iron filter.
It is more difficult to make a pressure aeration system on your own than its non-pressure counterpart. At the same time, its reliability in comparison with a non-pressure aeration system can also be called into question.

Andre.voda FORUMHOUSE User
Non-pressure aeration works better and more reliably than pressure! Consider the option with pressure aeration: what are the leaks arising from clogging of the air vent .... And the failure of check valves, and failures of the flow sensor .... If the compressor stopped in pressure aeration, then everything is kirdyk: there is no oxidation, and iron does not fall out.
Considering all of the above, we will consider the option of installing a pressureless aeration system, especially since most of the "experimenters" of our portal practice.
In the case of non-pressure aeration, an open type aerator is used, in which water pressure is lost. Therefore, such systems require an additional pump (pumping station) of the second lift, which supplies water to the distributing line. The aerator in this case performs the function of a storage tank, at the same time allowing you to solve the issue of providing a certain supply of water for the plumbing system.
Scheme of a water treatment system based on a non-pressure aeration column
Schematically, a water purification system operating on the principle of non-pressure aeration is as follows.

- Supply line with first lift pump and mechanical sump filter.
- Aeration unit with second lift pump.
- Iron filter.
- Block of fine water purification.
- Drainage line for flushing the system.
Let's consider the presented elements in more detail.
supply line
The main element of the supply line (if you do not take into account the pipes themselves) is the pump (pumping station) of the first lift. This device can be dispensed with only if water is supplied to the installation from a centralized water supply system. If the water is pumped from a well or a well, then an ordinary deep pump can be installed in the supply line.
Everyone determines the need to install a mud filter for himself.

If a float valve is used to regulate the water supply in the aeration tank, then the coarse filter (sump), retaining large mechanical impurities, protects the valve from sticking. If automation is used to control the first lift pump, then the supply line can even work without filters.

Operator FORUMHOUSE User
Installing filters is the time to wash and maintain them. Without filters, all debris from the well and iron deposits remain in the storage tank. For a year, I have about 5 cm sediment at the bottom there. In the summer, I open the drain and flush all the sediment down the drain. Otherwise, all this will have to be cleaned out of the filters. So I removed all the filters that I foolishly put in the filling system. I pump everything from the well into the tank. Debris remains at the bottom.
aeration block
The main element of the aeration block is the aeration tank, in which water is saturated with oxygen, iron is oxidized and primary sediment is deposited.
To create an aerator, you can use a container that has a specialized purpose and has a design that provides for the possibility of backwashing. For example, the photo shows a specialized container with a volume of 1 m³.

Also, an aerator can be made from a container designed to filter water in pools. At the same time, some users of our portal use ordinary plastic barrels for food storage.

valexs FORUMHOUSE User
From the well, water is supplied by a deep pump into a barrel of 250 liters.
The volume of the working capacity is a very important indicator. According to user valexs, an aerator with a capacity of 250 liters provides water for a family of 4 people. At the same time, no one experiences a shortage of water. Approximately 94 m³ of water is consumed per year (200-300 liters per day).
As you can see, the system is quite efficient. If you have more planned water consumption, then the volume of the tank can be increased. An aerator with a volume of 1000 liters, for example, allows you to provide purified water not only to a country house, but also to a garden irrigation system. Some users practice the creation of an aeration unit from two containers: water is settled in one, and water is consumed from the other.
The ordinary showering method will help start the aeration process in the tank. We are talking about the spraying of water entering the tank under a certain pressure.


Operator FORUMHOUSE User
A very simple way: from the well you collect a tank through a shower diffuser. Water does not just pour, but pours out of the shower under great pressure, saturated with oxygen. Almost immediately, the water becomes cloudy, and iron begins to precipitate.
It is very important to let the water settle after filling the container. Otherwise, all main filters located in the cleaning system after the aeration tank will quickly become clogged.
According to our users, it takes at least 36 hours to fully settle the water. Therefore, the larger the volume of the aeration tank, the more convenient it is to operate. After all, if you adjust the equipment to fill the aerator in small portions, then the time spent on settling water will practically not be felt.
The efficiency of the shower head can be significantly increased. So, for example, the user valexs did. He installed an ordinary plastic bucket (upside down) on top of the aeration tank. Water from the sprayer under high pressure hits the bottom of the plastic bucket. This leads to the formation of water mist and more efficient mixing of the liquid with oxygen.

The atomizer is built into the lid of the container, in which holes are drilled for draining water enriched with oxygen.

A corrugation is mounted on top of the bucket. It provides a connection of the tank with the atmosphere and prevents splashing of incoming water.

Water extraction and aerator filling
The water outlet from the tank must be installed at a level that will not allow the formed sediment to enter the water main.

Operator
Water from the tank should not be taken from the bottom, but about 30% above the bottom. Then the sediment does not enter the system.
Concerning the activation and deactivation levels of the first lift pump: the pump activation sensor must be located above the level of water withdrawal from the aerator. This will create a certain reserve of settled water, which can be used even in the process of filling the tank. In this case, the amount of unsettled water entering the water main will be minimal, and fine filters can easily cope with mechanical suspensions.

kilby FORUMHOUSE User
The level sensor for switching on the water supply is installed so that there is at least 100 liters of water between it and the level of water intake to the pumping station. This volume and contact time is quite enough for the smooth operation of the system.
The water supply control system is of two types: mechanical and automatic (based on electronic sensors).
An example of a mechanical system is a conventional float from a toilet bowl. Its design is extremely simple, and the shortcomings are immediately evident. It is almost impossible to adjust: the pump turns on as soon as the water drops below the upper level. This process occurs with an "enviable" frequency, which does not allow water to settle qualitatively.
An automatic system, consisting of electrical sensors, allows you to turn on and off the water supply when certain levels are reached. Which is much more practical.

Konstantin11 FORUMHOUSE User
A bar with control frogs (there are four frogs in total: two working and two emergency). The tank is filled to 80% (maximum). The deep pump turns on when about 100 liters of water remains in the tank, and turns off when about 800 liters of water are collected.

Reinsurance in the form of installing emergency sensors is an important point. If the pump does not turn on in a timely manner, nothing terrible will happen. A real disaster can befall the owner of the aeration unit if the pump does not turn off after filling the tank.
This is how one of our users insured his premises against a possible “flood”.

Operator
I also have a three-level barrel overflow insurance system: an electric float, a mechanical float, and a drain to the street into a storm drain.
Second lift pump
The second lift pump provides a stable pressure throughout the plumbing. Also, with its help, water is supplied to the deironing filter and fine filters.
To operate the pumping station of the second lift, you should use a pump equipped with an automatic on-off system, triggered by a signal from pressure sensors (which it is desirable to duplicate).


Konstantin11
The photo shows the pump of the second lift (it stands to the right of the tank). The drain line is clearly visible. Pressure sensors are also clearly visible, which, due to their tendency to stick, stand with the covers removed. It's good that they are duplicated, and their sticking does not affect the performance of the system. The sump and check valve are poorly visible, but they are needed there.
In almost all systems, the pump is located at the outlet of the aerator. But the users of our portal have their own view of things. For example, there is an opinion that if the pumping station is located immediately after the aerator, then underoxidized iron accumulates in it, which clogs not only the pump, but also the control sensors. For this reason, it is advisable to place the pumping station after the deironing filter. It is difficult to disagree with this conclusion, especially since the author of the concept (the user - the Operator) was able to assemble a working installation in accordance with such a non-standard scheme.
The second lift pump should be selected based on the hydraulic characteristics of the device. Also important is the reputation of the manufacturer.
Filter-deironing agent with filler
The bulk of the iron contained in the water precipitates to the bottom of the aeration tank. But for better cleaning, we will definitely need a system of additional filters. To get rid of the remnants of unoxidized iron, an iron-removing filter is used. It is a vertical column with bulk content.

morteh FORUMHOUSE User
The column is a plastic pipe with a diameter of 300 mm and a height of 2000 mm. The bottom (stainless steel b = 8 mm) is screwed through the rubber seal with M8x40 bolts with a pitch of 40 mm. The lid is the same as the bottom, only a 3/4" stainless steel spigot is welded in the center, and the second one is the same 60 mm from it.

In this case, a polyethylene pipe was used, while the design of serial installations involves the use of fiberglass.
When determining the filter volume for your system, you should be guided by the dimensions of standard installations: their diameter varies from 6 to 16 inches, and height - 17-65 inches. The exact volume of the filter (as well as the volume of the media) can be calculated by knowing the characteristics of the backfill, the water flow and the level of impurities.
When determining the level of filter loading, it should be taken into account that during washing or regeneration, the filler layer increases under the action of the back pressure of water. Taking into account the expansion coefficient, the filter should be filled with catalytic filler to approximately 60%.
The internal design of the iron remover is designed in such a way that water enters it from above, then passes through a layer of catalytic backfill and only then enters the water main (through the lower intake pipe).


morteh
A pipe is screwed to the central bend of the cover, and a slotted filter is assembled at the end of the pipe. When the cover is installed on the column, this filter does not reach the bottom by about 30–50 mm. A slotted filter is also placed on the drainage squeegee screwed into the lid. It is needed so that during backwashing, backfill is not washed out of the column.

The intake tube passes through the entire layer of catalytic filler.

In some cases, it is possible for mechanical impurities to slip from the aerator into the deironing filter (if the water in the aerator has not yet had time to settle, if the tap was turned on in the house at the time of filling the aeration tank, etc.). Therefore, it is desirable to protect the iron remover by installing a mechanical filter at the outlet of the aerator.

Konstantin11
For example, after the tank (or rather, between it and the second lift station) I have an ordinary mud sump.
It is better to choose a filler for an iron remover that does not need additional regeneration. It is characterized by ease of maintenance, which comes down to periodic washing of the filter with a reverse flow of water. On the market, fillers of this type are presented in large quantities.
With a low iron content, quartz sand can be used for iron removal. The following fillers have also proven themselves well: activated carbon and aluminosilicate coated with iron and manganese oxides.
An example of a filler that requires periodic regeneration with acids or common salt is an ion exchange resin.
In order to determine the type of filler and its quantity, it is necessary to conduct a comprehensive analysis of the source water in the source and study the properties of a particular backfill.

Konstantin11
I chose the filter materials myself - based on water analysis and technical descriptions of filter media. In the left column: quartz sand at the bottom (a tube sits in it), then industrial filler. On the right is a softener.
The user implemented a two-stage cleaning system with a combined filler. The first stage is used to remove iron residues (which have not had time to oxidize in the aerator) and for mechanical cleaning, the second stage is used to soften water.

Pressure gauges built into the line allow you to control the degree of clogging of the filters.
Filter washing
Even if the backfill of the deironing filter does not need regeneration, the owner will still have to periodically rinse it during operation. Therefore, all self-cleaning filters (including iron removal and aeration tanks) must be equipped with a bypass and drain lines.

It is worth installing a few additional taps, and the flushing line will allow the flow of water to flow in the opposite direction (almost directly from the source). Drain lines can be brought into the sewer system or stormwater.

Operator
The catalyst barrel is regularly backflushed. There's a six-position tap on the barrel. And at the exit from the iron remover there is a regular filter - a cartridge of 0.5 microns. For the aerator, I made the following flushing system: at the bottom of the barrel, a drain with a tap, once a year I open the drain and at the same time pour it, washing the sediment down the drain.
The frequency of washing the iron remover and other filters, everyone determines for himself. It depends on the degree of water contamination, on the volume of its consumption and on the characteristics of the backfill (on its tendency to caking). You can read more details in a special section of our website.
To ensure high-quality flushing, the water flow rate in the return flow should be 2–3 times higher than the flow rate of the working flow. The pressure in the flush line must be at least 2.5–3 atm. (more is possible, but at the same time it is necessary to ensure that the backfill does not end up in the drainage).
If the second lift pump does not have sufficient power, an additional pumping station can be installed for flushing.
Filler regeneration is a little different from normal flushing. Indeed, in the process of regeneration, special reagents must be added to the flushing line (which ones - depends on the type of filler). First, the filler is washed with water from mechanical impurities and loosened at the same time (for 15–20 minutes). Then, a reagent (a solution of salt, acid, etc.) is supplied to the flushing line using a pump and an additional container. At the last stage of regeneration, the filler is washed from the reagent.
You can read about how in the corresponding FORUMHOUSE topic. Here, users of our portal share their tips and practical experience. can be found in a section specially created for this purpose. The article will talk about a simple and affordable way to provide water to your country house. And in the video about the creation of the caisson, a practical idea is considered that allows you to organize a modern and reliable system for supplying water from a well to a country house.
An aerator is a hydromechanical device that saturates water with oxygen. Fish and other living organisms that live in water bodies need a certain concentration of oxygen to live. Lack of air negatively affects the health of all living things. Thanks to the aerator, ponds filled with life are created from stagnant, bad-smelling reservoirs - with fish, mollusks, water lilies and other attributes of a prosperous reservoir.
How does he work?
In nature, saturation of water with oxygen occurs due to the natural movement of water. In artificial reservoirs, especially in winter, stagnation of water masses is observed.
What does an aerator do?
- Mixes layers of water by creating artificial streams.
- Purifies water from impurities and contaminants, makes it transparent.
- Eliminates bad odor.
- Cleans water from algae.
- Reduces midges and mosquitoes.
- In winter, it forms a polynya through which harmful gases escape.
What is an aerator made of?
Typically, a pond aeration system consists of:
- compressor;
- air nozzles with 4 mm connecting fitting;
- multiplier with 4 mm fittings at the outlet - connects the atomizers to the compressor;
- silicone hoses with an internal diameter of 8/4 mm - connects the inlet of the breeder to the compressor / breeder to sprayers.
Compressor models are equipped with multipliers with the number of output channels corresponding to the maximum performance of the device .
- spring-type check valves - they are installed in front of the sprayers, their task is to prevent the aeration hoses from freezing in winter.
The nuances of the design of the aerator depend on its type and principle of operation. For stocked ponds, vortex compressors are usually used. The table shows the types of compressors that differ in the principle of operation, and the features of their application.
Features of the use of compressors of different types
Device selection criteria
An aerator is not cheap, but the cost of buying it is not comparable to the problems that arise in a pond with stagnant water. Regardless of the purpose of the reservoir - decorative or economic, water aeration is necessary. The industry produces aerators of various types - they differ not only in names, but also in the principle of operation.

When choosing a compressor, take into account the size of the reservoir - each device is designed for a certain volume of water. What else you need to know about the saturation of water with oxygen:
- The amount of oxygen in the water must meet the needs of the fish - an excess of it is just as harmful as a shortage.
- The need for oxygen varies with the seasons.
- The type of aerator, its design and principle of operation is selected in accordance with the purpose of the pond.
When choosing an aerator, it is evaluated according to the following indicators:
- compressor power;
- noise;
- boundary temperatures for using the device.
The cost of aerators for small decorative ponds is 4-10 thousand rubles. A device for a large stocked pond costs ten times more - about 100 thousand rubles.
The optimal ratio of compressor performance to water volume is 1 l/h per 1 liter of water.
There is no exact formula for compressor selection. For each specific pond, the device is selected taking into account many factors:
- stocking density;
- the presence of aquatic plants;
- water temperature;
- biochemical composition of the soil;
- the depth of the reservoir;
- the presence of shallow water;
- bottom configurations;
- the presence of a shadow over the water surface.
If the aerator is purchased for the first time, and it is not known what power will be optimal, they start with a 40-60 watt device. After installing the aerator, monitor the oxygen concentration in the spray zone through special tests. In case of insufficient oxygen concentration, additional compressors are purchased - their number and power is determined empirically.
In order for aeration to be of high quality, it is necessary that the daily water flow of the system be four times the total volume of the pond.
Under certain circumstances, it is necessary to increase the capacity of the aeration system by increasing the number of aerators in the pond if:
- the reservoir is oversaturated with algae;
- organic matter enters the reservoir along with storm water;
- the pond has an irregular shape - this makes it difficult to mix the water.
On average, for every 10,000 sq. m of water surface requires at least one aerator.
By type
All aerators by type of installation are divided into two large groups:
- Stationary. Capital devices installed in a particular reservoir. Work is permanent or according to a certain regime.
- Mobile. These are devices for temporary, seasonal use. They can be moved from place to place, installed in different reservoirs. Such devices are usually used in ponds of a small area, as well as in reservoirs that do not need constant oxygen saturation.
By location
According to the principle of operation and location, aerators are divided into the following groups:
- Surface. These are compressors that create streams of water in the form of fountains or waterfalls. Such a spectacular option is more interesting for a decorative pond. Constant noise can cause discomfort to the inhabitants of reservoirs - this must be taken into account when choosing the type of aerator. The surface installation works simply - the pump draws in a portion of water, and then, giving it acceleration, throws it back. When water enters the air, it captures oxygen and, falling into the pond, replenishes its oxygen balance.
- Ejectors. These devices work almost the same as surface devices. But ejectors do not suck up water, but simply set it in motion. The blades, driven by the engine, hit the water with force - as a result, the water is mixed and air bubbles are created. Ejectors, like surface aerators, are quite noisy.
- Combined. The compression unit is located on the shore, the sprayer is in the pond. From the spray head, which is usually located on the surface of the water surface, a water stream spouts, which, falling, saturates the water with oxygen.
- Wind. This is a standalone device. It does not need electricity to work - it is powered by wind energy. There are two design options - stationary or floating installations. The design consists of blades - they are located on the surface of the water, and a propeller - it is under water. The blades, rotated by the wind, transmit torque to the propellers, thanks to which the water mixes and boils.
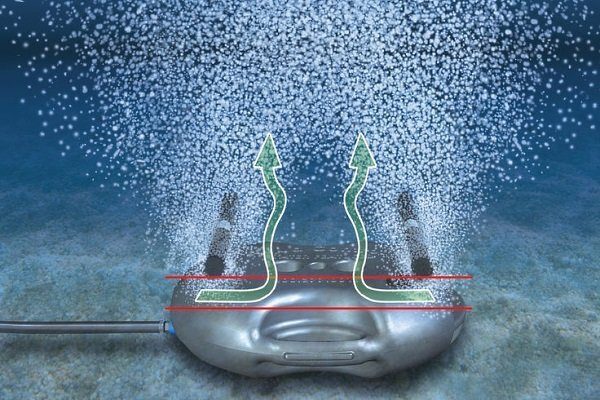
- Bottom. This is a relatively new type of aerator. The most efficient device to date. The compressor remains to work and make noise on the shore, and only the tube and diffusers are immersed in the water. Water, leaving through holes of small diameter, passes through layers of water. The reservoir receives oxygen, and the layers of water are constantly mixed. This type of aerator is ideal for fish ponds. The only drawback is the high cost.
surface aerator

Ejectors

Combined aerator

Wind aerators
Bottom aerator
Model overview
Today, aerators are widely represented on the market - you can choose a model for a reservoir of any size. Consider several modern models.
This is a powerful floating type aerator designed for reservoirs up to 250 sq. m. The air from it penetrates to a depth of 4 m. The device is able to transform a pond with stagnant water into a reservoir with running water. The device maintains the biological balance of ponds and prevents them from blooming.
Model Features:
- equipped with an adjustable injection nozzle - ensures the accuracy of oxygen supply;
- has a high flow rate;
- suspension and pump casing - stainless steel;
- low noise level;
- thanks to the sealed pump, the device has a long service life.

Specifications AquaAir 250:
Bottom-type aerator, designed for a reservoir up to 4,000 sq. m. The set consists of:
- compressor;
- bottom sprayer;
- metal stand for the compressor.

Specifications ROBUST AIR RAE-1:
- ideal for ponds up to 15 m deep;
- economical - by means of compressed air it continuously mixes water, spending a minimum of energy;
- possible year-round use.
Bottom type aerator for small reservoirs up to 6.5 m deep and up to 4000 sq. m. Model with one diffuser. Noise - 51.1 dB at a distance of 1.5 m.

Specifications Airmax PS 10:
Advantages and features of the model:
- The housing reliably protects internal parts from water and mechanical damage.
- The body has a camouflage aesthetic - it is almost invisible in landscape design.
Floating aerator. Able to create a powerful stream of water saturated with oxygen.

Specifications AirFlow 25 F:
Features of AirFlow 25F:
- air injection is provided by the Venturi effect;
- the device is economical - it consumes a minimum of energy;
- you can change the direction of the flow;
- use in sea water is allowed.
Each model of aerator comes with individual instructions for use. Most of the instructions are presented in the language of the producing countries, so they must first be translated.
Is it possible to assemble an aerator with your own hands?
Pond aerators, especially those designed for large areas, cost more than 100,000 rubles. If the owner of the pond has the skills to work with equipment and tools, you can save money by assembling an aerator with your own hands. Consider the processes of assembling devices of various types.
How to assemble an ejector aerator?
What you need to stock up:
- drainage pump;
- sewer pipe d 32 mm - 2 m and branch pipe - 30-50 cm;
- corner tee at an angle of 45 degrees;
- corner at 45 degrees;
- double braided wire.
The pump is selected with average power and cost, taking into account the aeration area. The cable is taken with such a cross section that it can withstand the strength of the current consumed even during continuous operation.
Assembly process:
- The pump is usually equipped with an angled outlet and a hose fitting. Seals are inserted into the sewer tee and connected to the fitting. Silicone sealant can be used to seal the joint.
- A branch pipe is attached to the second side of the tee.
- An angle of 45 ° is placed in the upper outlet, and a 2-meter pipe is attached to it.
- It remains to connect the resulting design with the corner adapter of the pump.
- Lead the cable. The fork is cut off. The wires are twisted, wrapped with electrical tape. Then they are hidden in the sleeve, poured with polymer. If you do not cut off the plug, you will have to use an extension cord. In this case, the socket with a plug is packed in polyethylene, and hermetically wrapped with electrical tape.
- The pump is placed at a depth of 70-100 cm. The intake pipe must be on the surface of the water. To do this, make a mast - from a steel pipe. She is driven into the ground.
- The pump should preferably be placed in a mesh container. The aerator is attached to the mast with wire. Now you can supply electricity.
A 90 degree tee cannot be used. If the angle is 45 degrees, then the air, drawn in, moves and mixes with water. If the angle is 90 degrees, there is a risk of air backflow.
How to assemble a bottom aerator?
The assembly of such an aerator will be inexpensive. For this design, you will need a car compressor with a receiver. Also stocked:
- hose for high pressure;
- clamp;
- tees;
- sprayers.
Sprayers can be made from half-liter plastic bottles. It is enough to make holes in them with an awl. To reduce the diameter of emerging bubbles, the bottles are wrapped with foam rubber.
Assembly order of a homemade bottom aerator:
- The compressor is installed near the pond or in some nearby outbuilding.
- The compressor is connected to the central hose, which is pulled to the reservoir.
- By means of tees, bends are made. The number of outlets corresponds to the number of nozzles. The fixation is reinforced with staples.
- Diffusers attached to tees are placed on the bottom of the pond. To avoid rising to the surface, they are pressed down with stones or fixed with pins curved at the ends.
Bottom aerators cannot work without interruption. The devices are also noisy, causing discomfort to others. Such devices are usually used for periodic saturation of water with oxygen.
How you can make an aerator with your own hands is shown in the video below:
How to assemble a wind aerator?
Wind turbines are especially good for winter time. The assembly process is simple and does not require expensive parts. You will need:
- metal sheet - a square with a side of 30 cm;
- steel rod, d 20 mm;
- bearings of the corresponding section;
- metal strips (thickness - 2 mm);
- plastic container;
- fan;
- fasteners.
Assembly order:
- 8 squares are cut out of a metal sheet. They make cubes. Crossbars are placed inside the cubes, a hole is made in it and a bearing is placed. The centers of the bearings must be in a straight line.
- The rod is inserted into the bearings.
- The plastic container is cut in half - these will be the blades for rotating the shaft.
- With the help of metal loops, the blades are attached to the top of the rod.
- Support legs are welded to the structure.
- A radiator propeller is fixed at the end of the shaft.
- Now the structure can be lowered into the water.
Due to the wind, the blades spin, transferring rotation to the propeller located at the bottom of the shaft. The propeller, rotating, creates a whirlwind that prevents the water from freezing in winter.
Aerators are an indispensable thing when growing fish in ponds with stagnant water. This device can be bought or made independently - the main thing is that the pump power is enough to aerate a given area.
7City Novosibirsk
Publications: 234A private pond is a worthy decoration of any site, a great place to relax with family and friends, as well as an excellent haven for a variety of flora and fauna. In order for the country pond to always remain clean, it needs to be looked after. One of the most important components of pond care is the organization of the aeration process.
After reviewing the information below, you will get a general idea of aeration as such and consider the features of its organization in the cold season.
The aerator in its traditional sense is a hydromechanical device, through which the forced supply of oxygen to the reservoir is carried out and the water flow is organized, which minimizes the risk of the pond "blooming" due to stagnation.
![]()
There is no need to talk about the need to supply air to the reservoir: firstly, the inhabitants of the pond breathe oxygen, and secondly, aeration contributes to additional water purification - reacting with oxygen, pollution collects in foam on the surface of the water or accumulates in sediment.

Factory-made aerators are relatively expensive - they, in fact, account for one of the most significant cost items for arranging a private reservoir. But here, as they say, it is better to spend money once and not know the problems than to constantly think about how you can once again reanimate the pond.

Features of devices for pond aeration in the cold season
Aeration must be adequate throughout the year. The situation remains relevant even in winter: the ice shell on the surface of the reservoir does not allow oxygen to penetrate into the water, and this already threatens the death of the inhabitants of the pond.

Pond aeration - scheme
In addition, if you leave the pond without aeration for the winter, there will be no current in the pond and it will most likely freeze through, which is also unlikely to benefit your pets.

Factory aerators
The modern market presents a large selection of aerators for private ponds. Of the factory-made units, it is worth noting the bottom models, which are best suited for winter use.

The setup is this: the air atomizer is placed at the bottom of the reservoir at its deepest point, it is connected by means of a hose to a compressor installed on the shore or in the room, the latter is connected to the mains and the aeration process starts. The air supplied directly under the ice floats up, at the same time creating a current and eliminating the possibility of freezing of the reservoir.

In terms of their power indicators, bottom aerators noticeably outperform even the most productive surface models, because. are capable of delivering oxygen more intensively while simultaneously ensuring its most uniform distribution in the water.

Important advice! When choosing an aerator, consider not only its power and the size of an artificial reservoir, but also the needs and life preferences of the inhabitants of the latter. Not all representatives of flora and fauna will favorably react to a surface aerator. The installation of a bottom unit will avoid such problems and eliminate the risk of adverse effects on plants, fish and animals.

Homemade aerators
If you wish, you can give preference to a homemade aerator. In the case specifically with the cold season, the choice will be limited to submersible type devices and wind deflectors. About them in the table.
Table. Types of homemade pond aerators
| Varieties of models | Description |
|---|---|
| It is assembled like this: take a car compressor, connect a supply hose to it, connect the other end of this hose to the membrane. The membrane can be made from a perforated pipe, plugged on one side. The car compressor is located above the level of the pond. The plug and hose are lowered into the water. The compressor is connected to the mains and the aeration process begins. In winter, a longer hose can be used to allow the compressor to be installed indoors. In this case, the hose will need to be pre-buried below the freezing level of the soil. If excavation seems too laborious, you can run the hose on the ground, wrapping it with any suitable thermal insulation, and tie a weight to the spray head so that the membrane sinks to the bottom and remains there. |
|
| Their self-made variety differs from factory wind aerators, first of all, in the absence of a compressor: wind energy is transferred to the blades installed in the water. The model cannot boast of a beautiful appearance, but it copes with its tasks by 100%. The design is somewhat more complex in execution compared to the above option. Here you will have to assemble the bed, the movable shaft, and the blades into a single complex. When determining the optimal shaft length, we focus on the depth of the reservoir. The main disadvantage of this design is the dependence on climatic conditions. For regions with prolonged and severe frosts, models with a compressor are best suited, though. in such conditions, wind deflectors are often covered with ice - even a few hours of calm weather will be enough. |
Having decided on the appropriate type of construction, pay attention to its key technical characteristics. About them further.
What to consider when choosing an aerator?
First of all, decide on power. To do this, we need to know the volume of the artificial reservoir. We determine it and compare it with the information given in the manufacturer's instructions for the aerator you like. We buy a structure with a certain power reserve - if we take everything accurately and under the calculation, the structure will work for wear, which will lead to a significant reduction in its service life.

Secondly, we pay attention to climatic conditions of the area. Even a "winter" aerator will have its own lower permissible temperature limit.

Thirdly, we take into account the features of the aerator. It is unlikely that you will be happy to install a device that is too noisy near your home. And the inhabitants of the pond will not like such tests with sound.

Fourth, we pay attention to the presence / absence of the possibility of changing the modes of operation of the structure. Do not forget that in winter and summer water requires a different degree of aeration.
Fifth, pay attention to the manufacturer of the design. German brands are recognized world leaders. But, if you are planning to purchase a modest aerator for servicing a miniature country pond, focus more on the budget and elementary prudence - it is unlikely that a quality product will be sold too cheaply.

Aerator for reservoirs "AQUA-MINI". Instruction. Download file
Remember a few helpful tips:

And the last point, which you also have to decide: buy a ready-made aerator or make it yourself. Decide for yourself: a professional design for aerating a medium-sized pond costs at least 40-50 thousand rubles, for a large pond - from 100 thousand rubles, depending on the technical characteristics, manufacturer and other important points. Along with this, if the issue of landscaping a small pond in a summer cottage is being decided, with a high degree of probability a structure with a power of about 100 watts will suffice. Buying equipment with such characteristics, it is quite possible to meet 10 thousand. For the rest, the choice is yours.


Video - Aerator for a pond in winter
Any container needs a supply of fresh air. If natural reservoirs are self-enriched with oxygen, then an impromptu pond, pool or even an aquarium must be fed.
Why is this needed at all? Without oxygen, flowering begins, there is no necessary nutrition for living creatures. Therefore, an aerator is required. The question is: buy or do it yourself? Let's explore both options.
How it works
Artificially created aeration is needed for the following factors:
- Temperature fluctuations. It's about daily change (day-night) and seasons. When the reservoir is warm enough, there is an improved exchange in flora and fauna, and because of this, oxygen consumption rises.
- Lots of silt. Dirt in the pond interferes with the exchange.
- Extra vegetation. It is from 2 and 3 reasons that it is customary to systematically clean the reservoir.
- Overpopulation. It happens that the fish breeds very actively, naturally, they do not have enough oxygen (as in an office aquarium).
- No natural support. Any reservoirs are associated with the sun, precipitation (rain, humidity). When there is a dry period, a large number of microelements evaporate, and without rain there is no necessary renewal.
- When there is no movement in the pond, there is stagnation between the warm upper and lower cold layers. Artificial aeration solves this problem.
- The aerator normalizes the temperature regime.

About characteristics
Now there are two types of aerators:
- Mobile;
- Stationary.

By location:
- Surface. The most primitive view, the easiest way to make from a drainage pump and a few accessories.
- Donny. It is possible to assemble from a car compressor equipped with a receiver. You will also need sprayers (usually made from improvised means, for example, plastic bottles);
- Coastal or outdoor. For example, Oase aquaoxy 240. This is a small model in size and power, suitable specifically for private artificial reservoirs;
- Combined;
- Wind. An excellent option for winter time, because it works due to an autonomous system.
Advice! When choosing a purchased model, it is not the buyer's preference that is more important, but the feature of the reservoir in which the aerator will be used.
More about Oase aquaoxy 240

50532 af aquaoxy 05 a 02
The feature of the device is as follows:
- Affordable price (up to 3 thousand rubles);
- Suitable for any body of water no more than 4 cubic meters;
- 240 is a passing ability. That is, the aerator passes through itself 240 liters in an hour. And in a day they will process up to 5.8 cubic meters;
- Can be placed below water level or outdoors;
- Works without noise;
- European production.
Let's make it ourselves
The simplest type of device is ejector.
In the process of creation, you can not do without:
- Drainage pump;
- Sewer pipe (diameter 32 mm, length 2 meters);
Branch pipe (maximum 50 cm); - Angle tee (45 degrees);
- Corner (45 degrees);
- Double braided wires.

Let's get started with this plan:
- We select the pump easier. There is no need for any brand.
- The electrics (the cable itself) must withstand the daily load.
- When buying a pump, pay attention to the kit. To it must be in addition a fitting and an angled outlet.
- It is necessary to insert rubber seals into the sewer tee.
- We attach a fitting to the tee. They simply press together without fasteners. But for reliability, sealants are sometimes used.
- On the reverse side of the fitting, it is necessary to install the branch pipe from the kit.
- For the top tap we use a corner (45 degrees). And to the corner you already need to attach a pipe that is longer in length.
- Next, you need to connect everything that is already equipped with an angle adapter.
- We provide food. For reliability, it is better to make protection for the extension cord (most likely the regular cord is not enough). It's about the plug and socket, which remain in the open space. The easiest way is to wrap this connection with polyethylene and electrical tape.
- For successful operation, the structure must be at a certain depth (no more than a meter). You can't do without a mast. It is better to take a metal or aluminum pipe as its basis and hammer it into the bottom of the pond.
- We fix the aerator on the pipe.
- We apply voltage and test the work.
All actions take no more than a day.
It is important to know! Only at the right angle will the oxygen enrichment of the treated liquid. Therefore, we take a corner of exactly 45 degrees into work.
What manufacturers offer
Aerators for lakes, medium and large ponds are in demand.
Using the example of AirEco and AirPro devices, we will consider everything that a buyer needs to know. 
Complete set of bottom devices:
- Cover made of aluminum or fiberglass;
- Mounting plate;
- Compressor;
- Hose for self-submersible aerator;
- Diffuser;
- Hose connectors.
Due to the piston compressor through a self-immersing hose and a diffuser (has a self-cleaning function), air is supplied to the bottom of the pond. Because of this pressure, the destruction of the lower layer of silt begins. Moreover, there can be several points for air injection.
Advice! For convenience, good models should be equipped with a timer.
Lake aerators are designed for a shallow immersion depth, up to 10 meters in total, although this value is enough for an impromptu pond.
Factory floating models are convenient at any time of the year, because at sub-zero temperatures the aerator located on the surface of the reservoir creates a polynya. They work on the principle of an ejector.
Where the beauty of high power surface models is in the additional features. For example, the very powerful AirFlo, which produces up to 300 cubic meters of water per hour, is equipped with a fountain and light diodes. Of course, such a device is not needed for a modest area with a shallow pond, and the cost is very high - at least 340,000 rubles.
How to work with the equipment
High-quality aeration implies a significant daily volume of treated liquid. What does it mean? Everything is simple! In 24 hours, the equipment must drive through its system a volume of water 4 times more than there is in the entire pond. And in case of drought or heavy rain, the volume must be regulated.
When the reservoir is made of a non-standard shape, there are some areas remote from the system, then the power will necessarily increase.
And if there are frequent winds blowing through the entire area of a small lake, then increased power is not needed.
How to choose a device
- Determine the amount of water in the pond (volume).
- We plan the location of the diffusers.
- We calculate total number of diffusers according to the following rule: The number of dif. = The volume of water in the reservoir / the flow of water (cubic meters / day), multiplied by 4.
For reference! Air supply from the very beginning cannot be done for 24 hours. The first day of aeration is all 20 minutes. Each subsequent day add 1 hour.
Otherwise, a sharp change in oxygen in the reservoir violates the water biological structure.
Still, if it is difficult to choose between a particular model due to the overestimated power of the latter, experts recommend installing several aerators of different types. If their total power can cope with the declared volume, then it is better to leave it that way than to buy one expensive one with several diffusers.

About prices
Owners of any reservoirs need to think about buying an aerator that is suitable in terms of power. If an ordinary country pond can easily be processed with a device for 3-4 thousand, then containers from 20 cubic meters require more serious investments.
Among the people, the guideline is simple: for 1 cubic meter, on average, you need 1 thousand rubles. So it turns out that impressive reservoirs (from 100 cubic meters and above) will simply suffocate without a powerful installation.
As for homemade products, here the price rests on the most expensive parts - a drainage pump and hoses. Pumps at market value start at 2 thousand, but with hoses the issue is individual, although there are no problems with the choice at the present time. The bottom line is this: if the hand does not lie specifically on the production of an independent system, then it is most profitable to purchase one or several models of the Oase aquaoxy 240 type aerator.
findings
Ideal for any body of water - this is a stand-alone installation. The option when neither a compressor nor a pump is needed is always one step ahead. One minus - in the absence of wind, such an aerator will not work. So that the reservoir does not “suffocate”, you need to have some kind of device in case of severe frosts or a long calm.
Perfect:
Submersible model (for example, mentioned above) and Windbreaker. The first is for emergencies, because the compressor is placed in a warm place, and hoses of sufficient length are placed in advance deep in the soil, below the freezing level. As a result, for all seasons it is possible to enrich any private artificial reservoir with oxygen.
video consultation
Assembly of an ejector aerator for a reservoir in a very accessible presentation. Those who watched the material commented: the idea really works and they succeeded according to the author's instructions.


