A drainage system is necessary to drain precipitation from pitched roofs. If all the rules of installation and operation are observed, its service life is from 5 to 12 years. It often happens that a newly installed system is damaged and not only looks ugly, but also does not perform its main function. This is due to violations of the installation and installation technologies. This article will help you understand the basic rules for installing a plastic gutter system that will ensure reliable operation of the gutter for the entire warranty period and even longer.
All manufacturers of drainage systems must attach installation instructions, which indicate all the features and nuances. Therefore, when buying, be sure to ask the seller for instructions. But all systems have general installation rules that cannot be neglected.
The main function of drainage is pipes and gutters. In order to attach them to the roof or connect them to each other, various accessories are used. These include: brackets, plugs, elbows, funnels, and more. Therefore, the procedure for installing a plastic gutter system consists in attaching accessories and basic elements with a clear sequence.
See also: How.
Installation of a plastic drainage system
Stage 1. Installation of water intake funnels
It is necessary to determine the number and location of downpipes. After that, in those places where the drains will be located, you need to install water intake funnels. Installation begins with the funnels in those systems in which the inlet funnels also perform the function of a gutter connector. At the ends of the funnel in this case there are devices that hermetically connect it to the gutter. For adhesive systems, this may be the place where the adhesive is applied, or rubber seals for other types of plastic gutters. The funnels are independently attached to the roof structure using brackets. Therefore, it is with them that the installation of the drainage system begins.
Such funnels are fastened with brackets to the roof structure. Therefore, the installation begins with them. If you purchased a drainage system with such funnels that need to be attached directly to the gutter, and not to the roof structure, then in this case the water inlets are mounted after the gutters are installed.
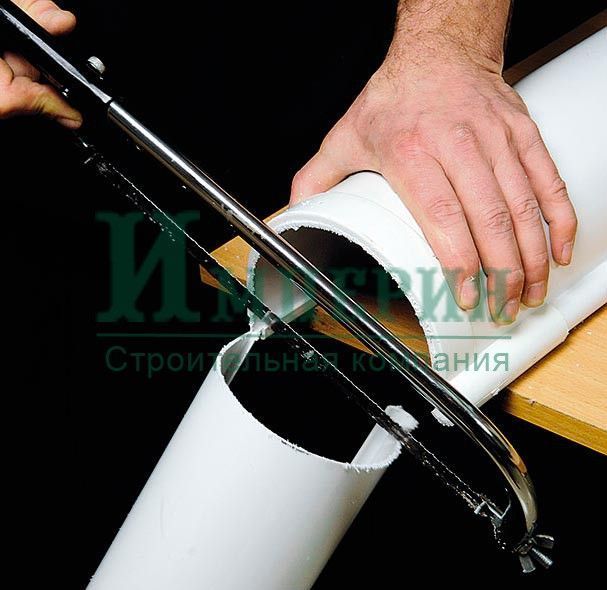
In the place where the water intake funnel is attached, before mounting the gutter, you need to cut a hole. To do this, you need to apply a contour, cut a hole with a fine-toothed hacksaw and clean the edges. After that, the funnel can be attached to the gutter.
Stage 2. Mounting brackets
It is necessary to fasten the brackets (gutter holders) at the distance recommended in the installation instructions. As a rule, plastic drains require a distance of 50-60 cm. It is necessary to fix the brackets in such a way that the slope of the gutters to the funnel is about 2-3 mm. To do this, the extreme holder of the gutter is installed at the highest point, a cord is pulled between it and the funnel, and, focusing on it, the remaining brackets are attached.
The holders must be mounted on the wind (frontal) board. Before installation, make sure that it is level. An unevenly installed front board can adversely affect plastic gutters and their operation. If at the time when you are installing the plastic drainage system, the roofing has not yet been laid, then the brackets can be mounted on the rafter leg.
Usually, plastic gutter holders are used for mounting on a windboard, and metal ones are used for mounting to rafters. On average, one holder can withstand up to 75 kg. Often this figure misleads many, and they make, in their opinion, the right decision in terms of savings - to install a smaller number of holders. This is one of the main mistakes when installing a drainage system. Because it is not the weight that the bracket can support that matters, but the area of \u200b\u200bsupport of the gutter.
If this factor is not taken into account, the consequences will be very deplorable: the gutters are twisted, then sag, and after some time they simply break off. Therefore, such "savings" will result in a partial or even complete replacement of holders and gutters.
Stage 3. Installation of the gutter
Now you need to lay the gutters in the holders, starting from the funnel. Firmly insert the edge of the gutter into the latch located on the edge of the gutter holder, then press lightly to snap the structure into place. Tightly connect the gutters to each other using soldering joints, special adhesives or connecting elements (depending on the type of system chosen). And do not forget that in systems with adhesive bonding, after complete assembly, it will no longer be possible to dismantle or re-install.
In order to cut the gutters of the plastic drainage system, you must use a grinder or a hacksaw. Then clean up the burrs with a file.
When installing the gutter, it is necessary to place its edge below the line of continuation of the roof. This will avoid the "transfusion" of water during a downpour. Also, there will be a minimum amount of snow sliding from the roof.
Stage 4. Installation of a dropper
Drip installation in progress. It provides a free exit of water from the under-roof space and directs it to the gutters. The dropper is mounted to the rafter leg, going inside the gutter by 1.5-2 cm.
Stage 5. Mounting the side plugs
Now you need to fix the corners to the gutters in those places where you need to go around the protruding parts of the facade or the corner of the house. After that, side plugs are attached to the ends of the gutter.
Stage 6. Installation of plastic gutters
We begin to mount plastic gutters. This is done from the funnel, that is, from top to bottom. The pipes must be attached to the wall so that the distance between them is from 3 to 8 cm.
Stage 7. Assembly of the drainage system
Using couplings, it is necessary to assemble the pipes in one piece and attach them to the wall with clamps every 1-2 m (see the supplier's recommendations in the instructions).
Stage 8. Installation of tees
If necessary, tees (pipe splitters) are installed at this stage.
Stage 9. Installation of the drain
Installation of a drainpipe outlet (drain). Leave at least 30 cm between the soil and the drain. If you plan to install a linear drainage system, then leave 15 cm.
Gutters are mounted using the following tools:
- Roulette.
- Ruler.
- Pencil.
- A hammer.
- Cord.
- Hacksaw.
- Screwdriver.
Installation of the drainage system and temperature conditions
Do not install plastic gutters at temperatures below 5˚C. Otherwise, when cutting or fastening the pipes, they may crack from mechanical stress. Many plastic gutters cannot be stored in the open sun in their packaging.
Drainage pollution
When debris or leaves enter the gutter, the flow of water through the gutter is restricted. Because of this, the system overflows, and in the future the walls of the building get wet, and over time, the foundation may be washed away. To prevent such undesirable consequences, it is enough just to install a leaf catcher. And plastic gutters are protected from clogging by installing a garbage collector and leaves directly into the water intake funnel.
Icing
This phenomenon is fraught with deformation and collapse of the entire system. To prevent it, a cable anti-icing system is installed. Beforehand, it is necessary to calculate the power of the heating cable and the required number of its lines. The cable can be with a regulator or self-regulating.
Overflow
Overflow occurs when pipes and gutters are not sized to handle the amount of rainfall that is possible in a particular area. To prevent overfilling, when choosing a system, be guided by the recommendations of the manufacturer from which you will purchase it.
Now you know all the basic nuances of installing a plastic gutter system. Follow the instructions carefully, and you will undoubtedly be able to mount plastic gutters in your home yourself.


Today, the most serious competition for metal or galvanized gutters is made up of modern plastic ones. They showed themselves remarkably well in difficult climatic conditions: they are not afraid of either Russian frosts, or the equatorial heat, or inspiring snowfalls. And their shapes, color and design appeal to even the most demanding customer! With such additional elements it is easy to emphasize the style solution of any home, if you only understand the technology of their installation.
Therefore, we offer you the latest information on how to install plastic roof gutters with your own hands - from the choice of hooks to the construction of an unusual design system. And in just 5 steps!
Step 1. Choosing a high-quality drainage system
Modern drainage systems must meet a number of requirements, including not only mechanical strength, but also corrosion resistance and maximum tightness. That is why plastic gutters are considered the most practical today.
Their main advantage is that they are easy to match not only to the roof covering, but also to the facade, and the color scheme is the richest among other materials. And not only! But it is also important to know about certain disadvantages that can nullify all your work.
Advantages and competitive properties
Modern plastic drainage systems include horizontal gutters, vertical pipes, elbows, pipe couplings, external and internal corners, funnels, docking elements, brackets, clamps and gutter plugs. Also, from different manufacturers, plastic drains are supplemented with their own details, such as a trash catcher.
The plastic drainage system is also good because it can be purchased on rubber seals. And this makes it easy to correct any installation errors, especially if you took up the drain for the first time - unlike the adhesive system:
In addition, the plastic drainage system does not corrode or scratch. And, if the drain is still torn off, then the deformed plastic gutter or pipe can simply be put in place, then when the metal one will have to be completely replaced.
And, finally, also a valuable advantage - in the small weight of such drains. Most often, industrial gutters have a length of 50 or 100 centimeters. In drainage systems, gutters are used with a height of 7.5 to 15 cm and a width of 10 cm.
Annoying flaws and quality issues
Of the minuses, we note that plastic, in view of the peculiarities of its structure, is able to easily bend and deform during the period of temperature fluctuations. And in especially hot weather, the plastic gutters even sag a little between the hooks if the mount was placed incorrectly and too far apart.
Although, according to modern manufacturers, these disadvantages are insignificant compared to the advantages of plastic gutters. But when it comes time to purchase such additional elements, you will encounter such moments on the market: bad plastic that easily bursts in the cold or blooms, poor-quality connection of pipes with gutters and ill-conceived details. And there may be an erroneous opinion that plastic gutters were of poor quality, as they are, and there is nothing better than native galvanization.
In fact, it is precisely because of these features that special chemical elements are added to the composition of plastic for the production of such products today, which allow the drain to acquire immunity to ultraviolet radiation. For example, among modern products on the Russian market, the Ruflex gutter system from Denmark, which was developed specifically for the climate of our country, similar PVC gutters from the Polish company Gamrat, the English Hunter, the Dutch Galeco, the Russian Ruplast and the Danish Aso Plastmo. And Ruflex gutters are considered especially durable and resistant to ultraviolet rays, the plastic formulation of which includes specially developed additives.
And modern PVC gutters are covered with a layer of acrylic or titanium dioxide during the production process. This is called the co-extrusion method, and this approach maximizes the resistance of normally brittle PVC to chemical rain, UV radiation, and frost. Moreover, the plastic of the drains is stained even in the process of its manufacture, in its mass, and therefore the scratches on it are not only not noticeable, but also harmless.
In a word, a modern plastic drainage system is made not at all from unreliable and flexible plastic, as many still think, but from a special unplasticized and impact-resistant PVC of a new technology. These are the most modern drains that serve all 50 years! That is why it is so important to purchase gutters from well-known companies that value their reputation and not skimp on quality.
Standard equipment
In addition to the main gutters and pipes, the modern plastic drainage system includes funnels, brackets, bends, plugs and even nets to retain debris:
Modern PVC gutters are assembled on rubber seals or on glue. The difference between these methods is huge: the adhesive connection is bad because it is quite difficult to fix it if you make mistakes, and it does not compensate for thermal expansion at all, but rubber copes with this 100%.
Therefore, the drains, which are connected to the seals, easily move during thermal expansion and allow you to replace at least all the details at any moment:

Step 2. We select the right mount
Each bracket is matched to the cross section of the plastic pipe and according to certain parameters, such as the installation method, planned load and aesthetic moment. Therefore, there are brackets for gutters with a square, trapezoidal, round section and holders for pipes with an unusual shape.
For example, a standard mount for plastic gutters looks like this:

Most often, plastic hooks are used for a plastic gutter system. The entire structure of the bracket is reinforced with vertical ribs, and they are able to withstand fairly heavy loads.
But hooks for a plastic drain do not have to be made of the same material, metal is also great:

But most often plastic gutters are made in the form of a cylinder, a rectangular box or a triangular prism:

You have several options for attaching a plastic drain:

So, fastening in place, we proceed to the installation of gutters and vertical elements.
Step 3 Install the hooks and gutters
It is possible to install plastic gutters on the roof only when it is more than 5 degrees Celsius outside. And the technology itself is quite simple:
- On the last board of the cornice overhang, which completes the crate, mark the position of future downpipes.
- Then the end brackets are fixed so that the gutters then have a slope of 2 to 5 mm per linear meter towards the receiving funnel.
- After that, the twine (or strong thread) is pulled onto the installed holders and markings are made.
- We check with the help of a construction plumb line the verticality of the bent backs of the holders.
- We finally fix the fasteners with galvanized self-tapping screws.
- At the end of the work, the gutters must be closed with plugs and sealed with silicone sealants.
See how simple it really is:

There is only one rule here: fasteners should not interfere with the free movement of the gutter due to thermal expansion.
Step 4. We cut the funnels and fasten the knees
Now let's figure out how to competently proceed to the installation of funnels and vertical downpipes:

Connect plastic gutters to each other like this:
- Insert the rubber seal with the ribbed side up. It should not reach just a centimeter to the edge of the connector.
- After that, align the connector symmetrically in the center of the grooves so that there is 3-4 millimeters between the grooves.
- Pull the front part up to the connection chute so that the lock snaps into place. The gutters must be inserted into the curl of the corner 30 cm deep.
- After that, the lock must be locked and the latch must be returned to its original position.
- And finally, at a distance of 10-15 centimeters from such connections, be sure to install additional hooks.
- Attach the plug to the end of the gutter and press it inward so that the rubber seal is between the chamfer and the gutter.
- Next, the plug can be planted with a mallet so that its back “ear” closes inside. Now wrap the funnel in the direction of the gutter and bend the retainer plates. Insert special "spider" elements into the funnel, which help prevent clogging of the drainage system with debris.
- Now fix the joints with two 4 by 6 mm rivets.
- To seal such a connection, purchase a special glue. The back side of the plug will be fixed with a rivet.
Now check the strength of the finished horizontal elements. Pay attention to the fact that if you hear a creak from already installed drains, then there is a problem. By itself, this material does not creak, it's not a tree. This is a sign that the pipe is changing under the influence of temperature, and something touches some kind of barrier.
For example, in some place, the holders are poorly fixed on it or they are in too tight contact with it. In this case, just lubricate all the fasteners, in 80% of cases this alone is enough. If you are dealing with plastic accessories, then just check all connections for the quality of installation.
Step 5: Connecting the Vertical Elements
At this stage, we move from the funnel to the downpipe - with the help of two universal elbows. If your cornice overhang is more than 25 centimeters wide, then install a drainpipe between your knees. If less, then don't worry.
Fasten the pipes to the wall. To do this, drill a hole for the dowel in it and install it. Turn the hardware through a special decorative overlay, which should be turned in the opposite direction and pressed against the wall. Screw the nut onto the hardware so that you can see 5 millimeters of its thread. Also twist the back of the pipe and fix the knee.
At the bottom of the riser, arrange a pipe outlet using special adapters and pipe connectors. To do this, you will need two pipe cuts that will not have a connecting raster.
To make it easier for you to understand the process, we have prepared detailed step-by-step master classes for you:


To form a more complex configuration, you will need to connect a pair of shapes with the letter L or at an angle of 90 degrees. Please note that manufacturers provide an installation space in the connectors for the plastic drainage system. It allows you to compensate for the change in the linear dimensions of the drain.
And finally, it is plastic drains that are most often connected to the rainwater collection system that is used for greenhouses:


Installation of plastic gutters is an ideal option for those who want to independently protect the roof of the house from excessive moisture. The function of the drainage system is the rapid removal of precipitation from the roof of the building. How it is installed (correctly, not correctly) will determine how long and how efficiently the system will function. In fact, do-it-yourself drainage system is not difficult to install. The main thing is to follow the assembly and installation instructions for the system elements. Installation of plastic gutters can be structured into several stages.
Installation of gutters for the roof: preparatory stage
The advantages of plastic gutters are as follows:
- great popularity and competitiveness;
However, plastic gutters also have disadvantages. First, it is the fragility of the structure. Secondly, if the elements of the system are not installed correctly, the plastic may change color or shape.
First you need to do all the calculations. To calculate the diameter and length of the system, you need to take into account the height of the building and the area of \u200b\u200bits roof.
Calculation template: building height=4.5m, roof area=9m. With such initial data for the installation of plastic gutters, the following will be required:
Three-meter gutters (3 pieces),
- gutter plugs (right and left),
- funnels (2 pieces),
- brackets - necessary for fixing the gutter (16 pieces),
- plastic pipe 3 m long (4 pieces),
- fixing the pipe to the wall (10 pieces),
- 45-degree pipe turns (6 pieces).
1) Construction knife
Installation of gutters for the roof: installation stage
Do-it-yourself drainage system is not difficult to install. First you need to decide on the location of the drainage system. In places where it is planned to install drain pipes, funnels should be mounted.

Fasteners - brackets should be evenly distributed over the entire plane of the wall. A distance of 500-600 mm must be observed between them.

The do-it-yourself drainage system continues with the installation of gutters.
Many people prefer to collect gutters with plugs, funnels immediately on the ground. After that, the entire structure is lifted up and attached to the brackets. On your own, alone, it is problematic to do this. Therefore, it is best to assemble the drainage system at the top in stages.
The gutters are mounted from the funnel, while they are joined using connectors. The edges of these elements are entered up to a special mark.

If you want to cut the gutter to a given size, then in this case you can use a hacksaw. Burrs are cleaned with a file.

Plugs are mounted on the end side of the gutters. From the gable board to the plug should be at least 30 mm.

Do-it-yourself drainage system begins to be mounted from the funnel. If the roof extension is small, it is recommended to use a coupling.


In order to connect pipes, couplings should be used, as mentioned earlier. It is necessary to leave a gap in the coupling when entering the lower pipe. A bracket (with a clamp) is installed under this element.

Tees are mounted similarly to couplings, as shown in the photo below.

Then a branch is glued to the bottom pipe.

Next, you need to install a storm water inlet. It is installed in the place where the water will come out of the downpipe. To do this, you will need polymer pipes that are discharged into the well. From the house you need to dig a trench and equip a filter well. Pipes are laid in the trench. One end of the pipe will be mounted in the filter receiver, and the other - in the pit. The pit can be purchased from a specialized store. After the pipe has been laid in the trench, the storm water inlet is concreted.
This completes the installation of plastic gutters.
Do-it-yourself plastic roof gutters: 5 steps to a quality gutter system
Today, the most serious competition for metal or galvanized gutters is made up of modern plastic ones. They showed themselves remarkably well in difficult climatic conditions: they are not afraid of either Russian frosts, or the equatorial heat, or inspiring snowfalls. And their shapes, color and design appeal to even the most demanding customer! With such additional elements it is easy to emphasize the style solution of any home, if you only understand the technology of their installation.
Therefore, we offer you the latest information on how to install plastic roof gutters with your own hands - from the choice of hooks to the construction of an unusual design system. And in just 5 steps!
Here is a good overview of modern plastic gutters:
Step 1. Choosing a high-quality drainage system
Modern drainage systems must meet a number of requirements, including not only mechanical strength, but also corrosion resistance and maximum tightness. That is why plastic gutters are considered the most practical today.
Their main advantage is that they are easy to match not only to the roof covering, but also to the facade, and the color scheme is the richest among other materials. And not only! But it is also important to know about certain disadvantages that can nullify all your work.
Advantages and competitive properties
Modern plastic drainage systems include horizontal gutters, vertical pipes, elbows, pipe couplings, external and internal corners, funnels, docking elements, brackets, clamps and gutter plugs. Also, from different manufacturers, plastic drains are supplemented with their own details, such as a trash catcher.
The plastic drainage system is also good because it can be purchased on rubber seals. And this makes it easy to correct any installation errors, especially if you took up the drain for the first time - unlike the adhesive system:
In addition, the plastic drainage system does not corrode or scratch. And, if the drain is still torn off, then the deformed plastic gutter or pipe can simply be put in place, then when the metal one will have to be completely replaced.
And, finally, also a valuable advantage - in the small weight of such drains. Most often, industrial gutters have a length of 50 or 100 centimeters. In drainage systems, gutters are used with a height of 7.5 to 15 cm and a width of 10 cm.
Annoying flaws and quality issues
Of the minuses, we note that plastic, in view of the peculiarities of its structure, is able to easily bend and deform during the period of temperature fluctuations. And in especially hot weather, the plastic gutters even sag a little between the hooks if the mount was placed incorrectly and too far apart.
Although, according to modern manufacturers, these disadvantages are insignificant compared to the advantages of plastic gutters. But when it comes time to purchase such additional elements, you will encounter such moments on the market: bad plastic that easily bursts in the cold or blooms, poor-quality connection of pipes with gutters and ill-conceived details. And there may be an erroneous opinion that plastic gutters were of poor quality, as they are, and there is nothing better than native galvanization.
In fact, it is precisely because of these features that special chemical elements are added to the composition of plastic for the production of such products today, which allow the drain to acquire immunity to ultraviolet radiation. For example, among modern products on the Russian market, the Ruflex gutter system from Denmark, which was developed specifically for the climate of our country, similar PVC gutters from the Polish company Gamrat, the English Hunter, the Dutch Galeco, the Russian Ruplast and the Danish Aso Plastmo. And Ruflex gutters are considered especially durable and resistant to ultraviolet rays, the plastic formulation of which includes specially developed additives.
And modern PVC gutters are covered with a layer of acrylic or titanium dioxide during the production process. This is called the co-extrusion method, and this approach maximizes the resistance of normally brittle PVC to chemical rain, UV radiation, and frost. Moreover, the plastic of the drains is stained even in the process of its manufacture, in its mass, and therefore the scratches on it are not only not noticeable, but also harmless.
In a word, a modern plastic drainage system is made not at all from unreliable and flexible plastic, as many still think, but from a special unplasticized and impact-resistant PVC of a new technology. These are the most modern drains that serve all 50 years! That is why it is so important to purchase gutters from well-known companies that value their reputation and not skimp on quality.
Standard equipment
In addition to the main gutters and pipes, the modern plastic drainage system includes funnels, brackets, bends, plugs and even nets to retain debris:
Modern PVC gutters are assembled on rubber seals or on glue. The difference between these methods is huge: the adhesive connection is bad because it is quite difficult to fix it if you make mistakes, and it does not compensate for thermal expansion at all, but rubber copes with this 100%.
Therefore, the drains, which are connected to the seals, easily move during thermal expansion and allow you to replace at least all the details at any moment:
Step 2. We select the right mount
Each bracket is matched to the cross section of the plastic pipe and according to certain parameters, such as the installation method, planned load and aesthetic moment. Therefore, there are brackets for gutters with a square, trapezoidal, round section and holders for pipes with an unusual shape.
For example, a standard mount for plastic gutters looks like this:
Most often, plastic hooks are used for a plastic gutter system. The entire structure of the bracket is reinforced with vertical ribs, and they are able to withstand fairly heavy loads.
But hooks for a plastic drain do not have to be made of the same material, metal is also great:
But most often plastic gutters are made in the form of a cylinder, a rectangular box or a triangular prism:
You have several options for attaching a plastic drain:
So, fastening in place, we proceed to the installation of gutters and vertical elements.
Step 3 Install the hooks and gutters
It is possible to install plastic gutters on the roof only when it is more than 5 degrees Celsius outside. And the technology itself is quite simple:
- On the last board of the cornice overhang, which completes the crate, mark the position of future downpipes.
- Then the end brackets are fixed so that the gutters then have a slope of 2 to 5 mm per linear meter towards the receiving funnel.
- After that, the twine (or strong thread) is pulled onto the installed holders and markings are made.
- We check with the help of a construction plumb line the verticality of the bent backs of the holders.
- We finally fix the fasteners with galvanized self-tapping screws.
- At the end of the work, the gutters must be closed with plugs and sealed with silicone sealants.
See how simple it really is:
There is only one rule here: fasteners should not interfere with the free movement of the gutter due to thermal expansion.
Step 4. We cut the funnels and fasten the knees
Now let's figure out how to competently proceed to the installation of funnels and vertical downpipes:
Connect plastic gutters to each other like this:
- Insert the rubber seal with the ribbed side up. It should not reach just a centimeter to the edge of the connector.
- After that, align the connector symmetrically in the center of the grooves so that there is 3-4 millimeters between the grooves.
- Pull the front part up to the connection chute so that the lock snaps into place. The gutters must be inserted into the curl of the corner 30 cm deep.
- After that, the lock must be locked and the latch must be returned to its original position.
- And finally, at a distance of 10-15 centimeters from such connections, be sure to install additional hooks.
- Attach the plug to the end of the gutter and press it inward so that the rubber seal is between the chamfer and the gutter.
- Next, the plug can be planted with a mallet so that its back “ear” closes inside. Now wrap the funnel in the direction of the gutter and bend the retainer plates. Insert special "spider" elements into the funnel, which help prevent clogging of the drainage system with debris.
- Now fix the joints with two 4 by 6 mm rivets.
- To seal such a connection, purchase a special glue. The back side of the plug will be fixed with a rivet.
Now check the strength of the finished horizontal elements. Pay attention to the fact that if you hear a creak from already installed drains, then there is a problem. By itself, this material does not creak, it's not a tree. This is a sign that the pipe is changing under the influence of temperature, and something touches some kind of barrier.
For example, in some place, the holders are poorly fixed on it or they are in too tight contact with it. In this case, just lubricate all the fasteners, in 80% of cases this alone is enough. If you are dealing with plastic accessories, then just check all connections for the quality of installation.
Step 5: Connecting the Vertical Elements
At this stage, we move from the funnel to the downpipe - with the help of two universal elbows. If your cornice overhang is more than 25 centimeters wide, then install a drainpipe between your knees. If less, then don't worry.
Fasten the pipes to the wall. To do this, drill a hole for the dowel in it and install it. Turn the hardware through a special decorative overlay, which should be turned in the opposite direction and pressed against the wall. Screw the nut onto the hardware so that you can see 5 millimeters of its thread. Also twist the back of the pipe and fix the knee.
At the bottom of the riser, arrange a pipe outlet using special adapters and pipe connectors. To do this, you will need two pipe cuts that will not have a connecting raster.
To make it easier for you to understand the process, we have prepared detailed step-by-step master classes for you:
To form a more complex configuration, you will need to connect a pair of shapes with the letter L or at an angle of 90 degrees. Please note that manufacturers provide an installation space in the connectors for the plastic drainage system. It allows you to compensate for the change in the linear dimensions of the drain.
And finally, it is plastic drains that are most often connected to the rainwater collection system that is used for greenhouses:
Roof drainage systems
To prevent water from the roof from washing away the foundation, a drainage system is made. There are they from different materials, more or less expensive, but in general, the costs are solid. You can save a little if you collect the drain with your own hands. About the features and order of installation and will be discussed further.
Types of drainage systems
The most famous and common roof weirs are made of galvanized metal. Although they are not as attractive as more modern options, they are reliable and inexpensive. And this is important. What else is good - if you have the skill of a tinsmith, or just having “straight” hands, you can make a drain from galvanization with your own hands.

General view of the drain (storm drain, roof drainage system)
If we talk about other metal systems, then two of them belong to the elite category - copper and from an alloy of zinc and titanium. They are certainly durable, but the price is very high. There is a more democratic option - metal gutter systems with polymer coating. At a price they are quite affordable, in appearance - you can’t find fault, in terms of durability - it depends on the manufacturer. If technology is followed, they will happen for many years.
There is another type of drainage from the roof - from polymers. They normally tolerate ultraviolet, frost and heat, are highly durable, and look good. The disadvantage can be considered a rather high price, especially of European manufacturers. However, there are good options in the category of inexpensive systems.
Composition of drainage systems
Gutters are located under the roof overhang. They are mounted on special brackets that hold the system. Since the storm drain is located around the entire perimeter of the roof, there are corners - internal and external. All these elements must be connected tightly, for this there are gutter connectors with rubber seals. These elements are often considered redundant. Then the gutters are overlapped with an overlap of at least 30 cm, connected with self-tapping screws.

What elements does the drain consist of?
To drain water, holes are made in the gutter into which funnels are inserted. Downspouts are attached to the funnels. If the roof overhang is large, the pipe is required to be curved. To do this, there are maple or universal rings (some manufacturers have). The downpipe is attached to the wall of the house using special clamps that have the same color as the entire system.
From all these elements, a system of the required configuration is assembled. If you decide to buy ready-made elements, and then assemble the gutter with your own hands, the best solution is to have a house plan with dimensions on hand. According to it, you will quickly determine the composition of the system and calculate the required number of elements.
Mounting Features
Most questions arise regarding the fastening of brackets for the drain. It must be said right away that they are installed taking into account the fact that the gutters should have a slight slope towards the funnels. The minimum recommended slope is 3 mm. If you want the water to drain faster, you can make it larger - up to 10 mm.
If the length of the roof gable is less than 10 meters, the slope is made to one side. If more, either they put an additional funnel (and a drainpipe) in the middle and form a drain to it, or the gutter in the middle of the gable has the highest point and the slope goes from the middle to both sides.

Organization of the slope of the drain
When mounting a drain with your own hands, they usually do this: they nail the bracket at the highest point. Then the lowest one is nailed - taking into account the planned slope. A twine is stretched between them, along which all the rest are attached. One recommendation - before forming a slope, check the horizontalness of the line you are targeting. Usually this is either a frontal (wind) board. Unfortunately, it is not always perfectly level. So check the verticality, and preferably with a hydraulic level or a level, in extreme cases, a bubble one is also suitable, but of great length - at least a meter. For shorter ones at longer lengths, you will not be able to navigate.
Number of brackets and methods of their fastening
The number of brackets for installing a drain is considered simple: the distance between two adjacent ones should be 50-60 cm. Divide the total length of the wall by this distance. We add one to the resulting figure (the end bracket) and get the required amount for one wall. All others are calculated in the same way. If the building has a non-linear shape, you will have to count by the piece - the corner elements must be supported on both sides.

Mounting brackets for roof drains
Now directly about the methods of fastening the brackets. There are three possibilities:
- Attach to roof rafters. The option is good if the roofing material has not yet been laid - there are no problems with fasteners.
- Install on a windboard. If plastic flashings are chosen, this is the only option. In other systems - one of the possible.
- To the extreme board of the batten or flooring under the roofing material (if it is solid). This method is also used until the moment they started laying the roofing material.

Roofing material should not protrude more than half of the gutter
Once again, we draw attention to the fact that the brackets are nailed, taking into account the slope created. If they are made of metal, they are bent using improvised means or a special tool - a hook bender (sold in the same place as drains). In this case, the gutter must be positioned so that the roofing material ends before reaching half of the gutter, but it is better that it is in the interval 1/2 - 1/3. So most of the gutter "catches" water, which is important during heavy rains.
At what level to mount
Now about how high to raise the gutter to the roofing material. If there is little snow in your region, or the roof has a large angle of inclination, so that snow does not accumulate on it, you don’t have to worry too much and mount it where you like. Otherwise, it is necessary to lower the gutter, so that when the snow melts, the drain does not “come down”.
In the figure, the approximate trajectory of the melting snow is indicated by a dotted line. The far edge of the gutter should not intersect with it. By the way, it should be a couple of centimeters lower than the one located closer to the house.
If it is not possible to lower the gutter below, it will be necessary to install snow retainers on the roof. They prevent massive snowfall. The snow melts little by little, and comes off in small fragments without harming the storm drain.

This is what a massive snowfall looks like. As you can see, the storm drain bracket does not interfere (this is a fitting)
Gutter installation
Gutters are laid in fixed brackets. There are two systems with different sequence of actions. The first has a specially molded groove on the edge of the gutter. The ends of the brackets are threaded into this groove, then the gutter is turned into place, securing it with special tongues on the brackets. If you look at the photo, it will become clearer.

Mounting the gutter from the outer edge
In the second system, installation begins from the side of the gable board. The far edge of the gutter is inserted into the locks located there, then alternately pressed into the locks on the front of the brackets.

Installation of gutters according to the second system
Two fragments of the gutter must be connected with a special connecting element with rubber seals. But their cost is quite high, so two gutters are simply overlapped with a 30 cm approach (make sure that the joint is located along the water flow). For greater tightness between the two gutters, you can lay a strip of rubber, and connect them with ordinary self-tapping screws (or with washers and rubber gaskets). After installing the gutter, its edges are closed with plugs.

Plugs are installed on the edges of the gutter
Funnel attachment
Having assembled and installed the gutter on the brackets, the installation of the drain continues with the installation of funnels. They are placed in the lowest areas. If the funnels are located close to the corners, stepping back from the edge of the gutter about 20 cm, a hole is cut with a hand saw. It is better not to use a jigsaw or grinder - it is likely that your cutout will be too large.

Installation of a funnel for a drain
A funnel is attached to this cutout, clinging to the outer edge of the gutter. Then it starts up to the second edge and is fixed there with special clamps.
Installation of downpipes
Downspouts are attached to the funnels. If the roof overhang is large, a rotary element is attached directly to the funnel, which allows you to bring the pipes closer to the wall and fix them there. For fastening there are special clamps, painted in the same color as the entire system. They are of different designs, but mostly they have a latch so that they can be dismantled without removing the screws that fasten the pipe to the wall.

Two ways to assemble downpipes
Clamps are installed at a distance of at least 1.8-2 m from each other. At the bottom, the drain can be brought directly into the drainage system (if it is located nearby). If just a blind area is made around the foundation, the drain pipe ends with a rotary element that diverts water from the foundation to a distance of at least 20 cm.

Rules for fastening downpipes
In principle, a do-it-yourself drain is installed, but there is one more detail that will make operation much easier. A metal (preferably stainless) mesh is laid on the gutter. It prevents leaves and other large debris from entering the system.

When collecting a drain with your own hands, put the grid on the gutter. She will not let foliage and branches clog the storm drain
Installing a grid will allow less frequent maintenance of the system. This is especially true in tall buildings.
Homemade drain
Ready-made drainage systems are good, but not cheap. What to do if drainage needs to be done in the country and spend a minimum for this? There are several very affordable options. The first is to make a drain from plastic sewer pipes. Take pipes of large diameter (110 mm and more), good quality with a thick wall, cut them in half and use them as gutters. As downpipes, you can use the same diameter or a little less. Brackets are more convenient to buy ready-made, but in principle, you can do it yourself. For more information on how to make a drain with your own hands from sewer pipes, see the video.
An even more budget option is drainpipes made from plastic bottles. The gutter of them cannot be made normal, but the funnels of the pipe work normally.
How to install a plastic drain - installation according to the instructions
For the arrangement of drainage systems, plastic elements have long been used. Contrary to popular belief about their unreliability, plastic gutters are in many ways superior to traditional metal parts in their characteristics. In addition to good technical parameters, plastic components for drainage systems are also quite affordable, which makes them an extremely profitable purchase. This article will discuss plastic gutters for the roof and their features.

Device and equipment
For the production of plastic gutters, polyvinyl chloride is used - a polymer material obtained by thermoplastic processing. All components of drainage systems are made from this material.

Installation of plastic gutters is carried out using the following elements:
- Gutters. These elements are necessary for receiving and transmitting water flowing from the roof slopes to the water intake funnel. Plastic gutters differ from metal products in a wide variety of sizes, which allows you to choose the best option for a particular situation.
- Gutter sleeve. The coupling allows you to connect the individual parts of the gutter. This element is small in size, and its installation requires a silicone sealant or rubber gasket.
- Injection. The corners allow you to direct the plastic gutter in the right direction. In construction, parts with a right angle of bend are most often used, but if you need to create a different angle, a non-standard option can be found on the market.
- brackets. These elements are fasteners that serve as a support for the gutter. The holders themselves are attached to the boards of the crate.
- Stubs. These details of the drainage system allow you to block water access to the drain through the edge of the gutter, located on the other side of the funnel.
- funnel. This is an indispensable element of any drainage system, which collects water from the gutter and transfers it to the drain pipe. Visually, such a detail is a small gutter that turns into a funnel.
- Drain pipe. This pipe is installed vertically and provides the transfer of the liquid collected by the funnel to the storm sewer.
- Drain pipe tip. This element of the drainage system is necessary so that the flowing water slows down when draining. The tip has a curved shape, due to which the speed of the liquid is damped.
- Drain pipe brackets. The brackets are attached to the wall of the building with a certain step, after which a pipe is inserted into their outer rings.

When choosing elements of a plastic drain, you need to remember that there are no strict standards regarding the size of parts. In order for plastic drain pipes to be compatible, it is worth purchasing a complete set from one manufacturer.
Advantages of a plastic drain
Plastic downpipes have the following positive qualities in their arsenal:
- Complete resistance to corrosion. Like all polymers, polyvinyl chloride is completely resistant to oxidation, so it can be successfully used to collect and transport liquids.
- light weight. Light weight is another quality inherent in all polymer products. Thanks to this quality, the installation of a plastic drain can be performed without additional reinforcement of the roof truss system.
- Low noise. Of course, the noise of falling and flowing water will still be, but if we compare the acoustic properties of metal and plastic products, then the latter will go far ahead.
- Ease of installation. It is very easy to work with plastic elements of drainage systems, so it is quite possible to install them yourself. In addition, the installation of a plastic drain is greatly simplified due to the low weight of polymer products.
- Low cost. Plastic drainage systems are much cheaper than metal ones, and there are much fewer problems with them.
- Long service life. Components made of polyvinyl chloride under normal operating conditions may well serve for about 50 years without any complaints.
- Variety of colors. If necessary, you can easily pick up plastic parts that match the color of the existing building exterior.
- Possibility of self-adjustment. Even when installing a drain of a complex configuration, there will be no problems - if necessary, plastic parts can be easily cut with a hacksaw without losing their characteristics.
Disadvantages of plastic gutters
Plastic has its own negative qualities that you need to know about before installing a plastic drain:
- Low mechanical strength. This is one of the most serious disadvantages of plastic products. A huge number of plastic drainage systems simply broke as a result of heavy snowfall. If the region in which the construction is being carried out is characterized by a serious level of precipitation, then it would be better to choose more durable materials for arranging the drain.
- The need for preliminary calculations of the drain. In order for the drainage system to work normally, it must be designed and calculated before installation. Otherwise, the throughput of structural elements may simply not be enough, and the entire system will have to be reinstalled using larger parts.
- High degree of thermal expansion. When exposed to high or low temperatures, the plastic changes in volume, which, if the elements are rigidly fastened, may well lead to their deformation. To avoid this phenomenon, plastic parts must be fixed with a floating method or using rubber gaskets.
Installation of gutters and PVC pipes
In order for the drainage system to perform its functions efficiently, it must be properly installed. Naturally, before this, the building must have a rafter frame and a crate, protected by waterproofing material.

Installation of a plastic drainage system is as follows:
- First, on the frontal board, you need to mark the attachment points of the gutter so that the slope is from 3 to 5 degrees per meter of the drain (to comply with the slope, you should use a cord);
- Next, brackets are attached, and they must be installed so that the overhang of the slope is exactly in the middle of the gutter - such an arrangement will protect the drainage system from snow;
- The installation process must be read from the point where the funnel will be located, measuring 15 cm in each direction and installing brackets at the obtained points;
- All brackets, except the first, are installed in increments of about 50 cm, and the installation is carried out towards the funnel;
- A funnel is installed on the brackets, after which you can proceed with the installation of the gutter, having previously adjusted it to the required dimensions;
- When installing the gutter, it is necessary to use a sealant or rubber connecting elements;
- Brackets necessary for fixing the drain pipe are attached to the wall vertically in increments of one meter;
- Next, a drain pipe is mounted, which must first be attached to the funnel, adding the necessary part with separate parts of the pipes fastened with couplings;
- The lower part of the drain is equipped with a curved tip, the edge of which should be located at a distance of no more than 30 cm from the ground.
It is advisable to install PVC drains at temperatures above +5 degrees. The fact is that at an average temperature the plastic will take a normal shape. It is also worth remembering about the change in the size of polymer parts as a result of temperature changes - this moment must be compensated by leaving small gaps when tightening screws or using special elements that provide such a gap. Some craftsmen even make a drain from plastic bottles, which is free.

Conclusion
A plastic drain is a reliable and convenient system, which, with a high-quality selection of components, well-conducted installation and normal operating conditions, can work for several decades.
Do-it-yourself installation of a plastic drain
The problems with the constantly wetting foundation and damp walls of the building are familiar to many owners of private cottages firsthand. The best option for solving problems of this kind is the installation of a plastic drainage system.

Features and stages of work on the installation of a plastic drain
Why choose plastic?
Of course, when buying and installing a drain, every owner of a private house "cherishes the hope" to spend money once and no longer think about excess moisture for many years.
In this regard, before buying a gutter structure, he necessarily conducts a comparative analysis of drains made of different materials. We will conduct such an analysis by comparing metal and plastic systems:
- almost all types of plastic drainage systems are distinguished by a large structural variety, they can have a rectangular, round or even figured shape;
- when it enters a plastic pipe (gutter, funnel), the masses of water flow down almost silently (unlike a metal gutter);
- galvanized steel gutters of even the highest quality are inferior to their plastic counterparts in such an important parameter as the period of trouble-free operation;
- the production of products from high-quality steel is many times more expensive than the production of plastic structures;
- all arguments about the imaginary fragility of plastic drainage systems have no evidence base. Many years of experience in their use is a serious confirmation of the durability and reliability of plastic systems;
- due to the low weight of the plastic construction, it is very easy to assemble and mount. In addition, with this approach, it is possible to reduce the load on a number of structural elements of the building;
- the probability of leakage in the version with a plastic drain is very small. This is primarily due to the geometry of the plastic structural elements.

About preparatory work
A well-designed project for future assembly and installation work is a good opportunity to reduce real costs. First of all, you should decide on two most important points: the number of drainage pipes and the length of the hanging gutters of the system.
Based on these two parameters, you can calculate the number of other auxiliary elements that require installation. We are talking about catchment funnels, clamps and brackets-holders, corner elbows, plugs for gutters and so on.

The diameter of gutters and pipes is usually selected, focusing on two indicators - the area of \u200b\u200bthe roof of the building and the approximate amount of precipitation in a given area (see special tables).
The number of necessary auxiliary parts will again depend on the area of \u200b\u200bthe roof and its configuration (how many slopes). If we are dealing with a non-standard or complex roof, we should, among other things, take into account its every break and angle. In the version with a very long roof (length), the catchment funnels of the gutter should be no more than 24 meters apart from each other.
About installing gutters
There is a general recommendation for the installation of a gutter - compliance with the installation of the structure at an angle of 2 degrees. In order to ensure a smooth system of moisture drainage from the roof, we recommend using a simple and reliable method. We install a pair of extreme brackets with a pre-calculated interval, and set the remaining brackets along the rope with an interval of 60 centimeters and fasten them to the rafter system or frontal boards.

The extreme upper ends of the gutters should be located three to four centimeters below the edges of the roof slopes. In this case, the snow mass will fall into the drainage system without delay.
The outer edges of the gutters should be located below the inner ones, then if water overflows over the edge, it will not fall on the wall surface.
High-quality roof gutters should be installed in such a way that moisture collects in the middle of the gutters. For this purpose, special gaskets are used, which are placed under the bases of the brackets.
The installation of the gutter is carried out in the direction from the roof to the ground. There are two main ways to seal joints. In this case, we are talking about one-piece adhesive joints and rubber gaskets. Each of these options has its own advantages and disadvantages.

Docking of adjacent elements is carried out using understatements. Each assembly part must be inserted as far as it will go. The option with rubber gaskets has a rather serious drawback - they will have to be changed over time (this is inevitable). Self-replacement of a failed part of the drainage system is a rather difficult and time-consuming process.
The standard length of plastic gutters for roof gutters is three or four meters.
It is known that cutting plastic is a very simple job. However, try to keep the number of connections to a minimum. Each of the burrs formed during the work should be removed with a knife or file (thus, the contact of the joints improves).

If you have a small one-story house, and you have opted for an adhesive type of connection, the gutter can be assembled on the ground.
An important point: the installation of gutters is difficult to implement without outside help.
About funnel installation
Water intake funnels are attached to the gutter or to the surface of the wall (in the second case, the funnel simultaneously plays the role of an additional support and connecting part of the gutter). In the variant with hanging the water collector on the gutter, it is necessary to make a drain hole in the wall of the gutter.

Water collectors are one of the key components of the entire system. Leaves or various debris entering the funnel can cause the passage to be clogged. The result of this is often a rupture of drainage pipes. In this regard, it will not be superfluous to equip funnels with “options” for collecting garbage (we are talking about nets and spiders).
About pipe installation
Most often, when installing a drainage pipe to a wall, a knee with an angle of 35 degrees is used. The use of such a knee ensures the smooth flow of water in the future.
The structure is fastened to the wall using two (or more) clamps-holders (the interval between the clamps is 2 meters). The recommended interval between the drain and the wall surface is 3 centimeters. This figure can be guided by when cutting pipe sections connecting the elbows (here it is necessary to take into account the length of the connecting sections inside and the length of the fittings on the outside).

Water marks are attached to the lower ends of the pipes, which are necessary to divert water flows from the walls.
If we are talking about installing a drainage system in a house where people will live on a permanent basis, it is worth spending money on a heating cable. This “option” is a good way to prevent ice in pipes, water collectors and drain funnels.
Video: Installation of PVC gutters
- Insufficient elasticity (for certain types of products), which, if the installation rules are violated, can lead to deformation of the system elements.
- Ultraviolet contributes to the destruction of some materials. The intensity of the process depends on the type of plastic.
- It does not "combine" with all roofing. For example, if it is planned to lay natural tiles on the roof, then it is better to choose gutters from a different material.
Summarizing the above, we can conclude that in order to extend the life of the structure, it is necessary not only to install the gutters correctly, but also to select the appropriate type of product. The most popular are PVC products, although there are also gutters made of other types of plastic - polyethylene, polypropylene, unplasticized PVC. But regardless of the material of manufacture, the general principle of installation remains the same.
It should be noted that when selling certified products from a Manufacturer with a good reputation, the product is always accompanied by Instructions for Use (Installation). She must be guided in the first place.
Operating procedure
Calculation
In order not to be mistaken in the number of purchased elements and to correctly select everything you need (connectors, plugs, limiters, etc.), it is better to draw up a building plan indicating all dimensions, including its height. According to such a home-made "drawing", it will be easier to deal with all the nuances yourself, and the Seller in a specialized store will help with the choice of components. In this case, it is necessary to take into account not only the configuration of the roof, but also its dimensions and design features.
- Funnels are installed approximately every 10 m and at the corners of the building, as well as at the bends of the walls (for complex architectural structures).
- The number of gutters is determined in accordance with the perimeter of the building, taking into account protrusions, turns, and so on.
- Brackets are purchased on the basis that 1 pc. needed to fix 0.5 - 0.6 m.p. gutters and on each knee of the sewer pipe.
- The diameters of the gutter elements (in "mm") depend on the parameters of the roof. For small (less than 70 m2), pipes are selected with a cross section from 50 to 70, and gutters - from 70 to 110. If the roof is about 100 m2, then the diameters increase: for pipes - up to 100, for gutters - up to 130. With dimensions of more than 100 m2, respectively, values in the range of 95 - 155 and 140 - 200. Such a spread in numerical indicators is explained by the features of a particular system, and first of all, by the number of installed funnels. The selection of diameters is carried out in such a way that even at the maximum level of precipitation, the water completely goes into the pipes, and does not overflow through the edges of the water collectors and gutters.
markup
Some features of the installation have already been mentioned. It should be noted that high-quality water drainage is ensured only if the gutters have a certain slope towards the water collectors (funnel). As a rule, it is assumed that the difference in height for each r.m. The "pipe" must be at least 2 mm (within 2 - 5), depending on the section of the elements and the length of the "channel".
Tracing is carried out using a nylon cord (thick fishing line), along which the fixing points of the brackets are marked (including in height).
Mounting holders
Its specificity depends on which house is to be equipped with a drainage system (under construction or already in operation) and the features of the roof.
Fixation on the front board
This is the simplest technique, but provided that there is access to the rafter system. Therefore, this is how it is advisable to install brackets in the "new building".
Attachment to rafters
If there is no frontal board in the roof structure, then combined holders are used. Their difference is that they are equipped with "extenders" that allow you to "fasten" them directly to the rafter "leg".
When covering the issue of installing gutters, some sources indicate an approximate interval between the holders of 1 m, but it is not noted that this applies only to metal gutters. For "plastic" it has already been agreed - about 50 - 60 cm. This is what you need to be guided by.
In case of reconstruction of the drain (replacement of gutters), already installed brackets can be used if they are suitable for further use and placed in accordance with the requirements for the installation of plastic products. If the diameters do not match, the holders are easy to bend. This is done more efficiently with the help of special devices - hook benders.
Particular attention must be paid to the correct installation of seals. Poor tightness of the "route" will lead to the gradual destruction of the blind area.
You should not use rotary elements with an angle of 900. It is in such places that blockages will most often form, so you will have to deal with periodic cleaning of the system. Even at right angles of the building, it is desirable to use more “smooth” rotary elements - for example, by 1200. By the way, so-called “wiring” can be used to “smooth” a right angle.
To minimize the maintenance of the drain and extend the life of all its structural elements, it is advisable to install a heating system. How to choose, install and use it correctly.
 The drainage system is a structure that designed for controlled precipitation removal from the roof surface, and to protect the blind area and the buried part of the building (foundation, basement) from moisture in order to prevent or minimize the destruction of the relevant building and finishing materials.
For the construction of the drain system, plastic gutters are also used, but due to the higher cost of the former, many prefer PVC products.
Now let's talk about this in more detail.
PVC gutter is product made of hard impact-resistant plastic. For the production of system elements, plasticized and non-plasticized polyvinyl chlorides are used with the use of various additives: coloring pigments, wear-resistant plasticizers, stabilizers and UV additives.
Manufacturers produce samples of various colors, which makes it easy to match gutters to the color of the roof. Products are dyed in mass so that small scratches and defects on the surface are not too noticeable.
If a only the top layer is painted, which means the drain is of poor quality and made, most likely, in artisanal conditions.
Plastic drainage systems have the following advantages:
- moisture resistance. Since the function of the system involves direct contact with water, it is impossible not to mention that plastic is absolutely not afraid of moisture;
- light weight. When using PVC construction, the load on the eaves of the structure is reduced;
- stamina to high and low temperatures (from -40 to +50 degrees);
- UV protection. If the drain is made of good quality plastic, it is not afraid of exposure to UV rays, so that the product will retain its appearance for a long time;
- Plastic gutters for the roof easy to cut, not afraid of scratches and minor accidental bumps;
- installed on and cornices without roofing, and installation can be carried out at almost any temperature, up to -20 degrees;
- low cost. PVC is a material that is easy to manufacture and process, which has a positive effect on the price of finished products. Examples of manufacturing companies - and.
Disadvantages of plastic systems:
- susceptibility to mechanical damage. This circumstance does not allow the installation of such structures on high-rise buildings. PVC systems can only be installed in private houses;
- repair unsuitability. A damaged part cannot be repaired;
- a plastic drainage system with rubber seals requires their periodic replacement, which makes it necessary to disassemble and assemble structural elements;
- wide range of temperature expansions. On a stretch of 10 meters, with a temperature difference of 20 degrees, the plastic increases to 1.5 cm.

Docke plastic roof drains
Element types
Gutter systems can be different shape:
- Round.
- Rectangular.
- Square.
- The shape of a trapezoid.
The first option is considered classic and is more common than others. There are no stiffeners on such gutters, therefore their installation is carried out using special clamps, which provide more reliable fastening of the elements to each other.
Rectangular patterns are very similar to pavement drains. They are equipped with several stiffeners and are quite large in volume, which allows you to equip a system capable of removing a large amount of wastewater. Rectangular and square pipes are mainly used for closed-type drainage systems. Such structures are installed in the roof and equipped with drainage funnels.
Structural components of PVC drain
To equip a plastic drainage system, manufacturers produce various components that allow you to build a structure of any configuration.
plastic gutter
They are channels for collecting liquid, which are located along the edges of the roof and receive water flowing from the roof, directing it into the water intake funnel.
also have accessories:
- Coupling. This element is designed to connect individual parts of the gutter to each other.
- Injection. Used to connect gutters at corners. The most common designs have a 90 degree angle, but other options are also found.
- bracket. It is a plastic hook for fixing the gutter. It is attached to the frontal board, after which a drain is inserted into it.
- Stub. It is used in places where the gutter is not connected to other parts of the system. It is put on the end of the element and limits the unorganized flow of water.
funnel
This is the most important part of the drainage system. The liquid flowing down the gutter enters it, which then enters the drain pipe. In appearance, this element is similar to a short gutter with a funnel-shaped ending.
Drain pipe
It is a vertical pipe that is connected to a funnel. This element is intended for arranging a directed flow of liquid and diverting flows from the building.
NOTE!
Closer to the surface of the earth, drain pipes, as a rule, have a bend in the opposite direction from the wall through which the liquid through the storm water inlets enters the storm sewer or drainage system.
Drain pipe tip
A part that reduces the speed of falling water. The tip is bent so that the liquid flows smoothly from the roof.
Drain pipe clamp
Ring-shaped fastener with which the pipe is mounted on the wall. In fact, this element performs the functions of a bracket and is often even sold under that name along with other connecting parts.

Drainage system device
Which drain is better: plastic or metal?
To highlight the distinctive features of both options, you should compare their characteristics. on several key parameters:
- The weight. Plastic is much lighter than any kind of metal, so in this respect it outperforms the metal counterpart, which requires the use of reinforced brackets for mounting.
- Strength and impact resistance. These properties, of course, are more inherent in metal products, because plastic, whatever it may be, is not able to withstand significant mechanical stress.
- Corrosion susceptibility. Plastic products are absolutely not afraid of corrosion, while they are subject to the negative influence of water. But aluminum, metal-plastic and zinc products are protected from moisture, but they are more expensive than other analogues.
- tightness. Plastic connections are tighter than metal ones and do not leak, which allows them to be characterized as more effective.
- Durability. The warranty for plastic products is 25 years, steel counterparts last 15-20 years, and samples with a polymer coating - 50-60 years.
- Temperature resistance. The operating temperature of plastic is -40 to +50 degrees, and metal from -50 to 120, which allows the use of metal systems in the Far North.
Based on the above parameters, it is difficult to say about the unequivocal advantage of one material over another, so the choice in favor of one or another option depends, perhaps, on the situation, the preferences of the owner and his financial capabilities.

metal drain
Attaching the drainage system to the roof
Gutters are attached to the roof, the specifics of installation of which depend on the conditions under which the drainage system is installed (on a house under construction or in operation), as well as on the characteristics of the roof.
- Fastening to the front board. This is the easiest way, but it is only possible if there is access to the truss system. Therefore, this option is well suited for the "new building".
- Fixing to rafters. In the absence of a frontal board in the roof structure, combined holders are used, which are equipped with "extensions" attached to the rafters.
- Mounting on crutches. This method is used when it is not possible to apply the previous two. In this case, metal parts can be attached to the crate or to the wall.
In order for the parts to be placed correctly, it is recommended to fix the end brackets first and then all the others.

Mounting brackets
Do-it-yourself installation of a drainage system
Installation of a plastic drain is carried out in several stages:
- Gutter hooks are attached using one of the methods described above. The distance between the elements is 0.6-0.9 m. In order for the water to drain well, a slope of at least 0.5 cm per linear meter should be provided.
- The gutter funnel is installed. The number of these elements depends on the area of the roof slope and the length of the gutter. One funnel can serve up to 120 m2 of roofing and up to 10 meters of runoff.
- Plugs are mounted, which are attached along the edges of the gutter, which do not fit with other structural details.
- Gutter is installed. The upper outer edge of this element must be located no closer than 2.5 cm from the roof slope line. It is also necessary that the inner edge of the drain rises above the inner edge by 0.6 cm, which will prevent water from entering the facade of the building during heavy rains.
- Connecting and corner elements are mounted. The distance between the drain sections when connecting should be 3-4 mm.
- Drain pipe installed. Brackets are attached to the wall at a distance of 1 m from each other (but not less than 2 pieces per pipe). The upper elbow, the drain pipe and the drain elbow are connected to each other, after which the structure is attached to the funnel.

Do-it-yourself system installation

Gutter marking
When installing the system, it is also advisable to follow the instructions from the manufacturer, but in any case, all elements of the system must be securely fixed, which will reduce the risk of accidents during the operation of the drain.
Useful video
Installation of a plastic drain in the video below:
In contact with


