The porch is a necessary architectural element, without which no building is conceivable. Of course, the most correct decision is when the porch is provided at the design stage of the house, and the foundation for the porch to the house is laid at the same time as the foundation for the main building. But in practice, for a number of reasons, a porch is attached to the house with their own hands already to the finished building.
Self-construction of a porch to the house, see the photo of the most popular and beautiful solutions in the article, must be carried out in compliance with the rules and regulations that apply to the construction of additional outbuildings. Next, we will tell you in detail what extensions are, we will review the materials from which the porch of a private house is most often arranged with our own hands, we will conduct a comparative analysis of construction technologies. We will pay special attention to the questions of what foundations are laid for a makeshift building, how to make the foundation yourself, and how to properly tie the porch to an existing house.


General form
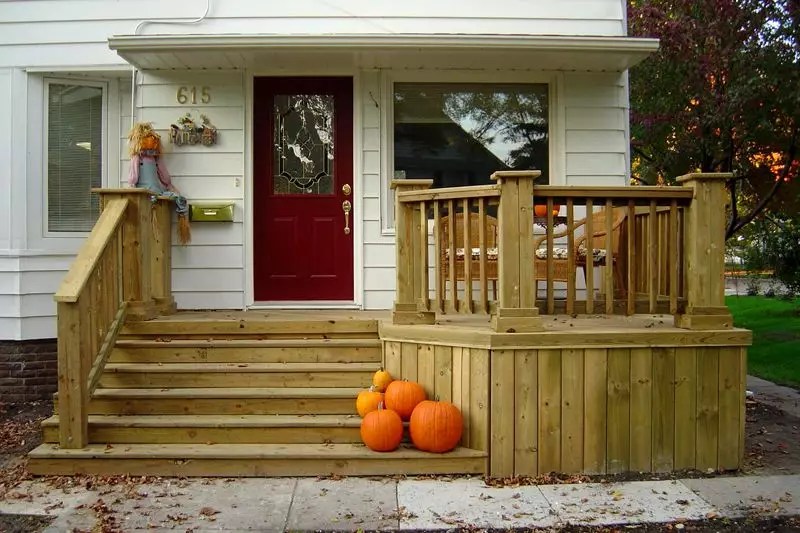
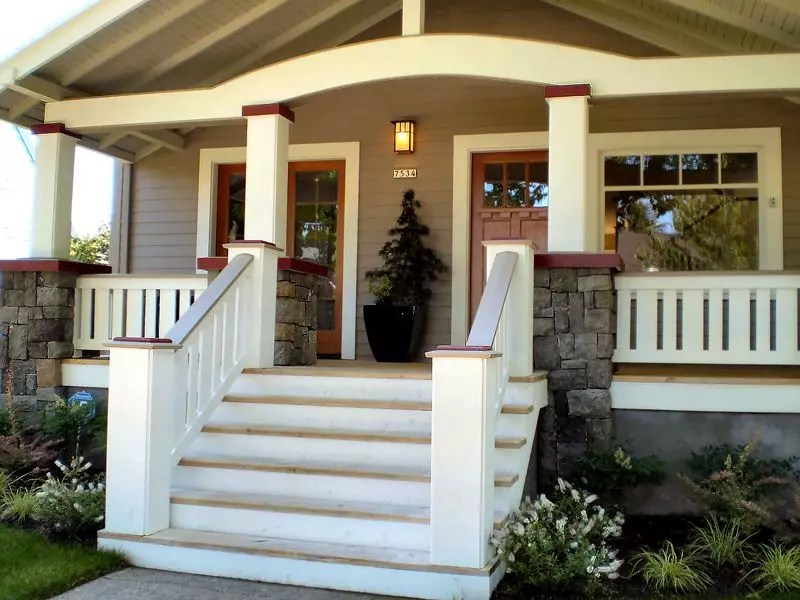
One of the basic rules for building a porch is that the design of the extension should resonate with the exterior of the home. The most common option for making an aesthetically correct completion is to use the same materials from which the house is built in the manufacture of the porch. But in construction there are extensions with an eclectic design, for example, a wooden porch is often attached to a structure made of concrete or stone. In such cases, it is important to observe the proportions and shape of an independent extension so that it harmoniously fits into the general appearance and dimensions of the house.

Before you build a porch to the house, you need to consider the design of the extension.
But besides aesthetics, the practical side of the issue is very important. The porch is a street extension, which is constantly under the influence of an aggressive environment, experiences systematic mechanical loads. Therefore, the material for self-made construction must be resistant to moisture, to alkaline and acidic environments, to corrosion, microorganisms, UV rays, fungi, rodents, refractory and durable to abrasion loads. Of course, not a single, even the most innovative material, can meet all the requirements without exception, so there is no universal recipe for what it is better to make a porch from. Next, we will consider common materials for home-made construction, and analyze their main advantages and disadvantages.

Combinations of a log house with forging and tiles
materials
A do-it-yourself porch, the photo in the gallery is a good example of this, most often attached from wood, concrete, brick or metal. These materials for construction, with certain skills, are quite simple to work with, and have a relatively low cost, they tolerate physical, mechanical and chemical loads well, which is why they are so popular for porch construction.
How to build a wooden porch
The most popular material for homemade extensions is wood. A do-it-yourself wooden porch is perfectly combined with houses made of timber, logs, bricks, adobe, frame structures, concrete plastered structures, sheathed with siding, clapboard with wooden imitation of all stripes.
For the construction of the porch, logs, glued laminated timber, hardwood, mainly larch, are usually used. Of course, this is a fairly common material for home-made construction, wood is easy to install and does not require any special complex tools. And hardly anything can compare with the beauty and warmth of natural wood. In addition, the modern building materials market for homemade outbuildings offers a huge selection of carved elements, figured balusters, railings, steps - all this opens up great prospects for a beautiful building design.
But before you make a wooden porch with your own hands, in stages the tree needs to be treated with antiseptics, fire-resistant solutions, and impregnated with moisture-repellent compounds. Of course, this entails additional time and financial costs for construction, but without preliminary preparation, a wooden porch is unlikely to last a long time.

How to make a porch with your own hands correctly, high structures are built if the house has a high base, and in snowy regions
They install a home-made wooden porch on a special base, it can be rubble stones for supports, and a slab, columnar and pile foundation. Before starting construction, all parts of the wooden elements that will be immersed in the ground must be treated with bituminous mastic, wrapped with roofing material, and the seam fastened with a blowtorch. The choice of the type of base for the arrangement of the porch depends on the design features of the extension, and of course, on the weight of the materials, we will talk about the nuances a little later.

DIY wooden porch, photo of a large extension
Depending on the design of the porch, the device of a home-made extension begins with the construction of the upper platform, then a ladder is attached to it on stringers or on a bowstring, and then steps are installed. In conclusion, a visor and fences are attached. As you can see, the technology for building a wooden porch is quite simple, but when arranging an extension, it is important to follow all the stages of wood preparation, and then the finish should be applied correctly to protect the structure from external influences.
Homemade concrete porch
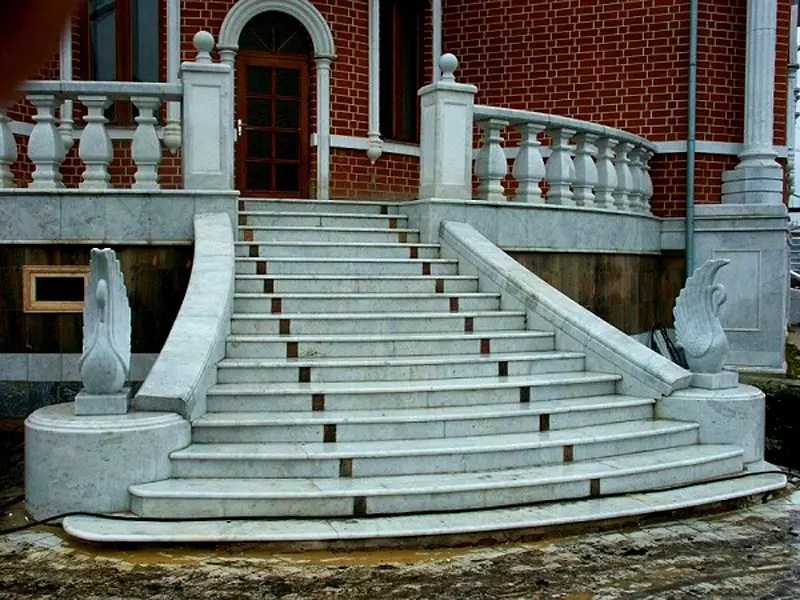
In general, concrete is a huge opportunity in the construction of homemade porches of various shapes. The plasticity of the material allows you to make not only rectangular, but also semicircular, oval, broken, curved structures with your own hands. Concrete home-made extensions fit without problems even into the most complex exterior of the house, as they can be lined with various materials, including tiles, stone, porcelain stoneware, just paint, or arrange special steps made of sculpted concrete, which, depending on processing, can imitate granite, malachite, marble, etc.

How to make a porch to the house, photo of a large homemade terrace
After the foundation pit is made, and the sand and gravel cushion is laid to give shape to the makeshift porch, formwork is made of boards, plywood, and plastic. A reinforcing frame is knitted in the crate, which is poured with concrete. But it is also possible to lay ready-made concrete blocks in the crate, which are attached to each other, and only then are poured with mortar. Monolithic construction of a porch is cheaper, in addition to buying ready-made blocks, they must also be delivered, unloaded, laid, and for this, if you are not a descendant of three heroes, you will need special equipment.
Important: The frame is best made from ribbed rods, with a cross section of 8-12 mm, it is recommended to use knitting wire for fastening, welding significantly weakens the metal. It is necessary to fill the reinforcing frame so that it is surrounded on all sides by concrete, with a layer of at least 50 mm, before installing the frame, put pebbles or special supports on the bottom.Concrete structures cannot be loaded until the solution is completely formed, and this takes 28 days. In addition, a special frost-resistant mortar or heating cables will be required to install a porch in winter, which will significantly increase the cost of a homemade extension. Any violation of the pouring technology will lead to inevitable destruction and deformation of the porch.

Construction of a concrete porch with a wooden half-closed canopy
How to make a metal porch
Considering the question of how to make a metal porch with your own hands, first of all, it should be noted that its construction is possible only on a pile foundation.

How to make a porch with your own hands, a homemade version of the frame
Of course, other options for foundations are possible, if there is an urgent need, if there are rocks on the ground, or your country house is located in the permafrost zone. For example, slab or tape, but this is not always advisable, so sometimes it is better, and even cheaper, to consider options for building home-made outbuildings from other materials. Pile foundations are always buried below the level of soil freezing by 20-30 cm, and this level depends on the climatic zone.
It should be noted that a home-made porch made of high-quality rolled metal and treated with anti-corrosion compounds has a long safe operation life. In addition, homemade metal porches go well with elegant forging, with polycarbonate visors, etc. The metal porch can be cut along the racks and moved to another place, no extension from any other material can boast of such an advantage.

Do-it-yourself porch in the country house, an easy way to make an extension on a metal frame
Other materials for building a homemade porch
Speaking about building a porch with your own hands, it’s impossible not to mention such materials as brick and foam blocks. For the extension, it is recommended to use backfill red or silicate white brick. It is very convenient that the height of the two bricks together is equal to the height of the step, this circumstance greatly facilitates the laying.
Advice: When building a porch with your own hands, in order for the extension to be strong and reliable, the seams of the first layer should be covered with a whole part of the bricks or blocks of the next row.
How to build a porch with your own hands, an extension of silicate brick
After masonry is completed, porch finishing will be required, which material to choose for cladding depends on the design and budget for the porch. It should be noted that a do-it-yourself brick porch in fact comes out more expensive than home-made outbuildings made of concrete and wood, but you can use a brick that has already been in use. Building a porch from foam blocks with your own hands requires much less time and financial costs, but cellular concrete absorbs moisture well, which can go sideways during rainy autumn and severe frosts in winter.
We offer you to watch a video on how to make a porch with your own hands, the video will help you avoid major mistakes in construction.
How to make the right foundation
The foundation is an important component of any structure, it is a kind of guarantor of the reliability and safe operation of the structure, whether it is a multi-storey building or a home-made wooden porch.
The choice of the type of foundation directly depends on the geodetic conditions on the site, and on the extension project, where the weight is calculated and the design features of the porch are indicated, the load from the extension should be evenly distributed.

How to pour a porch with your own hands, a slab for an extension
For example, a pile foundation is suitable for swampy areas. But if you make an analysis of the construction of St. Petersburg, which is all located in the swamps, then the old houses in this city are installed on a slab, but meanwhile they have been standing for more than one century. Or the pyramids, located on quicksand, are also all completely installed on the slabs. Therefore, no matter what type of foundation for a home porch is chosen, the main thing is to strictly follow the technology when constructing and pouring it.
Kinds
As for the types of foundation, there are only four of them: tape, columnar, pile and slab. But each of them has a number of varieties. And each of them in certain cases is suitable for the construction of a porch.
Tape is a composite or monolithic tape, which is laid around the perimeter and under the load-bearing walls of the building. According to SNiP, the tape should be 100 mm wider on each side of the structure. As a rule, it has 2 or more horizontal reinforcing belts interconnected by vertical rods. The optimal width of the tape is 300-400 mm.

Do-it-yourself porch, photo of the strip foundation for a large extension
The columnar foundation can be made of rubble, logs, bricks, concrete, metal and asbestos pillars, the masonry material is interconnected with reinforcement. The principle of the device is quite simple: along the perimeter, at a distance of no more than 2 m of a friend, pits are dug into which the pillars are installed.

How to make a column foundation
The pile foundation is not so easy to arrange with your own hands. Firstly, the piles must be installed strictly vertically, and secondly, to drive a pile, you need remarkable strength, therefore, in order to install piles even under a makeshift extension, you will need to involve special equipment. There are driven and screw piles with special blades at the end, they are installed around the perimeter and under the supporting structures at a distance of 2 m from each other, after installation they are connected to each other by heads with a grillage: concrete tape, beam or metal channel.

How to make a slab for a veranda
The slab foundation is a monolithic concrete slab, 100-400 mm thick, poured over the entire area of the building. To make an extension, it is enough to fill a thin slab. Before pouring concrete, a mesh of reinforcement is installed at the bottom of the pit, with cells of 200 * 200 mm, which can be tied by hand, for thicker bases, 2 horizontal reinforcing layers are required.
Types
Depending on the depth of occurrence, the foundations are shallow - up to 500 mm, shallow - 700 mm, buried 200-300 mm below the level of soil freezing.
Shallow foundations can be columnar, slab and strip foundations. The slab is only non-buried or shallow-buried. The pile foundation is made exclusively deepened.

How to make a strip base with an open loop
How to make a base for a porch
Before pouring the foundation with your own hands, the first step is to clear the site for the construction of a makeshift porch, remove the fertile soil of about 200 mm. Further, the drawings of the extension are transferred to the area, pegs are hammered in the corners, and a rope is pulled around the perimeter.
Regardless of the type and type of foundation, with the exception of piles, it is necessary to make a recess in the ground for the foundation. For a tape - a trench, for a columnar - a pit, for a slab - a foundation pit. The bottom of the site is carefully rammed, leveled horizontally. Then a geotextile is laid, on which a layer of crushed stone 100-300 mm is poured, and the same layer of sand. The pillow is rammed so that there are no traces of the shoes of a person weighing 75-80 kg on the surface.
If a columnar foundation was chosen for the porch, then a little concrete is poured into the bottom of the pit, the pole is aligned vertically, and the pit is filled with concrete. If the pillars are hollow, then reinforcement is thrown inside, and it is also poured with concrete. For the construction of pillars made of brick and stone, the first 4 layers of masonry are placed on the concrete layer, then it is necessary to make a reinforcing belt, bricks are laid again, and according to this algorithm, the pillars rise to the desired height.
Before making a tape, a crate is installed on the pillow, leveled, supported from the outside with struts, pulled together with bars so that the base does not lose its geometry. A reinforcing frame is knitted in the crate, it is better to use corrugated rods with a cross section of 8-12 mm, which is poured with concrete. When the concrete has risen, this requires approximately 7 days, the crate can be removed.
For the device of the slab, after laying the pillow, several supports or stones 50 mm high are installed on the bottom, a reinforcing mesh is placed on them. For a slab foundation, smooth reinforcement cannot be used, only corrugated reinforcement. The pit is then filled with concrete.

How to lay a reinforcing frame
It is better to entrust the construction of a pile foundation to professionals. But if you decide to screw the piles with your own hands, then the main rule is that the pile must stand strictly vertically, and be deepened 300 mm below the freezing level of the soil. If something went wrong, then the pile should be unscrewed, and it is no longer possible to twist it into this place again, only nearby.

Screw pile for homemade extension
After the installation of any base, it is necessary to perform vertical waterproofing: coat the sides of the base with bitumen, or glue it with roofing material, and you can insulate it by spraying a layer of polyurethane foam. At the end, backfilling of the soil is done, and you can start building a homemade porch.
How to do it right: tie or not tie foundations
When examining regulatory documents, there is a definite answer to the question of whether two foundations can be connected: it is categorically not recommended to connect two foundations with a rigid hitch. Between them it is necessary to leave a gap of at least 20 mm, and to fasten the structures so that the seam does not diverge, it is better with anchors or special hinged corners.

Photo how to make a hitch of bases
But after reading reviews on numerous forums where craftsmen share their practical experience, we decided to describe one, the most popular way, how to make a do-it-yourself rigid hitch of two independent foundations. Before pouring the foundation under the porch, it is necessary to dig out the base of the house, clean it, hollow out the concrete to the reinforcement. Further, perpendicular rods are tied to this reinforcement, and released onto the foundation of the porch, then the reinforcing frame of the extension is attached to them. We illustrated the ways on how to properly make ligaments in the diagram below.

How to make a porch with your own hands, rigid hitch drawings
I must say that this method of fastening the foundations found its ardent defenders, and no less ardent critics. But from the point of view of building codes, such a binding can damage both foundations, firstly, buildings have very different weights, heaving forces will act unevenly, which will lead to cracks. Secondly, a seam is formed due to the difference in the freshness of the concrete, which cannot ensure the integrity of the structure.


To summarize, a rigid connection of the bases is possible if, in the process of research and calculations, it is established that the foundation of the main house is built with a margin of safety, the foundation of a makeshift porch is calculated in accordance with current standards, and on the basis of geodetic and engineering studies. Among other conditions, it is important that the shrinkage of the main structure has already occurred, and if precipitation wash the soil under the base of the makeshift porch and it hangs, then its weight should not exceed the allowable loads (margin of safety) on the main foundation.
If you want to build a porch to the house with your own hands, then we have great news for you - it is quite possible to do it yourself! What's more, you can even choose from several options available - concrete, wood, or metal porches! In this case, in the latter version, the design will be equipped with a beautiful polycarbonate canopy.
Let's take a closer look at each of the available options. First, let's get acquainted with the instructions for making a concrete porch to the house.
Option one. concrete porch
The strongest and most durable design, which also looks quite solid. First, decide on the size of the porch.

Stage number 1. How to calculate the dimensions of the porch

In most cases, the porch of the house is just a few steps. You are obliged to choose the optimal dimensions of this design. Ideally, the width of the stairs should be between 0.8 and 1 meter. If possible, you can make it even wider - so the whole porch will look more attractive and comfortable. Making the width smaller is highly discouraged.
As for the angle of inclination of the stairs, it should be in the range of 28-45 degrees. The table below shows the optimal dimensions of this design.

The width of all steps of the porch should be the same and be approximately 25 centimeters, while the optimal height is from 12 to 20 centimeters (it all depends on who exactly the porch is intended for).
Note! When arranging the upper platform, try to keep it below the front door by about 5 centimeters.

Stage number 2. How to make a porch foundation
First, dig a pit according to the dimensions of the future structure (at least half a meter deep). Build formwork around the perimeter.

Then take the crushed stone and fill it with the bottom of the resulting pit (the thickness of the layer should be about 20 centimeters). Thoroughly tamp the gravel, then pour sand on top of it in a 10-centimeter layer. It is desirable to pour sand with cold water to make it easier to compact it.
Cover the resulting area with roofing material. From above, lay a reinforcing mesh with cells of 100x100 millimeters, then fill everything with concrete mix. You can easily cook the latter with your own hands, for this, adhere to the following proportions:
- one part of cement;
- five pieces of rubble;
- three parts of sand.
After pouring, level the surface of the concrete, pierce it in some places with a reinforcing bar to remove air. Now it remains only a few days to wait for the initial curing of concrete to occur.

Stage number 3. How to build a formwork for steps

To build the formwork for the steps, you will need thick plywood. At the same time, it is important that the height of such formwork is 20 centimeters greater than the height of the porch itself. The construction process itself is nothing complicated: cut out all the details of the formwork from plywood (according to the height of each of the steps), and then install them in the right places. To tighten the shields together, use metal plates, wooden bars, or any other suitable fasteners.

Note! The shields located on the sides must be reinforced without fail with additional stiffeners.
In addition, reinforce all the steps, and lay the reinforcement in such a way that it is located in all 3 planes at once. Alternatively, you can weld an iron frame, the shape of which matches the planned staircase, and build the formwork around it. This will be even more convenient. In other words, do what feels right for you.


Stage number 4. How to pour steps for the porch with your own hands
To begin with, lubricate, using oil, all the internal surfaces of the formwork. This is necessary so that later you can remove the structure without much effort. As for the pouring solution, prepare it in the same way as before.

Start pouring in stages, starting with the first step. After pouring each new step, take a short break so that it dries a little, and then proceed to pouring the next one. So your porch for the house with your own hands will turn out to be as strong and durable as possible. In the course of pouring, fasten additional formwork parts in front of each step. In this case, the height should be the same as that of the first step.
Note! The formwork surface that will be in contact with the mortar should be as smooth as possible.
After pouring, carefully level the concrete, then pierce it with reinforcing bars.

It is possible to dismantle the formwork no earlier than in a week, and even better in 10 days. At the end, finish the structure. For cladding, you can use tiles or natural stone, boards or, alternatively, any other finishing material (decide for yourself).

Installing railings is not necessary at all, do it at your discretion. If you still decide to install, then please note that the height of the handrails should be at least 0.9 meters. As an example, we give an option that is equally suitable for metal / wood structures. Install support posts made of metal pipes above and below the porch. In this case, the length should be such that the angle of inclination of the railing is similar to the inclination of the stairs. Connect the ends of the racks together with iron pipes, but of a smaller diameter. Use a welding machine to connect.
The top tube will serve as a handrail. To fill the space between the pipes, you can use absolutely any rental. When mounting the element, the gap can also be any - here everything will depend solely on your personal preferences.

Upon completion of installation, thoroughly clean all metal parts, cover them with two layers of primer mixture. Thanks to this treatment, the service life of the railing will increase markedly.
Video - Construction of a concrete porch to the house with your own hands
Option two. Do-it-yourself metal porch (with a polycarbonate roof)
Immediately make a reservation that the option described below is successfully combined with almost all types of private houses. The process consists of several stages, let's get acquainted with the features of each of them.


In this case, there are no fundamental differences from the foundation that we previously created for the concrete porch, the only exception is the fact that the support posts for the future canopy must be installed at this stage. We recommend installing supports in each of the corners of the structure - thanks to this, the structure will turn out to be more stable. If the dimensions of the porch are large enough, make several supports along its length in increments of 2 meters.
First, dig holes about 1.5 meters deep for supports (by the way, steel pipes can be used as the latter). Place each pipe in the appropriate hole, then fill it with concrete.
Note! Wooden bars can also serve as supports. The sequence of actions here is the same, only the lower parts of the bars should be pre-tarred or wrapped with roofing material, and also treated with an antiseptic.
Also install supports under the stairs. Also dig holes, place metal racks in them, and then fill them with concrete. It is unlikely that the length of the stairs will be too large, therefore, the supports above and below the structure will be enough. Although, for greater reliability, you can additionally put supports in the middle of the flight of stairs.
When pouring concrete, make sure that the ladder is somewhat recessed into it. Pour concrete not to the very top of the site - leave a small gap (within 10-30 centimeters, the specific figure depends on the current dimensions of the structure). Later, when the assembly of the metal structure is completed, you can fill the pit to the top.


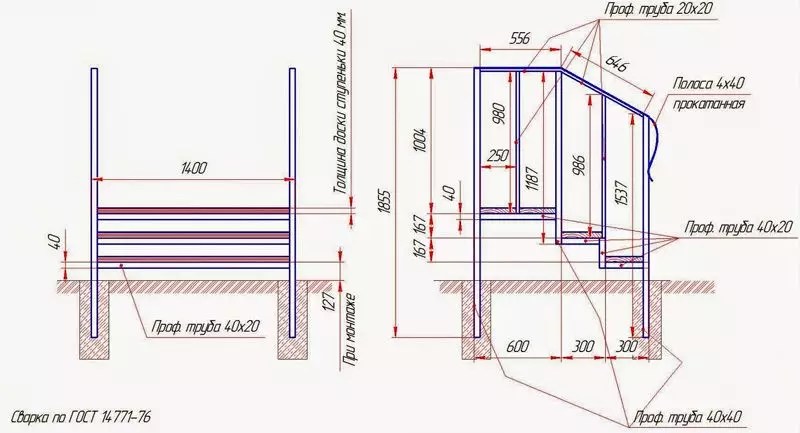
Stage number 2. How to weld a ladder

To get started, take a couple of metal channels. Weld them to the supports that were installed and poured with concrete in the previous stage of work. Later steps will be welded to these channels. Take an iron corner (without fail equal-shelf), cut it according to the length of the steps, adding the width of the weld. After that, weld this corner along the contour.

Take the second segment of the corner, weld it in the same way, only to the attached corner. At the next stage, it is necessary to weld the second corner to the channel. As a result, you should get something like the following.


It turns out a kind of L-shaped product, you have to connect them together. For the upper connection, use an equal-shelf corner - weld it along the contour to both elements so that the shelves are placed inward. Make the bottom connection using the same corner, but the shelves should already “look” outward.


To fill the steps of the stairs, which will decorate the future porch to the house with your own hands, you can use any materials - for example, plywood or wood. For fixing, use self-tapping screws, twisting them from below. And to further secure the wooden elements, use glue or, alternatively, silicone-based sealant.


In principle, further finishing can be done at your discretion. If you want, you can not close the horizontal openings at all - in this case, the casing will be mounted directly on the steps.
Stage number 3. How to make a canopy over the porch with your own hands

So, we installed the racks at the stage of pouring the base, so the further algorithm of actions should look something like this.

Take the cross supports and install them in accordance with the dimensions of the frame. If you like, your future canopy can be curved. To achieve this, cut the profile every 4 centimeters and bend it as needed. The advantage of canopies with a curved shape is that precipitation and various kinds of debris will slide freely from them.


Take polycarbonate, install it on the frame and fix it with self-tapping screws (we recommend using special thermal washers). The fastening step in this case should be 30 centimeters. Seal the edges with glue. Everything, the canopy can be considered ready!

Video - Do-it-yourself porch to the house from a profile pipe under polycarbonate
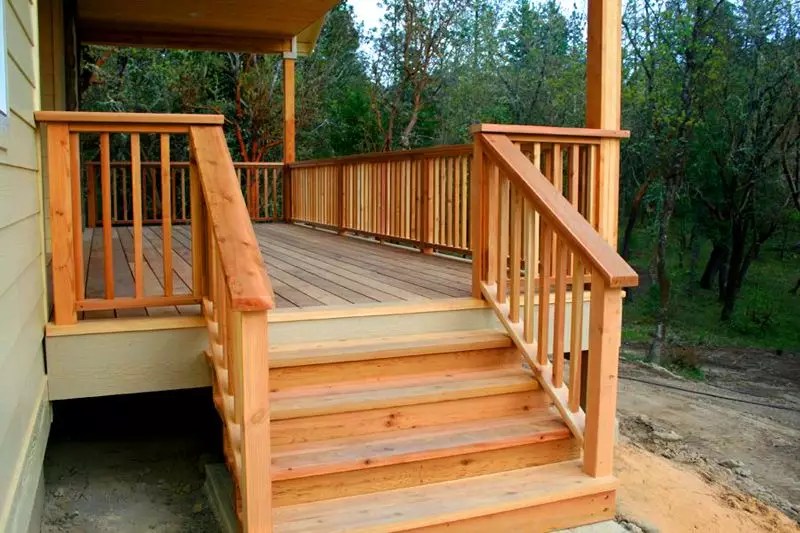
Option three. wooden porch
You can find a diagram of a porch made of wood below.


The work consists of several stages, we will get acquainted with the features of each of them.

Stage number 1. How to build a foundation
The best option in this case is a pile foundation. The fact is that such a base is extremely simple and quick to install, but its reliability is at a fairly high level.
First, dig holes where the piles will be located - not only in the corners of the future structure, but also along the length of its sides (the step should be from 0.8 to 1 meter). It will be great if you do this below the freezing level of the soil. After that, take the support bars and treat them with an antiseptic, and wrap the lower parts with roofing felt for waterproofing. After that, insert the bars into the holes. Align them vertically, and then fill with concrete mortar.
After the concrete has hardened well, you can proceed to the next step.
Stage number 2. How to mount lags
If necessary, trim the tops of the beams so that all supports are at the same level. It is worth noting that when calculating the height of the piles, it is necessary to act in such a way that, upon completion of the installation of the platform, a 5-centimeter height difference remains between the front door and it.
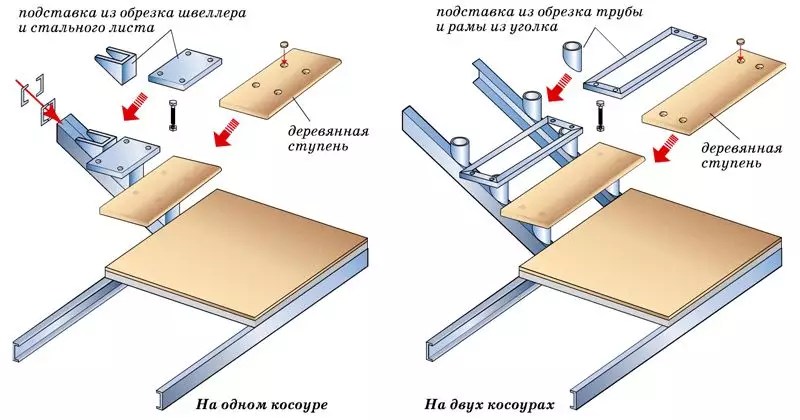
Stage number 3. How to make a bowstring (kosour)


Now start making the supporting part of the ladder structure. It is to this part that the steps will subsequently be attached. In other words, the kosour is, as it were, the side face of the steps.
To make a bowstring, you will need boards that are 50 millimeters thick. Take one of them, draw steps on it and cut them out with a saw or jigsaw. At the end, connect the stringer to the joists using a tenon-groove connection.
Stage number 4. How to arrange steps and platform

This is the last stage, after which the porch to the house with your own hands can be considered completely finished. First, attach the sheathing boards to the joists (you can either nail them or screw them). If you want, you can also lay some kind of finish on the boards (here, again, everything depends only on your personal preferences).
Attach treads and risers to the stringer, and you need to start working only from the bottom step. The sequence of actions is as follows: fix the riser, install a tread on top of it, and so on. Fasten using a thorn-groove connection or self-tapping screws.


As for the arrangement of the visor and railings, there are no special restrictions here. We have given step-by-step instructions for mounting these elements above. The algorithm of actions itself is the same, but instead of cladding elements and supports, you must use similar wooden parts (you can use any other material you like).

Video - Original do-it-yourself wooden porch
Common mistakes in the process of building a porch to the house
There are several mistakes that are made in the work most often. Let's get acquainted with them.
- Mistake #1. The construction of the porch is carried out after the completion of the construction of the house itself. In such cases, the depth of the foundation is not significant, moreover, it is not associated with the foundation of the house. Consequently, the foundation is affected by groundwater, heaving of the soil, as well as a number of other factors leading to the fact that cracks appear between the porch and the house.
- Mistake #2. Wooden support poles, which are used in the case of arranging a wooden porch, are not treated with antiseptic preparations. The result of such an error is obvious - after some time, the structure has to be rebuilt.
- Mistake #3. The height of the platform is the same as the height of the entrance to the house. In winter, when the soil rises, the height of the porch increases, which can cause jamming of the front door.
- Mistake #4. There is no vapor barrier or it is of poor quality. As a result, moisture will seep through the structure and reach the cladding, which does not allow steam to pass through. Further, this steam will turn into water and simply remain under this material. With the onset of cold weather, moisture will begin to expand, which will lead to a breakdown of the finish.
Do-it-yourself porch made of stone or brick
We left this option to the very end, since it is perhaps the most difficult and time-consuming, so not everyone is able to do everything with their own hands. And it is not surprising, because building a foundation out of bricks, where there is no particular need for accuracy, is one thing, but laying it out perfectly evenly is quite another.

It's no secret that professional masons are engaged in laying bricks only if there are several helpers, whose job is to prepare the cement mortar and supply it in a timely manner. As for the stone, things are somewhat more difficult for them, because uneven edges are extremely reluctant to fit together. In a word, if you do not have experience and a couple of assistants, then it is better to immediately forget about the porch made of stone or brick, otherwise you will simply waste your time and money.

It is much easier to build a concrete staircase, and then choose a facing stone or tile for steps, the size of which is as close to natural as possible. After that, you can easily overlay the entire structure. Among other things, this method is attractive in that even if you make some mistake, then you can easily chip off the desired piece of cladding and repeat the finish without any problems.
How about a canopy over the porch?
If we talk about the visor, then it will serve not only to protect the porch and the staircase itself from rain or snow, but also as a decorative element in the design of the structure. On the net you can find a lot of different options for the visor, in addition, there are photographs in print media specializing in suburban construction.

Note! In most cases, visors are made from a frame - metal or softwood - and polycarbonate / plexiglass as a sheathing material.
Tellingly, visors made of wood must be tinted every few years or, alternatively, coated with special compounds, otherwise the wood will dry out and begin to crack along the fibers. The thickness of the polycarbonate used here should be 7 millimeters, and it is recommended that the material be laid in spans of a maximum of 0.7 square meters. You should not use glass for this, because in winter it may not withstand the mass of snow cover and simply crack (another reason for this may be the deformation of the wood).

Note! The visor should have a larger area than the entire porch to the house with your own hands, by about 50 centimeters. Otherwise, the performance of the main function - protective - can be forgotten.

In the instructions for pouring the base, we already mentioned that it is preferable to install support pillars under the visor even during the formation of the foundation. It is better to install your visor on such supports. In addition, this option will allow in the future (if such a need arises) to equip a closed glazed veranda in just two to three hours.
As for the coating, they can serve as sheet metal, on top of which a beautiful tile is laid, but it is still better to use polycarbonate or plexiglass, which we just mentioned.

Note! To protect the metal that covers the visor from corrosion, paint it with two or three coats of a suitable paint.
It is also important that the visor turned out to be pitched, and on it there was a metal chute installed at a slight slope. We also recommend attaching a chain almost to the ground to the end of this gutter so that water does not splash around when it rains. And in this case, it will smoothly flow down the chain. To avoid the appearance of puddles near the porch, you can equip drainage at the drain point.

Glazed porch - is it possible?
Such a solution as a closed porch has become increasingly popular in recent years. Transparent glass structures look extremely attractive, which is why many are eager to build something similar near their home.

What is a glazed porch? In fact, this is a simple foundation made of stone or concrete with a ladder and a canopy (the latter must be on piles). By means of corners, the length of which corresponds to the height of the piles, a frame is created.

Note! Sheets can be of any height, while the width must be a maximum of 1.2 meters. If the sheet is wider, then its windage will be so strong that the wind, which has a speed of 30 meters per second, will easily break 5 mm glass.
If the distance between the piles is more than 1 meter, then it is better to break them with pseudo-piles. Similarly, you can divide the height using a pair of double corners for this. Thanks to this, you will reduce the load on the sheets of glass, and the porch to the house with your own hands will still be light and transparent.
As you can see, no specific skills or knowledge are required for self-construction of a porch, since even the most complex options can be handled with your own hands. Each of the described operations is basic for the construction industry, and a person with skillful hands will perform them without problems.
That's all, good luck with your work and warm winters! And for a more detailed acquaintance with the issue, we recommend that you watch the thematic video below.
Video - We make a porch with our own hands
A porch is not an easy visor over. This is practically the calling card of the house. buildings can be luxuriously decorated, but if instead of a step there is a wooden box of vegetables in front of the door, and a piece of unevenly cut iron as a roof over the door, the whole impression is lost. How to properly and beautifully for a private home? Photos of the best projects, design secrets and much more on the topic - in this material.
The porch is an indispensable part of the facade of anyone and few people think that in fact this structural detail has a very important function. It is the transition from ground level to the height of the first floor of the building. If houses have, then this height can be quite decent - up to one and a half meters.

At least one, but it will be needed. Before the front door, there must certainly be a platform on which it will be convenient to turn around and open the door leaf so that it does not interfere with the passage.
In addition to the specified main function, the tasks of the porch include:
- preventing entry into the house and dirt;
- in some cases, the placement of seats for relaxation and garden tools;
- in a closed structure performs the task of a heat insulator;
- is an element of decoration of the facade.

Among the minimum design requirements are the presence of at least two or three steps, the minimum size of the site is one square meter.
All about Feng Shui
The shape of the entrance extension depends on the taste and preferences of the owner and can be:
- rectangular;
- angular;
- radial;
- trapezoidal.
Chinese folk signs say that the well-being of the family depends on the shape of this part:
| Semicircle and circle |  | Promote harmony and well-being in family relationships |
| Square | 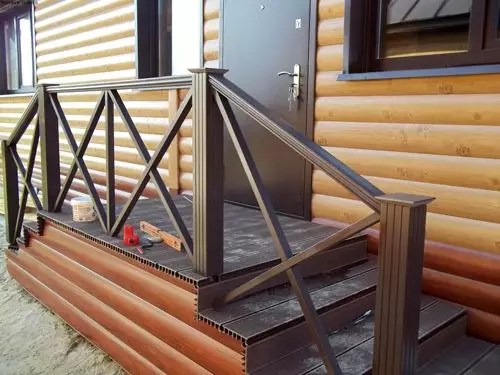 | For success and stability in life |
| Rectangle | 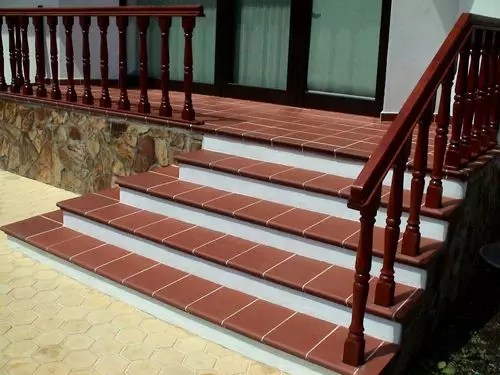 | Helps personal growth and solitude |
| Trapeze |  | Financial stability |
| corner option |  | Unity of children and parents |
According to these canons or not, the shape of the porch for a country house should look good. If this design has rounded shapes, they should be repeated in the lines of the building or adjacent and.
Open and closed mold
The entrance part of the house can be closed or open. In the first case, the construction will be less expensive and not difficult. In the second, the structure will become an integral part of the facade and can be used not only as a porch, but also as.
Note! The porch material does not have to be the same as the façade material. It is only necessary to maintain the general style of design.
Projects of a closed porch for a private house can be very different, consider a photo of the most successful options.
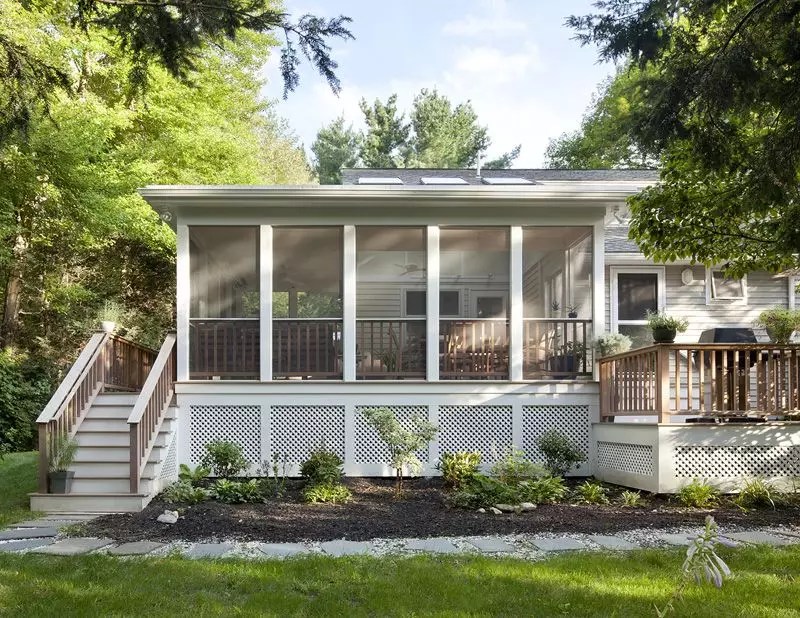
Veranda– glazed on three sides, in which there is no heating system. It can not only be in front of the facade of the cottage, but also recede from its side.
Advice! In order for the attached veranda to look like an organic part of the house, it should be no more than a third of the area of the first floor.

The terrace has no walls. This is an open form, which can be not just in front of the house, but even located around the entire perimeter of the building. In this case, the steps can be located in any convenient place or at several points at once. Most often, the terrace is decorated with railings, they give the structure a finished look.
Metal porch in private houses: photo
Metal structures are strong and durable. Forged options are distinguished by an openwork design. Such extensions can look like real works of art. The basis is metal racks and profiles or pipes. If the house has already shrunk, you can firmly tie it to the metal porch by welding parts of the reinforcement. Forged extensions have only one, but a significant drawback - they will not protect the entrance to the house from cold and wind. Photo of a porch in a private house made of metal:

 The combination of stone and metal is the most durable and monumental option
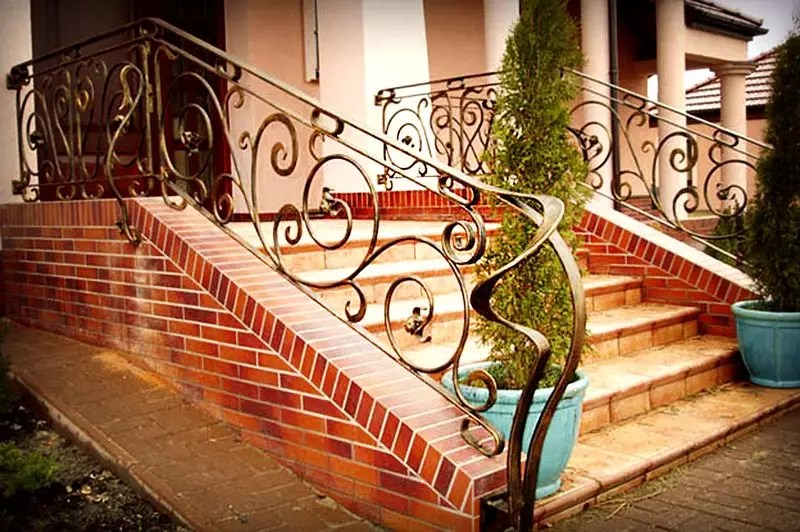

Reinforced concrete structure
This extension option is the most common. Experts advise laying the foundation of a concrete porch along with.
In this case, the steps for lifting are also made of concrete. To form the feet, figured formwork and special spacers are used. So that over time the concrete base does not collapse under the influence of rain and snow, it is covered.


Design features
The appearance of the entrance extension should correspond to the style of the facade of the building. Various materials are used for decoration:
- a rock;
- ceramic tiles;
- wood;
- plastic;
- moisture resistant laminate.
Note! If ceramic tiles are used for facing the steps, it is worth taking care of the anti-slip coating. In its role can be a rubber or polyurethane mat. It is especially important to provide such coverage in winter.

For decoration use original and other accessories.
Common styles:
- Country. Characteristic signs of this are figured balusters and a parapet lined with stone. The visor is made of wood, and the space between the railings is filled with crossed wooden slats.

- implies the use of . The pattern should be in harmony with the patterns on the platbands and cornices. If you add bright coloring, you get a truly royal porch.

- High tech. They use a harmonious combination of metal and plastic. Details are made of galvanized pipes, it is possible to use tempered glass. A good idea would be to use polycarbonate. It has different colors, is easy to mount and bend if necessary.

- Classic. Such extensions are decorated with stone. Marble and granite are best suited for this purpose. Columns are appropriate in the facade. Wrought iron railings can be installed.
Do-it-yourself porch to the house: projects, photos and advice from builders
For the construction of the porch does not require any special skills. First of all, you will need to work. It is necessary to measure the height of future degrees, the doorway.
Here are some examples of projects:

All these options can be reworked to suit your own requirements and facade features.
Do-it-yourself wooden porch construction with a canopy
Stage 1 - design
In each case, the size and shape of the porch may be different, but there are some mandatory parameters:
- the width of the flight of stairs is not less than ninety centimeters;
- slope of the stairs within thirty - forty-five degrees;
- height of steps from 15 to 19 centimeters;
- the width of the steps is thirty centimeters.
These are dictated by the anatomical features of a person and adapted to his average parameters. For people with large growth, all the above parameters should be increased by 3-4 centimeters.
Important! So that rainwater does not stagnate on the steps, when they are arranged, they make a slight tilt forward.
If there are only a couple of steps on the wooden porch, you can do without. But if there are elderly people in the house, it is better to provide for them.

The minimum site size is one square meter. If possible, it is better to provide a larger area. Subsequently, you can put on it for the summer. The flooring level should be provided five centimeters below the threshold of the front door. So even when the boards swell in wet weather, there will be no problems with opening and closing the door leaf.
Stage 2 - arrangement of the foundation
The wooden structure at the entrance is installed on a columnar or pile foundation. You can install such a foundation in just one day. For this purpose, recesses are drilled in the ground, into which asbestos-cement pipes are installed, which are reinforced with reinforcement and filled with concrete mortar. Wooden poles can also be installed, but they will not last long, even if the wood is impregnated with protective compounds. The easiest way to work with screw piles.

Supports of any type are buried to a level below the freezing level of the soil. After installation, a horizontal strapping is attached to the supports.
Stage 3 - installation of stairs
The thickness should not be less than 3 centimeters. Otherwise, when moving furniture or a refrigerator, the load will be such that the steps will simply break. To fix the steps on the stringer, use self-tapping screws. Unlike nails, they won't loosen over time and split wood.
Stage 4 - canopy device
From what to make the roof of the porch - everyone decides, but the issue of a harmonious combination of materials should be taken into account. The combination of concrete and wood is not the best option. The tree goes well with tiles and. Examples in the photo of the visor above the porch:


The shape of the roof can be shed, hipped or arched. The main thing is the presence of a slope for water flow and. The distance between the rafters is not more than thirty centimeters.
Important! All wooden parts of the porch should be carefully treated from wood-eating insects and rot.
Results
To make you feel like in a children's rhyme, a prince on the porch, you have to work hard. A project should be developed that guarantees the stability of the structure and its harmonious combination with the facade of the building.
The entrance to the house, equipped with a veranda or terrace, will become a comfortable place for the whole family to relax. For inspiration, you can use the best photos of the porch for a private house and recommendations on the video.
Any house cannot be built without a porch, because without it it is impossible to enter the premises of the house. Moreover, this design contributes to the protection of the front door from snow and dust, as well as from rain.
The porch can be built from different materials, for example, from wood, metal. Here's how to build a metal porch with your own hands, we'll talk further.
Sketch and drawing of the porch
Measurement of the dimensions of the platform above must be careful, because they must be such that when the door is opened, there are no obstructions.
The door should be positioned so that its lower part is five centimeters higher than the porch platform.
Do-it-yourself foundation for a metal porch
Before starting the arrangement of the foundation, it is necessary to determine the depth of its placement. It should be below the freezing of the soil by thirty centimeters.
If you live in the house all the time, and the temperature in it constantly stays at least ten degrees, then the depth of the foundation can be made a little less.
Stages of work on the arrangement of the foundation
The design of the metal staircase should be slightly recessed into the concrete.
When you fill the foundation, you must leave about thirty centimeters to the top.
When you install the stairs, then the concrete must be added to the top.
After the concrete has been poured, it is necessary to rid it of voids; for this, a special tool is used.
So the air bubbles from the concrete are removed, and the concrete can be covered with a film until it dries completely.
This takes approximately one week and after this time the concrete must not be touched. 
The metal porch has:
- railing;
- Visor.
In the manufacture of stairs, two channels are used, they are its basis.
Then rolled metal is welded to them, which will act as steps.
The design of the steps can be different, and we will analyze one of them further.
They are connected with shelves inward, and the finished steps are connected with shelves outward.
The steps are filled with any suitable material.
 In order to attach the material to the metal structure, self-tapping screws and silicone-based glue are used.
In the event that the porch staircase has more than three steps, the stairs are equipped with handrails with handrails, they are needed to ensure safety.
The porch of a country house is most often built of metal, wood or concrete. The choice of a particular material depends mainly on the architectural features of the building itself. For each of the varieties of street stairs, there are construction technologies.
They will be discussed in this article. You will learn not only how to properly make a porch to a house from one material or another, but also how to tie it to the foundation of the house and what its own foundation should be.
The choice of material for the porch
The choice of material for the porch to the house mainly depends on what its walls are built from. So, at the facade of a wooden building, it is best to build a structure of boards and timber. A concrete or metal structure can be attached to a concrete or brick house. Tiles, bricks, wood or even plastic are often used for decoration:


Porches made of wood for a country house
Porches made of wood have a number of undeniable advantages. They are beautiful and practically do not require additional finishing. Such designs are somewhat cheaper than other varieties.

Construction of a porch to the house. Photo of an aesthetic and not difficult to manufacture design
Wooden street stairs are usually attached only to a chopped or cobbled building or to a bathhouse. But there are exceptions to every rule. The simplicity of the design of such stairs makes them extremely popular and often a carved or ordinary wooden porch can also be seen near concrete or brick houses.

A wooden staircase can be attached, including to a concrete house
Is it worth making a porch out of concrete?
Concrete porch options can be filled. They are also built from blocks. Such a design can be made at the entrance to a concrete or brick building. The main advantage of a concrete staircase is durability. How to fill the porch with your own hands and how to make it from blocks will be discussed below.

Concrete marches look very beautiful and at the same time solid and solid
Metal constructions
Do-it-yourself metal porch at the dacha It is best to make it from a corner or a profiled pipe.
On a note: Very beautiful designs are obtained from galvanized material. However, making them at home is hardly possible. In order to make such a ladder, considerable experience in working with a welding machine is needed. Therefore, at the entrances to private houses, you can often see painted metal structures made of ordinary steel.It is better to make the steps of street stairs made of metal wooden. In some cases, they are made of metal.

Using wooden steps, you can build a very beautiful metal porch.
You can build a porch in a country house or in a country house using different technologies. The choice of a specific one depends on what material will be used for its manufacture:


Assembling a wooden outdoor staircase
First, consider how to make a porch with your own hands to a wooden house. To build even the simplest wooden porch so that it turns out to be reliable can only be done by drafting a project. In this case, the calculation of the stairs should be performed taking into account the following factors:
- The angle of inclination of a comfortable march varies from 27 to 45 degrees;
- The width of the step should be approximately 30cm, height 17cm;
- The height of the railing should not be less than 90cm.

How to build a porch with your own hands. Drawings of comfortable street stairs
To make a simple wooden ladder, you will need to prepare the following materials:
- Edged board for steps and stringers;
- Beam at least 80*80mm. From it it will be possible to make porch supports;
- Board 3cm for a bowstring or stringer;
- Beam 50 * 50mm in order to make a railing and a canopy frame;
- Board 2cm for sheathing the visor.
They continue to build a wooden porch with their own hands by installing supports. To make them durable, it is worth treating their ends with automotive oil. Under them, in the ground at a distance from the wall equal to the width of the upper platform, they dig holes about half a meter deep.

A durable porch can only be built with reliable supports.
At the next stage, the upper platform is knocked together. Next, you will need to make strings or bowstrings. At one end of the kosour, they are attached to the upper platform, and at the other they rest on a concrete pad. Then proceed to stuffing the treads and risers.

Wooden porch with their own hands. Photo of the process of installing steps on stringers
Advice: When building a wooden staircase of a private house, it is better to fix the steps not on self-tapping screws, but on bolts with nuts. Weak fasteners from a constant load in the future simply simply loosen up.So, we have examined how to build a wooden porch with our own hands in stages. However, without a railing and a canopy, the design will be unfinished. Balusters are mounted on metal studs. Next, the handrail is attached to the bolts. After that, you need to make a visor by sheathing a wooden frame with boards.

Making reliable railings with your own hands when building a porch is not so difficult.
How to build a welded metal porch
Now let's figure out how to build a porch to a metal house. The technology of erecting such structures is slightly different from the method of assembling wooden ones. Install supports from a pipe, angle or from a profile of at least 50 * 50mm. Next, you need to make the frame of the upper platform. The bowstring should be made from a channel or corner.

A porch to a metal house can be made using a welding machine
During the construction of the porch, the steps are welded from the corner in the form of frames, to which the racks are welded along the height of the riser. Further, the resulting elements are welded to the bowstrings, to their upper edge. Then the edged board is screwed to the corner.
Since metal is a material that does not tolerate moisture, a canopy must be made. You can equip a porch with your own hands made of metal, for example, with a visor made of profiled sheet. In this case, the frame should be made of a steel corner.

The construction of a metal porch involves the mandatory installation of a visor
If you like arched, domed or curved canopies, polycarbonate can be used instead of a metal profile. You can make a curved frame yourself using a pipe bender. Polycarbonate sheets are attached to it with self-tapping screws with thermal washers.

From polycarbonate you can make a visor of a very interesting shape
Important: Holes for fasteners should be slightly larger in diameter than their rods. The self-tapping screws themselves do not tighten too much when installing the sheet, since polycarbonate sheets expand with increasing temperature.How to build a concrete march
A concrete porch should be attached to the stone building. With your own hands, you can make it filler or block.
Monolithic porch. How to build
When building a porch from monolithic concrete, formwork is used. Its form depends on the chosen form of the march itself. It is easiest to make it from the board, and it is a multi-tiered structure (by the number of steps). All steps must be reinforced. The concrete mixture is made from cement, sand and crushed stone in a ratio of 1 * 4 * 4.

To build a concrete porch, you need to make a multi-tiered formwork
On a note: A semicircular, round or oval concrete porch looks very nice. In this case, during construction, the formwork can be made of tin or plastic.See below how you can build a porch with your own hands (video):
How to build a block porch
In order to make a neat porch of a country house from blocks or from foam blocks, marking should be done. Next is the foundation. The ladder is laid out with dressing of the seams. After construction, a block structure, just like a monolithic one, must be tiled or boarded. In this case, you will get not only a solid, but also a beautiful porch.

The porch can also be built from concrete blocks.
Approximately according to the same technology, a do-it-yourself porch is made of brick or stone.
How to tie a ladder to a house
In the event that the porch of a village house is arranged during its construction, it is poured simultaneously with the foundation of the building.
Important: At the same time, the foundation of the street staircase is laid to the same depth as the foundation of the house itself.
It is best to build a porch at the same time as the building itself
However, more often the march is tied to the building after it has been erected. In this case, you should follow the rules for attaching the porch to the basement, which will be discussed below.
Concrete stairs. How to build a reliable
When attaching the porch of a private house with your own hands, it is worth remembering that heavy structures are not recommended to be fixed rigidly to the foundation and plinth. In this case, roofing material or polyethylene is laid between the march and the house. It can also be plywood or boards impregnated with bitumen. The fact is that an extension is usually made to a house that has already shrunk. A heavy concrete or brick staircase will definitely sit down.
Iron and wood deck
In the event that you make a porch with your own hands from wood or metal, you can attach it directly to the plinth. At the same time, bars or a metal corner are nailed to the wall during construction. A wooden frame or an iron frame of the upper platform is attached to them with one edge.

You can build a metal porch by attaching it directly to the house
What can be the foundation of the porch
How to properly attach a porch to the house with your own hands, we hope now you understand. Only one question remained unconsidered, namely, what should be its foundation. Under the street stairs, you can make a base of different types.
concrete pad
Under light wooden and metal stairs during their construction, a small concrete cushion is usually arranged. Next, let's see how to fill in such a support. They do not lay it on the entire width of the porch, but only under the first step of the march. Thus, it serves as a support for stringers or bowstrings. Its installation is carried out as follows:
- In the place where the ends of the stringers will subsequently be located, a square pit is dug out to the width of the porch. Its depth depends on the weight of the structure of the outdoor ladder and is usually 30-40 cm;
- Formwork from boards is installed in the pit. Further, sand or gravel is poured on its bottom with a layer of 10 cm;

Do-it-yourself porch. Photo of the process of arranging a concrete cushion for a march
- After that, the bottom is poured with a three-centimeter layer of cement mortar;
- A reinforcing cage is installed on the resulting support, which can be made from a 12mm bar;
- Next, the formwork is filled with concrete mix. At the same time, four parts of sand and the same amount of crushed stone are taken for one part of cement grade 300-400.
- At the last stage, the surface of the filled pillow is carefully leveled. In this case, it will be possible to build the most stable porch.
If a wooden or metal staircase has a very wide or long flight, it is worth building a thicker pillow. At the same time, wooden or concrete pillars of the upper platform must have a thickening at the very bottom.

The concrete pillow under the porch can be quite large. You can build it, including the number and steps
Column foundation under the porch to the house
Sometimes wooden ladders are simply supported on poles during construction. At the same time, in addition to the supports of the upper platform, two more wooden posts are dug into the ground under the march (instead of a concrete cushion). In the same way, you can make supports for the bowstrings of a metal staircase from pipe segments. Such a foundation is cheaper than a pillow and its construction is simpler, but at the same time it is less reliable.

You can build a porch with different types of pillars
Strip foundation
The porch device is technologically rather complicated if it is built into the veranda. In this case, most often during construction, a strip foundation is completely poured under the entire structure.

Do-it-yourself porch. Photo of a foundation pit for a strip foundation
This event consists of several stages:
- After the markup is made, a trench is dug around the perimeter of the veranda;
- Sand is poured on its bottom;
- Further, formwork is installed along the edges, which can be made from a board;
- Then, bars 5 cm thick (reinforcement supports) are laid at the bottom of the trench;
- The armature is knitted from a 12mm rod;
- After it is installed in the formwork, the latter is poured with a concrete mixture of the same composition as for a simple concrete pad;
- Formwork can be removed a day after pouring.

How to build a porch. Filling the strip foundation
Important: The veranda and the march itself are erected no earlier than two weeks after the foundation is laid.How to build a slab foundation
Next, let's see how to make a slab foundation for a street staircase. This type of foundation is arranged under heavy structures - concrete and brick. It is a monolithic slab under the entire area of the stairs. It is poured in about the same way as a pillow. The depth of laying depends on the depth of the foundation of the building. Usually it is 50-70cm.

The slab foundation under the porch is not very difficult to make.
On a note: The thickness of the sand or gravel layer according to SNiP must be at least 10 cm.So, now you know how to build a porch with your own hands. Depending on its type, different methods can be applied. Under light street stairs, you can make the foundation cheaper and simpler. Heavy structures require more reliable foundations.


