When starting to build your own house, one cannot but take into account the peculiarities of the soil in the building site. There is such a thing as soil heaving. It characterizes the ability of the soil to change volume with seasonal temperature changes. The indicators vary depending on soil moisture and temperature differences. The construction of a conventional pile-strip foundation in this situation is not entirely justified, since there is a high risk that the supporting pillars will be pushed out. And the use of the foundation according to TISE technology allows you to avoid such problems. A pillar with an extension at the bottom is securely fixed in the ground, and the freezing earth will not be able to exert pressure on it with the necessary force so that it changes its position. This is far from its only advantage. The article will discuss how to make the foundation of TISE with your own hands.
The principle of choosing a foundation depending on the type of soil
A meco-deep foundation (MDF) becomes the only available solution if the groundwater is too close and the possibility of its diversion or the construction of drainage is impossible due to various circumstances. With its erection, another problem arises: during the entire cold season, the force of frost heaving will raise the foundation. And in the spring, after the soil warms up, the base will return to its place, but with minor shifts. Such a phenomenon is not considered particularly destructive for wooden houses, but such displacements are strictly contraindicated for stone buildings.
- Given the above, a shallow foundation is good for sandy soils. And if you arrange it on soils prone to heaving, then only if the planned structure does not differ in large dimensions and weight. In this case, you can not do without reinforcing the walls and the foundation itself.
- The universal foundation according to TISE technology makes it possible not to take into account the described features of the soil. The close occurrence of groundwater and a high degree of heaving in winter will not affect the strength characteristics of a house built on this type of foundation.

Foundation TISE
- Individual construction of any material requires a quality foundation. Most of the existing types involve significant cash costs, while the budget is often completely not designed for them. Therefore, the main principles were the price (which is three to four times lower than analogues) and safety for the environment. At the same time, economy did not affect comfort at all.
- The date of "birth" of the TISE strip foundation can be considered the 90s of the XX century. Then a drill was developed to create a recess for piles with a lower expansion, and all installation costs were minimized. The expansion at the base of the pillar increases its bearing capacity by several times and increases resistance to the destructive force of freezing soil. Further development of the technology was marked by the fact that the developer proposed to raise the grillage connecting the piles at a distance of 10-15 cm from the ground. This made it possible to free it from the loads inevitably exerted by the swollen soil.

Its reliability allows you to build buildings on different types of soil:
- clay;
- loam;
- sandy soils;
- sandy loam.
A certain restriction in its use is imposed only by the presence of quicksand on the site. It will not allow you to create a high-quality foundation for laying piles.
The purpose of the building does not play a role: a house, a garage, a bathhouse or a barn - for the universal foundation of TISE there are no obstacles in these parameters, as well as in the material used. You can build from bricks, foam blocks, timber - the same stability will be ensured in any case. This technology is ideal for low-rise private construction.
Tise pile foundation
- The pile has one feature - an expansion at the bottom, equal to 60 cm. With the advent of a drill capable of making the necessary recess in the ground, the installation process has ceased to be considered complicated and time-consuming. On the contrary, the speed of construction has become one of the advantages of the TISE foundation.
- To call such piles an innovative development would be a mistake. Pillars for the foundation, increasing in radius in the supporting part, have been known to builders since the middle of the 28th century. Another thing is that the increase in the well from below was achieved by not the most convenient and safe methods from special nozzles to the use of blasting.
Having made the necessary calculations of the TISE foundation, you can proceed with its installation.
Foundation tise drilling technology
- The easiest way to work is in sandy soils. Clay and loam are harder and more difficult to drill. But solid soil will not require significant expansion either.
- Drilling takes place to the required depth, but the bearing part of the pile must be entirely below the freezing level. Certain difficulties can be created by a stone of considerable size that has fallen in the way. Then the drill will not be able to pass it. In this case, you will have to deal with the removal of the obstacle manually.
- When the groundwater level is low, the drilled well must be immediately filled with concrete to prevent collapse.

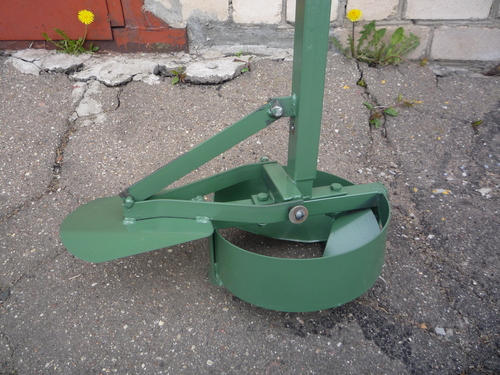
- The drill itself has a simple design, but it makes it easy to create a recess of the required shape and depth. Elements of the mechanism:
- vertical stand with handles;
- folding knife with traction;
- a container for collecting soil and cutters located at the bottom for entering the soil.
- The operator starts the drilling process, which at the first stage does not differ from the usual one, and when the desired depth level is reached, the knife is folded back. Thanks to the traction, he continues to choose the soil, which in turn is collected in a container and easily removed.
Among the common models of the drill, TISE F300, F250 and F200 can be distinguished. The numbers after the letter indicate the diameter of the hole in mm.
How is reinforcement done correctly?
Reinforcements will require both the columnar base itself and the grillage.
Giving strength to piles
- The purpose of this procedure is to prevent the destruction of the expanded base and the support itself in the process of freezing and swelling of the soil. For reinforcement, reinforcement with a diameter of 10 - 12 mm is taken, formed into U-shaped rods. They are connected by wire from above.
- Before mounting the reinforcement, it must be cleaned of dirt, corrosion and paint (if any). This procedure is performed using a metal brush. It is needed so that the remnants of the old coating and dirt do not interfere with the adhesion of the rods and mortar.

- For reinforcement, any long material of a suitable diameter is suitable. The main condition is that it does not have a cavity. That is, the use of pipes is considered unacceptable, since liquid that accidentally gets inside it during frost will cause cracking of the reinforcement, and then the destruction of the pillar.
- When reinforcing the pile itself, you need to make sure that the reinforcing material runs in the center, and does not move to the edges.
Principles of grillage reinforcement
- The diameter of the reinforcement used for this purpose is 10-14 mm. This is the case when more is not better. The inexpediency of using a material thicker in girth is explained by the fact that it will come into contact with concrete much worse. You can calculate the number of rods depending on their diameter. The data are given in the table.
- The rod is cut in length so that it does not reach a couple of centimeters to the transverse sides of the formwork. When forming T-shaped joints and when creating corners, reinforcement elements do not require fastening to each other. It is quite simple to build up a rod that is missing along the length: two pieces are simply overlapped.

Installation takes place as follows:
- formwork waterproofing;
- “cakes” from the solution are thrown onto the insulating layer with an interval of 1 or 1.5 meters. They should not be large, 5-6 cm will be enough;
- the lower layer of reinforcement is laid on the formed "cakes";
- concrete is poured, a little short of the edge of the formwork;
- a second layer of reinforcement is laid on the solution;
- filling is completed to the very top.
Pile concreting
Some difficulties will arise if the groundwater level is high enough. As already mentioned, this feature will require pouring with a solution immediately after drilling work. In the case when it was not possible to do this quickly, or the water managed to fill the well, it will have to be pumped out with a pump or scooped out.

Filling will occur in stages:
- reinforced expansion;
- a wide pile element is poured;
- the pillar itself is strengthened;
- a "shirt" of roofing felt is installed;
- final concreting of the pile.
Installation of grillage TISE
The final stage in creating the foundation using TISE technology is the grillage. Its installation is started after the final solidification of the piles (after about 3 days). Its height for houses made of wood or panel buildings is 20 cm, for brick - 40 cm. In any case, the width is calculated from the thickness of the walls. The need to raise the grillage has already been mentioned above. There are no constructive differences between it and the usual "dug" version. The difference is only in the level of placement. This "suspended state" provides the foundation with the following advantages:
- savings on materials for waterproofing. You can do all the work, while costing five or six rolls of roofing material of the usual price category;
- rise above ground level will not allow the foundation to break on soils prone to seasonal heaving;
- such a "gap" creates a perfectly ventilated space - an excellent prophylactic against mold, dampness and the reproduction of fungi;
- earthworks are kept to a minimum.
If the building is located on a site with a large slope, then the element will be stepped, and a slight rise implies a grillage with a variable height.
Stages of work
- First, the area between the piles is filled with soil, slag or sand to a level with concrete foundations. The width of the "mound" should correspond to the thickness of the foundation tape with an allowance of 200 mm. Everything is carefully packed. Ruberoid or polyethylene is laid on top.

- Formwork is carried out using stakes and edged boards. A little more material will be required than when constructing formwork using a different technology, but this condition cannot be considered a significant drawback.
- It is advisable to carry out the cementing procedure as soon as possible, no more than two days. Preferably still meet the filling for the day. A smooth base can be achieved by laying the formwork with roofing paper. It is impossible to perform work at negative temperatures.
- The formwork is removed on the 22nd day after pouring and the embankment can be removed from under the grillage. The beam can be covered with a layer of liquid waterproofing. If in the future there are plans for the construction of walls using TISE technology, then the entire surface of the grillage is covered, except for the one that will be in direct contact with the wall.
The procedure for carrying out work during the construction of the foundation according to TISE technology

All actions fit into ten main stages
- You will need to mark the axes of the foundation.
- Designate the location of the piles.
- Drill wells.
- Install wall waterproofing.
- Install the prepared frames in the wells according to the technology.
- Fill the foundation pillars.
- Determine the level of the future grillage.
- Install formwork.
- Create a waterproofing layer of the formwork walls.
- Perform reinforcement and pouring of the grillage.
Foundation tise video
Individual construction, like any other, aims to save money without losing quality. The foundation according to TISE technology, meeting these requirements, also allows you to take care of natural resources, and a home craftsman with average skills in construction is able to cope with it. Costs are already kept to a minimum, so it is strongly discouraged to try to save money on the quality of concrete or reinforcing material. Decent quality of "raw materials" will allow the foundation to serve more than one generation of residents of the house.
The desire to build your house cheaply and reliably is increasingly forcing developers to look for more effective novelties in the construction business. Wood concrete houses, aerated concrete or foundations using TISE technology have long come into the construction of low-rise buildings and have become commonplace. Foundation systems on TISE piles with increased bearing capacity are slowly but surely gaining popularity in individual construction, often even where their use does not bring any particular benefits.
What is the foundation of TISE, and where is it used
This is a technology borrowed from the field of industrial construction, which was developed for the construction of high-rise reinforced concrete structures in problem areas. Building a house on a foundation using TISE technology made it possible to solve a number of specific tasks:
- Ensure the construction of a foundation with a large bearing capacity with a minimum amount of excavation, which improves the environment in the area adjacent to the construction site;
- Make the structure of the house insensitive to any vibrations of the ground, for example, subway, trams and railway transport;
- Avoid the destruction of the frame of the house when the soil is heaving, especially for areas with a large depth of soil freezing.
For your information! The last point is most often the main argument in favor of using the TISE foundation.
The fundamentally universal foundation according to TISE technology is not much different from any other pile support systems. The main and main difference is in the design of the TISE pile itself. It resembles an inverted countersunk screw, at the bottom of the pile there is a hemispherical expansion, twice the diameter of the main shaft section.

The TISE pile, unlike other support options, is cast in the ground from a concrete mixture, which greatly simplifies the technology and minimizes the cost of transporting and installing foundation supports. But for casting, it will be necessary to make a well with a depth below the freezing point, and this, for example, for the Moscow region can be 120-150 cm. In practice, the pouring depth is performed in the region from 150 to 250 cm. There are few reasons for such wastefulness, but they exist. Firstly, the concrete body of the TISE pile in the ground contributes to a deeper freezing of the soil, so they try to deepen the support lower, and secondly, the warmer lower soil layers with temperatures from +3 ° C to +5 ° C warm up part of the concrete structure and reduce the risk its destruction.
Do-it-yourself TISE foundation
In addition to a lot of positive aspects, universal foundations using TISE technology have a lot of nuances and conditions for using a pile system. For example, the foundation of TISE, unlike the tape version, does not forgive mistakes, miscalculations and violations of technology are much more expensive than in the classical version. Therefore, before starting work, it will be necessary to calculate the foundation of TISE.
Estimated calculation option for the number and size of TISE piles
There are many recommendations and methods, including practical ones, based on an accurate geological study of the soil and the choice of a method for reinforcing the foundation. But, without experience and full engineering knowledge, it is better not to use complex methodological recommendations, but to assess the number of TISE piles and the step of their installation.
The procedure for assessing the parameters of the TISE pile foundation:
- According to the sketch and accurate data on the geometric dimensions of the house, the materials of the walls, ceilings, roof frame, roofing material, the weight of the house is considered as scrupulously as possible. To the value obtained, it is necessary to add the weight of furniture, equipment and the mass of snow cover of maximum thickness;
- It is necessary to drill at least three points of the pit, a meter deep, in the area where the construction of the TISE foundation is planned, classify the soil and determine the bearing capacity of the pile in tons from the reference data from the table;
- Next, we divide the weight of the building by the tabular standard for a specific size of the support foot of the TISE pile. We get the number of TISE supports. It remains to divide the length of the foundation tape by the number of supports, we get the desired step between the piles.
Advice! The distance between the TISE supports depends on the thickness of the grillage; for a section of 30 cm, an average step value of 1.2-1.5 m can be taken.
In addition to the pencil method for assessing the number of piles, you can resort to specialized programs that allow you to work with the parameters of the TISE foundation as accurately as possible. Most often, this method is used if the construction budget is limited, or documentary detailing is necessary when drawing up estimates for the construction customer.
Preparation for installation of foundation piles TISE
The most difficult stage in the construction of foundations using TISE technology is the drilling of pits or boreholes for piles. Today, almost the entire volume of drilling for TISE piles in the private sector is carried out by hand drills "Tise-F". The work is heavy, the performance is highly dependent on the density of the soil. Before you start to beat the pits, make a standard marking of the foundation on the site, fill in the lines of TISE piles and drilling points. The soil taken to the surface can be laid out in a wheelbarrow or on a tarpaulin, in between it can be removed along with debris and pieces of sod.

- First, we drill at all points of the location of the piles to a depth of about 80-90% of the calculated value. Pre-drilling is best done with a tool without a side nozzle, it is easier to work;
- A couple of buckets of water are poured into each drilled well, and after an hour and a half, they begin to form an expansion or cavity under the bearing heel of the TISE pile. Wet ground will be lighter and faster.
Important! When drilling, try to control the drilling vertical as much as possible; when installing a reinforcing frame made of steel rod, this will allow you to correctly install the reinforcement in the well.
With a large heel diameter, it is quite difficult to select soil from the cavity, but this must be done at any cost. You can add water or rotate the drill with jerky movements - the main thing is that the blade or plow of the tool carefully cuts out the cavity of the required size.
Casting of piles using TISE technology
Before pouring concrete, you will need to perform two more important operations - install waterproofing and reinforcement. The quality of the formation of the side surface of the pile and the resistance of the support to freezing in a humid environment depend on the quality of the waterproofing layer. It is not necessary to explain the importance of the correct installation of reinforcement, this is the guarantee of the strength of the TISE pile, which works both in compression and in rupture.
For waterproofing, a standard roofing material is used. A sheet one meter wide is cut to the size of the depth of the well plus the removal of waterproofing above the soil surface. The workpiece is rolled into a pipe along the diameter of the well, and the seam in the upper part of the insulation is sealed with mastic. The amount of waterproofing removal above the ground must be made to the size to the bottom of the foundation tape plus 3-5 cm. The waterproofing is lowered into the well and fixed with spacer rails.
The reinforcing frame of the foundation pile is most often welded in advance from a reinforcement bar of 10-12 mm with side jumpers. The lower ends of the bars are connected and reinforced with welded-on elements made of thicker metal. The upper ends are released above the cut of the TISE pile to the height of the foundation or grillage. It remains to install the frame in the well and align its position so that the ends of the bars are in the same vertical plane with the threads of the horizontal reinforcement of the foundation.

This method of manufacturing the TISE foundation frame does not provide a full-fledged TISE pile heel, and this is one of the most significant drawbacks of the technology. In some cases, the frame is recruited from individual rods with ends bent to the side. After installing 6-8 rods in the well, they are deployed and oriented so that the bent parts of the reinforcement diverge radially in different directions, thereby reinforcing the heel of the TISE pile. The axial part of the TISE pile is reinforced by installing a conventional welded frame in four bars with ligation with peripheral elements.
Before pouring concrete into the well, the upper part of the waterproofing, protruding above the surface, is put on a rigid collapsible form of wood or metal and covered with sand. For a standard TISE pile with a trunk diameter of 25 cm, 60 to 90 liters of mortar will be required, depending on the depth of embedding. The volume is considerable, so it will be most convenient to use a manual or electric concrete mixer. In addition, this will allow to obtain good mixing of all components of the solution, which means uniform shrinkage of the foundation and a minimum of surface defects.
Filling is most conveniently done through a horn or sleeve. After pouring more than half of the pile cavity, it is necessary to carry out the mortar casing. To do this, we take scrap and ram the mortar, trying to achieve full filling of all voids in the area of \u200b\u200bthe heel of the TISE pile. Similarly, we fill and seal the second half of the cavity of the foundation support.
Advice! When pouring, control the level of the concrete of the foundation so as not to cover the ends of the reinforcement to be tied with the foundation tape.
Specialists involved in consultations on the arrangement of the TISE foundation believe that with a normal viscosity of the solution, part of the cement with water will drain into the bottom of the sole and form a clay-cement cushion. Thus, the bearing capacity of the TISE foundation piles should increase by at least 40-60% of the calculated value.
TISE foundation assembly
In the classic version, the yew foundation is built in the form of a grillage, based on piles at a height of 5-10 cm above the ground. This method of constructing the TISE foundation allows you to protect the concrete mass from moisture and heaving of the soil.
The assembly of the bearing tape of the grillage takes place according to a scheme similar to the casting of the strip foundation. Before proceeding with the assembly of the shield structure for casting the supporting array of the foundation, the space between the heads of the TISE piles must be covered with sand in order to create support under the bottom formwork shield.
Next, the lower and side walls of the formwork of the future foundation are installed on the sand and gravel backfill, the wooden structure must be carefully leveled along the horizon so that when the solution is poured, the moving mass of concrete does not flow in one direction. The sides are reinforced with wooden stakes and props. For a small frame house of 5x8 m, it will be enough to make a foundation grillage 30 cm high and 25 cm wide.
At the next stage, it is necessary to lay a film or roofing felt waterproofing on the bottom of the formwork, the edges of the roofing material of the insulation of TISE piles are cut with a “chamomile” and run under the film layer of the foundation formwork.
The most time-consuming step in casting the foundation tape is the correct laying and bandaging of the reinforcement bars. A 10 mm steel bar is used to reinforce the grillage and foundation. To strengthen the foundation, a lower layer of reinforcement of four threads is laid at a distance of 3 cm from the bottom and a similar top layer.
The ligation of the threads of the foundation reinforcement can be performed according to the scheme proposed in the figure.
During the pouring of the tape with a mortar, anchor bolts or fasteners are embedded in the body of concrete, with which the foundation of future walls will be attached, covered with a film, and kept for at least two weeks until the pre-strength casting is set. In extreme heat for the first couple of days, it is necessary to spray the structure with water once a day.

Conclusion
The TISE foundation can be used for two and even three-story frame buildings. But it must be taken into account that an average building of 350-370 tons on soft ground will require at least a hundred TISE supports, which is quite difficult and time-consuming to do manually. In addition, unlike most foundation schemes, TISE supports require very careful sequential execution of all technological operations and good quality cement.
Foundation TISE - one of those foundation options that even novice builders will like. It is easy to manufacture, economical, affordable and at the same time extremely durable even with a heavy structure. A special foundation construction technology ensures the rapid construction of the foundation without the involvement of expensive construction specialists.
This is how video drilling works. Chise using a manual gas drill
The main features of the TISE foundation
In many ways, the foundation of TISE resembles, but TISE has many advantages.
Firstly, this is a technology in which the piles have an extension along the bottom.
This form with a support cap allows the foundation of TISE:
- perform well on any terrain,
- resist heaving forces,
- reduce vibration if the building is being built next to the railway or major highways,
- have a large bearing capacity.
The grillage of the TISE foundation is installed at the so-called zero level and does not contact the ground, which provides the structure with additional reliability.
Reliability of this type of foundation for do-it-yourself houses
The TISE foundation is built on any type of soil, and even in seismic hazard zones.
For work, a special TISE drill is used, which allows you to install special piles with a support cap. This drill allows you to build with your own hands, great for frame houses.

Site preparation and marking
Preparatory work includes clearing the site of debris and marking the future foundation.
Basic construction work foundation of TISE consists in drilling wells and pouring them with concrete mix. You can make holes for future piles yourself using a special drill with a removable plow.
Building a house using TISE technology step by step
Step-by-step instructions for building a TISE foundation from 7 steps
- Lot leveling
- We build a cast-off for the foundation
- Drilling wells for the foundation
- Expanding wells
- We reinforce
- We lay roofing material and pour concrete
- We make

Masters with experience in building foundations using this technology advise to make several wells of the main drilling at once, and only then, using a special nozzle on the drill, expand the base at once for all drilled wells. This will allow you to save time on re-equipping the drill (installing the plow).

How to soften the ground for the Chise foundation?
To reduce soil resistance during drilling, you can pour several buckets of water into the pit. This will soften the hard and things will go faster.
Pouring the foundation with concrete mix
When the wells are properly drilled and each one has a hemispherical recess at the base, you can proceed to install reinforcement and fill the well with concrete.
The reinforcing bar is bent and installed along the entire length of the future pile. It is most convenient to use as a pile, which keeps its shape well and is easily distributed over the surface of the well.
It should also be borne in mind that the construction of such a foundation will require a fairly large amount. Therefore, in order not to delay construction, it is better to order a concrete mixer.
Production of grillage on the foundation of TISE
When the stage of pouring piles is completed, we proceed to manufacturing. To do this, a wooden formwork is made, which must be upholstered with polyethylene. The formwork is fixed with studs. Next, a reinforcing mesh is installed under and the concrete mixture is poured.
The foundation of TISE in private construction is already familiar to many today, and those who built houses using it speak of its reliability, ease of construction and economy, the absence of construction shortcomings, also cannot but please the builder.
Where to buy Bur Tise and what is the price?
Watch the video of a professional in the field of foundation construction using TISE technology
From this article you will learn about the advantages and disadvantages of foundations built using TISE technology. We will tell you how to arrange the foundation with your own hands, we will give step-by-step instructions. You can learn about the nuances of a monolithic pile grillage and the piles themselves.
Individual ecological construction pursues many goals, one of which is a careful attitude to natural resources. Gentle technology allows you to get the desired result - a solid durable house, without spending extra energy and raw materials. We will talk about the foundation, the construction of which will be handled by a mediocre master even alone.
The basis of technology
The main advantage, or as they say today - "trick", of such a foundation is that it does not come into contact with the ground. More precisely, the contact area is minimal and is reduced to the surface of the piles. The tape grillage rests on them and is in limbo. This provides the following benefits:
- Reinforced waterproofing of the foundation is not required. For all waterproofing work, 5-6 rolls of ordinary inexpensive roofing material are enough.
- Seasonal heaving of the soil* does not affect the grillage tape. This factor often causes a break in strip foundations.
- The minimum volume of earthworks.
- The ventilated space under the ceiling is a reliable protection against dampness and debate.
- Earth energy is used. With the correct organization of the basement and the air under the house, a constant temperature will be maintained in the underground sinus.
* Soil heaving - the property of the soil to change volume with temperature changes. Depends on soil moisture and temperature.

The disadvantages can be called conditional:
- For the formwork of the beams, you will need more boards.
- It is necessary to withstand at least 21 days before demoulding.
"Hanging" grillage does not differ structurally from dug in. The difference between them is only in the level of placement.
Piles TISE
The peculiarity of TISE piles is that they have a developed support part in the form of an extension along the pile radius. It is difficult to call this a novelty - this design has been used in industrial construction since the middle of the 18th century. The main problem - increasing the space in the bottom part of the pile pit, was solved in different ways - from special nozzles to the drill rod to the explosive method.
The work of industrial mechanisms was taken as a basis by TISE engineers and created a special drill with a folding knife. There is no other way to make expansion at a depth of 1.8 meters under these conditions. The drill itself has a rather primitive design and consists of the following elements:
- Vertical bar with handles.
- Soil collector equipped with cutters in the bottom part for cutting into the ground.
- Folding knife with pull to the handle.

Drilling a pit for a pile is elementary - having reached the desired level by conventional drilling, the operator throws back the knife with the help of traction and selects the cavity, continuing to rotate the drill. The soil is collected in a soil collector container and the operator removes it to the surface. The depth of laying piles is set from a single rule: the bearing part of the pile must be completely below the freezing level of the soil.
At the moment, two original TISE-F200, F250 and F300 drills, as well as countless copies and analogues of them, can be found on sale. The numbers in the title are the diameter of the hole in millimeters. Drill cost:
- TISE-F200 - 75 USD e.
- TISE-F250 - 80 USD e.
- TISE-F300 - 85 c.u. e.
Piles and drill TISE on video
Foundation construction
The TISE foundation consists of two structural elements - a pile row and a grillage-beam, respectively, and the work will be divided into two stages. First you need to arrange all the piles, and then make the grillage.
Pile concreting
After drilling all the pits, you should proceed to the preparation of frames for piles. These can be simple frames made of A3 Ø 12 reinforcement - 3-4 working rods per pile. Take the length with a margin of 400-600 mm. Connect the working rods with clamps.
Progress:
- We make a footing - we add at least 50 mm of concrete to each pit. If your work requires precision, this step is to level the horizon at depth. To do this, stretch the cord in the horizon so that it does not interfere with work, and adjust the level with a layer of concrete, focusing on the cord.
- We install frames and concrete the headstock of the pile.
- We install a "shirt" of roofing material.
Video - how to make a sleeve for a pile
- We concrete the piles through the conductor, as shown in the video. The height of the column on concrete is from 100 to 200 mm above ground level.
Concreting of TISE piles on video
Further steps will vary depending on the material of the grillage. If it is wooden, like the rest of the house, then the piles can be cut with a grinder along the desired horizon after hardening. If the grillage is monolithic, it is necessary to focus on the stretched cord during concreting so that the concrete level of the pile is appropriate.
Concrete grillage
After the mortar has hardened (3 days), the foundation can be continued.
Progress:
- Fill the space between the piles with soil or sand/slag flush with the level of concrete (horizon) to a width equal to the width of the tape + 200 mm. Tamp with boards or hand rammer.
- Lay the contact plane with roofing material or polyethylene.
- Bend the reinforcement of the piles at the level of the future working rods of the frame of the beams.
- Tie the frame in accordance with the requirements of reinforcement. In this case, the releases of the pile frame must be tied into the frame of the beams.
- We install the formwork according to the requirements for the formwork.
- We concrete the beams, focusing on the horizon, which is better to transfer to the inside of the side. To do this, use high-quality concrete from pure raw materials with proportions of 1/3/3-4. When laying, use a vibrator - hanging beams must be reliable.

After laying concrete, it is necessary to withstand at least 7 days to continue work. After removing the formwork after 21 days, you need to remove the bedding from under the beams. The landscape will level out and there will be gaps between the bottom of the beam and ground level. The beam can be covered with one layer of liquid waterproofing (except for the contact surface during the further construction of TISE walls).
The final view of the TISE foundation on video
Further operation of the foundation will require the organization of underfloor ventilation. This can be done by closing the gap with a perforated sheet of laminated galvanized metal. The described technology is extremely economical. Attempts to make it even cheaper through the use of low-quality raw materials will inevitably lead to big troubles that will start from the foundation. Decent concrete and a sufficient amount of reinforcement will extend the life of the foundation up to 180 years.
Is the foundation of TISE. Its main difference is that at the end of the pile there is a hemispherical (dome-shaped) thickening. This form allows the use of pile foundations on heaving soils, while the amount of land work remains very small.
Piles TISE
The main disadvantage of the classic pile foundation is that with strong heaving, the support can simply be pushed out. But since the idea itself is very attractive - it is built quickly at a minimum of costs - on difficult soils they began to make a sole at the bottom of the pile - a rectangular reinforced plate. But with this option, the volume of land work immediately increased several times: for each pile, it is necessary to dig a foundation pit larger than the planned sole. But the building stands normally even on soils with severe frost heaving.
Under piles made using TISE technology create a similar thickening. But there is no need to dig pits. This extension is formed using a special knife, which is attached to a branded drill. This knife forms an expanded dome. Further, the whole technology almost exactly repeats the process of erecting a pile or pile-grillage foundation.
Previously, expansions were also practiced, but they tried to do them with the help of microexplosions or by picking with a blade on a long pole. The main innovation in TISE technology is a drill with an adjustable blade that opens. With it, making the expansion of the sole much easier.

Advantages and disadvantages
TISE foundations are rapidly gaining popularity: at minimal additional cost, a more reliable foundation is obtained. So, its advantages:

If a pile or pile-grillage foundation is recommended for your house, it makes sense to make TISE piles. With a small increase in the amount of work, you get a significant increase in reliability. After all, designers do not like pile foundations because it is impossible to find out what kind of soil is under each support. Therefore, it will not work to predict how reliable and stable the foundation will be. And the TISE foundation has a wider support, which reduces risks. It is still impossible to predict anything, but a large load distribution area is always good.
However, there are also disadvantages. Main: the heel of the TISE pile cannot be well reinforced. You can lower the reinforcement cage to the very bottom, but the expansion cannot be reinforced. Therefore, there is a possibility that this thickening will collapse.

Piles TISE - the basis of the pile-grillage foundation TISE
There is another drawback, but already from the practice of using a drill: it is not easy for them to work. The design itself is interesting. This is not a blade wrapped around a rod, but some kind of container with a composite bottom. On the plates that form the bottom, four blades are welded, set at an angle. When you spin the drill, they loosen the ground. Since the bottom is not solid, the soil gets into the body, from where it needs to be removed.
The order of work is as follows: they twisted the drill several times around its axis, took it out, shook out the soil. They lowered it into the hole again, turned it several times, and so on. The technology is simple, but the work is tedious. The device itself weighs 7-9 kg, plus soil. Raise, lower it often. In general, tedious. Plus - no mechanisms are needed. Minus - the work is physically difficult. Especially if the soil is rocky or made of dense clay.
Where to use
There are no restrictions on the types and materials of buildings: you can make a TISE foundation for wooden, frame, brick and block buildings. Floors - up to three.
For soils, the restrictions are the same as when using pile foundations: it is necessary that the piles transfer the load to the soil with a normal bearing capacity. To decide whether or not to use TISE, a geological study of the site is necessary in the place where construction is planned.

Since the base of the pile is expanded and the resistance to pushing forces is greater, this technology can be used on heaving soils. But at the same time, you need to consider: it makes no sense to put piles closer than 1.5 meters. If placed closer, one outsole extension will overlap the other. On the other hand, a pile diameter of more than 30 cm cannot be done either - there is no such drill. If the bearing area with such parameters is not enough, you need to use a different type of foundation.
Reviews of the corporate storm
The main questions of developers are related to how realistic it is to drill wells manually using a proprietary drill. Looking at the video, it seems that this task is not easy. But here are some reviews.
In my area, the soil turns out to be different: where is loam, where is dense clay, and such that it can only be chopped with an ax. At first I thought about renting a motor drill, but decided to try it right away with a drill. And nothing, not very hard. As a result, I decided that a motor drill would slightly speed up the process, so I made all 40 pieces by hand. During the day, 5-6 2-meter wells were obtained. They were drilled easily, but with the expansion it was hard: I already had dense soil there, it was difficult to turn with an open blade.
Oleg, Kharkiv
I modified the purchased TISE drill: I welded additional teeth, instead of a rope that opens the blade, adapted a rod - now you can put pressure on it, and not just pull it. And most importantly - lengthened the handle so that you can twist it together. While drilling expansions, they twisted it by 90 °, but then it became much easier to work. In general, I'm satisfied.
Nikolai, Krasnoyarsk
Calculation of the TISE foundation
The method of calculation is no different from the calculation in the general case. The load from the house is calculated and then compared with the total bearing capacity of the planned number and diameter of piles.
First, place the piles on the plan of the house. They must be in the corners and at the junction of the walls. If the distance between the piles is more than 3 meters, intermediate ones are placed between them. So arrange all the supports on the plan, adhering to the rule:
- the minimum distance is 1.5 meters;
- maximum 3 m.
Then calculate the load from the house. To do this, you first need to calculate the weight of the house (all building materials + furniture, plumbing, heavy household appliances).

Speaking on average, for buildings made of brick or shell rock, 2400 kg can be taken for each square of the area, 2000 kg from light building blocks (foam concrete, aerated concrete, etc.), from wood and carcasses - 1800 kg. These averaged norms can be preliminarily guided. If you decide to take everything seriously, you will need to follow the entire methodology: count the materials of walls, floors, roofs, finishes, etc. Since different technologies and materials can be used, the discrepancies can also be significant.
The resulting value is multiplied by the correction factor - 1.3 or 1.4. This is a margin of safety. The resulting figure is the load that will need to be transferred through the piles.
Now, according to the table, select what diameter the pile should have so that it can transfer the necessary weight.

If the planned number of columns with an expansion of the selected diameter can transfer the required load, you do not need to redo anything. If the transferred mass is too small, it is necessary to either increase the number of piles or make the "heel" of a larger diameter.
TISE foundation: work order

Foundation TISE - a subspecies of the pile-grillage foundation. And the technology of its manufacture is no different. The difference is in the drilling process. No others. . In this article, we'll give you some practical advice.
Difficulties in drilling
If the soil is very loose - fine sand - the walls of the well may crumble. To prevent this from happening, pour water. The sand will compact and hold its shape. Water will help even if the soil is very dry and dense. After drilling a few tens of centimeters, fill the well with water. It will soften the soil, it can be chopped with a shovel or other device, and then removed with a drill.

Difficulties are created by powerful roots of trees and bushes. They need to be cut down. To do this, the ax handle is welded (attached) to the handle. Dropping it sharply into the hole, crush the roots.
How to generate an extension
After reaching the design depth of the well, a plow is attached to the drill. It can be fixed in two positions: to form a heel of 50 or 60 cm. The plow is tied to a rope.

Lower the drill down, the rope is taut, the plow is pressed. The rope is released, it falls down under its own weight. You start to rotate (it's hard - the cutting surface is large), the blade cuts the ground, forming a thickening.
You can rotate both clockwise and counterclockwise. If clockwise, then try not to push down: you don’t need to go deep. When rotating counterclockwise, only cutting the soil without deepening occurs, but another problem arises: the soil is poured under the drill, pushing it up.
The optimal order of work is as follows: they scrolled several times counterclockwise. When you feel that the blade has rested against the vault, make a few turns clockwise, gaining cut soil into the drill body. Pull out the drill, pour out the soil. Repeat several times until an expansion is formed (the soil stops picking up).
On hard soils, working with an open plow can be problematic. Then you can form the extension in stages. First set the plow to the smallest distance, then increase it to the desired size.
Filling with concrete
If the groundwater level is low, no problems arise: fill in, process with a vibrator. All.
If the groundwater level is high, the heel can be poured immediately after it has been formed. It will only be necessary to insert the armature. Then knit it before drilling. The filling of the main part of the well can be left “for later”.

If there is a lot of water and it arrives quickly, you will need a large bag of thick film with a hole at the bottom. Insert it into the well and pour concrete. Since it is denser, it displaces water. Bay heel, pull out the bag. It will come in handy for the following piles.
The video below demonstrates the technology for building a foundation with TISE piles and a high grillage.


 Shrub snail keeping at home")

")
")


")


