Under most of the old houses and under each new one, as well as under the cottages built with the latest construction technologies, there is an underground floor - this is the basement, which the owners usually use to store vegetables, preparations, and seasonal items.
In modern buildings (brick or wooden house), the basement can be equipped as a functional living room, for example, an office, workshop, gym, home theater, billiard room, etc.
Regardless of the purpose, you can use the basement only if the temperature in it is comfortable. Even if the height of the basement does not allow arranging a full-fledged room in it, it still needs to be insulated, since basement thermal insulation is one of the most effective ways to reduce heat loss in the house.
Do you need to insulate the basement?
From the description above, it becomes obvious that yes, it is better to insulate the basement. Here are some more arguments, for those who doubt:
- useful area is effectively used;
- the appearance of fungi and mold in the basement, which are a source of unpleasant odor and deterioration of the microclimate on the lower floor of the house, is excluded;
- the temperature in the insulated basement does not drop to minus;
- basement insulation in the house makes it possible to protect the foundation from dampness and deformation due to heaving of the soil;
- the rate of destruction of the base of the building is reduced;
- the consumption of electricity or gas for heating the house is reduced.
Note. If the basement is not insulated, according to GOST 9561-91 "Reinforced concrete floor slabs", it is necessary to insulate the ceiling that separates the floor of the first floor from the non-insulated zone. The same requirement is spelled out in SNiP 2.08.01-85
August 28, 2016Specialization: Capital construction works (laying the foundation, erecting walls, constructing the roof, etc.). Internal construction works (laying of internal communications, rough and fine finishing). Hobbies: mobile communication, high technologies, computer equipment, programming.
Once I performed the insulation of the basement from the inside. One of my clients wanted to make something like a men's club in the premises under the house - to equip a billiard room, a gym, a hookah room and a home theater downstairs. The idea, in my opinion, is interesting and sensible, I myself already regret that I gave the basement at my dacha for storage of various unnecessary rubbish.
I took up the job with pleasure, as I like to make repairs in cottages located outside the city. And you earn money, and it seems like you enjoy being in the bosom of nature.
According to the described technology, by the way, it is possible to insulate the basement both in a private house and in other buildings (for example, a garage), so even if you are not going to become a homeowner in the near future, the proposed instructions will not be superfluous.
Choice of thermal insulation materials

But before proceeding to the presentation of the order of work, you need to decide on thermal insulation materials. Considering the specifics of operation in the basement (where high air humidity and significant temperature fluctuations are often observed), heaters should have the following properties:
- hydrophobicity - the material must retain its performance even when wet;
- mechanical strength - a heat insulator that is installed on the floor and from the outer part of the walls must withstand the compressive force that is transmitted from the surrounding soil;
- long service life, and without loss of its technical characteristics.
After analyzing the heaters on the market, I can highlight several materials that are more or less suitable for work (although not without some drawbacks):
- Extruded polystyrene foam(not to be confused with foam). This is a cellular material with closed pores, which retains thermal energy well, but at the same time has sufficient strength and hydrophobicity.

In addition, I can highlight a few more important advantages of EPPS:
- light weight - the insulation does not exert a large load on the structural elements of the building;
- antiseptic properties and non-susceptibility to biocorrosion - fungus and mold do not develop on the material, it does not collapse during operation from the activity of putrefactive bacteria;
- does not crumble - when cut, it does not break up into separate granules, which increases the ease of installation;
- safe for others - it can be used for thermal insulation of residential premises.
The only negative is a slightly higher price when compared, for example, with foam. However, it is fully justified by the highest performance properties.
- Expanded polystyrene foam(this is the styrofoam). It is a relative of extruded polystyrene foam, but has much lower strength, so the insulation layer requires external protection in the form of sheathing material or screed.

In addition, for some reason mice love to gnaw on foam, so if they live in your basement, you will first have to get rid of them. In addition, the material is combustible and crumbles when cut.
Despite several disadvantages, polystyrene foam is very widely used for basement insulation due to its low cost.
- Penofol. Insulation, which is a foamed polyethylene, on one surface of which aluminum foil is glued. The latter plays the role of a reinforcing layer and a heat-reflecting screen, which significantly increases the effectiveness of thermal insulation measures.

Despite the many advantages, foam foam is used as an additional material, since its thermal conductivity and thickness are not enough to effectively retain heat inside the basement.
I use penofol as an insulating membrane, protecting the layer of insulation installed from the inside from moisture.
- Polyurethane foam. This is a polymer foam that is applied to the surfaces to be treated using a spray gun and a compressor. In this way, you can easily and quickly insulate not only all surfaces of the basement, but also the engineering communications that are laid in it.

After solidification, a completely sealed insulating layer is formed without seams, joints and voids inside. Foam clogs all pores, cracks and surface defects, excluding the formation of cold bridges.
Polyurethane foam also has hydrophobic properties, so it does not require waterproofing. But it violates the vapor permeability of the walls, so water vapor will accumulate in the basement, which should be removed using effective ventilation.
Well, and most importantly, for the thermal insulation of rooms with the help of PPU, special equipment is needed, so this method of insulation is not used so often.
- Mineral wool. Insulating material, which is made from fibers glued together, obtained by melting basalt or other minerals. The heater is very effective, inexpensive and easy to use.

It also has a lot of downsides:
- when mineral wool gets wet, its thermal insulation properties deteriorate greatly, so you need to buy material with hydrophobic impregnation and carefully waterproof the insulation layer;
- wool has poor mechanical strength and does not withstand external loads, that is, I do not recommend using it for external insulation;
- the installation of this insulation requires the arrangement of the crate, which increases the time for work.
Despite all the disadvantages, I very often used basalt wool for arranging basements.
Do not use glass wool for work, which looks like mineral wool, but is made from other materials. Firstly, it is highly flammable, and secondly, during installation and during operation, it spreads very small particles of glass dust around itself, which is harmful to health.
As you can see, the choice is quite large. And this is not all possible options. As for me, I prefer to use extruded polystyrene foam and mineral wool. Although sometimes, for the sake of economy, clients ask me to use foam.
But I will talk in more detail about the methods of using different heat insulators later.
Internal insulation

Although I consider external basement insulation more effective (which I will discuss below), I will begin my story with a description of the internal one.
The fact is that usually people think about thermal insulation measures after the construction of the basement, basement, and sometimes the whole house is completed. Therefore, rarely does anyone resort to external insulation, which requires re-execution of earthworks.
And it will be easier to do the inside. Especially if you have not yet filled the basement with all sorts of rubbish, as was the case in my case.
Surface preparation
Let's start, as usual, with the preparatory stage. It consists of several items:
- First of all, it is necessary to clean the surfaces of the walls, ceiling and floor of the basement from debris, dust, remnants of building materials, and so on. I immediately lower the necessary tools and materials down so that I don’t have to run up and down the stairs later.

- Then you need to inspect the walls for defects, potholes, cracks, and so on. If the basement is not plastered, a plaster mixture should be applied to the walls along pre-fixed beacons. When you are going to install sheet insulation material, the surface must be flat and without vertical drops.

- Detected cracks should be repaired in advance with mortar or sealant. Subsequently, after installing thermal insulation and decorative, it will be impossible to do this.

As you can see, the preparation will not take long, but it cannot be considered complete without the waterproofing measures, which I will tell you about in the next section.
Waterproofing
The basement of a private house, although not a gloomy dungeon of a medieval castle, is rather damp. And the point is not only in the water vapor that is formed inside as a result of human activity (by the way, they can be done by ventilating the basement), but also in the ground moisture, which no, no, and will seep inside through the building envelope.
Therefore, surface waterproofing is necessary, which is measures aimed at counteracting the penetration of moisture to the insulation layer and further into the premises of the future men's club.

Most often, for waterproofing surfaces, I had to use PVC film, coating mastic (such as liquid rubber), roofing material, and so on.
If you want to use something more efficient, I can suggest the following options:
- coating surfaces with cement-based waterproofing compounds;
- covering the walls with penetrating waterproofing, which prevents the flow of water by forming crystals of a special shape inside the walls.
Coating waterproofing with mastic is quite simple. The finished mixture is taken (or the composition is prepared by mixing several components), after which it is applied to the walls with a roller, coarse brush or spatula. As an example, I can name Drizoro Maxseal Super or something similar.

For penetrating waterproofing, you can use some kind of compound like Penetron or Kalmatron.
I used a Hydro-S blend. There are several varieties, choose which material suits you best:
- B - fast hardening;
- B - waterproof;
- U - universal;
- P - antifungal.
The advantage of penetrating waterproofing is that it does not allow water to pass through from the outside, but allows moist air to escape from the room. This is very important to create a comfortable microclimate inside the basement.

Only after the waterproofing is completed, you can proceed to the insulation, starting from the walls and ceiling. More on that below.
Insulation on walls and ceilings
These surfaces are insulated a little using different technologies. I'll start my story with a story about how to insulate walls:
- Surfaces are waterproofed. I described in detail how and what to do in the previous section.

- Styrofoam sheets are glued(you can use extruded polystyrene foam, but inside this will not give a big advantage, since the heat insulator layer will later be protected by cement mortar).

Foam sheets are fixed with a special adhesive composition. You can take Polirem CKc-131L or any other with suitable specifications. It is necessary to apply the adhesive composition along the edges of the foam sheets and in the center. It is not necessary to cover the entire surface.
After processing with glue, the heat insulator sheet is applied to the surface and pressed slightly until final fixation. The second and subsequent rows of foam should be laid so that the seams of the material are staggered.
Make sure that the joints between the individual parts are minimal. I advise you to additionally fill the gaps with mounting foam.
- The insulation is fixed with dowels. These are special plastic fasteners with wide caps.

You just need to drill the insulation itself with a puncher and make a recess in the wall behind it, and then screw the dowel into the hole. The screw in it is enclosed in a plastic shell, therefore the fittings themselves will not cause the formation of cold bridges.
- A reinforcing fiberglass mesh is installed on top of the foam. It is necessary so that the surface cement mortar screed holds well and does not crumble over time.

Choose a material from any manufacturer, for example, VIKBUD or something similar. On the surface of the foam, the mesh is fixed using the same glue with which you mounted the thermal insulation sheets on the wall.
- Styrofoam is plastered with cement plaster. On the reinforcing layer, this will not be difficult to do.

I advise you to use mortars that are specifically designed for use in rooms with high levels of humidity. For example, Polymin ShTs-2. After hardening, it forms a hard layer, which can be covered with putty or decorative plaster.
Now about the ceiling. On a horizontal surface, it will be difficult for you to glue the foam, then the mesh, and then plaster it all. The back will just crack.
Therefore, I will describe a slightly different technology. We are talking about laying foam or mineral wool in a pre-made crate.
This technology will be indispensable for those who are looking for how to insulate a wooden floor from the bottom of the basement. In this case, the whole process is simplified, since the floor support logs will already play the role of load-bearing elements of the crate.
So, the sequence of actions for warming the basement floor is as follows:
- The surface of the ceiling is waterproofed. We discussed this question several times, I will not repeat it.
- Lags are installed. Wooden bars are suitable for them, the cross section of which is equal to the thickness of the insulation used. For example, if mineral mats are 10 cm thick, then bars with a section of 10 by 5 cm can be placed.

They must first be impregnated with antiseptic and water-repellent compounds. As you understand, they will be operated in humid air, so this treatment will significantly increase the life of the insulation.
It is possible to use a galvanized profile, but in this case, the formation of cold bridges (through metal) is possible, which reduce the efficiency of thermal insulation.
- Installed thermal insulation. It can be either foam or mineral mats.

In the first case, the material should be cut so that it fits snugly between the lags. Then no additional fasteners are required. For greater sealing, the gaps between the foam sheets must be blown out with mounting foam.
In the second, mineral mats must be cut so that their width is slightly larger than the distance between the lags. Then they will become unawares and will not fall. If you use rolled mineral wool, you can fasten U-shaped fasteners for a galvanized profile along the edges of the lags, into which you can insert insulation.
- A vapor barrier is installed. This is a special film (for example, Strotex 110), which protects the insulation (this is very important for mineral wool) from moisture vapor.

Penofol can be used instead of vapor barrier, especially if you intend to heat the basement. Foamed polyethylene will perform an additional heat-insulating function, and aluminum foil will serve as an effective heat-reflecting screen.
You can fasten the film with staples and a construction stapler or galvanized nails with wide hats.
- The control grille is mounted. Wooden blocks 3-4 cm high are stuffed on the logs on top of the vapor barrier layer.

This is necessary so that a ventilation gap is formed between the vapor barrier layer and the facing material, through which the accumulated moisture will be removed from the insulation layer.
- Decorative material is installed. For the basement, I recommend using plastic panels. They do not require additional decorative processing and are perfectly operated in humid air.

By the way, this method of insulation is also good because under the false ceiling you can perfectly hide engineering communications, which are usually located in the upper part of the basement.
On this work with the ceiling and walls can be considered finished. But we still have half. After all, you do not want your feet to freeze during a pleasant game of billiards.
Floor insulation
To insulate this surface, I recommend using extruded polystyrene or expanded clay granules. I talked about the first material, and the second is porous pebbles, having a small weight and a low coefficient of thermal conductivity.
The advantage of this material is that it is inexpensive and easy to install.
But first, I’ll tell you how the basement floor surface is thermally insulated using sheets of extruded polystyrene foam:
- First, you should take care of the repair and leveling of the floor. It is necessary to inspect the rough floor screed and repair all cracks and potholes found, as well as get rid of the protrusions.

If the floor is flat or the height difference in different parts of the room is small, you can do nothing or use a self-leveling compound. Otherwise, you will have to resort to a screed on the beacons.
- Then you need to waterproof the floor. To do this, I suggest using a pasting material. And better on an adhesive basis, so as not to mess with gas burners and industrial hair dryers (after all, we are not on the street), directing the sheets to the floor.

The main thing is to ensure that the seams between the waterproofing sheets are carefully sealed.
- After that, extruded polystyrene is laid on the waterproofing layer. You can use sheets of 10 cm or two layers of sheets of 5 cm. I recommend the latter method, as in this case it will be possible to place the seams apart and avoid the formation of cold bridges.

XPS sheets just need to be laid out tightly on the floor, fixed with something or glued optionally.
- Reinforcing mesh is installed. What is needed is not the fiberglass, which I proposed to reinforce the walls with foam plastic, but metal. Only she can strengthen the surface of the cement floor screed.

It is necessary to lay out the mesh not immediately along the insulation, but by raising it above the surface by a couple of sentiments. So that after pouring it was in its thickness.
- The floor is cemented. Dry building mixes are used, from which the solution is prepared. Do not forget to carefully level the surface of the uncured concrete, so that later it is easier to lay a decorative coating.

Well, the second method of thermal insulation is the use of expanded clay. In this case, the scheme is somewhat similar to the one used to insulate the ceiling.
You need to do the following:
- waterproofing should be laid on the repaired and leveled floor surface;
- from above, install support logs from wooden bars pre-treated with antiseptics and water repellents;
- pour expanded clay granules inside between the bars;
- cover the entire surface with a waterproof membrane from above;
- sew up the entire surface with plywood sheets, on which you can then lay your chosen floor covering.

At this point, internal insulation measures can be considered completed.
External insulation
Now I want to talk about external insulation, which I consider more effective than external insulation. In this case, you can not only create a comfortable microclimate inside and reduce heating costs, but also save house structures from destruction as a result of negative external factors.
The only disadvantage of the technology is that this type of insulation should be used at the stage of housing construction.
So, the instruction for warming the basement from the outside with expanded polystyrene (extruded) looks like this:
- First of all, waterproofing of surfaces is carried out. For this, I recommend using bitumen-based coating compositions.

They form a seamless sealed waterproof layer that retains elasticity during operation and does not crack from possible shrinkage of the base.
Coating waterproofing can be applied with a roller or brush. In this case, the surface to be treated must be previously cleaned of dust, earth and debris, and also repaired.
- Sheets of extruded polystyrene foam are installed. They can be glued with bituminous mastic.

The technical characteristics of XPS make it just an excellent choice for exterior basement insulation. The fact is that, unlike polystyrene, this material has sufficient strength and does not lose its shape, size and heat-retaining properties from contact with the soil after backfilling the foundation.
It is better to install insulation in two layers so that the seams of the first and second layers do not coincide with each other.
- Another layer of waterproofing is mounted on top. It is better to use membrane materials, which will act as additional protection against the effects of the surrounding soil.

If you decide specifically on the external thermal insulation of the basement, a few tips will be useful for you to help increase the effectiveness of your activities:
- It is better to carry out warming in dry and clear weather. Especially if instead of EPS you use ordinary foam, which is less resistant to moisture.
- In no case do not neglect waterproofing. This operation not only prevents damage to the insulating material, but also protects the foundation and walls of the basement from destruction.
- When choosing a mastic with which you are going to glue foam or EPS, pay special attention to its hydrophobic properties. And apply not pointwise (as I described for interior work), but in a continuous layer. Then she will play the role of another waterproofing agent.
- The edge of the glued insulation material should rise above the ground level (after backfilling) by at least 50 cm.

Conclusion
This is how the basement is insulated from the outside and from the inside. In conclusion, I want to show the video in this article, which describes how to insulate the basement in the garage. I would like to ask you what do you think about this technology? Do you have any tips or methods of warming? I will be glad to hear the answers in the comments to the material.
It is preferable to insulate the basement from the outside, since this process from the inside of the perimeter can harm the foundation. But thermal insulation of the basement from the inside in already built houses is much cheaper.
To decide on the possibility of insulating the basement from the outside or from the inside, you need to decide how wet its walls are and where the moisture comes from.
Why is the basement damp and what to do
Sometimes on the walls of the basement you can see droplets of water. There may be two reasons for this.
- Water comes from the ground through the walls or from the basement floor.
- Water condenses on the walls from the warm incoming air in summer. Since basement walls that are not insulated from the outside will always be cold (ground temperature).
Now consider two options:
- what to do if the basement is flooded, and water from the soil penetrates into it;
- if the basement is dry, then how can it be insulated from the inside and how it is done with your own hands.
If water penetrates, then it is unacceptable to insulate from the inside
Basement insulation from the inside is a necessary measure when external insulation is impossible or not cost-effective. It is possible to conduct internal basement insulation only on dry foundation walls. But at the same time, there is a risk of an increase in the rate of destruction of the foundation due to its freezing.
If water penetrates into the basement from the ground through the foundation walls, then it is strictly not allowed to lay the insulation on the inner side surface of the foundation.
Internal insulation will cause even more moisture in the foundation, as well as lower its temperature in winter, since there is no external insulation.
The freezing area inside the foundation will increase much, which, combined with high humidity, very quickly disables the foundation.
How to drain and drain water
Eliminating the penetration of water into the basement from the ground is either difficult or impossible. More often you need to equip a drainage system around the house or repair an existing one.
In this case, it is necessary to tear off the foundation from the outside. In this case, talking about internal insulation loses all meaning, since the foundation walls become free for external insulation and additional waterproofing.
There may be other drying options. Sometimes the issue is resolved comprehensively for a group of houses or a whole village, by digging a drainage ditch.
Sometimes the basement can be drained only by equipping a well with a pump in it. Although pumping out a spring under the house is an extremely thankless task, but what to do? This source of water can serve for the purpose of water supply at home, so not all pump work will be "downwind".
Thus, for a wet basement, one method of insulation remains - external with preliminary drainage of the soil.
That's right - insulation from the outside
Briefly about the external insulation of the basement. If we are talking about a heated basement, then the insulation layer on the outside is not recommended to be less than 0.15 meters.
For external insulation of the foundation itself in order to preserve it and reduce heat loss from the house, the thickness of the insulation can be 0.1 meter for the upper belt along the perimeter of the house with a height of 0.5 meters, and 0.05 meters for the lower, the same height.
The general scheme of insulation of the foundation without a basement from the outside and from the inside with waterproofing of the concrete structure is shown in the figure.
Now let's take a closer look at the option when the soil around the basement is dry, and there is a need to insulate the basement, and it is advisable to do this only from the inside.
Polyurethane foam for basement insulation from the inside
Steam condensation on foundation walls always occurs in summer because the wall at ground temperature will be below the dew point for warm air entering the basement.
When insulating the basement from the inside, it is necessary to lay the insulation on the wall in such a way that there is no empty space between it and the surface.
The use of a heater that passes steam well for insulating the walls of the basement from the inside is not allowed, as it will immediately get wet from condensate.
The best option for indoor use is sprayed polyurethane foam. It adheres strongly to any surface and fills all the cracks, so that there are no voids left.
A false wall is built on top of the polyurethane foam, which rests only on the side surfaces. In this case, the continuity of the insulation must not be violated.
How to apply extruded polystyrene foam
Extruded polystyrene foam is also great for warming the basement from the inside. But the material is slab, so the wall must be leveled carefully before applying it. In difficult places, it is allowed to cut the material according to the surface configuration.
It is impossible to fasten the insulating material to fragile foundations, i.e. plaster or loose concrete. Before insulation with glue or foaming compounds, the plaster is removed, with the exception of extra-strong layers. The wall, if necessary, is leveled with an adhesive mortar, and in case of significant flaws, with a very strong cement-sand mortar.
In the case of basement insulation from the inside, additional fastening of insulation sheets with dowels is not necessary and harmful.
The expanded polystyrene layer must be continuous and completely adjacent to the surface of the foundation on the adhesive. The joints between the sheets (thorn groove) are coated with sealant. Thus, a complete obstacle is created for the movement of steam through the polystyrene foam insulation layer and its condensation in the voids on the wall.
Styrofoam for basement insulation is not recommended due to its low vapor and water resistance. It is possible to use only extruded non-absorbent options.

Insulation thickness
In order for the insulation of the basement from the inside to be sufficient in terms of the minimum level of heat loss, the thickness of the insulation should be:
- 10 centimeters for polystyrene foam;
- 8 centimeters for polyurethane foam.
How to insulate a basement
To insulate the basement from the inside on your own, you can choose only extruded polystyrene foam. This heater is relatively expensive. But cheap foam in the basement is not applicable, due to the fact that it can gradually become saturated with moisture. 
Basement insulation from the inside:
- the existing plaster is stripped, the wall is cleaned of dust;
- the wall is impregnated with a water repellent;
- the wall is leveled, if necessary, with foam glue or a strong (comparable to concrete) cement-sand mortar;
Styrofoam sheets are glued to the wall. The glue is applied to the wall with a notched trowel, the sheets are applied and tapped with a mallet, when joining, the seams between the sheets are smeared with sealant.
Only expanded polystyrene sheets joined in a groove are used.
The surface of the glued sheets is leveled with a grater if necessary.
On top of the expanded polystyrene, decorative plaster is applied or a false wall is built on top of the insulation.
If finishing is needed
In the basement, expanded polystyrene does not require additional protection, since sunlight does not penetrate into the basement. Therefore, a layer glued on the wall with your own hands can not be covered with additional protection.
If finishing is necessary, then the easiest way to insulate the basement from the inside is to do the following:
- cover the expanded polystyrene with a thin layer of glue with a notched trowel 8 mm;
- drown in glue plaster fiberglass mesh with a cell of 4 - 5 mm;
- apply another layer of glue on top of the mesh with a figured roller, obtaining a figured surface that is suitable for painting.
But this simple option can be replaced with any other finishing option, with the exception of heavy finishes (ceramic tiles, stucco molding ...), and ways where you need to break through the continuity of the insulation. Most often, either figured plaster or wall alignment for wallpaper is used.
How to insulate the floor
Of course, it makes sense to insulate basement walls only when reliable floor insulation is done. Cold penetrates the basement from all sides. It is necessary to create a box of insulation, with the exception of the thermal insulation of the upper floor, if the basement is heated.
As a rule, the floor in the basement is bulk on the ground. This type of floor can be insulated by raising it by 20 - 30 cm with laying waterproof strong insulation under a reinforced concrete screed. This conventional technology provides:
- laying polystyrene foam 15 centimeters thick on the ground (compacted sand bedding);
- closing polystyrene foam with a waterproofing agent;
- pouring on top of a reinforced concrete screed with a thickness of 5 centimeters or more with reinforcement with a metal mesh.
Only by doing a similar set of works on warming the basement from the inside, you can make it a heated room below ground level. But before embarking on such work, you need to think again about the possibility of conducting external insulation of the basement walls so as not to harm the structure.
Cellar insulation is an important component of any basement. It is necessary for the preservation of products in the proper form. It is enough to create the appropriate temperature and humidity to achieve results.
Before you start repair work, you should know that insulation alone cannot solve the problem. The basement should be equipped with reliable ventilation, which can regulate the moisture content in the air space.
Insulation technology can vary significantly depending on the type of construction. basement. In the presence of a ground structure, the main emphasis should be on the installation of insulation inside and outside the building. For such tasks, foam is best suited. The technology of installation of these materials implies carrying out all work in the open.
Warming basement, stages of work:
- Check walls for damage.
- Get everything out of the basement.
- cleaning hatch.
- Removal of all detected defects.
- Waterproofing basement.
- Fixation of rigid insulation boards.
- Attach the polymer mesh to the surface.
- Blow out the joints of the sheets with foam.
- Apply plaster.
In some cases insulate the cellar from freezing possible using penoplex. The tool is better how most popular cheap heaters. It has high strength, durability, and also provides high thermal protection, safety and environmental friendliness.
How to make external waterproofing

If a cellar on the street, you need it insulate having completed waterproofing work to protect against groundwater and precipitation, which are filtered into the soil. It can fulfill as professional and amateur. It is enough to know what materials to use and the technology for their application.
Materials for external waterproofing:
- Bitumen.
- Bituminous mastics.
- polymer mastics.
- Adhesive materials.
- polymer cement mixtures.
Warming outside

A rather painstaking task, as it involves the implementation of a mandatory series of actions.
Main work process:
- Removal of excess soil.
- Insulation is being installed (polyurethane foam can be applied).
- Removal of irregularities and roughness from the surface (if any).
- Dry all surfaces.
- Roofing material is laid on top of the ceiling.
- Insulation of the cellar with foam.
- From above, the roof is covered with a pre-prepared mixture (if the basement is bulk).
- Filling gaps with mounting foam (good cellar insulation).
If all of the above conditions are met, then cellar thermal insulation completely completed.
Warming of the caisson for the cellar
How to insulate cellar- caisson, because quite often there is a problem of condensation. This leads to the formation of mold on stored products and the formation of rust on the metal surface.
For problem solving coffered cellar high-quality waterproofing is necessary, and also do not forget to carry out repair work of the resulting damage in a timely manner.
How to insulate the cellar from freezing from the inside
To cellar insulation from the inside most effective, the ceiling, floor and doors should be insulated. The most problematic rooms suffer from typical problems: in winter, moisture freezes and frost forms, and in spring it all begins to melt and condensation appears. Such phenomena have a bad effect on the quality of products.
First you need to determine the source of moisture. If melt water is to blame, then reliable waterproofing protection should be arranged.

How to insulate a cellar door
Previously, this was done using felt or other soft materials. The most efficient way to how to insulate a cellar from the inside, considered the choice of a rigid material as the basis of the insulation.
Warming technology:
- Heaters are glued to the door.
- The insulation is covered with plywood (other similar material can be used).
- It is necessary to get rid of any small defects.
- Where the door meets the frame, a door seal must be installed.

How to insulate the ceiling in the cellar
To organize a favorable microclimate, it is necessary to know how to insulate ceiling correctly and so that no new problems arise. Penetrating cold air forms condensation on the ceiling. Simple covering the cellar will solve this problem.
Cellar ceiling insulation work plan:
- Explore the basement above. Carefully look at the surface for seams and cracks that may be between concrete slabs. To eliminate them, you need to lubricate problem areas with putty with antiseptic additives. This is good insulate t basement.
- A special membrane is installed on the areas treated with putty. It contributes to the normal release of moisture throughout the entire period of operation. The membrane is better than other similar material, as it prevents the penetration of moisture from the outside. If you didn't know how to insulate cellar lid, then a membrane is the best option.

How to insulate wet space? It is better, how vapor barrier will be the solution to install battens body kits. It is necessary to choose a material that will show excellent performance even in a humid environment. Any strong bars can act as suspensions, but their installation takes a lot of time. cellar lid insulation as outside, and inside it can be carried out using a galvanized profile, which is mounted on hangers.
Basement floor insulation
Cellar insulation is a process that can be done using mineral wool, but for this you will have to make a special design:
- Special bars are attached from the inside.
- Mineral wool is laid inside the crate, and not outside.
- A vapor barrier film is useful to protect the insulation from water.

Warming materials:
- Chernozem.
- Peat soil.
- Expanded clay.
- Often used polystyrene foam.
One of the key steps to successfully storing vegetables and homemade products during the winter is maintaining the optimal temperature in the basement. If the work on the arrangement and insulation of the cellar is carried out correctly, its internal surfaces will not be covered with condensate, and there will be enough fresh air to keep food fresh.
From this article you will learn how to insulate the cellar with your own hands so that all internal and external surfaces are reliably protected not only from freezing, but also from moisture accumulation.
We warm the cellar with our own hands from freezing
Owners of dachas, household plots and private houses have the opportunity to equip their own facility for storing various food supplies, harvested crops. To create an optimal microclimate in the basement, it is necessary to properly equip it. After all, an insulated cellar is a guarantee that the entire crop will remain intact, regardless of the time of year.
Note: When deciding how to insulate the basement, one should take into account its type: ground, buried or underground. So, the simplest for insulation is ground, since thermal insulation work is possible both inside and outside this structure. The buried storage needs not only thermal insulation, but also surface waterproofing. Finally, the most advantageous, from the point of view of operation, is bulk (underground), which keeps a constant positive temperature well throughout the year.
Despite the variety of storage types, their structures remain the same: roof, floor, ceiling. Therefore, when carrying out thermal insulation work, all the above-mentioned surfaces are insulated, taking into account the features of this type (Figure 1).
 Figure 1. The main types of cellars (from left to right): underground, ground and semi-buried
 For example, when insulating a ground storage, the main focus is on the thermal insulation of walls and roofs, and when performing outdoor work, foam plastic or expanded polystyrene is used. Thermal insulation of a buried structure is preceded by waterproofing work, since there is a risk of flooding such a storage. The most time-consuming is the insulation of the underground cellar, since it involves the partial removal of the soil surrounding the roof and walls, followed by the arrangement of an additional protective barrier against moisture.
Waterproofing surfaces: walls, roofs or doors
You should be aware that the deeper the cellar is in the ground, the higher the requirements for its waterproofing (Figure 2). If it is done correctly at the construction stage, then it can be done at a low cost. On the contrary, it is much more difficult to repair a damp room. Therefore, when starting construction, take an interest in the level of groundwater and the depth of soil freezing in the cold season.
Note: With a low level of groundwater, it will be enough to make a concrete floor, plaster the walls and whitewash them. Roofing material can be used as waterproofing. In the event that groundwater comes close to the surface of the soil, it will be necessary to plaster the walls from the outside and inside, glue them with roofing material based on bituminous mastic in 3-4 layers, press the roofing material with a red brick wall. For additional protection, a 20-centimeter layer of crumpled greasy clay is applied to the brick wall. If the basement is located on sandy, drainable soil, its cement walls should be covered with two layers of bituminous mastics and immediately covered with coarse sand.
Recessed structures are subject to additional waterproofing before carrying out thermal insulation work. This is explained by the fact that the walls of such storages are half located in the ground and, therefore, there is a risk of flooding by groundwater. Therefore, in order to exclude such a possibility of flooding, it is necessary to free the underground part of the walls from the soil, treat them with a waterproofing solution or cover them with roofing material.
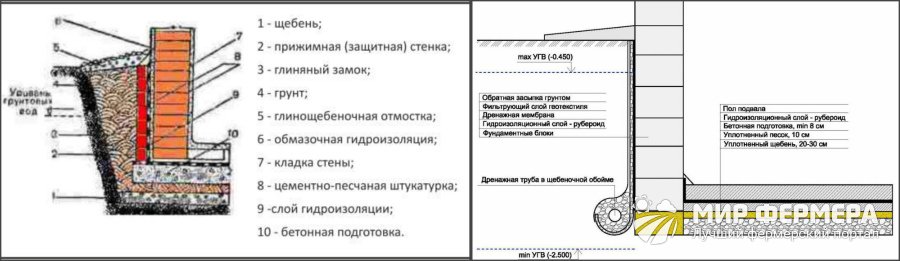 Figure 2. Cellar waterproofing steps
 Then a rigid insulation or polyurethane foam is laid, re-wrapped with roofing material and covered with soil. In addition, in order to minimize the effect of moisture on the storage, it is recommended to arrange a drainage system.
You will find more information about basement waterproofing in the video.
How to insulate the cellar from freezing from the inside
To protect the interior of the room from freezing, its walls, ceiling, floor and door are insulated, that is, all surfaces of the structure through which heat loss is possible. At the same time, materials such as expanded clay, roofing material, rigid insulation are used.
Let us consider in more detail the features of insulation of various internal surfaces of the storage.
Practice shows that the most optimal option in terms of price-quality ratio is floor insulation using expanded clay.
The technology includes several steps(picture 3):
- The hardened concrete floor with exposed beacons is covered with a layer of expanded clay gravel with a fraction of 5-20 mm (the thickness of the layer depends on the expected load on the floor).
- The expanded clay layer is covered with a vapor barrier film with its exit to the inner wall. In this case, the height of the overlap must correspond to the height of the backfill.
- Beacons begin to be installed along the film, the first of which should be at a distance of 30-40 cm from the wall, and all subsequent ones at a distance that corresponds to the length of the rule with which the screed will be leveled.
- According to the installed beacons, a reinforced screed is poured, the thickness of which is determined by the expected load.
 Figure 3. Scheme of floor insulation in a home basement
 Sometimes the bulk floor is insulated with sand and gravel. In this case, the floor is first filled with hot bitumen, which acts as a waterproofing. Then a gravel-sand cushion is laid on it and carefully rammed. In this case, the crushed stone layer is 10 cm, and the sand layer is 5 cm. Then the surface of the pillow is covered with a rigid insulation (penoplex, expanded polystyrene sheets), which is poured with a reinforced concrete screed.
How to insulate the ceiling in the cellar
Since the ceiling of a buried cellar is considered the most vulnerable place in terms of heat loss, it is recommended to insulate it in two layers.
In this case, thermal insulation work is carried out in the following sequence(picture 4):
- Ceiling plaster;
- Treatment with a penetrating waterproofing primer on concrete floor slabs or wooden beams;
- Installation of a layer of hard insulation;
- Covering the heat-insulating layer with a mounting grid.
 Figure 4. Features of ceiling insulation in the basement
 At the final stage, the ceiling must be whitewashed with lime with the addition of a small amount of copper sulfate.
Wall insulation
Basement wall insulation is a rather laborious process, since it involves preparatory work (Figure 5). So, first of all, the room must be freed from its contents, and all shelves and racks must be dismantled. Then you need to inspect the walls for defects and eliminate all protrusions and cracks by knocking them down or foaming. Such preparatory work must be carried out carefully, since the remaining irregularities significantly affect the quality of the insulation installation.
 Figure 5. Do-it-yourself wall insulation scheme
 After leveling the walls, work is carried out on their waterproofing by applying a special mastic. Only after that you can proceed with the installation of foam using dowels or glue. You should know that the fastening of the insulation starts from the bottom row moving up. In this case, in each next row, the foam is shifted by half of its sheet. The joints of the sheets are blown out with foam, the insulated surface is covered with a polymer mesh and plastered.
How to make an insulated cellar door
If the door to the cellar is in the open air, it must also be insulated. The thermal insulation procedure is carried out using modern rigid insulation, which are fixed on the door and sheathed with natural wood, plywood or plastic.
 Figure 6. Ways to insulate the cellar lid
 Be sure to pay attention to the presence of gaps between the door and the door frame. You may need to install a special door seal. In addition, check if the door can open spontaneously, because in this case, all your attempts to keep warm will be in vain.
The lid (hatch) can be insulated with foam or polystyrene foam sheets, which are easily attached to the surface with glue. Additionally, they can be decorated with plastic or wood (Figure 6).
It will not be superfluous to check how tightly the cover adjoins the inlet. Detected gaps can be closed by installing a door seal tape on the cover.
Do-it-yourself basement insulation materials
The choice of thermal insulation material is very important for high-quality basement insulation. Since the modern construction market is oversaturated with various kinds of materials, we will talk about the most popular among them, which are acceptable not only in quality, but also in price (Figure 7).
Styrofoam
The most popular insulation is polystyrene, which has been used in construction for a long time and is valued for its cheapness, simplicity and quality. However, despite all the advantages, polystyrene is not relevant for basement insulation, since it is unable to qualitatively protect the underground room from cold and moisture. In addition, moisture that gets on the foam and freezes on its surface destroys this material. Therefore, the use of polystyrene foam in basements is impossible without the use of hydro- and vapor barrier films.
Based on the foregoing, we can conclude that foam plastic as a heat-insulating material can only be used to insulate ceilings in underground storage facilities.
Mineral wool and fiberglass
One of the most popular building materials is mineral wool. With a large list of advantages, this material is also available because it has a low price. Mineral wool is fire-resistant and non-hygroscopic, vapor-permeable and environmentally friendly. It has low thermal conductivity and high sound insulation. This building material is durable and strong, easy to mount on any surface with different configurations. Therefore, it can be recommended for thermal insulation work.
When working with mineral wool, care should be taken to protect the respiratory system, because small particles of this material rise into the air like dust. Inhalation of such dust by a person is not at all good for his health. In addition, mineral wool releases phenol, which is also harmful to the human body. Therefore, when working with mineral wool, it is recommended to use respirator, and cover the surface insulated with it with a vapor-tight PVC film.
 Figure 7. Types of insulation for the cellar: polystyrene foam, mineral wool, polyurethane foam
 Glass wool is a type of mineral wool. It is an elastic and sufficiently strong material consisting of fragile glass threads. These threads, broken, dig into the skin and eyes, injuring them. Therefore, when working with glass wool, precautions should be taken: wear gloves, goggles, a respirator, work clothes with long sleeves.
polyurethane foam
The most popular thermal insulation material is polyurethane foam (PPU). He received high popularity due to his advantages, among which are: complete protection from moisture, guaranteed tightness of the room, biological neutrality.
Since PPU is applied to the surface in a monolithic layer that quickly hardens, it has no seams and joints. Even with direct contact with moisture, this material does not rot and mold. Polyurethane foam can be used for both indoor and outdoor use.
The only downside to using PUF is the way it is applied, as it requires a high pressure unit that only construction companies can afford. However, this disadvantage is insignificant in comparison with the achieved effect.
How is the ventilation of the cellar during insulation
A home cellar cannot do without such an important element of its design as a ventilation system (Figure 8). It is especially relevant for insulated cellars, because due to the constant positive temperature in storage, air humidity can be increased and, accordingly, mold can develop. To prevent this from happening, it is necessary to provide for ventilation holes during construction - vents. As a rule, they are closed in winter, and left open the rest of the time.
 Figure 8. Scheme for arranging ventilation in the cellar with your own hands
 For example, supply and exhaust ventilation is able to provide high-quality inflow and outflow of fresh air, but you need to take care of the normal temperature regime in other ways. For example, it is recommended to insulate the ventilation duct with mineral wool and cover it with waterproofing material. In this case, the ventilation system will work efficiently and smoothly, and a constant comfortable temperature will be maintained in the cellar.


