Any owner of a summer cottage is faced with the need to fertilize his garden and vegetable garden. To do this, you can use chemical fertilizers, or you can use natural ones. The best solution in this case is the use of a compost pit. Another benefit of building a garden composter is that you care about the environment, as all organic waste can be turned into usable compost rather than landfilled.
Where to set up a compost heap
First of all, you should take care of the purity of drinking water, so the well or well should be removed at a distance of about 25 m from the heap and preferably be higher (if there is a slope on the site).

Of course, the composter can smell bad, so it is important to place it further from the kitchen, gazebo or porch (your own and your neighbors), given the most common wind direction. It is ideal to locate the compost pit close to the vegetable garden or garden in the shade of trees, while providing easy access to it for a garden wheelbarrow or a walkway with a trash can.


Before starting the construction of a compost pit in the summer cottage, think about whether you need it and for what purposes. Such a facility performs the functions of recycling household organic waste. A compost pit will also come in handy in order to produce the fertilizer needed by the garden and vegetable garden, in case you are not going to plant green manure on your land to fertilize the soil.
You can, of course, put the waste, along with the remnants of vegetables and fruits, in bags, and then take it to the city garbage containers. But do not do this - it is environmental pollution. If you build on a summer cottage compost pit, you can recycle the vast majority of organic waste into a wonderful nutrient mix for your plants called compost. And waste time is not wasted.
The purpose of the compost pit
Each compost pit has a set of appropriate design features that depend on the needs for which it will be used. If you don't know where to throw your garbage, you may be interested in a nice bonus that you can get in a few years - valuable compost. Then you need to arrange a compost pit using the appropriate scheme.

Obtaining and using compost.
If you want to quickly prepare fertilizer from improvised materials, which can be leaves, mowed grass, manure, then the compost pit will have a different design. There are some requirements that must be followed when equipping a compost pit.
How to equip and use a compost pit?
When choosing a location compost pit try to take into account some pretty important points:
Arrange a pit at a distance of at least 25-30 meters from sources of drinking water - wells, wells, streams or other bodies of water.

In summer cottages with a slope, the pit is located at a level below the well.
Compliance with such precautions is necessary because otherwise the decomposed waste may end up in drinking water, which is dangerous and undesirable.
When building a pit, consider the wind rose so as not to poison yourself and your neighbors with unpleasant odors.
If you place the compost pit in an open sunny area, its contents will overheat. This will stop composting. Therefore, the best option would be to arrange a pit equipment on a site shaded by tree crowns.
The best place for a compost pit is a corner of the land adjacent to a fence or blank wall.
It is also necessary to decide which waste is placed in the compost pit, and which cannot be thrown into it.
Waste that can fill the compost pit
- Raw vegetables, fruits, berries, tea, cereals, coffee, cleaning residues;
- Hay, cut grass and straw;
- foliage;
- Branches, bark of trees, roots of shrubs and trees that need to be crushed a little;
- weeds;
- wood ash;
- needles;
- Napkins, cardboard, paper bags (paper must be natural) - all this is crushed;
- Unpainted wood waste;
- Second year herbivore manure.

How to fill a compost pit in a summer cottage.
What is forbidden to fill the hole?
- Bones;
- Pet experiments because they can have helminth eggs;
- Insect pests and their eggs;
- Plants affected by diseases (tops of tomatoes with late blight, pumpkin and powdery mildew, and others);
- Plants from land plots that have been treated with herbicides;
- Inorganic waste, which can be in the form of plastic, iron, rubber or synthetic fabrics.
All waste that cannot be composted is best incinerated or disposed of in if they are excrement.

Rules for sorting household waste for use in a compost pit.
Organic waste is processed by microorganisms and earthworms. Do not insulate all walls of the compost pit that are below ground level, because if you dig a hole in the ground at a depth of 50 cm and then enclose it with impervious material, worms and microorganisms will not enter it. In this case, their own accommodation is necessary.
As can be seen from the above, the rules cannot be called complex, but they must be observed.
Set up a compost pit or pile
The most important thing during the construction of the compost pit is the necessary provision of good moisture and friability in case you want the composting process to be of high quality. There are no specific recommendations on this subject.

Arrangement of a compost pit in a summer cottage.
To keep the compost heap moist, you can water it regularly, or cover it with a film that will create a steamy effect. The friability of the structure of the contents of the compost heap is supported by the fact that it is periodically crushed with a conventional pitchfork, or materials with different densities are laid in layers.
The optimal size of the compost pit
- Width - no more than 1.5 meters;
- Length - up to 2 meters;
- The maximum height is 1.5 meters;
- Deepen into the ground no more than 0.4 meters.
There are several different compost pit designs, which can match the preferences of any owners.
Compost pit with two sections
It takes about 2 years to rot and compost organic waste, unless you use the services of additional effective microorganisms along with those that are present in the soil on your site. In order to make the use of the pit more convenient, a two-section structure is constructed:
- Fresh waste is placed in the first section;
- The second section contains waste that is composted from last year.
Prepared in the second section compost they take it out and lay it out in the beds, where they want to improve and saturate the earth with useful substances. The compost pit can be enclosed on all sides by making it in the form of a box, but use only material that provides free access to air.

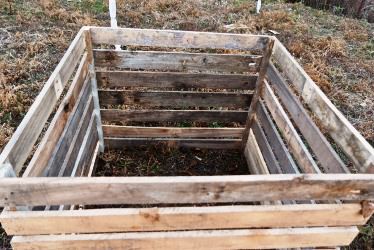
Wooden box for arranging a compost pit.
The box can be made from wooden fences, which are nailed with a small distance between them. At the same time, the contents of the pit will not rot and will not smell unpleasant. Such a compost pit can be built independently in just 1-2 days - the duration of work depends on the material chosen for fencing.
Compost pit with free access from the bottom of the structure:
Such a hole will perfectly replace the first option, because it does not require breaking into sections. Protect the pile 30 cm from the ground. Below is the accumulation of finished compost. If necessary, it is easily selected with a shovel and used to fertilize the garden.
The construction of such a pit is very convenient and causes little trouble. Constantly, when the compost is taken from below, the contents of the heap fall below, and occupy the vacated space, in parallel it is saturated with oxygen. No special loosening and throwing is needed.
Compost heap equipment
Not all summer residents like the artificial creation of unnecessary difficulties. The best way out of this situation is to do nothing, in which nothing is dug, fenced, divided. Only a certain place is chosen where organic waste is accumulated, gradually forming a heap.

Food waste for the compost pit.
If desired, this pile is watered with EM preparations, or covered with an opaque film to speed up the composting process. If you have nowhere to hurry, then you should not cover the pile - its contents will overheat on their own, it only takes time.
Use of plastic containers and barrels
Using plastic compost bins is convenient for those who do not spare money and want their compost pit to look presentable. The container is installed in any convenient place, since there is no risk of contamination of drinking water due to the tightness of the container. In addition, the tank has a special ventilation in order to prevent water from stagnating.

Using plastic barrels to make a compost pit.
When using this option, you need to know that it is necessary to use drugs that accelerate the decomposition of organic waste, or to move earthworms into the pit.
Self-construction of a compost pit
An example is a self-equipped compost pit in one of the summer cottages. If the structure is fenced on all sides, and has a height of one and a half meters, its contents must be shaken periodically, but this is a very inconvenient task. Therefore, it was decided to arrange two piles, or rather, one pile on two sides.
After choosing a good place - the corner of the site near the fence itself, they put organic remains in the corner. It is very good if the alternation of grass, manure and earth is made. At first, before the formation of a heap, a place for it is laid with branches of trees and shrubs.

Building a compost pit with your own hands.
When a heap reaches 1 meter in height, deep holes are made (several pieces), into which an EM preparation is poured (this can be Oksizin, EMochki, Bokashi). On the advice of experts, you can cover the compost heap with an impervious film - this way it will maintain constant humidity and temperature, but not everyone does it. When covered with a film, the compost will be ready in 2-3 months, and for composting uncovered waste, it takes at least six months to a year.
You can not use EM drugs. California worms or prospector worms will do an excellent job. However, the use of worms has its drawbacks. Worms love heat, so they do not work in the cold month of the year. And it is enough for microorganisms that the temperature in the compost heap rises to only + 4 ° C.
It is necessary to water the pile with water from a hose during dry times. If it is necessary to obtain ready-made compost for transferring it to the beds, you can transfer the upper part of the heap to another place and select the humus that has accumulated at the bottom of the heap. After the humus runs out, waste is thrown back into this place.
When building a compost heap, it occurs to some summer residents to spread a plastic film on the ground, on which they then dump organic waste. They make such a design, believing that in this way there will be no washing out of useful elements into the soil. However, they are wrong, this cannot be done for the following reasons:
When the base of the compost heap is isolated from the ground, conditions are created that cause moisture to quickly evaporate from the heap. At the same time, moisture does not rise from the ground, despite the fact that even on hot days, thanks to a natural mechanism, moisture must rise from the depths of the earth upwards using special capillaries.
If the pile is isolated from the ground, this prevents the humus from washing out of the compost. Mineral fertilizers are washed out, since trace elements are combined with organic matter and are constantly in the upper soil layer.
But these properties are quite convenient for use in gardens - neither rain nor downpour is terrible. And while limiting the minor leakage that may still occur, pour a 10 cm layer of peat, which perfectly solves these problems: it prevents nutrients from leaking into the ground. Peat also allows groundwater to rise into the heap.
Requirements for a proper compost pit
If after reading the article you still have questions about building a proper compost pit, get advice - do not build it at all. Why?
The labor of dragging grass and other organic waste from one place to another can be considered unnecessary and meaningless work. When composting, carbon dioxide vapors are formed - this is an indispensable plant food, which mediocrely disappears on a pile, simultaneously acting on the nerves of you and your neighbors with an unpleasant smell.

Proper arrangement and use of the compost pit.
You may be called a weirdo, but it's better to lay out organic waste directly on the beds, where it overripes well and does not emit unpleasant odors. In addition, microorganisms will multiply in them right on the beds, earthworms will crawl, which will appreciate such an abundance of work for them. The cut grass can be used as mulch. Chop and lay branches in paths between rows, and scatter peelings from fresh vegetables and fruits in the garden.
This will allow:
- Keep moisture in the beds;
- Feed plants with carbon dioxide;
- Do not allow weeds to germinate in the beds;
- Engage in the preparation of compost in places where it is needed;
- Prevent leaching of humus;
- Reduce the amount of work.
The work proposed above for the implementation of organic and food waste is simple, not requiring additional skills or efforts.
A compost pit is the simplest design that will allow you to prepare fertilizer from compost in the country.
They enrich the soil, allowing you to harvest more crops. But in order to prepare fertilizer, you need a place for its production - a pit / box.
Making a compost bin is an order of magnitude more difficult than digging a hole. A do-it-yourself compost pit is prepared in just one day, and lasts for years.
Humus as a result of composting is a very valuable mineral fertilizer.
Basic rules and nuances
Although the arrangement of the pit is extremely simple, this process has a lot of nuances that must be observed both during the construction and operation of the pit in order to obtain fertilizer:
- The size of the pit is selected taking into account the garbage that will accumulate in 2 years + the garbage that will constantly rot in the country;
- If the design of the pit is closed, then the compost smell should not penetrate outside;
- The process of lifting the compost humus out of the pit should be simple;
- The pit can be covered and open;
- The pit can be built with a lid for constant air access;
- It is better to dig a hole in the area behind the yard so that it does not spoil the landscape;
- If the pit is concreted, then you need to put earthworms in the compost so that they accelerate its “ripening”;
- The pit must be arranged so that direct sunlight does not fall on it, otherwise the compost will dry;
- Sheets of metal or slate cannot be laid at the bottom of the pit, but the walls can even be made from tires;
- If you pour soapy water into the pit, then you moisten the compost and enrich it with phosphorus, sulfur and ammonia group, from which bacteria extract compost nitrogen;
- The distance from the pit to the well should be as large as possible. So you secure groundwater;
- It takes from several months (with the participation of special additives) to 2 years to make fertilizer from compost! So it is better to make either two holes, or one for 2 sections;
- A pit near fruit trees in the country - their certain death;
- A concrete pit is preferable to just dug;
- If you don’t know how to mix concrete, you can easily put a wall of a compost pit on the sides of a brick.
- The minimum dimensions of the compost pit: 1.5 x 3 meters, depth - up to 1 meter;
- The compost will need to be constantly shoveled / sorted out with a pitchfork, so the pit should not be very deep;
- It is advisable to equip two pits: the compost matures slowly, while one pit is being prepared for the coming season, you are preparing a second compost bookmark for the season in a year;
- Please note that if the pit is open and the wind blows, the compost smell will “kill” any appetite, both in your country house and in your neighbors;
- Always keep an eye on the ingredients you add to your compost. Not all of them are useful for crafting! They will be discussed separately at the end of the article.

Features of the pit device
The device of the compost pit has its own nuances that must be taken into account when creating it. Compost loves good moisture and friability for enrichment with oxygen, which is extremely important not only for decay, but for the decomposition of organic matter into minerals.
The compost heap should be regularly watered and covered with a lid or cling film to create a greenhouse effect in the pit and compost.
Use a pitchfork to loosen the compost, or alternate brown and green materials when laying the pit (they will be discussed separately).
The device of the compost pit can be different, but if we take into account the standard 6 acres and calculate the approximate need for organic matter for the soil, we will get the following dimensions: width up to 1.5 m, length - 2 m, and height - a maximum of 1.5 m.
We will not consider options for a compost bin, for which such a height is always justified, but we will find out why such a depth is needed.
If we do not use special microorganisms when preparing compost, then “on our own” the organic matter on the site will decompose in about 2 years.

For this reason, it is illogical to make a small compost pit, and one at that. Two sections - at least!
In one pit, the laying of the year before last is already “reaching”, and in the other, compost is being prepared for the next year. You can also use barrels instead of the second pit.
It is important to note! Many believe that they dug a hole and it's ready. How to loosen compost?
In the dimensions indicated above, a height of 1.5 meters is measured as follows: 0.5 m of the pit itself and 1 meter of the fence that will hold the compost.
This forces us to build a fence, but such a pit is considered the most effective.
In any case, you can dig a large hole and compost in it, but think about how you can make it easier for yourself to loosen the job.
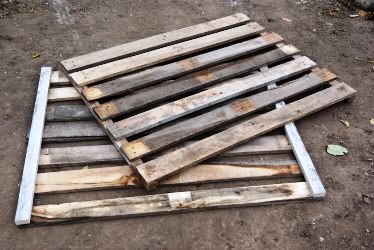
You can build a fence from wooden pallets or tires.
Pit making options
This section provides examples of technologies on how to properly make a compost pit in a suburban area.

Method 1 - bulk compost, without a pit and a box:
- Choose a secluded place in the far corner of the yard in the country, where there are no plantings;
- As soon as organic waste appears, immediately compost it;
- Alternate bookmarks in layers: added waste from the kitchen, immediately reported grass / manure on top, etc .;
- As soon as the compost heap grows a full meter in height, make a few holes right in it and fill in the compost preparation;
- Cover the compost with a film on all sides so that there is a constantly high temperature and humidity inside;
- Water the compost once a week with water and after 3 months the humus will be ready!
- Do not lay any film, no slate, no tires, no pallets, let alone metal under the compost! Moisture from the soil cannot rise, and humus is not washed out, unlike other mineral fertilizers;
- If it often rains in your area, then cover the pile with a film, and to prevent "leaks" pour a small layer of peat under the bottom of the compost;
- Once a month, worms can be planted in a growing pile of compost so that they loosen it and enrich it with oxygen.
Method 2 - a simple pit:
- We choose a place in the far corner where there are no trees / shrubs;
- We dig a hole, 50 cm deep and 1 m wide;
- We lay straw, dry grass, small branches, bark on the bottom;
- Having thrown away household waste, we immediately cover it with a layer of grass so that flies do not divorce;
- Each portion of the waste must be covered with grass - this is how we alternate brown and green materials.
- Do not throw everything unnecessary into the compost - this is still not a cesspool;
- If the pit is not in the shade, then the compost should be watered regularly;
- If the pit is in the shade, then for ripening, you need to constantly cover the compost with a film.
"Sandbox" - this is the same compost pit, only surrounded by wood (as an option, with the help of slate, rubber tires, metal sheets).

Method 3 - sandbox:
- We remove the sod around the entire perimeter of the future compost pit to a shallow depth (30-40 cm);
- If the sides are wooden, then we hammer in / bury the pegs along the edges of the bare area;
- We nail the boards to the bearing pegs, leaving 2 cm of clearance between them;
- Thus, a middle structure is obtained between the pit and the box. The advantage of this design is that it is easy to turn over the contents, since it is at a shallow depth;
- If desired, several wooden pallets can be used as a ready-made replacement for stakes.
- Fell plant residues without tamping, otherwise you will end up with silage.
- Instead of wooden stakes and boards, vertically driven slate sheets can be used.
- In the heat, you need to constantly water the compost. Cover the top of the pile with a lid / sheet of plywood / film.
Method 4 - concrete pit.
Such a compost pit always consists of at least 3 compartments: one for old compost, and the second for constant replenishment.
The pit is supplied with a cover for a set of fertilizer and tedding.
The construction process is as follows:
- We measure a plot in the far corner of the plot with dimensions of 2x3 m and make markings;
- On the marked area, we evenly remove the sod, but do not throw it away - it will still come in handy;
- We dig a hole 0.8 m deep;
- We construct formwork and pour concrete (10 cm thick).
How to prepare a solution:
- Pour gravel into two 10-liter buckets and shake well;
- Add water in a measuring container. If 5 liters of water entered the bucket, then the voidness of the gravel is exactly 50% (a ratio of 2 to 1 is required);
- Add 10 liters of river sand.
Stir the solution.
Attention! If there is more water than it should be, then the concrete will be in bubbles. The key to good concrete is the ability to thoroughly mix!
The concrete will dry in 2-3 days, and you can start pouring compost components into the finished pit.
Instead of concrete, you can use barrels buried directly in the ground, as a result of which they will be both a pit and protection at the same time, as well as bricklaying or a stack of tires (the sides need to be sawn off).
There is another popular option - creating a compost bin using Finnish technology, but it requires much more time and effort.
How to prepare compost?
First you need to know what you can and cannot put in the compost heap.
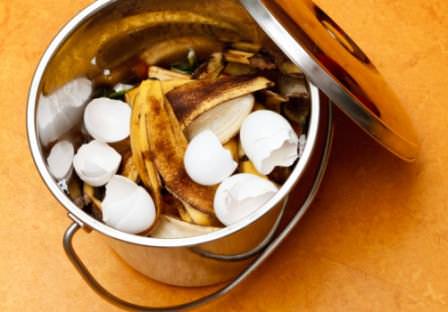
- Fruits, vegetables, cereals, berries in any form;
- Ash, leaves, straw, grass, branches, bark;
- I love needles;
- Shredded paper, napkins, cardboard;
- sawdust, wood shavings and dust;
- Manure, bird droppings.
- Any bones;
- Excrement of carnivorous animals (cats, dogs);
- Tomato and potato tops;
- Inorganics: plastic, rubber, iron, synthetics;
- Any organic matter that has been treated with insecticides, herbicides.
The balance of the mixture in the composter is the key to successful ripening, so you need to correctly combine green material (bird droppings, fruits, vegetables, peelings, coffee grounds and tea leaves, fresh weeds) and brown (fallen leaves, sawdust, straw, hay, bark, domestic hair). animals).
The best organic fertilizer has always been considered rotted manure. But it is not always and not always easy to find it everywhere, so many summer residents prepare their own manure substitute - compost. Almost any organic waste is suitable for it, and after a while, almost free fertilizer is obtained.
How to make your own compost
Compost contains the same nutrients as manure and in most cases the two fertilizers are interchangeable. It is only important to properly prepare the compost.
What is compost
Compost is a natural fertilizer obtained from various wastes of plant and animal origin by their decomposition. It is formed during the biodegradation of organic matter under the influence of microorganisms. Composting requires the presence of air, so they try to place the waste not in a pit, but in some kind of structure on the surface of the soil. In addition to air, biodegradation of organics requires high humidity and the ability to maintain internal heat.
During the season, the heap is constantly growing: the lower layers may already be almost ready, and fresh raw materials are still being applied on top
Properly prepared compost is a highly effective fertilizer that does not contain helminths, weed seeds and pathogenic microflora. Composts have favorable acidity for most crops (pH 6.7–8.4), contain about 3% nitrogen (half of it is in the ammonium form), up to 3% phosphorus and up to 2% potassium.
The list of trace elements contained in the compost is wide: zinc, copper, boron, molybdenum, etc.
Compost not only fertilizes the soil, but also improves its structure: it becomes loose and absorbent. Compost is widely used for mulching to conserve moisture and inhibit weed growth. Composting allows you to save money on the purchase of fertilizers, makes it possible to get rid of a large amount of garbage and waste.
How is compost prepared
You can start composting at any time, except for winter. As a rule, the first layers begin to form already at the beginning of summer, when weeds fall out, and by autumn the compost heap grows rapidly. For accelerated decomposition, it would be better if the process took place during the warm season. But life makes its own adjustments, the main amount of waste in the country occurs in the second half of summer and autumn.
Container for compost
If possible, prepare a special box, but you can do without it by simply enclosing the compost heap with boards or slate sheets. For the construction of the box, you can use any boards, but not painted and not rotten. It can be of any size (not less than 1.5 x 1.5 m), but the height is convenient in the range of 1.0–1.2 m: with a higher pile, it will be more difficult to care for the compost.
The options for arranging a compost box are very diverse, it all depends on the owner's imagination and the availability of materials.
The box is built on a flat place or on a slight hill, so that the compost is not washed away by rainwater. During its construction, it is not necessary to adjust the boards: it is necessary to ensure sufficient access of oxygen. Often the front wall is made removable so that it is more convenient to add material and take ready-made compost. Many people put oilcloth or old linoleum on the bottom of the box, but this is not mandatory.
What can and cannot be composted
A variety of natural materials are put into the compost; the wider their list, the more trace elements the fertilizer will contain. The most common "participants":

You also need to know what does not belong in the compost heap. You should not put in it:
- large bones;
- meat and fish waste;
- perennial weeds with living roots;
- diseased, as well as pest-infected plants;
- waste containing toxic substances;
- products made of metal, rubber, plastic, glass, etc.
Fresh manure can only be added to the compost if it is expected to be prepared for at least a year.
Compost technology
As waste is generated, they are crushed and stacked in layers in a compost heap, periodically interbedded with layers of earth. The layer of earth is only 3–4 cm, it is poured when 15–25 cm of organic matter is accumulated. If the weather is dry, the pile must be watered to keep it constantly moist.
If the pile is small, it is worth shoveling it from time to time to increase air access. In winter, no one will do this at their summer cottage, but in the spring, with the beginning of the season, it is highly desirable to turn over the contents. If there is peat, it is periodically added to the pile. If possible, it is useful to water a pile of slurry.
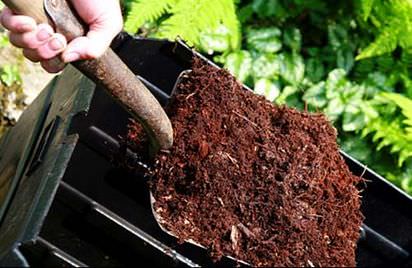
The compost can be ready for use in 6-8 months. The finished fertilizer is a loose homogeneous mass of brown color, without a pungent odor: it should only smell a little earthy.
Video: how to prepare compost
Compost is an almost free organic fertilizer that every gardener can easily prepare on their site. It is only important to know what can be used to make compost and put in a little effort.
Soil fertilization is an important requirement for the agricultural technology of any plant, and compost is considered one of the main components for soil application. Today we will learn how to make it in the country on our own.
Many summer residents have been preparing compost with their own hands for a long time, because this not only saves time and money, but also eliminates a lot of unnecessary worries, which are already enough in their summer cottage.
Benefits of making compost in the country
- Compost is considered one of the best fertilizers, which, when applied to the soil, fills it with a huge amount of trace elements.
- Compost is the cheapest and most practical means for proper soil structuring, as it increases moisture conservation and creates loosening necessary for all plants.
- Spreading compost over the surface of the soil can create the best organic mulch that will conserve moisture and inhibit the growth of many weeds in the area.
- Composting in a summer cottage is a very useful process, as well as a significant contribution to the development and environmental protection. Not a single mineral fertilizer can be compared with high-quality compost, and a properly formed pit in which organic components rot can become a real incubator for beneficial bacteria and microorganisms.
- Composting significantly reduces your physical effort, since now you do not need to take out a good part of the garbage from the territory of your summer cottage, everything can simply be placed in a special pit.

What is garden compost
Compost is a specific product obtained from organic waste under the influence of the environment and a huge variety of insects and microorganisms. It is used for structuring the soil, mulching, fertilizing.

The bark and branches of trees, the stems and leaves of plants - all this can be put in a certain order in a special pit or simply in a pile, ensure the conditions for decay and processing, and get a high-quality, truly environmentally friendly product without any harmful and toxic compounds. Naturally, the process of decomposition of all organic residues will seriously wait, maybe even several years, but then you will get real quality, and not a mixture from the store prepared on the basis of unknown components.

How to make compost
Professionals know how to make compost in a fast and slow way. They are also called cold and hot.
Before we move on to looking at “recipes”, we would like to talk about building a proper compost bin or pit.
How to make a compost bin?
So, initially we need to prepare the material for the production of a compost bin in size. Almost any, but not rotten and not previously in contact with toxic materials, boards or planks are suitable for this. In the first case, during the biological process, rotten planks can deteriorate, in the second, boards in paint or oil can simply poison the compost, damaging its quality irreversibly.
We would advise you to take unedged pine in boards or beams so that the finished box will last for many years, and work with this material. So you will make a quality container, but do not spend a lot of money.

Now choose a place and start building. On a hill or on a flat area, it doesn’t really matter if your terrain is not rainy, and the GWL is low. In general, it is desirable to place a place under the compost a little higher than the standard soil level so that it does not wash away. So, we create four sides of the box, like a standard vegetable box, but much larger.

Be sure to observe the gaps between the prefabricated planks to ensure ventilation of the compost for the correct internal biological processes.
At the place of collection of the box, we install supports, we attach three ready-made walls made of pine boards or timber to the supports. We leave the last side removable so that it is convenient for us to get the finished product for fertilizer or in the country.
It is advisable to lay some material, for example, old linoleum, on the bottom of a box or, as they say, a compost pit.
How to make the right compost quickly?
How to make compost the fast way? This question interests many beginners of the dacha business, and therefore, we turn to it without delay.
First of all, we create a special container - a frame that will contain all organic residues entering the compost on a single heap. It can be just a pit, fenced with wooden structures, a special wooden or plastic box, in which there will be ventilation and access to the contents from above or from the side.
We create drainage at the bottom of the tank. You can make it from a layer of hay, straw, spruce branches. The layer should be about 10 cm.

Materials and various products for composting are stacked in layers. For example, you can immediately put branches and other fruit waste, then a layer of paper, the next layer of leaves, then a layer of mowed annuals or grass, and so on. It is important that the layers alternate approximately as follows, dry waste with wet, soft with hard. Such a laying method will provide air access, ventilation, and acceleration of the composting process. In this case, it must be remembered that the seal is useless here, and may even harm.
It is required to lay each layer with special process accelerators, for example, nitrogen supplements that are offered in garden stores, herbivore manure, plants such as legumes, nettles, dandelions, yarrows. You can also use rotted manure or ordinary garden soil.

To maintain the temperature and the correct internal environment, it is necessary to cover the compost storage with special materials - oilcloth, old rags, a piece of linoleum or carpet. The main thing is to keep warm inside.


In the summer, when there is a drought outside, the compost can be shed a little in order to maintain the desired humidity inside the storage. But remember, only spill, and do not fill to the top.
If you smell specific aromas from the compost bin, this may mean that the cooking process has failed and is not going right. If it smells like ammonia, there are too many nitrogen components in the pit (you can correct the situation by adding some torn paper). If you smell rotten eggs, then there is not enough oxygen in the pit or box, and the contents must be well stirred up, spilling the layers with straw or shavings.
If you manage to make the container correctly, as well as fill it with even layers, in a few months the compost will be ready. It is better to choose it from the lower layers, so that the upper ones fall evenly, pressing against the top with new organic residues.

How to make compost the slow way?
How to make compost from grass or branches? How to get the most correct and high-quality product? Naturally, this method is a little more complicated, or rather, longer, but as a result you will get very high quality compost.
By and large, you don’t have to do anything in particular, just prepare everything for rotting once and wait a few years. By the way, this way you can install a new compost pit in the corner of the site every year so that in 2-3 years you can reach constant annual volumes.

So how do you make your own compost?
If you can make compost in a barrel in a quick way, then for a slow, cold way, you will need an ordinary pit on some hill of the site. The pit is dug small, about the size of a spade bayonet, but wide enough to accommodate enough branches and logs for composting. Further, broken branches and arrows of trees, trimmed parts and rotten logs in a crushed state are poured into the pit. Our whole heap is covered with soil from above and forgotten for a long time. In the second year, if you are very lucky, or in the third, which is stable with proper preparation, you will receive a noble fertilizer for the garden.
When choosing from fertilizer preparation methods, many choose a fast one, and it’s not even worth explaining to anyone the reason. But now I want to say not about the method, but about what should go into the compost pit and what should not.
What can you make compost from?
If you want to make high quality compost and save time, throw in the place of decay only the following:
- Kitchen waste (fruits, vegetables, cereals, tea leaves, coffee grounds);
- Straw, hay, shavings, sawdust, mowed grass;
- Thin branches and stems of garden bushes and trees;
- Recycled wood from a garden shredder;
- rotted animal manure;
- Rotten leaves and other garden waste;
- Various algae;
- Other natural materials - fabric and paper;
- Shredded weeds (avoiding rhizomatous weeds in the compost).
What not to compost
During the preparation of fertilizer, it is necessary to remember that it is impossible to place in the compost storage:
- Bones, large and hard, poultry, meat, fish waste, pet droppings;
- Fresh leaves, rhizomatous and perennial weeds;
- Plants or debris infested with diseases or pests;
- Fresh manure, which can only be poured into slow-cooking compost;
- Waste from the garden that contains toxins, poisons, herbicides, and so on;
- Unnecessary garbage - metal, glass, rubber, plastic, polyethylene, etc.
How to make compost (video)
Following the simplest rules and advice from experienced summer residents who have been preparing a useful “potion” for their garden for several years, you can make compost in the country with your own hands very simply and immediately start fertilizing the soil to improve the quality of crops.


