Just keep turning
Summer residents usually dry the surplus of their crops for harvesting in stove ovens, which requires constant monitoring of the process: a little distraction and everything will burn. There is another significant disadvantage in this method - the increased (depending on the type of stove) consumption of gas or electricity.
Alternatively, many gardeners lay out their trophies in the sun on sheets of plywood or cardboard on hot days.
But even here there are great inconveniences: firstly, all this takes up a lot of space, and secondly, constant supervision is again needed, because either the sheets will be knocked over by a gust of wind, or the rain will suddenly splash, or the birds will descend to feast on a freebie ...
Anatoly Andreevich Gnatchenko in his article "" spoke about a device that can be easily made from improvised materials.
But it seemed to me that it, even empty, would turn out to be too bulky and heavy. And if you load fruits and berries into it to the full, then alone (especially for the elderly) such a drying box can no longer be moved.
Yes, and the technical solution of the protective casing (the author suggested using a rigid metal mesh) and its fastening to the box can hardly be called convenient either. Therefore, last year I made my own version of a solar dryer, eliminating the design flaws described above:
And first of all, I, it seems to me, picked up the most optimal dimensions of the structure, which thereby determined its low weight - 90 × 60 cm. another with the help of self-cutting screws and a screwdriver.
And I made the back wall of the frame from a fiberboard sheet, which, for the mechanical strength of the entire structure, was sheathed with sheet iron (although you can do without it).
To close the front of the dryer, I nailed plastic corners along the outer edges of the sides of the frame and the bottom board with the gap necessary for further installation of glass. The glass itself took the usual, window, 3-4 mm thick. First, I cut it out entirely - 60 × 95 cm. On the one hand, there is less fuss with such glass - you immediately open or close the entire box. On the other hand, you need to make an effort to insert it into the grooves every time. Therefore, as an option, you can cut the glass into sections 30-35 cm wide, or replace it with polycarbonate, fiberglass or even film.
Since the temperature in the dryer in the sun reaches 70 °, I drilled five holes with a diameter of 20 mm in the bottom and top boards of the frame for air circulation. Thanks to uniform blowing, in two or three days, with regular stirring, the contents of the dryer reach full condition.
He made drying trays from galvanized mesh with a cell of 70 × 70 mm, bending its edges to prevent fruits from rolling off it and to stiffen the structure. The geometric dimensions of the grid depend on the width of the side boards of the frame and the installation angle of the dryer in relation to the sun, which is approximately 30° relative to the horizon.
Under this degree, on the side boards, I nailed wooden glazing beads with a section of 1.5 cm, on which I installed five pallets.
From two shtaketins 1 m long, I made the supporting legs of the dryer. From each of them I sawed off fragments of 20 cm, which I fixed to the side boards with self-tapping screws, - the lower support legs turned out. And I also fixed their longer parts to the side boards of the frame with the help of bolts and washers - these will already be folding support legs that allow you to install the dryer at any angle to the sun's rays.
Convenient and profitable
The solar dryer is stable even with a fairly strong wind; when it rains, it can be covered with a film, oilcloth or transferred under a canopy. It is very profitable to have such a dryer in the country, because the fruits can be dried starting in July, since there are plenty of warm sunny days at this time.
When drying fruits in this way, vitamins are preserved much more than in the oven. I will not be mistaken that someone who cooks dried fruits in the oven at least in the amount of 5-10 kg consumes 100 kW. And this at a rate of 3 rubles per kilowatt gives a total of about 300 rubles. If we also take into account that the cost of electricity is constantly growing, then the value of the dryer I proposed is also increasing.
But the most important thing is that it is trouble-free, durable, does not require special care, takes up little space, for the winter it can be raised to the attic of the house, put in a barn, in a garage, under a stationary canopy, after wrapping it from dust and moisture with a film, or sew it for her special cover.
Last year, I dried all kinds of raw materials for 5 kg in it for various compotes, and candied fruits from apple and pear - it turned out unmeasured, I didn’t even weigh all this stuff. In such a dryer, you can also dry other garden crops, as well as dry freshly semolina and lightly salted small fish. It is also suitable for drying hawthorn, wild rose and, of course, mushrooms. Pallets are well washed with a sponge and do not rust.
If the dryer is placed with its "back" to the sun's rays or covered with a sheet of cardboard, then medicinal herbs, raspberry leaves, currants, mint, and lemon balm can be dried in it.
As you can see, dear gardeners, this dryer will be indispensable for fulfilling the mass of fantasies that you have.
And one more thing: colleagues, you have enough time to purchase the necessary materials and make such or similar environmentally friendly solar dryer; from pure wood, economically justifying the cost of paying for electricity. Have a good harvest in the leap year 2016 at your dachas!
 New toy dogs, cats, Squeaker squeaky plush sound fruits vegetables ...
71.32 rub.
Free shipping★★ ★★ ★★ ★★ ★★ (4.80) | Orders (602)
 Multifunctional Vegetable Shredder Household Potato Shredder Potato Cutter ...
Fruits are a source of pectins and vitamins, the consumption of which provides the body with the necessary nutrients. But fresh fruits are available only in the warm season. You can prepare them for the winter through a certain processing, which involves two options. Vegetables and fruits canned or dried.
A fruit dryer is an excellent device that you can build with your own hands at minimal financial cost.
Today, the second method is preferable. A fruit dryer is an excellent device that you can build with your own hands at minimal financial cost.
General device of the dryer
The principle of operation of the dryer is the effect of increased air flow on crushed fruits. As a result, the metabolic processes in the fruits are activated, the moisture leaves, and they dry out faster. There are three types of dryer, each of which has its own device.
The design of a standard dryer consists of 4 main parts:
- fan;
- corps;
- tray for fruits and vegetables;
- electric motor.
The functioning of the solar dryer is based on the penetration of rays through a transparent material and the heating of a sheet mounted on the back wall. This contributes to an increase in the temperature inside the device, when the figure can reach 50 ° C. Fruits and vegetables, being in such conditions, dry out. Thanks to good ventilation, moisture is removed to the outside, which prevents the formation of mold on the fruit. A cold air stream penetrates from the bottom side of the structure, it heats up in the case and exits through the upper hole.
This dryer is made up of:
- wooden case;
- pallets for crushed fruit;
- transparent polycarbonate lid.
The infrared dryer is a multifunctional handy device. It can be rolled up. This will greatly facilitate the storage of the device. If necessary, it can also be easily transported. The potential of such a device is 58 ° C, which allows you to get high-quality dried fruits. This device will successfully cope with the function of the heater.
The structural elements of such a dryer are as follows:
- infrared film;
- case from a box;
- transformer;
- wiring.
There may be doubts about the expediency of manufacturing a dryer. After all, if the fruits are placed in an ordinary attic, after a certain period of time they will reach the required state. This option does not require effort and financial investment. But it also has a disadvantage. Vegetables and fruits in this case will attract insects. It is impossible to prevent the occurrence of this situation, since constant contact with air is necessary for the complete drying of the fruit. Accordingly, they cannot be placed in sealed packaging.
Undoubtedly, it is possible to treat fruits with a special compound so that insects lose interest in them. But the taste properties of the fruit change. In addition, after such processing, fruits retain chemical components in their structure, and it is no longer possible to call them completely safe.
Important! A dryer is the most acceptable way to stock up on supplies to enrich your diet with vitamins for the winter.
Necessary tools and materials
For the construction you will need a professional tool
There are several design options. To get a regular dryer, you need to prepare:
- body materials. It can be plywood sheets measuring 60 cm x 80 cm or an old refrigerator;
- metal mesh;
- trays;
- a fan with a motor or 2 incandescent lamps with a power of 150 W;
- self-tapping screws.
For an infrared dryer you will need:
- electrical wire with switch and plug;
- film 100 cm x 50 cm, designed for underfloor heating;
- bitumen and PVC insulation;
- 2 terminals, 2 eyelets, 2 clips;
- soldering iron;
- metal bar.
The solar dryer is made using materials and tools such as:
- wooden bars;
- a metal sheet;
- mosquito net;
- black paint;
- polycarbonate or glass;
- lining or plywood;
- brush;
- self-tapping screws;
- level.
Step-by-step instructions for making a dryer for vegetables and fruits with your own hands
Each variation of the execution of the drying cabinet has its own characteristics, so making a choice in favor of a particular design is exclusively your right. Consider in turn the procedure for the construction of each type of drying device.
Plain
For the construction of a conventional structure, it is first necessary to prepare the hull. Next, you need to do the following manipulations:

infrared device
Infrared Dryer Assembly Diagram
The process of building such a dryer is quite simple, and will not take much time. Mylar film is used as a heating element. You will also need two lattice boxes made of plastic material. All actions are reduced to the following aspects:
- We cut the supporting corners and walls so that the products do not come into contact with the heating element.
- We cut out 3 bases for holders of infrared parts from cardboard.
- The radiation from the heaters comes in two directions. To direct it to the fruits, you should use food foil, which will act as a reflector.
- We glue the cardboard.
- Heating elements must be connected to a transformer. The wires are connected using flat connectors, insulating tape and pliers. This method will eliminate the need for soldering.
- The edges of the wires are connected and crimped with a connector. Electrical tape will help keep moisture out.
- When connected to a transformer, 4 connectors are made for each polarity. For convenience, wires of different colors should be used.
- Then the whole system is assembled.
- The transformer is connected to the network.
- This is the end of the job.
solar design
This version of the device makes it possible to use solar energy for drying fruits. As a result of this natural process, fruits retain all the beneficial properties. So, the construction of the structure occurs in this order:

Rules for using a homemade dryer
The rules for using a solar dryer boil down to the following aspects:
- To get dried fruits, they should be cut into small pieces, put on trays and placed in the case.
- You can not directly affect them with a stream of air. Fruits and vegetables should lie in the device for 3-4 days, only after this time you can start the drying process.
- One of the necessary conditions for high-quality drying of fruits is the presence of a certain temperature regime in the structure. It cannot be raised prematurely. To do this, the walls of the dryer are covered with heat-insulating material. The temperature level should be within 40°C-50°C and not exceed this figure. Otherwise, the content of vitamins in fruits will be significantly reduced.
- The solar structure is installed at a slight slope so that the rays fall on the structure. To do this, the dryer is leaned against any suitable surface. Metal pipes can be attached to the sides of the case, which will act as a support.
- For the manufacture of shelves, it is recommended to use mesh material so that air circulates freely through the dryer. A mosquito net will do.
Video: alternative fruit dryer construction
It is well known that fruits that have been thermally affected lose a significant part of their nutrients. To get the most useful products will allow the method of drying fruits and vegetables. So they retain their nutritional value at room temperature and take up relatively little space. We told you how to make a device that will help harvest fruits. Use our instructions and enjoy vitamins even in the cold season.
At present, a great many people have finally begun to pay attention to their health. There is no need to be surprised here! The whole world is already utterly "chemicalized" and this naturally affects our condition, health and, of course, not in the best way. And in these difficult conditions for the body, it constantly needs to be replenished with vitamins and high-quality vitamins! We try to replenish the body by eating fresh vegetables and fruits.
Vegetables and fruits are a real storehouse of vitamins and minerals. In summer and autumn, there are no problems with fruits and vegetables - the shelves of our stores get tired of bending under their abundance, and at other times of the year there are already enough of them. But their prices, places of growth, ways of growing are confusing! Especially hydroponics! For sim, buy vegetables, fruits, berries ... from reliable suppliers you know. Where to get them? In Russia, we have a lot of people growing them in garden plots. Negotiate.
Why dry fruits and vegetables.
But what to do in winter, spring? After all, you can’t eat vitamins for the future, but there is a way out - provide yourself and your loved ones with homemade dried fruits! When drying, berries, fruits, they retain a large amount of useful substances: fiber, trace elements, magnesium, vitamin B, iodine, calcium, iron, antioxidants. Yes, and doctors give recommendations to stock up on dried fruits for the winter. Preparing dried fruits at home is not difficult, and this is a big plus that speaks in favor of homemade preparations. The process itself is not laborious, does not require financial influences. This method of preserving vegetables, fruits, berries by drying is the cheapest and easiest way to do it for the entire long winter period.
Drying itself is probably the most ancient way of preserving fruits, berries, and vegetables. The drying process is simple and consists in evaporating most of the water from fruits, vegetables ... This significantly increases the concentration of vitamins and trace elements in the finished product, reduces the risk of microorganisms developing in them.
Naturally, special attention should be paid to the storage of the dried product - after all, it depends on how long they can be stored at home. By ensuring their proper preservation, you can be sure of the complete safety of vitamins.
Well, in order to get vitamins in the cold season and enjoy various delicious dried fruits, you need to know how to cook them at home.
For drying, slightly unripe fruits are best suited. Their bones can not be removed, but dried with them. Drying can be both natural - solar drying in the open air, and artificial - in the oven, electric dryer, on the stove.
Read also:
How to make drying at home.
I suggest you make a solar dryer (dryer) that does not use electricity.
Many gardeners and not only already use dryers to harvest dried fruits for the winter. Drying is more profitable than freezing, since refrigerators and freezers that consume electricity during the entire period of food storage are not used for freezing. This is probably one of the pluses - we save electricity, the boom also bites at the present time.
Modern dryers (dryers) are efficient and fast, but they run on electricity and, frankly, the quality of products cooked in the sun is better.
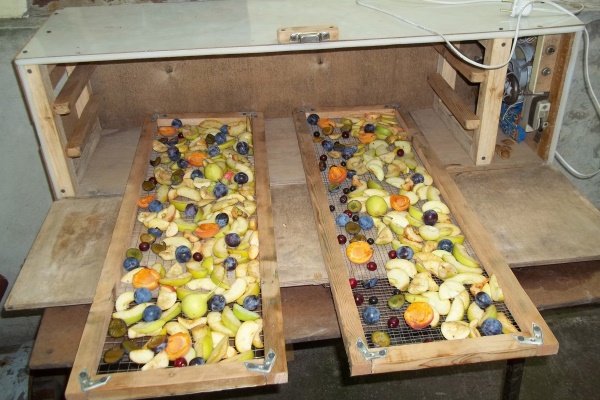
Here is a simple compact drying, which you can make yourself at home, according to your size. Consider this just a sample.

Facade. The lid is made of polycarbonate sheet, glass can be used. At the bottom there is a ledge for water drainage. The bottom and back panels are covered with black plastic. In principle, you can leave it wooden, but rub it with a dark pigment.
 Side view. This side is covered with a polycarbonate sheet, again glass can be used. The height of the side panel is 61 cm, the width is 71 cm. The shelves are staggered to get more direct sunlight.
On the top shelf, the products dry faster, so the shelves with drying products should be swapped. Rectangular wooden shelves covered with plastic mesh. For convenience, the shelves "walk" on wooden rails and are easily pulled out through the rear door.

This is the back panel. It is 61 cm high and 64 cm wide. It has a ventilation opening and is covered with a net.
![]()
The same opening is made in front below the polycarbonate sheet.
Ventilation openings provide airflow for drying products.
To get rid of the problem with ants, you need to put trapping belts on the legs or put the legs in tin cans filled with water. But in this case, the drying legs must be made of metal.
The height of the legs is 15 cm.
I think that this description is enough to start building your own solar dryer - dehydrator. Dried fruits become ready in it in 2-3 days, depending on weather conditions.
If you are not satisfied with the design of the dryer given in the article, then make an electric one. In fact, the weather outside is not always sunny, and it is necessary to process the products grown in the garden on time. They won't wait for the weather. In this case, an electric homemade dryer is useful. For its manufacture will not require scarce and expensive materials. You can make a dryer "for yourself" of the required dimensions and from the materials you have available that you can always find in your "stash box".
Do-it-yourself dryer for pollen, vegetables, fruits, berries
Drying is the oldest way to preserve fruits and vegetables. Initially, it was produced only with the help of sunlight, but now special devices are used for this purpose - solar or infrared dryers. They can be purchased at the store, or you can make your own. How to do this, we will consider further.
What is this device?
Modern dryers are presented in a wide variety, but basically they consist of several tiers of mesh boxes located one above the other. The device is closed with a lid, in the middle of which there is a hole for the exit of moist air. The pallet is equipped with the simplest electric motor. It heats the incoming air masses, which are then redirected to the working chamber and act on the ingredients.
In the blanks, metabolic processes are activated, which accelerate the process of their drying. In the process of heating, the moisture from the fruits evaporates, and their final moisture index is on average 5-8%. To prevent a sharp effect of open air flow on the fruits, it is first recommended to cut them and arrange them on trays, and after 3-4 days simply keep them in the dryer.
In general, two conditions are required for drying products:
- create a warm temperature regime at which the processes of evaporation of moisture from fruits and vegetables begin (about 40 degrees);
- create ventilation, through which moisture will be removed from the container in time.
To assemble a dryer of any type with your own hands, you must proceed from these criteria. Beginner craftsmen can start with solar appliances, while more experienced crafters can also handle the assembly of infrared dryers.
Solar beam dryer
It is the most economical option, since the design works due to the heat of sunlight and does not require any additional energy sources. You can assemble such a dryer from a wooden cabinet, which will have sectional trays for fruits and vegetables. Read on for what you need to do.
Assembly
To assemble the solar structure, you will need wooden bars measuring 50x50 mm, but their width and length can be changed based on your own needs. It should be taken into account that the number of trays located inside will depend on the height of the structure.
You can make a wooden dryer according to the following instructions:
- Knock down the bars between themselves to get the outline of the future dryer. In general, three such circuits will be required, and one of them will be used as a door.
- Determine the angle of future shelves. Trays must be placed at an appropriate angle so that the rays warm up the workpieces well when the cabinet is located at right angles to the sun. You can determine the angle empirically, since it depends on the time of year and the territory of residence. To do this, set the frame in the sun and follow its shadow. When tilting it, it is important to determine the moment when the shadows of the two contours converge. At this time, attach the level to the side wall and mark the location of future shelves with a pencil.
- Sew up the side and back walls with plywood or lining. In addition, a thin metal sheet should be attached to the back wall, which will increase the heating of the dryer.
- Build ventilation blocks. In the upper and lower parts of the structure, from the front and back, nail plywood, in which to make round holes of 8 pieces on each side to ensure the release of wet fumes. Close the openings with a mosquito net to prevent the entry of insects.
- Paint the inside of the structure black to create a greenhouse effect in the dryer, which will speed up the drying of fruits and vegetables.
- Install shelves. For free air circulation in the structure, it is required to use mesh materials. For these purposes, it is best to use a mosquito net, which is fixed on the frame.
- Put the cabinet on long legs, which are fixed with transverse wooden beams.
- Cover the front of the frame with a transparent material through which the sun's rays can pass and affect the fruit. For these purposes, you can use transparent slate, cellular polycarbonate or glass. For even more heating, you can first place cans of drinks on the bottom of the cabinet.
- From above, close the cabinet with a roof made of plywood or metal sheets, and then make a door to tightly close the structure. So, by simple manipulations, you can assemble a solar dryer.
For better exposure to sunlight on fruits and vegetables during drying, the structure should be leaned against some surface. If there is none, you can use pipes by attaching them to the sides of the dryer.
Operating principle
The assembled dryer operates as follows:
- The rays of the sun penetrate the structure through the transparent coating and heat the rear metal sheet.
- The temperature in the container rises and exceeds 40 degrees, and therefore the fruits gradually begin to dry out.
- The moisture that comes from fruits and vegetables is vented outside through the ventilation windows, so that the food does not get moldy. So, ventilation needs to be given special attention so that cold air enters through the lower hole, heats up and exits through the upper hole, also removing moisture to the outside.
Thus, natural air circulation is carried out, and the heating and ventilating effect is simultaneous. This dryer model allows you to provide all the necessary conditions for drying fruits and vegetables.
The drying process cannot be accelerated by increasing the temperature to 50 degrees and above, since this will lead to the destruction of a large amount of vitamins and pectins in the preparations, which will ultimately reduce their nutritional value.
In the following video, the home master clearly shows how you can assemble a simple but productive dryer from wooden beams:
Infrared dryer with heating elements
This type of dryer emits infrared radiation of a certain wavelength, which is actively absorbed by the water contained in the products, but is not absorbed by the fabric of the dried blanks. So, when moisture is removed at low temperatures (40-60 degrees), vitamins and biologically active substances are preserved in fruits and vegetables. In addition, they retain their natural color and aroma even after drying.
The device using infrared heating elements has the following characteristics:
- the level of preservation of useful substances: 80-90%;
- vitamin loss rate: 5-15%;
- reduction of blanks in volume: up to 3-4 times;
- weight reduction of blanks: 4-8 times;
- storage of products after drying: up to 2 years in sealed containers.
Heating element selection
To make such a dryer, you will need an infrared heating element in the form of a flexible lavsan film. It can be purchased at the radio market. The optimal characteristics of this element are as follows:
- power consumption: 30 W;
- supply voltage: 12 V;
- infrared surface temperature: up to 65 degrees;
- operating temperature range: from -40 to 50 degrees;
- dimensions: 28x20 cm;
- weight: up to 15 g;
- warranty period: 2 years from the date of purchase;
- service life: 50 years.
Such a heating element will become the heart of an infrared dryer, which you can assemble with your own hands in several stages.
Assembly
Two lattice plastic boxes are used as the basis for the design. Their optimal length is 48 cm, and the width is 29 cm. They have a convenient initial shape and fit the dimensions of the heating elements. In addition, the boxes are made of plastic, so it is convenient to work with them.
Having prepared the heating element and two boxes, you can start assembling the dryer:
- Cut off part of the wall of one drawer, as this will keep the optimal distance from the surface of the heating element to the products inside the drawer. This distance can be from 7 to 10 cm. So, if the standard height of the sides was 11.5 cm, then after trimming it should be 7-10 cm. Also cut the corner supports of the box. The optimal length is 13.5 cm. The finished box will later be the main (lower).
- Take a second box with a side height of 18 cm. Cut off part of the wall, but do not touch the supporting corners. Install on the main drawer for a compact and lightweight structure.
- Prepare a holder for infrared heating elements. For this, you can use double-folded cardboard with a thickness of 6 mm, since it will provide greater rigidity. So, you need to cut out three cardboard partitions along the contour of the box - the top, middle and bottom.
- Take ordinary food foil and glue the partitions as follows: the lower and upper ones on one side, and the middle one on both. You can use double sided tape to attach the foil. The foil is used as a reflector as it helps direct the infrared rays generated by the heating elements onto the food.
- Attach the heating elements to the foil partitions using double-sided tape. Do it as follows: attach 2 elements to the upper and lower partitions (4 in total), and 2 elements to the middle one on each side (4 in total). In this case, it is necessary to make all the conclusions of the heating elements in one direction, so that it is easier to connect. At this stage, the assembly of the dryer is completed, so it remains to connect.
It should be noted that there may be free areas on the partitions that could not be covered with heating elements. You should not worry about this, since there is a small spread of infrared rays, so they will heat the entire area of \u200b\u200bthe trays, that is, all workpieces will dry under such influence.
Connection
When assembling the dryer, only 8 heating elements were used. Each of them consumes 30 watts, so the total power of the device is 240 watts. In addition, it must be borne in mind that drying will require a voltage of 12 V. To ensure it, it is advisable to use a step-down transformer 220/12 V and a power of 250 W. Here are its characteristics:
- manufacturer: Feron;
- input voltage: 230 V;
- output voltage: 12V;
- power: 250 W;
- dimensions: 84x29x42 mm.
The connection stage must be given special attention, because in case of incorrect or unreliable connection, the device simply will not work, and the failure of the heating elements can lead to damage to the step-down transformer.
In order to properly perform all the work, you first need to understand the connection diagram of the heating elements. Since they must work in parallel, the two elements can be connected as follows:
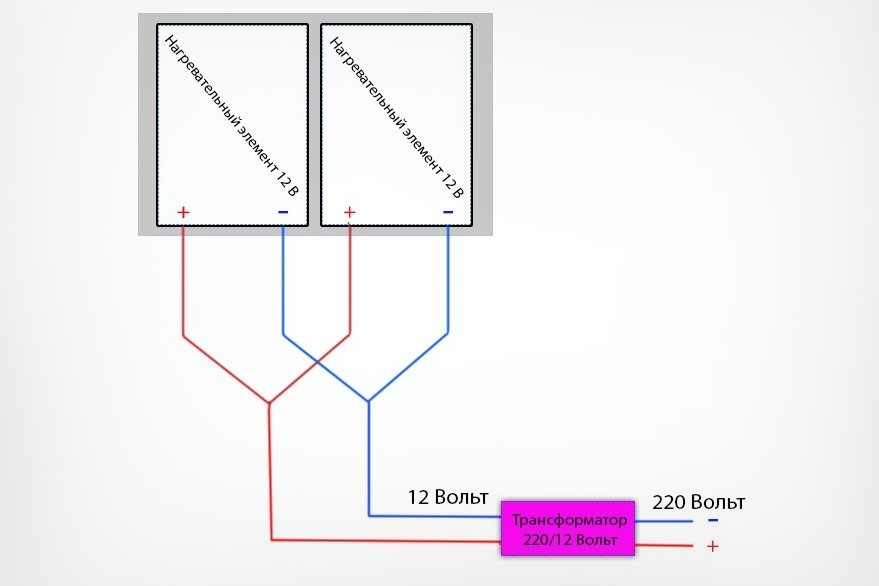
In the case of a dryer, 8 heating elements will need to be connected, with each polarity connected to a transformer. Therefore, the exact circuit of a 240 W dryer will look like this:

Having dealt with the circuit, you can proceed directly to the connection of the wires to each other. In this case, it is worth using flat female-male connectors, since with their help you can make a high-quality connection without the ability to solder, only using pliers and electrical tape. In addition, with such a connection, one of the heating partitions can later be turned off so that only one drawer works. This is convenient if you want to dry a few products.
Connection work is carried out in the following order:
- Connect the ends of the wires to each other, using the above diagram, and secure with a male connector on the heating elements.
- Additionally secure with electrical tape of different colors to prevent confusion when connecting the female-male connector to the transformer. In general, duct tape will help keep moisture out of the joints.
- Make the connection on the transformer with 4 connectors for each polarity. To do this, you need to use 4 wires of different colors, which will facilitate the connection process. Care must be taken when connecting the transformer connection to the cable that will be connected to the 220 V network.
- The design is ready, so it remains only to assemble the entire system. To do this, you need to insert partitions into the frame: the top one - on the top box with the heating element down, the middle one - between the boxes, the bottom one - under the second box with the heating element up.
- Plug in the transformer.
Examination
To test a homemade dryer, you can use a thermal imager, as it will allow you to clearly see how the device works in the infrared spectrum. If the connection is made correctly, on the right you can see the operation of the 12 V heating elements. In this case, the photographs will show that they create infrared radiation over the entire surface of the dryer, which is required for drying fruits and vegetables.
With the help of a thermal imager, it will also be possible to determine how much the entire structure heats up. Normally, the cardboard reflector will heat up to 34 degrees. This will mean that the bulk of the infrared rays are directed in the right direction, that is, on the products. In the very center, the structure can heat up to 45 degrees. If you bring your hands to a running dryer, you can feel a pleasant warmth. There should not be any unpleasant odors.
In order to increase the efficiency of the design, it is possible to install a layer of foam plastic 2-3 cm thick on top and bottom of the dryer to direct infrared rays more than 80-90% towards the workpieces.
Homemade dryers from improvised items
You can assemble an electric dryer from old household appliances. We will consider various options below.
air grill
It is required to perform a series of simple manipulations to turn an air grill of any modification into a dryer. The instruction looks like this:
- Remove a baking sheet from the stove, on which to spread vegetables, fruits, berries or mushrooms.
- Remove the cover with the lamp and fan from the air fryer.
- Take the high grid from the kit for the baking sheet and place it exactly in the middle of the baking sheet, while it must rest firmly on the steel, and not swing.
- Place the grill cover on the grid and connect to the outlet.
- Open the handle to block the inclusion.
- Place the baking sheet with the airfryer lid on the floor, stool or table. At the same time, it is important to monitor safety in order to prevent fire. It is worth keeping away curtains, pets and children.
- Start the convection oven according to the instructions at a low temperature, while caution is required, since the heat will be quite strong.
- Set the makeshift dryer timer to 60 minutes. At the signal, mix the workpiece, and after 20 minutes turn it on again. Continue until the product is completely dry.
Fridge
If you have an old refrigerator and don’t know where to put it, then it can be easily turned into a dryer using the following instructions:
- Remove the freezer and compressor from the refrigerator. In such devices, as a rule, a double-glazed window is used as a heater. When removing it, you must act carefully, after putting on tight clothing and rubber gloves.
- In the lower and upper parts of the refrigerator, make windows through which air flows will enter the structure, and then exit.
- Fix the door using a regular hook. If it is slightly bent and a notch is made on it, when closed, the door will fit as tightly as possible to the refrigerator, ensuring a hermetic closure of the case.
- As a bottom, install a fine-mesh metal mesh.
Grill grates
A primitive appliance can be assembled using a grill grate. Proceed in this order:
- Remove the wire handles from the grill.
- On the grid, fix the fan, which is equipped with a motor. You can get a similar element from old technology or make it yourself. If there is no fan, two 150 W incandescent lamps can be used as a replacement. It is worth considering that in the case of using lamps, drying will take a little longer.
- Install trays at the top of the box, which will be affected by the air flow from the fan.
Heating film
It is used for the installation of underfloor heating. Based on it, you can make a simple and economical dryer.
You will need the following materials:
- heating film 50x100 cm in size and 110 W;
- electrical wire with plug and switch;
- insulation kit.
Experienced craftsmen recommend using bituminous insulation, which is used for installing infrared floors. On top of this material, it is worth laying PVC insulation, which can be purchased at the points of sale of the heating film. In general, the assembly of the dryer is as follows:
- Connect the wire to the heating tape using 2 clamps, an eyelet and a terminal - rings.
- Connect the wires with a soldering iron. During the soldering process, it is worth placing a metal bar under the film to prevent it from overheating.
After connecting the wires, you can get a dryer, the temperature of which can reach 58 degrees, which is quite enough for drying products. Such a device is rolled up, so it is easy to store or transport. In cold seasons, it can also be used as a heater.
The following video offers step-by-step instructions for assembling an electric dryer from improvised means:
Each home craftsman can assemble a productive dryer for vegetables and fruits with his own hands, and for this you can use the most affordable materials and tools. There are many ways to assemble such a device, so everyone can choose the option that suits them.
In contact with
We offer you a solar drying option that does not consume electricity.
Many of us already use dryers to prepare food for the winter. much more environmentally friendly than freezing, as throughout the entire period of storage of products.
Modern dryers are very efficient and fast, but they also run on electricity.
Let's look at a simple compact drying that you can do at home. 
Here is the front view. The lid is made of polycarbonate sheet. At the bottom there is a ledge for a stack of water. Bottom and back panel covered with black plastic 
This is a side view. Again, the side is covered with a protective layer of polycarbonate. Side panel height (61 cm), width (71 cm). The shelves are staggered so each shelf gets some direct sunlight.
Products on the top shelf tend to dry faster, so I often shuffle them up when the top layer dries. I forgot to take a picture of the shelf, but they are basically rectangular wooden structures with plastic mesh.
Shelves run on wooden skids and are easily pulled out through the back door. 
Here is the back panel. It is (61 cm) high and (64 cm) wide. In the back wall there is a ventilation opening 6 cm high and closed with a mesh. 
The same opening is located in front below the polycarbonate sheet.
The essence of ventilation openings is very simple. During drying, warm air rises and exits into the rear opening, while cold air is drawn in from the front into the lower one. This creates good airflow for drying food.
The only problem I ever had was ants, but that was solved by having ditches around each leg that they can't climb. To do this, you can use inverted cans of medium size, which must be placed under the legs. You can also use large containers of water.
The height of the legs is about 15 cm.
Hopefully this is enough to get you started on your own solar dryer dehydrator. I like it and the products dry in it in 1-2 days and, most importantly, it uses free energy and reduces the harmful effects on the planet.


