The need for waterproofing arises when rainwater and snow freely penetrate an open balcony or loggia or flow from above from neighbors. The lack of waterproofing can lead to destruction, blurring of the base of the floor or ceiling, strong leaks lead to the formation of cracks in the ceilings, not to mention the fact that the property located on the balcony or loggia suffers. If you are faced with similar problems, this article will help you understand why the balcony is leaking, tell you what to do if there is a leak and teach you how to waterproof the balcony yourself.
Waterproofing, where to start?
First of all, it is necessary to choose a waterproofing option and prepare the surface accordingly.
Waterproofing Options
Depending on the material used, there are two main options for waterproofing a balcony with your own hands - painting (mastic) and roll (pasting).
Paint waterproofing It involves protecting the surface from water by applying special water-repellent mastics to it. It stands out for its simplicity.
For waterproofing loggias from the inside, penetrating and coating mastics are used. Penetrating compounds are usually produced in the form of a powder, which consists of quartz sand, cement and chemically active additives. The mixture is diluted with water and applied with a painting tool or spray. Such mastics are used for loggias and balconies with concrete bases.
Coating waterproofing is used when working with brick, polyurethane or stone surfaces. The composition of coating mastics can be bitumen-rubber, bitumen-cement or polymer-cement.
Application of bitumen-rubber mastic
Speaking of roll waterproofing , it is worth noting that technologically it is more complex and difficult to implement without certain skills and tools. This option for waterproofing a balcony from the inside involves the use of roll materials that are laid on the surface and glued to it by fusing or applying adhesives to the surface.

Surfacing of rolled waterproofing
They also produce roll materials that already have an adhesive base. Such, for example, as penofol. It will provide not only waterproofing, but also excellent vapor barrier of the balcony due to the double-sided metallized coating. Among the welded materials applicable as waterproofing on loggias and balconies, one can single out hydroisol, hydrostekloizol, armobitel and filizol.
Preparatory work
In order for the waterproofing of the loggia with your own hands to become as effective as possible, it is necessary to thoroughly clean its surfaces. As for directly, it is desirable to perform a leveling cement screed on it. This work should be done after cleaning the base, but before waterproofing.
When cleaning the floor of the loggia, the sheathing is initially dismantled. Then the base is inspected for the presence of bare reinforcement, cracks and rotten, worn-out areas. Detected metal parts are carefully cleaned of rust and treated with protective compounds. Cracks and weak areas of the base are embroidered for subsequent filling with a screed. At the last stage, dust and debris are swept out with a stiff brush from the surface of the floor and from all its recesses. Next, a leveling cement screed is performed.
Such an operation will make both roll and paint waterproofing of the floor on a balcony or loggia more effective. Rolled materials will adhere more closely to the surface, and the mastic will provide excellent adhesion to the base.
Ceiling waterproofing
The public service will take up the restoration of its integrity only if it recognizes the structural element as emergency, and the neighbors are unlikely to be imbued with the seriousness of the problem and take up waterproofing the floor of their balcony or loggia. Therefore, the best way out of the situation is to carry out waterproofing from the inside. This procedure is also relevant for or balconies and it is carried out before covering the ceiling with insulating material.

Ceiling in need of waterproofing
The following instructions describe the sequence of actions for waterproofing the ceiling of a balcony or loggia from the inside using penetrating mastic:
- Removing the ceiling lining and cleaning the slab from the remnants of finishing materials, paint, glue, cement.
- Thorough moistening of the balcony or loggia ceiling with water. The easiest way to do this is with a spray gun and a paint roller.
- Application of the first layer of mastic. To do this, use a brush with synthetic bristles or a sprayer. If a brush is used, then its movements are directed along the balcony slab.
- Applying the second layer of mastic with brush movements directed across the balcony slab. Usually, when waterproofing with penetrating compounds, the second layer is applied after 2-3 hours after the first layer has been applied. It is enough that the mastic grabs a little. Before applying the second layer of waterproofing, the ceiling of the loggia or balcony must also be moistened abundantly.
- Maintaining the ceiling in a wet state for 1-3 days after waterproofing work.
This theoretical knowledge will help you independently waterproof the ceiling of a balcony or loggia, but watching a video that shows an example of using penetrating waterproofing will not hurt in this matter.
A little about sealing balconies and loggias
As a rule, the need to seal balconies or loggias appears due to the occurrence of various kinds of leaks. The reasons why a balcony flows can be very different. Here are the most common:
- the leak was formed due to cracks in the glazing;
- water flows through the gap between the balcony slab and the wall;
- the leak is the result of a poor connection to the wall;
- water flows from neighbors at the end of the floor slab through the gap between the visor and the ceiling of the balcony.
For the first case, when the leak is due to poor-quality or aged plastic glazing, there is a proven way to fix the leak. It is necessary to use seals, popularly called flashings. They are mounted on the frame from the windward side, are widespread and are available in various modifications.

Flap for plastic glazing
How to cover up the cracks on the balcony or loggia in other cases? For sealing wide recesses, it is best to use mounting foam. And to eliminate small gaps, silicone sealant is suitable.

The gap between the glazing and the wall, requiring sealing
Sealing a balcony or loggia using a sealant is carried out as follows:
- First of all, the surface is cleaned of glue, old paint and other contaminants. Then it is wiped with a damp cloth. In this case, it is important not to use detergents, since the sealant does not adhere to them.
- Next, you need to make sure that the recess to be sealed is dry, which will ensure good fixing of the sealant.
- The next step is to make a sealing seam. After applying the sealant, the seam is smoothed with a wooden or plastic spatula dipped in soapy water. To prevent excess sealant from sticking to the surface, the walls along the seam can be sprayed with the same soapy water and removed after drying.
Such a simple, affordable way of sealing will allow you to eliminate small leaks easily and without the help of specialists.
Today, a balcony or loggia is not used as a pantry, where various unnecessary things are stored. Every family tries. and that's not enough. If you do not carry out waterproofing of the balcony from the inside, its sealing and vapor barrier, you can incur considerable financial losses in the future. What these works are and how to perform them correctly, you will learn from this article.
Balcony waterproofing
Waterproofing– protection of building materials and structures from the damaging effects of water. The results of the lack of waterproofing can be seen on the balconies of the upper floors, which do not have a roof and glazing, to which water constantly flows from the roof. On closed balconies, loggias, moisture gets inside due to poorly performed sealing work.
The destruction of concrete is observed at the junction of the balcony slab to the facade slab, its edges are heavily crumbled and cracks and shells are often visible on the plane.
What should be done to avoid such a situation? One of the prerequisites is to waterproof the balcony (loggia) with sealing of the seams.
You can use the services of specialists, but this is justified for outdoor work on the upper floors. From the inside, it is quite possible to waterproof the balcony with your own hands. It is necessary to pay attention to the sealing of all seams, regardless of their condition.
First, consider what the waterproofing of a balcony, loggia is.
The diagram below shows that during these works, the waterproofing mastic creates a protective layer, and the sealing of the seams and the restoration of damaged parts of the balcony slab is carried out using sealants.
Conditional scheme for waterproofing a balcony slab
The materials used in waterproofing work are divided into several types:
- Coating compositions - bitumen-polymer, cement-polymer, bitumen-rubber. They form an elastic coating that requires a screed from above.
- Penetrating compounds are the most persistent and popular. Apply to a damp surface, fill all cracks. They also increase the strength of building materials by 15-20%. But it can only be used for waterproofing concrete surfaces.
- Pasting materials - polymeric (viniplast, polyethylene) and non-polymeric (fiberglass, roofing material). They are rarely used for waterproofing balconies (loggias), because working with them is expensive and laborious.
Consider step by step how to waterproof the balcony and loggia together with sealing.
Floor waterproofing
Work begins with the implementation of a concrete screed. For an open balcony, it is necessary to make a screed with a slope of 2%. It is necessary for the free descent of water from the surface of the plate. The screed is reinforced with a metal mesh.
When performing a screed, three types of seams are necessarily provided:
- Compensatory - is formed when laying the pressure layer. Another name is temperature.
- Forced - seams that divide the screed into squares.
- Wall-mounted - located at the junction of the balcony slab to the facade.
Subsequently, 50% of the seams are filled with sealing mastic, into which an elastic cord is pressed.
The screed is cleaned of dust and debris, a primer is applied to it for better adhesion. One of the best is the WB Primer.
We apply several layers of polyurethane mastic (for example, Hyperdesmo RV) on moistened concrete. The final thickness of the insulation on the floor of the balcony, loggia must be at least 20 mm.
In addition to the floor, the waterproofing layer should also extend to the walls up to 150-200 mm.

Application of polyurethane waterproofing on the floor of the balcony (loggia)

Loggia waterproofing from the inside using polystyrene foam and vapor barrier film
Sealing and waterproofing the balcony ceiling from the inside
After glazing a balcony, a loggia, during precipitation, we sometimes see an unpleasant picture - a balcony is flowing. This could happen if the ceiling and roof of the balcony (loggia) were not sealed and waterproofed.
With poorly sealed balconies, the joints of windows leak, the roof flows from above, floods the floors. How to fix this defect?
From the inside, all work to eliminate the leak can be done independently. We seal all seams. We use polyurethane sealant Germoplast or Emfi. Before covering up the defects, we cut the seams and cracks with a grinder, clean them of dust and moisten them with water. We also pay attention to dark spots on the ceiling - in these places there may be microcracks through which water also flows. We also cut and seal them.

Sealing joints with polyurethane sealant
Next, we examine (loggias). Often frames are installed with technology violations. These shortcomings will have to be corrected with your own hands. Otherwise, having sealed and waterproofed the ceiling, we will constantly observe how water flows through the cracks in the glazing.
When installing glazing, mounting foam is used. Under the influence of ultraviolet rays, the foam is destroyed, water flows freely through these seams. It is necessary to partially remove the outer layer of foam, fill the formed groove with a hydro-swellable elastic cord. Under the influence of moisture, the cord increases in volume and prevents water from flowing in this place.

Leak at the bottom of the loggia frames due to poor sealing
We start waterproofing the ceiling by cleaning the entire surface and treating it with an antiseptic for (for example, Dali). Then we perform sealing of cracks and chips according to the technology described above.
For the ceiling, it is better to use polyurethane mastic Elastomiks or Elastopaz. They have good adhesion and it is not very difficult to apply it to the moistened surface of the ceiling.
The ceiling is covered with mastic in two layers - the direction of the second is perpendicular to the first. The waterproofing layer is reinforced with mesh after the first layer. To create a durable crystalline protective layer, it is necessary to allow the mastic to harden for 3 days.
When sheets of foiled polystyrene foam are glued to the ceiling - it also acts as a vapor barrier. The seams between them are also sealed.
Roof waterproofing
It is not always possible to do a complete sealing and waterproofing of the loggia with your own hands. We are talking about the upper floors - the roof of the loggia is leaking and external work is required. Who should fix the leak? It is impossible to do such work on your own - it is very dangerous. What to do in this case? It is necessary to invite experts.
You can watch how the work on waterproofing and sealing balconies (loggias) is carried out on the video on the Internet.
Conclusion
Now we know that waterproofing protects the balcony (loggia) from premature destruction under the influence of water, and sealing eliminates any leakage, preventing moisture from getting on unprotected surfaces.
As you can see, you can independently, using modern materials, carry out work on sealing, waterproofing the loggia and balcony. Protect them from even a small leak and dampness.
Which can be used at any time for different purposes.
From the author: I am glad to welcome you again, my dear readers. I hasten to tell you that sealing a loggia is a process that you can do on your own, without the help of professionals. All that will be required is to use our advice and impeccably fulfill all the requirements that I will now set.
For many, it remains a secret how important it is to seal the balcony before carrying out any work. Many people think that the insulation itself will do a great job, and do not think that the cold air that enters the cavities between it and the wall will not play a big role.
I have to upset you by saying that it is not so. Styrofoam, expanded polystyrene and protect your living space from negative temperatures, but not from air currents, which can easily make a breach in this fragile fortress wall.
Some visitors to our site miss this moment when working and send us letters that our methods do not work, although I have spoken in every article on such processes about the importance of this step.
Now I will tell you in more detail how to seal the balcony, protecting it from unwanted cold penetration. Let's start!
How to find cracks and crevices
The first thing you need to do is find all the points where air enters. Now you can say that they will be visible anyway, but, alas, no. In addition to visible gaps and cracks, flaws can be in floor or wall seams, at the joints of ceiling tiles and in other invisible places. Now I will tell you a few life hacks that will solve this problem.
Many years of experience shows that there are a huge number of ways to help find places that need to be repaired. There are special devices that determine them, but I recommend using the old grandfather method, which has never let me down.
This secret was told to me by my father when we first worked with him on an object that needed to be protected from air. To do this, you need an ordinary sheet of paper and a ladder. I think that your actions are foreseen independently, and it makes no sense to describe them once again. The only thing I want to suggest is that you should not check only the corners and interpanel seams. You need to walk with a leaf over the entire area of \u200b\u200bthe balcony or loggia to make sure of the quality of the check.
There is another way, but it requires a lot of money - checking with light. To do this, you will need opaque curtains or a black film, which needs to block all sources of external light, creating absolute darkness in the area being checked. In sunny weather, cracks and cracks will show themselves.
The second method may seem a little crazy, but believe me - it is effective and has been repeatedly done in practice.

What materials to use
The second step is the choice of sealant. For this, two materials are often used:
- construction foam;
- silicone sealant.
You'll need both for a job well done, so take your time choosing. Why both? Each of them will perform work with certain openings, since these tools have different technical properties.
Building foam tends to expand, so it is used when sealing larger holes. These can be formed due to two factors:
- mechanical impact. Your balcony can be damaged during worsening weather conditions, such as hail or strong winds. The wind itself will not affect the surface in any way, but the nearby trees will very much be able to;
- destructive processes. In this paragraph, I mean all kinds of corrosive processes, which are predetermined by the fact that nothing lasts forever, and each product has its own shelf life and operation.
Silicone mixtures should be used when working with joints of ceiling tiles, seams on and butt openings. Simply put, everything that is less than three centimeters wide lends itself to this material. You can also turn to thiokol or acrylic counterparts, but I do not advise, because the material I have chosen has the best price-quality ratio.
If you want to waterproof a balcony or loggia from the outside of the facade of the building, then you will need polymer-based substances. It can be mastic or other penetrating compounds.
How to seal seams
You need to start, as always, with a general cleaning. Mutes, dust, pieces of concrete screed that have broken off can affect the result. Do not be lazy and notice the entire area several times, and vacuum the seams on the balcony. This will not take you more than two hours, so do everything carefully.
Let's move on to the sealing process itself. It is not complicated and does not require special knowledge and skills. If you don't think it's necessary, I can assure you that she won't live even five years. The ingress of moisture will lead to its complete destruction.
If you want to insulate only the outside, you need to remember that working at height requires a completely different approach, and it may well be better to turn to the help of professionals. Understand that no amount of money is worth your health, and the lack of proper equipment can lead to disastrous consequences. The services of a person who will do everything in one day will not ruin you, and you will be calm, knowing that everything will be done with high quality and without threats to human life.
All you need for the job is a special gun. If you have never used it, you can see how to do it correctly in the video below:
Little secret: in addition, you can use rubber seals. They are sold at any hardware store, and they are very often used for soundproofing entrance and interior doors, as well as for soundproofing domestic cars.
If you are a happy owner of wooden structures - do not try to use mounting foam! Wood is a material that can be deformed much easier than concrete slabs. If you overdo it with foam, you can damage the entire balcony, and you will have to dismantle the cover, which will take you valuable time and hard-earned money.
What to do with a visor
If the roof of your balcony is made of metal, slate or other sheeting, but, nevertheless, allows moisture and air to pass through, then the problem is definitely in the correct installation. Most likely, improper flooring has led to the formation of gaps between the sheets, which can be filled with sealant. This will solve the problem.
Provided that the roof is flat, you have to try. The cheapest method is roofing, but you should not do everything yourself if you do not know the basic principles and have never worked with gas burners or other heating devices.
Let's take it step by step:
- Remove all debris that may interfere with the full implementation of the procedure, and do not bring unnecessary things with you. Everything is just the essentials.
- Clean problem areas so that the surface is as even as possible. In the event that you want to make a slope or achieve a filigree plane, you can install OSB boards. Roofing material will perfectly take on them.
- Seal all visible cracks with construction foam. This will increase the efficiency of your work.
- Dry the surface of the visor, carefully checking every centimeter for moisture. Agree that it makes no sense to seal the roof, which already has water.
- The next step is to apply the mastic. I do not recommend smearing the entire area of \u200b\u200bthe roof at once. It's better to do it gradually.
- Installation of the roofing material itself will not do without a heating mechanism. The most commonly used gas burners. I do not welcome this, but, alas, there will be no other unit at hand. The entire roofing material should be heated evenly, and pressed with a wet rag, because a dry one will stick to a hot surface.

I would like to pay special attention to safety precautions when working with fire. Be sure to take a fire extinguisher with you, and preferably two, as one, trust my experience, may not work. Check it for the presence of filler and air, and also make sure that the mechanism is working. And yet - do not forget that you are far from two meters above the ground, so be careful when approaching the edge. Protect the place of work under the balcony with signal tape, if possible, put a person below.
I do not advise you to do all of the above on your own, because you will spend a lot of effort, and it will be very unlikely to be convenient. It is best to ask for help from someone who has previously done this. This way you will be sure that you will not make mistakes.
We wish you a speedy completion of the repair, friends!
When the turn comes to a balcony or loggia during the renovation of an apartment, most people try to make a cozy corner for relaxation there, sometimes a convenient platform for a workplace or household needs. Increasingly, balconies are glazed and insulated. Such a solution not only improves the appearance of the facade and adds warmth to the apartment, but also gives its inhabitants a noticeable increase in living space. When glazing a balcony, gaps and small gaps often remain, because due to the unevenness of the plates it is impossible to join the material perfectly without gaps.
How to close the gaps on the balcony and loggia:
1. Elimination of cracks in concrete surfaces
Often there are gaps of several centimeters between the concrete floor. In such cases, use mounting foam, cement mortar, primer.
Firstly, the end of the gap must be thoroughly cleaned of dust and debris, remove elements that are poorly attached or weakened by water or other factors.
After cleaning, you need to make sure that there is no moisture in the crack, after that we treat the crack with a primer and fill the holes with mounting foam.
Foam is best used with a special gun (a device where a bottle of foam is inserted), this will make it possible to deliver foam to hard-to-reach places. Since the foam has the properties to expand, it is not necessary to squeeze out a lot of it. It is enough to pour in a little more than half the volume of the gap to seal it. Within a few hours, the foam will expand, filling all the small pores hermetically.

After a day, excess foam can be cut off with a clerical or ordinary knife and puttied with a thin cement mixture. Instead of cement mortar, paint can be used. The main thing is to close the foam from solar radiation, which destroys it.
If there are small cracks in the concrete, then they can only be sealed with cement mortar.
But sometimes the gaps between the plates are more than 8 cm. In this case, there will be little mounting foam. Preferably, galvanized iron is used to cover such a space.
Strips are cut out of a sheet of iron with metal scissors, which are then bent into corners for plates. Attach such corners with a puncher to the dowel. Depending on the size of the gaps, the corners can be mounted on one of the plates or on two at once. Having reduced the size of the crack, it is filled with polyurethane foam. Then the excess is cut off and primed or painted.
2. Elimination of cracks in wooden surfaces
If the gap is large enough, then you can try to fill it with mounting foam. But, when working with foam and wood, you need to be very careful. Wood is soft and easily deforms when force is applied, and using too much foam can easily dislodge wood elements. The consequence may be a non-closing window or door.
For wood, it is better to buy ready-made factory putty. Before starting work, the gap also needs to be cleaned of dust, dirt and crumbling rotten elements. It must be applied with a spatula and very carefully. After complete drying, the place with putty is carefully rubbed with sandpaper and varnished or painted to match the wood.
3. Elimination of cracks on plastic surfaces
For working with cracks in plastic surfaces, silicone sealant is most suitable.
The use of cement mortar and foam is excluded (for the same reason as for wooden surfaces).
To seal holes in plastic, you will need the following materials: sealant packaging, sealant bottle gun, rubber-tipped spatula, double-sided adhesive tape, hand gloves, solvent. 
We clean the surface of the crack and dry it thoroughly. Silicone tends to stick to everything, so you need to use it carefully and try not to stain anything. In order for the sealed gap to look neat, it must be glued on both sides with adhesive tape before applying silicone.
Fill the hole with silicone using a gun. It has a long tip and allows you to get the most inconvenient places. Excesses and errors of the sealant are immediately removed with a spatula with a rubber tip. It is better to remove the excess sealant immediately, since after solidification it will not be possible to do everything carefully due to the silicone consistency.
After the sealant has hardened, we check to see if anything has been missed. If somewhere there are areas with cracks, then we are doing work to eliminate the gaps. When everything is perfect, remove the tape.
Advantages of silicone with its transparency, after hardening, it does not require additional primer or painting.
It is necessary to get rid of cracks not only from below, but also in the upper slabs, which serve as a roof for a balcony or loggia. We use the method for concrete floors. You can replace the foam with waterproofing mastic. If there is a crack in the upper ceiling, then it is advisable for the neighbors from above to also do the procedures to eliminate it, otherwise moisture will still be able to penetrate your balcony.

After the cracks are fixed, the balcony can be insulated or repaired. With the right way to close the gaps, the balcony will be protected from drafts, precipitation and cold.
From time to time, closed gaps need to be checked to see if the material has peeled off and whether unfinished gaps have appeared.
They glaze the balcony in order to create additional space suitable for comfortable living. For the same reason, insulation is also performed here. But how to close the cracks on the balcony? After all, one cannot call a cozy room where it blows or flows. On an insulated balcony, all cracks must be sealed, and this is an axiom, because otherwise the use of any heaters will not give the desired effect. But even if you don't plan on glazing, there shouldn't be any cracks in the base slab, walls, or railings. And this is a guarantee not only of the durability of the entire structure, but also a guarantee of an aesthetic appearance.
Features of the materials used
Sealing cracks on the balcony requires careful surface preparation - any crack on the loggia must be cleaned of dirt and completely moistened with water. The further algorithm of actions depends on the surface of which material we are talking about.
Note: The most versatile material for sealing cracks on a balcony is polyurethane foam. It can be poured directly into cracks when it comes to concrete or wood, and any synthetic surfaces are treated with acetone so that the foam is better fixed.
In addition, the gap sealing foam must be prepared in a special way. For work, you will also need a special gun, where the balloon is wound. Shake the foam bottle and then turn it upside down. It is important to remember that the foam expands very much, which means that you do not have to fill the entire existing gap - it is enough to fill only 2/3 of the depth. Works with polyurethane foam are carried out only at temperatures above +5°C. In addition, the material needs 24 hours for the final solidification, after which the excess foam is cut off and sealed with putty, sealant or paint (this is important, since ultraviolet light is harmful to the material, it will begin to break down).
If we are talking about wooden surfaces, then they should seal with putty or sealants, and you can also use window putty or even rags. When it is necessary to repair worn-out plastic structures, silicone sealants will definitely be required. As for cracked concrete slabs, cement mortar is required here. Cracked concrete slabs definitely need waterproofing, because if you leave a porous surface, moisture will still enter inside, which has a destructive effect.
When choosing how to close the gaps on the balcony, you should consider that:
- for plastic and wood, silicone sealant is required;
- cement mortar is required for concrete.
- and polyurethane foam is a universal solution;
Sealing cracks on the balcony with plastic trim
How to close the cracks on the loggia with plastic elements? You will need a silicone-based sealant and a special gun, thinner and a rubber spatula, as well as mounting tape. The algorithm of actions in this case is as follows:
- remove all dirt from the crack, remove those elements that crumble. Dust can also be removed with a vacuum cleaner;
- the gap must be treated with a solvent to degrease the surface;
- it is also important to remove all moisture - the surface must be dry before sealing;
- mounting tape is glued on both sides of the gap, this will allow not to stain the rest of the surface;
- insert a cartridge with silicone sealant into the gun and open it;
- the sealant gun is placed at an angle of 45 °, and the gap is sealed;
- excess material should be removed with a rubber spatula - the seam must be shaped immediately, because after a quarter of an hour the sealant will already begin to harden;
- curing over the entire depth will occur in about a day - provided that the temperature on the balcony is about 20 °. The higher the temperature, the faster the curing will occur.
Filling cracks in concrete balconies
To seal a gap in a concrete surface, you will need a mounting foam and a solvent, as well as a cement mixture and a primer. You will also need gloves to protect your hands, and a trowel with a brush to apply the solution.
The crack is cleaned, dedusted and dried. After that, the surfaces are treated with a primer and sealed with mounting foam. The foam will expand inside the crack, so the gap is not completely filled - 2/3 of the depth will be enough. When the mounting foam is completely dry, the excess is removed with a knife, and then everything is covered with cement mortar.
To close the gaps on the balcony, you can only use cement mortar if it is a very small damage to the concrete slab.

Features of working with cracks on wooden surfaces
How to close the gaps on the balcony if the crack is not very large or you do not want to work with mounting foam? For wooden surfaces in this case, you can use a special putty. It is applied to the cleaned gap. After application, the excess is cleaned off, and the surface is polished with sandpaper. After that, it is desirable to varnish the surface, choosing the varnish in such a way that the repaired element does not need to be painted.
If we are talking about a large gap on the loggia, larger than 8 cm, it must be filled with foam. In this case, the work is carried out according to the standard principle - foam is applied to the cleaned gap, then I remove its excess, and treat the repair site with a primer and varnish.
How to repair very large cracks on the balcony
Sealing gaps on the balcony and loggia may require the use of galvanized iron. In this case, you will need the following set of tools:
- measuring devices - tape measure / ruler;
- galvanized sheet;
- self-tapping screws for metal and dowels;
- a hammer;
- metal scissors;
- drill / puncher;
- polyurethane foam in a cylinder;
- hand protection gloves.
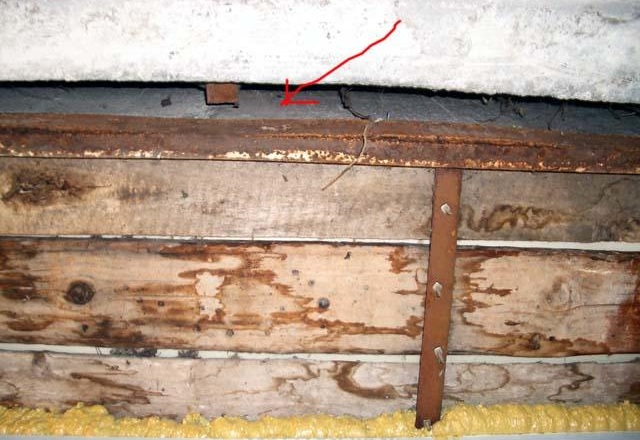
This method is used to seal large gaps in balcony structures, for example, when there is a gap between the fence and the floor.

Here it will not be enough to use only one mounting foam - you will need a plug made of galvanized sheet. The size of the plug is determined with a tape measure, however, to a certain size, you need to add 200 mm of height per bend and cut the sheet using metal scissors. The cut off piece of galvanizing is bent in the form of a corner and adjusted with a hammer to the shape of the existing hole. Then the plug is fixed with dowels and self-tapping screws - both to the floor slab and to the fence. Around the perimeter of the installation of a galvanized plug, everything is foamed. The small cracks found are also necessarily foamed, after which all excess foam is cut off.
It remains only to give aesthetics to the formed structure, for which you can use any finishing material: tiles, lining, wood or plastic.
Filling of upper cracks
If the construction work during the construction of the house was not carried out very well, then a large gap could remain between the wall and the upper balcony slab, into which water would constantly drain. You need to close it both from above and from below., that is, the neighbors will also have to carry out repair work on their balcony.
It is important to completely clean the crack, for which you need a metal wire brush. The actual filling of the gap occurs either with mounting foam or mastic for waterproofing. Mastic should be applied to the cleaned surface with a spatula or brush. If your choice is mounting foam, then a gap primer is also added to the preparatory operations. After the foam hardens, all irregularities are cut off.
The filled gap is cemented, and after the solution has dried, it is primed. A crack closed with mounting foam must be protected from ultraviolet radiation and wind by painting, cement, sealant or insulating tape.
After you complete the repair work, do not forget to install ebbs and a visor on the balcony - they will protect the internal surfaces from flowing external moisture. By the way, sealing cracks on the balcony will improve its sealing, which means it will become more comfortable. Naturally, you will have to continue to monitor the condition of the surfaces in order to immediately remove all the cracks that have arisen. This approach will allow you to avoid major repairs for many years and keep the space attractive.
And this video presents a story about mounting foam and its features.


